I’m obsessed with how air-dry clay can turn into seriously cute, wearable handmade jewelry with that perfectly soft, matte look. Here are my favorite ideas to try in the studio—starting with the classics and drifting into the fun, “how did you make that?” designs.
Air-Dry Clay Geometric Dangle Earrings
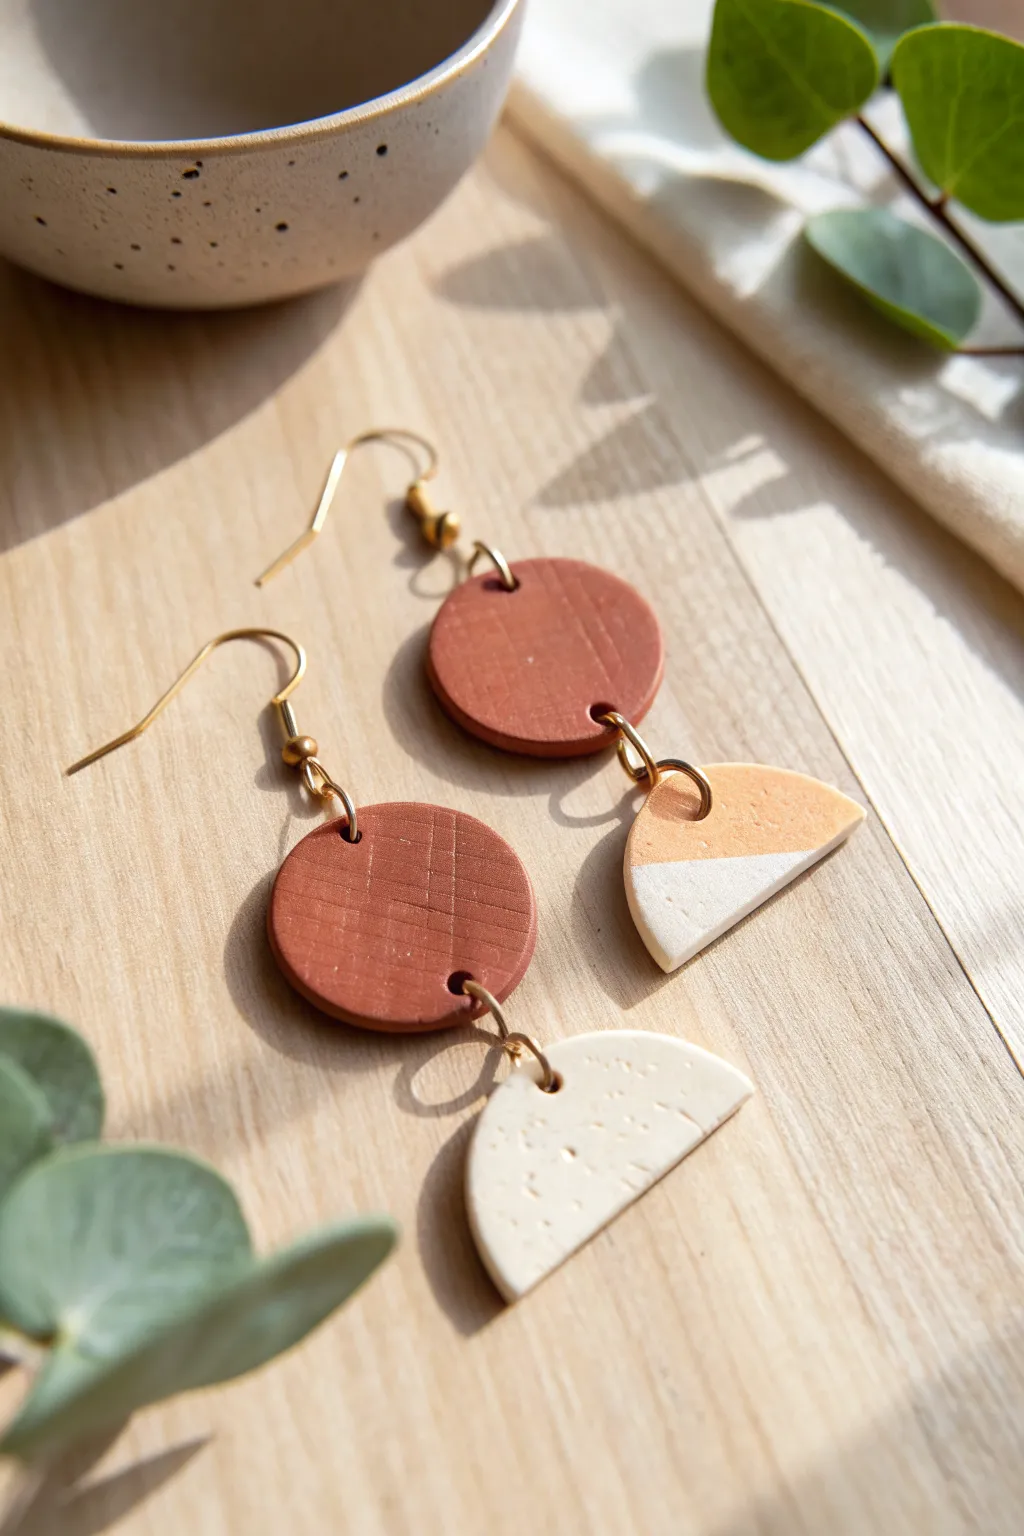
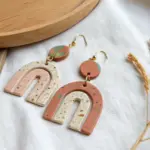
These lightweight dangle earrings combine warm terracotta tones with creamy whites and soft geometric shapes for a modern, bohemian look. The textured finish and half-moon details make them appear far more sophisticated than a simple beginner project.
Step-by-Step Guide
Materials
- Air-dry clay (white and terracotta/red-brown colors)
- Acrylic rolling pin
- Circle cutters (approx. 2cm diameter)
- Craft knife or clay blade
- Sandpaper (fine grit)
- Needle tool or toothpick
- Two earring hooks (gold finish)
- Four large jump rings (gold finish)
- Two small jump rings (gold finish)
- Jewelry pliers (round nose and flat nose)
- Texturing tool (optional: fabric scrap, sandpaper, or toothbrush)
Step 1: Shaping the Clay Components
-
Condition the Clay:
Start by taking a small amount of terracotta-colored clay and white clay. Knead each piece separately in your hands until they are soft, pliable, and free of cracks. -
Roll Out the Terracotta:
Using your acrylic rolling pin, roll the terracotta clay into a smooth slab about 3-4mm thick. Try to keep the thickness even across the entire slab for professional-looking results. -
Add Texture:
Before cutting your shapes, lightly press a texturing tool onto the clay surface. In the reference image, I created a subtle cross-hatch pattern by gently pressing a piece of coarse fabric or a sanding block onto the wet clay. -
Cut the Circles:
Take your circle cutter and press firmly into the textured terracotta clay to create two perfect circles. Remove the excess clay from around the shapes. -
Prepare the White Half-Moons:
Now, roll out your white clay to the same thickness as the terracotta pieces. If you want the two-tone effect seen on the right earring, gently marble a tiny pinch of terracotta clay into the white before rolling. -
Cut the Base Shape:
Use the same circle cutter to cut two white circles. This ensures the curve of your half-moon perfectly matches the scale of the top piece. -
Slice the Half-Moons:
Using your craft knife or clay blade, cut the white circles in half cleanly. You will need two half-moon shapes for this project; set the extras aside for another pair. -
Add Speckled Texture:
To mimic the stone-like texture seen in the photo, gently poke the surface of the white half-moons with a toothbrush or a crumpled ball of aluminum foil. It gives it that organic, ceramic feel.
Step 2: Assembly and Finishing
-
Pierce the Holes:
While the clay is still wet, use a needle tool to create holes for your jump rings. The terracotta circles need a hole at the very top and very bottom (aligned vertically). -
Pierce the Half-Moons:
Pierce a single hole in the center of the straight edge of each white half-moon shape. Make sure the hole isn’t too close to the edge to prevent breakage later. -
Dry Completely:
Place your clay pieces on a flat surface lined with baking paper. Let them dry for at least 24-48 hours. I find flipping them over halfway through drying helps keep them perfectly flat. -
Sand the Edges:
Once bone dry, take your fine-grit sandpaper and gently smooth the rough edges of the circles and half-moons. Do this lightly so you don’t ruin the circular shape. -
Open the Large Jump Rings:
Using your two pairs of pliers, twist open the larger jump rings sideways (never pull them apart outward). -
Connect the Shapes:
Slide one large jump ring through the bottom hole of a terracotta circle and the top hole of a white half-moon. Twist the ring closed securely. -
Attach the Earring Hook:
Open a smaller jump ring and attach it to the top hole of the terracotta circle. Slide the loop of the earring hook onto this same ring before closing it. -
Repeat:
Repeat the assembly process for the second earring, ensuring the textured sides are facing front. -
Final Check:
Inspect all jump rings to ensure they are fully closed so your clay pieces don’t slip off while wearing them.
Keep it Clean
Baby wipes are essential! Wipe your hands and rolling pin thoroughly when switching between red and white clay to prevent accidental color transfer.
Fixing Cracks
If small cracks appear as the clay dries, mix a tiny bit of fresh clay with water to make a paste and smooth it over the crack with your finger.
Now you have a stunning pair of natural-toned earrings ready to wear or gift.

Air-Dry Clay Simple Round Studs
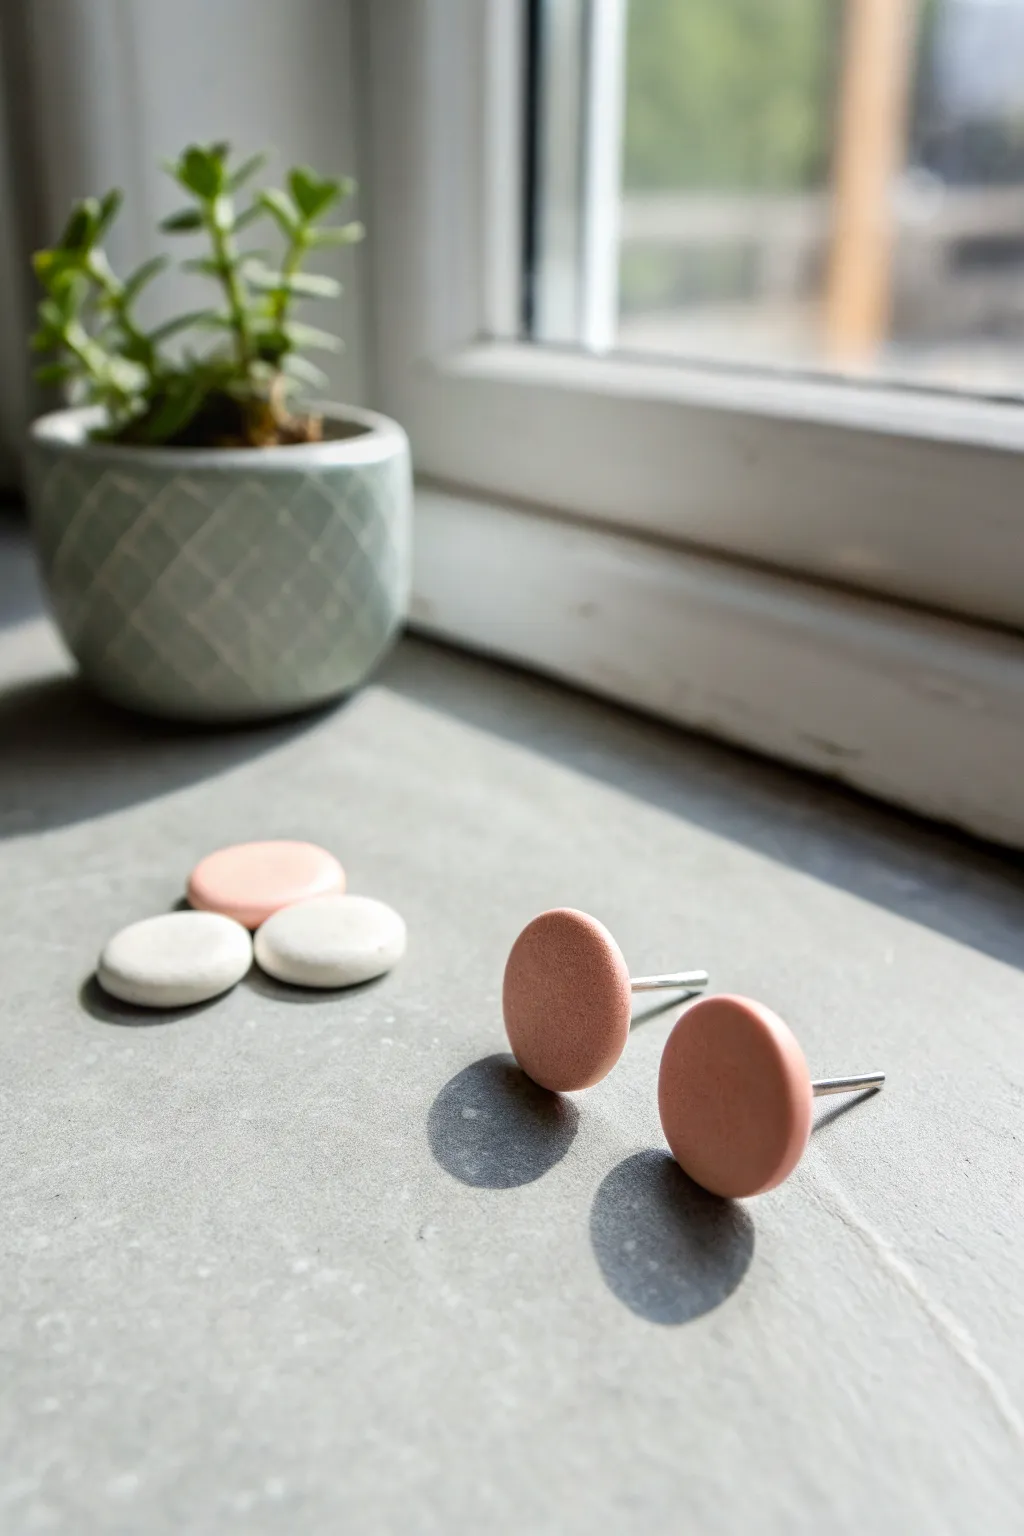
Embrace simplicity with these effortlessly chic round stud earrings crafted from smooth air-dry clay. Their matte finish and soft, earthy tones make them a versatile accessory perfect for everyday wear.
Step-by-Step Tutorial
Materials
- White air-dry clay
- Acrylic paint (soft pink, peach, or terracotta)
- Rolling pin or smooth glass jar
- Small round cutter (approx. 1cm diameter) or a pen cap
- Parchment paper or silicone mat
- Fine-grit sandpaper (400-600 grit)
- Earring posts (flat pad style)
- Strong jewelry glue (like E6000)
- Matte varnish or sealant (optional)
- Small paintbrush
Step 1: Prepping and Shaping
-
Condition the clay:
Begin by taking a small amount of white air-dry clay and kneading it in your hands until it becomes soft, pliable, and free of cracks. -
Roll it out:
Place the clay on a sheet of parchment paper or a silicone mat to prevent sticking. Use your rolling pin to flatten the clay to an even thickness of about 3-4mm. -
Cut the shapes:
Using your small round cutter, press firmly into the clay to create perfect circles. If you don’t feature a dedicated cutter, a clean pen cap works surprisingly well for this petite size. -
Release the circles:
Gently remove the excess clay from around your cut circles. Carefully lift the circles off the mat; using a thin blade can help slide them off without distorting the round shape. -
Smooth the edges:
Dip your finger in a tiny bit of water and run it gently around the circumference of each circle to smooth out any rough cutting marks or jagged edges.
Step 2: Drying and Refining
-
Let them dry:
Place your clay discs on a clean, flat surface to dry. Allow them to air dry completely for at least 24 hours, heavily dependent on your room’s humidity. -
Check for dryness:
The clay should feel hard, lightweight, and room temperature to the touch. If it feels cool, it likely needs more time. -
Sand for perfection:
Once fully cured, take your fine-grit sandpaper and gently buff the edges and the surface. This step is crucial for achieving that professional, high-end finish. -
Wipe clean:
Use a dry, soft cloth or a paper towel to wipe away all the sanding dust. The surface must be perfectly clean before painting.
Cracking Up?
If tiny cracks appear while drying, mix a small amount of fresh clay with water to make a paste and fill them in before sanding.
Step 3: Color and Assembly
-
Mix your color:
Prepare your acrylic paint. For the soft terracotta pink shown in the image, you might mix a touch of brown or orange into a standard pink to mute the brightness. -
Apply the base coat:
Paint the top and sides of the clay discs. I find holding the disc down with a toothpick helps keep it steady while painting the edges. -
Add a second coat:
Once the first layer is dry, apply a second coat for solid, opaque coverage. Let this dry completely. -
Seal the finish:
To protect the paint while maintaining the look, apply a thin layer of matte varnish. This prevents chipping without adding unwanted gloss. -
Prepare the posts:
Take your flat pad earring posts and apply a small dot of strong jewelry glue to the flat surface. -
Attach the hardware:
Press the glued post firmly onto the center of the back of the clay disc. -
Final cure:
Allow the glue to cure according to the manufacturer’s instructions (usually 24 hours for maximum strength) before wearing them.
Color Insider
Mix your acrylic paint directly into the wet white clay before rolling it out for a solid color that won’t chip off later.
Now you have a charming set of handmade studs ready to complement any outfit with a touch of modern simplicity


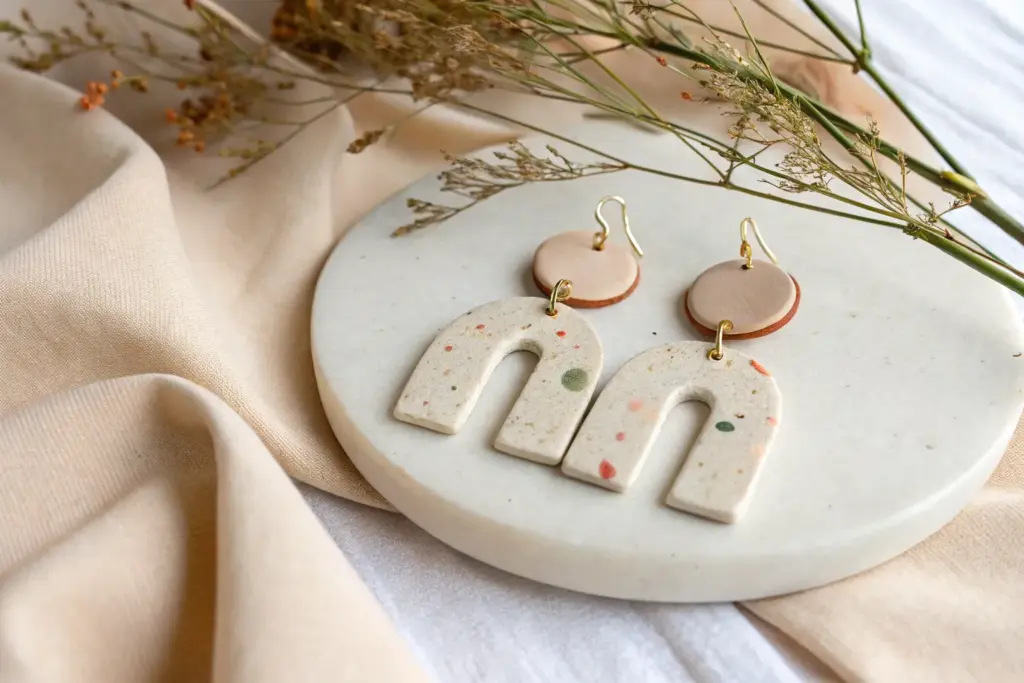
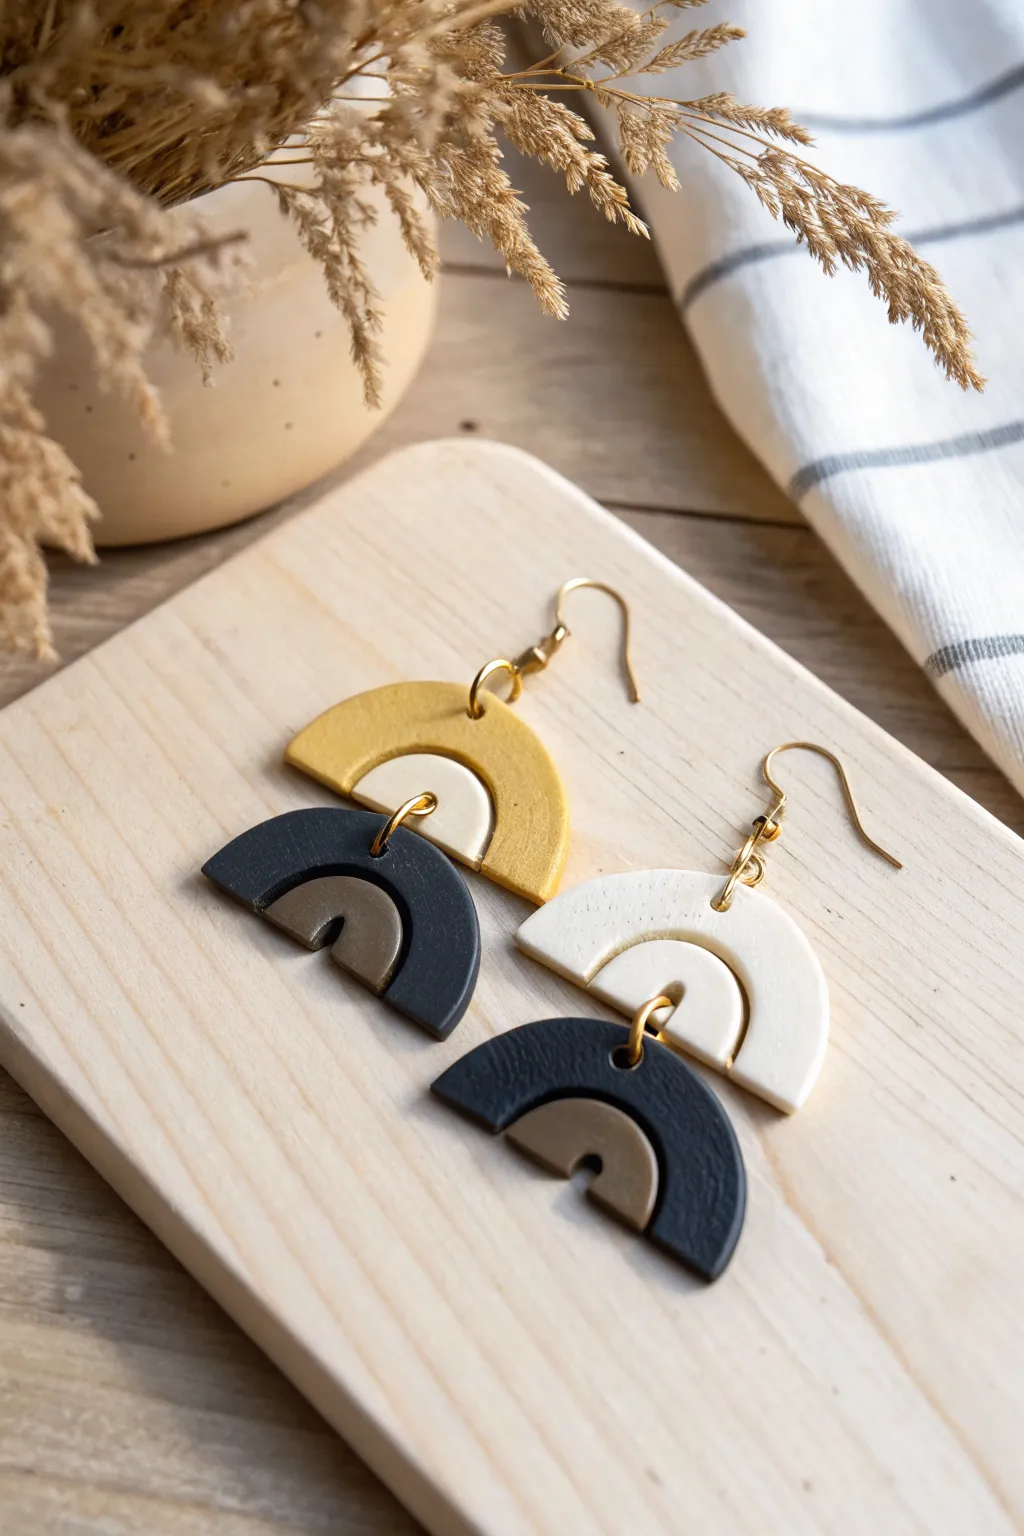
Air-Dry Clay Modern Arch Earrings
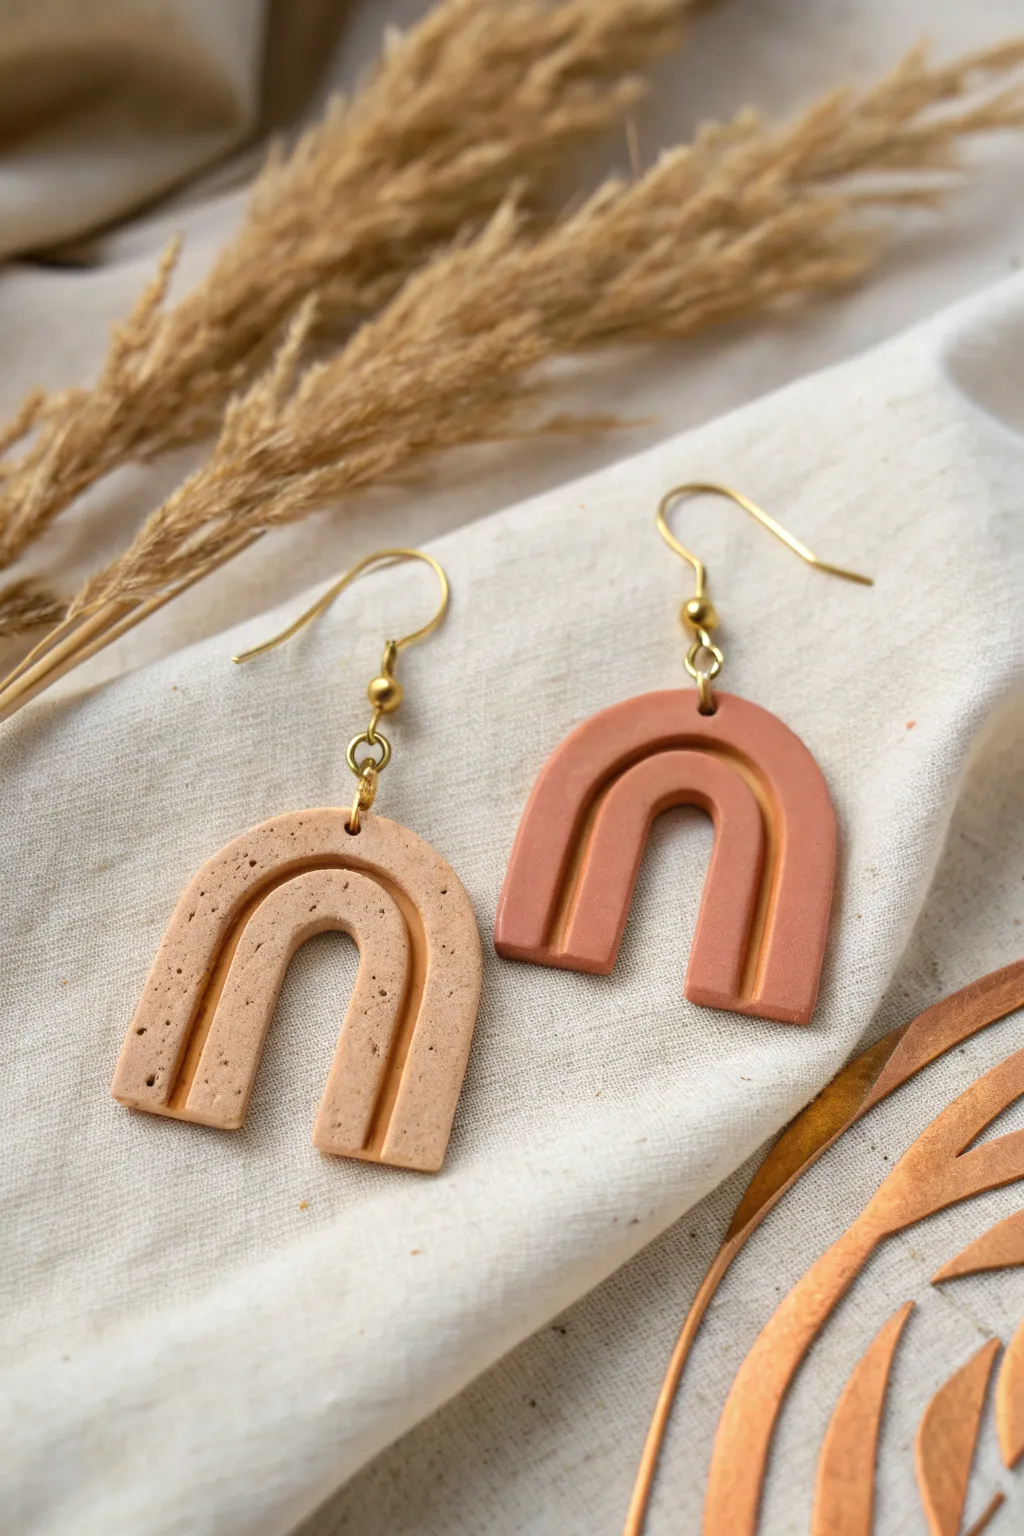
Embrace the earthy, minimalist aesthetic with these stylish arch-shaped earrings featuring a subtle inlaid groove detail. One earring showcases a solid terracotta hue, while the other offers a speckled stone effect, creating a beautifully mismatched yet cohesive modern set.
Detailed Instructions
Materials
- Air-dry clay (white and terracotta/red-brown colors)
- Black acrylic paint or black pepper (for creating speckles)
- Parchment paper or silicone mat
- Rolling pin (acrylic or wooden)
- Arch-shaped clay cutter (or a craft knife and a paper template)
- Small round tool (like a dull pencil tip or specialized clay embossing tool)
- Fine grit sandpaper
- Small drill bit or needle tool (for holes)
- Gold earring hooks (fishhook style)
- Gold jump rings (4mm or 6mm)
- Jewelry pliers (flat nose and round nose)
- Gloss varnish or sealant (optional)
Step 1: Preparing the Clay
-
Condition the terracotta clay:
Begin by kneading a small ball of terracotta-colored air-dry clay until it is soft, pliable, and free of cracks. Warm hands help speed up this process. -
Create the speckled clay:
Take a separate ball of white clay. To achieve that faux-stone speckled look, I like to knead in a tiny pinch of dried black pepper or speckles of dried dark paint. Continue kneading until the specks are evenly distributed. -
Roll out slabs:
Place your clay balls on parchment paper. Roll each color out into a slab about 3mm to 4mm thick. Ensure the thickness is even so your earrings hang level.
Fixing Cracks
If tiny cracks appear while drying, mix a small amount of fresh clay with water to make a paste (slip). Fill the crack, smooth it over, and let it dry again.
Step 2: Shaping and Detailing
-
Cut the arch shapes:
Use your arch-shaped cutter to punch out one shape from the terracotta slab and one from the speckled slab. If you don’t have a cutter, trace a paper template lightly onto the clay and carefully cut along the lines with a craft knife. -
Smooth the edges:
Dip your finger in a little bit of water and gently run it along the cut edges of the clay to smooth out any roughness or stray crumbs. -
Emboss the groove:
Select a tool with a rounded, blunt tip. Gently press into the clay surface to create a U-shaped groove that follows the curve of the arch. Press deep enough to be visible, but be careful not to puncture through to the back. -
Refine the groove:
Go over the groove a second time to smooth the bottom of the channel and ensure the width is consistent from start to finish. -
Pierce the holes:
Using a needle tool or a toothpick, poke a hole at the very top center of each arch. Make sure the hole is large enough to fit your jump rings later, as clay shrinks slightly when drying.
Step 3: Finishing and Assembly
-
Allow to dry:
Place the clay pieces on a clean, flat surface away from direct sunlight. Let them dry for at least 24-48 hours. Flipping them halfway through helps prevent warping. -
Sand for perfection:
Once fully cured, use fine-grit sandpaper to buff the edges and flat surfaces. This removes any fingerprints and gives the piece a professional, matte finish. -
Clean the dust:
Wipe the pieces down with a slightly damp cloth or a baby wipe to remove all sanding dust. -
Seal (optional):
If you want extra durability or a bit of shine, brush on a thin layer of matte or gloss varnish. Let this dry completely before handling. -
Open the jump rings:
Use two pairs of pliers to twist your gold jump rings open. Twist the ends away from each other (front to back) rather than pulling them apart, which weakens the ring. -
Attach the findings:
Thread the open jump ring through the hole in the clay arch. Before closing it, slide the loop of the earring hook onto the jump ring as well. -
Close the rings:
Use your pliers to twist the jump ring back into a closed position, ensuring the gap is tight so the earring doesn’t slip off.
Go Gold
paint the inside of the embossed groove with gold liquid leaf or metallic acrylic paint. This adds a luxurious, high-contrast pop of shine.
Wear your new geometric creations with pride, knowing you’ve mastered the art of minimalist clay jewelry design


Air-Dry Clay Mini Charm Hoop Earrings
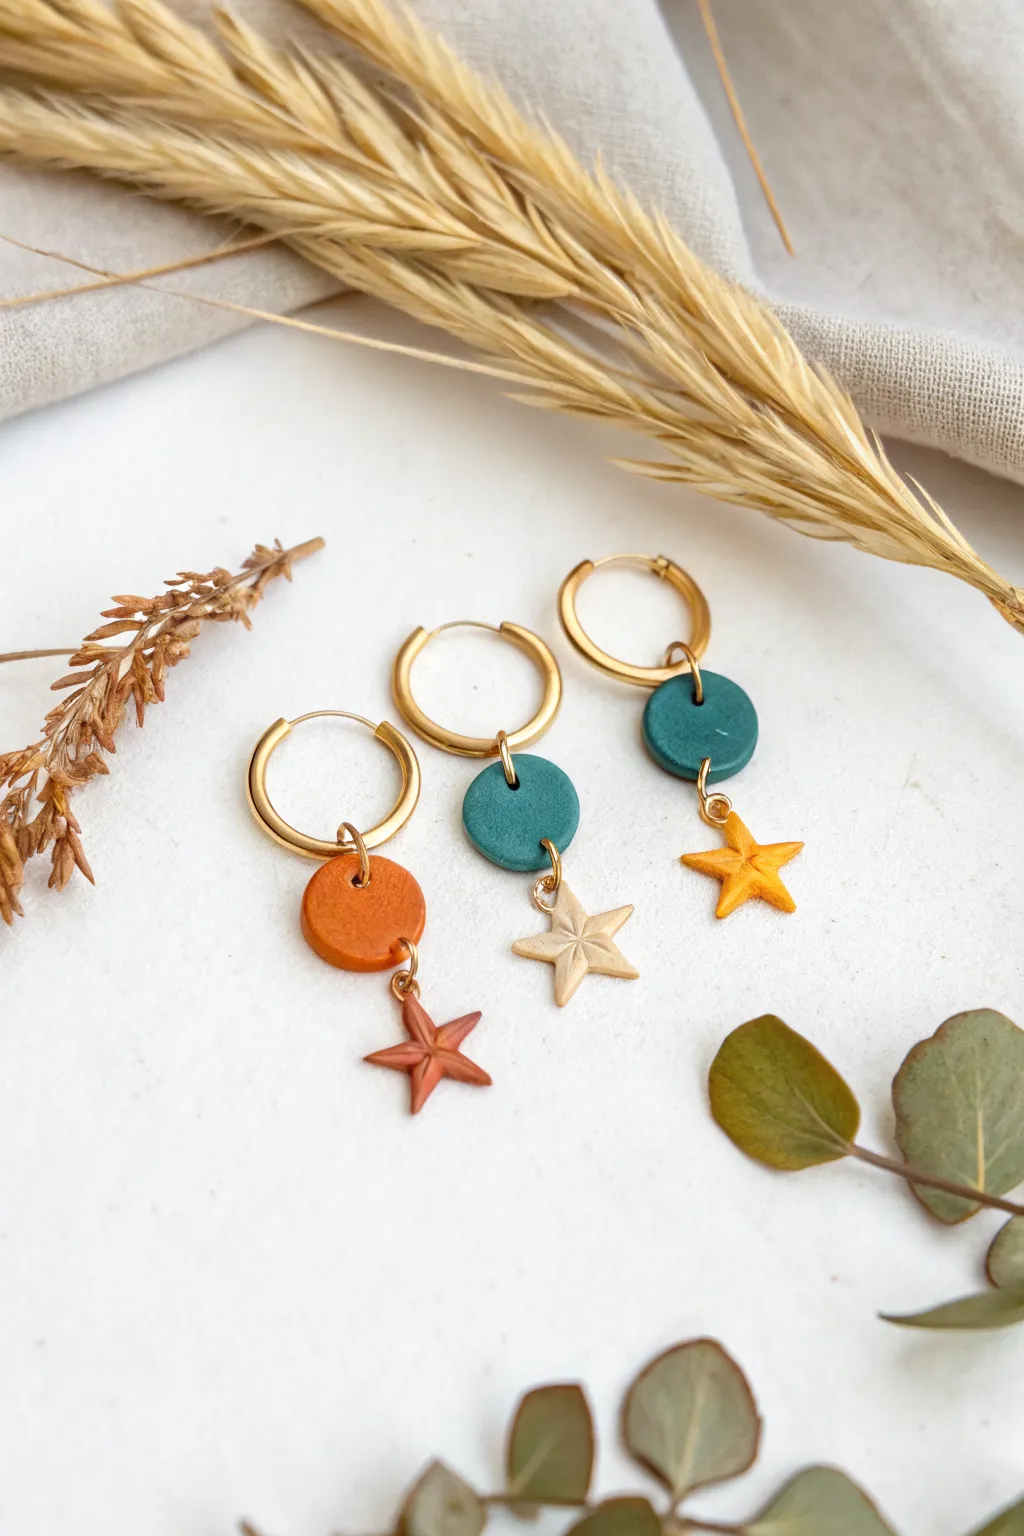
These delicate earrings combine simple geometric shapes with a touch of whimsy, perfect for adding a handmade pop of color to your everyday style. Featuring smooth clay circles and tiny, textured stars dangling from classic gold hoops, this project is a wonderful way to practice precision with small clay components.
Step-by-Step
Materials
- Air-dry clay (white or pre-colored)
- Acrylic paints (terracotta, deep teal, mustard yellow, metallic gold)
- Small rolling pin
- Mini circle cutter (approx. 1cm diameter)
- Mini star cutter (approx. 1cm diameter) or craft knife
- Gold-plated or brass hoop earrings (20-25mm)
- Gold jump rings (4mm and 6mm)
- Jewelry pliers (flat nose and round nose)
- Hand drill or thick needle for piercing
- Fine-grit sandpaper
- Gloss or matte varnish (optional)
- Paintbrushes (fine detail)
Step 1: Shaping the Clay Elements
-
Condition the clay:
Begin by kneading a small amount of air-dry clay until it is soft, pliable, and free of cracks. -
Roll it out:
Roll the clay onto a smooth surface to an even thickness of about 3mm. You want it substantial enough to hold the jump rings but light enough to wear comfortably. -
Cut the circles:
Use your mini circle cutter to punch out three perfect circles. If edges look rough, gently smooth them with a wet fingertip. -
Create the stars:
Punch out three small star shapes. If you don’t have a cutter this small, you can carefully hand-cut them using a craft knife or shape them by hand for a more organic look. -
Add dimension to stars:
To mimic the faceted look in the photo, use the back of your knife or a sculpting tool to gently press lines from the center of the star out to each point and each inner corner, creating a slightly 3D effect. -
Pierce the holes:
While the clay is still wet, carefully poke holes for assembly. The circles need two holes (one top, one bottom) opposite each other. The stars need just one hole at the tip of the top point. Ensure the holes are large enough for your jump rings. -
Let them dry:
Place all pieces on a flat surface away from direct heat. Let them dry completely, which typically takes 24-48 hours depending on humidity.
Step 2: Painting and Finishing
-
Sand for smoothness:
Once fully dry, check the edges. If there are any sharp bits or irregularities, gently buff them away with fine-grit sandpaper. -
Base coat the circles:
Paint the circles. For the look in the photo, paint two of them a deep teal green and one a warm terracotta orange. I find applying two thin coats gives a smoother finish than one thick one. -
Paint the stars:
Paint the corresponding stars. Match one star to the terracotta circle. Paint a second star mustard yellow and the third star a shimmering metallic gold or light beige. -
Seal the pieces:
Apply a coat of varnish to all sides of the clay pieces to protect the paint and add durability. Let this cure completely before assembly.
Smooth Edges Trick
Before drying, dip your finger in water and run it around the cut edges of your clay shapes. It prevents sharp burrs and minimizes sanding time later.
Step 3: Assembly
-
Attach hoops to circles:
Open a larger jump ring using your pliers. Thread it through the top hole of a clay circle and then loop it onto the rigid wire of the hoop earring. Close the jump ring securely. -
Connect the stars:
Open a smaller jump ring. Loop it through the hole in the star charm and connect it to the bottom hole of the clay circle. -
Repeat the process:
Continue this assembly process for the remaining earrings, mixing and matching the circle and star colors as shown in the image or creating your own combinations. -
Double check closures:
Give all jump rings a final gentle squeeze with your pliers to ensure they are perfectly flush so your charms won’t slip off.
Mix & Match Sets
Make extra charms in different shapes (moons, hearts, clouds) and put them on lobster clasps instead of jump rings so you can swap them out daily.
Now you have a charming set of custom earrings ready to wear or gift to a friend

The Complete Guide to Pottery Troubleshooting
Uncover the most common ceramic mistakes—from cracking clay to failed glazes—and learn how to fix them fast.
Air-Dry Clay Terrazzo Speckle Earrings
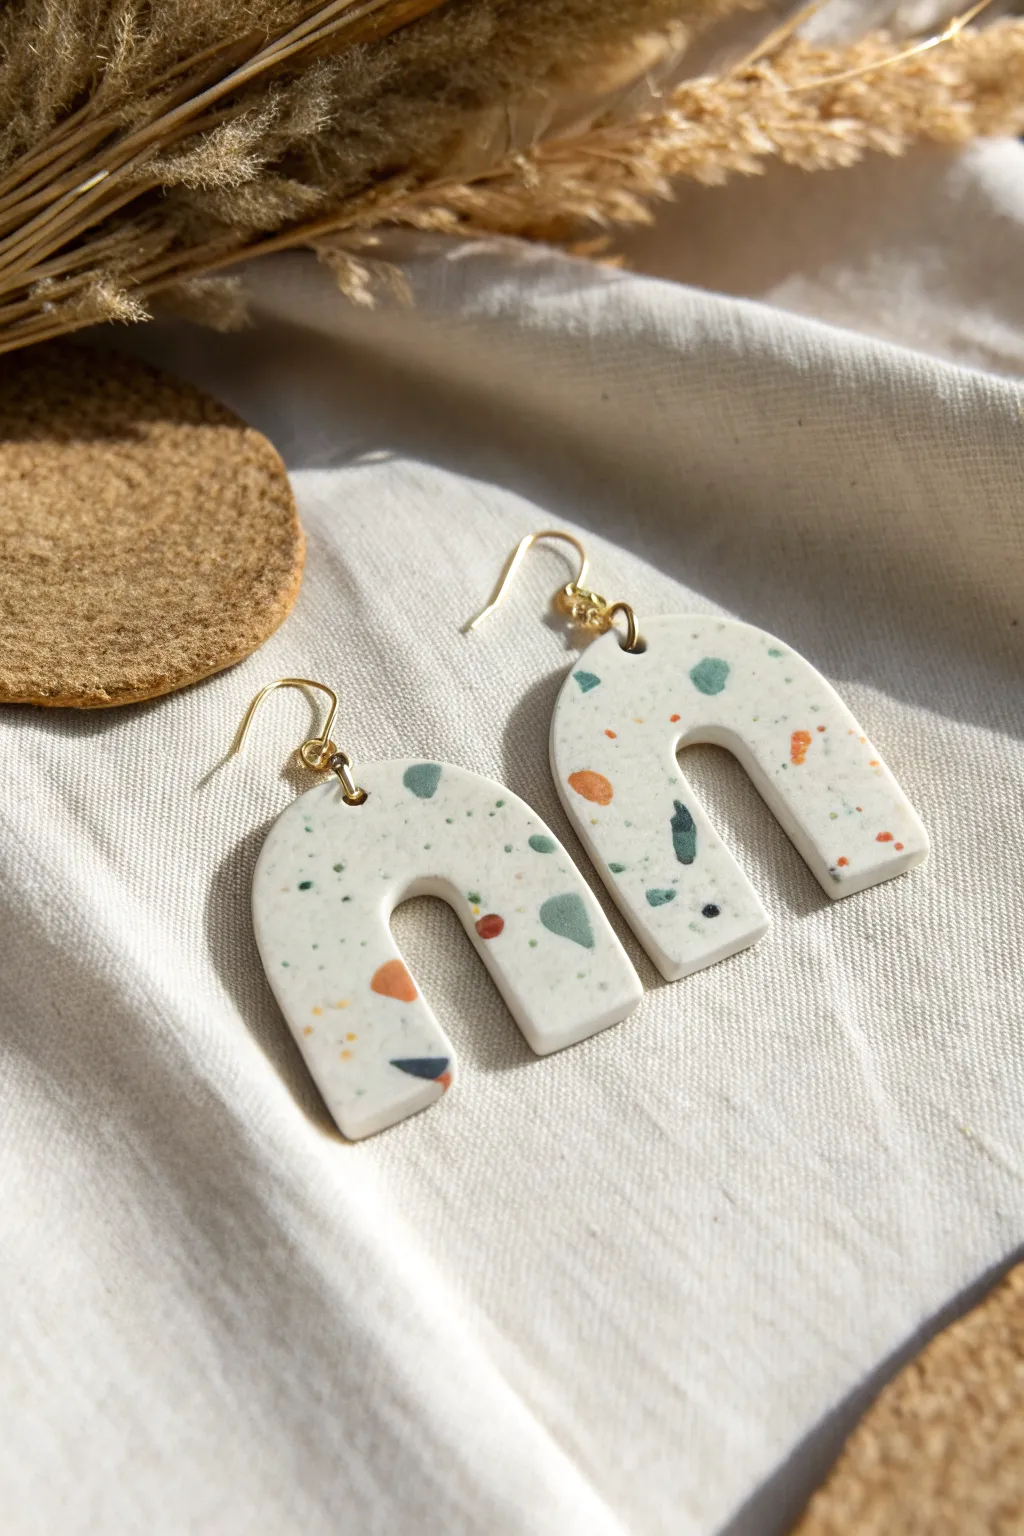
These simple yet striking earrings feature a timeless U-shape and a trendy terrazzo effect that looks much harder to achieve than it actually is. The combination of a creamy white base with flecks of terracotta, teal, and charcoal creates a sophisticated, modern accessory suitable for any occasion.
Step-by-Step Tutorial
Materials
- White air-dry clay (smooth finish)
- Colored air-dry clay (teal, burnt orange, black, navy blue) OR acrylic paints to color white clay
- Rolling pin
- Parchment paper or silicone mat
- U-shaped clay cutter or a craft scalpel and template
- Small round cutter or toothpick (for connector holes)
- Fine-grit sandpaper (400 and 1000 grit)
- Gloss or matte varnish (optional)
- 2 Gold jump rings (6mm)
- 2 Gold earring hooks
- Jewelry pliers
Step 1: Prepping the Chips
-
Mix your colors:
If you don’t have pre-colored clay, take small pea-sized balls of your white clay. Mix a tiny drop of acrylic paint into each—one teal, one burnt orange, one black, and one navy—kneading until the color is solid and consistent. -
Flatten the colored clay:
Roll each colored ball out very thinly onto your parchment paper. You want these to be almost paper-thin sheets. -
Create the crumbs:
Let these thin sheets dry for about 10-15 minutes so they aren’t sticky. Then, tear or chop them into tiny, irregular shards and crumbs. Keep the sizes varied, mostly small, to mimic real stone chips.
Step 2: Forming the Base
-
Condition the white clay:
Take a larger chunk of white clay and knead it in your hands to warm it up. This conditioning prevents cracks later on. -
Initial roll:
Roll the white clay out into a slab that is about 4-5mm thick. It doesn’t need to be perfect yet, just a flat working surface. -
Sprinkle the ‘terrazzo’:
Scatter your colored clay chips randomly over the white slab. Don’t overthink the placement, but try to ensure an even distribution of colors. -
Embed the chips:
Gently gently use your rolling pin to press the colored chips *into* the white clay surface. Roll over the slab repeatedly until it is smooth and flat again, roughly 3mm thick.
Cracks Appearing?
If tiny cracks appear while drying, mix a small amount of white clay with water to make a paste (slip) and fill them in. Sand smooth once dry.
Step 3: Cutting and Refining
-
Cut the shapes:
Place your U-shaped cutter over a section of the slab that has a nice distribution of colors. Press down firmly to cut your two earring shapes. If you don’t have a cutter, trace a U-shape onto paper, cut it out, place it on the clay, and trace around it with a craft scalpel. -
Smooth the edges:
Dip your finger in a tiny bit of water and run it gently along the cut edges of the clay to smooth out any roughness or loose bits. -
Add holes:
Using a toothpick or a very small circular cutter, poke a hole at the very top center of each arch. Make sure the hole is big enough for your jump rings but not too close to the edge. -
Drying time:
Place your pieces on a clean piece of parchment paper away from direct heat. Let them dry completely, ideally for 24-48 hours. I like to flip them over halfway through so both sides dry evenly.
Level Up: Metallic Pop
Add gold leaf flakes into your terrazzo mix alongside the colored clay chips before the final roll for a luxurious, sparkly finish.
Step 4: Finishing Touches
-
Sand for smoothness:
Once fully dry and hard, use 400-grit sandpaper to smooth any bumps on the edges. Follow up with 1000-grit to polish the surface and make those terrazzo specks really pop. -
Seal the piece:
Apply a thin layer of varnish if you want a glossy finish or keep it raw for a matte stone look. Varnish helps protect white clay from getting dirty over time. -
Open the jump ring:
Using two pairs of pliers, twist a gold jump ring open (twist front-to-back, don’t pull apart). -
Attach findings:
Thread the open jump ring through the hole in your clay arch, then loop the earring hook onto the jump ring. -
Close and wear:
Twist the jump ring back completely closed so there is no gap. Repeat for the second earring.
Now you have a stylish, lightweight pair of faux-stone earrings ready to wear
Air-Dry Clay Marbled Swirl Pendants
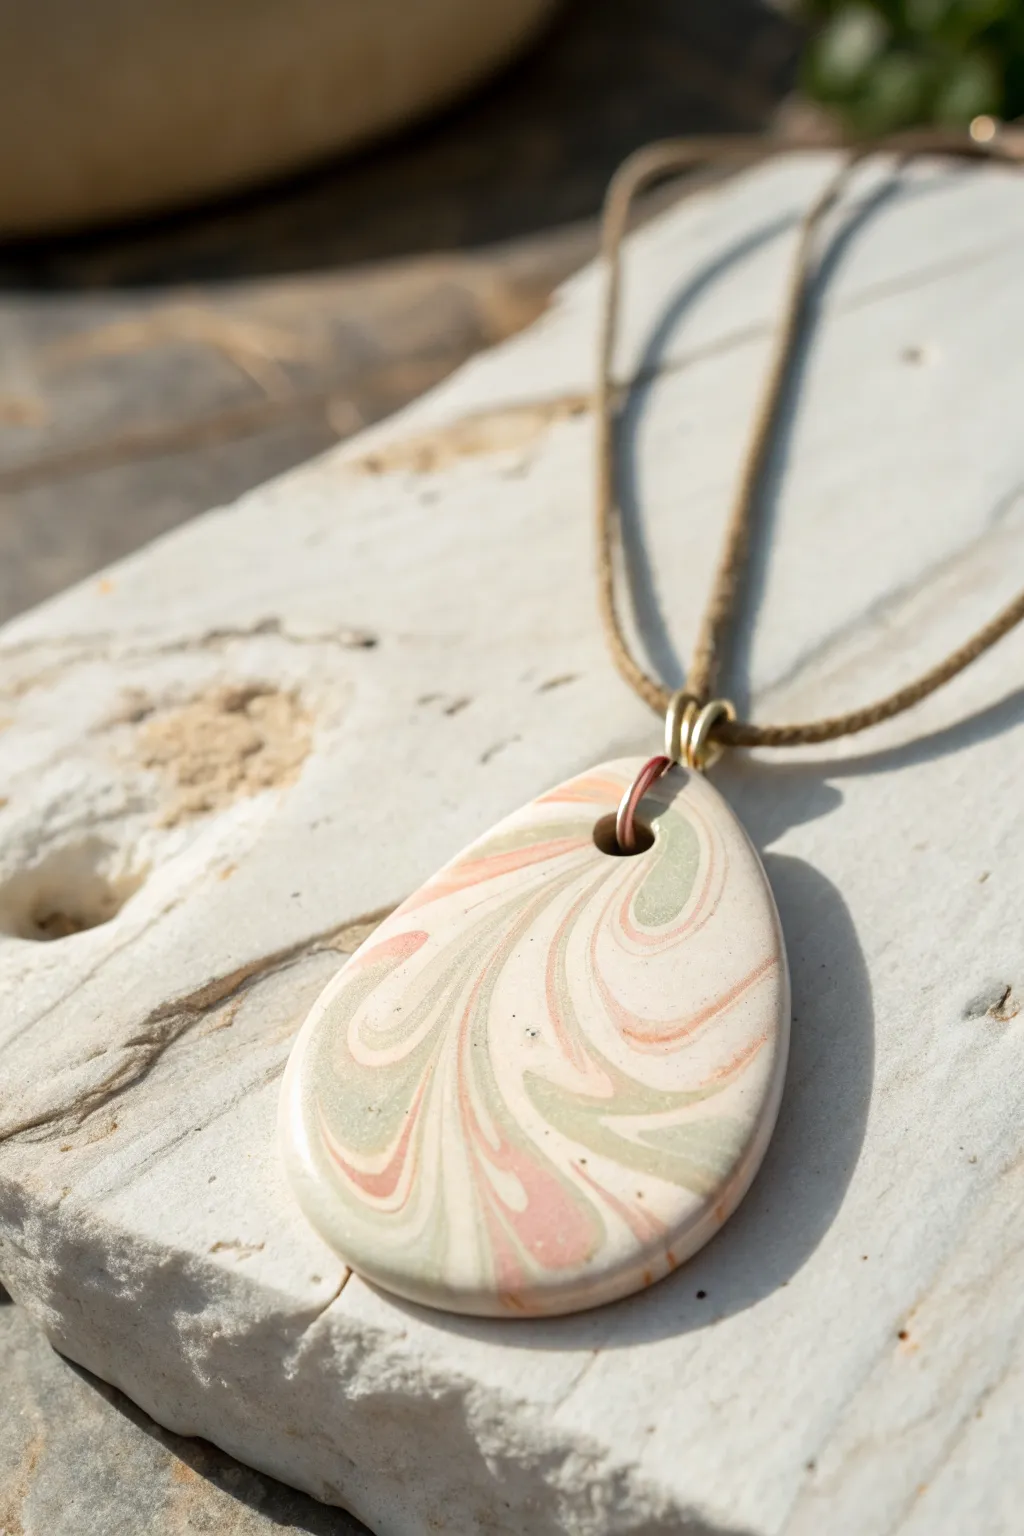
Capture the elegance of natural stone with a soft, marbled pendant that blends sage greens, blush pinks, and creamy whites. This air-dry clay project creates a sophisticated, lightweight accessory perfect for everyday wear.
How-To Guide
Materials
- White air-dry clay (fine grain)
- Acrylic paints (Sage Green, Blush Pink, Cream/White)
- Rolling pin or smooth glass jar
- Sharp craft knife or clay blade
- Teardrop template (cardstock or paper)
- Sandpaper (fine grit)
- Gloss varnish or sealant
- Leather or waxed cotton cord
- Jump rings (gold or brass)
- Plastic wrap or parchment paper
- Straw or toothpick
Step 1: Preparing the Marbling
-
Condition the clay:
Begin by taking a chunk of white air-dry clay about the size of a golf ball. Knead it thoroughly in your hands until it becomes warm, pliable, and free of cracks. -
Portion the clay:
Divide your clay ball into three parts: one large part (about 60% of the total) and two smaller parts (20% each). The largest piece will remain white. -
Add color:
Take one of the small portions and add a tiny drop of sage green acrylic paint. Knead the clay until the color is fully uniform. Repeat with the second small portion using blush pink paint. -
Create snakes:
Roll each of the three colored balls (white, pink, green) into long, thin snake-like ropes on a clean surface. -
Twist and combine:
Lay the three ropes side-by-side, twist them together into one large rope, and then fold that rope in half. -
Marbling technique:
Twist the folded rope again, roll it out, and fold it once more. Be careful not to over-knead at this stage, or the colors will blend into a muddy grey instead of distinct swirls.
Clean Cuts Only
Apply a tiny bit of lotion or oil to your craft knife blade before cutting. This prevents the clay from dragging and creates sharp, professional edges.
Step 2: Shaping and Refining
-
Squash and roll:
Press the marbled clay ball down onto a piece of parchment paper. Use a rolling pin to flatten it to a uniform thickness, approximately 4-5mm. -
Check the pattern:
Examine the surface. If you don’t like the swirl pattern, you can gently fold and roll once more, but remember that less is often more with marbling. -
Cut the shape:
Place your teardrop template over the most attractive section of the pattern. Use a sharp craft knife to trace around it, cutting cleanly through the clay. -
Make the hole:
Using a straw or a tool specifically for making holes, punch a clean circle near the top (narrow end) of the teardrop. Ensure it is not too close to the edge to prevent breakage. -
Smooth the edges:
Dip your finger in a little water and gently run it along the cut edges of the pendant to smooth out any roughness from the knife. -
Drying time:
Place the pendant on a clean, flat surface to dry. I like to flip the piece over after the first 12 hours to ensure even drying on both sides. Allow 24-48 hours for full curing.
Step 3: Finishing Touches
-
Sand for smoothness:
Once fully bone-dry, take a piece of fine-grit sandpaper and lightly buff the edges and surface to remove any final imperfections or fingerprints. -
Apply varnish:
Apply a coat of gloss varnish to the front and sides of the pendant. This protects the clay and makes the marble colors pop. -
Add hardware:
Open a gold jump ring using pliers and thread it through the hole in the pendant. Close the ring securely. -
String the pendant:
Thread your leather or waxed cotton cord through the jump ring. Tie the ends of the cord with a sliding knot or add a clasp to finish.
Touch of Gold
Before the varnish dries, press a tiny flake of gold leaf onto one of the swirl lines for an upscale, geode-inspired look.
Now you have a unique, wearable piece of art that mimics the beauty of polished stone


What Really Happens Inside the Kiln
Learn how time and temperature work together inside the kiln to transform clay into durable ceramic.
Air-Dry Clay Stamped Texture Earrings
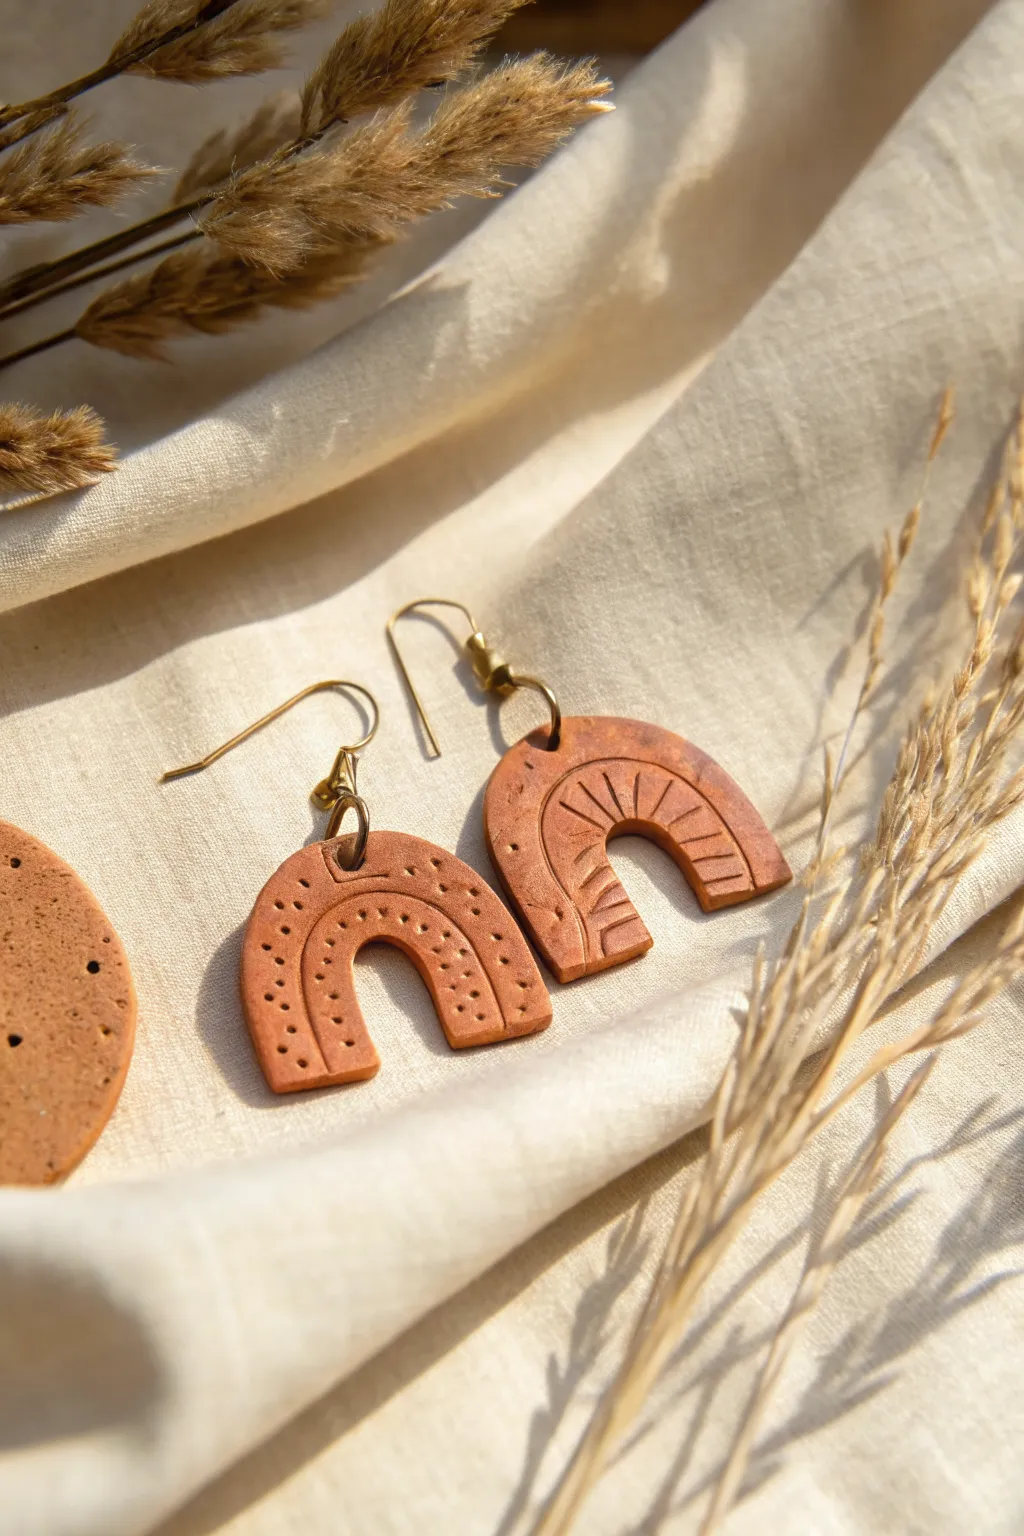
Embrace earthy vibes with these stunning terracotta-tone earrings featuring delicate stamped details. The warm, rustic color paired with simple geometric patterns creates a modern boho accessory that looks professionally made but is surprisingly simple to craft at home using air-dry clay.
Step-by-Step Tutorial
Materials
- Terracotta-colored air-dry clay (or white clay mixed with acrylic paint)
- Acrylic rolling pin or smooth glass jar
- Parchment paper or a silicone craft mat
- Arch-shaped clay cutter (approx. 1.5 inches)
- Needle tool or a large safety pin
- Small craft knife (X-Acto)
- Fine-grit sandpaper (400-600 grit)
- Small jump rings (antique gold or brass finish)
- Fishhook ear wires (antique gold or brass finish)
- Jewelry pliers (flat nose and round nose)
- Small circle cutter or straw (for jump ring holes)
- Gloss or matte varnish (optional seal)
Step 1: Preparation & Shaping
-
Prepare your workspace:
Lay down your parchment paper or silicone mat on a flat, stable surface. Having a non-stick surface is crucial so your delicate clay shapes don’t get distorted when you lift them later. -
Condition the clay:
Take a small handful of terracotta air-dry clay. Knead it in your hands for a minute or two until it is warm, pliable, and free of any cracks. If using white clay, knead in a small amount of terracotta or burnt orange acrylic paint until the color is uniform. -
Roll out the slab:
Place the clay on your mat and roll it out evenly using your acrylic roller. aim for a consistent thickness of about 3mm to 4mm. I find that using playing cards stacked on either side of the clay as guide rails helps keep the thickness perfectly even. -
Cut the arch shapes:
Press your arch-shaped cutter firmly into the clay slab. Wiggle it slightly to ensure a clean cut, then lift the cutter. Repeat to cut a second matching shape. Carefully remove the excess clay around the arches, leaving the shapes on the mat. -
Smooth the edges:
Dip your finger in a tiny bit of water and gently run it along the cut edges of the arches to soften any sharpness or loose bits of clay.
Texturing Trick
To keep texture lines crisp while impressing them, dip your needle tool or knife into a bit of cornstarch before pressing it into the clay. This prevents sticking.
Step 2: Texturing & Drying
-
Create the sunburst pattern (Left Earring):
On the first arch, use your needle tool or craft knife to firmly impress straight lines. Start from the inner curve and press outward toward the edge, spacing them evenly like rays of sunshine. Press deep enough to make a mark but not cut all the way through. -
Create the dotted pattern (Right Earring):
On the second arch, use the point of your needle tool to poke rows of small dots. Follow the curve of the arch, creating two or three nested rows of stippled texture. Varying the pressure slightly gives a lovely organic look. -
Add jump ring holes:
Use a small circle cutter, a toothpick, or a drinking straw to punch a hole at the very center top of each arch. Make sure the hole isn’t too close to the edge to prevent breakage later. -
Let them dry:
Allow the pieces to dry completely on a flat surface. This usually takes 24-48 hours depending on humidity. Flip them over halfway through the drying process to ensure the backs dry evenly and to prevent warping. -
Sand for finish:
Once fully hard, take your fine-grit sandpaper and very gently sand the edges and the flat back of the earrings. This gives them a refined, high-end feel.
Step 3: Assembly
-
Seal the clay (Optional):
If you want extra durability or a specific sheen, apply a thin coat of matte or gloss varnish now. Let it dry completely before moving to assembly. -
Open the jump rings:
Hold a jump ring with two pairs of pliers. Twist one hand forward and one hand back to open the ring sideways (never pull it apart, as this weakens the metal). -
Attach the ear wires:
Slide the open jump ring through the hole in your clay arch, then loop the fishhook ear wire onto the jump ring. -
Close the rings:
Using the same twisting motion with your pliers, close the jump ring tightly so there is no gap for the wire to slip through. Repeat for the second earring.
Color Wash Finish
After drying, rub a tiny bit of white acrylic paint into the grooves and quickly wipe the surface clean. The white stays in the texture, making the pattern pop.
Now you have a unique pair of handmade earrings to wear or gift.
Air-Dry Clay Botanical Imprint Medallions
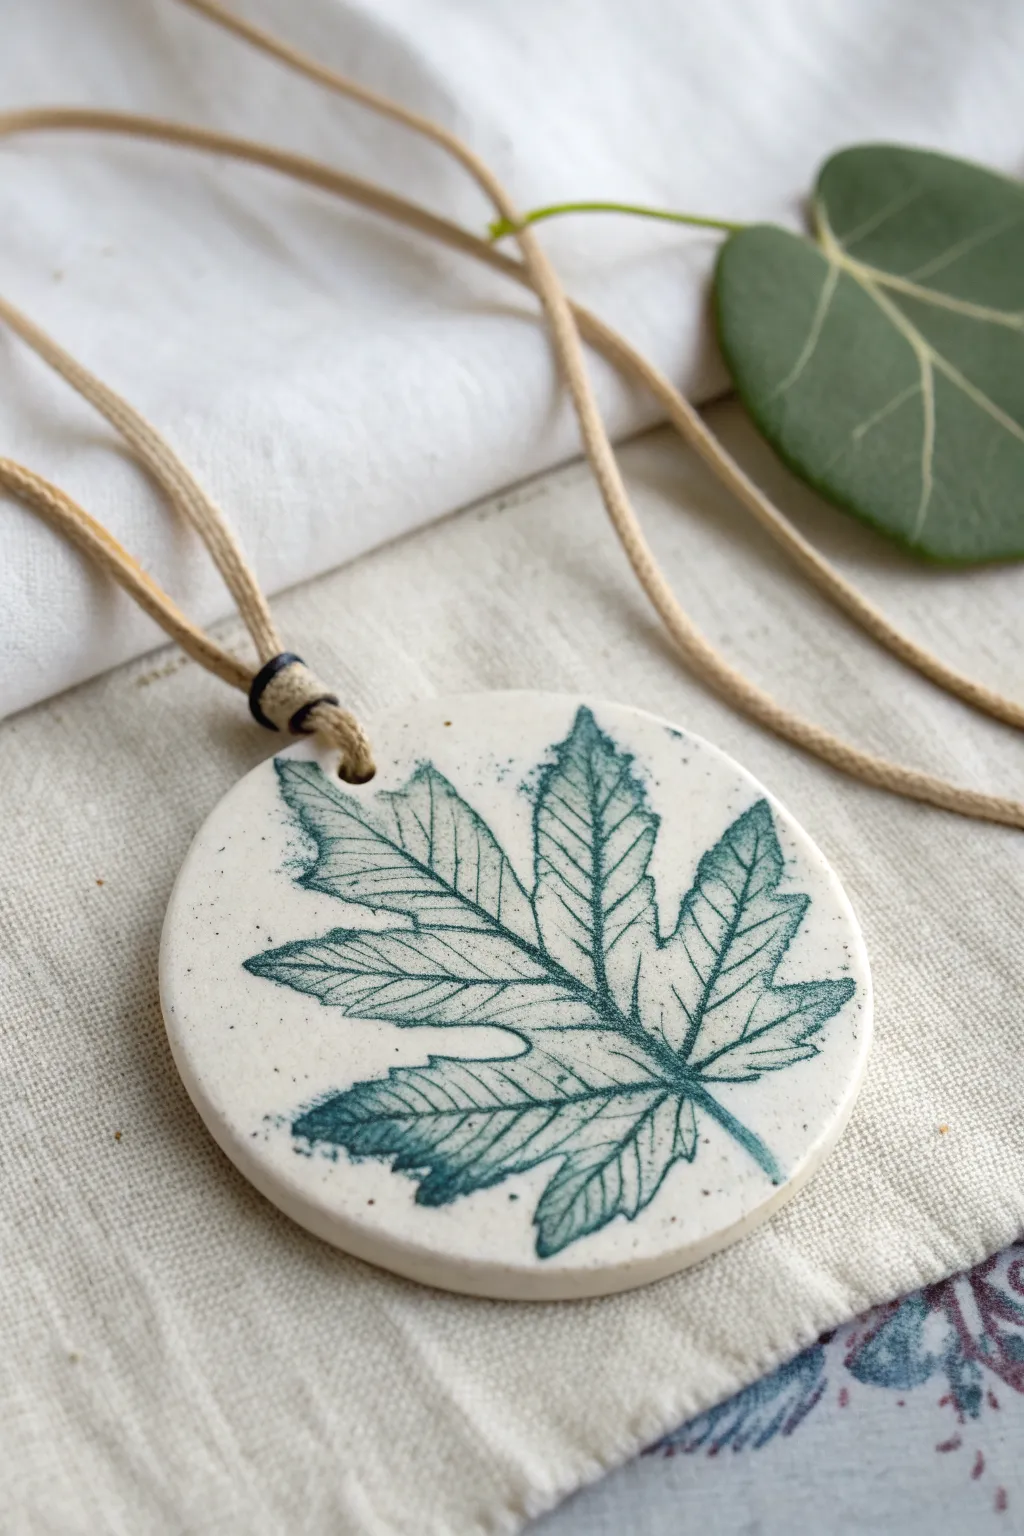
Capture the delicate veins of nature with this elegant pendant that mimics the look of high-fire ceramic. Using a simple botanical impression technique, you’ll create a sophisticated, glossy medallion featuring a deep teal leaf motiff.
Step-by-Step Guide
Materials
- White smooth air-dry clay (e.g., DAS or Crayola)
- Fresh leaf with prominent veins (like maple or fig)
- Rolling pin or smooth glass jar
- Round cookie cutter or drinking glass
- Sandpaper (fine grit)
- Acrylic paint (Deep Teal or Phthalo Green)
- Small paintbrush
- Damp sponge or paper towel
- Gloss varnish or clear sealant
- Cord (leather or waxed cotton)
- Straw or toothpick for the hole
Step 1: Shaping the Clay
-
Condition the clay:
Begin by kneading a small ball of white air-dry clay until it is warm, pliable, and free of cracks. If it feels too dry, add a tiny drop of water. -
Roll the slab:
Roll the clay out on a smooth surface or canvas mat to an even thickness of about 4-5mm. You want it thick enough to be sturdy but thin enough for jewelry. -
Select your botanical:
Place your chosen fresh leaf face-down onto the clay slab. Ensure the vein side is touching the clay for the deepest texture impression. -
Impress the design:
Gently roll over the leaf with your rolling pin once or twice. Apply firm, even pressure to push the veins into the clay without making the slab paper-thin. -
Reveal the texture:
Carefully peel the leaf away by the stem to reveal the imprinted design. Check that the details are crisp. -
Cut the shape:
Position your round cutter over the best part of the leaf imprint and press down firmly to cut out your medallion. -
Create the hole:
Use a drinking straw or a skewer to punch a hole near the top edge for the cord. Make sure not to distort the circle shape while doing this. -
Smooth the edges:
Dip your finger in a little water and gently run it around the cut edge of the circle to smooth out any roughness before drying.
Uneven Impressions?
If the leaf isn’t pressing in evenly, place a piece of parchment paper over the leaf before rolling. This prevents the roller from dragging or tearing delicate botanicals.
Step 2: Coloring and Finishing
-
Dry thoroughly:
Let the clay dry completely for 24-48 hours. I prefer to flip it over halfway through the process to prevent the edges from curling up. -
Sand for perfection:
Once fully dry, use fine-grit sandpaper to buff the edges and surface lightly, removing any tiny bumps or jagged areas. -
Apply the wash:
Dilute a small amount of deep teal acrylic paint with a drop of water. Brush this wash over the entire indented leaf area, ensuring it gets into every tiny vein groove. -
Wipe back:
Immediately take a slightly damp sponge or paper towel and wipe the surface of the clay. This removes the paint from the raised areas while leaving the color trapped in the recessed leaf veins. -
Refine the look:
Continue wiping until the background is mostly white again and the leaf design stands out clearly in green. Let the paint dry for 10 minutes. -
Seal the piece:
Apply a coat of high-gloss varnish or sealant to the front and back. This protects the clay from moisture and gives it that polished ceramic appearance. -
Add the cord:
Cut a length of beige suede or waxed cotton cord. Fold it in half and thread the loop through the medallion hole. -
Secure with a knot:
Pull the loose ends of the cord through the loop to create a lark’s head knot, securing the pendant tightly, and tie the ends to your desired necklace length.
Go for Gold
After the dark wash dries, brush a tiny amount of liquid gold leaf or metallic wax just on the raised rim of the circle for a luxurious, gilded ceramic effect.
Wear your new botanical necklace with pride and enjoy the natural elegance it adds to your outfit

TRACK YOUR CERAMIC JOURNEY
Capture glaze tests, firing details, and creative progress—all in one simple printable. Make your projects easier to repeat and improve.
Air-Dry Clay Line-Art Painted Earrings
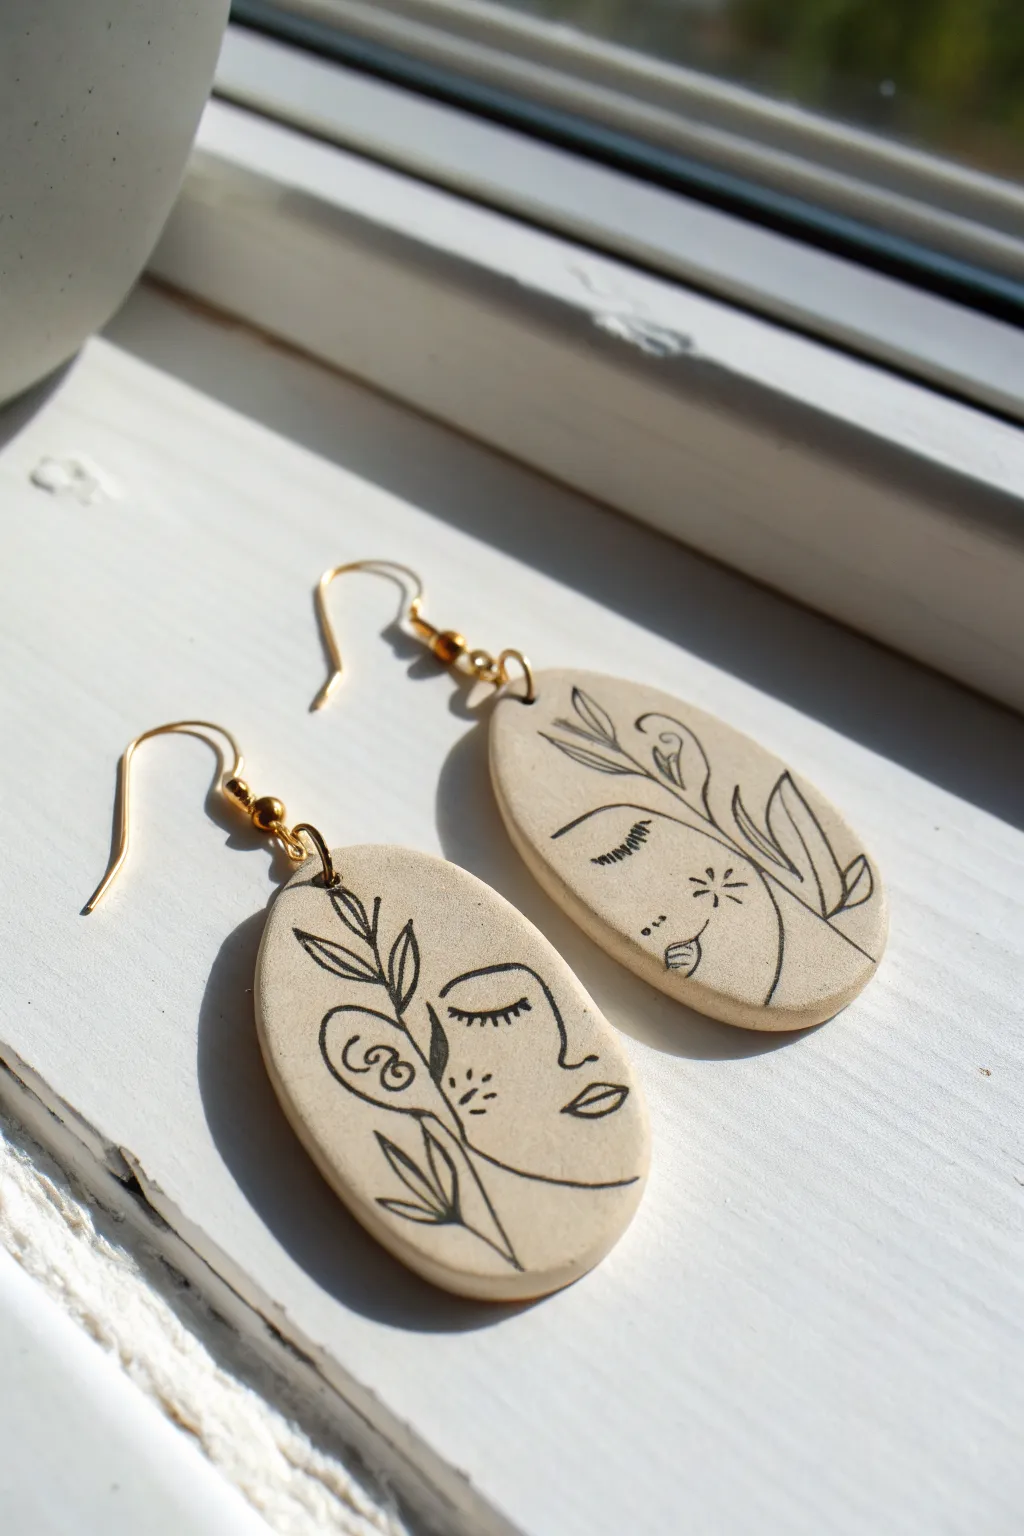
Embrace the minimalism trend with these elegant clay earrings featuring delicate line-drawn faces and botanical elements. Their simple oval shape provides the perfect canvas for creative expression, resulting in a sophisticated, gallery-worthy accessory.
Step-by-Step
Materials
- Air dry clay (white or cream)
- Rolling pin
- Oval clay cutter (medium size)
- Fine grit sandpaper
- Fine tip black permanent marker or archival ink pen
- Sealant (glaze or matte varnish)
- Drill or needle tool
- Jump rings (gold)
- Earring hooks (gold)
- Jewelry pliers
Step 1: Shaping the Clay Base
-
Condition the Clay:
Cut a small block of air dry clay and knead it in your hands until it becomes warm and pliable. This prevents cracking later on. -
Roll It Out:
Using a rolling pin, flatten the clay to an even thickness of about 3-4mm. I like to use depth guides or playing cards on either side to ensure the surface is perfectly flat. -
Cut the Shapes:
Press your oval cutter firmly into the clay to create two identical shapes. If you don’t have a cutter, you can trace a paper template and cut carefully with a craft knife. -
Smooth the Edges:
Dip your finger in a tiny bit of water and run it gently around the raw edges of your ovals to smooth out any roughness. -
Create the Hole:
While the clay is still wet, use a needle tool or a toothpick to poke a small hole near the top center of each oval. Make sure the hole is big enough for your jump rings. -
Dry Completely:
Place the pieces on a clean, flat surface to dry. Allow them to air dry for 24-48 hours, flipping them occasionally to ensure even drying on both sides.
Steady Hands
When drawing the fine lines, anchor your pinky finger on the table surface. This stabilizes your hand and gives you much cleaner, more controlled lines on the small clay canvas.
Step 2: Artistic Details
-
Refine the Surface:
Once fully dry, take your fine grit sandpaper and very lightly sand the edges and surface until they are silky smooth. Wipe away any dust with a damp cloth. -
Plan Your Design:
Before drawing on the clay, sketch your face design on a piece of scrap paper. Notice how the design in the photo uses continuous, fluid lines for the profile and adds leafy sprigs for hair or decoration. -
Pencil Sketch (Optional):
If you are nervous about going straight to ink, lightly sketch your design onto the clay with a pencil. Keep the lines faint so they are easy to erase or cover. -
Ink the Outline:
Using a fine-tip permanent marker or archival ink pen, carefully trace your design. Start with the profile of the face—forehead, nose, and lips—then add the eyes and eyelashes. -
Add Botanical Elements:
Draw the leaves extending from the side of the face or the head. Vary the line weight slightly by pressing harder on the stems and lighter on the leaf tips for a dynamic look. -
Final Details:
Add small whimsical touches like a spiral for an ear, freckles on the cheek, or a simple flower shape near the eye.
Step 3: Assembly and Finish
-
Seal the Artwork:
To protect your drawing from smudging and moisture, apply a thin coat of matte varnish or glaze. Let this layer dry completely according to the manufacturer’s instructions. -
Open the Jump Rings:
Using two pairs of pliers, twist a gold jump ring open sideways (never pull it apart). -
Attach the Earring Hook:
Slide the open jump ring through the hole in the clay piece, then loop the earring hook onto the ring. -
Close the Findings:
Using your pliers, twist the jump ring back into a closed position, ensuring the ends meet perfectly so the clay won’t slip out. -
Repeat for Pair:
Repeat the assembly steps for the second earring to complete your beautiful set.
Ink Bleeding Issues?
If your ink bleeds into the clay, the surface might be too porous. Try sealing the clay with a light coat of matte varnish *before* drawing, let it dry, then draw on top and seal again.
Now you have a stunning pair of custom-designed earrings ready to wear or gift
Air-Dry Clay Color-Block Statement Earrings
Embrace earthy tones and modern geometry with these stunning tiered arch earrings. Featuring a sophisticated color-blocked design with textured finishes, they offer a professional look achievable right at home.
Step-by-Step Tutorial
Materials
- Air-dry clay (white)
- Acrylic paints (mustard yellow, dark slate grey, cream, metallic bronze)
- Rolling pin or clay roller
- Clay cutters (large circle and medium circle) or X-Acto knife
- Sandpaper (fine grit)
- Needle tool or toothpick
- Jump rings (gold)
- Earring hooks (gold)
- Jewelry pliers
- Gloss or matte varnish (optional)
Step 1: Shaping the Clay Components
-
Roll out the base:
Begin by conditioning your air-dry clay until it’s pliable and smooth. Roll it out on a flat, non-stick surface to an even thickness of about 3-4mm. Consistency is key here so the earrings hang evenly. -
Cut the primary arches:
Use your large circle cutter to cut two circles. Then, use a straight blade to slice them in half, creating four large semi-circles. These will form the main body of your tiers. -
Create the inner tiers:
For the layered look, use your smaller round cutter to remove a semi-circle from the center bottom of each large semi-circle. Keep the cutout pieces; you can trim these down to serve as the smaller inner arches, or cut fresh small semi-circles that fit snugly inside the larger ones. -
Pierce joinery holes:
While the clay is still wet, use a needle tool to poke holes for hardware. You need a hole at the very top of the upper arch (for the hook) and holes at the bottom of the upper arch and top of the lower arch to connect them. Ensure the holes are large enough for your jump rings. -
Dry completely:
Place your clay pieces on a clean, flat surface to dry. I prefer to let them sit for at least 24 hours, turning them over halfway through to ensure they dry flat and don’t curl.
Pro Tip: Textured Finish
Before the clay dries, gently press a piece of sandpaper or canvas onto the surface to give the clay a stone-like texture that grabs paint beautifully.
Step 2: Refining and Painting
-
Sand for smoothness:
Once fully cured, gently sand the edges and surfaces with fine-grit sandpaper. Focus on smoothing out any rough cuts from the shaping phase. -
Prime the surface:
Apply a thin base coat of white acrylic paint to all pieces. This seals the clay and ensures your final colors pop true to tone. -
Apply the top arch color:
Paint the large outer arch of your first pair mustard yellow and the other cream/white. Use smooth strokes to avoid brush marks. For the inner small arches of the top tier, paint them a soft cream color to create a subtle contrast. -
Paint the bottom tier:
For the bottom dangling sections, paint the large outer arches a deep slate grey or nearly black. Paint the small inner arches with metallic bronze paint for that elegant shine. -
Seal the work:
After the paint is fully dry, apply a coat of varnish. A matte finish gives a modern ceramic look, while gloss adds durability.
Step 3: Assembly
-
Connect the inner and outer arches:
You can glue the small inner arches inside the larger outer arches for stability, or if you designed them to hang separately, link them with small jump rings. -
Link vertical tiers:
Using your jewelry pliers, open a jump ring and thread it through the bottom hole of the top yellow/white arch and the top hole of the grey bottom arch. Close the ring securely. -
Attach the ear wires:
Open the loop on your earring hook (or use a small jump ring) and attach it to the top hole of the upper arch. Repeat for the second earring. -
Final check:
Hold the earrings up to ensure all pieces hang forward correctly. Twist the jump rings slightly if corrections are needed.
Troubleshooting: Warping
If your clay curls while drying, place a heavy book on top of the pieces (sandwiched between parchment paper) once they are semi-dry but still flexible.
Enjoy wearing your handcrafted statement pieces that look like they came straight from a boutique studio
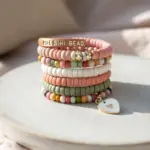
Air-Dry Clay Chunky Bead Necklace
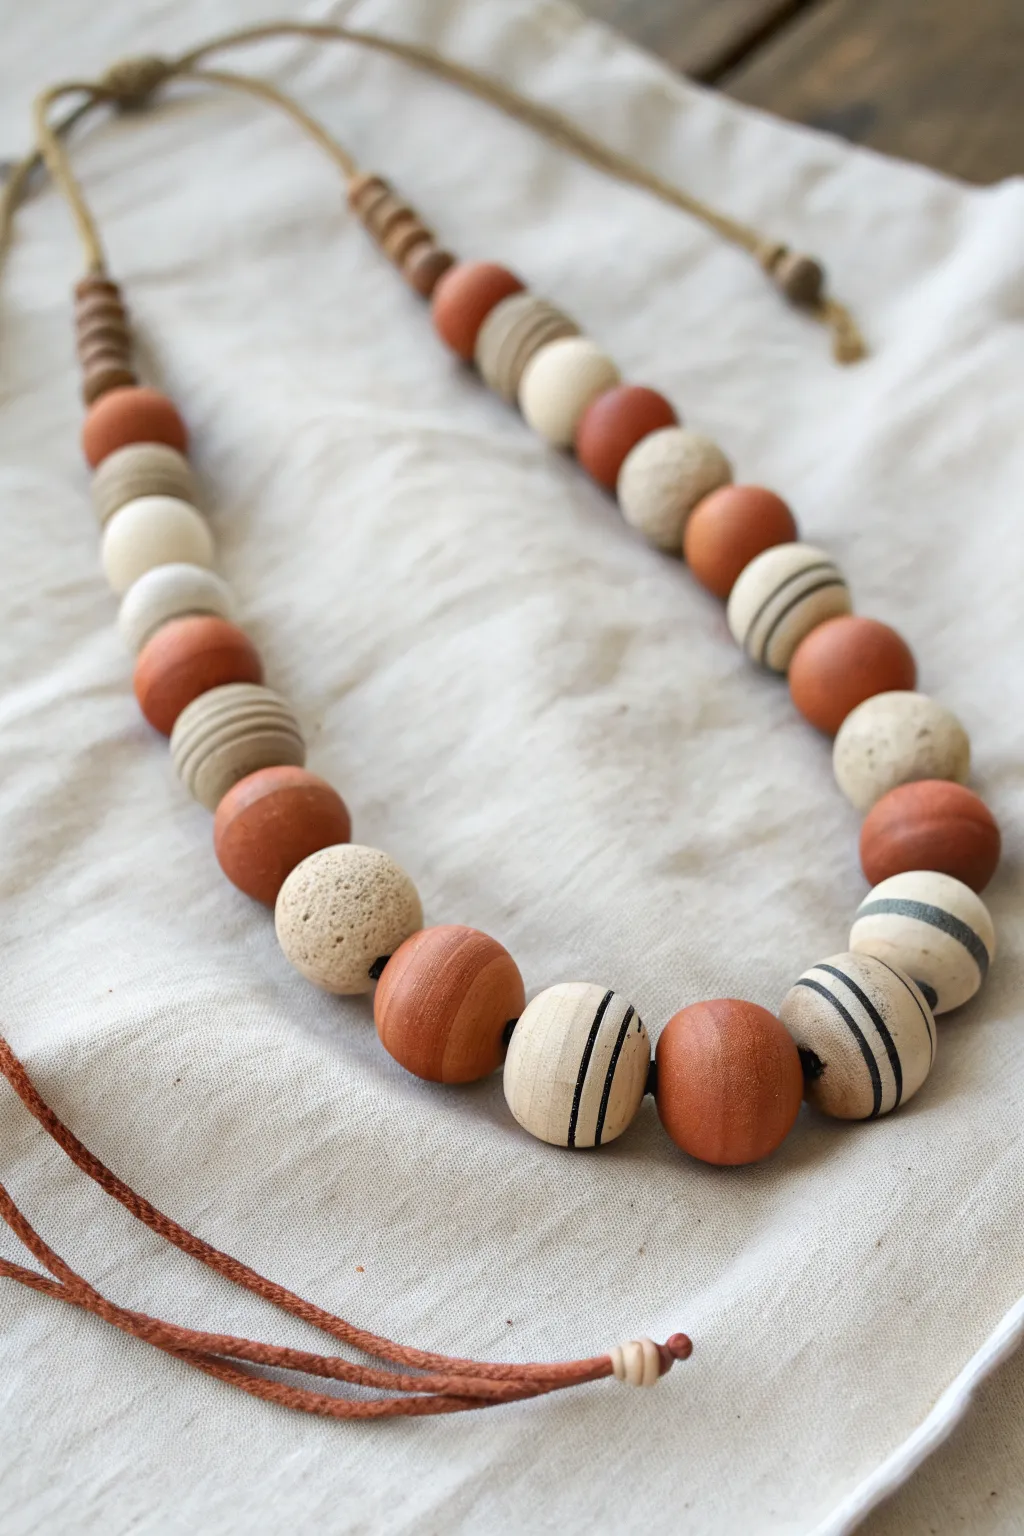
This chunky, earthy necklace combines the rustic charm of terracotta tones with modern graphic stripes for a bold accessory. Using air-dry clay allows you to craft oversized, lightweight beads that look like heavy ceramics without the weight.
Detailed Instructions
Materials
- White or terracotta air-dry clay (or both for easy mixing)
- Acrylic paints (terracotta/burnt sienna, beige/taupe, black, white)
- Paintbrushes (medium flat brush and fine detail brush)
- Wooden skewers or knitting needle (for piercing beads)
- Fine-grit sandpaper
- Waxed cotton cord or leather cord (brown or tan)
- Matte varnish or sealant
- Old toothbrush (optional, for texturing)
- Ruler
Step 1: Shaping the Beads
-
Prepare your clay:
Condition your air-dry clay by kneading it until it is smooth and pliable. If you want a uniform size, roll the clay into a log and slice it into equal segments before rolling. -
Roll the main rounds:
Create about 20-25 spherical beads. Aim for a mix of sizes: large focal beads (approx. 2.5cm/1 inch diameter) for the center, tapering down to smaller beads (1cm) for the ends near the clasp. -
Create spacer beads:
Roll tiny amounts of clay into small discs or flattened ovals. These will act as spacers near the neckline, adding visual rhythm to the strand. -
Pierce the holes:
While the clay is still wet, gently twist a skewer or knitting needle through the center of each bead. Ensure the hole is wide enough for your chosen cord to pass through twice if needed for knots. -
Add texture:
For the beige/speckled beads shown in the photo, gently tap the surface of the wet clay with an old toothbrush or a piece of rough sandpaper to create a stone-like pitted texture. -
Smooth the surface:
For the beads intended to be painted with stripes or solid colors, dip your finger in a little water and smooth out any fingerprints or cracks. -
Dry thoroughly:
String the beads loosely on a skewer (propped up between two objects) or lay them on a wire rack. Let them dry for 24-48 hours. Turn them occasionally to ensure even drying.
Step 2: Painting & Decorating
-
Sand imperfections:
Once fully cured, use fine-grit sandpaper to buff away any rough spots, especially around the bead holes. -
Paint the base coats:
Divide your beads into color groups. Paint about a third of them in a rich terracotta/burnt sienna. Paint another third in a creamy white, and the remaining textured beads in a warm beige or taupe. -
Create the speckled stone look:
On the dry beige beads, load an old toothbrush with slightly watered-down brown or grey paint. Run your thumb over the bristles to flick tiny speckles onto the bead surface. -
Paint the stripes:
Using a very fine detail brush or a black paint pen, carefully draw thin, parallel lines around the circumference of selected white or cream beads. Rotate the bead on a skewer to help keep the line straight. -
Seal the beads:
Apply a coat of matte varnish to all beads. I prefer matte over gloss here to maintain that natural, ceramic aesthetic. Let this dry completely before assembly.
Clean Lines Hack
To get perfectly straight stripes on round beads, put the bead back on the skewer and spin the skewer while holding your brush steady against the surface.
Step 3: Assembly
-
Measure the cord:
Cut a length of cord approximately 35-40 inches long. This generous length allows for adjustable knotting or tying the necklace at different lengths. -
Plan the layout:
Lay your finished beads out on a table to finalize the pattern. A symmetrical design works best, placing the largest striped or terracotta beads in the center and working outwards with alternating colors. -
String the beads:
Thread the beads onto the cord according to your layout. If the holes are tight, wrap a piece of tape around the cord end to create a makeshift needle. -
Secure the ends:
Once strung, tie a simple overhand knot after the last bead on each side to keep them centered. You can finish the necklace with a sliding knot closure for adjustability or simple loops.
Natural Texture
Mix dried coffee grounds or fine sand directly into the beige clay before rolling. This creates an authentic ‘stone’ texture that runs all the way through.
Wear your new statement piece over a linen top or simple dress to let those earthy textures shine
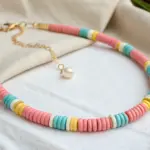
Air-Dry Clay Flat Disc Bead Choker
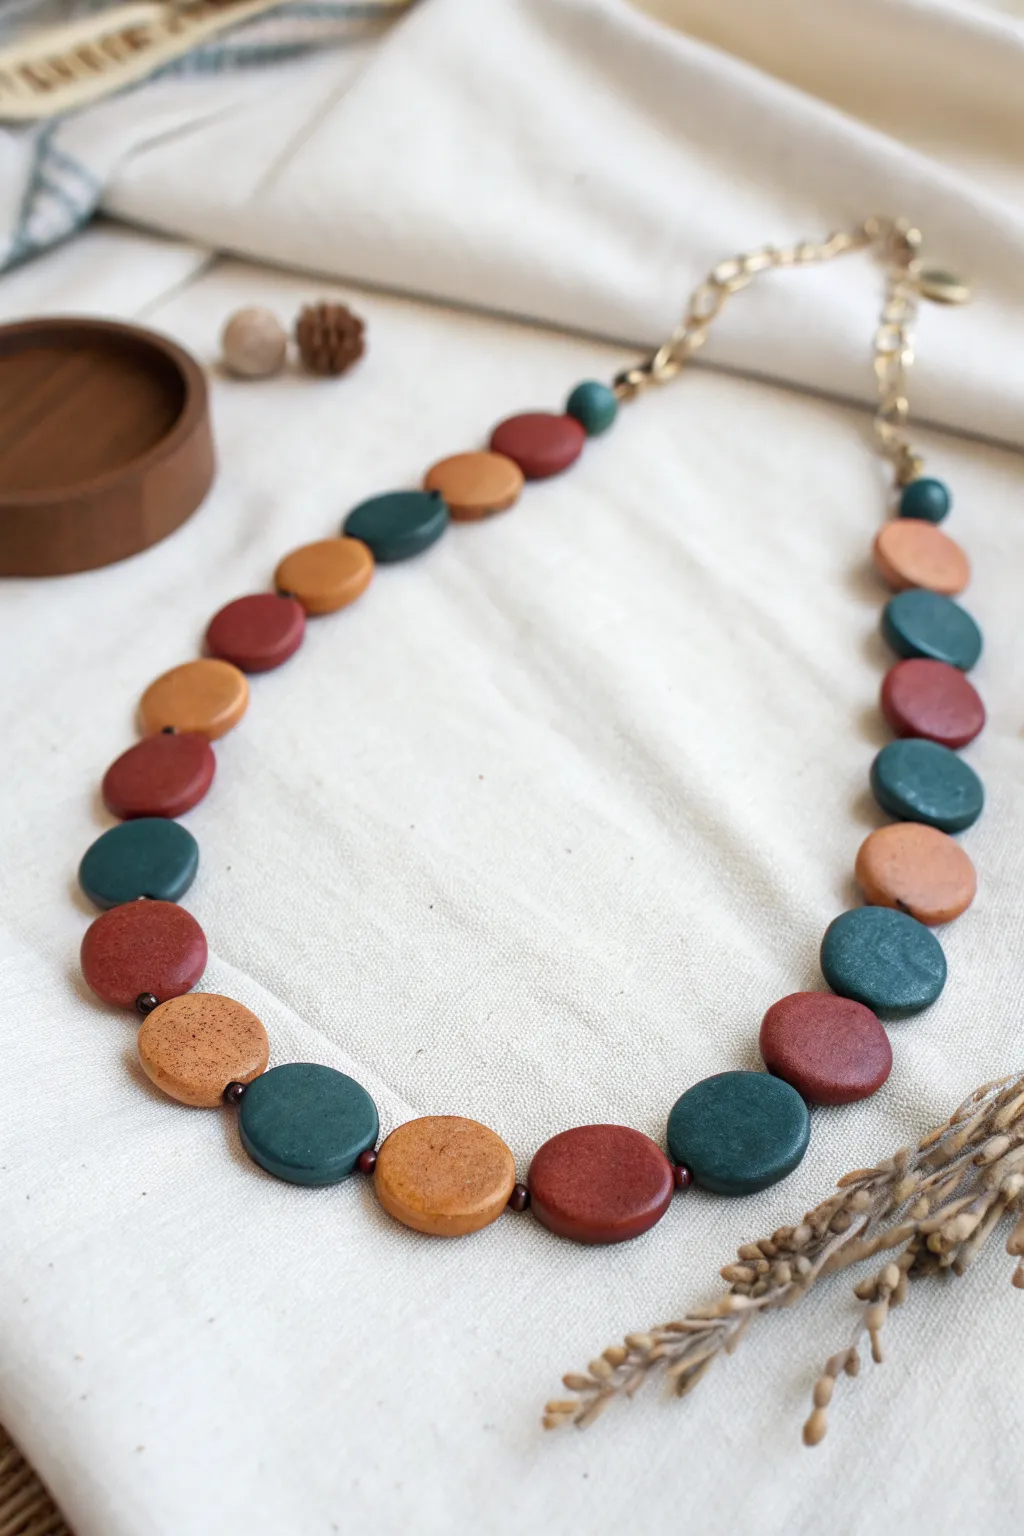
Embrace earthy elegance with this handcrafted choker featuring smooth, disc-shaped beads in a warm autumn palette. The matte finish and organic imperfections give each bead a unique, artisan feel that pairs beautifully with simple gold hardware.
Step-by-Step
Materials
- Air-dry clay (white or terracotta)
- Acrylic paints (deep teal, burnt ochre/mustard, terra cotta red)
- Clay roller or rolling pin
- Small circular clay cutter (approx. 1.5 cm diameter) or a bottle cap
- Toothpick or bead reamer
- Fine-grit sandpaper (400-600 grit)
- Small flat paintbrush
- Matte spray varnish or sealant
- Beading wire or nylon cord
- Small spacer beads (bronze or dark wood)
- Gold chain extender and lobster clasp
- Crimp beads and crimping pliers
- Parchment paper or silicone mat
Step 1: Shaping the Clay Discs
-
Condition the Clay:
Begin by taking a chunk of your air-dry clay and kneading it in your hands until it becomes soft, pliable, and free of cracks. -
Roll the Sheet:
Place the clay on a silicone mat or parchment paper. Use a roller to flatten it into an even sheet, aiming for a consistent thickness of about 3 to 4 millimeters. -
Cut Out Shapes:
Using your small circular cutter, punch out as many discs as you need. For the necklace shown, you’ll want approximately 25 to 30 discs. -
Smooth the Edges:
Dip your finger in a tiny bit of water and gently run it around the circumference of each cut disc to smooth out any sharp or jagged edges left by the cutter. -
Pierce the Holes:
While the clay is still wet, carefully insert a toothpick through the center of each disc to create the bead hole. Gently rotate the toothpick to ensure a clean opening. -
Check the Hole Size:
I usually like to poke the hole from the front, flip the bead, and poke again from the back to ensure the opening is uniform and won’t close up during drying. -
Initial Drying:
Lay all the beads flat on a piece of parchment paper to dry. Let them sit for at least 24 hours, flipping them over halfway through so both sides dry evenly.
Uneven Edges?
If your discs warp while drying, place a heavy book on top of them (with parchment paper in between) once they are semi-dry but still slightly flexible.
Step 2: Refining and Painting
-
Sand for Smoothness:
Once fully cured, use fine-grit sandpaper to buff the surface of each bead. Focus on the edges to achieve that polished, stone-like quality. -
Clean the Dust:
Wipe each bead with a slightly damp cloth or a dry soft brush to remove all sanding dust before you begin painting. -
Mix Your Palette:
Prepare your acrylic paints. You want a distinct trio: a deep forest teal, a warm mustard yellow (try mixing yellow with a touch of brown), and a muted brick red. -
Paint the Base Coat:
Paint the beads in batches. Hold a bead by inserting a toothpick into the hole to paint all sides without getting fingerprints on the wet surface. -
Add a Second Coat:
Air-dry clay is porous, so a second coat is usually necessary to get that solid, opaque color coverage seen in the final piece. -
Seal the Finish:
To protect the paint and give it a professional finish, coat each bead with a matte spray varnish. Avoid glossy finishes if you want to replicate the earthy look in the photo.
Speckled Stone Look
Dip an old toothbrush in diluted brown paint and gently flick it over the dried, painted beads to create a faux-stone speckled texture.
Step 3: Assembly
-
Plan the Pattern:
Lay your finished beads out on a table to design your sequence. The example uses a repeating pattern of Teal, Mustard, Red, continuing along the strand. -
String the Beads:
Cut a length of beading wire. Thread the beads in your chosen order, placing a tiny dark spacer bead between each clay disc to help them lay flat and articulate well. -
Attach the Clasp:
Slide a crimp bead onto one end of the wire, followed by the gold chain extender. Loop the wire back through the crimp bead and use your pliers to flatten it securely. -
Secure the Other End:
Repeat the crimping process on the other end, attaching the lobster clasp. Trim any excess wire close to the crimp bead for a neat finish.
Wear your new statement piece with pride knowing you sculpted it from scratch
Air-Dry Clay Diffuser Pendant
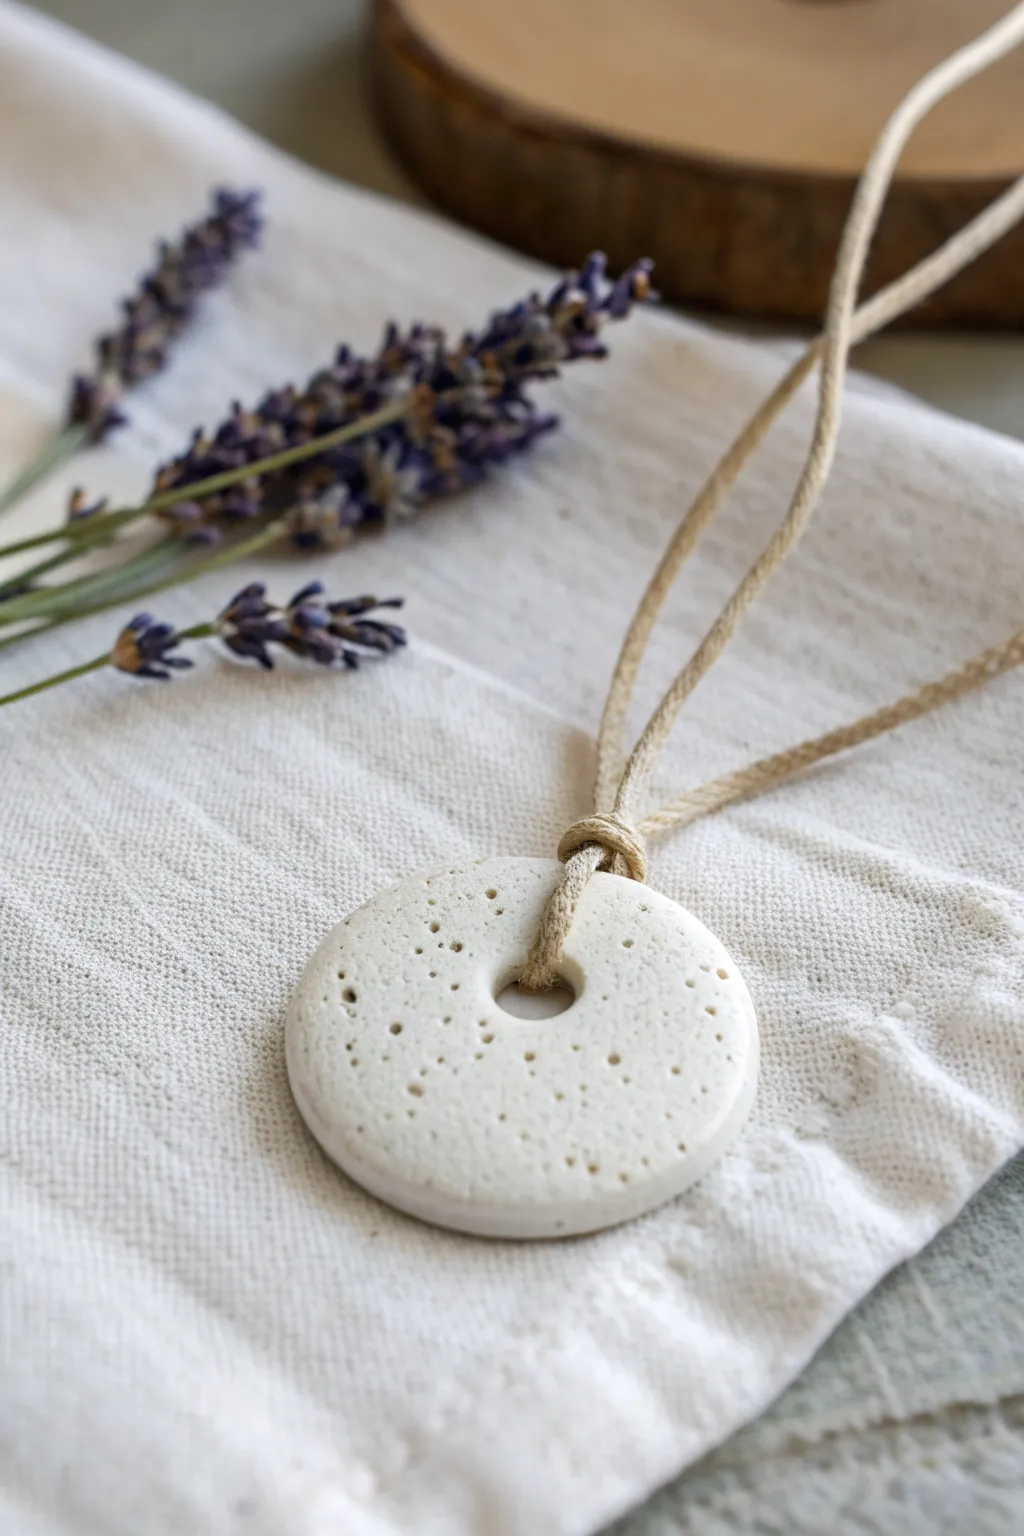
This minimalist pendant combines rustic charm with functional aromatherapy. Using the natural porosity of air-dry clay, this textured donut shape acts as a wearable diffuser for your favorite essential oils.
Step-by-Step Guide
Materials
- White polymer or air-dry clay (stone effect optional)
- Small round cookie cutter or a glass
- Straw or small piping tip (for the center hole)
- Toothpick, needle, or stiff toothbrush
- Fine-grit sandpaper (400-600 grit)
- Beige or oatmeal-colored cotton or hemp cord
- Rolling pin
- Parchment paper
Step 1: Shaping the Clay
-
Condition the Clay:
Begin by kneading a small ball of white clay in your hands until it becomes soft, pliable, and free of cracks. Warmth from your hands helps condition it. -
Roll it Out:
Place the clay between two sheets of parchment paper to prevent sticking. Roll it out to an even thickness of about 1/4 inch (6mm). You don’t want it too thin, or it might become brittle. -
Cut the Circles:
Using your main circle cutter, press firmly into the clay to create the outer shape. Gently wiggle it to release. -
Create the Donut Hole:
Take your straw or small piping tip and press it directly into the center of the clay circle to create the aperture for the cord. -
Smooth the Edges:
Dip your finger in a tiny bit of water and run it gently around the cut edges to soften any sharp ridges left by the cutter.
Natural Speckles
Mix a tiny pinch of dried tea leaves, coffee grounds, or black pepper into the white clay before rolling to create a speckled, faux-ceramic look naturally.
Step 2: Texturing
-
Prepare the Texture Tool:
For that porous, coral-like look, you’ll need something sharp. A toothpick or a thick needle works perfectly. -
Add Stippling:
Hold the tool vertically and gently poke the surface of the clay repeatedly. Vary the depth and spacing of the holes to keep it looking organic. -
Refine the Texture:
Personally, I find that clustering some dots closer together and leaving other areas smoother creates a more natural, stone-like aesthetic. -
Check the Back:
Flip the pendant over carefully. If the texture has distorted the shape, gently press it flat again with your palm.
Cracking Issues?
If small cracks appear while drying, mix a tiny bit of clay with water to make a paste (slip) and fill the cracks, then smooth over with a finger.
Step 3: Finishing and Assembly
-
Drying Phase:
Let the clay dry completely according to the package instructions. This usually takes 24-48 hours. Flip it halfway through to ensure even drying. -
Sand for Smoothness:
Once bone dry, take your fine-grit sandpaper and lightly buff the edges and flat surfaces. Be careful not to sand away your texture. -
Seal (Optional but Specific):
Since this is a diffuser, do NOT seal the textured front with varnish, as the clay needs to remain porous to absorb oil. You can lightly seal the back if it will touch skin directly. -
Prepare the Cord:
Cut a length of hemp or cotton cord, approximately 24-30 inches long depending on where you want the pendant to sit. -
Create the Lark’s Head Knot:
Fold the cord in half. Push the loop end through the pendant’s center hole from front to back. -
Secure the Pendant:
thread the two loose ends of the cord through the loop you just pushed through, and pull tight to secure the pendant. -
Add the Top Knot:
To mimic the image, tie a simple overhand knot with both cords together, positioning it about half an inch above the pendant itself. -
Infuse with Scent:
Place 1-2 drops of essential oil (like lavender) onto the textured surface and let it soak in before wearing.
Enjoy the calming scent that follows you throughout your day with this simple piece
Air-Dry Clay Personalized Initial Tags
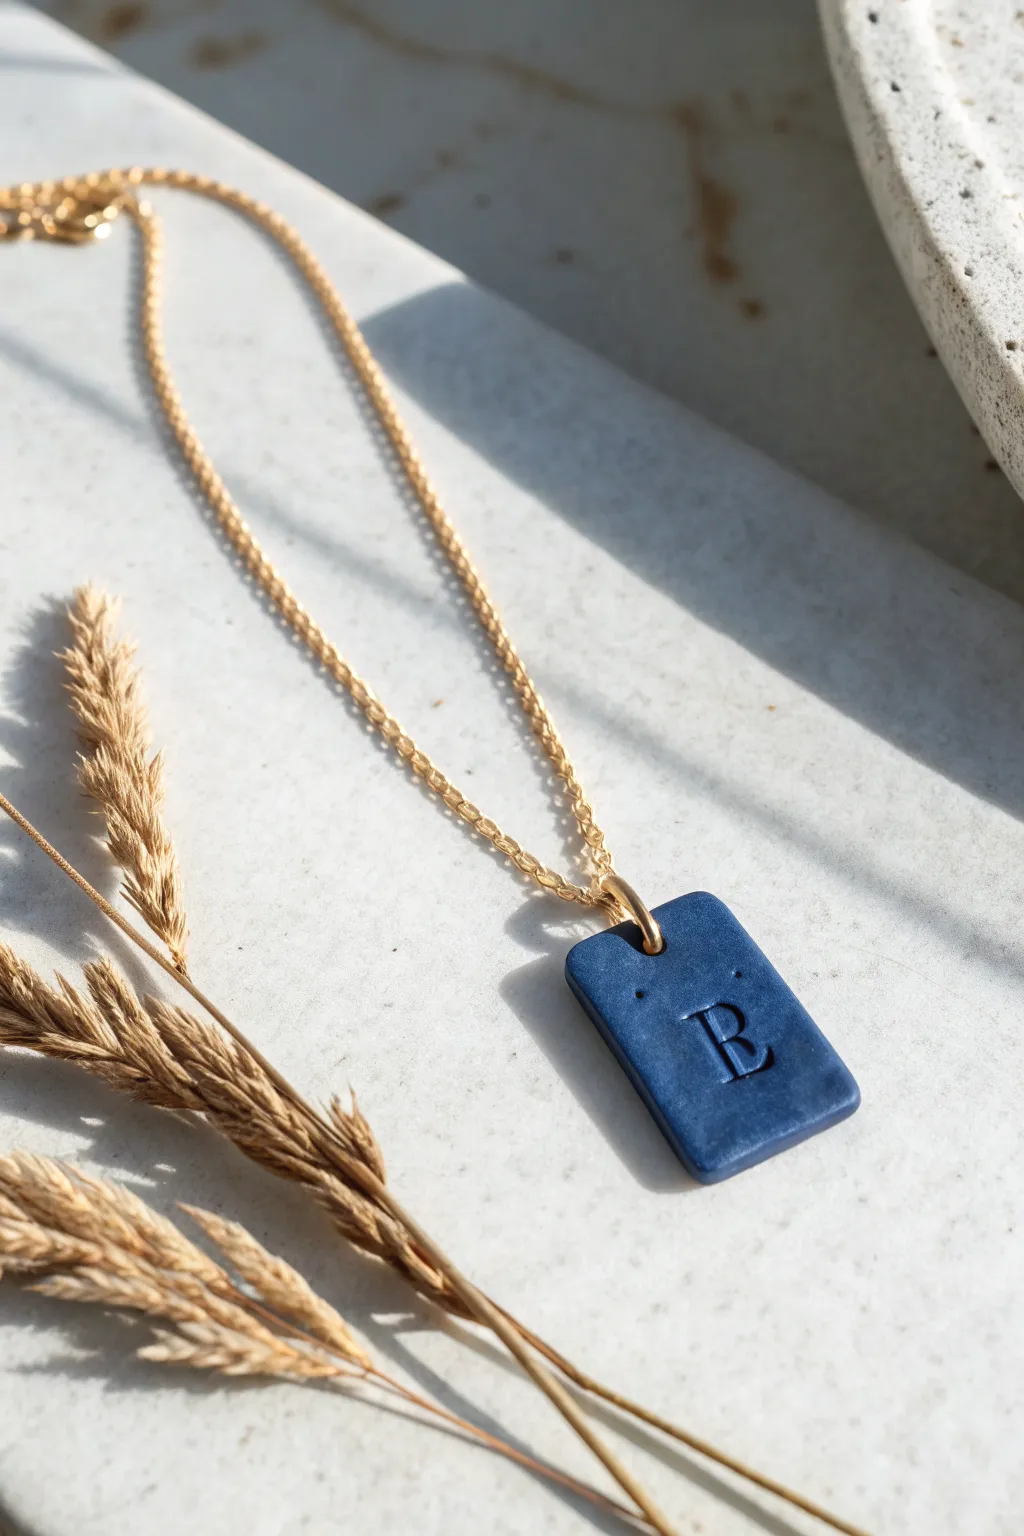
Create a sophisticated, minimalist statement piece with this deep blue initial pendant. Despite its high-end boutique look, this personalized tag is surprisingly simple to craft, combining the matte elegance of air-dry clay with a classic gold chain.
How-To Guide
Materials
- White or pre-colored blue air-dry clay
- Rolling pin or smooth glass jar
- Rectangle clay cutter or craft knife
- Letter stamp set (serif font preferably)
- Sandpaper (fine grit)
- Navy blue acrylic paint (if using white clay)
- Matte sealant or varnish
- Jump ring (gold)
- Fine jewelry chain (gold)
- Toothpick or small drill bit
- Small pliers
Step 1: Shaping the Tag
-
Condition the clay:
Begin by kneading a small amount of air-dry clay in your hands. You want it warm and pliable to prevent cracking later. -
Roll it out:
On a smooth, clean surface, roll the clay out to a uniform thickness, ideally about 3-4mm. If you want it perfectly even, use playing cards as depth guides on either side. -
Cut the shape:
Using a small rectangular clay cutter, press firmly into the clay to create your tag base. Alternatively, you can hand-cut a rectangle using a ruler and a craft knife for sharp edges. -
Smooth the edges:
Dip your finger in a tiny bit of water and gently run it along the cut edges of the rectangle to soften any sharpness or stray clay bits. -
Create the hole:
Use a toothpick or a small straw to pierce a hole at the top center of the rectangle. Ensure the hole is large enough to fit your jump ring, bearing in mind the clay might shrink slightly as it dries.
Stamp Stuck?
If your stamp pulls the clay up when you lift it, dust the stamp face lightly with cornstarch or dip it in water before pressing it into the clay.
Step 2: Stamping and Finishing
-
Position the stamp:
Select your desired letter stamp. Hover it over the bottom center of the rectangle to gauge placement before committing. -
Make the impression:
Press the stamp straight down into the clay with firm, even pressure. Don’t wiggle it, or the impression will blur. Lift straight up to reveal the letter. -
Dry completely:
Place the piece on a clean sheet of paper or a drying rack. Let it air dry for at least 24-48 hours. I like to flip it over halfway through the drying process to ensure it stays flat. -
Refine the surface:
Once fully hard, inspect the edges. Use very fine-grit sandpaper to gently buff away any remaining roughness or fingerprints. -
Apply color:
If you used white clay, paint the entire pendant with navy blue acrylic paint. Use multiple thin coats rather than one thick one for a smooth finish, letting it dry between layers. -
Paint the initial:
Ensure the paint gets into the deep recesses of the stamped letter. If you want the letter to be darker, you can do a second pass just in the groove. -
Seal the piece:
Apply a coat of matte varnish or sealant. This protects the clay from moisture and gives it that professional, non-shiny finish seen in the photo.
Make it Luxe
After the blue paint dries, use a tiny detail brush to paint inside the stamped letter with liquid gold leaf for a striking, elegant contrast.
Step 3: Assembly
-
Open the jump ring:
Using two pairs of pliers (or pliers and your fingers), twist the gold jump ring open sideways—never pull it apart outwards. -
Attach to pendant:
Loop the open jump ring through the hole you created in the clay tag. -
Add the chain:
Before closing the ring, slide your gold chain into the open jump ring. -
Close the ring:
Twist the jump ring back into a closed position, ensuring the two ends meet perfectly flush so the chain doesn’t slip out.
This personalized pendant makes for a thoughtful handmade gift or a lovely addition to your own jewelry rotation
Air-Dry Clay Tassel Drop Earrings
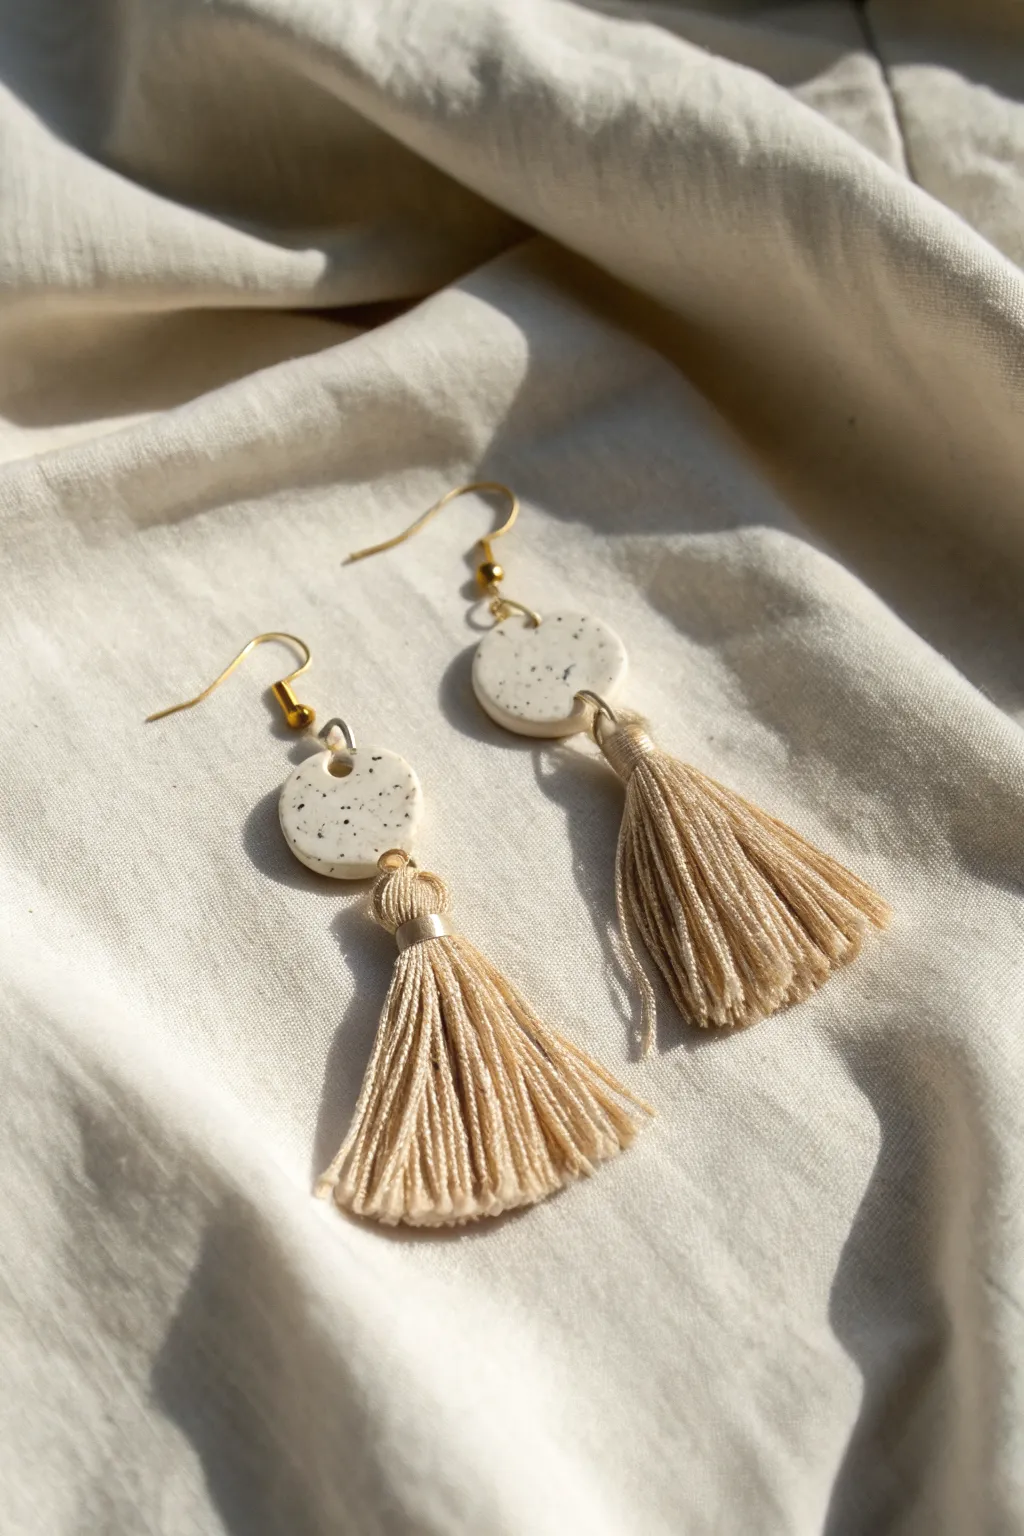
Embrace a relaxed bohemian vibe with these lovely mixed-media earrings that combine the rustic charm of speckled clay with soft, flowing tassels. The minimal cream and beige color palette makes them a versatile accessory for any outfit.
Step-by-Step Tutorial
Materials
- White or cream air-dry clay (small amount)
- Black acrylic paint
- Old toothbrush or stiff bristle brush
- Small circular clay cutter (approx. 1.5 cm)
- Beige or oatmeal embroidery floss or thin cotton yarn
- Gold earring hooks
- Gold jump rings (6-8mm)
- 24-gauge gold craft wire
- Rolling pin or smooth glass jar
- Toothpick or needle tool
- Cardboard (approx. 5cm wide)
- Fine-grit sandpaper
- High-gloss varnish or sealant (optional)
- Jewelry pliers
- Scissors
Step 1: Crafting the Clay Discs
-
Prepare the clay:
Begin by conditioning a small ball of white air-dry clay in your hands until it is soft, pliable, and free of cracks. -
Roll it out:
Place the clay on a smooth, non-stick surface and roll it out evenly to a thickness of about 3mm. You want it substantial enough to hold the hardware but not too heavy. -
Cut the shapes:
Use your small circular cutter to punch out two identical discs. If you don’t have a cutter, you can trace a bottle cap and cut around it with a craft knife. -
Smooth the edges:
Dip your finger in a tiny bit of water and gently run it around the circumference of each disc to smooth out any rough cutting lines. -
Create the holes:
Using a toothpick or needle tool, pierce a hole near the top edge and another directly opposite near the bottom edge of each disc. Ensure the holes are large enough for your jump rings to move freely. -
Create the speckle effect:
In a small dish, water down a drop of black acrylic paint until it’s very fluid. Dip an old toothbrush into this mixture. -
Splatter paint:
Hold the toothbrush over your clay discs and run your thumb across the bristles to flick tiny specks of paint onto the wet clay. I find practicing on a scrap piece of paper first helps control the splatter size. -
Dry thoroughly:
Set the discs aside in a safe, dust-free place to dry completely. This usually takes 24-48 hours depending on humidity; turn them over halfway through for even drying.
Splatter Control
To prevent giant blobs of black paint ruining your work during the splatter phase, tap the excess paint off the toothbrush onto a paper towel before flicking it over the clay.
Step 2: Making the Tassels
-
Start wrapping:
While the clay dries, take your piece of cardboard (about 5cm wide) and wrap your beige embroidery floss around it approximately 30-40 times for a nice full tassel. -
Secure the top:
Cut a separate 10cm piece of floss. thread it under the wrapped bundle at one end of the cardboard and tie it tightly with a double knot. Leave these ends long for now. -
Cut the loops:
Slide the bundle off the cardboard. Use sharp scissors to cut through the loops at the end opposite your knot. -
Create the neck:
Cut another piece of floss or a 3-inch piece of gold wire. Wrap it tightly around the tassel bundle, about 1cm down from the top knot, to create the ‘head’ of the tassel. -
Trim evenly:
Comb through the strands with your fingers and trim the bottom straight across to your desired length. Repeat these steps to make a second identical tassel.
Make it Metallic
Instead of using thread to bind the ‘neck’ of the tassel, use gold jewelry wire wrapped 4-5 times. It adds a professional hardware finish that matches the hooks.
Step 3: Assembly
-
Refine the clay:
Once dry, lightly sand the edges of your clay discs with fine-grit sandpaper if there are any lingering rough spots. -
Seal (optional):
Apply a coat of varnish if you want a glossy finish like the example image, or leave them matte for a raw ceramic look. -
Attach the tassel:
Open a gold jump ring using two pliers (twist, don’t pull). looped it through the top tie of your tassel and the bottom hole of a clay disc, then close securely. -
Add the hook:
Open the loop on your earring hook (or use a second jump ring) and attach it to the top hole of the clay disc. -
Final check:
Repeat for the second earring and ensure all jump rings are closed tightly so nothing slips out.
Enjoy the gentle sway of your new handmade earrings as you wear them out and about
Air-Dry Clay Faux Stone Beads
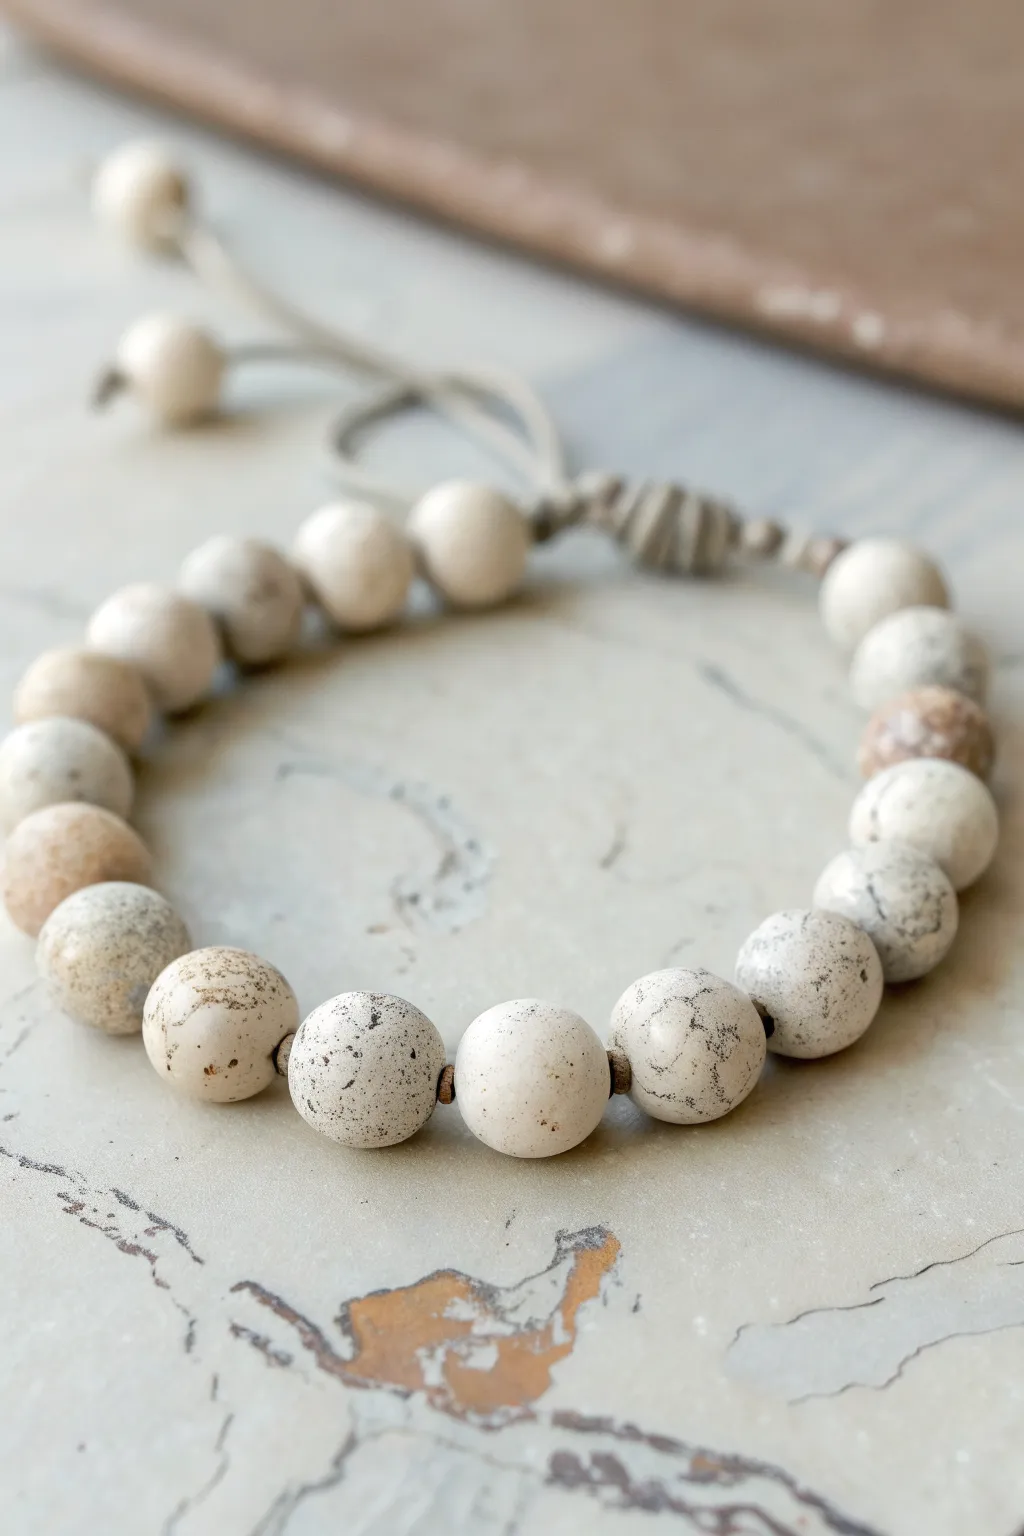
Achieve the high-end look of natural dalmatian jasper or speckled ceramic with nothing more than air-dry clay and some paint. This project focuses on realistic stone effects, creating a neutral, earthy accessory that looks beautiful with everything.
Step-by-Step
Materials
- White air-dry clay (fine grain)
- Acrylic paints: Black, burnt umber, beige/tan
- Toothbrush (an old one is perfect)
- Bamboo skewers or thick toothpick
- Fine grit sandpaper (400-600 grit)
- Matte varnish or sealant
- Elastic cord or waxed cotton cord
- Small loose mixing surface or cardboard
Step 1: Shaping the Clay Base
-
Portion the clay:
Begin by pulling off small, uniform chunks of white air-dry clay. Aim for about the size of a large pea or small marble for each bead. You will need roughly 18-22 pieces for a standard wrist size. -
Roll spheres:
Roll each chunk of clay firmly between your palms. Apply gentle pressure initially to compact the clay, then lighten your touch to smooth out any creases until you have a perfect sphere. -
Create variation:
To mimic natural stone, mix a tiny drop of beige or tan paint into the raw clay for just a few of the beads before rolling. Don’t overmix; a marbled or slightly off-white look adds realism. -
Piercing the holes:
While the beads are still soft, carefully push a bamboo skewer through the center of each sphere. Use a gentle twisting motion to avoid squashing the round shape. Wiggle the skewer slightly to ensure the hole is wide enough for your cord. -
Drying setups:
Leave the beads on the skewers and prop them up across a bowl or box edge so they touch nothing while drying. Let them dry completely, which usually takes 24-48 hours depending on humidity.
Wet Finger Smoothing
Before drying, dip your finger in water and gently rub the clay surface. This creates a slurry that fills cracks better than sanding later.
Step 2: Creating the Stone Effect
-
Refining the shape:
Once fully dry, remove the beads from the skewers. I like to gently rub each bead with fine-grit sandpaper to remove any fingerprints or imperfections. -
Prepare the speckling station:
Lay down newspaper or work inside a cardboard box to contain the mess. Dilute a small amount of black acrylic paint with water until it’s quite fluid, like ink. -
The splatter technique:
Dip just the tips of your toothbrush bristles into the watery black paint. Hold the brush over your beads and run your thumb briskly across the bristles to flick tiny specks of paint onto the clay surfaces. -
Second color speckling:
Repeat the previous step with diluted burnt umber paint. The mix of black and brown specks creates depth and mimics the mineral inclusions found in real stone. -
Rotate and repeat:
Let the first side dry for a few minutes, then roll the beads over to expose the undersides. Splatter again until you have even coverage on all surfaces. -
The wash effect (optional):
For a more weathered look, wipe a very watery wash of tan paint over a few random beads and immediately wipe it off with a paper towel. This leaves pigment in the tiny pores of the clay.
Step 3: Final Assembly
-
Sealing the beads:
Thread the beads back onto skewers or toothpicks. Apply a coat of matte varnish. Matte is crucial here—glossy finishes will make them look like plastic rather than stone. -
Threading the bracelet:
Once the varnish is dry, arrange your beads. Mix the beige-tinted beads randomly among the white ones for a natural rhythm. Thread them onto your chosen cord. -
Securing the knot:
If using elastic, tie a surgeon’s knot and secure with a dab of superglue. If using cord as shown in the photo, create an adjustable sliding knot closure for a more rustic finish. -
Optional cord ends:
For the finishing touch seen in the image, tie two smaller clay beads at the very ends of your adjustment cords to prevent the knot from slipping through.
Add Real Texture
Mix dried coffee grounds or fine sand directly into your white clay before rolling. This adds genuine grit and texture that paint alone can’t achieve.
Enjoy styling your new faux-stone bracelet with your favorite neutral outfits
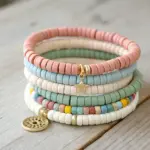
Air-Dry Clay Hollow Tube Bead Bracelet
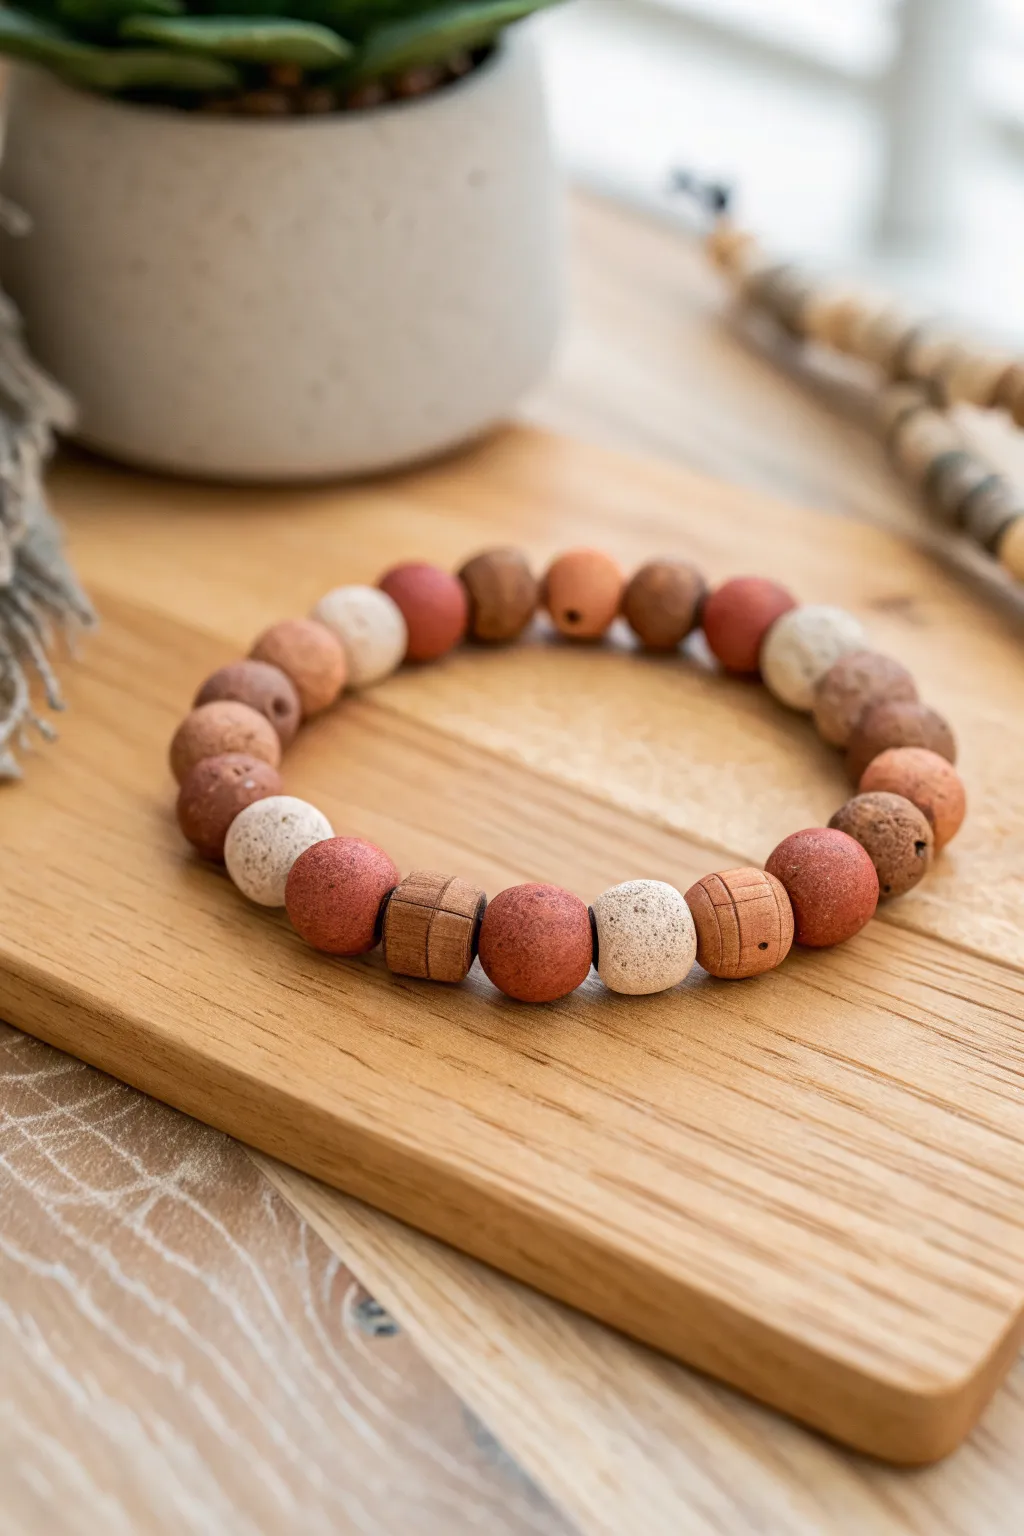
Embrace organic textures and warm, earthy tones with this rustic air-dry clay bracelet. Combining classic round beads with uniquely grooved tube shapes creates a piece that feels both grounded and stylishly handmade.
Step-by-Step Tutorial
Materials
- Air-dry clay (white or terracotta color)
- Acrylic paints (terracotta, burnt sienna, dark brown, off-white, beige)
- Elastic jewelry cord
- Skewers or toothpicks (for making bead holes)
- Sandpaper (fine grit)
- Sculpting tool or needle tool (for grooves)
- Glazing medium or matte varnish (optional)
- Paintbrushes
- Rolling pin (optional)
Step 1: Shaping the Beads
-
Prepare the workspace:
Lay down parchment paper or a silicone mat to prevent the clay from sticking to your work surface. -
Roll spherical beads:
Pinch off small amounts of clay and roll them between your palms to create spheres. Aim for a size just under half an inch in diameter. -
Create size irregularities:
Make about 15-20 round beads, allowing slight variations in size to maintain an organic, handmade look. -
Form the tube beads:
Roll a small cylinder of clay and slice it into short segments, roughly equal in width and length to resemble thick washers or short tubes. -
Add texture to tubes:
Using a needle tool or the edge of a credit card, press vertical and horizontal grooves into the side of the tube beads to create a segmented or ‘grid’ effect. -
Pierce the holes:
Carefully push a skewer or toothpick through the center of each bead. Rotate the skewer as you push to keep the hole clean and the bead shape intact. -
Dry partially:
Let the beads sit for about 30 minutes until the exterior is less tacky but not fully hard. -
Re-shape holes:
Give the skewer another gentle twist inside each bead to ensure the clay hasn’t shrunk and closed the opening.
Clean Holes Tip
When piercing the beads, twist the toothpick continuously while pushing through. This prevents the bead from squashing into an oval shape.
Step 2: Coloring and Finishing
-
Full drying time:
Allow the beads to dry completely for 24-48 hours, depending on humidity and clay thickness. They should feel light and hard. -
Smooth the imperfections:
Use fine-grit sandpaper to gently buff away any sharp ridges or fingerprints, especially around the hole openings. -
Mix earthy tones:
Create a palette of natural colors: deep rust, light sand, muted brown, and terra cotta. If your clay was already colored, you can skip full coverage painting. -
Apply the base coat:
Paint the beads individually. Placing them back on a skewer makes painting all sides easier without getting messy fingers. -
Create a speckled effect:
For the lighter beige beads, use an old toothbrush to lightly flick minute specks of brown paint onto the surface for a stone-like texture. -
Highlight the grooves:
For the tube beads, paint them a wood-tone brown and then use a darker wash in the grooves to make the texture pop. -
Seal (Optional):
If you want durability, apply a coat of matte varnish. I find leaving them unvarnished keeps that lovely raw ceramic feel, but a sealer protects against moisture.
Scent Diffuser Upgrade
Leave the clay unsealed and apply a drop of essential oil to the porous beads. Your bracelet will act as a personal aroma diffuser all day.
Step 3: Assembly
-
Measure the cord:
Cut a length of elastic cord about 10 inches long so you have plenty of room to tie knots. -
String the beads:
Thread the beads onto the elastic, alternating colors and shapes. Try placing the textured tube beads between groups of colored spheres for visual balance. -
Check the fit:
Wrap the strand around your wrist to ensure it isn’t too tight; add or remove a bead if necessary. -
Secure the bracelet:
Tie a strong surgeon’s knot (right over left, left over right) and pull tight. Add a dab of clear glue to the knot before trimming the excess cord.
Enjoy wearing your new accessory that perfectly balances nature-inspired tones with modern geometry
Air-Dry Clay Articulated Kinetic Earrings

Embrace earthy tones and geometric charm with these articulated dangle earrings, featuring cascading semi-circles and delicate teardrops. The kinetic movement of the jump rings gives them a playful sway, while the matte finish mimics the look of high-end ceramic jewelry.
Detailed Instructions
Materials
- Air-dry clay (white or pre-colored)
- Acrylic paints (Teal/Dark Turquoise, Terracotta/Burnt Orange, Mustard Yellow)
- Rolling pin or clay roller
- Circle cutters (approx. 2cm or 0.75 inch diameter)
- Small teardrop cutter or craft knife
- Sandpaper (fine grit, 400-600)
- Hand drill or needle tool used for piercing
- Gold jump rings (6mm or 7mm)
- Gold earring hooks (fishhook style)
- Jewelry pliers (flat nose and round nose)
- Matte varnish or sealant (optional)
Step 1: Shaping the Clay Components
-
Condition the Clay:
Start by kneading your air-dry clay thoroughly until it is soft, pliable, and free of cracks. If you are mixing paint directly into white clay for a solid color effect, do this now, or plan to paint the surface later. -
Roll It Out:
Roll the clay into an even slab, approximately 3mm thick. I like to use depth guides or playing cards on either side of the roller to ensure the thickness is perfectly consistent across the whole slab. -
Cut the Circles:
Using your circle cutter, punch out six full circles. You will need three semi-circles per earring, so six circles will actually yield twelve semi-circles (giving you plenty of spares in case of breakage). -
Create Semi-Circles:
Use a sharp craft knife or a thin blade to cut each circle strictly in half. You need three distinct semi-circles for each earring: two for the top teal sections and one for the lower terracotta section. -
Form the Teardrops:
Cut out two small teardrop shapes for the very bottom tier. If you don’t have a tiny cutter, create a small ball of clay, roll it into a cone, and flatten it gently with your finger. -
Smooth the Edges:
Dip your finger in a tiny bit of water and gently run it along the cut edges of every piece to smooth out any sharpness or clay burrs before they dry.
Uneven Hanging?
If the pieces twist or don’t hang straight, your holes might be too close to the edge or off-center. Use a larger jump ring to give the clay pieces more room to settle naturally.
Step 2: Piercing and Drying
-
Plan the Holes:
Lay out your pieces in the correct vertical order: semi-circle, semi-circle, semi-circle, teardrop. Determine exactly where the holes need to be for the jump rings to connect them vertically. -
Pierce the Clay:
Using a needle tool, carefully pierce holes about 2-3mm from the edge. The top and middle semi-circles need a hole at the top center curved edge and the bottom flat edge. The bottom semi-circle needs a hole at the top curve and bottom flat edge. The teardrop needs just one hole at the top point. -
Double Check Aperture:
Make sure your holes are large enough for your specific jump rings to move freely. Give the needle a little wiggle to widen the hole slightly, as clay shrinks when drying. -
Let Them Dry:
Place all components on a clean, flat surface to dry. Allow at least 24-48 hours depending on humidity. Flip them over halfway through the process to ensure even drying.
Smooth Edges Pro-Tip
Before the clay dries, use a wet Q-tip or a soft, damp paintbrush to refine the edges. It’s much easier to smooth wet clay than to sand dry clay later!
Step 3: Finishing and Assembly
-
Sand for Smoothness:
Once fully dry, lightly sand the edges and surfaces with fine-grit sandpaper to remove any fingerprints or irregularities. -
Apply Paint:
Paint the top two semi-circles in a deep teal. Paint the third semi-circle in terracotta. For the teardrop, paint one mustard yellow and the other terracotta (or match them if you prefer symmetry). Apply 2-3 thin coats for opacity. -
Seal (Optional):
For durability, apply a thin layer of matte varnish. This protects the paint from scratching without making the earrings look too shiny or plastic. -
Open Jump Rings:
Use two pairs of pliers to twist your gold jump rings open. Remember to twist the ends away from each other (front to back), never pull them apart horizontally. -
Connect the Tiers:
Start from the bottom up. Thread a jump ring through the teardrop and the flat edge of the terracotta semi-circle. Close the ring securely. -
Continue the Chain:
Connect the curve of the terracotta piece to the flat edge of the lower teal semi-circle with a ring. Repeat to attach the lower teal piece to the top teal piece. -
Attach the Hardware:
Finally, attach the earring hook to the very top hole of the first teal semi-circle using one last jump ring.
Wear your new geometric creations with pride and enjoy the gentle movement they bring to your outfit