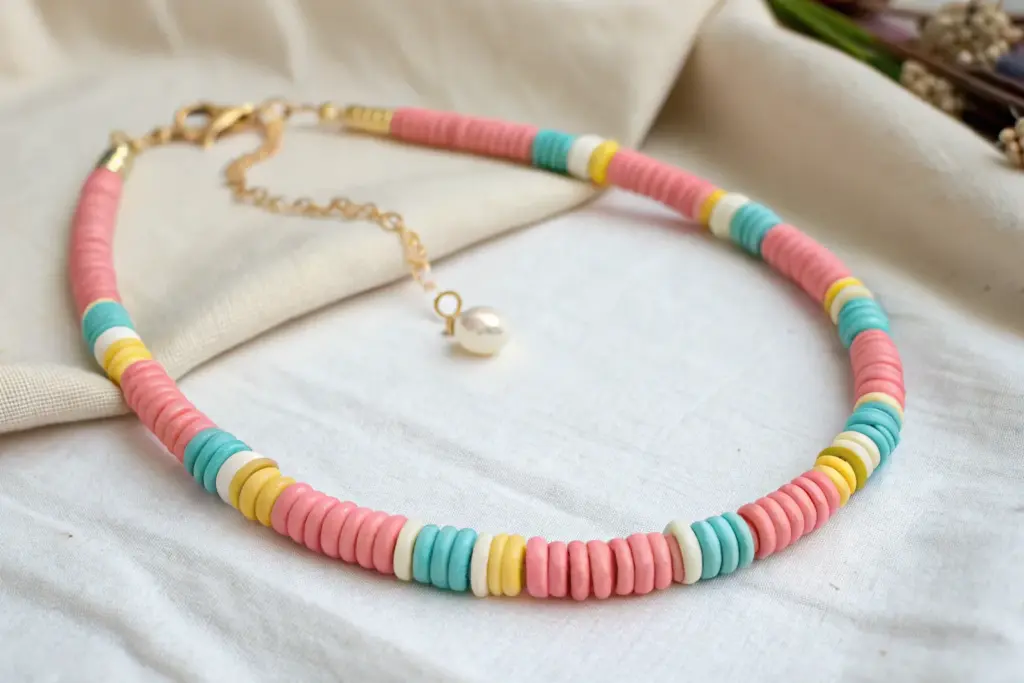
There’s something so satisfying about a clay bead choker—it’s quick to make, comfy to wear, and it instantly makes an outfit feel more fun. Here are my favorite choker clay bead necklace ideas for everything from classic heishi looks to more unexpected statement styles.
Classic Rainbow Heishi Choker
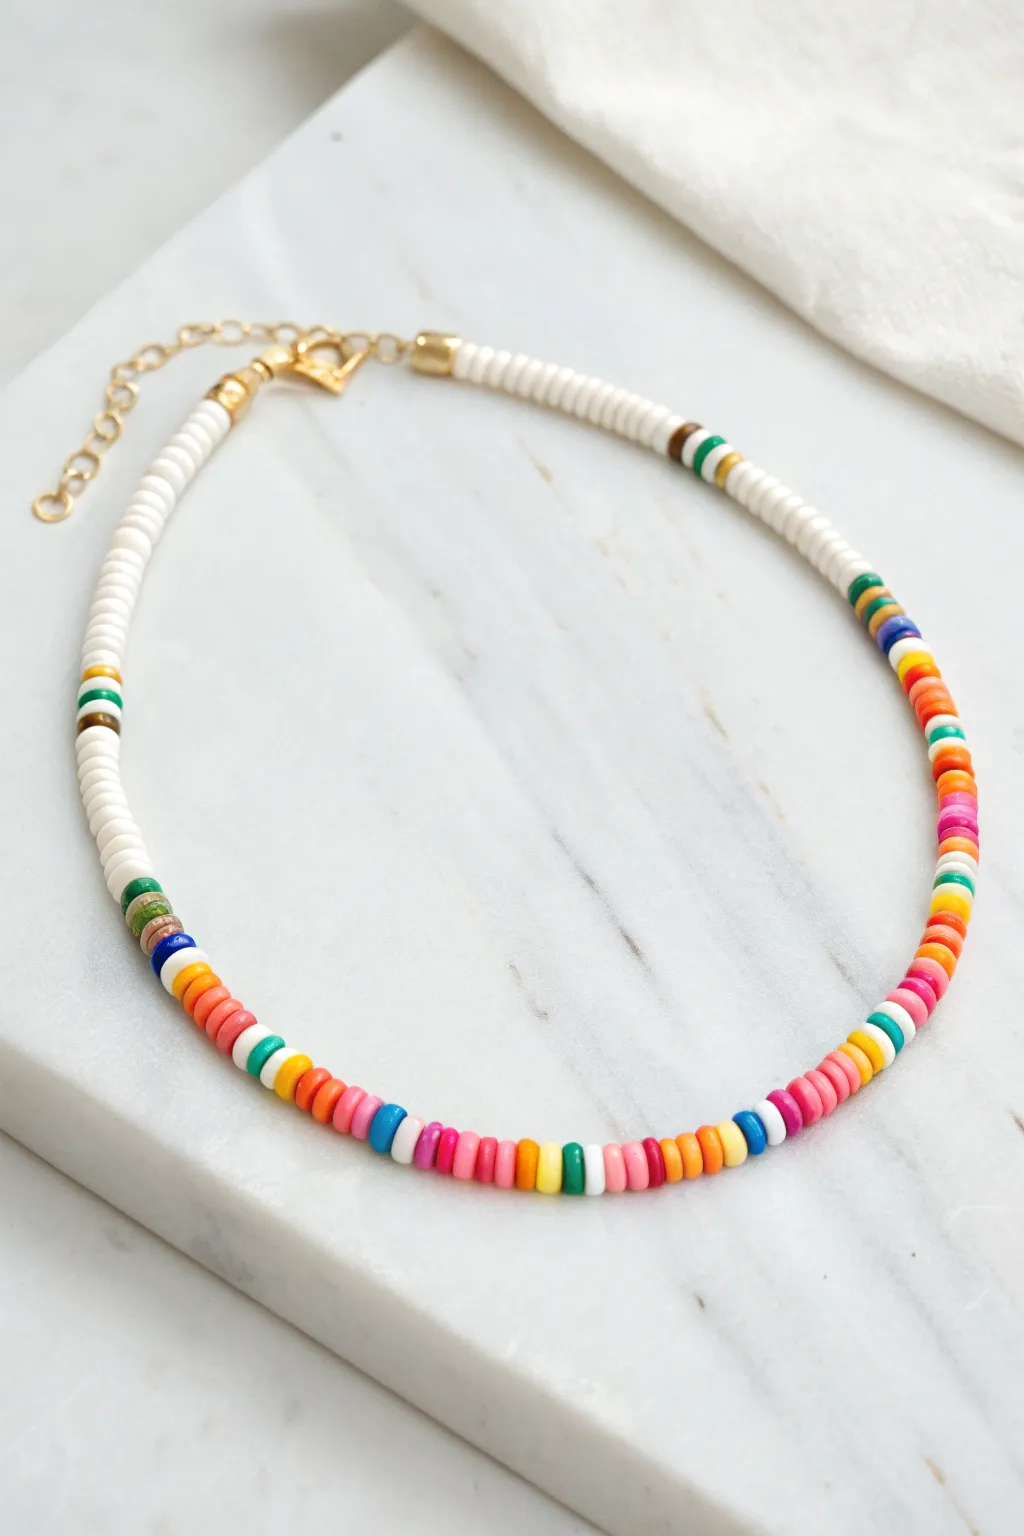
This cheerful choker combines the minimalist elegance of white clay discs with a vibrant splash of summer colors. The design features a solid white back section that transitions into a playful, random assortment of rainbow hues at the front, perfect for layering or wearing solo.
How-To Guide
Materials
- 6mm polymer clay heishi beads (white)
- 6mm polymer clay heishi beads (assorted rainbow colors: pink, orange, yellow, green, blue, purple)
- Gold accent beads (small gold spacers or crimp covers)
- Beading wire (flexible, 7-strand or 19-strand recommended)
- 2 Gold crimp beads
- 2 Gold wire guards (optional but recommended for durability)
- Gold lobster clasp
- Gold extender chain
- 2 Gold jump rings (4mm or 5mm)
- Crimping pliers
- Wire cutters
- Bead stopper or tape
Step 1: Setting the Foundation
-
Measure your wire:
Cut a piece of beading wire approximately 18-20 inches long. This gives you plenty of extra room for crimping and handling, even if you want a tight 14-inch choker. -
Secure the start:
Place a bead stopper or a piece of masking tape on one end of the wire to prevent beads from sliding off as you work. -
Begin with white:
Thread on your white heishi beads first. This section will sit on one side of your neck, leading toward the clasp. Continue adding white beads until you have about 4 to 5 inches of solid white strand. -
The first transition:
Once the white section is substantial, add a small gold spacer bead or a single contrasting colored bead (like brown or dark green) to mark the end of the solid white section. -
Create a transition pattern:
Before jumping into full color, create a small ‘buffer’ pattern. String about 1 inch of pattern where you alternate white beads with single colored beads to soften the shift from solid white to the rainbow section.
Step 2: Building the Rainbow
-
Start the color mix:
Begin adding your colored heishi beads. The look in the image is somewhat random rather than a strict repeating pattern. Group similar colors together occasionally—like two pinks followed by an orange—to create flow. -
Incorporate brights:
Mix in vibrant hues like hot pink, turquoise, sunny yellow, and lime green. Thread 3 to 5 colored beads, then perhaps a single white bead as a spacer to keep the design feeling light. -
Checking the length:
Continue the colorful section for about 5 to 6 inches. This will be the focal point that sits at the hollow of your neck. Hold it up to your neck occasionally to see where the colors fall. -
Mirror the transition:
As you finish the colored section, repeat the transition pattern you created earlier: alternate a few white beads with single colored beads for about an inch. -
Finish with white:
Complete the strand by threading on solid white heishi beads until this side matches the length of your starting white section.
Smooth Moves
Add a single gold spacer bead every 2 inches within the colored section. It adds a tiny sparkle and breaks up the matte texture of the clay.
Step 3: Attaching the Clasp
-
Prepare the first crimp:
Remove the bead stopper. Slide a gold crimp bead onto the wire, followed by a wire guard (if using) and one jump ring attached to the lobster clasp. -
Loop and secure:
Thread the wire back through the crimp bead to create a loop. Pull it tight so it sits close to the white beads, but leave a tiny bit of wiggle room so the necklace moves fluidly. -
Crimp it down:
Use your crimping pliers to flatten or fold the crimp bead securely. I prefer to tug gently on the wire to ensure it won’t slip. -
Cover and trim:
If you have a crimp cover (a gold bead that looks like a ‘C’), place it over the flattened crimp and gently close it with pliers to make it look like a round gold bead. Trim the excess wire tail close to the bead. -
The final connection:
Repeat the crimping process on the other end of the necklace, attaching the jump ring that holds the extender chain. Ensuring you have an extender chain allows you to adjust the choker’s fit perfectly.
Pattern Play
Instead of random colors, try color-blocking! Do 1 inch of pinks, 1 inch of oranges, and 1 inch of yellows for a structured sunset gradient effect.
Now you have a trendy, versatile accessory ready to brighten up any outfit


Soft Pastel Color-Block Choker
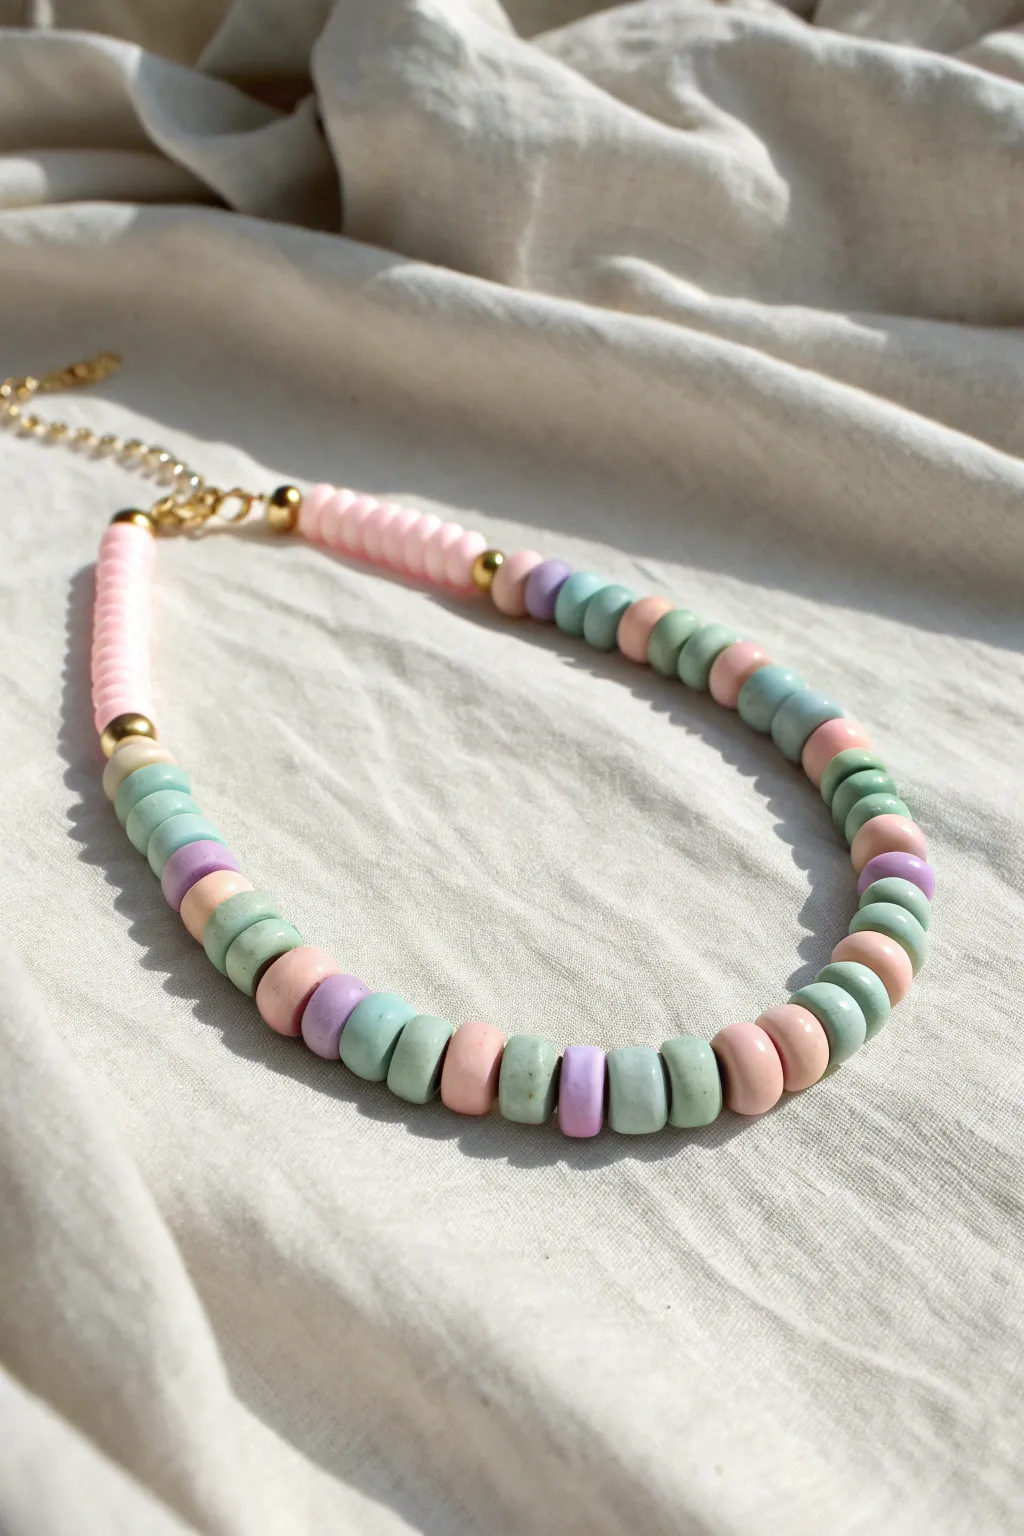
Embrace a dreamy aesthetic with this soft pastel choker featuring a mix of Heishi-style clay disc beads and elegant gold accents. The gentle color blocking of mint, peach, lavender, and pink creates a soothing, sophisticated accessory perfect for layering or wearing solo.
Step-by-Step Tutorial
Materials
- Polymer clay Heishi beads (disc beads) in pastel pink, mint green, lavender, and peach
- Small gold barrel spacer beads (approx. 4mm)
- Gold tone crimp beads
- Gold tone jump rings (4mm or 5mm)
- Lobster claw clasp
- Extension chain (optional but recommended for adjustable fit)
- Flexible beading wire (gold color or clear)
- Wire cutters
- Chain nose pliers
- Flat nose pliers
Step 1: Planning and Preparation
-
Measure your length:
Since this is a choker style, you’ll want a length that sits close to the neck base. Measure your neck and aim for about 14 to 15 inches of total beading length. -
Cut the wire:
Cut a piece of beading wire approximately 20 inches long. This generous extra length ensures you have plenty of room to work on the ends without beads slipping off. -
Sort your palette:
Organize your clay beads by color: pastel pink, lavender, mint green, and peach. Having them separated makes the patterning process much smoother and faster.
Step 2: Beading the Pattern
-
Secure the start:
Thread a crimp bead onto one end of the wire, followed by a jump ring (or the closed ring of your clasp assembly). Loop the wire back through the crimp bead. -
Crimp the end:
Using your flat nose pliers, squeeze the crimp bead tightly to flatten it creating a secure hold. Tug gently to ensure it won’t slip. -
Start with a block:
Begin the design with a solid block section. As seen in the reference, thread about 1.5 to 2 inches of just the pastel pink beads. This anchors the design visually. -
Add a gold accent:
Slide on one gold barrel spacer bead to mark the end of the solid color block. -
Begin the mixed pattern:
Now transition into the multi-color repeating pattern. Start with one peach bead, followed by one mint bead. -
Continue the sequence:
Add one lavender bead, then one pink bead. This establishing a four-color rotation: Peach -> Mint -> Lavender -> Pink. -
Establish the rhythm:
Repeat this specific sequence (Peach, Mint, Lavender, Pink) until you reach the halfway point of your necklace. I find checking the length against a ruler periodically helps maintain symmetry. -
Evaluate the center:
Once you have covered the main front section of the necklace, pause to look at the color distribution. The clay beads have natural variations, so swap out any that are too thin or misshapen. -
Finish the mixed section:
Continue the pattern until you have about 2 inches of wire remaining on the other side, mirroring the length of the mixed section on the starting side. -
Close the pattern:
Add a second gold barrel spacer bead to signal the end of the mixed pattern section. -
Final color block:
Finish the beading by adding a solid block of pastel pink beads, matching the length of the starting block exactly.
Stiff necklace syndrome?
If your necklace won’t curve into a nice circle, you pulled the wire too tight before crimping. Leave a tiny bit of slack—about 1mm—before the final crimp to allow movement.
Step 3: Finishing Touches
-
Prepare the closure:
Thread a final crimp bead onto the wire, followed by the jump ring attached to your extension chain or lobster clasp. -
Loop and tighten:
Pass the wire tail back through the crimp bead and through the first few pink beads to hide the end. -
Tension check:
Pull the wire snug so there are no gaps between beads, but not so tight that the necklace becomes stiff and won’t curve naturally. -
Final crimp:
Flatten the crimp bead securely with your pliers. -
Trim excess:
Use your wire cutters to trim the remaining tail wire as close to the beads as possible for a clean finish.
Level Up: Texture Play
Mix in a few freshwater pearl beads between the pastel clay discs. The organic shape of the pearls contrasts beautifully with the uniform flatness of the clay beads.
Now you have a serene, candy-colored accessory ready to brighten up any outfit


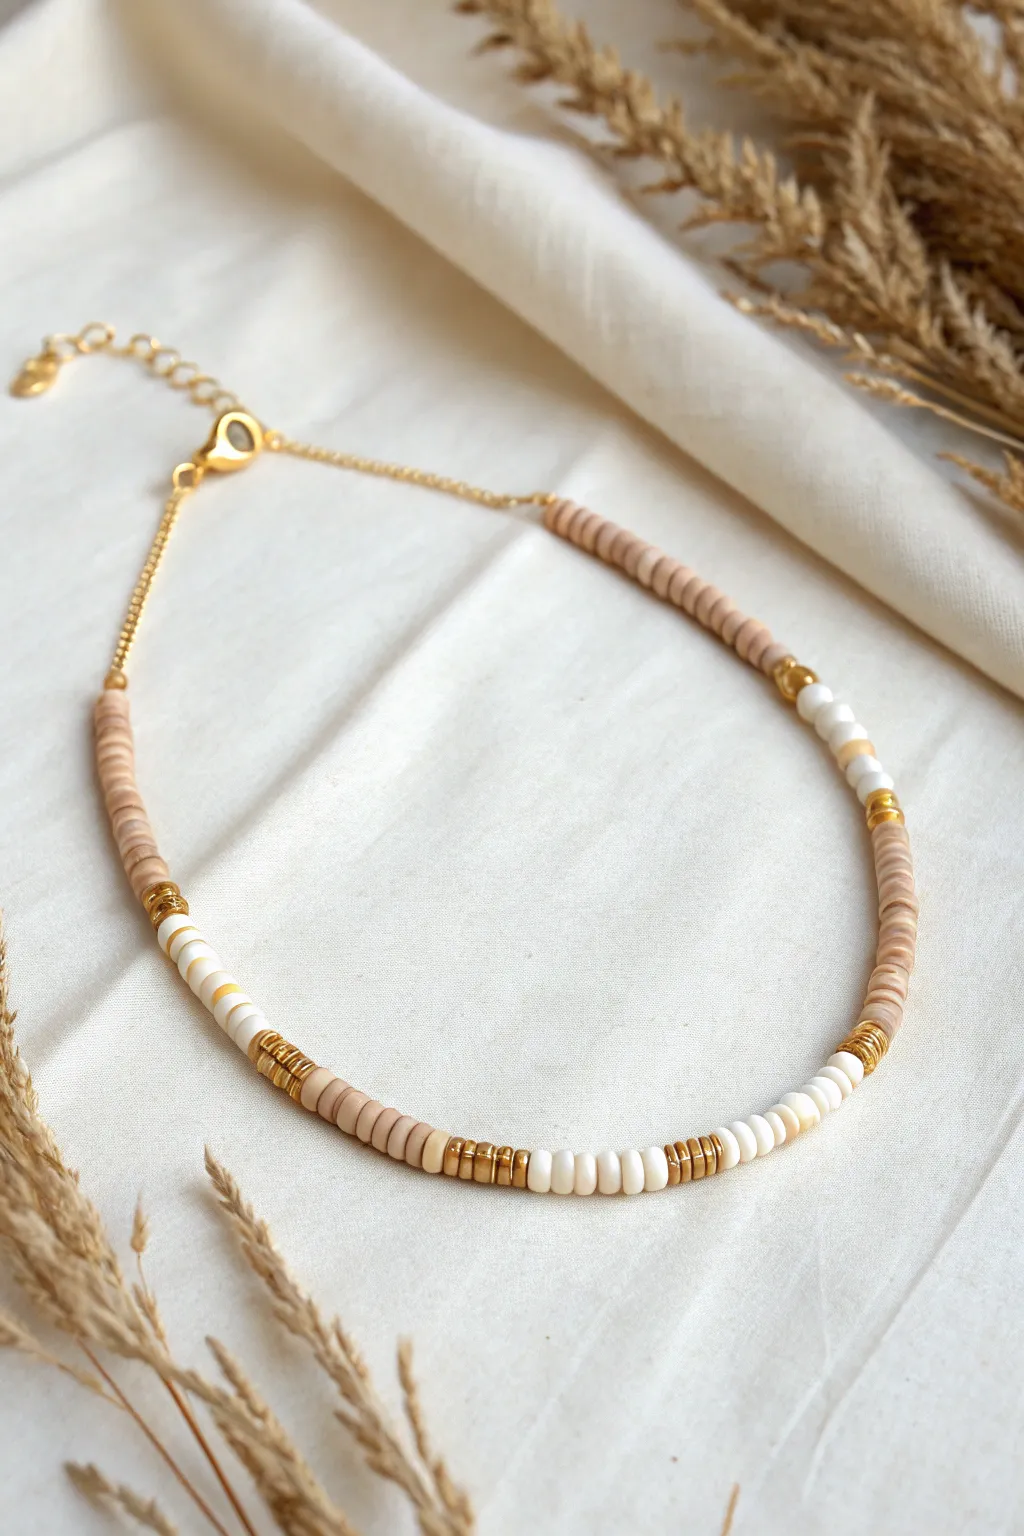
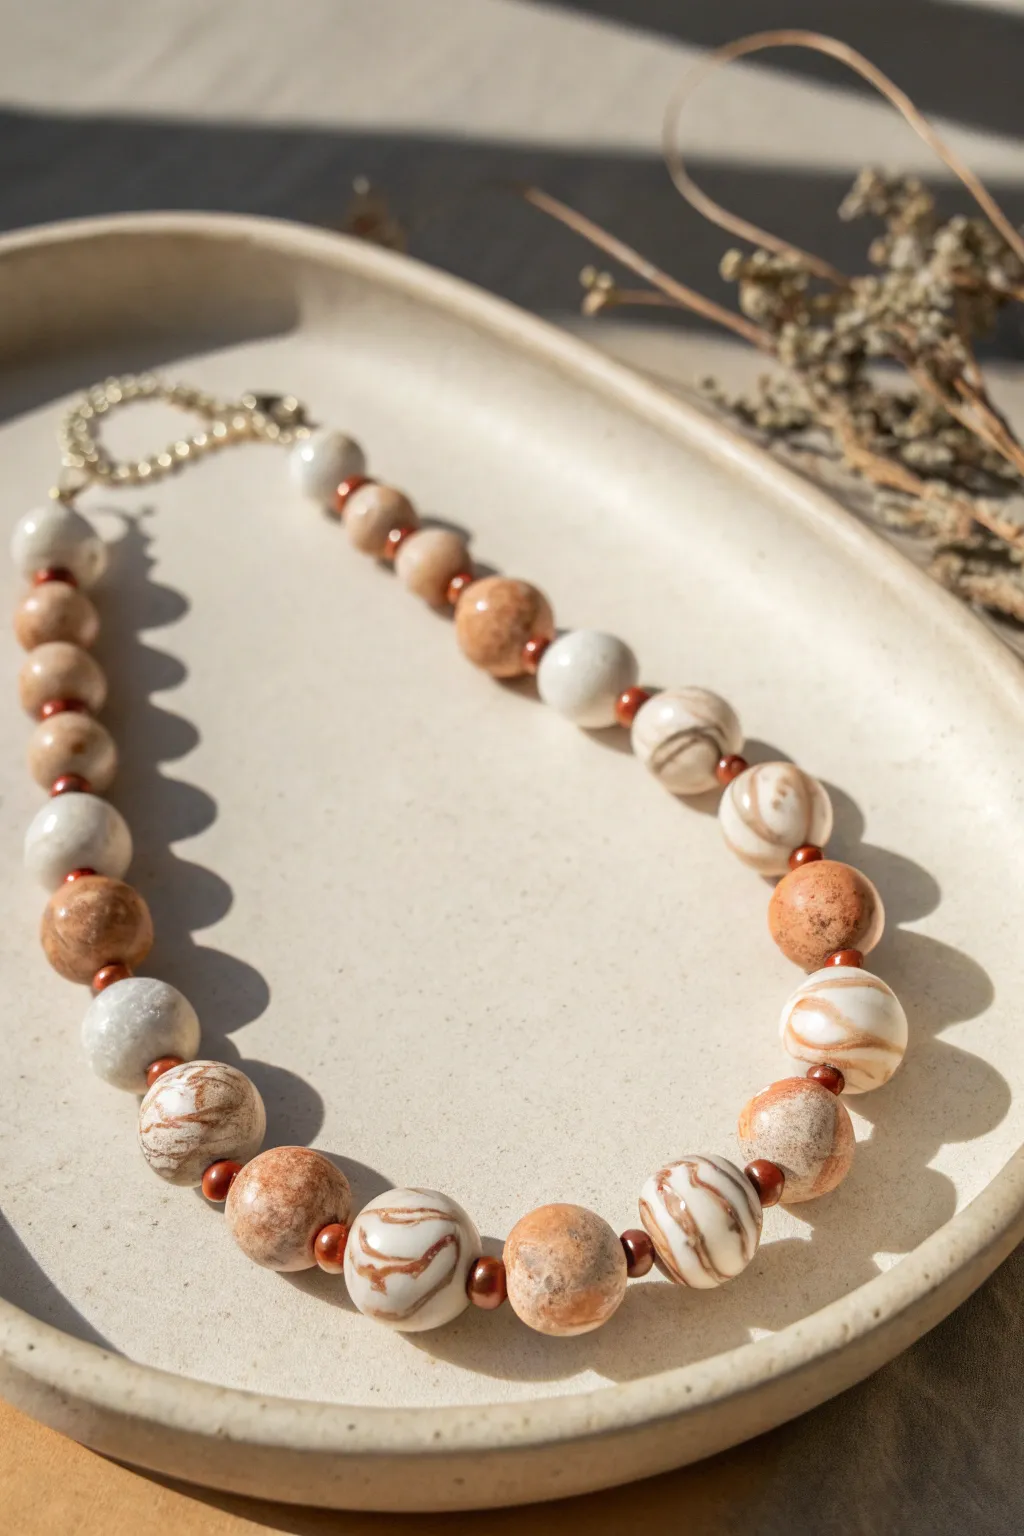
Neutral Minimal Heishi Choker
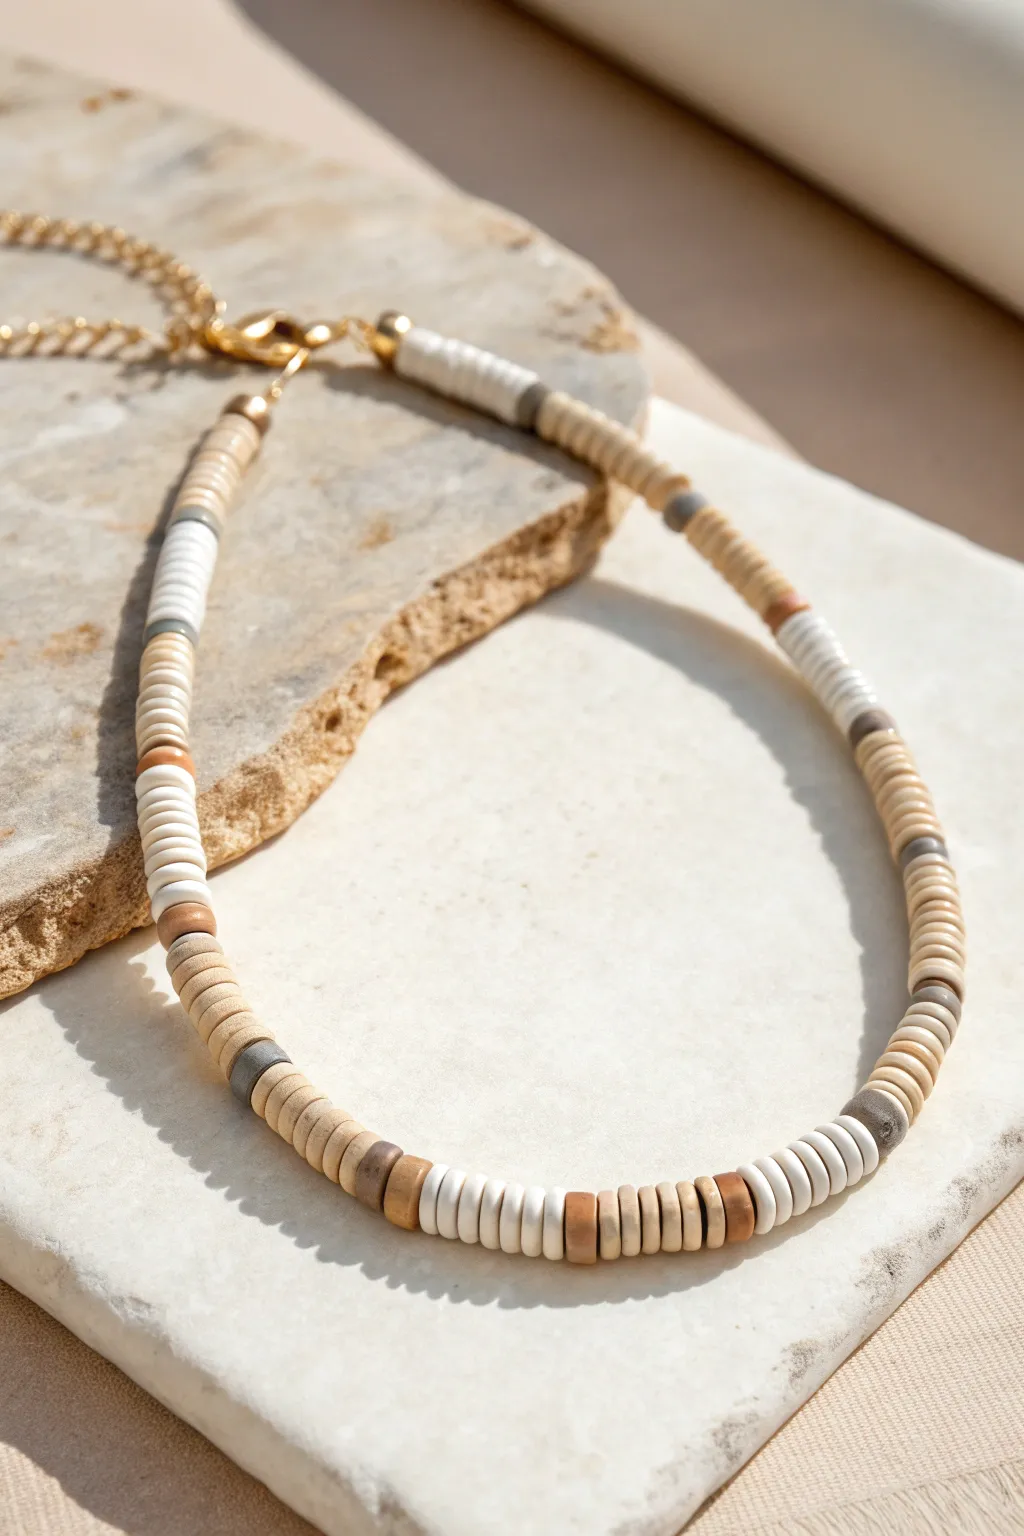
Earthy tones meet modern design in this understated heishi bead choker. The mix of cream, white, cool grey, and warm tan creates a versatile accessory that feels both organic and polished, perfect for layering or wearing solo.
Step-by-Step
Materials
- 6mm polymer clay heishi beads (white, cream/sand, tan/brown, dark grey)
- 0.38mm or 0.45mm flexible beading wire (gold color preferred)
- 2 gold crimp beads
- 2 gold wire guardians (optional but recommended)
- 2 gold crimp covers (3mm or 4mm)
- Gold lobster clasp
- Gold extension chain (2-3 inches)
- 2 gold jump rings (4mm or 5mm)
- Flush cutters
- Chain nose pliers
- Crimping pliers
Step 1: Planning and Prep
-
Measure the wire:
Cut a length of beading wire approximately 18-20 inches long. Since this is a choker style, you want a finished length of about 14-15 inches plus the extension chain, but having extra wire makes the finishing process much easier. -
Plan the pattern:
Observe the pattern in the reference project. It relies on color-blocking rather than a strict 1-1-1 pattern. Notice sections of 15-20 cream beads, interrupted by small clusters of white, tan, and grey. Lay out a few inches of beads on your work surface to test color combinations before stringing. -
Secure the first end:
Thread a crimp bead onto one end of your wire, followed by a wire guardian. Loop the wire through the guardian and back down into the crimp bead. If you aren’t using a guardian, simply loop the wire back through the crimp bead to create a small loop.
Stiff Necklace Syndrome?
If your necklace stands up like a wire hoop instead of draping, you strung it too tightly. Always bead in a ‘U’ shape on your mat to ensure flexibility.
Step 2: Stringing the Beads
-
Crimp the start:
Use your crimping pliers to flatten the crimp bead securely, locking the loop in place. Trim the short tail of the wire, leaving just a tiny bit to tuck into the first few beads. -
Cover the crimp:
Place a gold crimp cover over the flattened crimp bead. Gently squeeze it closed with chain nose pliers until it resembles a smooth gold bead. This adds a professional finish right from the start. -
Start with a neutral base:
Begin stringing with your main base color, which appears to be the cream or sand-colored beads. Thread about 1 inch of these beads to start, covering your tail wire as you go. -
Introduce the first accent:
Add a small section of a contrasting color. Try adding 3-4 dark grey beads followed by 2-3 tan beads. This mimics the organic, uneven striping seen in the original design. -
Build the white section:
Thread on a longer section of white beads, perhaps 15 to 20 discs. This brightens the necklace and creates a clean, modern block of color. -
Create a transition:
After the white block, string a single tan bead, a few grey beads, and return to the cream base color. I like to vary the size of these transition blocks so the pattern doesn’t look too manufactured. -
Continue the rhythm:
Repeat this loose pattern—long blocks of cream or white separated by thin, erratic stripes of tan and grey—until you reach roughly 14 inches (or your desired choker length). -
Check the fit:
Wrap the strung wire around your neck to check the length. Remember that the clasp and extension chain will add about 0.5 to 1 inch to the final length, so stop bead stringing just short of where you want it to sit.
Step 3: Finishing the Necklace
-
Prepare the closure:
Thread a crimp bead and then a wire guardian onto the end of the wire. Loop the wire through the guardian and back down through the crimp bead and into the last few heishi beads you strung. -
Tighten the slack:
Pull the wire tight so the beads are snug but not stiff. You want the necklace to drape naturally, not stand rigid. Leave a tiny bit of wiggle room (about 1mm). -
Final crimp:
Flatten the crimp bead securely with your pliers. Trim the excess wire flush against the beads so no sharp end is poking out. -
Add the crimp cover:
Just as you did at the start, place a gold crimp cover over this final crimp bead and gently close it with your chain nose pliers to make it look like a seamless gold ball. -
Attach hardware:
Open a jump ring by twisting it sideways (never pull it apart). Hook it through the loop you created on one end of the necklace and attach the lobster clasp. Close the jump ring securely. -
Add the extension:
On the other end, open a second jump ring and attach the extension chain. This allows the choker to be adjustable for different necklines or comfort preferences.
Pro Tip: Batch Mixing
Pour small amounts of all four bead colors into a single shallow dish. Picking randomly from a mixed pile creates a more organic, less rigid pattern naturally.
Now you have a chic, neutral accessory that pairs beautifully with everything from linen shirts to cozy sweaters


Black-and-White Graphic Choker
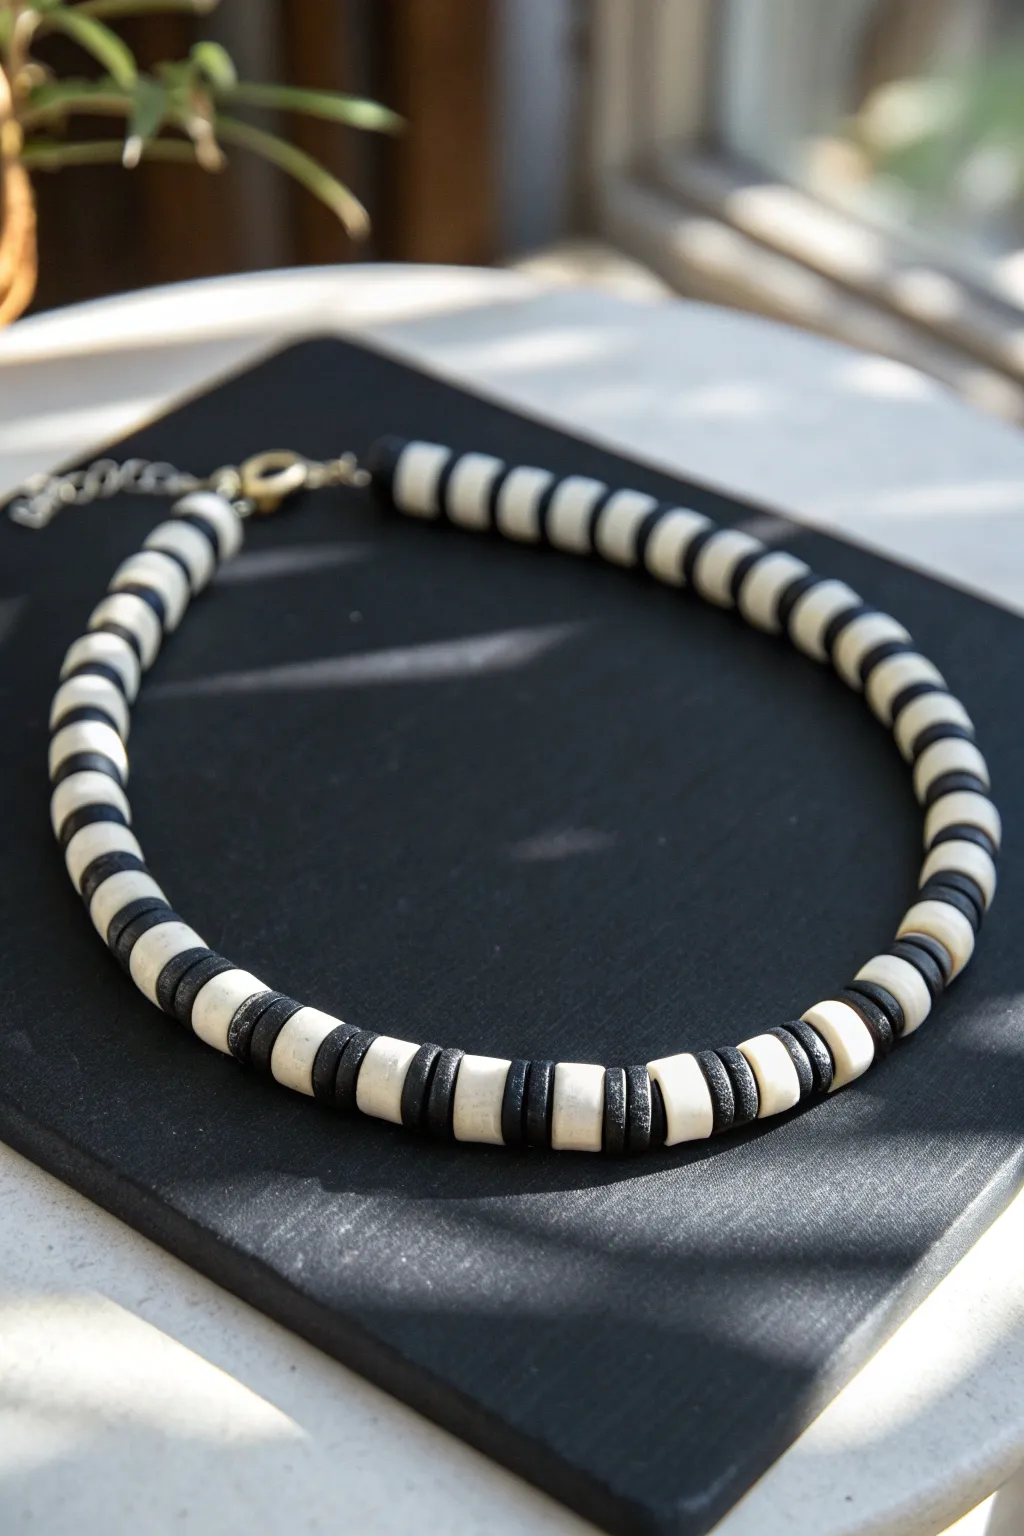
Embrace high-contrast minimalism with this graphic black and white choker. Using polymer clay to create custom beads allows you to achieve that perfect matte finish and rhythmic striped pattern that store-bought beads often miss.
Detailed Instructions
Materials
- Black polymer clay (e.g., Fimo Soft or Sculpey Premo)
- White or translucent white polymer clay
- Rolling pin or pasta machine for clay
- Round clay cutter (approx. 8-10mm diameter)
- Rigid tissue blade or craft knife
- Toothpick or bead piercing pin
- Beading wire (nylon-coated stainless steel)
- 2 Crimp beads
- 2 Crimp covers (optional)
- Lobster clasp and jump ring
- Extension chain (optional)
- Jewelry pliers (flat nose and wire cutters)
- Baking sheet and oven
Step 1: Creating the Clay Canes
-
Condition the white clay:
Start by warming the white polymer clay in your hands until it becomes pliable. Roll it into a smooth, thick log about 10mm in diameter. This will form the core of your white beads. -
Condition the black clay:
Repeat the conditioning process with your black clay. Roll this into a separate log, matching the diameter of the white log exactly so your beads will be uniform. -
Prepare for slicing:
Place both logs in the refrigerator for about 15 minutes. Cooling the clay firms it up, preventing the logs from squishing into ovals when you cut them later.
Clean Cuts Only
Wipe your tissue blade with baby wipes or rubbing alcohol between slicing different colors. This prevents black clay residue from smudging onto your pristine white beads.
Step 2: Cutting and Baking Beads
-
Slice the black discs:
Remove the black log from the fridge. Using your tissue blade, slice very thin wafers from the log. You need twice as many black discs as white ones for this specific pattern. -
Slice the white cylinders:
Take the white log and slice it into slightly thicker sections. Aim for a thickness of about 4-5mm to create that chunky, barrel-like shape seen in the reference. -
Pierce the specific holes:
Gently poke a hole through the center of each bead using a toothpick or pin. Twist the tool as you push to avoid deforming the clay. I often pierce halfway from one side, then flip and finish from the other. -
Refine the edges:
If your fingerprints have marred the surface or the shapes have distorted, gently roll the edge of each bead on a flat surface to smooth it back into a perfect circle. -
Bake the batch:
Arrange the beads on a dedicated baking sheet lined with parchment paper. Bake according to your clay manufacturer’s instructions (usually around 230°F/110°C for 30 minutes). -
Cool and buff:
Let the beads cool completely. For that matte finish shown in the photo, you can lightly buff them with a piece of denim or very fine grit sandpaper/polishing paper.
Wonky Holes?
If your bead holes are closing up during baking, try baking the beads directly on a dedicated bead rack or a thick wire suspended over a baking dish.
Step 3: Assembly
-
Cut the beading wire:
Measure a length of beading wire about 16 inches long, or slightly longer than your desired choker circumference to allow room for finishing. -
Secure the first end:
Thread a crimp bead onto one end of the wire, followed by the lobster clasp. Loop the wire back through the crimp bead. -
Crimp firmly:
Use your flat nose pliers to smash the crimp bead flat, securing the clasp. Trim the excess short tail of wire, or tuck it into the first few beads. -
Begin the pattern:
Start stringing your beads. The specific pattern for this visuals is: two thin black discs, followed by one thick white cylinder. Repeat this ‘black-black-white’ sequence. -
Check the rhythm:
Continue the pattern until you cover the entire length of the wire. Pause occasionally to ensure no black discs are stuck together, which disrupts the visual stripe. -
Finish the strand:
Once you reach the end, add a crimp bead and your jump ring (or extension chain). Loop the wire back through the crimp bead and pull tight, leaving just a tiny bit of slack so the necklace isn’t stiff. -
Final crimp:
Flatten the final crimp bead with your pliers. Trim the excess wire flush against the bead. -
Optional crimp covers:
If you want a more polished look, gently close a crimp cover over each flattened crimp bead to make them look like small silver or gold beads.
Wear your striking geometric choker with a simple crew neck to let the pattern really pop

The Complete Guide to Pottery Troubleshooting
Uncover the most common ceramic mistakes—from cracking clay to failed glazes—and learn how to fix them fast.
Gold Spacer Elevated Choker
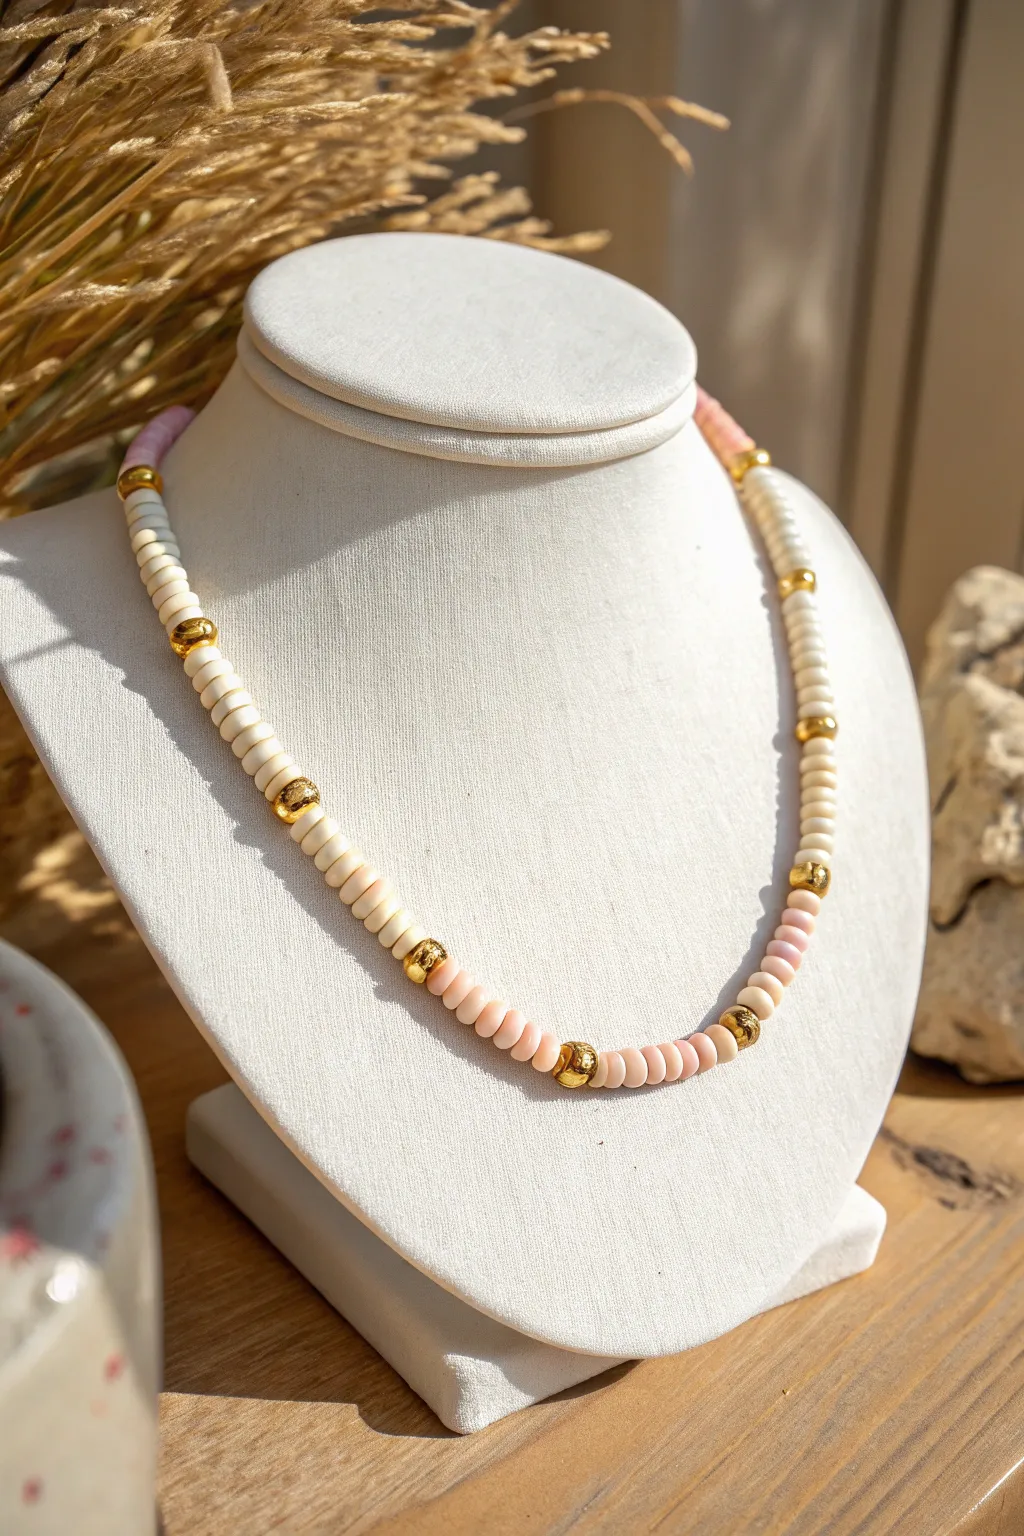
This elegant choker balances soft cream and peach tones with the luxurious shine of golden accents. Perfect for layering or wearing solo, the subtle color blocking and metallic spacers give it a sophisticated, high-end finish.
How-To Guide
Materials
- 6mm heishi polymer clay beads (cream/off-white color)
- 6mm heishi polymer clay beads (soft peach/light pink color)
- 6mm gold spherical spacer beads (plated brass or gold-filled)
- Small gold seed beads or crimp beads (optional for finishing)
- Beading wire (flexible, 7-strand or 19-strand)
- 2 crimp tubes
- 2 wire guards (gold tone)
- Clasp (lobster claw or spring ring, gold tone)
- Extension chain (optional, gold tone)
- Wire cutters
- Crimping pliers
Step 1: Planning and Prep
-
Measure your wire:
Cut a length of beading wire approximately 18-20 inches long. This gives you plenty of slack to work with, even though the finished choker will likely be 14-16 inches. -
Secure the first end:
Thread a crimp tube onto one end of the wire, followed by a wire guard. Loop the wire through the guard and back down into the crimp tube. -
Attach the clasp:
Before crimping, hook your clasp onto the wire guard loop. Use your crimping pliers to flatten or fold the crimp tube securely, locking the wire in place. I like to trim the excess wire tail close to the crimp.
Pro Tip: Seamless Gold
For a truly polished look, use crimp covers over your crimp tubes. They look exactly like small gold beads and hide the utilitarian hardware perfectly.
Step 2: Creating the Pattern
-
Start with color blocking:
Thread on about 1 inch of the peach heishi beads first. This section will sit near the clasp at the back of the neck, creating interesting detail even from behind. -
Add the first gold accent:
Slide on one gold spherical spacer bead. This marks the transition from the back section to the main body of the necklace. -
Begin the cream section:
String on approximately 1.5 inches of the cream/off-white heishi beads. This establishes the neutral base that makes up the majority of the choker’s sides. -
Insert the next spacer:
Place another gold spacer bead onto the wire. -
Continue the pattern:
Add another 1.5-inch segment of cream beads, followed by a gold spacer. Repeat this cream-and-gold pattern until you have about 4 segments of cream beads on this side.
Level Up: Texture Play
Instead of smooth gold spacers, try using hammered gold discs or faceted gold nugget beads. The irregular texture catches the light beautifully against the matte clay.
Step 3: Designing the Focal Point
-
Transition to the center:
After your last cream segment on the left side, add a gold spacer bead. -
Build the center peach block:
Now, switch back to the peach heishi beads. String about 2 to 2.5 inches of peach beads. This block will sit right at the collarbone as the subtle focal point of the design. -
Close the center section:
Finish the focal section by adding a gold spacer bead.
Step 4: Finishing the Second Side
-
Mirror the cream pattern:
Return to the cream beads. Add a 1.5-inch segment of cream heishi beads. -
Continue mirroring:
Add a gold spacer, then another 1.5-inch cream segment. Repeat this until this side matches the first side perfectly in length and pattern. -
Final transition:
Place your last gold spacer bead onto the wire. -
Finish with peach:
String the final 1-inch section of peach beads to match the beginning of the necklace. -
Check the fit:
Hold the necklace up to your neck to ensure the length is correct for a choker fit. Add or remove a few beads from the ends if adjustments are needed.
Step 5: Final Assembly
-
Prepare to close:
Thread a crimp tube onto the remaining wire end, followed by a wire guard. -
Attach the jump ring:
Loop the wire through the guard and catch the jump ring or extension chain loop before feeding the wire back down through the crimp tube and into the first few beads. -
Secure the necklace:
Pull the wire tight so there are no gaps between beads, but not so tight that the necklace becomes stiff. Crimp the tube firmly with your pliers. -
Trim excess wire:
Use your flush cutters to snip the remaining wire tail as close to the beads as possible for a clean finish.
Now you have a chic, modern choker that adds a touch of warmth to any outfit
Pearl Accent Clay Bead Choker
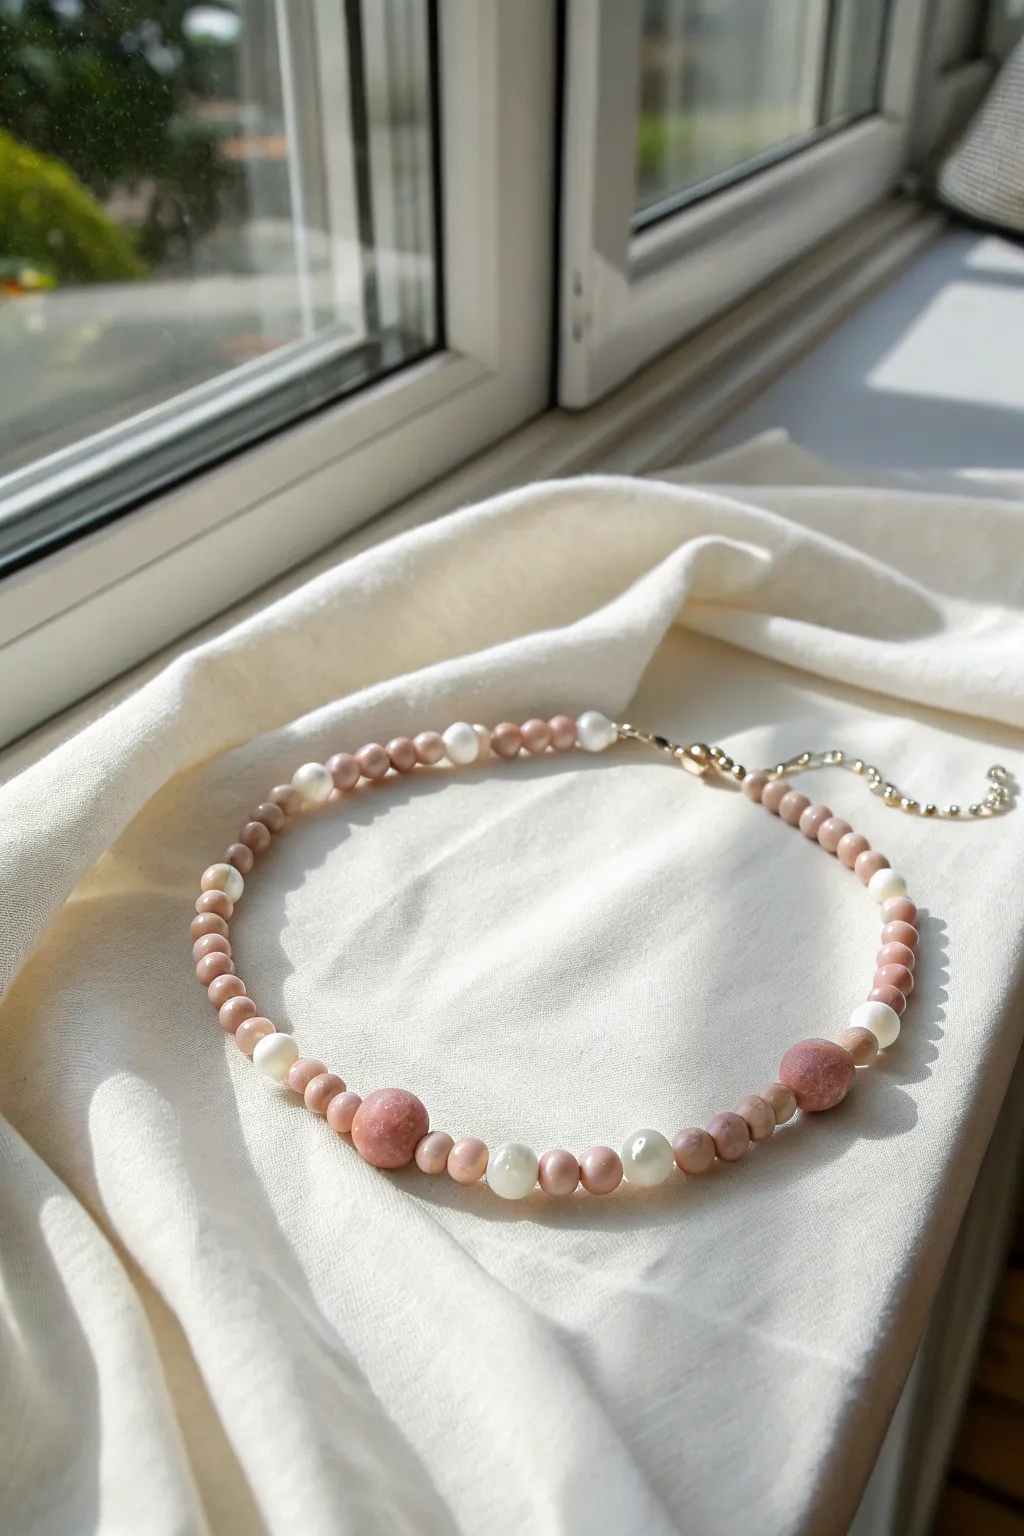
This delicate choker combines the rustic warmth of peach-toned beads with the classic elegance of freshwater pearls for a soft, romantic look. The asymmetrical arrangement of bead sizes creates a modern, organic flow that feels perfect for summer afternoons.
Detailed Instructions
Materials
- Heishi or round clay beads (peach/dusty pink, approx. 4-5mm)
- Larger focal beads (peach stone or clay, approx. 8-10mm)
- Small white freshwater pearls (or faux pearl beads, approx. 4-6mm)
- Beading wire (flexible, tiger tail or nylon-coated wire)
- 2 Crimp beads
- 2 Crimp covers (gold-toned)
- 2 Wire guardians (optional but recommended)
- Gold-toned lobster clasp
- Gold-toned extension chain
- Flat nose pliers
- Crimping tool or chain nose pliers
- Wire cutters
Step 1: Preparation & Design
-
Measure the wire:
Cut a length of beading wire approximately 16-18 inches long. This gives you plenty of extra room to work with for a standard choker length (usually 14-15 inches). -
Secure the first end:
Thread a crimp bead onto one end of the wire, followed by a wire guardian if you are using one. Loop the wire through the last link of your extension chain, then back through the crimp bead. -
Crimp firmly:
Use your crimping tool or flat nose pliers to flatten the crimp bead securely. Give the wire a gentle tug to ensure it holds tight. -
Hide the crimp:
Place a gold crimp cover over the flattened crimp bead and gently close it with your pliers until it looks like a round gold bead.
Step 2: Stringing the Beads
-
Start the pattern:
Begin stringing your smaller peach beads. Add about 1 to 1.5 inches of just these base beads to create a clean start near the clasp. -
Introduce the pearls:
Slide on your first white pearl. Follow it with a sequence of 3 to 5 small peach beads. The pattern doesn’t need to be mathematically perfect; a little variation looks more organic. -
Build the side section:
Continue the pattern: one pearl, followed by a small group of peach beads. Repeat this for about 3 inches. -
Transition to the focal point:
As you approach the center of the necklace, reduce the number of filler beads between accents. Add a pearl, then just one or two small peach beads. -
Place the main accents:
Thread on the larger 8-10mm peach focal bead. This adds visual weight to the front. -
Create the center asymmetry:
Follow the large bead with a short sequence: two small beads, a pearl, three small beads, and another pearl. -
Add the second focal bead:
Place the second large peach bead. Notice how in the reference image, the large beads aren’t right next to each other but are spaced apart slightly for balance. -
Mirror the pattern loosely:
Continue beading the second half of the necklace. While you don’t need to mirror the first side exactly, try to maintain a similar density of pearls to keep the visual weight equal. -
Check the length:
Wrap the unfinished strand around your neck to check the fit. Add or remove the final small peach beads until you reach your desired choker length.
Stiff Necklace?
If the necklace feels rigid or kinks, you crimped it too tightly against the beads. Leave a 1-2mm gap of bare wire before crimping to allow the beads to rotate and drape naturally.
Step 3: Finishing Touches
-
Prepare the final crimp:
Thread a crimp bead onto the remaining wire end, followed by the wire guardian (if using). -
Attach the clasp:
Loop the wire through the ring of your lobster clasp and thread it back down through the crimp bead and into the first few beads of your necklace. -
Pull tight:
Pull the wire taut so there are no gaps between beads, but leave just a tiny bit of slack so the necklace remains flexible and drapes nicely. -
Secure the end:
Flatten the crimp bead firmly with your tool. Cover it with the second gold crimp cover. -
Trim excess:
Use your flush cutters to trim the excess wire tail flush against the bead hole so it doesn’t poke the skin.
Make it Luxe
Swap the small clay filler beads for genuine rose quartz chips or round beads. The semi-translucent quality of the quartz elevates the piece from casual craft to boutique jewelry.
Now you have a stunning, beach-ready accessory that looks effortless when layered or worn solo


What Really Happens Inside the Kiln
Learn how time and temperature work together inside the kiln to transform clay into durable ceramic.
Center Pendant Clay Bead Choker
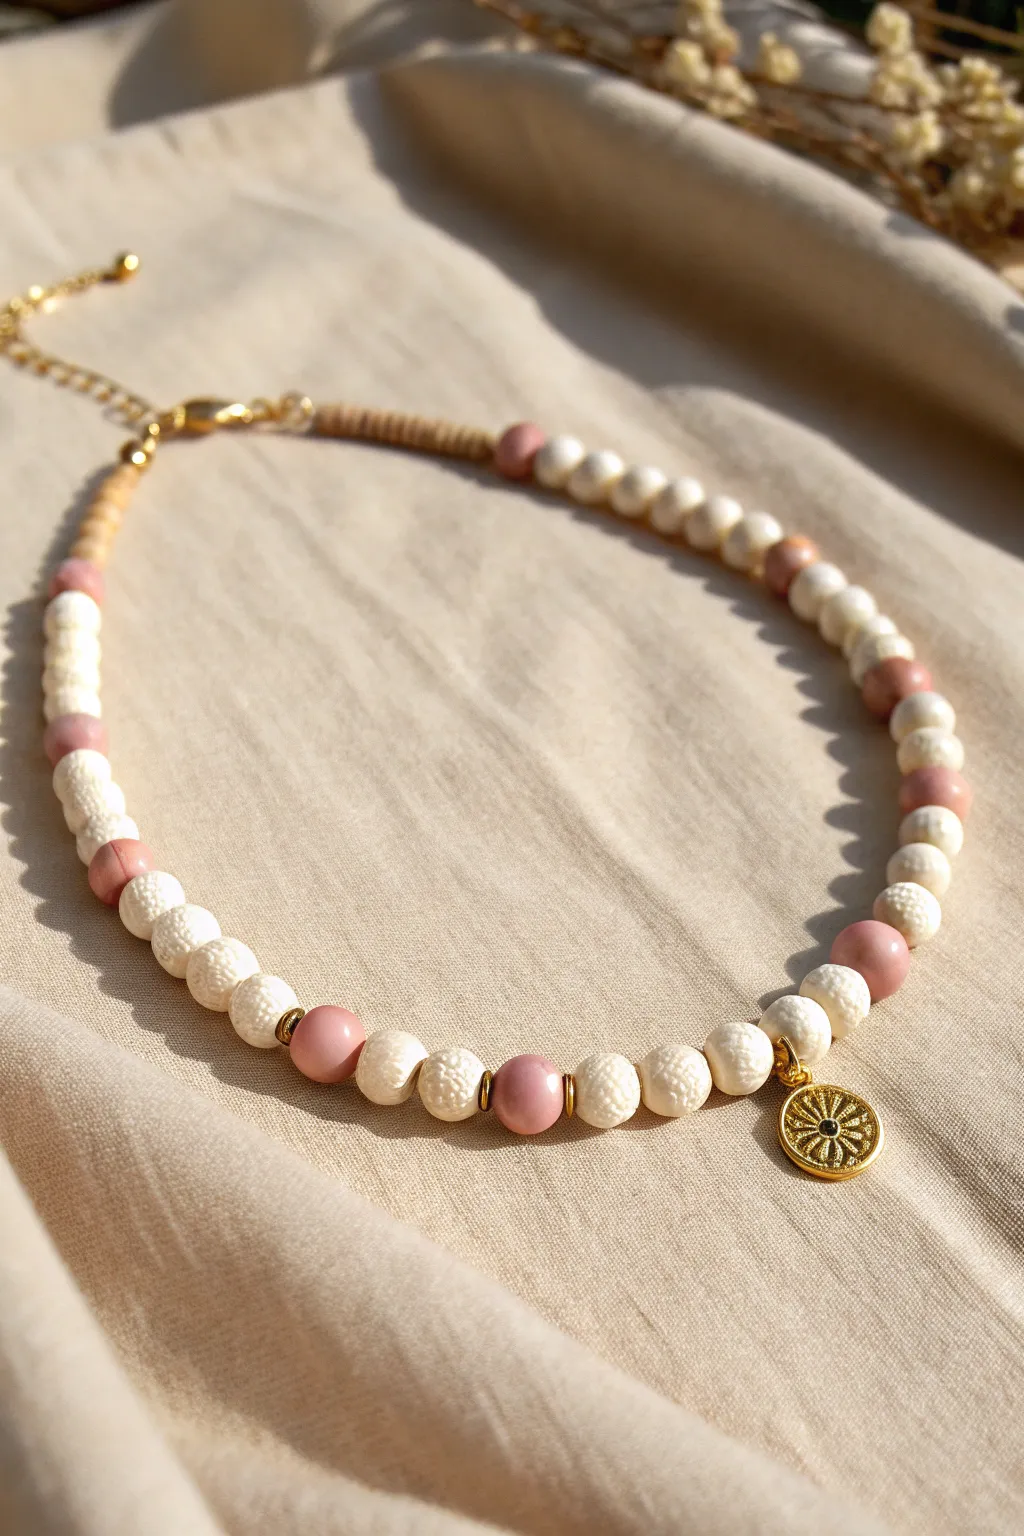
This elegant choker combines textured cream beads with smooth, mauve-pink accents for a sophisticated bohemian look. The golden sunburst pendant adds a touch of shine, making it perfect for layering or wearing as a standalone statement piece.
Step-by-Step
Materials
- Textured cream/white round beads (approx. 6mm-8mm) – look for lava stone or textured polymer clay
- Smooth mauve/dusty pink round beads (same size as cream beads)
- Gold tone spacer beads or small gold jump rings for accents
- Gold sunburst or coin charm pendant
- Gold finish jump ring for the pendant
- Beading wire (gold or neutral color)
- Two gold crimp beads
- Two gold wire guardians (optional but recommended)
- Two gold crimp covers (optional)
- Gold extension chain
- Gold lobster clasp
- Crimping pliers
- Wire cutters
- Flat nose pliers
Step 1: Planning and Prep
-
Measure your length:
Since this is a choker style, you’ll want a length that sits close to the neck base, usually around 14 to 16 inches. Cut a piece of beading wire about 4 inches longer than your desired final length to allow room for finishing. -
Lay out the pattern:
On a bead board or a soft cloth, lay out your beads to visualize the design. The pattern in the image is generally symmetrical, but with a wonderfully organic feel. -
Understand the rhythm:
Notice the pattern isn’t strictly 1-to-1. It uses blocks of textured cream beads separated by single pink accents. Near the center, the pattern shifts slightly to frame the pendant.
Step 2: Stringing the Beads
-
Start the first side:
Attach a bead stopper or a piece of tape to one end of your wire so beads don’t slide off. Begin stringing from one end, not the center. -
Create the ends:
The ends of this necklace use a specific sequence. Start with a smaller gold spacer or bead, followed by about 6-8 textured cream beads. -
Adding color accents:
Slide on one pink bead. Follow this with a group of 3 textured cream beads. Repeat this ‘1 pink, 3 cream’ sequence two or three times as you work toward the middle. -
Approaching the center:
As you get closer to the center point, switch the pattern to: 1 pink, 2 cream, 1 pink. This subtle change draws the eye inward. -
The center focal point:
For the area holding the pendant, thread on: a gold spacer, a cream bead, gold spacer, a pink bead, gold spacer, a cream bead. -
Attach the pendant:
Before closing the center sequence, slide your gold pendant onto the wire. It should sit between two textured cream beads to hang properly. -
Complete the center symmetry:
Mirror the pattern on the other side of the pendant: cream bead, gold spacer, pink bead, gold spacer, cream bead, gold spacer. -
Finish the second side:
Continue mirroring your initial pattern in reverse. Do the ‘1 pink, 2 cream’ section, followed by the ‘1 pink, 3 cream’ sections until you reach your desired length.
Design Pro-Tip
For that distinct ‘boho’ texture, specifically look for ‘white lava stone’ beads. Their pitted surface contrasts beautifully with the smooth pink beads.
Step 3: Finishing Touches
-
Prepare the first clasp end:
Remove your tape or bead stopper. Thread on a crimp bead, followed by a wire guardian. Loop the wire through the last link of your extension chain. -
Secure the wire:
Feed the wire back through the wire guardian and down through the crimp bead and the first 1-2 beads of your necklace. Pull tight but leave a tiny bit of slack so the necklace drapes naturally. -
Crimp it closed:
Use your crimping pliers to flatten the crimp bead securely. I like to give it a gentle tug to ensure it holds. Trim the excess tail wire close to the beads. -
Cover the crimp:
Place a gold crimp cover over the flattened crimp bead and gently close it with flat nose pliers until it looks like a round gold bead. -
Attach the lobster clasp:
Repeat the crimping process on the other end of the necklace, this time looping the wire guardian through the ring of your lobster clasp. -
Final check:
Before that final crimp, hold the necklace up in a ‘U’ shape to ensure the tension isn’t too stiff. If the beads buckle, loosen the wire slightly beforecrimping.
Level Up
Add tiny gold spacer discs between every single bead near the center for a richer, more metallic look that frames the pendant even more boldly.
Now you have a stunning, beach-ready choker simply waiting to be paired with a breezy summer outfit
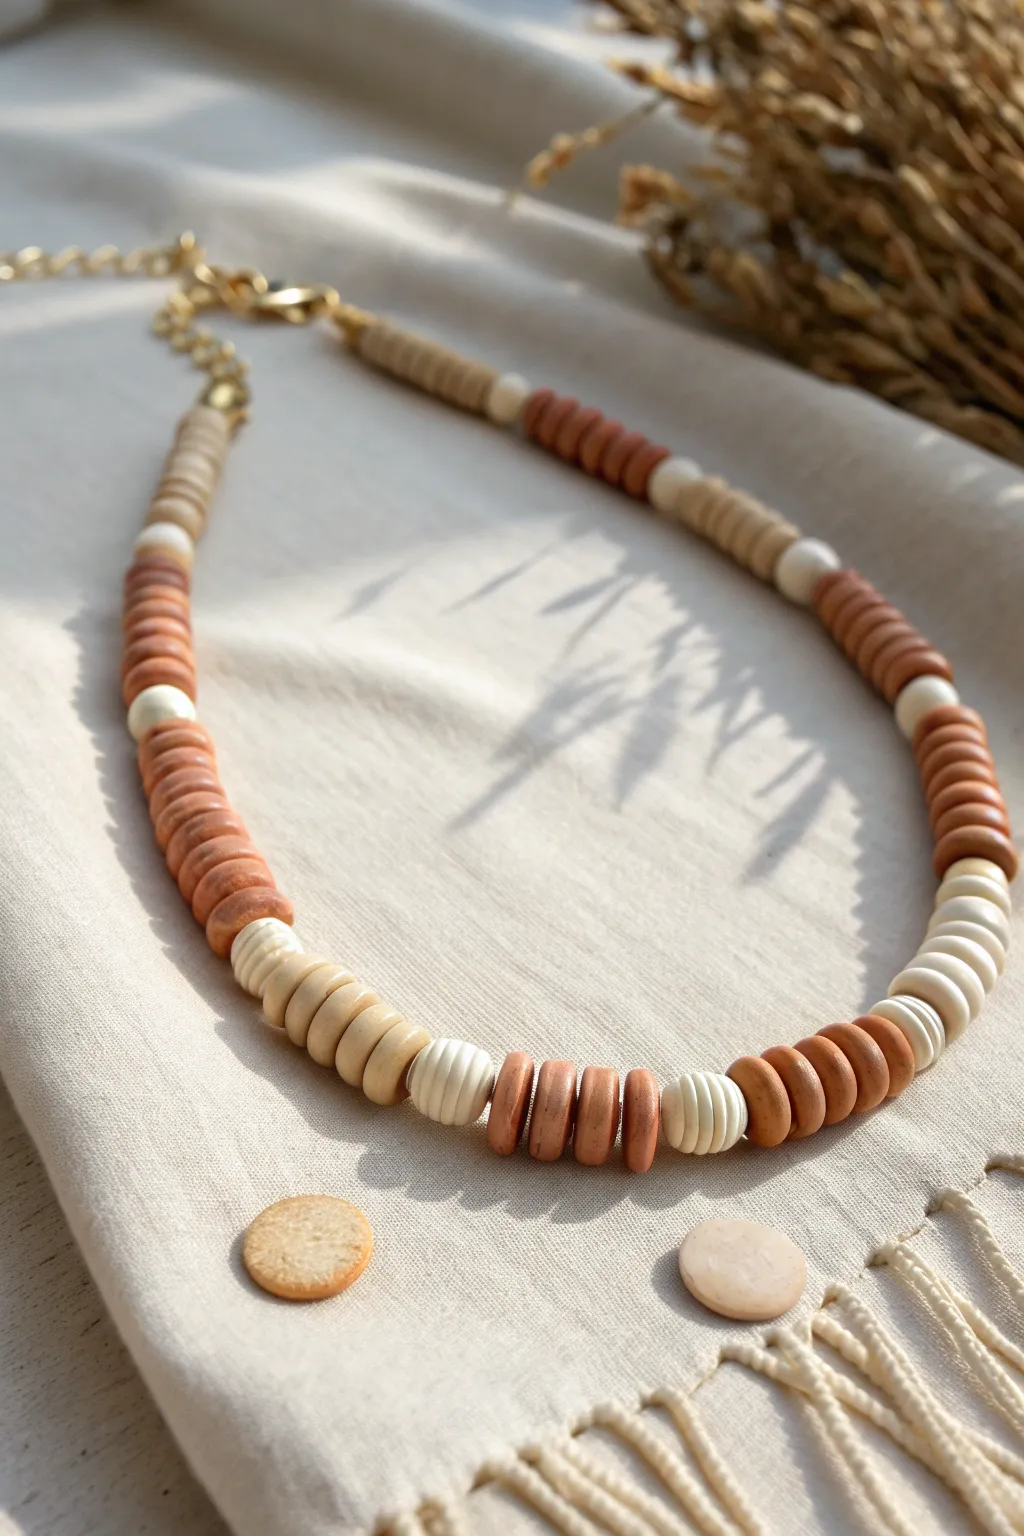
Tiny Clay Bead Bar Choker
This delicate necklace combines earthy, neutral tones with brilliant flashes of gold for a sophisticated bohemian look. The pattern alternates between segments of beige and cream clay discs, broken up by shimmering metallic spacers to create a subtle rhythm.
Step-by-Step Tutorial
Materials
- 4mm polymer clay heishi beads (light beige/tan)
- 4mm polymer clay heishi beads (cream/white)
- 3mm gold-plated brass spacer beads (flat disc or donut shape)
- Gold-plated crimp beads (2mm)
- Gold-plated wire guards (optional but recommended)
- Gold-plated chain extender (2-3 inches)
- Small gold lobster clasp
- Gold jump rings (4mm or 5mm)
- Flexible beading wire (0.015 or 0.018 inch, gold or clear)
- Crimping pliers
- Wire cutters
- Ruler or tape measure
Step 1: Planning and Preparation
-
Measure your wire:
Cut a piece of flexible beading wire approximately 16-18 inches long. This gives you plenty of slack to work with, even though the finished choker will be shorter (usually around 14-15 inches plus the extender). -
Establish the pattern:
Study the necklace rhythm. The main pattern seen here consists of long sections of beige clay beads (about 1.5 inches), followed by a specific sequence: a small gold spacer, a short section of white beads (roughly 5 beads), another gold spacer, and then back to beige. Occasionally, there are larger blocks of white or gold accents. -
Secure the first end:
Thread a crimp bead onto one end of your wire. Pass the wire through a wire guard (if using) and then attach a jump ring or the loop of your chain extender. -
Lock it in place:
Loop the wire back through the crimp bead. Slide the crimp snug against the wire guard/jump ring, but leave a tiny bit of wiggle room so the connection isn’t stiff. Use your crimping pliers to flatten or fold the crimp bead securely.
Step 2: Stringing the Design
-
Start the sequence:
Begin stringing from the back of the neck. Thread on about 1.5 to 2 inches of the light beige clay beads. This will sit near the clasp. -
Add first gold accent:
Slide on a single gold spacer bead, followed by about 4-5 cream/white clay beads. Add another single gold spacer bead to bracket this white section. -
The beige block:
Thread on a longer segment of beige beads. Aim for about 15-20 beads here, creating a noticeable contrast in length compared to the white sections. -
Create a gold bar:
Let’s introduce a purely metallic section. String 4-5 gold spacer beads in a row to create a solid ‘gold bar’ effect. -
Transition to white:
Following the gold bar, add a section of about 8-10 white beads. I find this irregular pattern keeps the eye moving. -
The mixed section:
Add a gold bar (4 spacers), followed by a short white section (5 beads), then another gold bar (4 spacers). This dense cluster of gold adds weight and shine to the center-side of the necklace. -
Fill the center:
Continue alternating. A good central pattern is: long beige section -> single gold spacer -> medium white section -> single gold spacer. Repeat your earlier sequences in reverse order if you want perfect symmetry, or keep mixing up the lengths for an organic feel. -
Check the length:
Periodically hold the wire up to your neck to check where the beads fall. Stop beading when you have about 14 inches of beads (or your desired choker length).
Pro Tip: Seamless Flow
When finishing, ensure there are no gaps between beads, but leave a hair’s breadth of slack. If strung too tightly, the necklace will kinks and won’t drape nicely.
Step 3: Finishing Touches
-
Prepare the final crimp:
Slide a crimp bead onto the open end of the wire. Thread the wire through a wire guard and attach your lobster clasp directly to the guard. -
Close the loop:
Pass the wire back down through the crimp bead and into the first few clay beads adjacent to it. Pull the wire until the loop is small and everything is taut (but not stiff!). -
Crimp and trim:
Use your crimping pliers to secure the final crimp bead. Trim the excess wire tail flush with the beads using your flush cutters. -
Attach the extender:
If you didn’t attach the chain extender in the first step, open a jump ring, hook it onto the loop you made at the start, and attach the chain. Close the jump ring securely using two pairs of pliers to twist it shut. -
Add a charm (optional):
For a professional finish, you can attach a tiny gold logo tag or a single bead on a headpin to the very end of the extender chain.
Level Up: Gemstone Sparkle
Replace one of the short white sections with tiny faceted moonstone or freshwater pearl beads to add an elegant texture contrast.
Now you have a chic, everyday necklace that layers perfectly with longer gold chains

TRACK YOUR CERAMIC JOURNEY
Capture glaze tests, firing details, and creative progress—all in one simple printable. Make your projects easier to repeat and improve.
Chain-and-Clay Hybrid Choker

Marry the elegance of gold metal chains with the earthy, warm tones of terracotta and cream clay beads in this stylish hybrid design. This project strikes a perfect balance between modern jewelry trends and organic textures, resulting in a versatile piece that complements both casual and dressy outfits.
How-To Guide
Materials
- Gold-plated oval link chain (approx. 18-20 inches total)
- Gold beading wire
- Tubular terracotta clay beads (brownish-red)
- Round cream/white ceramic or clay beads
- Round speckled beige stone or clay beads
- 2 Gold jump rings (closed or sturdy open rings)
- 2 Crimp beads
- Lobster clasp
- Jewelry pliers (chain nose)
- Wire cutters
- Crimping tool or flat nose pliers
Step 1: Preparing the Components
-
Measure and Cut Chain:
Begin by deciding the total length of your necklace. Cut two equal segments of the gold oval link chain, aiming for about 6 to 8 inches each depending on how low you want the beaded section to hang. Set these aside. -
Prepare the Beading Wire:
Cut a piece of beading wire approximately 10 to 12 inches long. This gives you plenty of slack to work with while stringing the beads and prevents them from sliding off accidentally. -
Secure the First End:
Thread one crimp bead onto the wire, followed by one of your gold jump rings. Loop the wire back through the crimp bead to create a secure loop holding the ring. -
Crimp to Lock:
Using your crimping tool, firmly flatten or fold the crimp bead to lock the wire in place. Trim any short excess tail of wire close to the crimp so it can be tucked into the first bead.
Loose Wire?
If the beaded section feels stiff or kinks, you crimped too tightly. Leave a 1-2mm gap of exposed wire before crimping to let beads drape naturally.
Step 2: Designing the Bead Pattern
-
Start with Symmetry:
To match the reference photo, we will build a symmetrical pattern working outward from the center, though you’ll string it from one end to the other. Let’s start the sequence. -
String the First Side:
Begin threading beads for the left side: alternate between the tubular terracotta beads and the round speckled beige beads. Occasionally substitute a round cream bead to add brightness. -
Create the Central Focal Point:
As you reach the middle of the wire, place a specific sequence to ground the design. Use a tubular terracotta bead, followed by a speckled beige round bead, then a tubular bead, a cream round bead, and another tubular bead. -
Mirror the Pattern:
Continue stringing the remaining beads in reverse order of the first half. Ensure both sides have an equal visual weight, balancing the reddish tubes with the lighter round spheres. -
Check the Length:
Hold the beaded section up to your collarbone to check if the curvature looks right. The beaded portion should sit centrally and be roughly 6-8 inches long.
Step 3: Final Assembly
-
Close the Beaded Section:
Slide a crimp bead onto the open end of the wire. Add the second jump ring, loop the wire back through the crimp bead, and pull tight—but not so tight that the beads buckle; leave a tiny bit of wiggle room. -
Secure the Second Crimp:
Flatten the crimp bead securely with your tool. Trim the excess wire tail flush with the bead hole. -
Attach the Chains:
Open the last link of your pre-cut gold chains using chain nose pliers. Attach one chain to the jump ring on the left side of the beaded strand and close the link securely. -
Connect the Right Side:
Repeat the previous step for the right side, attaching the second chain segment to the right jump ring. -
Add the Clasp:
On the free end of one chain, attach a jump ring and your lobster clasp. On the free end of the opposite chain, attach a slightly larger jump ring to act as the receiver for the clasp. -
Final Polish:
Wipe down the beads with a soft cloth to remove fingerprints and double-check that all metal links are fully closed so the chain doesn’t slip loose.
Texture Twist
Mix in small gold spacer beads between the clay tubes and round stones. This adds a subtle metallic shimmer that ties the chain and beads together.
Now you have a stunning mixed-media necklace that adds an artistic touch to your daily wardrobe
Paperclip-Link Clay Bead Choker
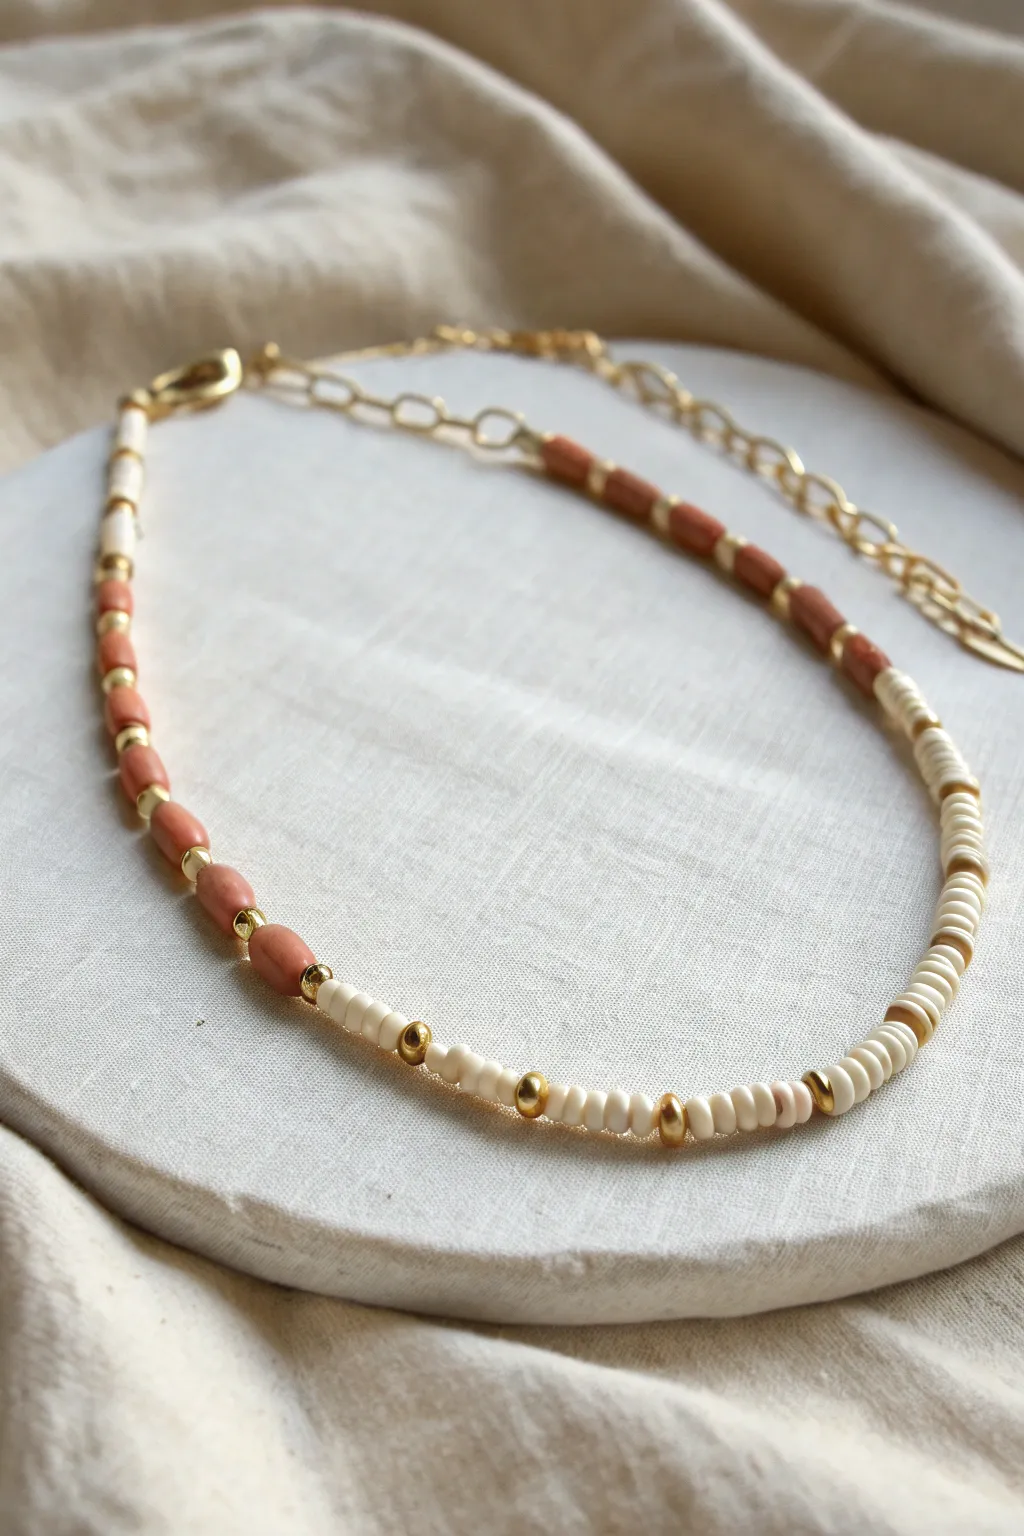
This earthy yet elegant choker combines the smooth texture of terra-cotta clay beads with the organic variation of cream heishi discs. The addition of a sleek gold paperclip chain at the back elevates the design from simple beachwear to everyday chic.
Step-by-Step
Materials
- Terra-cotta or coral tubular clay beads (approx. 4mm x 6mm)
- Cream/off-white heishi clay beads (approx. 4mm)
- Small gold nugget spacer beads (2-3mm)
- Larger gold round spacer beads (4-5mm)
- Gold-plated paperclip chain segment (approx. 3-4 inches)
- Beading wire (gold color preferred)
- 2 Crimp beads
- 2 Wire guardians (optional but recommended)
- 2 Jump rings (4-6mm)
- 1 Lobster clasp
- Wire cutters
- Crimping pliers or chain-nose pliers
Step 1: Planning and Prep
-
Assess your beads:
Lay out your materials to visualize the pattern. Notice that this design is asymmetrical: one side features long terra-cotta tubes, while the center and opposite side transition to flat cream discs. -
Cut the wire:
Cut a piece of beading wire approximately 12-14 inches long. You won’t need the full length for beads since the back chain takes up significant space, but extra length makes finishing easier. -
Begin the first side:
Start by stringing one crimp bead onto your wire. Loop the wire back through the crimp bead to create a small loop (or use a wire guardian here for extra durability) and flatten the crimp bead securely with your pliers.
Step 2: Creating the Terra-Cotta Section
-
Start the pattern:
Thread on a small gold nugget spacer first to hide your crimp connection. This gives it a polished start. -
String the tubes:
Add your first terra-cotta tubular bead. Follow this immediately with a small gold spacer. -
Build the section:
Continue this alternating pattern—one terra-cotta tube, one small gold spacer—until you have roughly 2 to 2.5 inches of beaded length. This section is designed to sit on the side of the neck rather than dead center.
Wire Tension Tip
Before crimping the final end, curve the necklace into a ‘U’ shape on your table. If you crimp it while it’s perfectly straight, it will become stiff and won’t drape naturally around your neck.
Step 3: Transitioning to Cream Discs
-
Switch beads:
After your last terra-cotta bead, thread on a slightly larger gold round bead. This marks the transition point in the design. -
Thread the heishi beads:
Begin stringing the cream heishi discs. Thread about 5 to 7 discs in a row. -
Add gold accents:
Interject a larger gold round spacer bead. I find that spacing these gold accents irregularly—every 5 to 8 discs—keeps the look organic and relaxed. -
Complete the center:
Continue the pattern of cream discs and occasional gold spacers. You want this section to be the longest, curving across the collarbone and up the other side. Aim for about 5 to 6 inches of length here. -
Create the final transition:
If you wish to mirror the other side, you can add another small section of terra-cotta tubes here, but the example image actually keeps the cream beads going until the end, creating a modern asymmetrical look. Finish with a final gold spacer.
Level Up: Mixed Media
Add a small baroque pearl charm to the center or attach tiny customized letter charms to the paperclip links at the back for a hidden personalized touch.
Step 4: Attaching the Chain
-
Secure the beadwork:
Slide on your second crimp bead. Feed the wire through a closed jump ring (or wire guardian), then back through the crimp bead and into the last few beads you strung. -
Crimp and trim:
Pull the wire taut so there are no gaps in your bead, but keep it flexible enough to drape nicely. Flatten the crimp bead firmly and trim the excess wire close to the beads. -
Prepare the chain:
Divide your paperclip chain. You need two pieces, but since we already beaded the majority of the length, you might only need one segment of chain on one side, or two short segments if you want the clasp centered. -
Design note:
In the reference image, the chain acts as an extender and a design element. Attach a 2-3 inch segment of paperclip chain to the jump ring you just secured. -
Add the clasp:
On the very first loop you created at the start (the terra-cotta side), use a jump ring to attach your lobster clasp. -
Final check:
The lobster clasp will now hook into any link of the paperclip chain, making the choker adjustable. Test the fit and enjoy your new accessory.
This versatile piece looks wonderful layered with simple gold chains or worn solo for a pop of texture
Linked Clay Bead Segment Choker
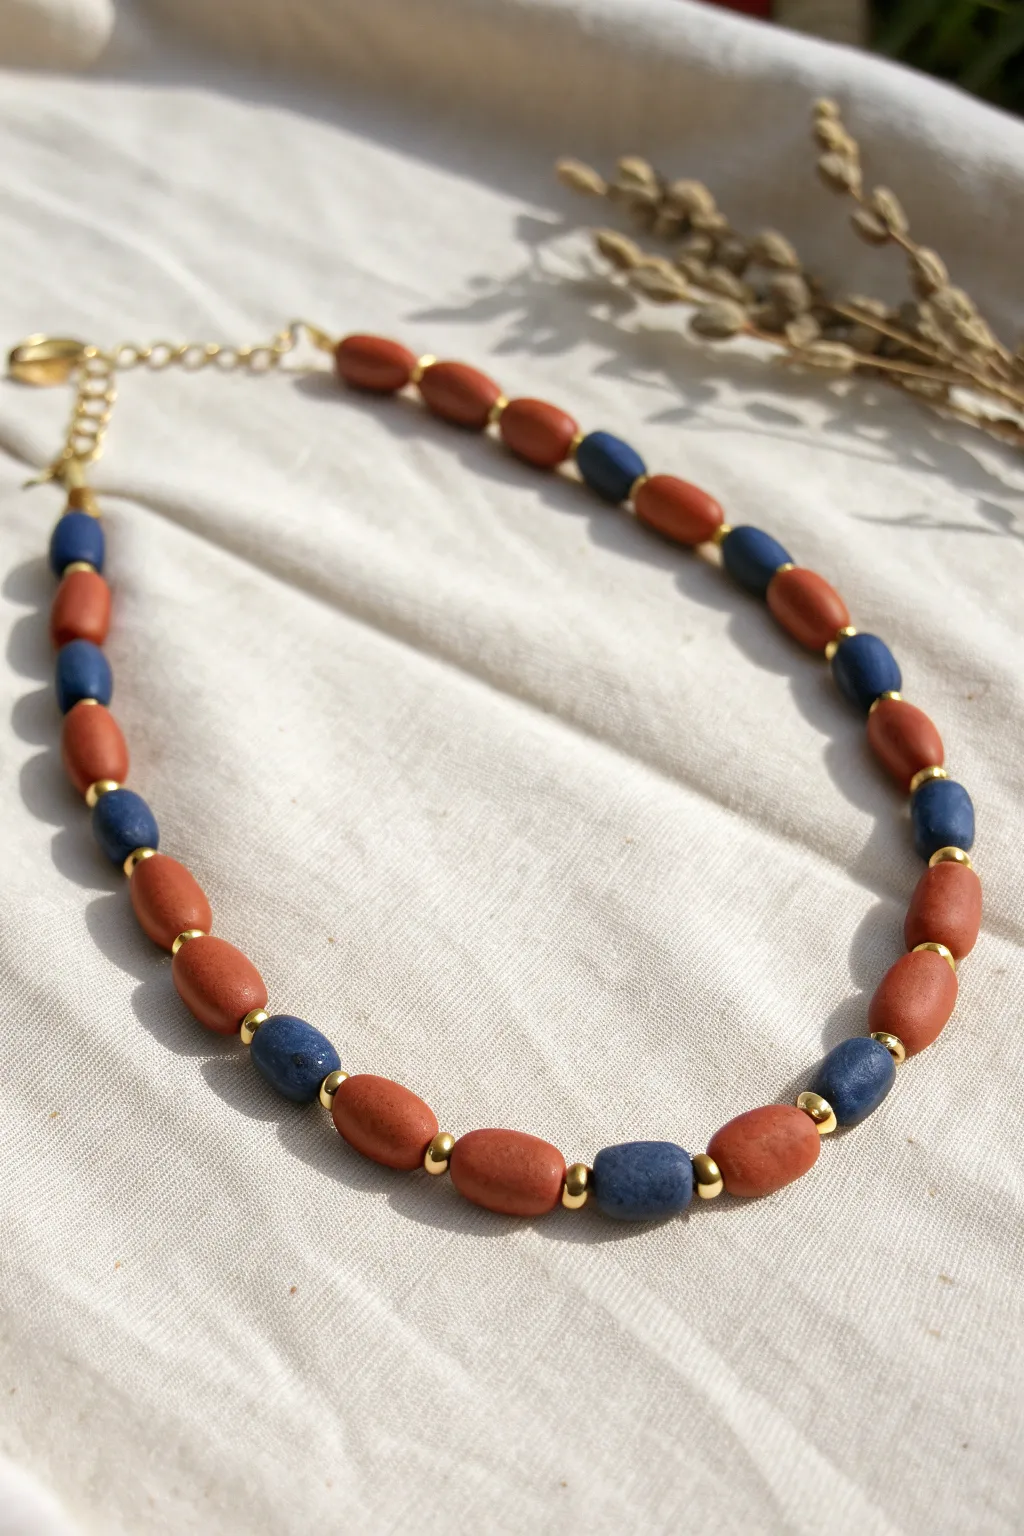
Embrace earthy elegance with this handcrafted choker featuring smooth, oblong clay beads in warm terracotta and deep indigo blue. Small gold spacer beads add a touch of luxe shine between the clay segments, creating a rhythmic and versatile accessory perfect for everyday wear.
Step-by-Step Tutorial
Materials
- Polymer clay (terracotta/burnt orange)
- Polymer clay (indigo/navy blue)
- Small gold bead spacers (approx. 3mm)
- Gold finish jewelry chain (cable chain)
- Gold finish lobster clasp
- Gold finish jump rings (4mm)
- Beading wire or strong nylon thread
- Crimp beads and crimp covers (gold)
Step 1: Crafting the Beads
-
Condition the Clay:
Begin by conditioning both the terracotta and indigo polymer clay blocks separately until they are soft and pliable. This prevents cracking later. -
Roll a Log:
Roll the terracotta clay into a smooth, even log or ‘snake’ shape, roughly 8mm in thickness. Repeat this process for the indigo clay. -
Measure and Cut:
Use a tissue blade to cut the logs into equal segments. For this design, aim for beads that are about 10-12mm long. You will need more terracotta beads than blue ones. -
Shape the Ovals:
Gently roll each cut segment between your palms or on your work surface to smooth out the sharp edges, creating little oblong, pill-like shapes. -
Pierce the Holes:
Using a bead pin or a thick needle, carefully pierce a hole through the center of each bead lengthwise. Rotate the needle as you push to avoid distorting the oval shape. -
Bake:
Arrange your beads on a baking sheet lined with parchment paper or cardstock. Bake according to your specific polymer clay brand’s instructions (usually around 275°F/130°C for 15-30 minutes). -
Cool and Finish:
Allow the beads to cool completely. If there are any rough spots around the holes, you can lightly sand them with fine-grit sandpaper. -
Seal (Optional):
If you prefer a specific sheen, you can coat the beads with a matte or satin varnish, though leaving them raw gives a lovely natural stone texture.
Step 2: Assembly
-
Plan the Pattern:
Lay out your beads on a bead board or cloth to establish the pattern seen in the image: two terracotta beads, one blue bead, two terracotta, and so on. -
Cut the Wire:
Cut a length of beading wire approximately 18 inches long. This gives you plenty of slack to work with for a choker length. -
Start the Strand:
Feed a crimp bead onto one end of the wire, followed by a wire guardian or a jump ring. Loop the wire back through the crimp bead and flatten it securely with pliers. -
Cover the Crimp:
Place a gold crimp cover over the flattened crimp bead and gently close it with pliers to make it look like a seamless gold bead. -
Begin Beading:
Thread on your first few beads following the pattern. I find it easiest to start with the center section to ensure symmetry later. -
Insert Spacers:
Crucial step: Place a small gold spacer bead between every single clay bead. This separation prevents friction and adds that professional metallic rhythm to the piece. -
Complete the Pattern:
Continue stringing—terracotta, gold spacer, terracotta, gold spacer, blue, gold spacer—until you reach your desired beaded length (usually about 12-14 inches for the beaded section). -
Secure the End:
Once the beads are strung, add a crimp bead and loop the wire through a jump ring or chain link. Thread the wire back through the crimp and the last few beads, pull tight (but not stiff), and flatten the crimp. -
Add the Hardware:
Attach a 2-3 inch length of extension chain to one jump ring and a lobster clasp to the other jump ring using pliers.
Smooth Operator
To prevent fingerprints on your clay, lightly dust your fingers with cornstarch or wear latex finger cots while rolling the oval shapes.
Texture Twist
Before baking, gently roll the raw clay beads over coarse sandpaper or a textured fabric to mimic the look of real stone or concrete.
Fasten your new necklace and enjoy the warm, artisanal vibe it adds to your outfit
Ombre Sunset Heishi Choker
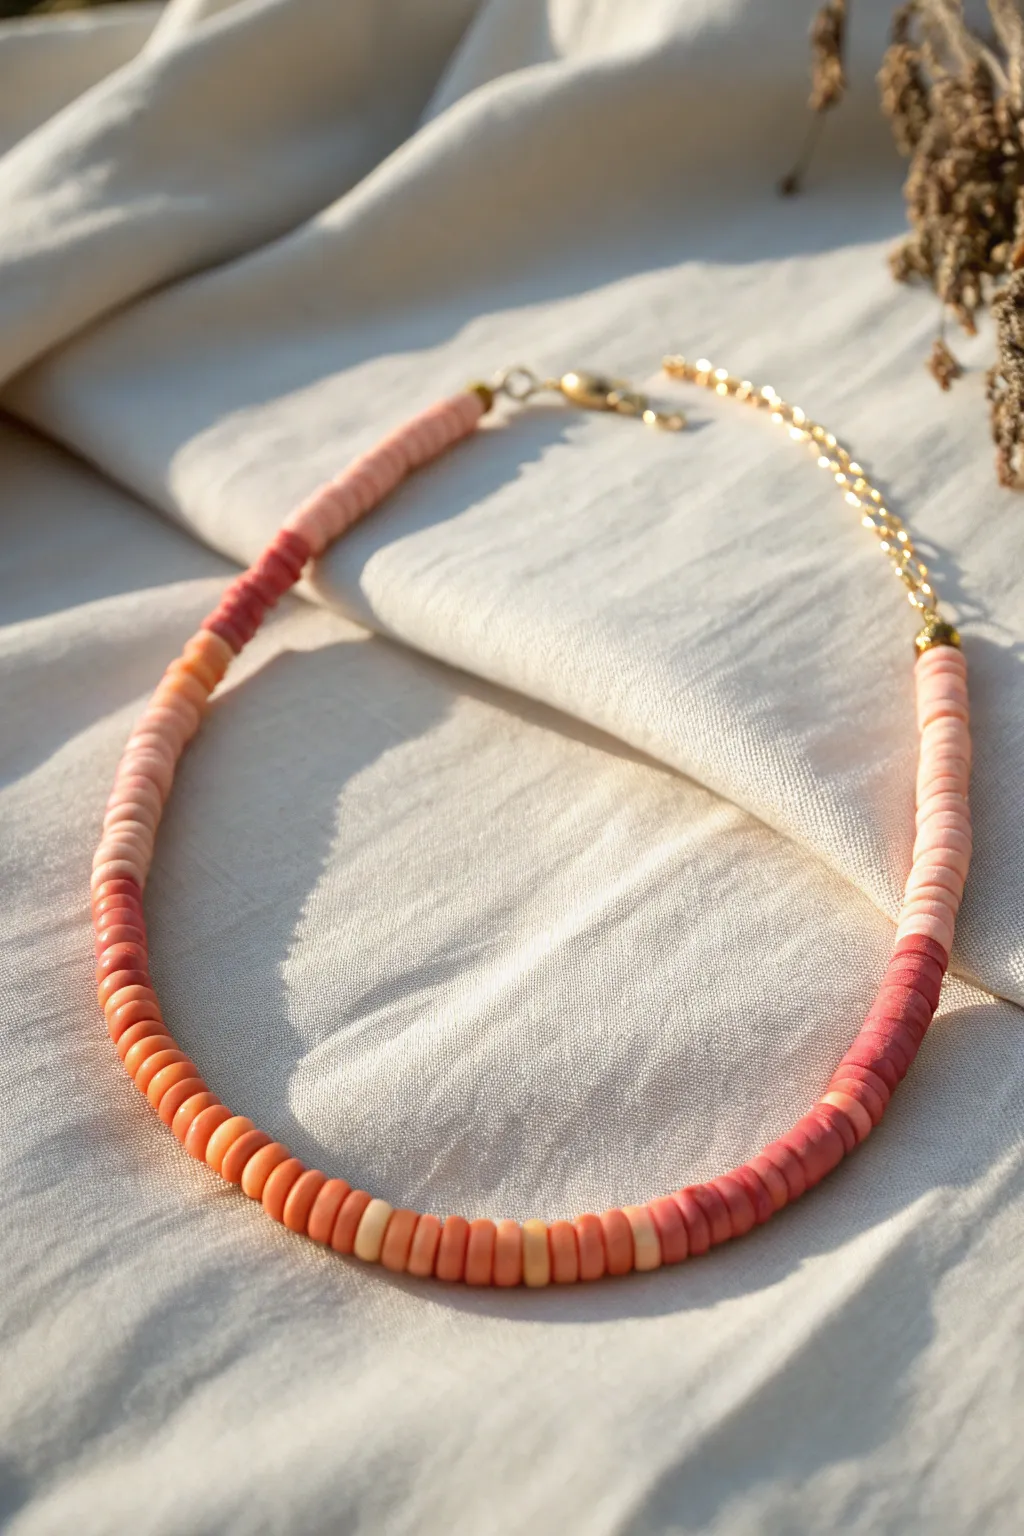
Capture the warmth of golden hour with this stunning color-blocked heishi bead necklace. Featuring a gradient of soft peach, vibrant orange, and deep rust tones, this choker mimics the perfect sunset sky.
Step-by-Step
Materials
- Heishi polymer clay disc beads in colors: pale peach/blush, coral orange, rust/terracotta, and deep rose pink
- Gold spacing beads (2mm or 3mm)
- Beading wire (clear nylon-coated or flexible beading wire)
- Gold crimp beads
- Gold finish lobster clasp
- Gold extension chain (optional but recommended for adjustable fit)
- Gold crimp bead covers (optional)
- Wire cutters
- Flat-nose pliers
Step 1: Preparation and Design
-
Measure and cut:
Begin by measuring your desired choker length. A standard choker sits around 14-16 inches. Cut a piece of beading wire about 4 inches longer than your final length to allow ample room for finishing the ends. -
Plan your palette:
Before stringing, lay out your heishi beads on a bead board or soft cloth. To recreate the look in the photo, you will creating distinct color blocks rather than a bead-by-bead mix. -
Establish the pattern:
The specific pattern shown relies on asymmetrical color blocking. Plan for a central section of bright coral/orange that transitions into lighter peach on one side and darker rust/rose tones on the other.
Uneven Blocks?
Don’t stress about exact symmetry. The organic look works best when color blocks are slightly different lengths, mimicking natural cloud formations.
Step 2: Stringing the Ombre Gradient
-
Start the first end:
Thread a crimp bead onto one end of your wire, followed by a jump ring or the loop of your extension chain. Loop the wire back through the crimp bead. -
Secure the clasp:
Use your flat-nose pliers to flatten the crimp bead securely. Give it a gentle tug to ensure it holds tight. -
Begin with blush:
Start stringing from one side, beginning with your lightest pale peach or blush beads. String about 2-3 inches of this single color. -
The first transition:
To create the blocky sunset feel, visualize where the colors shift. After the blush section, switch abruptly to a deep rose or terracotta color for a short segment (about 1 inch). -
The central gradient:
Now move into the vibrant center. String a long section of coral-orange beads. This is the focal point of the choker. -
Add subtle texture:
Notice in the reference that occasionally a single lighter bead (like a pale yellow or light peach) interrupts the orange block. I like to add one of these every inch or so to break up the visual weight. -
The second transition:
As you move past the center, switch to a darker rust or deep red clay bead. String this for approximately 1.5 inches. -
Mirroring the ends:
Finish the bead stringing with another section of the pale blush pink beads, ensuring the final length matches your initial measurement. -
Add gold accents:
Just before you finish the beading, add a small gold spacer bead at the very end of the clay beads to give it a polished, professional termination.
Step 3: Finishing Touches
-
Prepare the final crimp:
Thread a crimp bead onto the open end of the wire, followed by the lobster clasp. -
Looping back:
Pass the wire back through the crimp bead and through the first few heishi beads on the strand to hide the tail. -
Pulling it tight:
Pull the wire snug so there are no large gaps between beads, but be careful not to make it so tight the necklace becomes stiff. It needs to drape naturally. -
Crimp and trim:
Flatten the crimp bead with your pliers. Trim the excess wire tail flush against the beads using your wire cutters. -
Optional covers:
If you are using crimp bead covers, place them over your flattened crimps now and gently close them with pliers to make them look like round gold beads.
Pro Tip: Bead Board
Use a flocked bead board to lay out the entire gradient before stringing. This lets you adjust the color transitions perfectly without restringing.
Now you have a warm, stylish accessory that carries the feeling of summer sunset wherever you go
Beachy Blue-and-Sand Choker
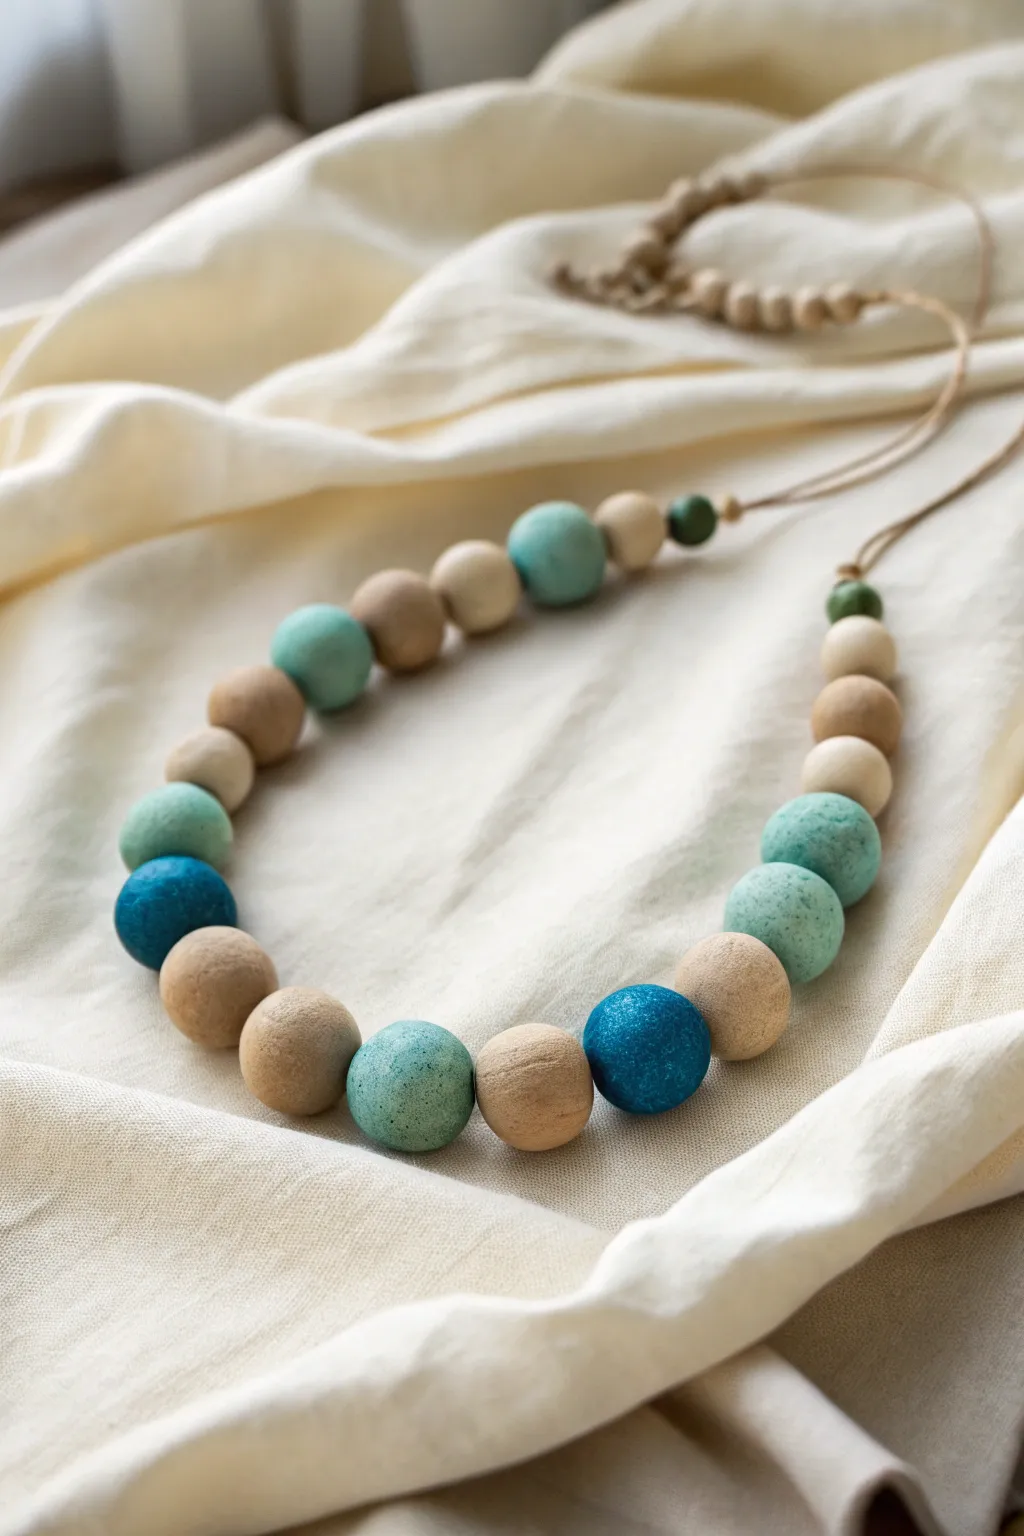
Capture the essence of a serene shoreline with this stunning polymer clay necklace, blending textured sandy beige tones with smooth teal and deep ocean blue spheres. The varied finishes—from matte and sandy to slightly speckled—create a tactile piece that feels like collected sea glass and pebbles resting against your collarbone.
Detailed Instructions
Materials
- Polymer clay in beige/ecru
- Polymer clay in light teal/turquoise
- Polymer clay in deep ocean blue
- Polymer clay in olive green (small amount)
- Hemp or waxed cotton cord (light brown)
- Fine grit sandpaper or a rough sanding sponge
- Coarse sea salt or sand (for texturing)
- Acrylic roller or pasta machine
- Bead piercing pins or toothpicks
- Wet/dry sandpaper (400-800 grit)
- Small round cutter (optional, for sizing)
- Oven for baking
Step 1: Creating the Sand Beads
-
Condition the Clay:
Start by warming up the beige polymer clay in your hands until it is pliable. This is crucial for preventing cracks later on. -
Add Texture:
To mimic the look of sand, roll your beige clay into a flat sheet. Sprinkle a small pinch of coarse sea salt or actual clean sand onto the surface and gently roll over it just enough to embed the granules. -
Form the Spheres:
Cut uniform portion sizes of the textured clay. Roll roughly 10-12 medium-sized balls between your palms. Don’t worry if they aren’t perfectly smooth; the texture is part of the charm. -
Pierce the Holes:
Using a bead pin or a toothpick, carefully pierce a hole through the center of each bead. Twist the tool gently as you push through to avoid deforming the sphere.
Fixing Flat Spots
If your beads developed flat spots during baking, sand them gently in a circular motion under running water. This rounds them back out without leaving deep scratches.
Step 2: Crafting the Sea Shades
-
Mix Custom Colors:
For the teal beads, you might want a varied look. Mix a little white clay into your teal to create a softer, sea-foam hue for a few of the beads, keeping others fully saturated. -
Create Speckled Effects:
For the light blue beads shown in the image, shave tiny flecks of dark blue or dry, baked clay into your raw teal clay. Roll the ball until the flecks are integrated but still visible as specks. -
Form the Blue Beads:
Roll out your deep ocean blue clay into 4-5 medium-sized balls. These should look smoother than the sand beads to provide visual contrast. -
Make Accent Beads:
Roll 2-4 much smaller beads using the olive green and beige clay. These will sit near the clasp area to taper the design. -
Piercing the Colorful Beads:
Pierce holes through all your blue, teal, and accent beads, ensuring the hole size matches the cord you plan to use.
Step 3: Baking and Finishing
-
Bake the Beads:
Arrange your beads on a baking sheet lined with parchment paper. I like to use an accordion-folded piece of cardstock to hold them so they don’t develop flat spots. Bake according to your clay package instructions (usually 275°F/135°C for 15-30 minutes). -
Cool and Soak:
Let the beads cool completely. If you used salt for texture on the beige beads, soak them in warm water for 10 minutes to dissolve the salt, leaving behind realistic craters. -
Sand for Matte Finish:
Lightly sand the blue and teal beads with wet/dry sandpaper to remove fingerprints and give them a soft, sea-glass matte finish. -
Layout the Design:
Lay out your beads on a towel to plan the pattern. The image uses an asymmetrical pattern: alternating sand and blue in the center, transitioning to solid blocks of beige towards the ends.
Add a Sea Scent
Before the final varnish (if using) or while stringing, rub a tiny drop of essential oil like sea salt & sage onto the wooden or unsealed clay beads for a sensory experience.
Step 4: Assembly
-
Prepare the Cord:
Cut a length of hemp cord roughly 24 inches long. Tie a knot at one end if you want a fixed stop, or prepare it for a sliding knot. -
String the Beads:
Thread the beads onto the cord following your layout. The larger blue and sand beads should sit centrally, with the smaller accent beads tapering off at the top. -
Secure the Ends:
Once strung, check the length against your neck. Tie a secure overhand knot flush against the last bead on each side to keep them in place. -
Final Clasp:
Finish by creating a sliding macramé knot or simply tying loop knots at the ends, allowing the extra cord loosely hang down the back as a decorative tassel.
Now you have a serene, handcrafted accessory that brings a touch of the coast to any outfit you wear
Fruit-Slice Charm Clay Bead Choker
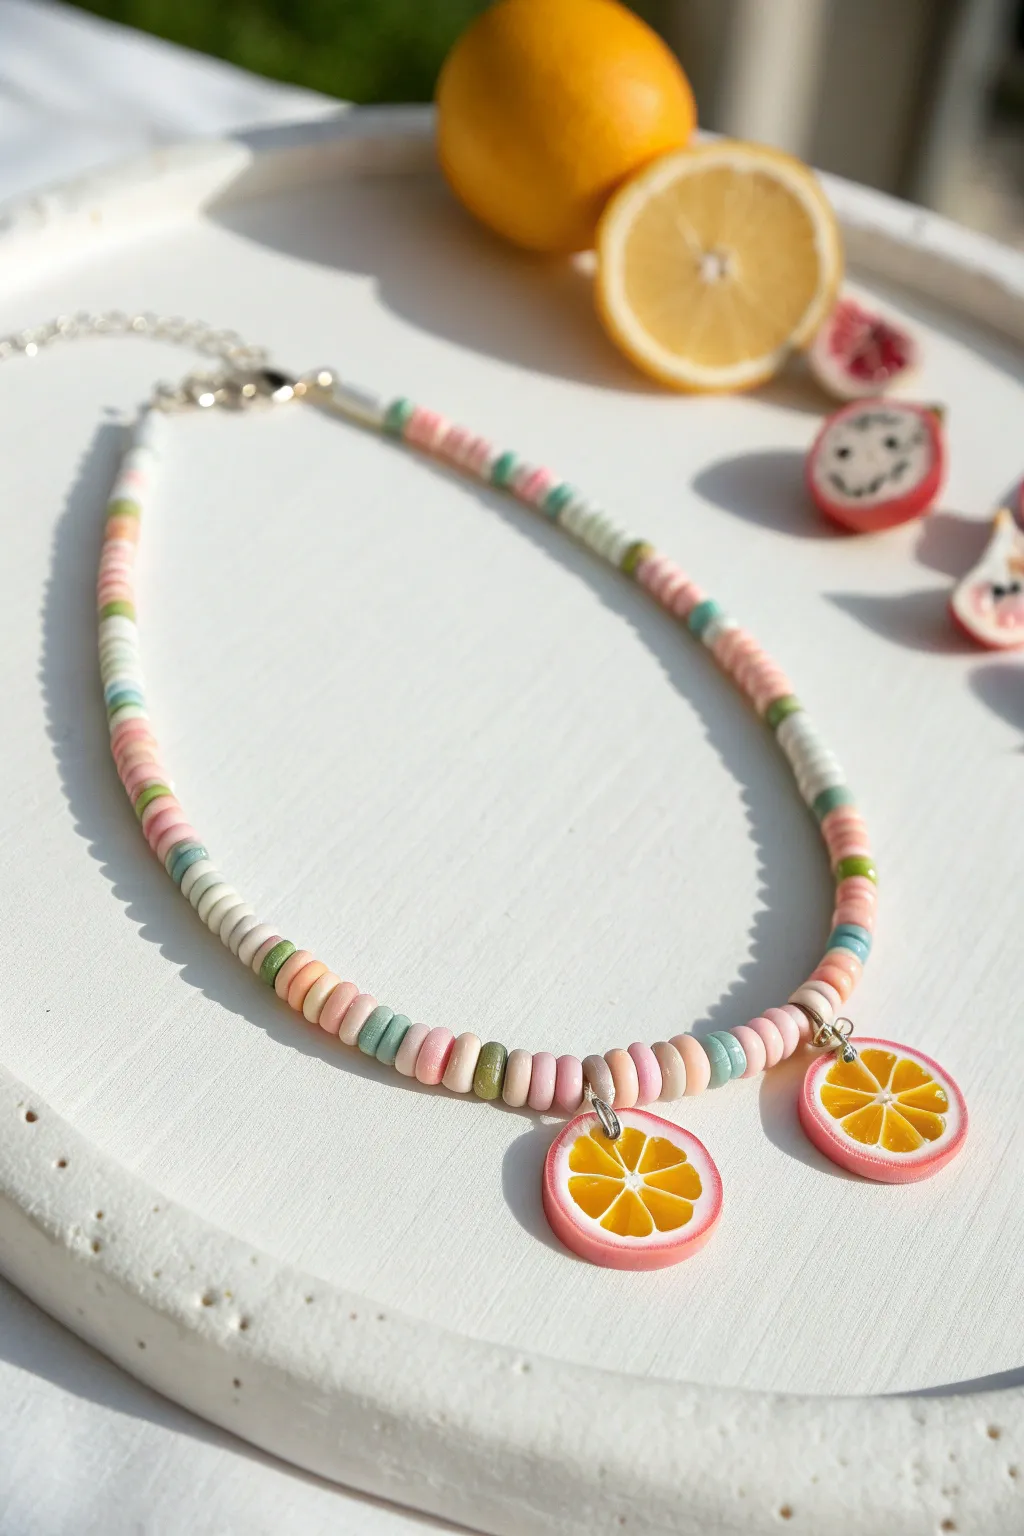
Capture the essence of summer refreshment with this playful clay bead choker featuring adorable pink grapefruit or lemon slices. The soft pastel palette of polymer clay discs creates a sweet, candy-like aesthetic that pairs perfectly with warm-weather outfits.
Step-by-Step
Materials
- Polymer clay Heishi beads (soft pink, peach, white/cream, sage green/teal)
- 2 Polymer clay fruit slice charms (pink grapefruit/lemon design)
- Beading wire (tigertail or flexible nylon-coated wire)
- 2 silver jump rings (approx 6mm)
- 2 silver crimp beads
- 2 silver bead tips (calotte crimps)
- Silver lobster clasp
- Silver extension chain
- Chain nose pliers
- Wire cutters
- Bead design board or measuring tape
Step 1: Preparation & Planning
-
Measure the wire:
Cut a length of beading wire approximately 16-18 inches long. This gives you plenty of extra room for finishing the ends, even if you want a tight 14-inch choker fit. -
Prepare the charms:
Take your two fruit slice charms and attach a jump ring to the top loop of each charm if they don’t already have one attached. Open the jump ring sideways with your pliers, slip it on, and close it securely. -
Lay out the pattern:
Before stringing, plan your color sequence on a bead board. The design uses a mix of pale pinks, creams, and peaches, punctuated by single teal or sage green beads every 6-8 beads to create a rhythmic pattern. -
Secure the first end:
Thread a crimp bead onto one end of your wire, followed by a bead tip. Loop the wire back through the crimp bead. -
Crimp firmly:
Use your pliers to flatten the crimp bead tightly. Trim the excess wire tail close to the crimp, then close the clamshell of the bead tip over the crushed crimp for a professional finish.
Pattern Rhythm
Don’t stress precise counting! Varying the pink sections between 4 and 7 beads makes the pattern feel organic and fun.
Step 2: Stringing the Beads
-
Begin the sequence:
Start stringing your heishi beads. I like to begin with about 1 inch of just the neutral cream and pale pink beads near the clasp for a subtle start. -
Establish the pattern:
Now start your main pattern: string about 4 to 6 warm-toned beads (mix pink, peach, apricot), then add one teal or sage green bead as an accent. -
Continue the rhythm:
Repeat this sequence—cluster of pinks, single green accent—continuously. The slight irregularity in the number of pink beads between greens makes it look more organic and relaxed. -
Check the midpoint:
Stop when you have beaded approximately 5.5 to 6 inches of length. Hold it up to your neck to verify this hits where you want the first charm to sit. -
Add first charm:
Slide the first fruit charm onto the wire by threading through its jump ring. Ensure the fruit face is oriented correctly.
Step 3: Creating the Centerpiece
-
Create the spacer gap:
String a small section of beads to sit between the two fruit slices. Add about 6 to 8 beads here, keeping the pattern consistent (mostly pink/peach with one green accent involved). -
Add second charm:
Slide on the second fruit slice charm. The small gap of beads ensures the charms don’t clack together but hang nicely side-by-side. -
Finish the second half:
Resume your regular beading pattern (pink clusters with green spacers) for the remaining length of the necklace. -
Match the length:
Measure the second side against the first side to ensure symmetry. The total beaded length should be around 13-14 inches for a choker style.
Make It a Set
Use leftover beads to make a matching bracelet, or turn a single fruit slice charm into a simple pair of coordinating hoop earrings.
Step 4: Finishing Touches
-
Prepare the final end:
Thread on your second bead tip, followed by a crimp bead. -
Tighten the slack:
Feed the wire back through the crimp bead and pull it tight so the beads are snug but not stiff. The necklace needs to curve comfortably around your neck. -
Final crimp:
Flatten the crimp bead securely with your pliers. Trim the excess wire flush. -
Close the tip:
Close the bead tip clamshell over the crimp. The loop on the bead tip is now ready for hardware. -
Attach hardware:
Open the loop on one bead tip to attach the lobster clasp. On the other bead tip, attach the extension chain using a jump ring.
Now you have a refreshing accessory ready to brighten up any sunny day outfit.
Checkerboard Pattern Clay Bead Choker

This minimalist choker brings a sophisticated touch to the classic checkerboard trend by alternating matte black and natural tan square beads. The resulting repeating pattern feels rhythmic and modern, perfect for layering or wearing solo as a statement piece.
Step-by-Step Tutorial
Materials
- Small square beads in matte black (approx. 4mm)
- Small square beads in natural tan or light wood tone (approx. 4mm)
- Flexible beading wire (gold or silver tone to match findings)
- 2 Crimp beads (gold or silver tone)
- 2 Crimp covers (optional, for a polished finish)
- Lobster claw clasp
- Extension chain (approx. 2 inches) with a teardrop charm
- 2 Jump rings (4mm or 5mm)
- Wire cutters
- Chain nose pliers
- Crimping pliers
Step 1: Preparing the Strand
-
Measure your wire:
Cut a length of flexible beading wire about 18 to 20 inches long. This gives you plenty of slack for a standard 14-16 inch choker, making it easier to attach the clasps without tension. -
Secure the first end:
Slide one crimp bead onto the wire, followed by a jump ring. Loop the wire back through the crimp bead to create a small, snug loop around the jump ring. -
Crimp firmly:
Use your crimping pliers to flatten the crimp bead securely. I always give a gentle tug on the loop to make sure the wire doesn’t slip before moving on. -
Finish the start:
Cover the flattened crimp bead with a crimp cover if you are using one, gently closing it with your chain nose pliers to look like a round bead.
Step 2: Creating the Pattern
-
Start the sequence:
Thread your first bead onto the wire. It doesn’t matter which color you start with, but push it all the way down to cover the tail of the wire left from the crimping step. -
Alternate colors:
Add a bead of the contrasting color. If you started with black, add tan. If you started with tan, add black. This simple A-B pattern creates the checkerboard look. -
Find your rhythm:
Continue stringing the square beads, alternating strictly between black and tan. Keep an eye on the orientation of the cubes; they should sit flat against each other. -
Check the fit:
Periodically hold the strand up to your neck to gauge the length. Stop stringing once you reach your desired choker length (usually around 14–15 inches for the beaded portion). -
Verify the end:
Look at your very first bead and your very last bead. For a perfectly symmetrical look, try to end on the opposite color you started with, though this isn’t strictly necessary.
Uneven Beading?
Square beads can sometimes twist. Ensure you use flexible beading wire rather than fishing line so the beads lay flat against the skin without flipping.
Step 3: Attaching the Findings
-
Prepare the closer:
Slide a crimp bead onto the remaining wire tail. -
Add the second jump ring:
Thread the wire through the second jump ring and pass it back down through the crimp bead you just added, and through the last bead or two on your strand. -
Tighten the slack:
Pull the wire tail until the loop is small and the beads are sitting together snugly. Be careful not to make it too stiff; the necklace needs to drape naturally around the curve of your neck. -
Secure the end:
Flatten the crimp bead with your crimping pliers and trim the excess wire flush against the beads using your wire cutters. -
Attach the hardware:
Use your chain nose pliers to open the jump ring on one end and slide on your lobster clasp. Close the jump ring securely so there is no gap. -
Add the extension:
Open the jump ring on the opposite end and attach the extension chain. This allows the choker to be adjustable for different necklines. -
Final polish:
If you used crimp covers, gently close the final one over the second crimp bead to match the other side. Give the necklace a quick wipe with a soft cloth to remove any fingerprints.
Pro Tip: Texture
For that organic look shown in the image, source ‘coconut shell’ or ‘matte wood’ square beads instead of shiny plastic or glass ones.
Now you have a stylish, versatile piece that adds a graphic pop to any outfit
Marbled Clay Bead Statement Choker
Embrace organic textures with this stunning polymer clay choker, featuring a blend of warm terracotta tones and creamy white marbling. The substantial beads create a bold yet natural statement piece perfect for elevating simple outfits.
Detailed Instructions
Materials
- White or translucent polymer clay
- Terracotta or rust-colored polymer clay
- Beige or tan polymer clay
- Small copper or bronze spacer beads (approx. 3-4mm)
- Beading wire
- 2 Crimp beads
- Gold-tone lobster clasp
- Gold-tone chain extender
- 2 Jump rings
- Toothpick or bead piercing tool
- Acrylic rolling pin
- Needle nose pliers
- Wire cutters
- Oven for baking
Step 1: Preparing the Clay
-
Condition the base colors:
Start by thoroughly kneading each block of clay—white, terracotta, and beige—until they are soft and pliable. This prevents cracks during baking. -
Create the stone-look mix:
For the solid-looking textured beads, mix roughly two parts terracotta clay with one part beige. Don’t mix them fully; stop when you have a natural, stony swirl. -
Prepare the marbled mix:
Roll a thick log of white clay and a very thin snake of terracotta clay. Twist the thin terracotta snake around the white log. -
Marbling technique:
Roll and twist the white and terracotta log together, fold it in half, and roll again. Repeat this simple process 2-3 times until you see beautiful, vein-like streaks.
Smooth Operator
To remove fingerprints before baking, lightly brush your raw clay beads with a tiny amount of baby oil or cornstarch for a flawless, professional finish.
Step 2: Forming the Beads
-
Portion the clay:
Cut your clay logs into equal-sized segments. You will need roughly 15-17 segments depending on your desired necklace length. -
Roll spheres:
Roll each segment between your palms to create smooth, round spheres. I like to vary the pressure slightly to ensure they aren’t perfectly manufactured-looking. -
Refine the surface:
Inspect each bead for fingerprints. Gently buff them lightly with your palm or a piece of parchment paper to smooth them out completely. -
Pierce the holes:
Using a bead piercing tool or a toothpick, carefully poke a hole through the center of each bead. Twist the tool as you push to prevent flattening the sphere. -
Bake the beads:
Arrange the beads on a dedicated baking sheet or tile. Bake according to your brand of clay’s instructions (usually around 275°F or 130°C for 15-30 minutes). Let them cool completely.
Step 3: Assembling the Choker
-
Cut the wire:
Measure a length of beading wire about 18 inches long to allow plenty of room for finishing the ends. -
Secure the first end:
Thread a crimp bead onto one end of the wire, followed by a jump ring attached to your clasp. Loop the wire back through the crimp bead and flatten it securely with pliers. -
Begin beading:
Start stringing your beads. The pattern shown alternates between the solid terracotta-blend beads and the white marbled beads. -
Add spacers:
Place one small copper spacer bead between every large clay bead. This crucial step separates the large spheres and adds that subtle metallic shine visible in the photo. -
Check the length:
Continue the pattern until the beaded section is about 14-15 inches long, or fits comfortably around the base of your neck. Hold it up to your neck to test. -
Attach the extender:
On the unfinished end, thread on a crimp bead and then the chain extender. Loop the wire back through the crimp bead. -
Final secure:
Pull the wire taut so there are no gaps between beads, but not so tight that the necklace becomes stiff. Flatten the final crimp bead with your pliers. -
Trim excess wire:
Snip off any excess wire tail close to the crimp bead and tuck the tiny sharp end into the hole of the first large bead if possible.
Glossy Glaze
After baking, apply a layer of water-based polyurethane varnish to the beads. This will make the marble veins pop and give the necklace a polished ceramic look.
Wear your new handcrafted choker with a simple linen top to let natural textures shine
Chunky Mixed-Size Clay Bead Choker
Embrace a natural, bohemian aesthetic with this textured choker featuring a rhythmic pattern of terracotta and cream disc beads. The mixed sizes and organic materials create a sophisticated piece that feels grounded yet stylish.
How-To Guide
Materials
- Polymer clay or Heishi disc beads (terracotta/burnt orange)
- White or cream disc beads (smooth finish)
- Beige/bone-colored disc beads (larger, slightly varied size)
- Ribbed/textured cream accent beads
- Gold-plated lobster clasp
- Gold-plated decorative extender chain
- 2 Gold crimp beads
- 2 Gold crimp covers (optional but recommended)
- Flexible beading wire (Tiger Tail), 0.38mm or 0.45mm
- 2 Gold jump rings (4-6mm)
- Flat nose pliers
- Wire cutters
Step 1: Planning and Prep
-
Measure your wire:
Cut a piece of beading wire approximately 18-20 inches long. This gives you plenty of extra room on both ends to work with the clasp without things getting tight. -
Lay out the pattern:
Before stringing, lay your loose beads on a bead board or a towel to visualize the sequence. The key to this necklace is the alternating sections of colored discs and larger creamy neutrals. -
Secure the first end:
Thread a crimp bead onto one end of the wire, followed by a jump ring attached to the extender chain. Loop the wire back through the crimp bead. -
Seal the start:
Slide the crimp bead close to the jump ring (leave a tiny bit of wiggle room) and flatten it firmly with your flat nose pliers. I prefer to cover this flattened crimp with a gold crimp cover for a polished look.
Uneven Tension?
If the necklace is stiff, your wire is too tight. Ideally, leave a 1-2mm gap of bare wire near the clasp before crimping to allow the beads to drape naturally.
Step 2: Stringing the Beads
-
Start the sequence:
Begin stringing from the back toward the center. Start with about 1.5 inches of small beige disc beads—these will sit at the nape of the neck. -
Add first terracotta section:
Thread on a section of terracotta discs. Use about 10-12 beads to create a block of color roughly an inch long. -
Insert a separator:
Place a single white/cream disc bead, followed by another short run of terracotta discs. -
Introduce texture:
Add a larger beige disc bead, then transition into a longer run of terracotta beads (about 15-20 beads) to build visual weight. -
Create the focal transition:
Thread on a sequence of larger, smoother beige discs (bone or wood style). Use about 5-6 of these progressively to widen the strand profile. -
Add the center highlight:
Place a ribbed cream accent bead. Immediately follow it with a short burst of 4 terracotta discs. -
Repeat the center grouping:
Add another ribbed cream bead, followed by 4 more terracotta discs, and a third ribbed cream bead. This creates the symmetrical center feature shown in the image.
Texture Twist
Swap the beige bone beads for unpolished coconut shell discs or raw wood beads. This adds an even earthier, more organic feel to the final piece.
Step 3: Finishing the Necklace
-
Mirror the pattern:
Reverse your steps to complete the other side. Add the larger beige discs, then the long terracotta section, the white spacer, and finish with the small beige nape section. -
Check the length:
Wrap the unfinished strand around your neck to ensure it sits comfortably as a choker. The bead work should end right at the base of your throat. -
Add the clasp hardware:
Thread a crimp bead onto the remaining wire end, followed by the jump ring attached to your lobster clasp. -
Loop and tighten:
Pass the wire back down through the crimp bead and through the first few beads of your necklace strand. Pull the wire until the loop is small but flexible. -
Final crimp:
Flatten the crimp bead securely. Trim the excess wire tail as close to the bead line as possible so it doesn’t poke you. -
Add final polish:
Apply a crimp cover over the flat crimp bead if you used one at the start, ensuring both ends match perfectly.
Enjoy styling your new handcrafted choker with a linen shirt or summer dress for an effortless look
Two-Strand Layered Clay Bead Choker
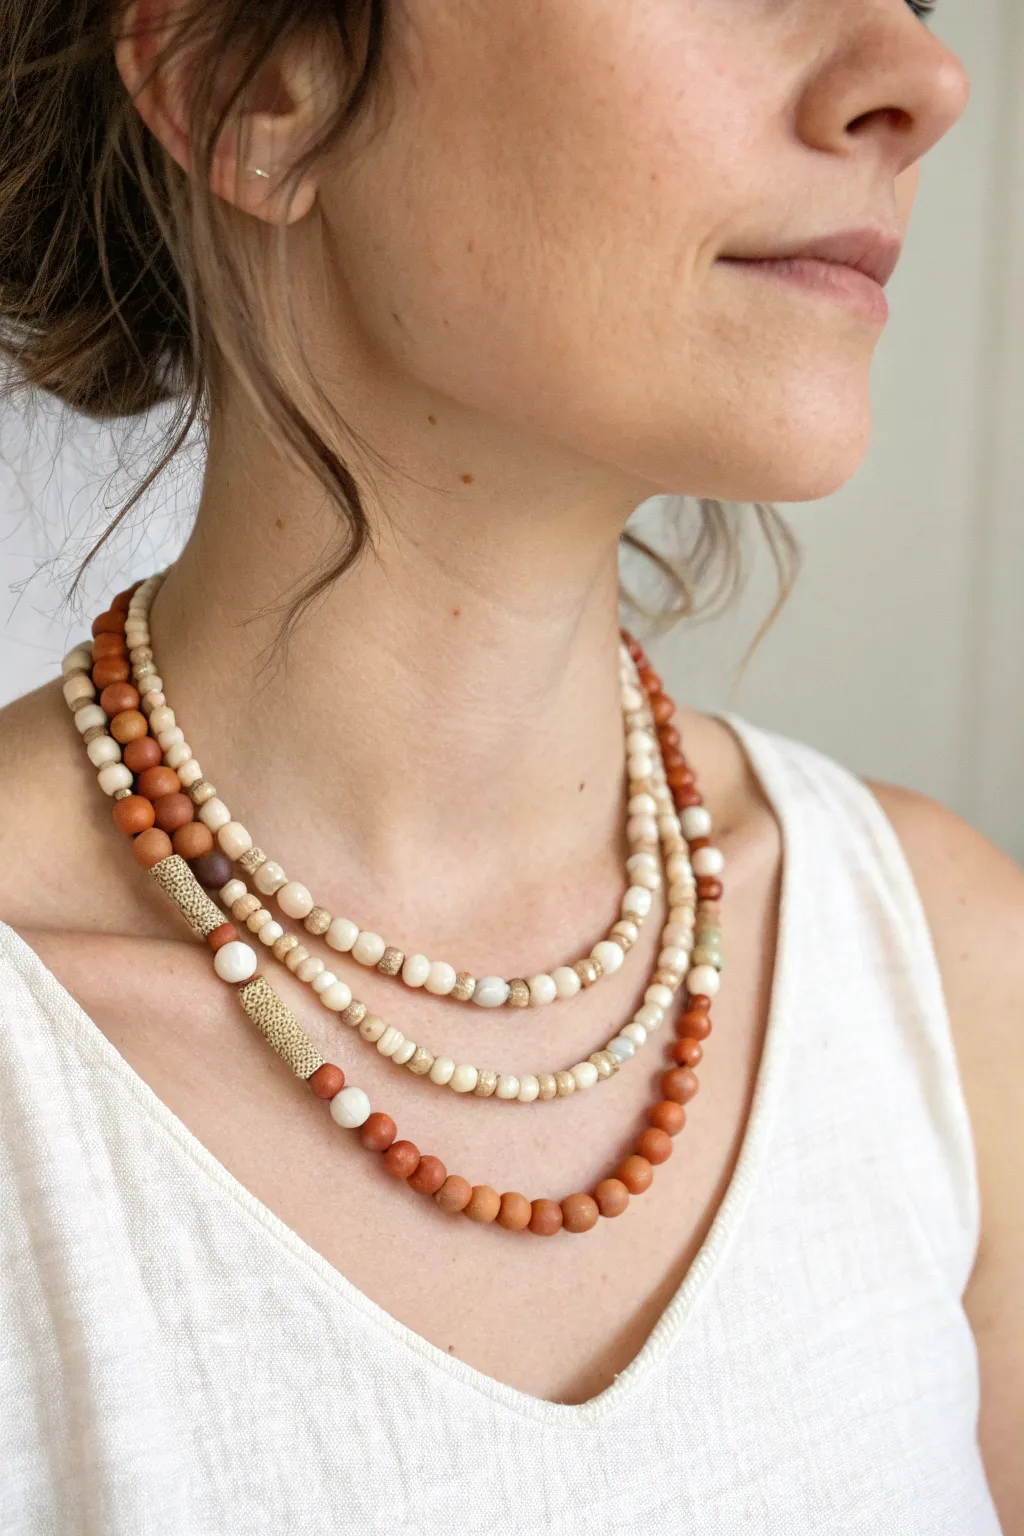
Embrace natural tones with this stunning two-strand necklace that combines the rustic warmth of terracotta-colored beads with smooth, creamy accents. This design features a clever illusion of three layers using varying bead sizes and textures to create a sophisticated bohemian accessory.
Step-by-Step Tutorial
Materials
- Terracotta-colored round clay beads (approx. 6mm and 8mm)
- Cream/off-white round wooden or synthetic beads (approx. 4mm)
- Beige speckled cylindrical tube beads (approx. 20mm long)
- Small gold or brass spacer beads
- Small beige/tan seed beads
- Dark brown or maroon accent beads
- Beading wire (flexible, 49-strand recommended)
- 4 Crimp beads
- 2 Crimp covers (optional)
- Clasp (lobster claw or toggle)
- 2 Jump rings
- Wire cutters
- Crimping pliers
Step 1: Planning & Preparation
-
Measure your strands:
Decide on the desired length for your necklace. Since this is a layered piece, the inner strand should sit higher on the collarbone (around 16 inches), while the outer strand hangs lower (around 18-20 inches). -
Cut the wire:
Cut two separate lengths of beading wire, adding at least 4 extra inches to each measurement to allow room for crimping and handling the clasp. -
Secure the first ends:
Attach one end of each wire strand to a single jump ring. Thread a crimp bead onto the first wire, loop it through the ring, and pass it back through the crimp bead. -
Crimp firmly:
Use your crimping pliers to squash the crimp bead flat or fold it, securing the wire. Repeat this process for the second wire on the same jump ring so both strands start from a central point.
Step 2: Creating the Inner Strand
-
Start the pattern:
Begin stringing the shorter wire. Create a base pattern alternating between small cream beads and tiny beige seed beads to build texture near the neckline. -
Build the center section:
As you reach the middle third of the strand, switch naturally to slightly larger cream beads intermixed with occasional small gold spacers for a subtle shine. -
Check the drape:
Hold the strand up to your neck occasionally to ensure the beads settle comfortably in the curve of your collarbone before finishing the row. -
Mirror the pattern:
Complete the second half of this strand by reversing your initial pattern, transitioning back to the smaller cream beads and seed beads until you reach the end. -
Secure temporarily:
Place a piece of tape or a bead stopper on the loose end of this wire so your work doesn’t slide off while you build the second layer.
Natural Layout
Before stringing, lay your beads out on a bead board or towel. This lets you play with the asymmetry of the tube beads without having to restring later.
Step 3: Creating the Outer Strand
-
Begin the outer layer:
On the longer wire, start creating the bolder, terracotta-focused layer. Begin with a mix of the 6mm terracotta beads and small cream spacer beads. -
Introduce texture:
About 3 inches down, add your first beige speckled cylinder bead. Flank it with a small gold spacer on either side to make the unique texture pop. -
Add accent colors:
String a short section of mixed beads—incorporate a dark brown or maroon bead here to break up the color palette and add depth. -
Install the second cylinder:
Add the second beige speckled tube bead. I like to space these asymmetrical features slightly apart rather than centering them perfectly for a more organic look. -
String the focal section:
Fill the bottom center of the necklace primarily with the larger 8mm terracotta beads, creating a visual weight that helps the necklace hang properly. -
Incorporate the third strand illusion:
To mimic the look in the photo where strands intertwine, you can thread a short separate segment of cream beads and carefully weave it between the terracotta beads, or simply stick to the two main structural strands for ease. -
Finish the outer length:
Complete the strand by mirroring the terracotta and cream pattern back up toward the neck, ensuring the total length is longer than your first strand.
Mixed Media Magic
Swap the terracotta clay beads for unfinished wood beads and seal them with olive oil. Over time, they will darken and create a beautiful, custom patina.
Step 4: Finishing Touches
-
Combine the ends:
Gather the loose ends of both beaded wires. Thread a crimp bead onto the first wire, loop it through the second jump ring (attached to your clasp), and pass it back through the crimp. -
Final crimping:
Repeat for the second wire, ensuring there is just a tiny bit of slack so the necklace remains flexible and doesn’t become stiff. Crimp both beads securely. -
Trim excess wire:
Using your wire cutters, snip off the excess tail of the beading wire as close to the crimp bead as possible without cutting the main structural wire. -
Optional crimp covers:
If you want a polished professional look, gently close a crimp cover over each flattened crimp bead to make them look like simple metal beads.
Now you have a effortlessly chic accessory that pairs perfectly with linen tops and summer dresses