When I’m craving that cozy, festive vibe, air dry clay Thanksgiving projects are my go-to because they’re cute, doable, and super display-worthy. Let’s make the classics first—turkeys, pumpkins, and fall leaves—then play with a few unexpected harvest twists.
Classic Turkey Figurines
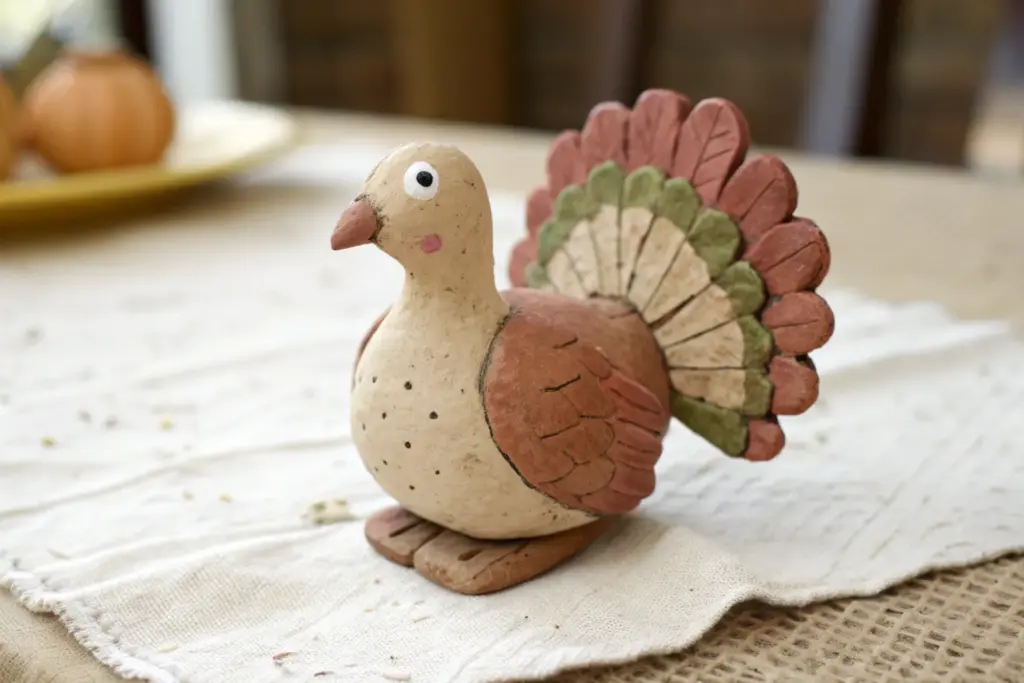
This charming, minimalist turkey figurine brings a warm, earthy touch to any Thanksgiving table setting. Sculpted from terracotta-colored air dry clay, it features lovely incised details on the tail feathers and wings that give it a handcrafted artistic feel.
Detailed Instructions
Materials
- Terracotta-colored air dry clay
- Rolling pin
- Modeling tools (needle tool, plastic knife)
- Small bowl of water
- Smooth work surface or silicone mat
- Aluminum foil (optional, for armature)
- Fine-grit sandpaper
- Acrylic paint (black and white for eyes)
- Fine detail paintbrush
Step 1: Sculpting the Body
-
Form the base:
Start with a lump of clay roughly the size of a tangerine. Roll it into a smooth ball in your palms to remove any cracks or lines. -
Shape the torso:
Gently gently elongate one side of the ball to create a pear shape. The larger, bottom part will be the turkey’s body, while the tapered top will become the neck. -
Create the head:
Pinch and smooth the top of the tapered end to form a rounded head shape. It should flow seamlessly from the neck without a harsh seam. -
Add the beak:
Take a very small pinch of clay and roll it into a tiny cone. Attach this to the front of the head to form the beak, using a dab of water to slip and score the connection point so it stays secure. -
Flatten the base:
Tap the bottom of your turkey figurine firmly on your work surface. This creates a flat base so the bird sits stably on the table without wobbling.
Step 2: Creating the Plumage
-
Prepare the tail feathers:
Roll out a slab of clay to about 1/4 inch thickness. Use a knife or cutting tool to cut out 5-7 elongated teardrop shapes for the tail fan. -
Detail the feathers:
Using a needle tool or the back of a knife, gently score a central vein down each tail feather. Then, carve angled lines branching off the center vein to create a realistic feather texture. -
Attach the fan:
Arrange the feathers in a fan shape at the rear of the turkey’s body. I like to start with the center feather and work outward. Use water to blend the base of the feathers into the main body so the connection is invisible. -
Sculpt the wings:
Create two smaller flattened teardrop shapes for the wings. Press them onto the sides of the body, blending the edges slightly so they look integrated rather than just stuck on. -
Decorate the wings:
Use a semi-circle tool or a drinking straw cut in half to impress a simple curved pattern onto the wing area, mimicking the look of folded feathers.
Tail Drooping?
If the heavy tail feathers slump backward while wet, prop them up from behind with a crumpled piece of paper towel or a small cardboard wedge until the clay stiffens enough to hold its own weight.
Step 3: Adding Textures and Finishing
-
Texture the chest:
Using a small, blunt tool or the end of a paintbrush, press small teardrop-shaped indentations into the chest area. This mimics the texture of downy chest feathers. -
Smooth the surfaces:
Check your sculpture for fingerprints. rough spots. Dipping your finger in a little water and rubbing it gently over the clay works wonders for a professional smooth finish. -
Dry thoroughly:
Set your turkey in a safe, dry place away from direct sunlight. Let it dry completely for 24-48 hours, turning it occasionally to ensure the bottom dries too. -
Paint the eyes:
Once fully dry, use the handle end of a paintbrush dipped in white paint to dot the whites of the eyes. Let that dry, then add a tiny black dot in the center for the pupil. -
Optional sanding:
If there are any rough edges on the tail feathers or base after drying, very gently smooth them down with fine-grit sandpaper. -
Seal (Optional):
To deepen the terracotta color and protect the clay, you can apply a thin coat of matte varnish.
Faux Glazed Look
After the paint dries, brush a coat of diluted Mod Podge or gloss varnish over just the beak and eyes. This contrast makes the matte terracotta body look even more earthy and sophisticated.
Now you have a timeless little sculpture ready to greet your guests


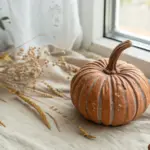
Mini Pumpkin Pinch Pot Bowls
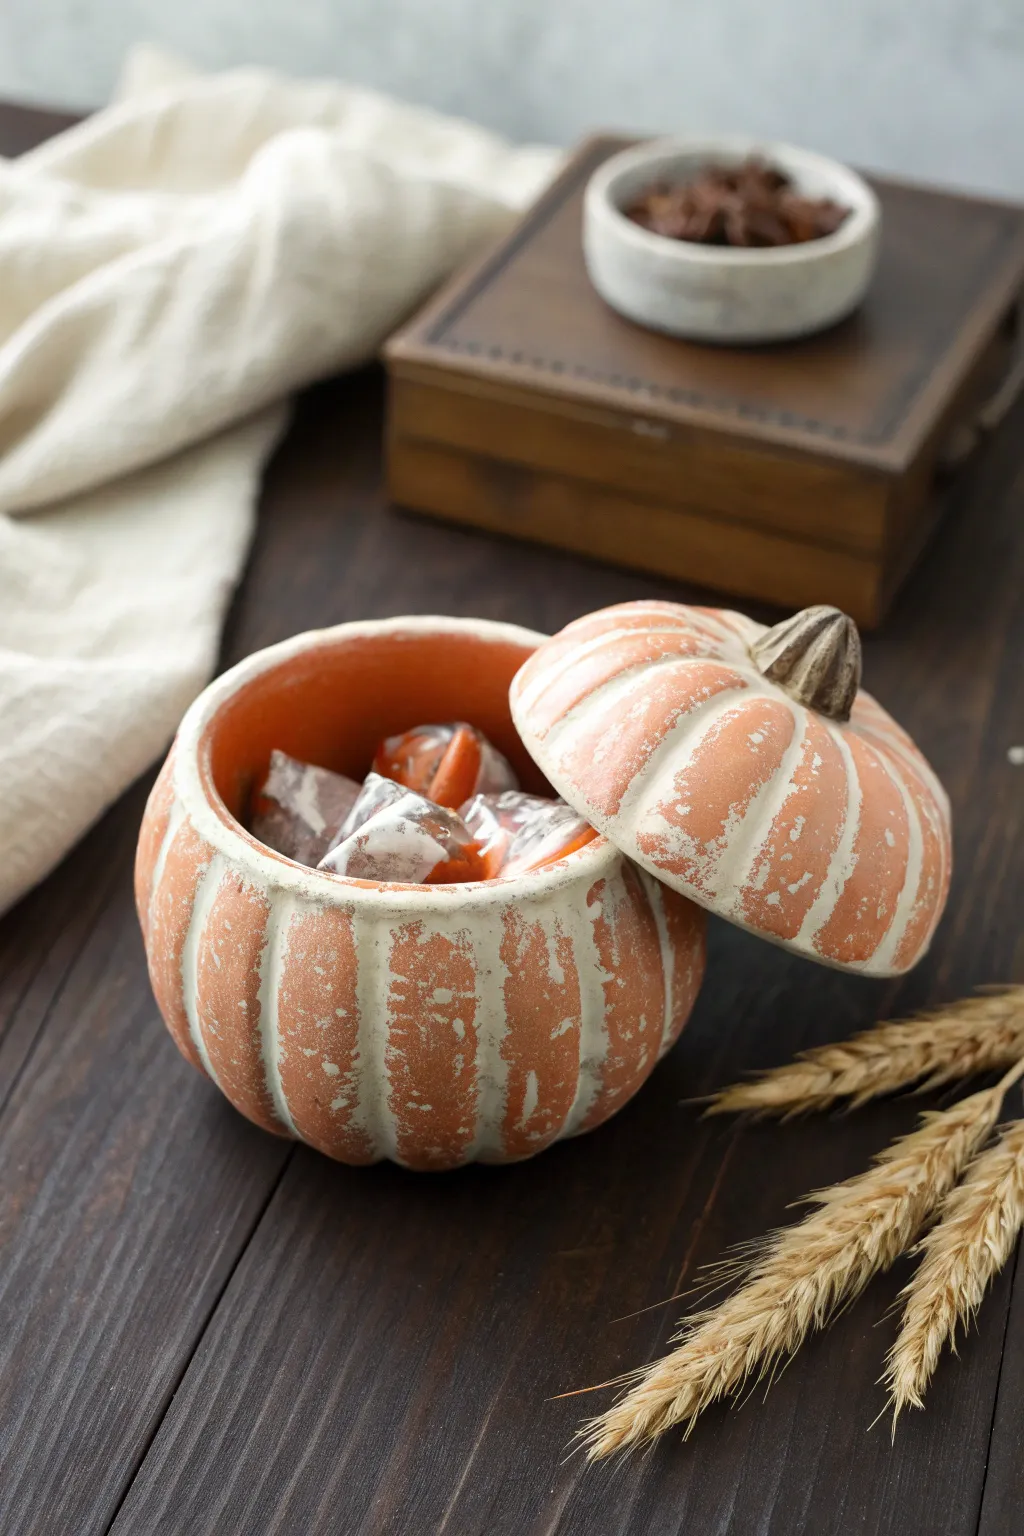
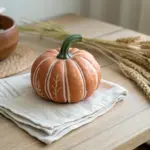
This charming lidded vessel combines the classic shape of a pinch pot with a beautifully distressed finish, perfect for holding seasonal treats. The textured white-washed effect over warm terracotta tones gives it an authentic, aged pottery look without needing a kiln.
Step-by-Step Guide
Materials
- Air dry clay (terracotta color recommended)
- Acrylic paint (burnt orange, warm white/cream, dark brown)
- Basic sculpting tools or a butter knife
- Sponge or textured cloth
- Fine grit sandpaper
- Water in a small cup
- Clear matte sealant or varnish
Step 1: Sculpting the Base
-
Form the main bowl:
Start with a ball of clay roughly the size of a large orange. Push your thumb into the center to open up the shape, pinching the walls evenly as you rotate the ball until you have a deep, rounded bowl. -
Refine the shape:
Gently tap the bottom of your pot on your work surface to create a flat base so it stands steadily. -
Smooth the lip:
Use a little water on your finger to smooth the top rim of the bowl. Ideally, you want the rim to curve slightly inward to mimic a pumpkin’s shape.
Step 2: Creating the Lid
-
Measure the opening:
Roll a second ball of clay, smaller than the first. Flatten it into a thick disc that is just slightly larger than the opening of your bowl. -
Shape the dome:
Gently curve the disc into a shallow dome shape. Test the fit on your bowl frequently to ensure it sits nicely on the rim. -
Add the stem:
Roll a small coil of clay for the stem. Score and slip (scratch the surfaces and add water) to attach it firmly to the center of the lid. Pinch and twist it slightly for a natural, organic look. -
Create the inner lip:
Roll a thin snake of clay and attach it to the *underside* of the lid, just inside where it rests on the bowl. This creates a stopper so the lid doesn’t slide off.
Keep it Moist
Keep a damp paper towel over your clay supply while you work on individual pieces. Air dry clay skins over quickly, making it harder to smooth out.
Step 3: Adding Texture and Details
-
Carve the ribs:
Using a modeling tool or the back of a butter knife, press vertical indentations deeply into the soft clay. Start at the bottom of the bowl and pull the line up toward the rim. -
Align the lid:
Place the lid on the bowl and continue those vertical rib lines onto the lid, so they align perfectly when the pumpkin is closed. -
Detail the stem:
Use a needle tool or toothpick to scratch fine, vertical wood-grain texture into the stem. -
Final drying:
Allow both pieces to dry completely. This usually takes 24-48 hours depending on thickness. Flip the lid occasionally so the underside dries evenly.
Add Gold Accents
For a glamorous Thanksgiving table, brush a tiny amount of metallic gold paint onto the very tip of the stem and the highest ridges of the pumpkin.
Step 4: The Distressed Finish
-
Base coat:
If you didn’t use terracotta clay, paint the entire exterior burnt orange. Only paint the stem a dark chocolate brown. -
Apply the white wash:
Mix warm white acrylic paint with a little water. Paint a heavy coat over the orange sections of the pumpkin, getting into the grooves. -
Distress immediately:
Before the white paint dries, take a slightly damp sponge or cloth and wipe away the paint from the raised surfaces. This leaves the white in the crevices and creates that weathered look. -
Sand for texture:
Once fully dry, lightly sand the raised ridges with fine-grit sandpaper to reveal more of the orange clay underneath, enhancing the striped effect. -
Seal the work:
Apply a coat of clear matte varnish to protect the paint job and give the piece a finished ceramic feel.
Fill your new pumpkin pot with wrapped caramels or chocolates for a delightful festive display


Turkey Napkin Rings
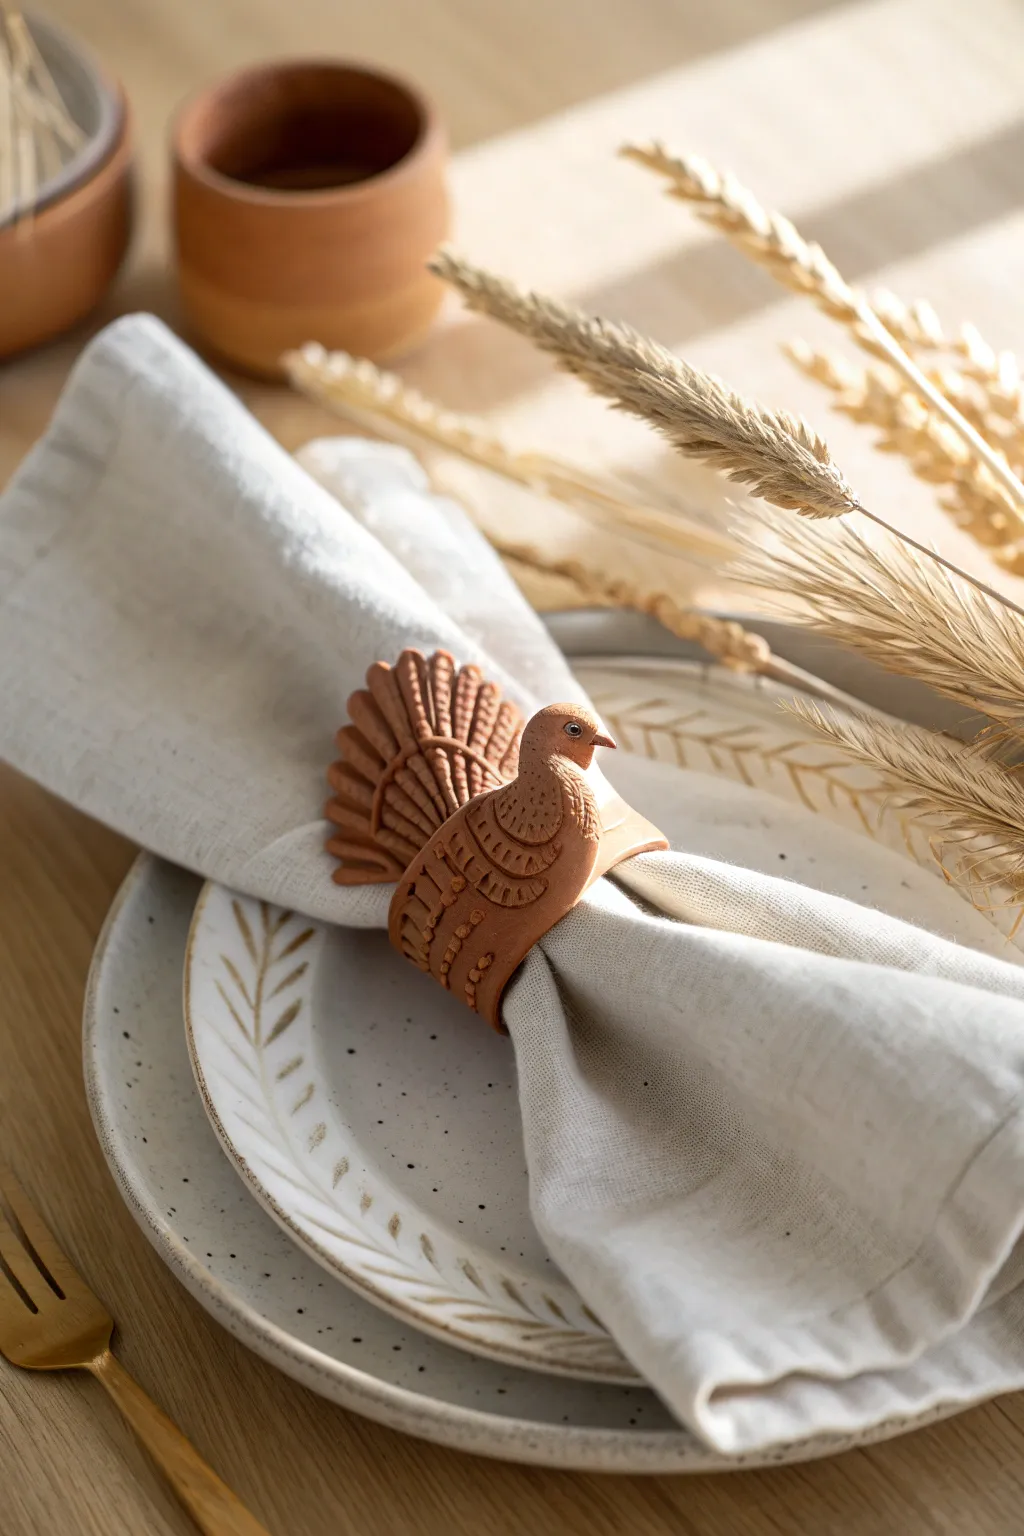
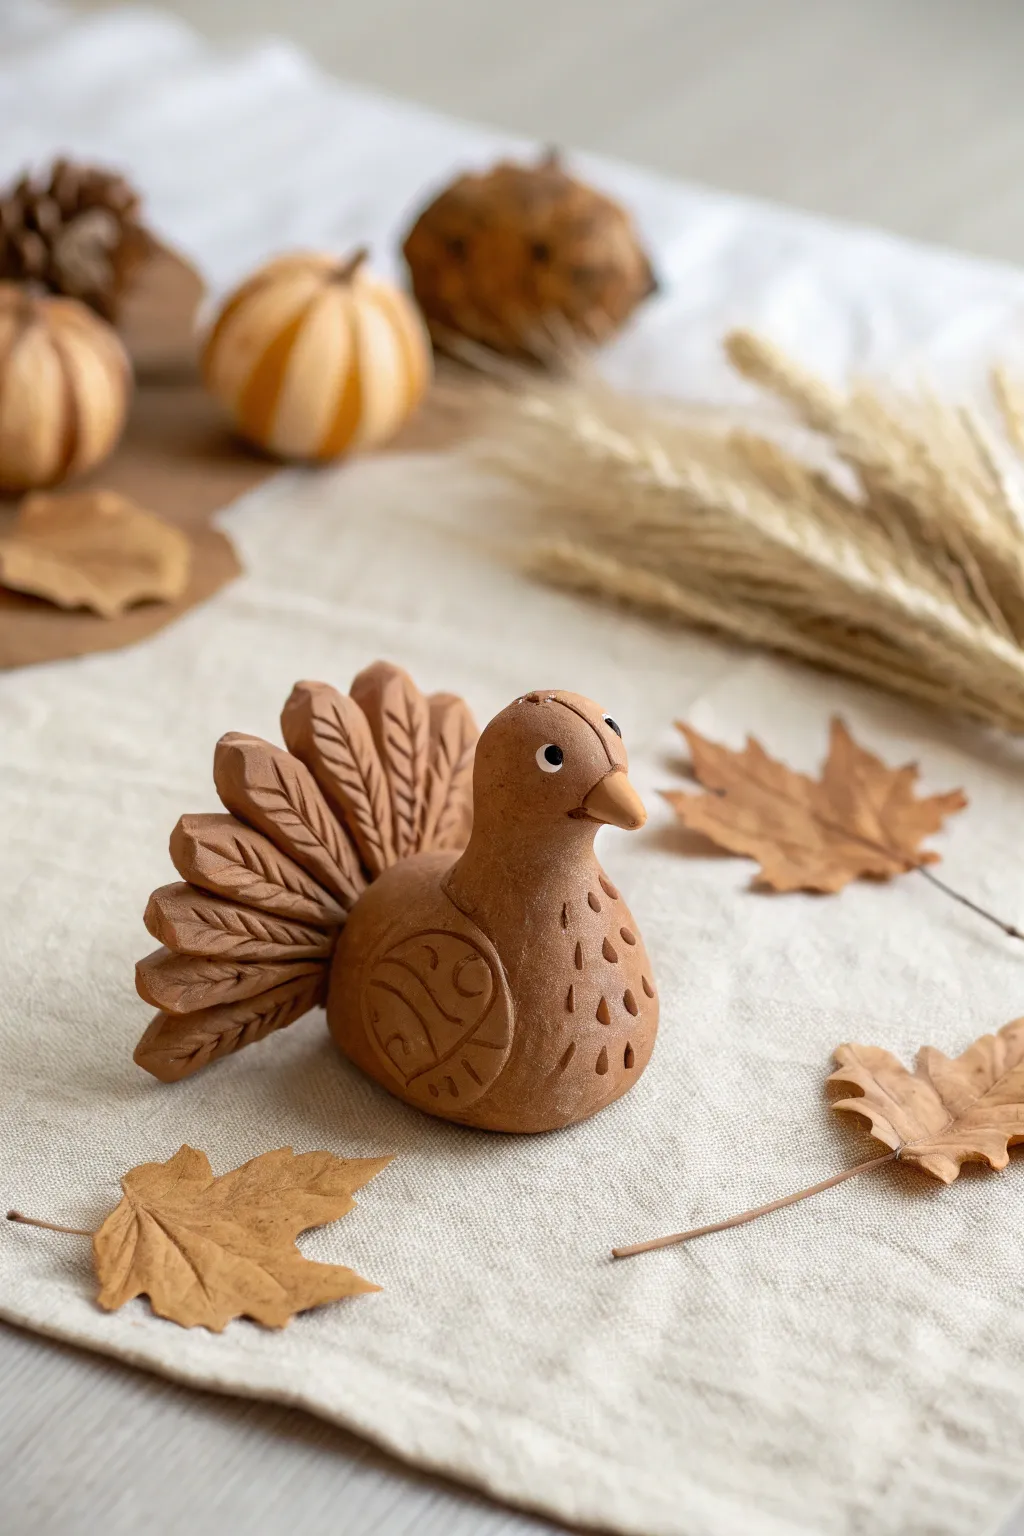
Bring a warm, artisanal touch to your Thanksgiving table with these charming hand-sculpted turkey napkin rings. Their rich terracotta hue and detailed feather impressions create a rustic look that pairs beautifully with cream linens and natural stoneware.
Detailed Instructions
Materials
- Terracotta colored air-dry clay (e.g., DAS or Crayola)
- Paper towel or cardboard tube (for sizing the ring)
- Rolling pin
- Clay knife or craft knife
- Small needle tool or toothpick
- Cup of water
- Small sponge
- Parchment paper
Step 1: Forming the Ring Base
-
Prepare the sizing form:
Cut a slice of a cardboard tube about 1.5 inches wide, or create a cylinder from cardstock taped together. Wrap this form in a small piece of parchment paper so the clay won’t stick to it later. -
Roll the clay slab:
Take a chunk of your terracotta clay and knead it until soft. Roll it out on a flat surface to an even thickness of about 1/4 inch. -
Cut the strip:
Using your clay knife, cut a clean rectangular strip approximately 1.5 inches wide and long enough to wrap around your cardboard tube with a little overlap. -
Form the ring:
Wrap the clay strip around your prepared tube. Where the ends meet, score both surfaces (scratch them up a bit), add a drop of water, and press them firmly together to smooth the seam. This will be the back of the napkin ring.
Smooth Seams
Use a little bit of water on your finger to blend the clay where the tail meets the body. A strong connection here is vital so the tail doesn’t snap off later.
Step 2: Sculpting the Turkey Body
-
Shape the torso:
Roll a sphere of clay about the size of a walnut. Gently pinch and pull one side to elongate it into a neck and head shape, curving it slightly forward. -
Defined the beak and chest:
Pinch the very tip of the head to form a small, pointed beak. Smooth the chest area so it is rounded and full. -
Attach to ring:
Score the bottom of the turkey body and the top center of your clay ring. Apply a little water slip and press the body securely onto the ring. Smooth the edges where they meet with your finger or a tool to make it one seamless piece. -
Create the wings:
Form two small, flat tear-drop shapes for wings. Attach these to the sides of the body using the score-and-slip method.
Vintage Wash
Once fully dry, dilute a little brown acrylic paint with water and brush it over the feathers, then wipe off quickly. It will settle in the grooves, highlighting the texture.
Step 3: Creating the Tail Feathers
-
Cut the fan shape:
Roll out a fresh piece of clay—slightly thinner than the ring base. Cut a semi-circle or fan shape that is wider than the turkey’s body. -
Texture the feathers:
Use your clay knife to press vertical lines radiating from the bottom center of the fan to the outer edge, creating individual feather sections. -
Add detail:
Use your needle tool to etching small diagonal lines along each feather section to mimic the texture of plumage. I stick to simple, repetitive strokes for a cohesive look. -
Attach the tail:
Score the back of the turkey body and the bottom center of the fan. Press the tail upright against the back of the turkey.
Step 4: Detailing and Drying
-
Sponge smooth:
Dip your small sponge in water and wring it out almost completely. Gently wipe over the smooth areas (like the beak and neck) to erase fingerprints, being careful not to blur your etched details. -
Add final textures:
Use the needle tool to poke small dots or dashes on the turkey’s chest and wings for extra visual interest, mimicking the intricate pattern seen in the inspiration image. -
Create the eye:
Use the needle tool to make a tiny indentation for the eye. You can leave it as a hole or roll a minuscule ball of clay and press it inside. -
Initial dry:
Let the napkin ring sit on the cardboard form for at least 3-4 hours until it stiffens up enough to hold its shape without support. -
Remove form:
Gently slide the cardboard tube out. This helps the inside of the ring dry thoroughly. -
Full cure:
Allow the project to dry completely for 24-48 hours. The color will lighten slightly as the moisture evaporates.
Set your table with these custom creations and enjoy the warmth they add to your holiday gathering


Leaf-Shaped Trinket Dishes
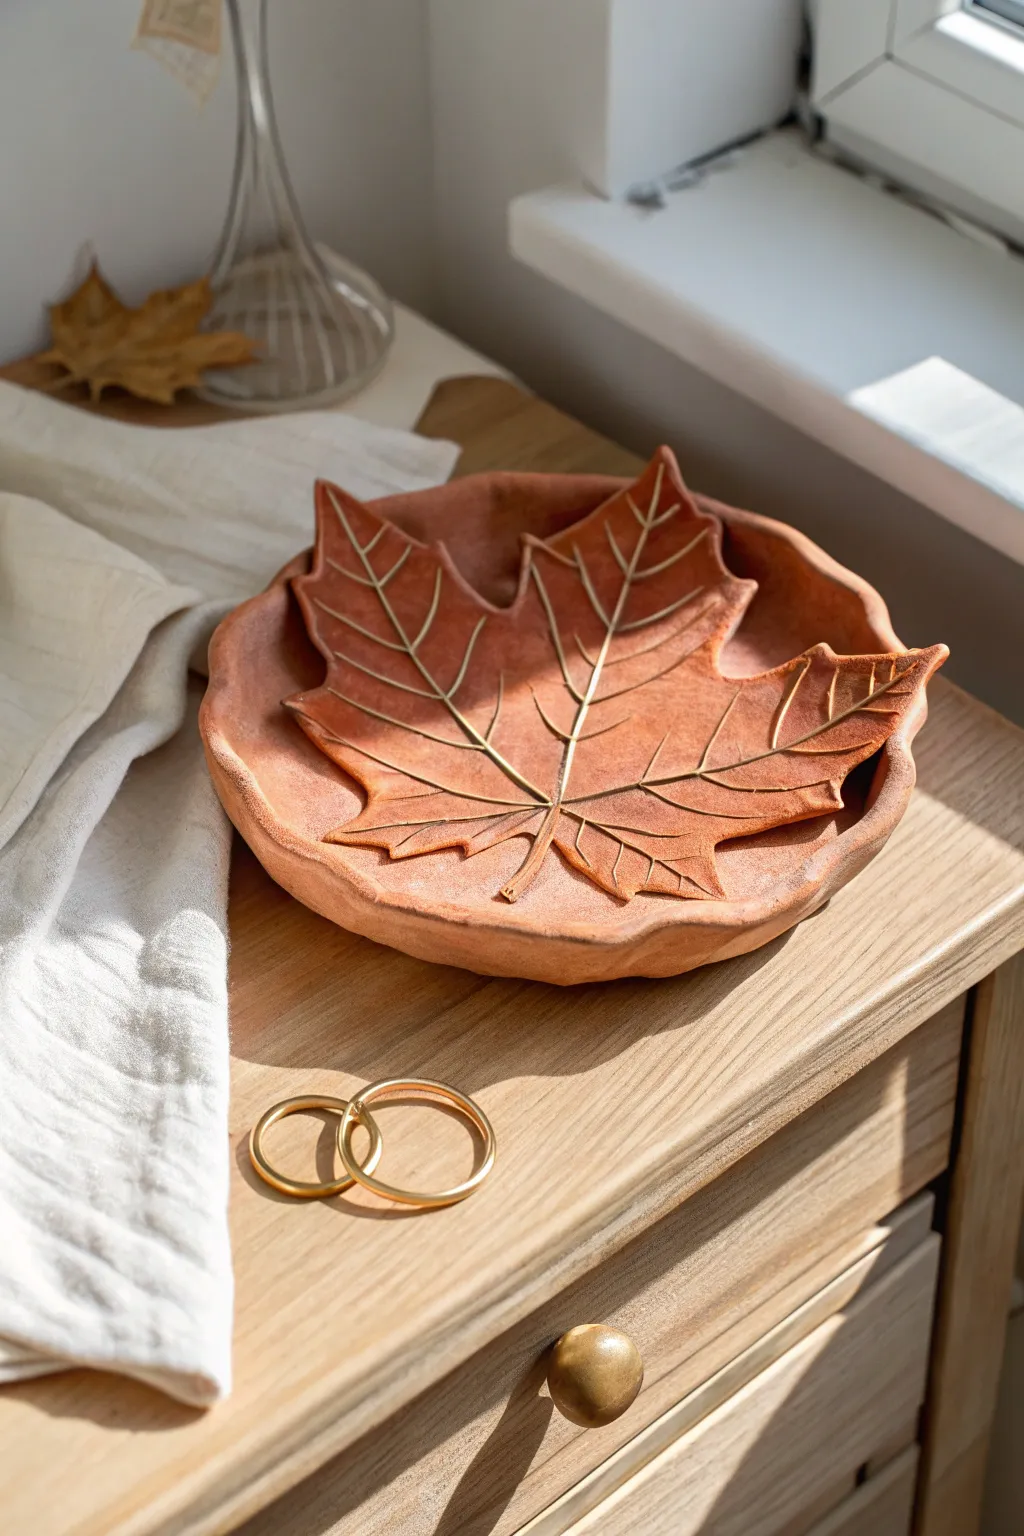
Embrace the warmth of autumn with this stunning relief dish that captures the intricate beauty of a fallen maple leaf. Using terracotta-colored air dry clay gives the piece an earthy, natural look perfect for holding jewelry or adding a seasonal touch to your entryway table.
How-To Guide
Materials
- Terracotta colored air dry clay
- Rolling pin
- Large, fresh maple leaf (or a detailed faux leaf)
- Fettling knife or X-ACTO knife
- Small bowl (for use as a mold)
- Small carving tool or needle tool
- Small cup of water
- Sponge
- Fine-grit sandpaper
- Clear matte varnish or sealant
Step 1: Creating the Base
-
Condition the Clay:
Begin by taking a substantial chunk of terracotta air dry clay and kneading it in your hands. You want it to be warm, pliable, and free of any air bubbles. -
Roll the Slab:
Roll the clay out on a smooth surface or canvas cloth until it is an even slab, approximately 1/4 inch thick. Try to keep the thickness consistent using roller guides if you have them. -
Cut the Base Shape:
Select a bowl that is slightly larger than the leaf you plan to use. Place the bowl upside down on the clay slab and trace around it, then cut out the circle using your knife. -
Shape the Rim:
Gently pinch the edges of your clay circle upwards to create a shallow lip. I like to leave this a bit wavy and organic rather than perfectly smooth to mimic the natural feel of the final piece. -
Smooth the Edges:
Dip your finger or a small sponge in water and run it along the rim of the dish to smooth out any sharp cuts or cracks that formed during shaping.
Step 2: Sculpting the Leaf Relief
-
Roll a Second Slab:
Roll out a second, slightly thinner piece of clay for the leaf element. It should be just under 1/4 inch thick so it doesn’t make the final dish too heavy. -
Impress the Leaf:
Place your maple leaf vein-side down onto this second slab. Use the rolling pin to gently but firmly press the leaf into the clay so the veins transfer clearly. -
Cut Out the Leaf:
Carefully cut around the outline of the leaf using your X-ACTO or fettling knife. Be precise around the points of the maple leaf for a crisp look. -
Score and Slip:
Using a needle tool, scratch cross-hatch marks (scoring) onto the back of the clay leaf and the center of your clay bowl. Dab a little water (slip) onto the scored areas. -
Attach the Leaf:
Press the clay leaf firmly into the center of the bowl. Start from the center and work outward to ensure no air is trapped between the layers. -
Enhance the Veins:
If the vein impression is faint, use a small carving tool or needle tool to deepen the main lines of the leaf. This adds dimension and mimics the style in the photo. -
Refine the Edges:
Use a damp brush to clean up the edges where the leaf meets the bowl, ensuring the transition looks intentional but the leaf remains distinct and raised.
Vein Definition Tip
To replicate the light-colored veins in the photo, gently run a tool through the veins while the clay is wet, or paint the indented lines with a thin white wash after drying.
Step 3: Drying and Finishing
-
Initial Drying:
Place the dish inside your mold bowl (lined with paper towel so it doesn’t stick) to help it hold its curved shape while drying. -
Full Cure:
Let the piece dry for 24-48 hours. Remove it from the mold halfway through so the bottom gets air exposure. Terracotta clay will turn a lighter, chalky color when fully dry. -
Sand the Imperfections:
Once bone dry, take fine-grit sandpaper and gently smooth the outer rim and the underside of the dish. Avoid sanding the detailed leaf veins. -
Dust Off:
Wipe the entire piece with a barely damp cloth or a dry soft brush to remove all sanding dust. -
Seal to Protect:
Apply a coat of clear matte varnish. This brings back the rich, dark terracotta color you see in the photo and protects the clay from moisture.
Gilded Edges
For a glamorous Thanksgiving table setting, paint the very edge of the bowl’s rim and the leaf tips with liquid gold leaf paint after the sealant has dried.
Now you have a timeless, organic centerpiece ready to hold your rings or simply be admired.

What Really Happens Inside the Kiln
Learn how time and temperature work together inside the kiln to transform clay into durable ceramic.
Real Leaf Impression Ornaments
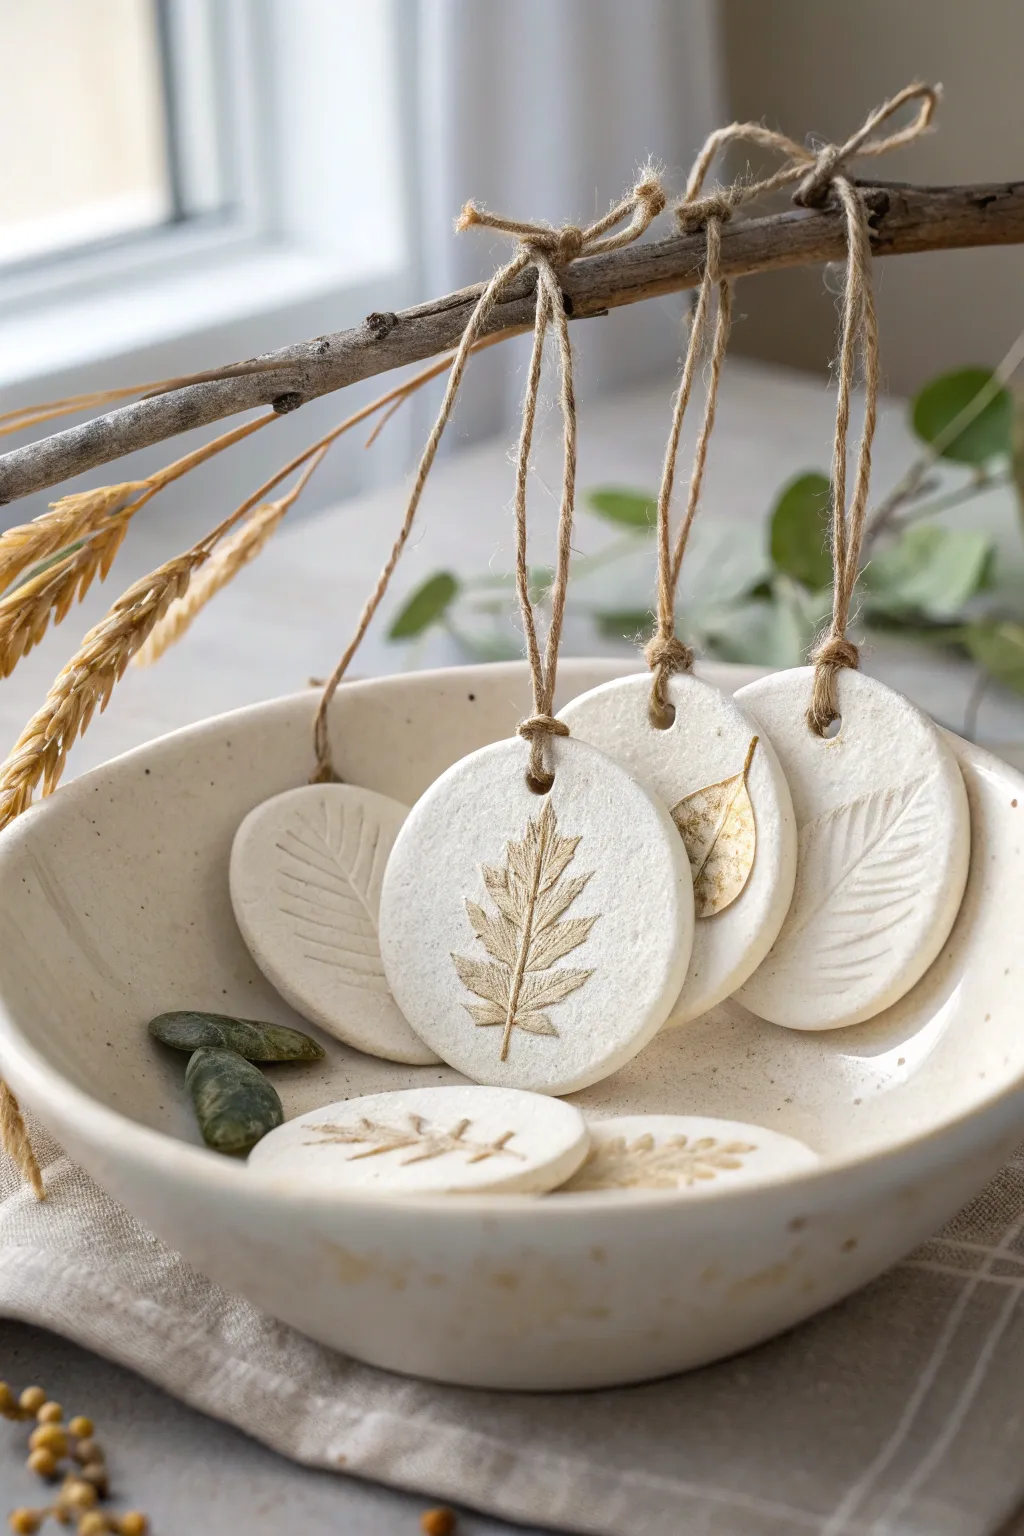
Capture the delicate details of autumn foliage forever with these elegant air-dry clay ornaments. Their minimal white finish and rustic jute hangers make them a perfect understated decoration for a Thanksgiving centerpiece or holiday tree.
Step-by-Step Tutorial
Materials
- White smooth air-dry clay (e.g., DAS or Crayola)
- Small rolling pin
- Various small leaves (fresh or pressed, with distinct veins)
- Round cookie cutter (approx. 2.5 – 3 inches)
- Straw or bamboo skewer (for making holes)
- Fine-grit sandpaper (400 grit or higher)
- Clear matte sealant spray (optional)
- Natural jute twine
- Wax paper or parchment paper
- Small bowl of water
- Brown watercolor paint or diluted acrylic (optional for antiquing)
Step 1: Preparation & Rolling
-
Prepare your workspace:
Lay down a sheet of wax paper or parchment paper to prevent sticking. Tape the corners down so it doesn’t shift while you roll. -
Condition the clay:
Take a handful of air-dry clay and knead it in your hands for a minute until it is warm, pliable, and free of cracks. -
Roll it out:
Place the clay on your paper and roll it out evenly. You want a thickness of about 1/4 inch (5-6mm). If it’s too thin, the ornaments might warp; too thick, and they get heavy. -
Smooth the surface:
If you see any tiny cracks or textures from the rolling pin, dip your finger slightly in water and gently smooth the surface of the clay slab.
Step 2: Creating Impressions
-
Select your leaves:
Choose leaves with prominent veins on the backside. Ferns, sage leaves, or small oak leaves work beautifully. -
Position the leaf:
Place a leaf vein-side down onto the clay. I find it helpful to arrange them so they fit comfortably within the space of your planned cookie cutter cuts. -
Press the design:
Gently roll over the leaf with your rolling pin once or twice.Apply enough pressure to push the veins into the clay, but not so much that the leaf tears apart. -
Reveal the print:
Carefully grab the stem of the leaf and peel it away to reveal the detailed impression underneath.
Vein Definition
Always place the leaf ‘ugly side’ down. The back of the leaf has raised veins which create a much sharper, deeper impression than the smooth top side.
Step 3: Cutting & Shaping
-
Cut the shapes:
Center your round cookie cutter over the leaf impression and press down firmly to cut out the ornament. -
Clean the edges:
Lift away the excess clay. If the edges of your circle look rough, moisten your fingertip and gently glide it around the rim to smooth it out. -
Add a hanging hole:
Using a straw or a skewer, poke a hole near the top of the circle. Make sure it is not too close to the edge, or the clay might break later. -
Flip and repeat:
Repeat this process with the excess clay until you have as many ornaments as desired.
Fixing Curled Edges
If your ornaments start curling upward while drying, place a lightweight book on top of them (with paper in between) during the final stages of drying to flatten them out.
Step 4: Drying & Finishing
-
Let them dry:
Place the ornaments on a flat surface to dry. Flip them over every 12 hours to ensure even drying and prevent curling. This usually takes 24-48 hours depending on humidity. -
Sand for perfection:
Once fully hard and white, use fine-grit sandpaper to gently smooth away any sharp burrs on the edges. -
Enhance the details (Optional):
To get the look in the photo, mix a tiny amount of brown watercolor with water. Paint it into the leaf groove, then immediately wipe the surface with a damp paper towel, leaving pigment only in the deep crevices. -
Seal the work:
Spray a light coat of matte sealant over the ornaments to protect them from moisture and dust. -
Add the hanger:
Cut a length of jute twine (about 8 inches). Thread it through the hole and knot the ends together to create a rustic loop. -
Final Display:
Hang your ornaments on a decorative branch or arrange them in a bowl as shown in the inspiration image.
These timeless botanical keepsakes bring a serene, natural touch to your holiday decor
Acorn and Gourd Fridge Magnets
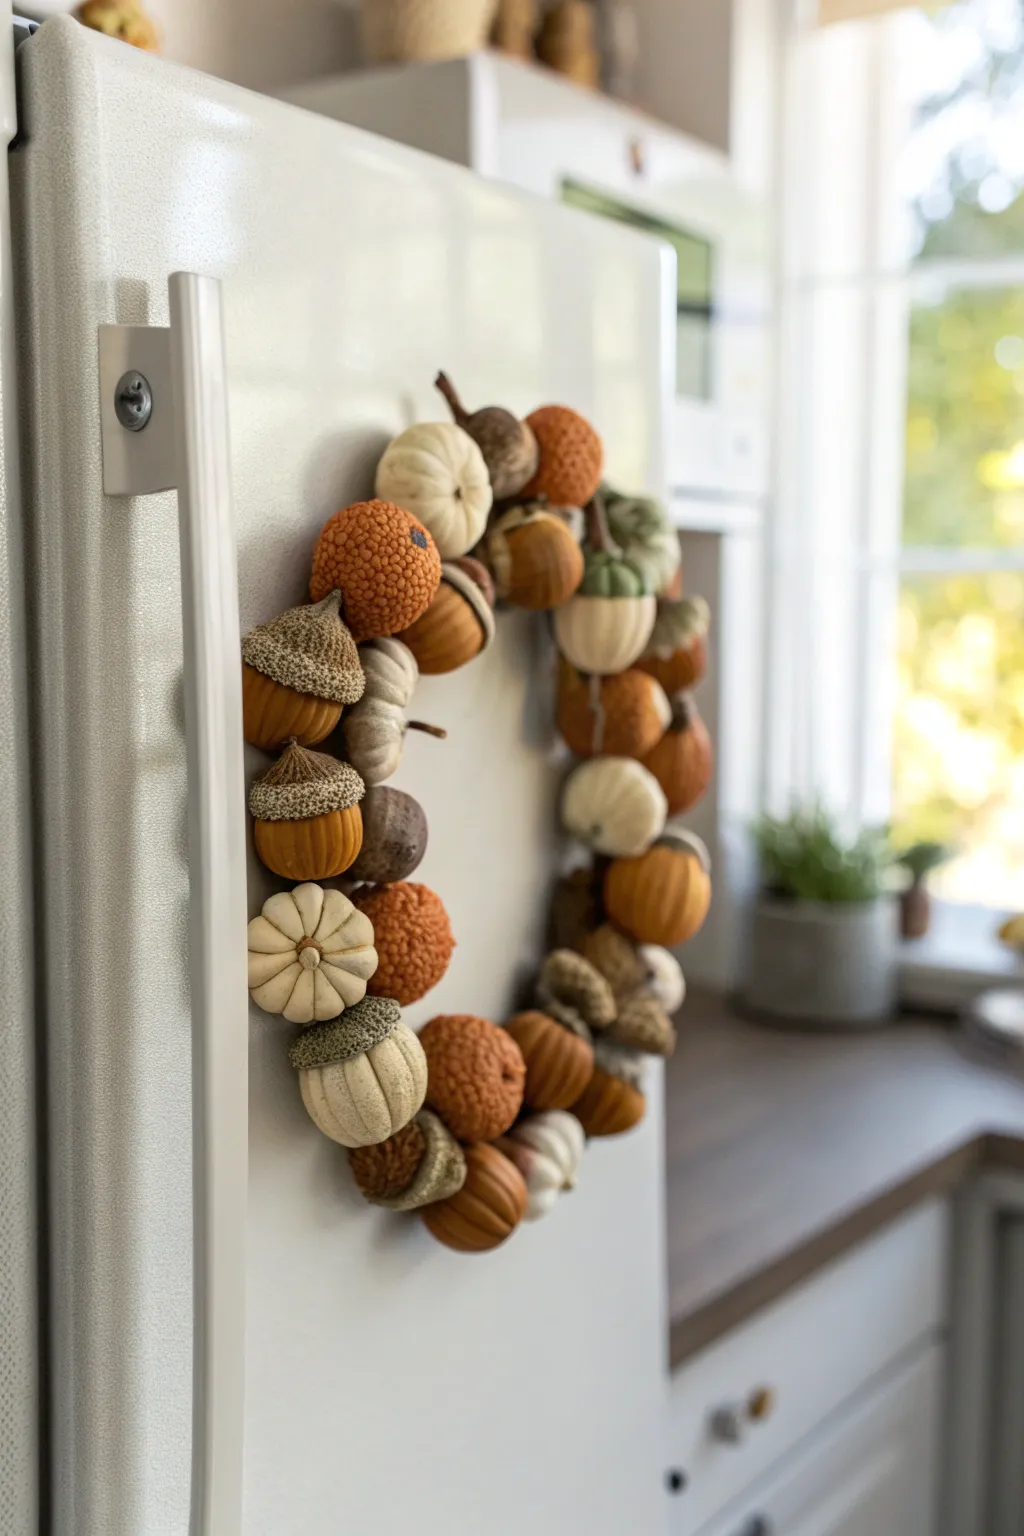
Transform simple lumps of clay into a charming collection of miniature pumpkins, gourds, and acorns that come together to form a festive wreath on your fridge door. The textured finishes and warm autumnal palette make these magnets look wonderfully realistic and cozy.
Step-by-Step
Materials
- Air dry clay (white or terracotta)
- Small round magnets (strong ferrite or neodymium)
- Acrylic paints (burnt orange, cream, sage green, various browns, ochre)
- Sculpting tools (needle tool, ball stylus)
- Texture tools (stiff paintbrush, clean toothbrush, or real acorn caps)
- Strong craft glue (E6000 or similar)
- Fine grit sandpaper
- Matte spray varnish
Step 1: Sculpting the Shapes
-
Condition the CLay:
Begin by kneading a handful of air dry clay until it feels smooth, pliable, and free of cracks. -
Form the Acorn Bases:
Roll small balls of clay about the size of a marble for the bottom nut part of the acorns, slightly tapering one end. -
Create Acorn Caps:
Flatten smaller discs of clay and gently press them over the wider end of your acorn bases to form the cap. -
Texture the Caps:
Using a needle tool or a stiff toothbrush, stipple the surface of the acorn caps aggressively to replicate that rough, bumpy natural texture. -
Shape Pumpkins and Gourds:
Roll slightly larger balls for pumpkins, flattening them just a bit on top and bottom. For gourds, roll pear shapes or elongated teardrops. -
Add Ribs and Segments:
To make the pumpkins realistic, use a sculpting tool or the side of a toothpick to press vertical grooves from the top center down to the bottom, creating distinct segments. -
Sculpt Stems:
Roll tiny, thin snakes of clay for stems. Attach them to the tops of your pumpkins and gourds using a dab of water to help the clay bond. -
Embed Magnets (Optional):
I find it easier to press the magnet into the back of the wet clay now to create a perfect indentation, then remove it to glue later. Alternatively, leave the backs flat.
Step 2: Painting and Assembly
-
Thorough Drying:
Allow all your clay pieces to dry completely. This usually takes 24-48 hours depending on thickness and humidity; they should feel light and chalky when done. -
Base Coating:
Paint the pumpkin shapes in varying shades of cream, burnt orange, and muted yellow. Base coat the acorns in a light tan or warm brown. -
Detailing the Acorn Caps:
Paint the textured acorn caps a darker chocolate brown. Once dry, you can lightly dry-brush a lighter tan over the high points to accentuate the bumps. -
Adding Depth:
Mix a watery wash of dark brown paint and apply it into the grooves of the pumpkins and gourds, then wipe away the excess with a paper towel to create shadowy depth. -
Painting Stems:
Carefully paint the tiny stems in dark brown or brownish-green tones for contrast. -
Sealing the Work:
Take the pieces outside and spray them with a matte varnish. This protects the paint and gives them a finished, high-quality look without making them too shiny. -
Attaching Magnets:
Apply a strong dollop of glue to your magnets and press them firmly onto the flat backs of your clay pieces. -
Arranging the Wreath:
Once the glue is set, arrange your individual magnets in a circle on your refrigerator to create the illusion of a continuous harvest wreath.
Easy Texturing Hack
Use a real acorn cap as a stamp! Press it gently onto your wet clay to imprint an authentic, nature-made pattern instantly.
Fixing Cracks
If small cracks appear as the clay dries, mix a tiny bit of fresh clay with water to make a paste (slip) and fill in the gaps. Smooth with a wet finger.
Enjoy arranging your harvest collection into different shapes throughout the season


The Complete Guide to Pottery Troubleshooting
Uncover the most common ceramic mistakes—from cracking clay to failed glazes—and learn how to fix them fast.
Feather-Tail Mixed-Media Turkeys
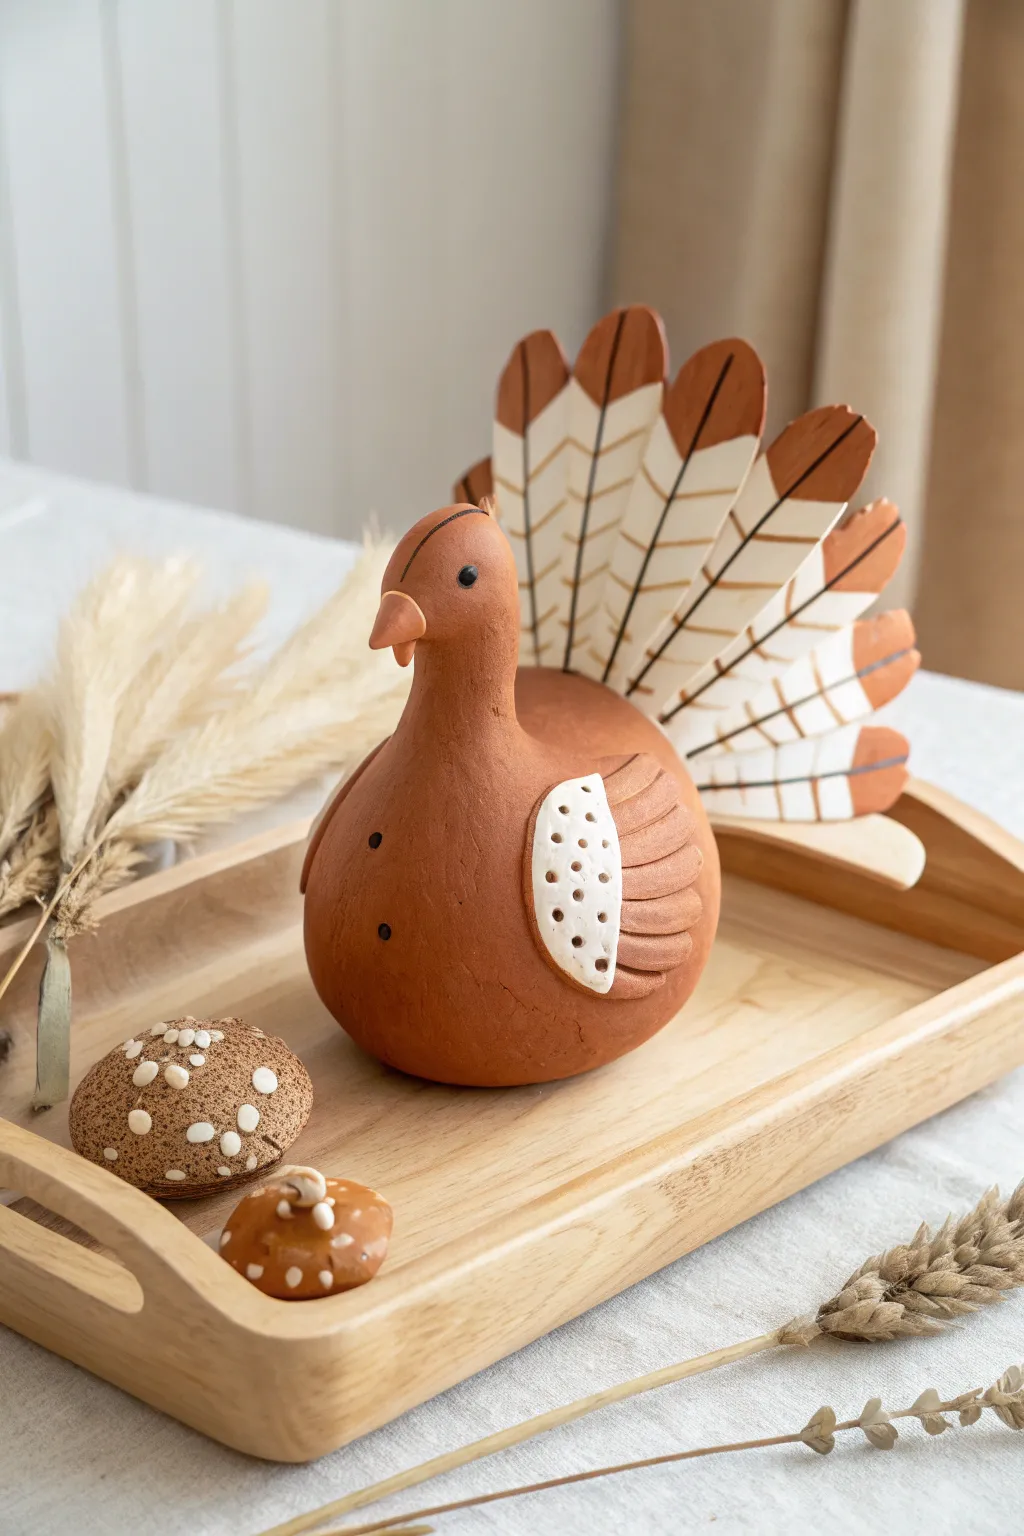
This charming, rustic turkey brings a touch of warmth to any Thanksgiving spread with its earthy terracotta tones and patterned details. The mixed media look, featuring a smooth clay body and a striking feather tail, creates a modern yet cozy centerpiece.
How-To Guide
Materials
- Terracotta colored air-dry clay
- White or cream air-dry clay
- Cardboard or thick cardstock (for the tail structure)
- Acrylic paints (terracotta/brown, cream/off-white, black)
- Fine detail paintbrushes
- Clay sculpting tools (needle tool, smoothing sponge)
- Black beads or small black clay balls (for eyes)
- Craft glue or tacky glue
- Water bonding slip (water mixed with a little clay)
Step 1: Sculpting the Body
-
Form the Base:
Start with a large ball of terracotta air-dry clay. Roll it between your palms until it is smooth and round, then gently tap the bottom on your work surface to create a flat base so it won’t roll away. -
Shape the Neck:
Pinch and pull a section of clay upwards from the front of the body to form the neck. Smooth the transition area with a little water on your finger so the neck looks seamless, not attached separately. -
Create the Head:
Round out the top of the neck to form the head. Pinch a small triangle of clay at the front to create the beak. You can add a tiny wattle (the fleshy bit under the beak) with a small teardrop of clay if you like. -
Add the Eyes:
Press two small black beads into the sides of the head for eyes. If you don’t have beads, roll tiny balls of black clay or poke indentation holes that you can paint black later. -
Sculpt the Wings:
Ideally, shape two flattened teardrop shapes from the terracotta clay for the wings. Score the side of the body and the back of the wing, apply a little water or slip, and press them firmly onto the sides of the turkey. -
Detail the Wing Feathers:
Use a needle tool or the edge of a credit card to press distinct lines into the back half of the wing, creating a feathered texture. Leave the front part of the wing smooth for now. -
Add the White Accent:
Take a small piece of white clay, flatten it into a crescent shape, and press it onto the front smooth section of the wing. Poke small decorative holes into this white section using a needle tool for texture.
Smooth Operator
To get that porcelain-smooth finish on the terracotta clay, dip your finger in water and gently rub the clay in circular motions just before letting it dry.
Step 2: Creating the Tail
-
Cut the Tail Shape:
While the body dries, cut a fan shape out of sturdy cardboard or stiff cardstock. The bottom curve should match the curve of the turkey’s lower back. -
Base Coast the Tail:
Paint the entire cardboard fan with a solid coat of cream or off-white acrylic paint. Let this dry completely before moving to the pattern. -
Paint the Feathers:
Paint long, tear-drop shaped feathers radiating from the center. Alternate the colors or stick to a terracotta brown that matches your clay body. Add a contrasting tip color like a darker brown or copper. -
Add Linear Details:
Using a very fine brush or a thin black marker, draw the ‘quill’ lines down the center of each painted feather, adding angled lines branching off to mimic feather barbs. -
Attach the Tail:
Once the clay body is mostly dry (leather hard) or fully dry, glue the cardboard tail firmly to the lower back of the turkey. Hold it in place for a few minutes until the glue tacks up.
Make it Shine
Once the clay is fully cured (24-48 hours), apply a satin varnish or Mod Podge. This deepens the terracotta color and protects the painted tail from moisture.
Step 3: Finishing Touches
-
Sculpt Mushrooms:
Use leftover clay scraps to make small mushroom caps. Roll a ball, flatten the bottom, and poke indentations all over the top with a tool. -
Fill the Patterns:
Roll tiny balls of white clay and press them into the indentations on the mushroom caps to create a spotted toadstool look. -
Final Surface Check:
Check the main turkey body for any cracks. Surface cracks can be smoothed over with a tiny bit of fresh clay mixed with water.
Place your finished turkey on a wooden tray with some dried wheat stalks for a perfect autumn display
Pilgrim Hat Turkey Decor
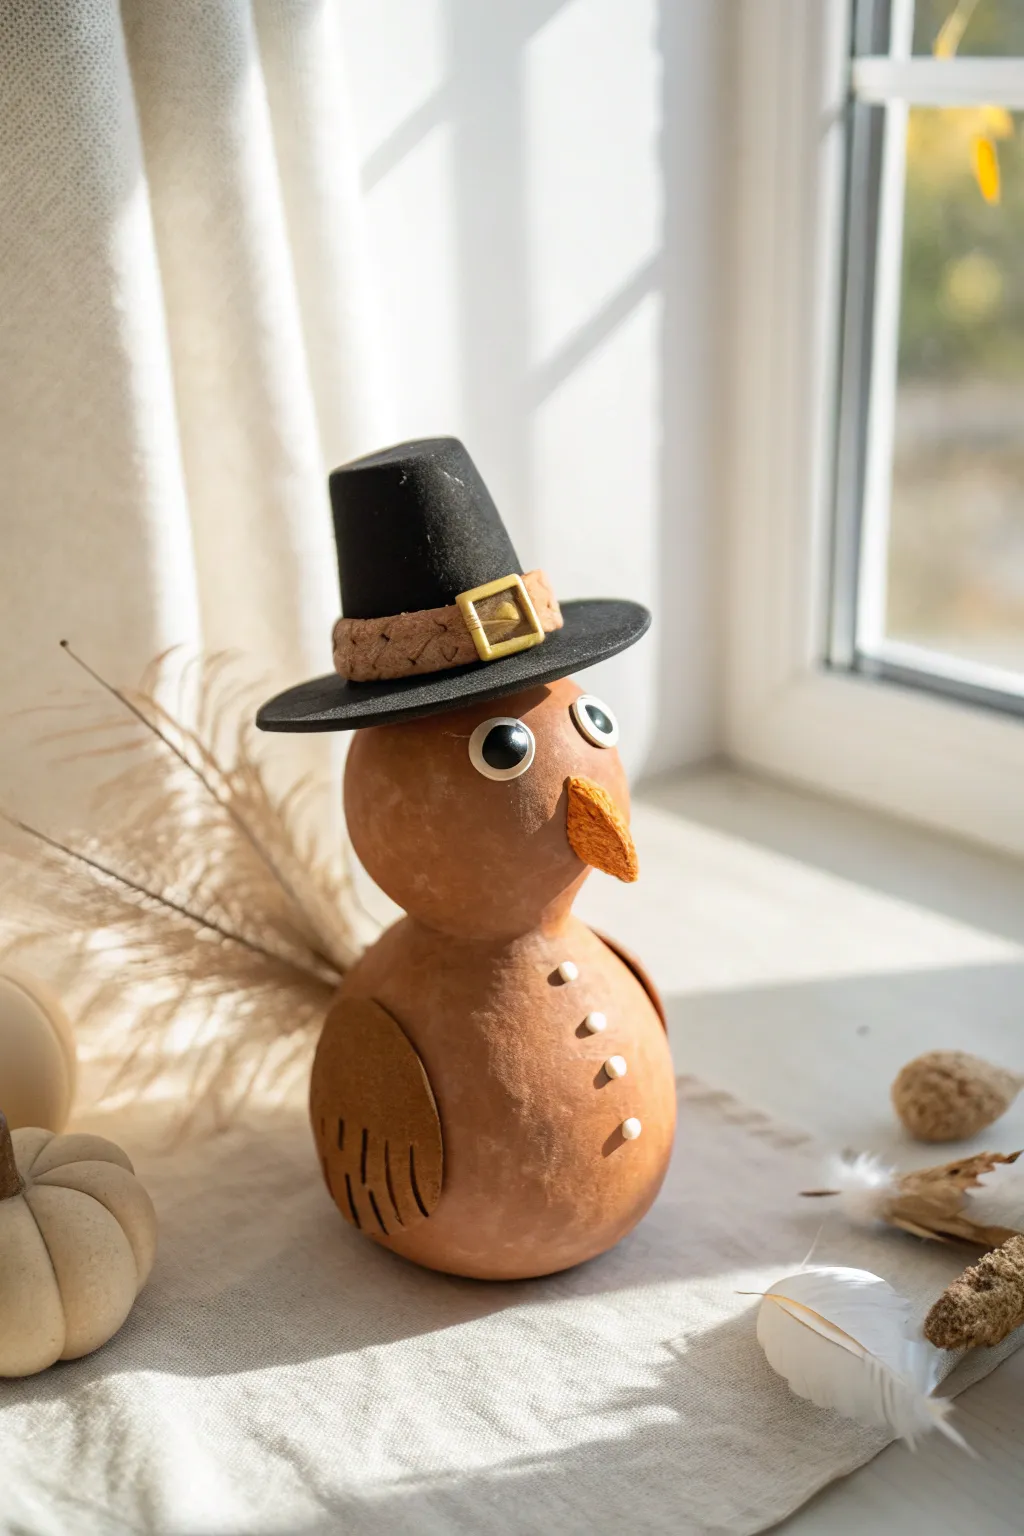
Celebrate the harvest season with this charming, minimalist turkey figure donning a classic pilgrim hat. Its warm, roasted-brown tones and whimsical button details make it a perfect centerpiece for your Thanksgiving table.
Step-by-Step
Materials
- Air dry clay (terracotta or white)
- Acrylic paints (burnt sienna, black, gold, orange, cream)
- Clay sculpting tools
- Water and sponge
- Rolling pin
- Strong craft glue or E6000
- Googly eyes (medium-large size)
- Black felt or cardstock (for the hat brim)
- Small piece of fabric or textured paper (for the hat band)
- Clear matte varnish (optional)
Step 1: Sculpting the Body
-
Form the base:
Begin by taking a large chunk of air dry clay and rolling it into a smooth, slightly heavy ball. This will be the turkey’s lower body, so ensure it has a sturdy, slightly flattened bottom so it stands upright without wobbling. -
Shape the head:
Roll a second, smaller ball of clay for the head. It should be roughly half the size of the body to create that cute, stacked proportion. -
Join the pieces:
Score the top of the body and the bottom of the head with a sculpting tool or toothpick. Apply a dab of water or clay slip to the scored areas and press them firmly together to bond. -
Smooth the seam:
Wet your finger slightly and gently smooth the clay where the neck meets the body, blending the seam so the transition looks natural but distinct. -
Add the beak:
Pinch a small triangle of clay and texture it slightly to look rough or feathery. Attach this to the center of the face, pointing downwards. -
Create the wings:
Roll out a small slab of clay and cut two semi-circles. Use a knife tool to indent vertical lines along the bottom edge to mimic feathers. Attach these to the sides of the lower body using the score-and-slip method. -
Make the buttons:
Roll three tiny, pea-sized balls of clay. Flatten them slightly and press them in a vertical line down the center of the turkey’s chest.
Weight it Down
Before sealing the body, push a small, heavy stone into the bottom center of the base clay. This lowers the center of gravity so your turkey won’t tip over easily.
Step 2: Crafting the Hat
-
Form the hat crown:
Take a separate piece of clay and shape it into a cylinder that is slightly wider at the top than the bottom. Flatten the top surface completely. -
Create the brim:
While you can make the brim from clay, I find using stiff black felt or cardstock works best for that thin, rigid look in the photo. Cut a circle slightly larger than the clay cylinder, with a hole in the middle if you want the cylinder to sit deep, or simply glue the cylinder on top of a solid circle later. -
Drying time:
Allow all your clay pieces—the turkey body and the hat cylinder—to dry completely. This usually takes 24-48 hours depending on humidity.
Golden Glamour
Brush a very light layer of metallic gold paint over the wing feathers and the beak. It catches the candlelight beautifully on a Thanksgiving table.
Step 3: Painting and Assembly
-
Base coat the turkey:
Paint the entire body and head with a warm burnt sienna or terracotta acrylic paint. Use a sponge to dab the paint on for a slightly textured, organic finish. -
Paint details:
Paint the beak a muted orange. Carefully paint the three buttons in a cream or white color. -
Color the wings:
Paint the wing sections a slightly darker brown or add a black wash to the grooves to make the feather details pop. -
Paint the hat:
Paint the dried clay cylinder solid black. If you made a clay brim, paint that black too. -
Add the hat band:
Glue a strip of textured fabric or brown paper around the base of the hat cylinder. Cut a small square from gold paper or paint a clay square gold to serve as the buckle. -
Assemble the hat:
Glue the clay cylinder onto your black brim piece. Once secure, glue the finished hat onto the turkey’s head at a slight, jaunty angle. -
Attach the eyes:
Adhere two medium-large googly eyes above the beak. The stark white against the brown clay gives it that classic crafting look. -
Seal:
Finish with a coat of matte varnish to protect the paint and give the clay a sealed, professional appearance.
Place your little pilgrim near a window or among pumpkins to bring a dash of harvest cheer to your home

TRACK YOUR CERAMIC JOURNEY
Capture glaze tests, firing details, and creative progress—all in one simple printable. Make your projects easier to repeat and improve.
Thankful Word Mini Tiles
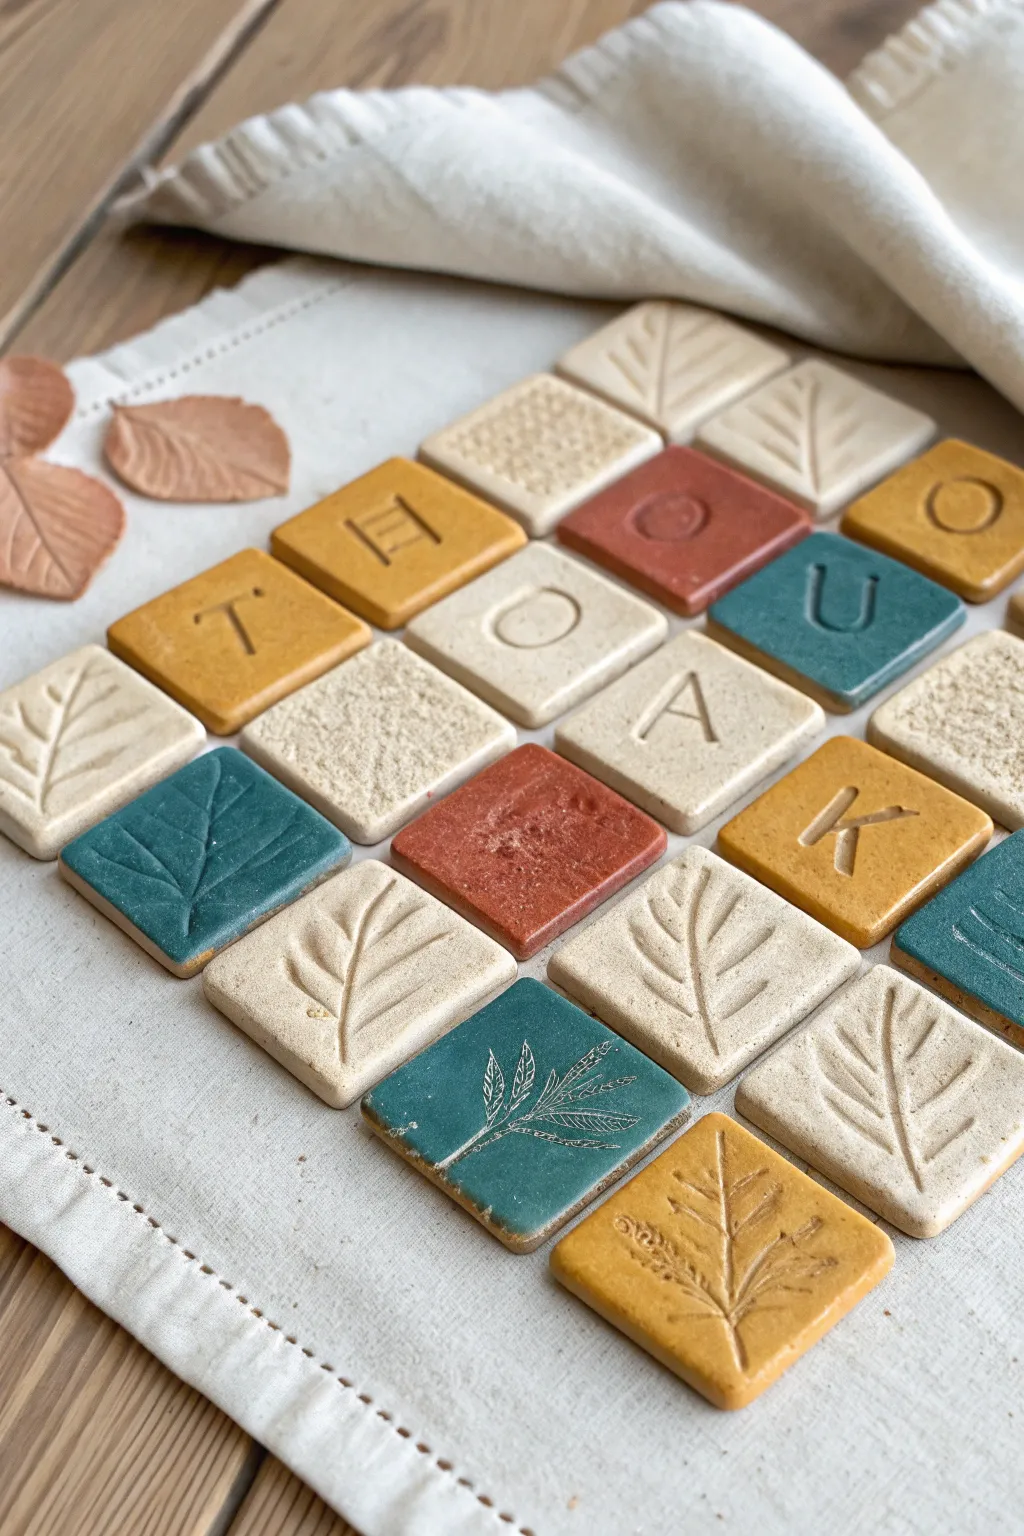
Create a stunning, tactile centerpiece or interactive game with these rustic autumn-toned clay tiles. Featuring a mix of stamped letters spelling “THANKFUL,” botanical impressions, and rich seasonal colors, this project adds a sophisticated handmade touch to your holiday table.
Step-by-Step Guide
Materials
- White air dry clay
- Rolling pin
- Square cookie cutter (approx. 1.5 inches)
- Letter stamp set
- Small leaves or botanical stamps for impressions
- Texture tools (sandpaper, burlap, or textured rollers)
- Acrylic paints (mustard yellow, terracotta, deep teal, burnt orange)
- Fine grit sandpaper
- Matte sealant (optional)
- Small paintbrush
- Parchment paper
Step 1: Preparation & Shaping
-
Roll the slab:
Begin by kneading your air dry clay until it is smooth and pliable. Place it on a sheet of parchment paper and roll it out to an even thickness of about 1/4 inch. Try to keep the thickness consistent so all your tiles match later. -
Cut the squares:
Using your square cookie cutter, cut out at least 25 squares. It’s always a good idea to cut a few extras in case of mistakes or cracking during the drying process. -
Smooth the edges:
Dip your finger in a little bit of water and gently run it along the cut edges of each square to smooth out any roughness or loose clay bits.
Fixing Curl
If tiles curl while drying, slightly dampen the concave side and place them under a heavy book (with parchment paper between) for a few hours to flatten them out.
Step 2: Stamping & Texturing
-
Imprint the message:
Select the tiles that will spell out your message (like “THANKFUL” or “YOU”). Gently press your letter stamps into the center of these tiles. Use steady pressure to get a clean impression without warping the square shape. -
Add botanical details:
On several blank tiles, press small leaves or botanical stamps into the clay. For real leaves, place the vein-side down and roll over them gently with your rolling pin to transfer the detailed texture. -
Create surface texture:
For the remaining plain tiles, add visual interest by pressing textured items like coarse sandpaper, burlap fabric, or a textured sponge onto the surface. This creates the subtle, rough finish seen in the cream-colored tiles. -
Allow to dry:
Arrange the tiles on a flat surface lined with parchment paper. Let them air dry completely for 24-48 hours. I find flipping them over halfway through the drying time helps prevent them from curling at the corners. -
Sand for perfection:
Once fully dry and hard, use fine-grit sandpaper to lightly sand the edges and surfaces. This removes any sharp burrs and prepares the clay for painting.
Magnetize It
Glue small circular magnets to the back of each finished tile to turn this table decor into an interactive refrigerator puzzle for guests to play with while cooking.
Step 3: Painting & Finishing
-
Plan the palette:
Separate your tiles into groups for painting. Leave the textured ones natural or paint them off-white. Select a mix of tiles for your accent colors: mustard yellow, terracotta, and deep teal. -
Apply base colors:
Paint the top surface and sides of your colored tiles. You may need two thin coats for opaque coverage, especially with the darker teal and terracotta shades. -
Highlight the impressions:
For tiles with leaf veins or deep textures, you can do a subtle wash. Mix a tiny bit of brown paint with water and brush it into the grooves, then quickly wipe the surface with a damp cloth/paper towel. This leaves dark paint in the crevices to make the design pop. -
White botanical art:
For the specific dark teal tile with the fine white drawing shown in the image, paint the tile teal first. Once dry, use a very fine white gel pen or a detail brush with white paint to hand-draw delicate leaves on top. -
Seal the work:
To protect the paint and give the tiles a finished look, apply a coat of matte varnish or sealant. This makes them more durable, especially if they will be handled often.
Arranged on a linen napkin, these custom tiles create a beautiful, understated holiday decoration that speaks volumes
Cornucopia Pocket Centerpiece
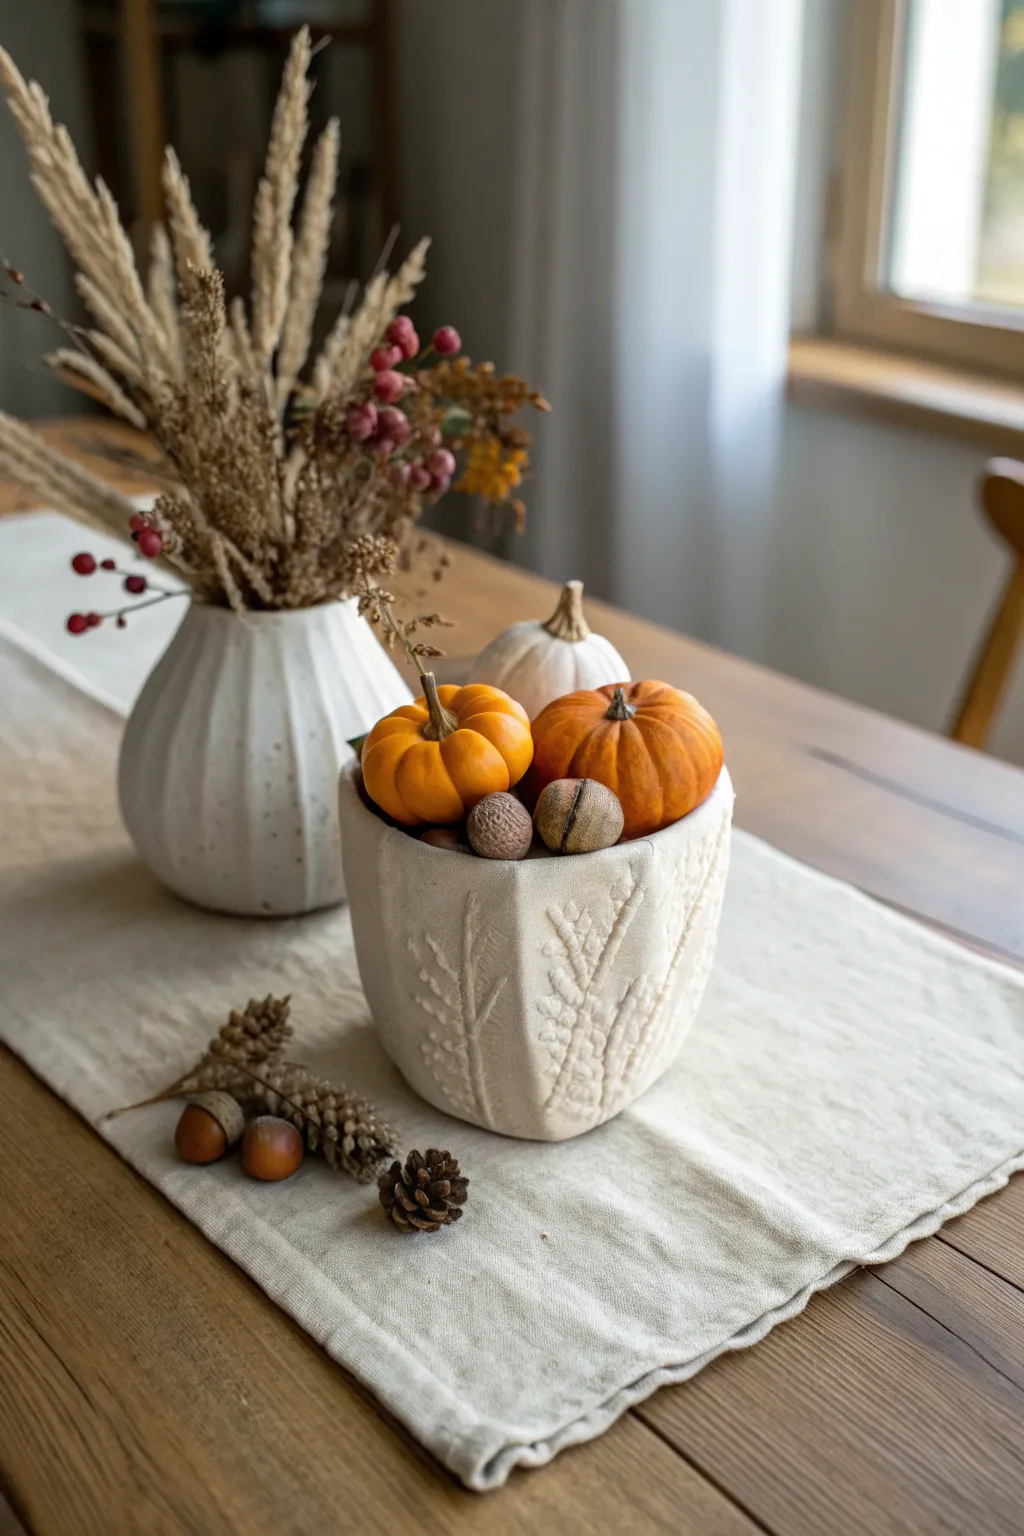
Create a cozy autumn accent for your Thanksgiving table with this textured air-dry clay pocket. The soft, imprinted wheat design adds a rustic, handmade touch that perfectly cradles miniature pumpkins and seasonal nuts.
How-To Guide
Materials
- White air-dry clay (approx. 500g)
- Rolling pin
- Dried wheat stalks or long grass for impressions
- Craft knife or clay cutting tool
- Rolling mat or parchment paper
- Small bowl or cup (to use as a mold)
- Plastic wrap
- Small bowl of water
- Fine-grit sandpaper (optional)
- Clear matte varnish (optional)
Step 1: Preparing the Clay Slab
-
Condition the clay:
Begin by kneading your air-dry clay until it is warm, pliable, and free of any air bubbles. -
Roll it out:
Place the clay on your rolling mat or parchment paper. Roll it out into a rectangular slab about 1/4 inch thick. Aim for a long rectangle shape, enough to wrap around your chosen mold. -
Trim the edges:
Using a ruler and craft knife, trim the edges of your clay slab to create clean, straight lines. Don’t discard the scraps yet; you might need them for patching.
Sharper Impressions
For clearer details, lightly mist the wheat stalks with water or cooking spray before pressing them into the clay. This prevents sticking and keeps lines crisp.
Step 2: Adding Texture
-
Plan your placement:
Lay your dried wheat stalks gently on top of the clay slab to visualize the pattern. Arrange them vertically to mimic the look of growing wheat. -
Press the design:
Once you like the arrangement, use the rolling pin to firmly press the wheat stalks into the clay. Roll over them once with steady pressure. -
Remove the botanicals:
Carefully peel the wheat stalks away from the clay. Use the tip of your craft knife or a pin to lift stubborn pieces without distorting the impression. -
Deepen the details:
If the impression is too faint, I sometimes go back in with a clay tool or toothpick to gently deepen the main lines of the stalks for better visibility.
Cracking Seams?
If seams start to separate while drying, mix a tiny bit of clay with water to make a ‘slip’ paste. Apply this to the crack and smooth it over with your finger.
Step 3: Forming the Pocket
-
Prepare the mold:
Take your small bowl or cup and wrap it lightly in plastic wrap. This prevents the clay from sticking to the form as it dries. -
Wrap the clay:
Lift your textured clay slab and wrap it around the mold. The textured side should face outward. Instead of making a perfect cylinder, pinch the sides slightly to create a softer, ‘pocket’ shape. -
Create the seam:
Where the two ends of the clay meet, press them together. Instead of smoothing it completely seamless, you can overlap them slightly and press firmly to seal, keeping a bit of the rustic look. -
Form the base:
Gently fold the bottom edge of the clay underneath the mold to create a floor for your container. Dab a little water on the clay to help smooth and seal these bottom folds together.
Step 4: Drying and Finishing
-
Initial drying:
Let the clay sit on the mold for about 2-3 hours until it is leather hard—stiff enough to hold its shape but not fully dry. -
Remove the form:
Carefully slide the bowl or cup out of the clay pocket. Peel away the plastic wrap gently. -
Refine the shape:
While the clay is still slightly flexible, you can gently push the rim into a soft square or organic oval shape if it became too round during the molding process. -
Full cure:
Allow the piece to dry completely for another 24-48 hours. Turn it upside down halfway through so the bottom dries evenly. -
Sand edges:
Once bone dry, use fine-grit sandpaper to smooth any sharp edges on the rim or base. -
Seal (Optional):
Apply a coat of clear matte varnish if you want to protect the piece from moisture, though leaving it raw maintains that lovely chalky finish visible in the photo.
Now simply fill your new creation with acorns and mini pumpkins to complete the look
Wheat and Harvest Sprig Bud Vases
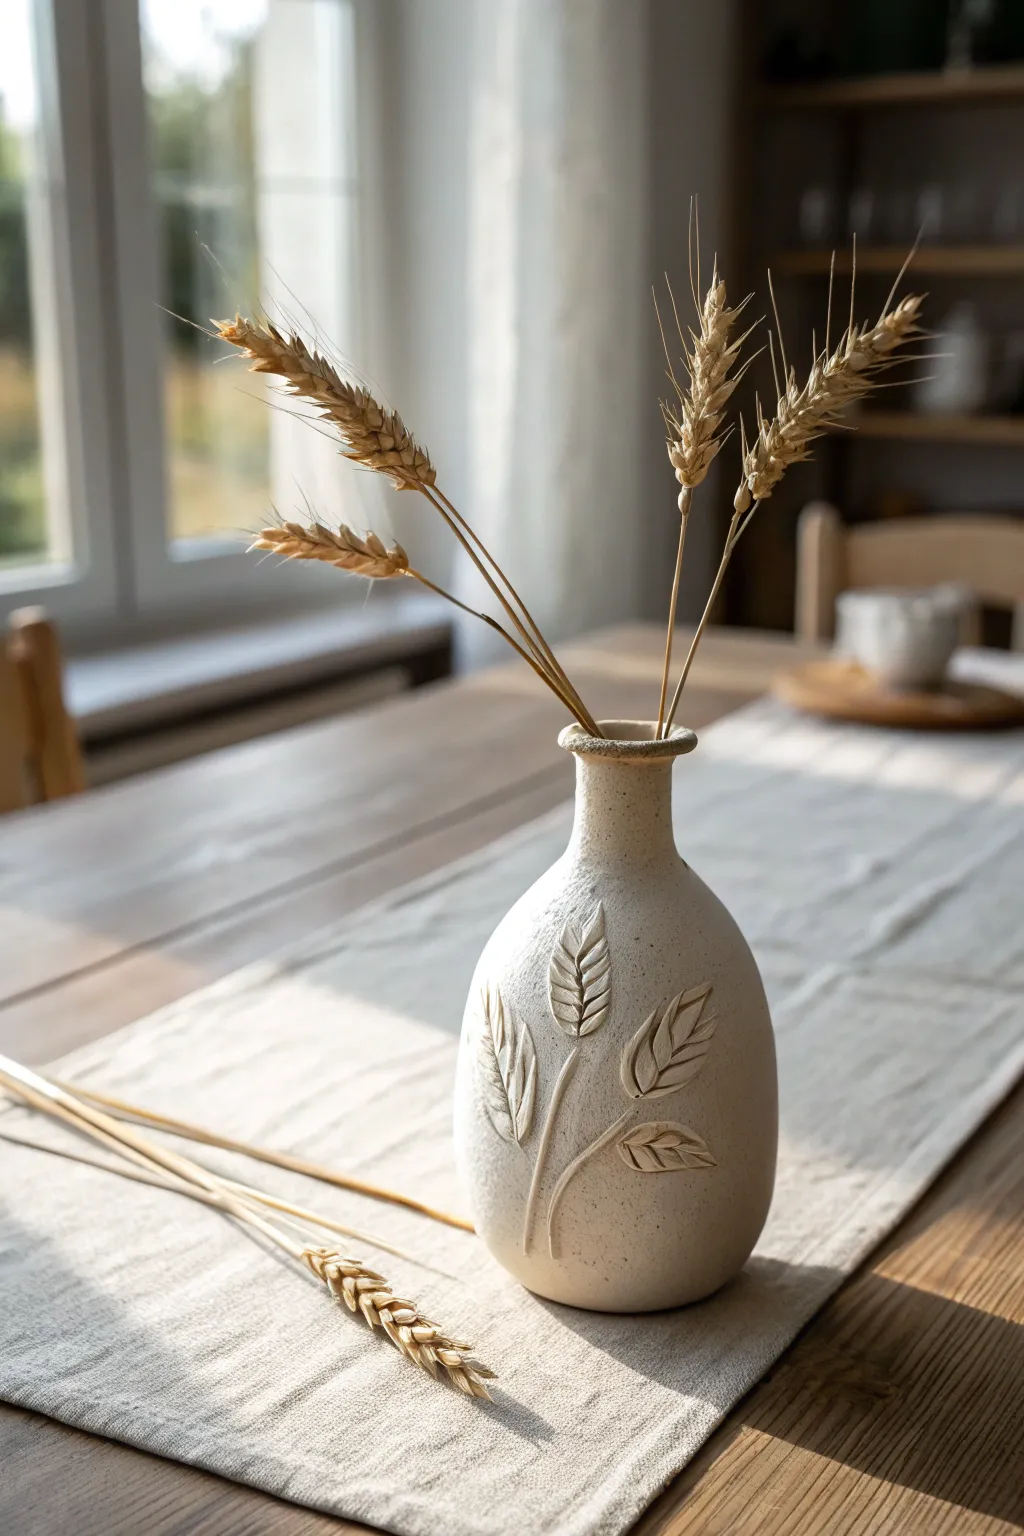
Bring the warmth of autumn fields indoors with this charming bud vase featuring delicate wheat motifs. The textured, speckled clay finish and raised relief design create a perfectly imperfect handcrafted look that anchors any Thanksgiving table setting.
Detailed Instructions
Materials
- Stone-colored or speckled air-dry clay (approx. 500g)
- Small rolling pin or acrylic roller
- Clay cutting tool or fettling knife
- Small bowl of water
- Slip (clay mixed with water)
- Small carving tools or a wooden skewer
- Smooth glass bottle or narrow jar (to use as an armature)
- Fine-grit sandpaper
- Matte spray sealant or matte acrylic varnish
- Sponge or soft cloth
Step 1: Farming the Base
-
Prepare the Armature:
Select a narrow glass bottle or jar that matches the desired silhouette of your vase. Clean it thoroughly and dry it. This will act as the internal support structure so your vase holds its shape perfectly while drying. -
Roll the Slab:
Take a large chunk of your speckled air-dry clay and knead it briefly to wake it up. Roll it out into a uniform slab about 1/4 inch thick. You want it wide enough to wrap fully around your glass bottle with a little overlap. -
Wrap the Bottle:
Gently lift the clay slab and wrap it around the glass bottle. Use a knife to cut a straight seam where the edges meet. Score (scratch) both cut edges, apply a little water or slip, and press them together firmly. -
Smooth the Seam:
Using your thumb or a damp sponge, blend the vertical seam until it disappears completely. The goal is to make the clay look like a continuous cylinder. -
Shape the Neck:
If your bottle narrows at the top, gently gently press the clay inward to follow that curve. If you have excess clay at the neck, trim it away carefully, smoothing the top rim so it looks slightly rounded and organic, not sharp. -
Close the Bottom:
Flip the bottle upside down. Trim any excess clay from the bottom edge, leaving just enough to fold over slightly. Roll a small separate disk of clay, score and slip it, and attach it to the base to seal the bottom completely. Smooth everything out.
Step 2: Harvest Details
-
Create Wheat Stems:
Roll out very thin, delicate coils of clay to serve as the stems. Arrange three or four of these on the front of the vase in a gently curving, natural layout. Use a tiny bit of water to adhere them, flattening them slightly against the body. -
Form the Leaves:
Roll small balls of clay, then flatten them into elongated tear-drop shapes. I like to make about 6-8 of these for the main wheat heads. Place them at the top of a stem in a stacked V-pattern to mimic a wheat stalk. -
Add Leaf Texture:
Using a needle tool or a sharp skewer, press a central vein line down the middle of each attached leaf. Then, create small angled indentations on either side of the vein to represent the grain texture. -
Refine the Edges:
Go around each added relief piece with a slightly damp brush or your finger to smooth any rough edges where the added clay meets the vase body. This ensures the design looks integrated rather than just stuck on. -
Create the Lower Foliage:
Add larger, single leaves lower down on the stems using the same teardrop method. These should look like the broader blades of grass found on wheat stalks. Carve the vein details deeply to catch the light.
Cracking Up?
If hairline cracks appear while drying around the rigid glass, mix a thick paste of clay and vinegar (instead of water). Fill the cracks, smooth over, and let dry again.
Step 3: Finishing Touches
-
Initial Drying:
Let the vase sit in a cool, dry place away from direct sunlight. Because there is a glass bottle inside, the clay will shrink against it as it dries. To prevent cracking, you must dry it very slowly; consider loosely draping a plastic bag over it for the first 24 hours. -
Sanding:
Once fully dry (usually 48-72 hours), the clay will be hard and chalky. Use fine-grit sandpaper to gently buff away any fingerprints or rough bumps on the main body, being careful not to sand down your beautiful wheat details. -
Create the Speckle (Optional):
If you didn’t buy pre-speckled clay, dilute a tiny amount of brown or black acrylic paint with water. Load a stiff brush and flick the bristles to spatter tiny dots across the vase for that stony, ceramic effect. -
Seal the Surface:
Apply a coat of matte spray sealant or varnish. This protects the clay from humidity and gives it a finished professional look. Since the core is glass, you can actually put water inside for fresh flowers, unlike purely clay vessels.
Golden Hour Glow
After the clay is dry but before sealing, gently dry-brush a metallic gold acrylic paint over just the raised wheat kernels to make the details pop.
Fill your new vase with dried wheat bundles or fall grasses to complete this lovely autumnal centerpiece
Wishbone Good-Luck Charms
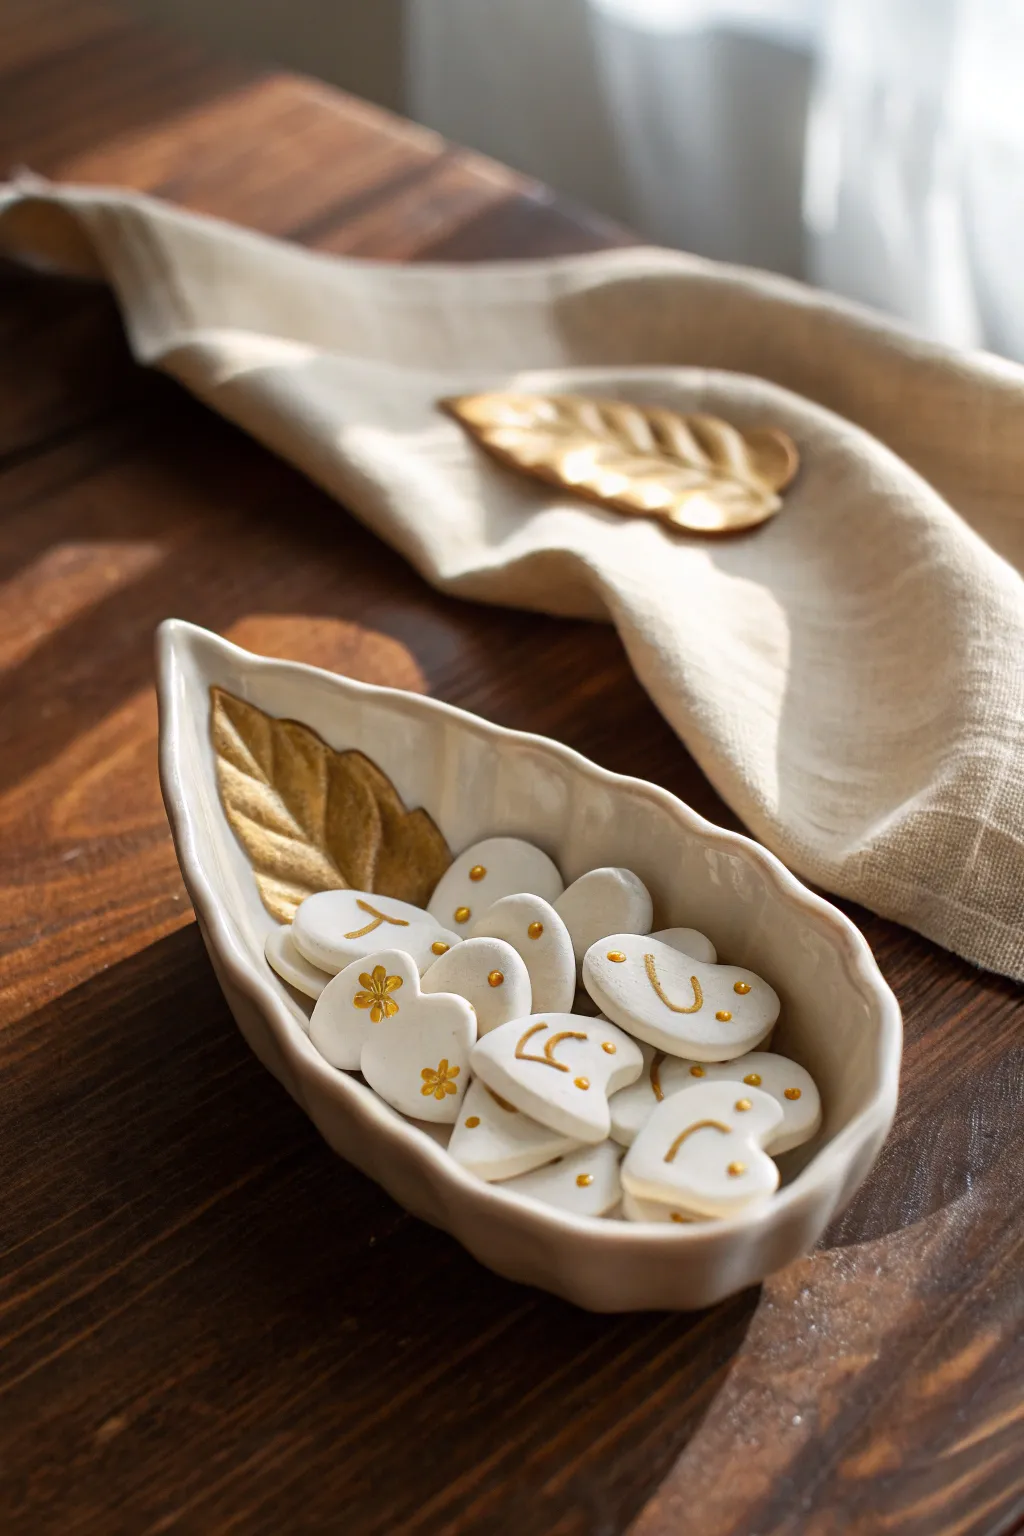
Create a meaningful Thanksgiving tradition with these delicate, heart-shaped wishbone tokens. Crafted from smooth white clay and accented with touches of metallic gold, they make lovely table scatter or thoughtful guest favors.
Step-by-Step Tutorial
Materials
- White smooth air dry clay
- Small heart-shaped cutter (approx. 1 inch)
- Clay rolling pin
- Parchment paper or craft mat
- Small round piping tip (for indentation)
- Dotting tool or toothpick
- Fine grit sandpaper (400-600 grit)
- Metallic gold acrylic paint
- Very fine detail paintbrush (00 or 000 size)
- Gloss or matte varnish (optional)
Step 1: Shaping the Charms
-
condition the clay:
Start by taking a small handful of white air dry clay. Knead it thoroughly in your hands until it becomes warm, pliable, and free of any large air bubbles. -
roll the slab:
Place the clay on a sheet of parchment paper. Use your rolling pin to roll it out to an even thickness of about 1/4 inch. Try to keep the surface as smooth as possible. -
cut basic shapes:
Press your small heart-shaped cutter into the clay to create your base tokens. Cut as many as you need for your guests, plus a few extras for practice. -
smooth the edges:
Dip your finger in a tiny bit of water and run it gently around the cut edges of each heart to smooth out any roughness or burrs left by the cutter. -
indent the wishbone:
To create the stylized wishbone look, take your small round piping tip or a similar round tool. Gently press a localized curve or ‘U’ shape into the center of the heart, not cutting all the way through, just creating a shallow impression. -
add decorative dots:
Using a dotting tool or the blunt end of a toothpick, press small, decorative indentations around the wishbone shape or near the bottom point of the heart. The image shows simple patterns like three dots in a cluster or single accent points. -
sculpt flower details:
For variety, you can create a flower imprint on some tokens. Press the dotting tool in a circle formation to create five petals, then add a center dot.
Step 2: Drying and Refining
-
dry completely:
Lay the clay pieces flat on a fresh sheet of parchment paper in a safe, dry place. Let them air dry for at least 24-48 hours, flipping them once halfway through to ensure even drying. -
sand the surface:
Once fully hard, inspect the edges. Use fine-grit sandpaper to gently buff away any remaining sharp bits or fingerprints, resulting in a porcelain-like finish. -
clean dust:
Wipe each piece with a slightly damp cloth or a dry soft brush to remove all sanding dust before painting.
Fixing Cracks
If tiny cracks appear while drying, mix a small amount of fresh clay with water to make a paste (slip). Fill the crack, smooth it over, and let it dry again.
Step 3: Gilding the Details
-
prepare gold paint:
Squeeze a small amount of metallic gold acrylic paint onto a palette. If the paint is very thick, add a tiny drop of water to improve the flow for fine lines. -
paint the wishbones:
Load your fine detail brush with gold paint. Carefully fill in the ‘U’ shaped wishbone indentation you created earlier. It helps to anchor your pinky finger on the table to keep your hand steady. -
fill the dots:
Dip the very tip of your brush or a toothpick into the gold paint and gently touch it to the indented dots. The paint should pool slightly inside the impressions. -
paint flower accents:
For the floral designs, carefully paint inside each petal indentation. I find creating the petals first and letting them dry before adding the center dot prevents the gold from blobbing together. -
seal the work:
Allow the paint to dry completely. If you want extra durability for dining table use, apply a thin coat of matte or gloss varnish over the entire charm.
Leaf Bowl Display
To complete the aesthetic shown in the photo, display your finished charms in a leaf-shaped ceramic dish alongside a soft linen napkin.
These charming little tokens are now ready to bring a touch of luck and elegance to your holiday gathering
Mini Thanksgiving Dinner Charms
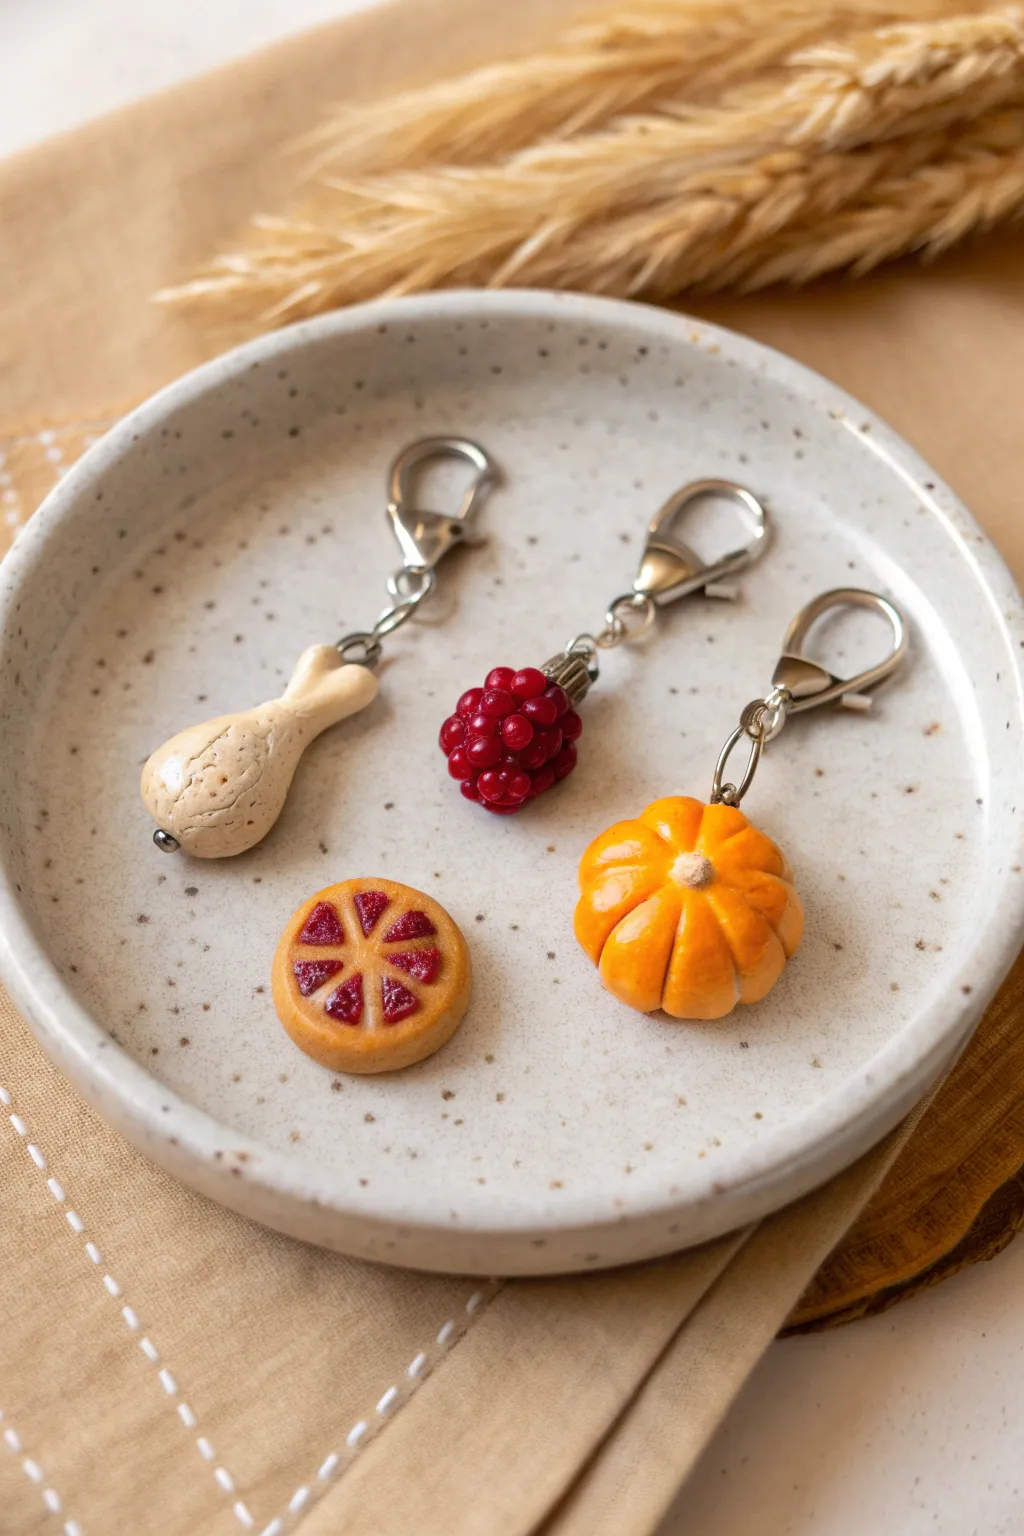
Create a cornucopia of cuteness with these tiny Thanksgiving-themed clay charms. This project features a drumstick, a cranberry cluster, a pumpkin, and a little pie tart, all perfect for zipper pulls or stitch markers.
Step-by-Step
Materials
- Air dry clay (white or pre-colored)
- Acrylic paints (orange, red, tan, off-white, brown)
- Gloss varnish or clear nail polish
- Metal screw eye pins (small)
- Lobster clasp keychains and jump rings
- Sculpting tools (needle tool, small ball stylus)
- Small paintbrush
- Pliers
Step 1: Sculpting the Drumstick
-
Form the bone:
Start with a small, pea-sized ball of white clay. Roll it into a thin log, then press one end gently to flatten it slightly into a heart shape to mimic the bone joint. -
Shape the meat:
Take a larger ball of clay (about the size of a marble) and shape it into a teardrop. -
Assemble the leg:
Press the bone piece onto the wider end of the teardrop. Blend the seam slightly with your finger or a smoothing tool so it looks connected but distinct. -
Add texture:
Use a needle tool or a crumpled ball of aluminum foil to gently tap texture onto the ‘meat’ portion for a crispy skin look. Insert a screw eye pin into the top of the bone.
Step 2: Creating the Cranberry Cluster and Pumpkin
-
Roll tiny berries:
Roll about 12-15 very small spheres of clay. These will be your individual cranberries. -
Cluster the berries:
Press the spheres together into a tight, grape-like bunch. I find it helps to build them around a small central core of clay to keep the shape round. -
Secure the hardware:
Dip the end of a screw eye pin in a little glue and insert it deeply into the center of the cluster. Add a textured metal bead cap at the top if desired. -
Form the pumpkin base:
Roll a medium ball of clay and slightly flatten it on your work surface to create a squat sphere. -
Carve the ribs:
Use a needle tool or the side of a toothpick to press vertical grooves all around the pumpkin, starting from the center top down to the bottom. -
Stem and hardware:
Add a tiny, textured snake of clay to the center for a stem. Insert your eye pin near the stem, ensuring it goes deep enough for stability.
Loose Eye Pins?
If an eye pin feels loose after the clay dries, remove it, add a drop of superglue to the shaft, and reinsert it into the hole for a permanent bond.
Step 3: Making the Mini Pie Tart
-
Make the crust:
Flatten a ball of clay into a thick disk. Use a ball stylus to press a depression into the center, leaving a raised rim for the crust. -
Create the filling:
Fill the depression with a smooth layer of clay. Score the top into six or eight equal triangular slices using a knife tool. -
Detail the slices:
Within each slice, gently press or stipple the clay to make it look like fruit filling texture.
Spice It Up
Mix real spices like cinnamon or nutmeg into the varnish for the pie charm to give it a speckled look and a faint, festive scent.
Step 4: Painting and Finishing
-
Dry thoroughly:
Let all your clay pieces dry completely (usually 24-48 hours depending on humidity) before painting. -
Paint the savory items:
Paint the pumpkin a bright orange with shaded crevices. Paint the drumstick a light tan, then dry-brush brown over the textured skin to make it look roasted. -
Paint the sweet items:
Paint the cranberries a deep, glossy crimson. For the pie, paint the crust golden brown and the filling a dark berry red. -
Seal for shine:
Apply a coat of gloss varnish to the cranberries, pumpkin, and pie filling to make them look juicy and ceramic-like. Keep the pie crust and turkey bone matte if possible. -
Attach findings:
Once the varnish is dry, use pliers to open the jump rings. Connect the lobster clasps to the eye pins on your charms.
Now you have a charming set of Thanksgiving miniatures ready to decorate your bag or give as holiday favors.