Whenever I’m stuck, I start hunting for clay art design ideas that feel doable but still make my brain light up. Here are some of my favorite directions to play in—ranging from classic little wins to artsy statement pieces you can totally pull off at home.
Simple Cute Animal Minis
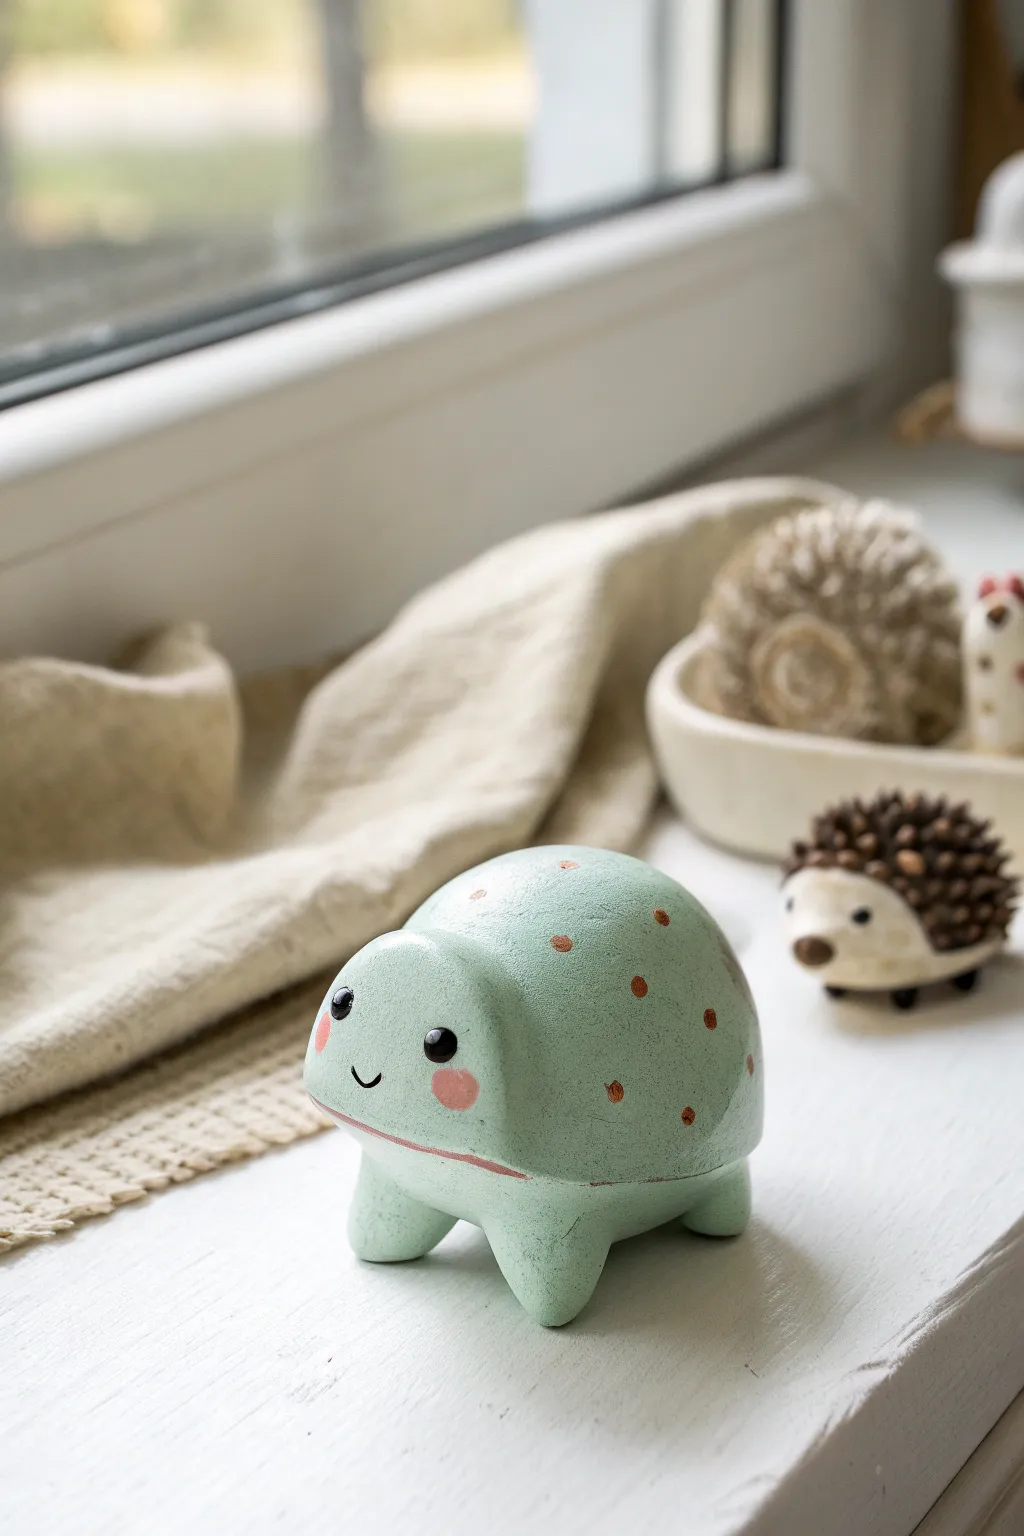
This adorable, palm-sized turtle figurine brings a splash of cheer with its rounded shape and polka-dotted shell. Its smooth, matte finish and blushing cheeks make it a perfect beginner-friendly project for adding a touch of whimsy to any windowsill.
Step-by-Step Guide
Materials
- Air-dry clay or polymer clay (white)
- Acrylic paints (pale teal/mint green, reddish-brown, soft pink, black)
- Fine grit sandpaper
- Sculpting tools or a craft knife
- Small round paintbrush
- Fine detail paintbrush or dotting tool
- Water cup and paper towels
- Matte sealant or varnish
Step 1: Sculpting the Form
-
Create the main body:
Start with a ball of clay about the size of a tangerine. Roll it firmly between your palms to smooth out any cracks, then gently press it down onto your work surface to create a dome shape with a flat bottom. -
Define the head:
Instead of attaching a separate head, pinch the front of the dome slightly to pull out a rounded protrusion. Smooth this transition so the head flows seamlessly into the back of the shell without a distinct neck. -
Shape the legs:
Roll four small, equal-sized beans of clay. Attach two near the front and two near the back on the underside of the body. Blend the seams entirely using your thumb or a modeling tool so the legs look like extensions of the body rather than add-ons. -
Refine the feet:
Press the figurine gently onto the table to flatten the bottom of the feet, ensuring it stands stable and level. Use your finger to round off the outer edges of the legs for a soft, chubby look. -
Smooth the surface:
Dip your finger in a tiny bit of water and rub it over the entire sculpture to remove fingerprints and imperfections. The smoother the clay now, the better the paint will look later. -
Dry the sculpture:
Allow the piece to dry completely according to your clay’s package instructions. For air-dry clay, turning it over halfway through drying helps the bottom dry evenly.
Cracking Clay?
If small cracks appear in your air-dry clay while drying, mix a tiny bit of fresh clay with water to make a paste (slip) and fill the cracks, then sand smooth once dry.
Step 2: Painting and Details
-
Sand imperfections:
Once fully dry (and cured if using polymer), lightly sand any rough spots or bumps with fine-grit sandpaper. Wipe away all dust with a slightly damp cloth. -
Base coat application:
Mix a soft, pale teal or mint green acrylic paint. Apply an even coat over the entire turtle, including the bottom. Let it dry, and apply a second coat if the clay color is still showing through. -
Paint the cheeks:
Using a soft pink paint and a small round brush, dab two circular blush marks on the reptile’s cheeks. I like to dilute the paint slightly here for a softer, watercolor-like edge. -
Add the smile:
With a very fine liner brush and black paint, carefully draw a small, U-shaped smile right between the cheeks. -
Create the eyes:
Use a dotting tool or the handle end of a paintbrush dipped in glossy black paint to press two solid black circles above the cheeks for eyes. Let these dry completely. -
Add eye highlights:
Dip a toothpick into white paint and add a tiny spectral highlight dot to the upper corner of each black eye. This essentially brings the character to life. -
Decorative dots:
Select a warm reddish-brown paint. Using a small brush, add random polka dots across the back of the shell. Vary the spacing to keep it looking organic and playful. -
Define the belly line:
Mix a pale pinkish-brown color and paint a thin, horizontal line separating the side of the shell from the underbelly, wrapping around the lower edge of the form. -
Final seal:
Once all paint is bon-dry, coat the entire figurine with a matte varnish to protect the paint job and unify the surface finish.
Texture Trick
Before the clay dries, gently tap the surface with a stiff-bristled toothbrush. This gives the ‘skin’ a subtle, stone-like texture that looks great under matte paint.
Now you have a charming little desk companion to keep you company while you work


Mini Food Sculptures That Look Delicious
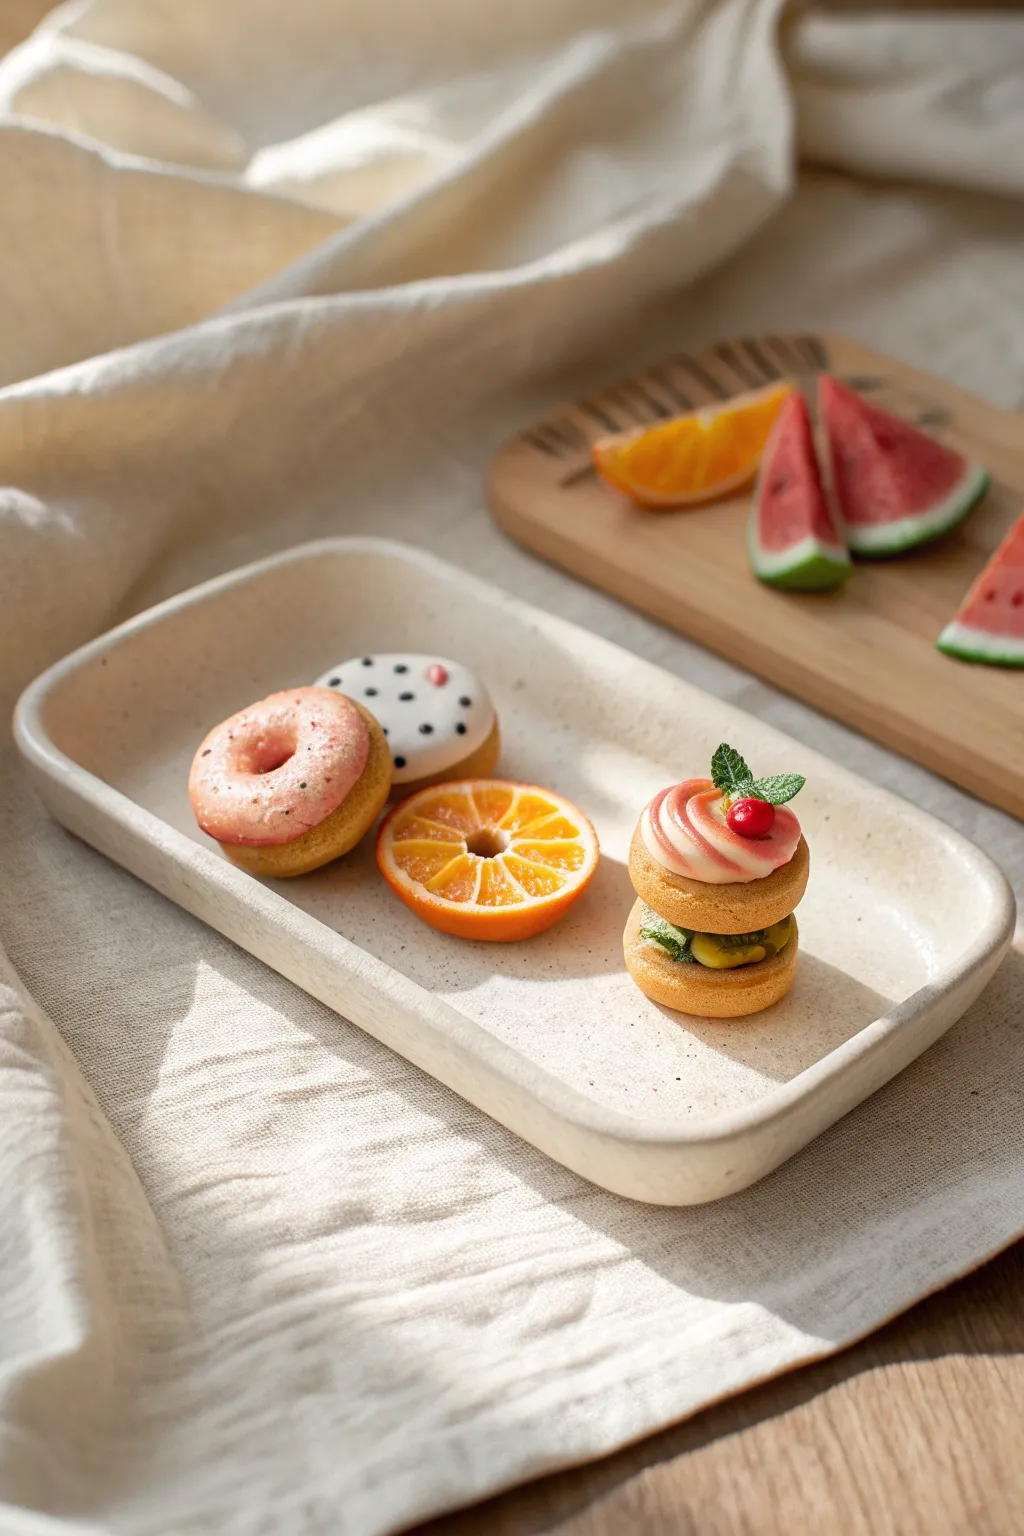
Create a delightful assortment of miniature desserts that look good enough to eat but are crafted entirely from polymer clay. This project features realistic texturing techniques to achieve the fluffy look of baked goods and the juicy translucency of fresh fruit.
Step-by-Step
Materials
- Polymer clay (tan, white, translucent, orange, red, green, black)
- Liquid polymer clay (Fimo liquid or TLS)
- Chalk pastels (orange, brown, red)
- Needle tool or toothpick
- Small ball tool
- Toothbrush or crumpled foil (for texturing)
- X-acto knife or craft blade
- Small round cutters (various miniature sizes)
- Gloss glaze or UV resin
Step 1: Sculpting the Donuts
-
Shape the Base:
Mix tan and white clay to create a ‘dough’ color. Roll two small balls and flatten them slightly into thick discs. Use a small tool or straw to punch a hole in the center of each to form the classic donut shape. -
Texture the Dough:
Gently tap a clean toothbrush or a ball of crumpled foil over the entire surface of the donuts. This creates a realistic baked texture that isn’t too smooth. -
Shade the Crust:
Scrape some orange and light brown chalk pastel into powder. Use a soft brush to dust the edges and bottoms of the donuts to simulate golden-brown baking marks. -
Create the Glazes:
Mix liquid polymer clay with a tiny bit of pink clay (or chalk pastel) for the strawberry glaze, and white clay for the vanilla glaze. The consistency should be like thick honey. -
Apply Toppings:
Carefully spread the pink glaze on one donut and white on the other. For the white donut, add tiny flecks of black clay for seeds or sprinkles. Dust the pink glaze with red pastel powder for a strawberry speckled look.
Glaze too runny?
If your liquid clay glaze runs off the donut, let it sit on a piece of paper for 10 minutes before applying. The paper absorbs excess oil, thickening the mixture slightly.
Step 2: Crafting the Orange Slice
-
Create the Segments:
Make a ‘cane’ by rolling a log of translucent orange clay. Wrap it in a very thin sheet of white clay. Cut this log into 8 equal lengths and pinch them into teardrop shapes. -
Assemble the Wheel:
Arrange the teardrops in a circle with the points facing inward. Wrap the entire bundle in a thin sheet of white clay, followed by a thicker sheet of orange clay for the rind. -
Slice and Texture:
Gently reduce the cane by rolling it until it’s the desired diameter. Slice a thick cross-section. Use a needle tool to gently poke and drag the translucent orange sections to mimic juicy pulp texture. -
Finish the Rind:
Texture the outer orange rind with your toothbrush. Poke a hole in the center if you want it to resemble the stylized donut-like slice in the photo.
Step 3: Building the Layered Dessert
-
Bake the Biscuits:
Using the same dough color as the donuts, create two small, thick circles. Texture the sides heavily with a needle tool to simulate a rise, and texture the tops with the toothbrush. Shade with pastels. -
Prepare the Bottom Filling:
On the bottom biscuit, arrange tiny flattened bits of green clay (kiwi) and yellow clay (mango). I find tweezers help immensely here for precise placement. -
Make the Cream Swirl:
Mix white clay with a little translucent clay for a frosting look. Roll it into a tapered snake and coil it on top of the fruit layer, or use a tiny piping tip with softened clay. -
Add Decorative Details:
For the top decoration, place a tiny cherry made of red clay and two minuscule mint leaves made of green clay. Use a needle tool to press vein lines into the leaves. -
Final Assembly:
Stack the second biscuit on top of the fruit layer, then add the decorative cream swirl element on the very top.
Level Up: Scented Clay
Mix a tiny drop of vanilla or fruit essential oil into the clay before sculpting. Your miniatures will smell as sweet as they look even after baking.
Step 4: Baking and Glazing
-
Bake:
Place all items on a ceramic tile or baking sheet. Bake according to your polymer clay manufacturer’s instructions (usually 275°F/130°C for 15-30 minutes). -
Seal and Shine:
Once cool, apply a high-gloss glaze or UV resin specifically to the fruit sections (orange pulp, kiwi, cherry) and the donut glazes. Leave the ‘baked’ dough areas matte for realism.
Arrange your tiny treats on a miniature tray and enjoy your imperishable dessert display


Happy Face Magnets and Pins
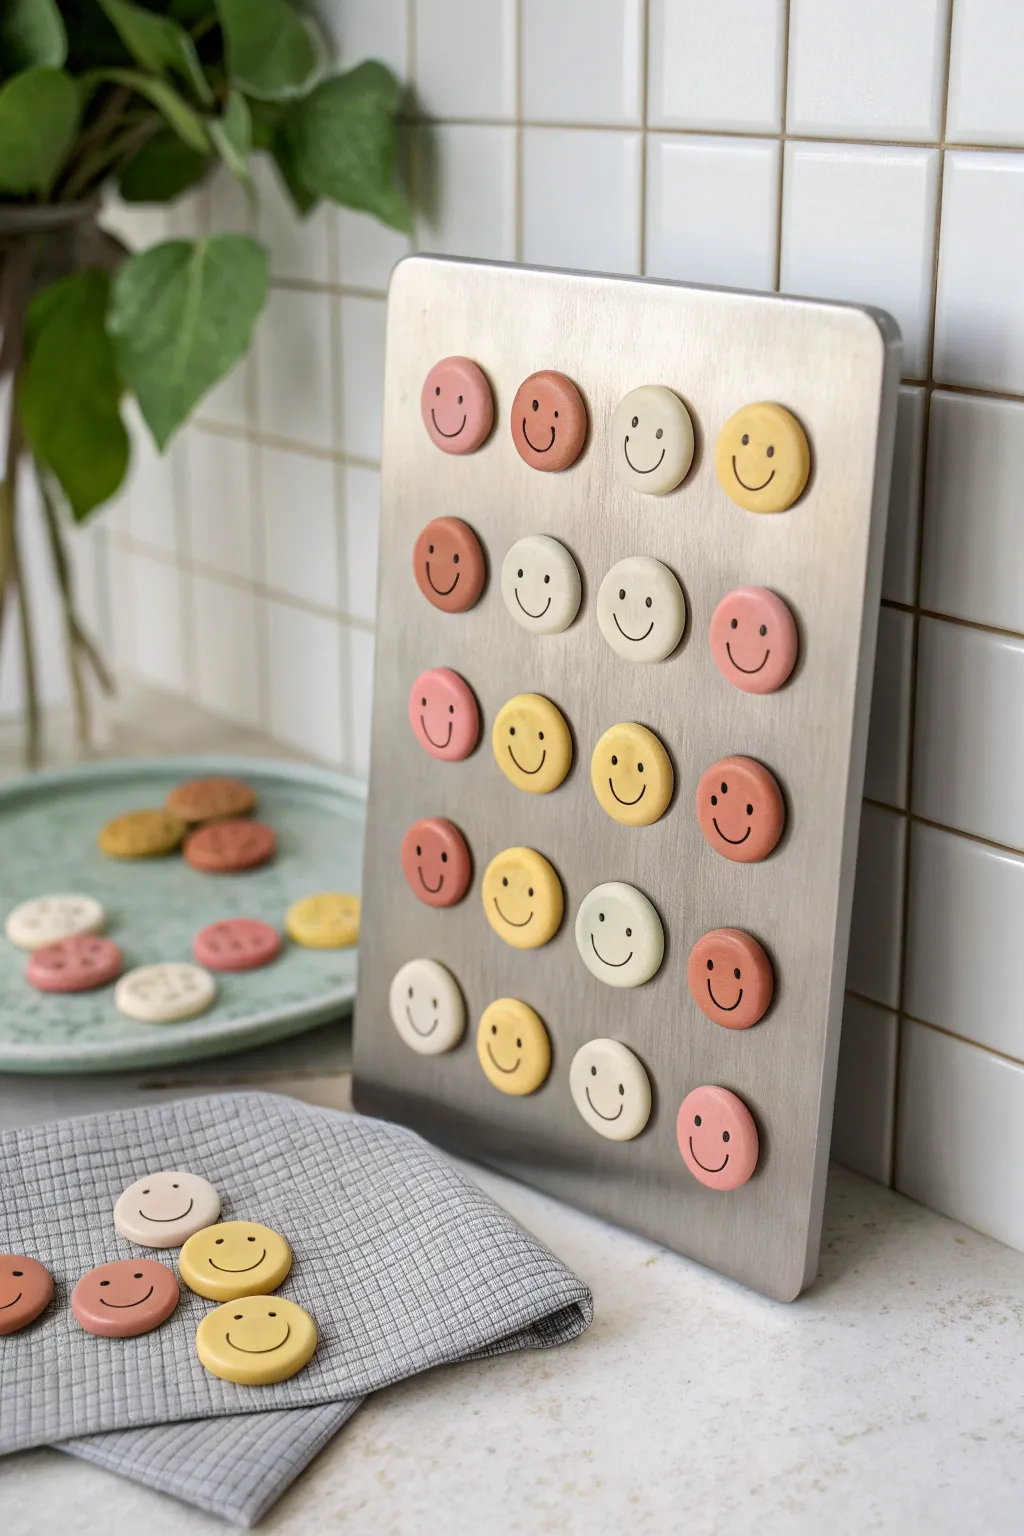
Brighten up your workspace or kitchen with this charming collection of minimalist smiley face magnets. Using earthy, muted tones and a simple round shape, these little ceramic-style tokens add a dose of positivity without overwhelming your decor.
Step-by-Step Guide
Materials
- Polymer clay in muted tones (terra cotta, mustard yellow, cream, pale pink, beige)
- Circle clay cutter (approx. 1 inch/2.5cm diameter)
- Acrylic rolling pin or pasta machine
- Small ball stylus tool or dotting tool
- Detail needle tool or craft knife
- Black acrylic paint
- Fine liner paintbrush (size 00 or smaller)
- Small round ceramic or neodymium magnets
- Strong craft glue (E6000 or similar)
- Parchment paper
- Gloss or matte glaze (optional)
Step 1: Preparing the Base
-
Condition the clay:
Start by taking small amounts of your polymer clay colors. Knead each color individually in your hands until it becomes soft, pliable, and warm to the touch. -
Roll out sheets:
Using an acrylic rolling pin or a dedicated pasta machine, roll the conditioned clay out onto a smooth surface or parchment paper. Aim for a consistent thickness of about 1/4 inch (6mm) to ensure the magnets are sturdy. -
Cut the circles:
Press your circle cutter firmly into the clay sheets to punch out your magnet bases. Try to cut as close together as possible to minimize waste. -
Smooth the edges:
Gently lift the circles off your work surface. Use your finger to lightly tap and smooth the outer edges, removing any sharpness left by the cutter for a soft, finished look. -
Clean surface:
Before baking or detailing, inspect the surface of each clay disc. If you see any fingerprints, buff them out lightly with a drop of baby oil on your fingertip or a soft brush.
Step 2: Creating Expressions
-
Mark the eyes:
This step requires a steady hand. Using a small ball stylus or a dotting tool, gently press two small indentations into the upper half of the circle where the eyes will go. Don’t press too deep; you just want a guide. -
Carve the smile:
Take your needle tool or a very fine craft knife. Carefully carve a shallow, curved line for the mouth. Start from the center and curve upwards on both sides. -
Refine the smile:
If I want a cleaner look, I sometimes go back over the carved line very gently to widen it slightly, ensuring it will hold the paint later. -
Bake the clay:
Arrange your clay circles on a baking sheet lined with parchment paper. Bake according to the manufacturer’s instructions for your specific brand of clay—usually around 275°F (135°C) for 15-30 minutes. -
Cool down:
Once baked, remove the tray from the oven and let the clay pieces cool completely before moving on to painting. Painting on hot clay can cause the acrylics to dry too fast and clump.
Pro Tip: Custom Shades
Mix primary clay colors with a tiny bit of white or brown to achieve those trendy, muted ‘terracotta’ tones shown in the photo, rather than using raw brights.
Step 3: Painting and Assembly
-
Paint the eyes:
Dip your fine liner brush into black acrylic paint. Carefully dab two small dots into the eye indentations you made earlier. A single, confident dot usually works better than trying to paint a circle. -
Fill the smile:
Using the very tip of your brush, trace the carved smile line with black paint. Since there is an groove, the paint should naturally want to stay within the line. -
Wipe excess paint:
If you get paint outside the groove, quickly wipe the surface with a damp paper towel or baby wipe. This leaves paint in the recessed smile while cleaning the top surface. -
Dry thoroughly:
Allow the black paint to dry completely. This usually takes about 10 to 15 minutes depending on how thick the application is. -
Apply varnish (optional):
For extra durability, you can apply a thin coat of matte or gloss varnish over the face. This seals the paint and gives the clay a professional finish. -
Attach magnets:
Flip the clay circles over. Place a small dot of strong craft glue (like E6000) on the back center of each piece. -
Press and hold:
Press a magnet firmly into the glue dot. Let the glue cure fully—usually 24 hours—before sticking them to your fridge or magnetic board.
Trouble with Smudges?
If your black paint lines look shaky, use a fine-tip permanent marker instead of a brush. It gives more control and fits perfectly into the carved grooves.
Now you have a whole army of cheerful faces ready to hold up your most important notes and photos


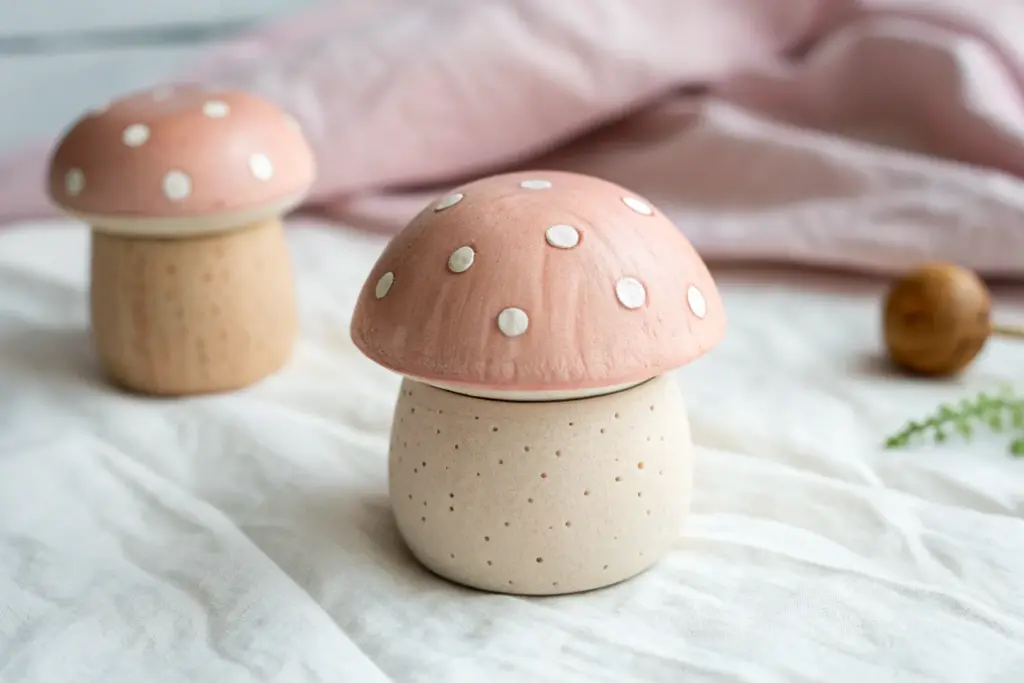
Pinch Pot Creatures With Personality

These charming, minimalist owl figurines bring a pop of color and personality to any windowsill or shelf. Created from simple clay forms, they feature a smooth, matte finish and wonderfully expressive eyes that are surprisingly easy to sculpt.
Step-by-Step
Materials
- Air-dry clay or polymer clay (white is versatile)
- Acrylic paints (Navy Blue, Terracotta/Rust Red, Mustard Yellow, White, Black)
- Small flat paintbrush
- Fine-point detail brush
- Clay sculpting tools (needle tool and a small rounded tool)
- Water cup (for smoothing)
- Fine-grit sandpaper (optional)
- Matte spray varnish
Step 1: Shaping the Basic Forms
-
Portion the Clay:
Start by taking three equal-sized lumps of clay, roughly the size of a tennis ball for each owl. Knead them well until they are soft, pliable, and free of air bubbles. -
Roll Smooth Spheres:
Roll each lump between your palms to create a smooth, tight ball. Aim for a surface free of cracks; a little drop of water on your fingers can help smooth out imperfections. -
Form the Cone Shape:
Gently taper the top of each sphere while flattening the bottom against your work surface. You are aiming for a rounded cone or ‘gumdrop’ shape that is stable enough to stand on its own. -
Refine the Silhouette:
Use your thumbs to smooth the sides, ensuring the transition from the wide base to the narrower head is gradual and organic. Avoid sharp points; keep the top rounded. -
Smooth the Surface:
Dip your finger in a tiny bit of water and run it over the entire surface of the clay to remove fingerprints. Let the shapes seek their final form; slight irregularities add handmade charm.
Eyes Falling Off?
If the clay eyes don’t stick to the body, score the back of the eye and the attachment point on the body with a needle tool. Add a dab of water (slip) to act as glue before pressing them together.
Step 2: Sculpting the Features
-
Position the Eyes:
Roll two small, pea-sized balls of white clay for each owl. Press these firmly onto the upper third of the cone shape, flattening them slightly into discs so they adhere well. -
Shape the Beaks:
Roll a tiny, grain-of-rice sized piece of clay. Pinch one end to make a point and press it directly between and slightly below the eye discs to form the beak. -
Add Texture Details:
Using a needle tool or a toothpick, gently scratch short, faint lines above the eyes to suggest eyebrows or feathers. You can add a few random texture divots on the body if you want a rougher stone look. -
Dry the Figurines:
Allow the clay to dry completely according to the package instructions. Air-dry clay usually takes 24-48 hours. I like to rotate them occasionally so the bottom dries evenly. -
Sand Imperfections:
Once fully dry, lightly sand any rough patches or fingerprints with fine-grit sandpaper, wiping away the dust with a slightly damp cloth afterward.
Step 3: Painting and Finishing
-
Base Coat Painting:
Paint the body of each owl in your chosen colors: one deep blue, one rust red, and one mustard yellow. Use a flat brush for smooth coverage, carefully painting around the white eye discs. -
Second Coat:
Apply a second coat of the body color if needed to ensure the paint creates a solid, opaque finish that looks like ceramic. -
Paint the Beaks:
Using a fine brush, paint the tiny beaks carefully. Use a contrasting yellow or gold tone to make them stand out against the body color. -
Detail the Eyes:
Paint the protruding eye discs crisp white if you haven’t kept them raw clay. Once dry, use a detail brush or the back of a paintbrush handle to dot a large black circle in the center of each eye. -
Add Eye Highlights:
This is the crucial step for personality: add a tiny white dot reflecting light inside the black pupil. Place the dots in the same position on both eyes (e.g., top right) for a focused gaze. -
Create Depth:
If desired, mix a slightly darker shade of your body color and gently stipple it near the bottom of the figurine to simulate shadow and texture. -
Seal the Work:
Finish by spraying the owls with a matte varnish. This evens out the sheen of the paint and protects the clay from dust and moisture.
Give Them Wings
Before the clay dries, gently press your thumbs into the sides of the body to create shallow indentations. This subtly suggests folded wings without needing to add extra clay pieces.
Arranging your colorful owl trio near a light source will really bring their quirky expressions to life

The Complete Guide to Pottery Troubleshooting
Uncover the most common ceramic mistakes—from cracking clay to failed glazes—and learn how to fix them fast.
Trinket Dishes With Bold Edges
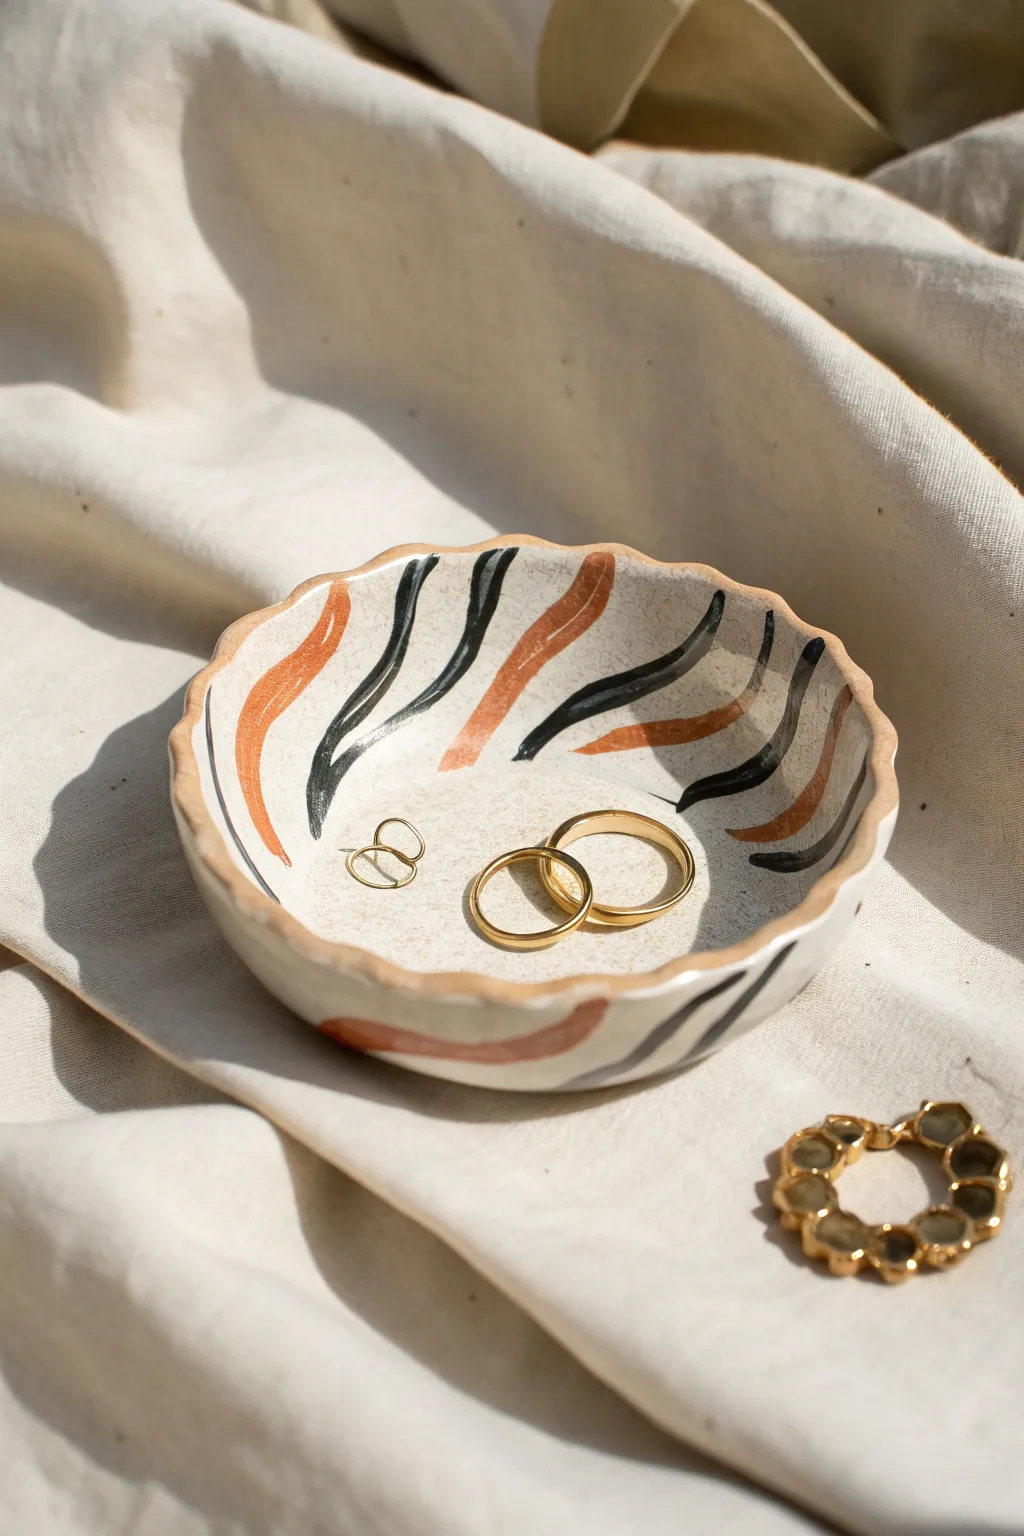
Embrace organic shapes and earthy precision with this scalloped-edge trinket dish. The subtle waves of the rim perfectly complement the bold, hand-painted pattern, creating a modern yet handmade home for your favorite rings.
Detailed Instructions
Materials
- White air-dry clay or polymer clay
- Rolling pin
- Circle cutter or bowl (approx. 4-5 inches diameter)
- Craft knife
- Sponge
- Small bowl (to use as a drying form)
- Fine-grit sandpaper
- Acrylic paints (burnt orange/terracotta and dense black)
- Fine round paintbrush
- Clear gloss varnish or sealant
Step 1: Shaping the Clay
-
Condition the clay:
Begin by warming up a ball of white clay in your hands. Knead it thoroughly until it is pliable, smooth, and free of air bubbles or cracks. -
Roll it out:
Roll your clay out on a smooth surface to an even thickness of about 1/4 inch. If you are using air-dry clay, turning the slab occasionally helps prevent sticking. -
Cut the base circle:
Place your circle cutter or an inverted bowl onto the clay slab. Use your craft knife to trace around it cleanly, creating a perfect disc. -
Create the wave edge:
Using your thumb and forefinger, gently pinch the edge of the circle at regular intervals. Push slightly inward and upward to create a defined, wavy scalloped rim. -
Smooth the imperfections:
Dip a small sponge in a tiny bit of water and run it along the rim and surface. This softens any sharp fingerprints or jagged cuts from the shaping process. -
Form the curve:
Carefully lift your clay circle and place it inside a small bowel lined with plastic wrap or cornstarch. Press it gently so it takes on a shallow, curved dish shape. -
Let it dry completely:
Allow the clay to dry fully according to the package instructions. For air-dry clay, this usually takes 24-48 hours; do not rush this phase or cracks may appear.
Step 2: Refining and Painting
-
Sand for smoothness:
Once fully dry and hardened, remove the dish from the mold. Use fine-grit sandpaper to gently buff the edges and the interior surface until it feels polished to the touch. -
Wipe clean:
Before painting, ensure all clay dust is removed by wiping the piece down with a barely damp cloth or dry brush. -
Mix your palette:
Prepare your paints on a palette. You’ll need a rich burnt orange (terracotta) and a deep black. Add a drop of water if the paint feels too thick to flow smoothly. -
Paint the orange stripes:
Using a fine round brush, paint curved, organic stripes of orange starting from the rim and swooping inward. Vary the thickness slightly—start thick at the rim and taper to a point. -
Add the black accents:
In the spaces between the orange stripes, paint similar curved black stripes. Allow the lines to follow the natural contour of the bowl rather than drawing perfect lines. -
Extend the pattern:
Don’t forget the outside! Continue your stripe pattern over the scalloped rim and down the exterior sides of the dish for a cohesive, professional look. -
Seal the piece:
Once the paint is completely dry, apply a coat of clear gloss varnish. This protects the paint from scratches and gives the dish a ceramic-like sheen.
Smooth Operator
Use a damp finger to smooth the edges of your clay immediately after cutting. This saves you significant sanding time later and results in a more organic, fluid rim.
Gilded Edges
For a luxe upgrade, paint the very top edge of the scalloped rim with liquid gold leaf after your varnish has dried. It adds a subtle metallic pop against the matte clay.
Place your new dish on your nightstand to catch your daily jewelry in style
Modern Ring Cones and Jewelry Stands
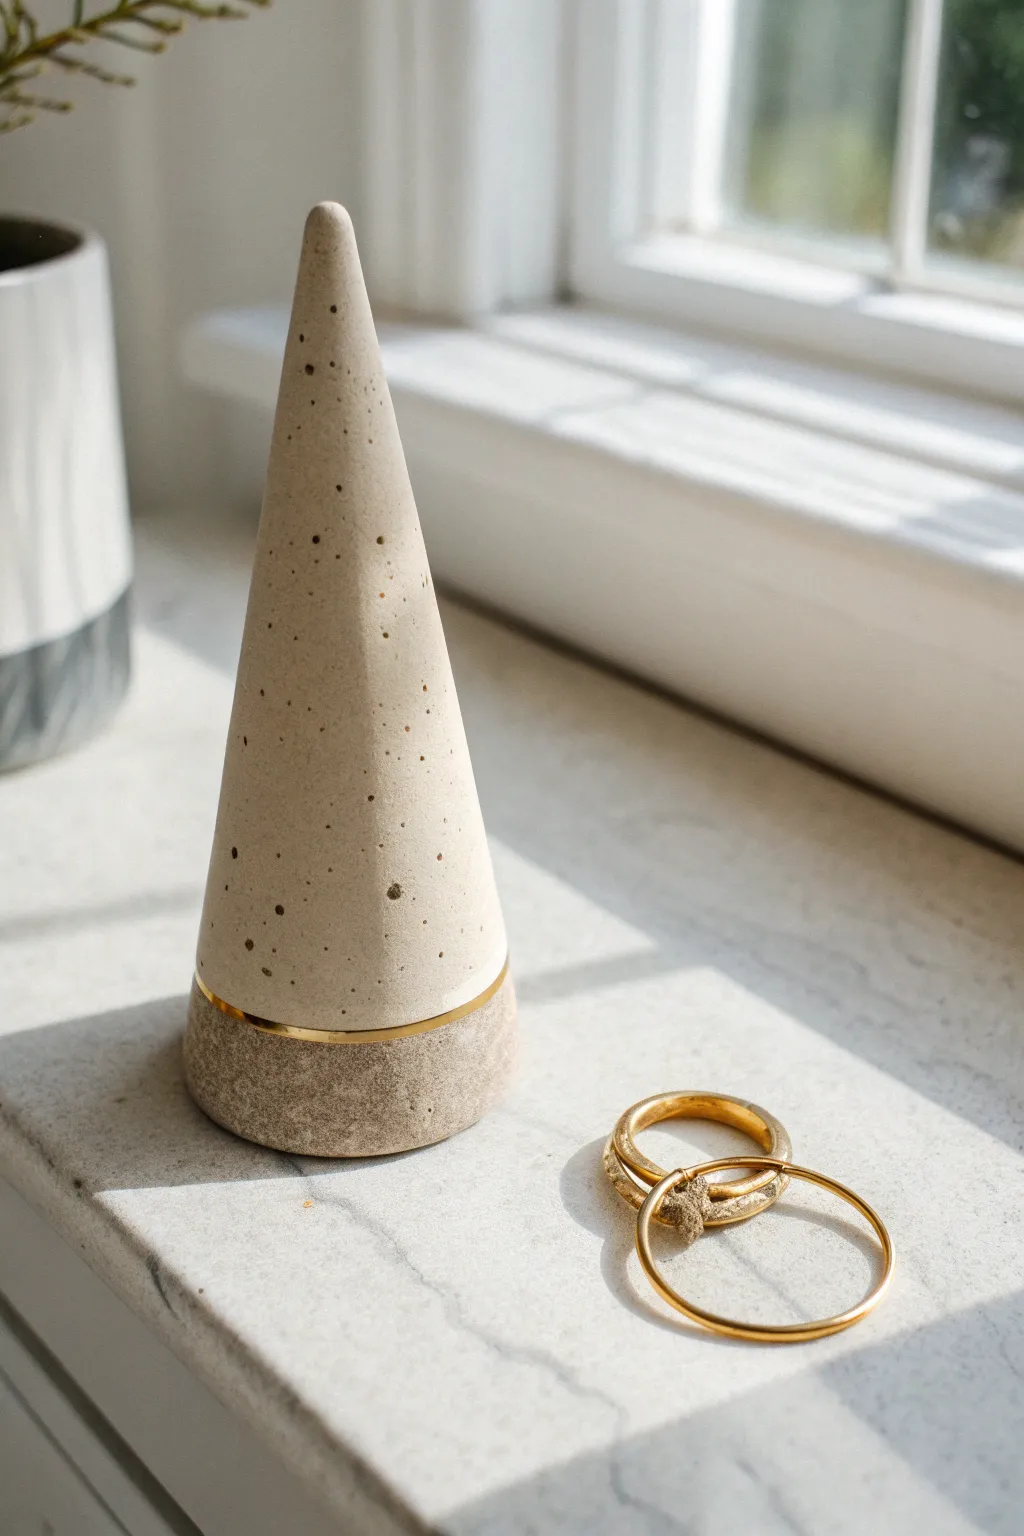
Elevate your vanity with this minimalist ring cone that mimics the look of speckled stone and raw concrete. This project combines a sleek, tall silhouette with a touch of luxury, featuring a crisp gold accent line separating the smooth upper body from the textured base.
How-To Guide
Materials
- White or light beige polymer clay (approx. 2oz)
- Granite-effect polymer clay or coarse black pepper/sand for speckling
- Light brown or sand-colored polymer clay (for base)
- Liquid gold leaf or gold enamel paint
- Fine detail paintbrush
- Acrylic roller or rolling pin
- Flexible tissue blade or craft knife
- Sandpaper (various grits, 400-1000)
- Old toothbrush or stiff bristle brush
- Gloss varnish (optional)
Step 1: Preparing the Speckled Clay
-
Condition the main clay:
Begin by thoroughly conditioning your white or light beige polymer clay until it is soft and pliable. This will be the main body of the cone. -
Add texture and speckles:
Mix in a small amount of granite-effect clay. Alternatively, for a more organic look like the photo, knead in a pinch of ground black pepper or dried used coffee grounds into the light clay. -
Blend until uniform:
Knead the clay repeatedly until the speckles are evenly distributed throughout the batch, creating a faux-stone appearance.
Clean Lines Pro-Tip
For a razor-sharp gold edge, wrap low-tack painter’s tape or washi tape around the cone above and below where you want the gold band before painting.
Step 2: Forming the Cone Shape
-
Roll into a ball:
Roll your prepared speckled clay into a smooth, crack-free ball. -
Shape the initial cone:
Using the palm of your hand against a flat work surface, roll the ball back and forth while applying more pressure to one side to elongate it into a teardrop or carrot shape. -
Refine the height:
Stand the clay up and gently roll it between your hands and the table to stretch it taller. Aim for a slender, elegant height of about 3 to 4 inches. -
Flatten the bottom:
Press the wide base firmly onto your work surface to ensure it stands completely flat and straight. -
Create the base texture:
Take a small disk of the darker, sand-colored clay. Press this onto the bottom of your cone. If you want a distinct separation, slice your cone near the bottom and insert this disk layer. -
Detailing the base:
Use an old toothbrush or a ball of aluminum foil to tap texture into the bottom half-inch of the cone. This mimics the rougher, sandy texture seen at the base of the original piece. -
Smooth the upper surface:
Use your fingers or a smoothing tool to ensure the upper speckled section remains perfectly smooth, removing any fingerprints.
Step 3: Baking and Refining
-
Bake the cone:
Place your cone upright on a ceramic tile or baking sheet. Bake according to your clay package instructions (usually between 230°F – 275°F for 15-30 minutes). -
Cool down completely:
Allow the cone to cool completely in the oven or on a wire rack. The clay helps harden as it cools. -
Sand for smoothness:
Once cool, use fine-grit sandpaper (start with 400, move to 1000) to gently wet-sand the upper portion of the cone only. Avoid sanding the textured base. -
Buff the surface:
Rub the sanded area with a piece of denim or a soft cloth to bring out a natural, stone-like sheen.
Level Up: Terrazzo
Instead of fine speckles, chop up tiny irregular chunks of black, grey, and terracotta clay and mix them into the white base for a bold terrazzo pattern.
Step 4: Adding the Gold Accent
-
Mark the line:
Lightly mark the separation point where the smooth body meets the textured base. You can use a piece of tape as a guide to keep your line straight. -
Apply the gold:
Dip a fine detail brush into liquid gold leaf or enamel. I find holding the brush steady and rotating the cone itself gives the steadiest line. -
Paint the band:
Paint a consistent band around the circumference, covering the transition area between the two textures. -
Dry the gold:
Let the gold paint dry completely according to the manufacturer’s time, usually at least one hour. -
Final seal (optional):
If desired, apply a thin coat of matte varnish to the cone body to protect the speckles, but leaving the clay raw often looks most like natural stone.
Place your favorite rings on your new creation and enjoy the chic organization it brings to your space


What Really Happens Inside the Kiln
Learn how time and temperature work together inside the kiln to transform clay into durable ceramic.
Abstract Face Planters
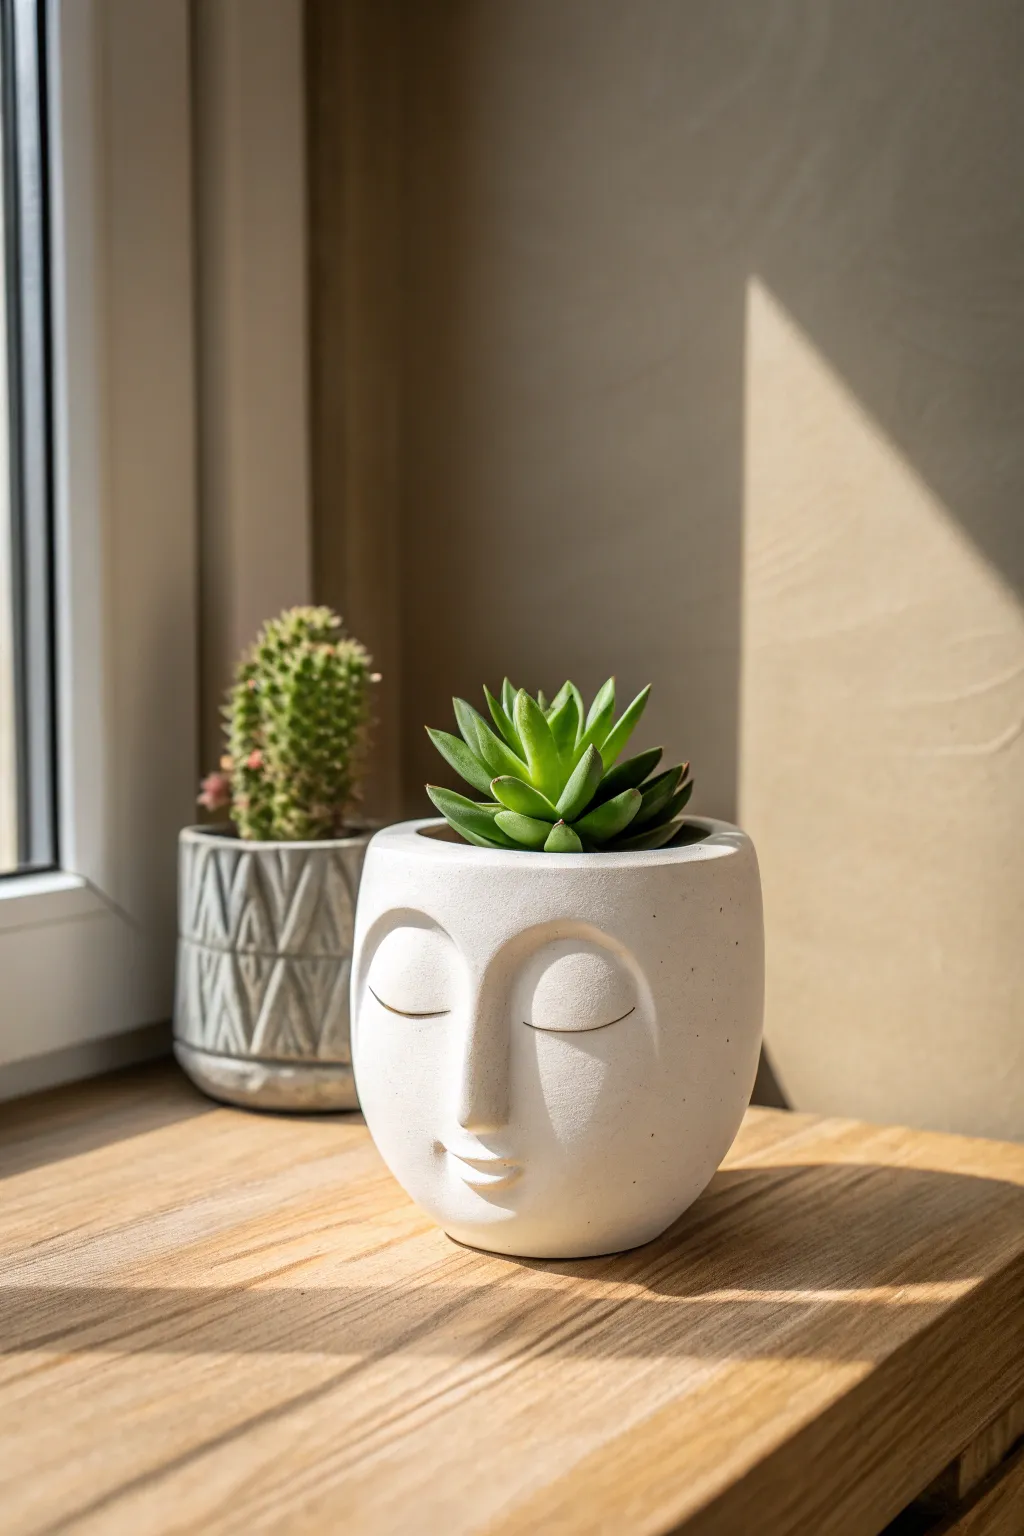
Capture a moment of zen with this minimalist face planter featuring soft curves and a peaceful expression. Its smooth, rounded form and stylized features make it a sophisticated vessel for your favorite succulent or small houseplant.
Step-by-Step Tutorial
Materials
- White sculpting clay (air-dry or polymer, depending on preference)
- Pottery wheel (optional, hand-building works too)
- Wooden modeling tools
- Metal kidney scraper
- Sponge
- Loop tool for carving
- Needle tool
- Small bowl of water
- Sealer or glaze (matte finish)
- Small succulent for planting
Step 1: Forming the Base Vessel
-
Prepare your clay:
Start by kneading your white clay thoroughly to remove any air bubbles. You want a smooth, pliable consistency that will hold its shape without cracking. -
Create the base cylinder:
If using a wheel, throw a simple cylinder with a slightly rounded bottom. If hand-building, use the coil method to build up a wall, or pinch a ball of clay into a deep bowl shape. -
Smooth the walls:
Pull the walls up until they are about 4-5 inches high. Use a metal kidney scraper to smooth the outside surface completely, removing any fingerprints or coil lines to achieve that modern, sleek look. -
Round the curve:
Gently push the walls outward from the inside to create a rounded, bulbous shape, slightly narrowing back in at the rim to cradle the plant later.
Smooth Operator
Use a barely damp cosmetic sponge for the final smoothing of the face. It’s gentle enough to not erase details but perfect for a porcelain-like finish.
Step 2: Sculpting the Features
-
Map the face:
Lightly trace a vertical line for the nose and a horizontal line for the eyes using a needle tool. Keep the features centered on the ‘front’ of your rounded vessel. -
Add volume for the nose:
Take a small snake of clay and attach it vertically along your nose line. Blend the edges seamlessly into the pot using your thumb, building up a straight, Roman-style nose bridge that connects to the brow bone. -
Define the eye sockets:
Using your thumbs, gently press into the clay on either side of the nose bridge to create soft indentations for the eye sockets. This adds depth without harsh carving. -
Form the eyelids:
Roll two small, flattened crescent shapes of clay. Attach them where the closed eyes will be. Wet your finger and smooth them down so they look like naturally closed lids. -
Carve the lash line:
With a fine carving tool or needle tool, incise a deep, sweeping curve along the bottom of the makeshift eyelids to define the sleeping expression. -
Build the mouth:
Add a tiny amount of clay below the nose. Sculpt a gentle ‘M’ shape for the upper lip and a fuller curve for the bottom lip. -
Refine the expression:
Use a small modeling tool to deepen the corners of the mouth slightly, giving the face a hint of a smile. -
Smooth everything down:
Dip a sponge in water and wring it out almost completely. Gently wipe over the entire face to soften any sharp tool marks and blur the transition lines between added clay and the pot wall.
Step 3: Finishing Touches
-
Check the rim:
Ensure the top rim of the planter is thick and smooth. A sharp edge can be fragile, so round it over with your damp sponge. -
Dry slowly:
Cover the piece loosely with plastic and let it dry slowly over a few days. This prevents the added facial features from cracking away from the main pot. -
Sanding:
Once bone dry (if using air-dry clay) or bisqued (if ceramic), gently sand any rough spots to achieve a stone-like texture. -
Sealing:
Apply a matte sealer or fire with a matte white glaze. A glossy finish distracts from the sculptural details, so I really prefer keeping it matte to mimic stone or plaster.
Make it Functional
Don’t forget drainage! Before the clay dries, use a circular cutter or straw to punch a hole in the bottom center so your succulent roots stay healthy.
Place your finished planter on a sunny windowsill where the shadows can play across the sculpted features
Body-Inspired Mini Vases
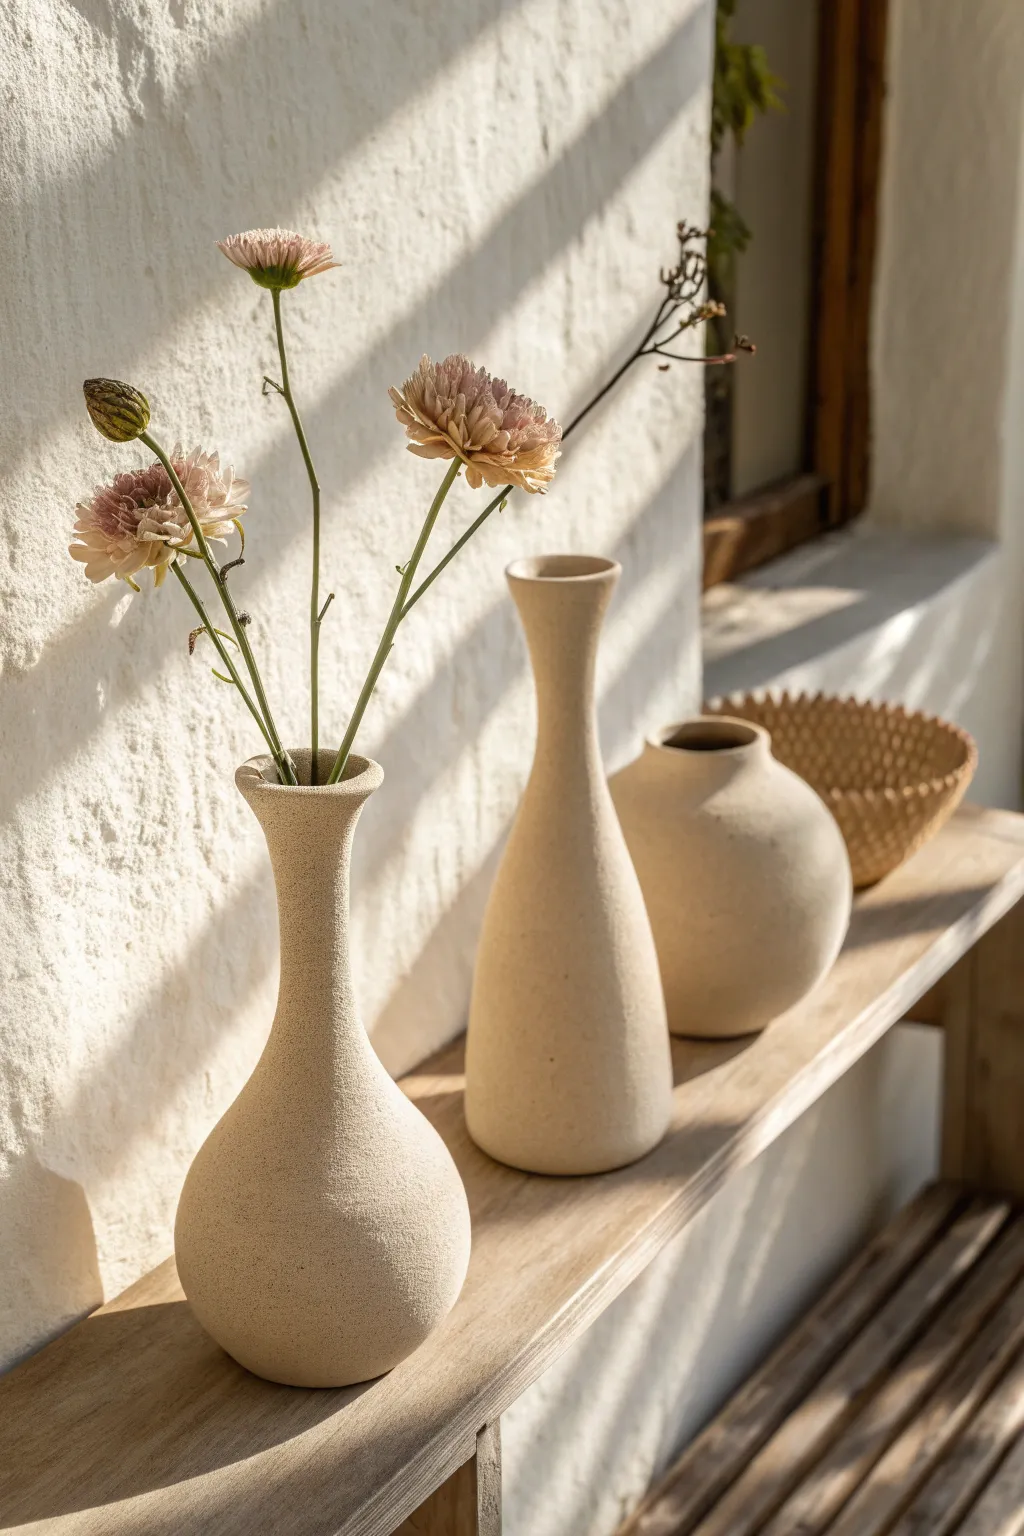
These minimalist, organic bud vases mimic the look of natural sandstone with their warm beige finish and subtle, speckled texture. Their gentle curves and narrow necks make them perfect for showcasing a single, dramatic stem or a small spray of dried wildflowers.
Step-by-Step
Materials
- Air-dry clay (white or cream)
- Pottery tools (sponge, sculpting ribs)
- Rolling pin
- Slip (clay mixed with water)
- Fine-grit sandpaper (220 grit)
- Stone-texture spray paint (beige/sand color)
- Matte acrylic sealer
- Small weighted base inserts (optional, like glass beads)
Step 1: Forming the Pinch Pot Bases
-
Prepare the clay:
Start by wedging your air-dry clay thoroughly to remove air bubbles. Divide the clay into three portions relative to the sizes of the vases you want to create (medium, tall, and round). -
Create the base sphere:
For the first vase, roll a portion of clay into a smooth ball. Hold it in your palm and gently press your thumb into the center, stopping about a half-inch from the bottom. -
Pinch the walls:
Rotate the ball while pinching the clay between your thumb and fingers to thin out the walls. Aim for an even thickness of about 1/4 inch all around. -
Establish the curve:
Since these shapes are organic, don’t worry about perfect symmetry. Gently paddle the outside with a flat wooden tool or your hand to encourage the bottom reservoir shape—either bulbous or more tapered depending on which vase you are mimicking.
Cracking while drying?
If small surface cracks appear as the clay shrinks, mix a tiny amount of fresh clay with water to make a thick paste (spackle consistency) and fill the cracks. Sand smooth once dry.
Step 2: Building the Necks
-
Roll coils:
Roll out long snakes of clay, slightly thicker than a pencil. These coils will be used to build height. -
Attach the first coil:
Score the rim of your pinch pot base and add a little slip. Place the first coil on top, blending it seamlessly downwards into the base using a modeling tool or your thumb. -
Shape the silhouette:
As you add subsequent coils, position them slightly inward to narrow the neck. For the tall center vase, continue adding coils upward to create that elongated, elegant throat, smoothing the seams completely as you go. -
Refine the rim:
Once you reach the desired height, use a damp sponge to smooth the top rim. You can flare it out slightly like the left vase or keep it straight for a modern look.
Level Up: Aged Patina
After the stone spray dries, dilute some brown acrylic paint with water (1:10 ratio) and brush it over the vase, then immediately wipe it off with a rag to leave shadows in the texture.
Step 3: Refining and Drying
-
Smooth the surface:
Take a slightly damp sponge and wipe the entire exterior. I find that using a flexible metal or rubber rib tool here helps remove lumps and creates that professional, seamless silhouette. -
Check balance:
Gently tap the vase on your work surface to flatten the bottom just enough so it stands securely without wobbling. -
Slow drying:
Place your vases away from direct heat or sunlight. Let them dry slowly for 24-48 hours. Turn them occasionally to ensure even airflow. -
Sanding:
Once bone dry, use fine-grit sandpaper to buff away any remaining fingerprints or rough tool marks. Wipe away the dust with a tack cloth.
Step 4: Creating the Stone Finish
-
Apply texture base:
Take your stone-texture spray paint and shake it vigorously. Apply thin, even coats to the vase, holding the can about 10 inches away. This special paint deposits little flecks that create the sandstone look. -
Layering:
Let the first coat dry for 15 minutes, then apply a second coat to build up the ‘pebbled’ texture density. -
Sealing the interior:
Since air-dry clay isn’t waterproof, pour a generous amount of waterproof sealer inside the vase. Swirl it around to coat every inch of the interior and pour out the excess. -
Final protection:
Finish the exterior with a coat of matte acrylic sealer to set the stone texture and prevent the grit from flaking off over time.
Arranging these together creates a serene, gallery-like vignette in any corner of your home

TRACK YOUR CERAMIC JOURNEY
Capture glaze tests, firing details, and creative progress—all in one simple printable. Make your projects easier to repeat and improve.
Textured Slab Coasters in Sets
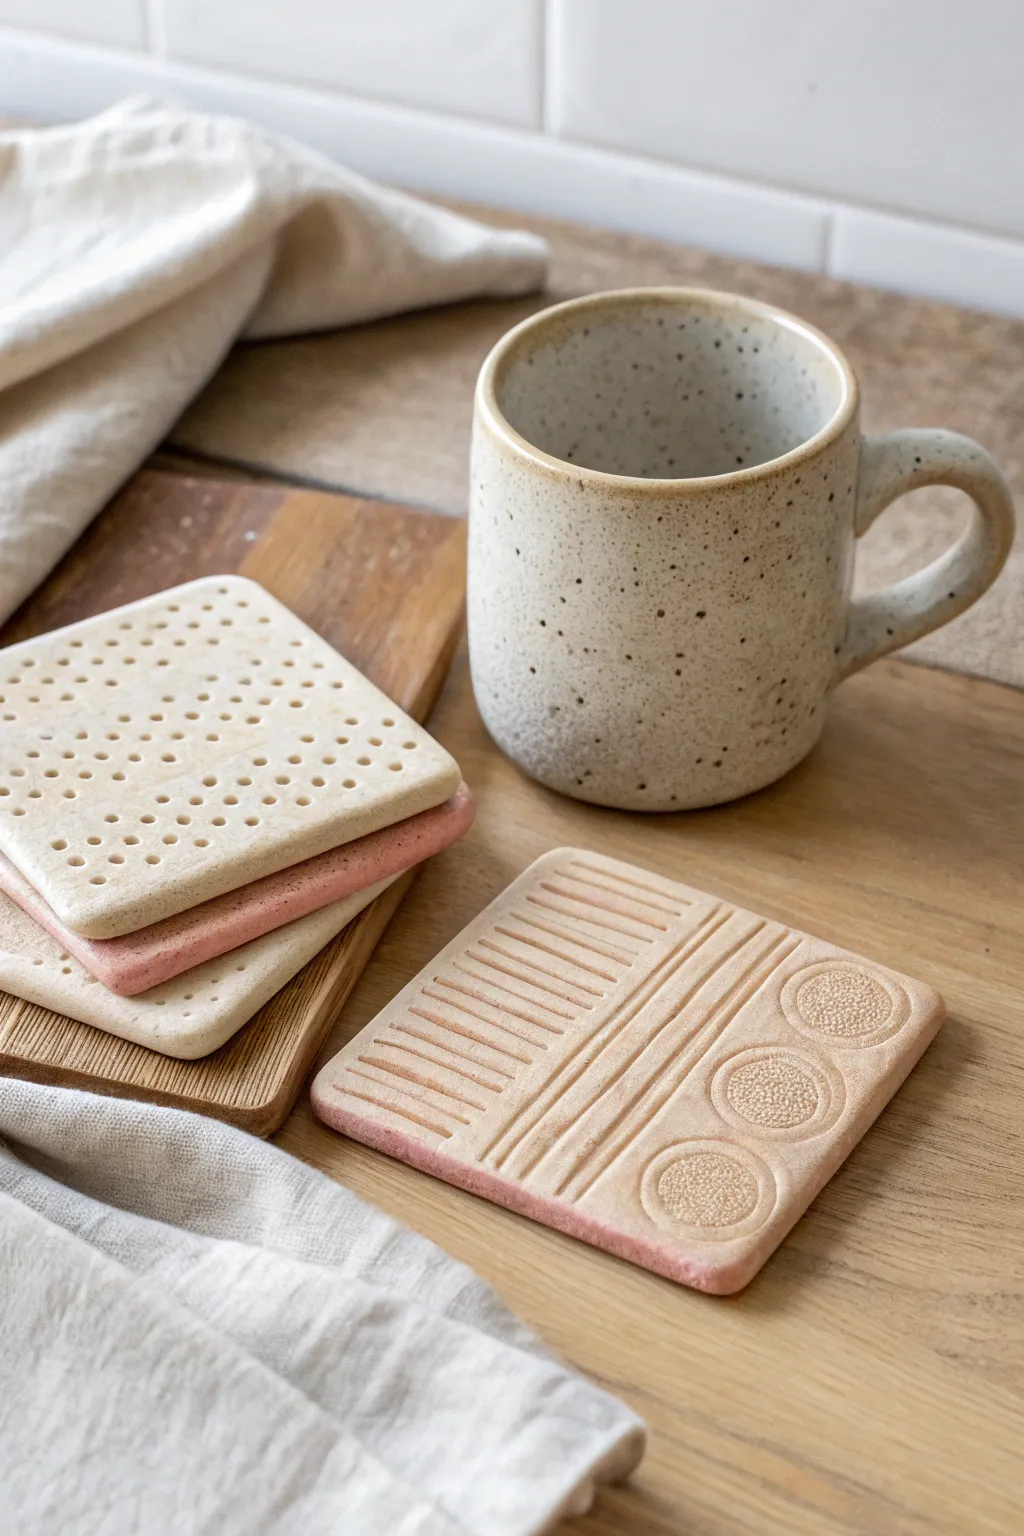
Elevate your coffee table décor with these minimalist ceramic coasters, featuring clean lines and satisfying tactile textures. By combining slab-building basics with simple household tools, you can create a custom set that feels both organic and architectural.
Step-by-Step Tutorial
Materials
- Stoneware clay (speckled or white)
- Rolling pin
- Two wooden guide strips (approx. 1/4 inch thick)
- Square cookie cutter (approx. 4×4 inches) or a ruler and craft knife
- Small circular hole punch or straw
- Wooden modeling tool or skewer
- Circular stamp or button (for the circle details)
- Sponge
- Canvas or cloth board for rolling
- Clear matte glaze
- Underglaze (optional, light pink or terra cotta)
Step 1: Preparing the Slabs
-
Wedge the clay:
Begin by thoroughly wedging your clay to remove any air bubbles and ensure an even consistency, which is crucial for flat slabs. -
Set up your guides:
Place your canvas on a flat work surface and position the wooden guide strips on either side of your clay ball to ensure a uniform thickness. -
Roll the slab:
Use the rolling pin to flatten the clay between the guides. Make sure to flip the clay over periodically to prevent it from sticking to the canvas. -
Smooth the surface:
Before cutting, take a damp sponge or a clay rib and gently smooth the surface of the slab to remove any canvas texture or imperfections.
Prevent Warping
Slabs love to warp. Flip your drying coasters over every few hours for the first day so both sides interact with the air evenly.
Step 2: Shaping and Refining
-
Cut the squares:
Using your square cutter or a ruler and knife, cut out your coaster shapes. Create at least four squares for a standard set. -
Soften the edges:
Gently tap the sharp corners with your finger or a tool to round them slightly, giving the coaster a more finished, user-friendly look. -
Smooth the rims:
Run a damp sponge along the cut edges to smooth away any burrs or sharpness left by the cutting tool.
Step 3: Texturing Design A: The Grid
-
Mark a light grid:
For the hole-punched design, use a ruler to very lightly press a grid pattern onto the surface as a guide for your holes. -
Punch the divots:
Using a small, round tool—like the end of a paintbrush or a clay hole punch—press vertically into the clay at each grid intersection. Don’t go all the way through; just create a distinct divot. -
Clean up displacement:
The punching action might push clay up around the holes. Let it stiffen slightly, then gently rub the surface with your thumb or a rib to flatten these ridges back down.
Get Creative
Instead of pre-made stamps, try pressing found objects like lace, dried flowers, or even the bottom of a sneaker into the clay for unique textures.
Step 4: Texturing Design B: Linear & Circular
-
Draw parallel lines:
For the patterned coaster, use a blunt wooden tool or the edge of a credit card to press a series of horizontal creates into the left side of the square. -
Add vertical dividers:
Create vertical lines to separate the horizontal texture from the rest of the coaster, pressing firmly enough to create a distinct groove. -
Stamp the circles:
On the right side of the coaster, press a circular stamp or textured button into the clay three times, aligning them vertically. -
Texture the circles:
If your stamp is smooth, I like to gently tap the inside of the circle impressions with a stiff bristle brush or sponge to create that pebbled texture shown in the image.
Step 5: Drying and Finishing
-
Slow drying:
Place the coasters between two pieces of drywall or weigh them down with a board while they dry to prevent the corners from curling up. -
Bisque fire:
Once bone dry, fire the pieces in a kiln to bisque temperature (usually cone 04). -
Apply color (optional):
If you want the pink accent shown on the bottom coasters, brush a light coat of pink underglaze on the edges or specific sections before glazing. -
Glaze and final fire:
Dip or brush the coasters with a clear matte glaze to seal them while keeping the natural clay speckles visible, then fire to the clay’s maturity temperature.
Now you have a stunning set of handmade coasters ready to protect your surfaces in style
Clay-on-Canvas Floral Wall Tiles
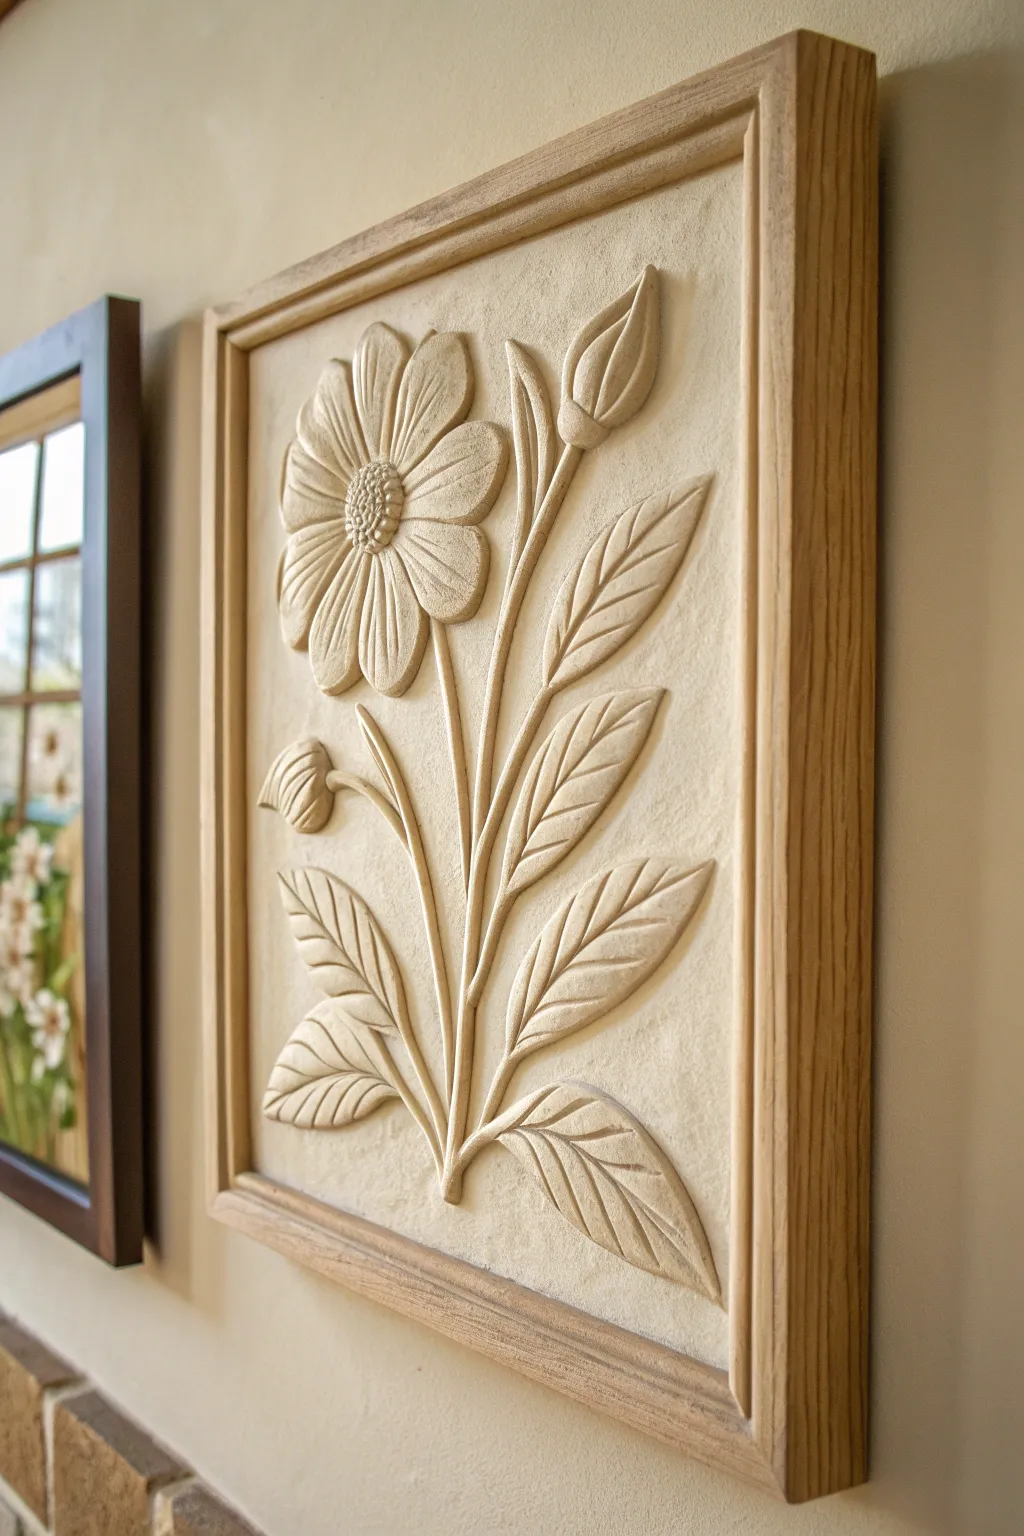
Capture the timeless elegance of stone carving without the heavy chisels using this clever clay-on-canvas technique. By layering air-dry clay and finishing it with a textured monochromatic palette, you’ll create a sophisticated botanical relief that mimics carved limestone.
Detailed Instructions
Materials
- Sturdy wooden canvas panel or MDF board (12×16 inches)
- White or terracotta air-dry clay (approx. 2 lbs)
- Clay sculpting tools (needle tool, modeling tool, loop tool)
- Rolling pin
- Parchment paper
- Slip (clay mixed with water to a paste consistency)
- Gesso (white or clear)
- Stone-textured spray paint or sand-colored acrylic paint
- Fine grit sandpaper
- Wood glue
- Light oak or ash wood framing strips
Step 1: Base Preparation
-
Prepare the Substrate:
Begin by coating your wooden panel or MDF board with a thin layer of gesso. This seals the wood and provides a grippy surface for the clay to adhere to. Let it dry completely. -
Create the Background Texture:
Roll out a very thin sheet of clay, about 1/8 inch thick. Adhere this to the board using a thin layer of wood glue spread evenly. Use a crumpled ball of aluminum foil to gently tap the surface, creating a subtle, stone-like pitted texture.
Step 2: Sculpting the Floral Elements
-
Roll Clay Coils:
Roll out several long, snake-like coils of clay for the stems. These shouldn’t be perfectly uniform; a little variation adds organic realism. -
Position the Stems:
Score the background where you want the main stems to go. Apply a little slip, then press your clay coils onto the board. I like to start with the central stem and branch outwards. -
Shape the Leaves:
For leaves, roll small balls of clay into teardrop shapes. Flatten them between your fingers or on parchment paper until they are about 1/4 inch thick. -
Attach and Detail Leaves:
Attach the leaves using the score-and-slip method. Once placed, use a needle tool to carve a central vein and angled side veins. Smooth the edges down slightly to make them look like they are emerging from the background stone. -
Form the Main Flower Petals:
Create similar flattened teardrop shapes for the flower petals. Arrange them in a circular pattern near the top left. They should overlap slightly for dimension. -
Add Petal Texture:
Use a modeling tool to press lines into the petals, running from the center outward. This striated texture mimics the look of a real daisy or cosmos flower. -
Create the Flower Center:
Roll a small ball of clay and flatten it into the center of the petals. Use a needle tool to stipple the entire surface with tiny dots to replicate pollen texture. -
Sculpt the Buds:
Form smaller, tighter teardrop shapes for the buds. Place them at the tips of the upper stems. Add vertical lines to suggest the sepals enclosing the petals. -
Refine Edges:
Go around the entire design with a damp brush or your finger to smooth out any rough clay burrs. Ensure the transition from the relief to the background is clean.
Clay Shrinkage Tip
Air-dry clay shrinks slightly. Apply clay to the very edge of the board, or better yet, slightly over, then sand it flush later to avoid gaps.
Step 3: Finishing and Framing
-
Dry Completely:
Allow the piece to dry for at least 24-48 hours. Keep it away from direct heat to prevent cracking. -
Sand Imperfections:
Once bone dry, lightly sand any sharp peaks or unwanted fingerprints. Wipe away the dust with a dry cloth. -
Apply Stone Effect:
Ideally, spray the entire piece (relief and background) with a stone-textured spray paint in a beige or limestone color. Alternatively, dab on sand-colored acrylic paint with a sponge. -
Dry Brush for Detail:
To enhance the depth, lightly dry-brush a slightly lighter cream shade of acrylic paint over the highest points of the petals and leaves. -
Measure the Frame:
Measure the outer dimensions of your finished clay board. Cut your wood framing strips to size with 45-degree mitered corners. -
Assemble the Frame:
Glue and clamp the frame corners together. Once the frame is solid, mount your clay board into the frame using wood glue or small brad nails from the back.
Antiquing Upgrade
Mix burnt umber paint with water (1:10 ratio) for a wash. Brush it over the dry relief and wipe it off immediately to darken the crevices.
Hang your new relief sculpture in a space with side lighting to really let those shadows play across the texture
Chunky Sculptural Bookends
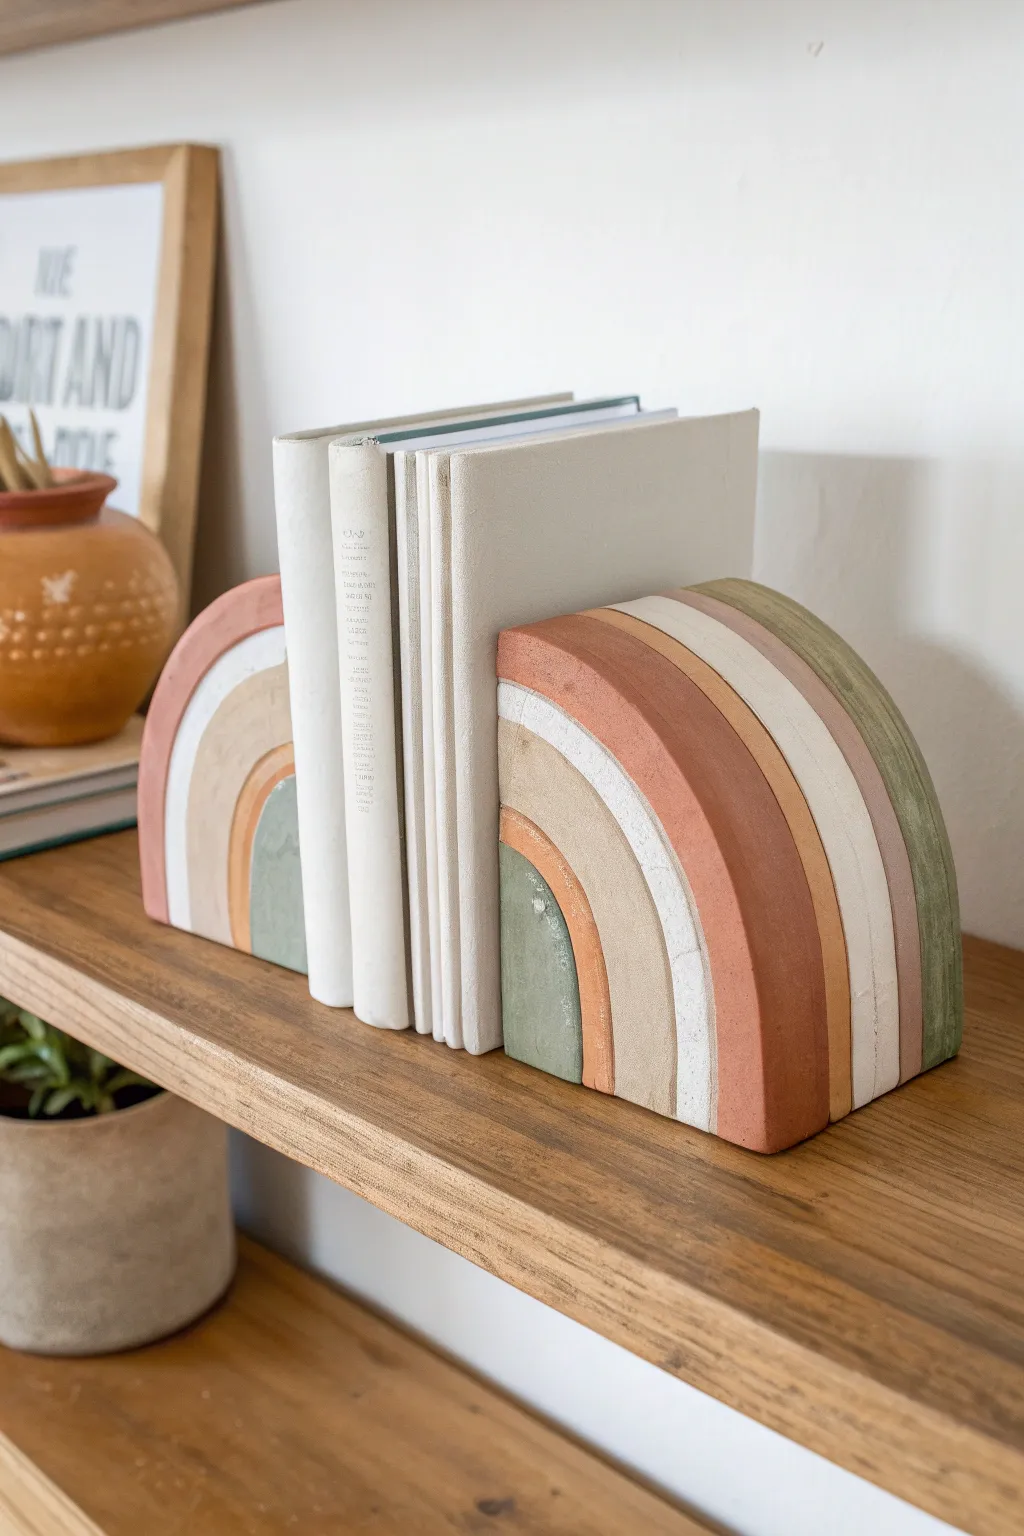
Bring warmth to your shelves with these delightfully chunky, earth-toned rainbow bookends that perfectly balance form and function. Their matte, stone-like texture and soothing palette of sage, terracotta, and cream make them a trendy sculptural addition to any reading nook.
Step-by-Step Tutorial
Materials
- Air-dry clay (white or terracotta)
- Rolling pin
- Sharp clay knife or X-Acto blade
- Heavy rectangular objects (like bricks or wood blocks) for the core weights
- Strong craft glue or E6000
- Acrylic paints (sage green, cream, terracotta, burnt orange, beige)
- Baking soda (to mix with paint for texture)
- Paintbrushes (flat and detail)
- Ruler
- Fine-grit sandpaper
- Matte sealant or varnish
Step 1: Forming the Arches
-
Prepare the weighting core:
Since air-dry clay is light when dry, you need a heavy core. Wrap your bricks or wooden blocks in a thin layer of plastic wrap to prevent the clay from sticking permanently if you plan to remove them later, though for this project, encasing a heavy non-porous block permanently is best for stability. If using wood, seal it first so it doesn’t warp from the clay’s moisture. -
Roll out the base slab:
Roll out a large slab of clay approximately 1/4 inch thick. This needs to be large enough to cut into the semi-circle shapes that will form the front and back of each bookend. -
Cut the facade shapes:
Using a bowl or a compass, trace two large semi-circles for each bookend (four total). These should be slightly larger than your weighted core block to hide it completely. Cut them out cleanly with your clay knife. -
Create the illusion of bands:
Instead of stacking individual coils which can be unstable, we will carve the rainbow design. Use a ruler and a dull tool to lightly score concentric arches onto the front face of your semi-circles. I find marking the spacing every 1 inch gives a nice chunky look. -
Deepen the grooves:
Once you are happy with the spacing, use a clay carving tool or the back of your knife to deepen these grooves. You want distinct separation between the ‘arches’ to make painting easier later. -
Cut the side walls:
Measure the depth of your weighted block. Roll out a long strip of clay that matches this width. This strip will wrap around the curved top of your bookend. -
Assemble the structure:
Apply slip (a water and clay mix) to the edges of your front and back semi-circles. Place your weighted block in the center, sandwiched between the two clay faces. Wrap the long strip over the top curve, smoothing the seams where it meets the front and back faces. -
Finish the bottom:
Ensure the bottom is perfectly flat by pressing the entire structure gently against your work surface. If needed, add a rectangular slab to the bottom to seal the weighted block inside completely. -
Smoothing and drying:
Smooth all seams with a little water on your finger. Let the bookends dry upright in a cool, dry place. This is crucial—air-dry clay needs slow drying to prevent cracking. Allow 48-72 hours until they are rock hard and room temperature to the touch.
Weight is Key
Don’t rely on clay alone! A solid brick or wood block inside is mandatory. Pure clay bookends are too light and will just slide away.
Step 2: Texturing and Painting
-
Sand imperfections:
Once fully dry, use fine-grit sandpaper to gently smooth out any sharp edges or rough seams. Wipe away the dust with a slightly damp cloth. -
Mix the textured paint:
To achieve that stony, matte ceramic look seen in the photo, mix a teaspoon of baking soda into your acrylic paints. The mixture should be fluffy and thick. -
Paint the outer arch:
Start with the sage green color. Paint the outermost arch section carefully. The baking soda paint is thick, so dap it on if dragging the brush pulls up clumps. -
Paint the middle sections:
Move inward with your next colors. Use a soft beige or light peach for the second band, and a cream or off-white for the third band. Use a smaller flat brush to keep the edges crisp inside the grooves. -
Paint the inner core:
Finish with a warm terracotta or burnt orange for the innermost semi-circle. Carry these colors over the top edge and down the back so the design looks consistent from all angles. -
Add depth (optional):
If the grooves got filled with too much paint, you can run a thin wash of darker brown paint inside the carved lines to make the sections pop. -
Seal the work:
Once the paint is completely dry, apply a coat of matte spray varnish. Avoid glossy finishes as they will ruin the natural, earthy aesthetic.
Cracks while drying?
Small hairline cracks are normal with air-dry clay. Patch them with a mix of fresh clay glue (clay + water) before painting for a seamless fix.
Place your warm, earthy creations on your shelf and enjoy the organized charm they add to your book collection
Coil-Pattern Bowls With Graphic Lines
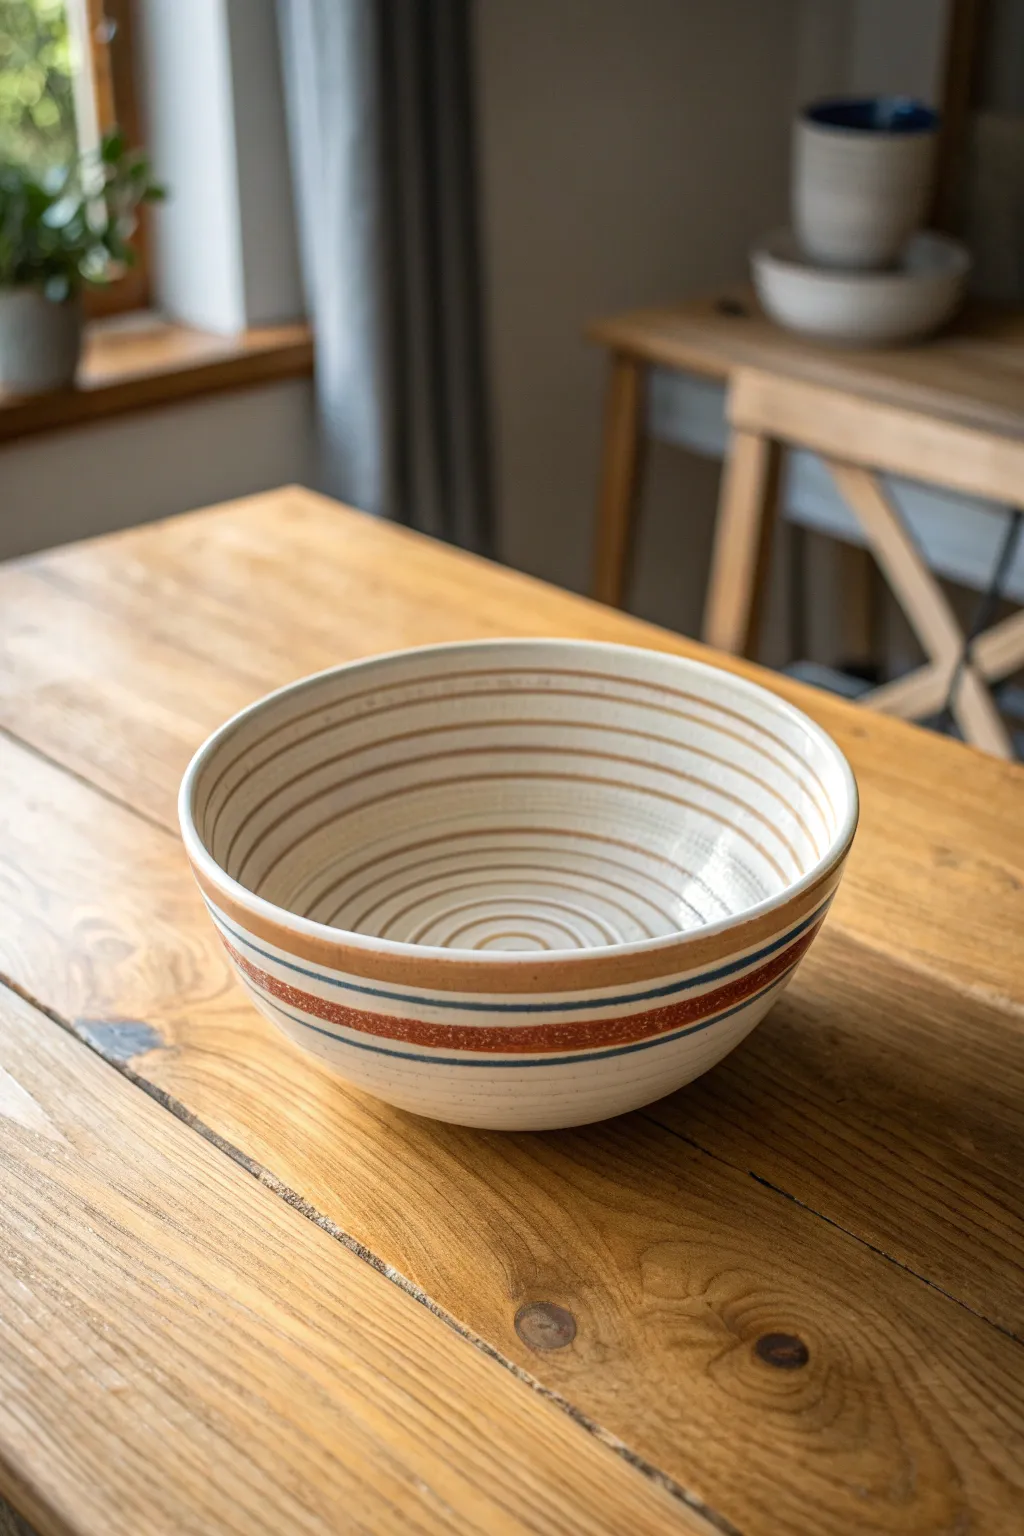
This project combines the clean lines of wheel-thrown pottery with the warmth of rustic glazing to create a stunning functional bowl. Featuring concentric interior rings and bold exterior banding, this piece balances earth tones with a pop of denim blue for a timeless kitchen staple.
Step-by-Step
Materials
- Stoneware clay body (white or buff)
- Pottery wheel
- Throwing sponge
- Needle tool
- Wire cutter
- Trimming tools (loop tool, rib)
- Underglazes: Rust/Terracotta, denim blue, and warm tan
- Clear transparent glaze
- Wax resist (optional)
- Banding wheel
- Soft fan brush and detail liner brush
Step 1: Throwing the Form
-
Center the clay:
Start with a well-wedged ball of stoneware clay. Secure it to the wheel head and center it using steady pressure and water for lubrication. -
Open the form:
Create the opening in the center, ensuring you leave about a half-inch of thickness for the base to allow for trimming later. -
Pull the walls:
Gently pull the clay upward and outward to form a wide, parabolic bowl shape. Aim for even wall thickness from bottom to rim. -
Refine the curve:
Use a kidney rib on the inside of the bowl while supporting the outside to smooth the surface and establish a continuous, graceful curve. -
Define the rim:
Compress the rim with a chamois or your fingertips to ensure it is smooth and resistant to chipping. -
Wire off:
Run a wire cutter underneath the bowl to separate it from the wheel head, then gently lift it onto a ware board to dry to a leather-hard state.
Wobbly Lines?
Steady your painting hand by resting your pinky finger lightly against the side of the bowl or the banding wheel base while the wheel spins.
Step 2: Trimming and Surface Prep
-
Center for trimming:
Once leather-hard, place the bowl upside down on the wheel. Secure it with clay lugs or a Giffin Grip. -
Trim the foot ring:
Carve away excess clay from the base to create a defined foot ring. This elevates the bowl and gives it a professional finish. -
Clean surface:
Smooth the exterior walls with a damp sponge to remove any harsh trimming marks, creating a clean canvas for your stripes.
Step 3: Applying the Design
-
Set up the banding wheel:
Place your bowl centered on a banding wheel. This makes painting continuous horizontal lines much easier than trying to move the brush yourself. -
Paint interior spiral:
Using a thin liner brush loaded with warm tan underglaze, start at the very center of the bowl’s interior. Slowly spin the banding wheel while pulling the brush outward to create a continuous, tight spiral pattern. -
Add exterior banding:
Switch to the bowl’s exterior. Load a wider brush with the rust/terracotta underglaze. While spinning the wheel, apply a thick band around the lower third of the bowl. -
Define lines:
Use a liner brush and the denim blue underglaze to paint thin, sharp pin-stripes immediately above and below the thick rust band. -
Clean up edges:
If any lines wavered, use a clean, stiff brush slightly dampened with water to gently ‘erase’ or tidy up the underglaze edges.
Pro Tip: Contrast
Using a speckled clay body adds natural texture that shows through the clear glaze, giving the white spaces between stripes more character.
Step 4: Glazing and Firing
-
Bisque fire:
Load the bone-dry bowl into the kiln and bisque fire it to cone 04 (or your clay’s specific schedule) to harden the ware. -
Wax the foot:
Apply wax resist to the bottom foot ring to prevent glaze from adhering to the kiln shelf. -
Apply clear glaze:
Dip the entire bowl into a clear, transparent glaze. This will seal the clay and make the underglaze colors pop without obscuring the stripes. -
Glaze fire:
Fire the piece a second time to the glaze maturity temperature (typically cone 5 or 6 for stoneware). -
Cool down:
Allow the kiln to cool completely before opening to prevent thermal shock to your finished piece.
Your finished bowl brings a handcrafted, artisan touch to any dining table setting
Tiny House Ornaments and Keepsakes

These charming miniature houses capture the cozy aesthetic of gingerbread cookies without the perishability, perfect for minimalist holiday decor or year-round village displays. Using air-dry clay and clever shading techniques, you’ll create a durable little hamlet with a warm, toasted finish.
Step-by-Step Tutorial
Materials
- White air-dry clay (or high-quality modeling clay)
- Rolling pin
- Parchment paper
- Craft knife or scalpel (X-Acto)
- Ruler
- Fine-grit sandpaper
- Soft pastel chalks (brown, ochre, and dark grey)
- Small paintbrush (soft bristle)
- Toothpick or needle tool
- Clear matte varnish (optional)
Step 1: Shaping the Structures
-
Condition the Clay:
Start by kneading a manageable chunk of white air-dry clay until it is warm, pliable, and free of any cracks. This ensures the final surface will be smooth and not prone to breaking. -
Roll out a Slab:
Place the clay between two sheets of parchment paper to prevent sticking. Use your rolling pin to create an even slab that is approximately 1/4 to 1/2 inch thick; you want these houses to be solid blocks rather than hollow boxes for stability. -
Cut the Basic Shapes:
Using your craft knife and a ruler, cut distinct rectangular blocks. Vary the heights and widths to give your village character—some tall and narrow, others squat and wide. -
Form the Roofs:
For each rectangular block, carefully slice the top corners off at a 45-degree angle to create a peaked roof. You can make some roofs steeper and others more shallow for variety. -
Smooth the Edges:
Dip your finger in a tiny bit of water and run it along all cut edges. -
Refine the Surfaces:
Gently tap the cut sides on your work surface to square them up and ensure the house stands perfectly flat.
Clean Cuts Tip
If your clay drags while cutting, rub a tiny bit of lotion or oil onto your craft knife blade. It will glide through the dense block without warping the shape.
Step 2: Adding Details & Texture
-
Score the Windows:
With the tip of your craft knife, gently press square window shapes into the front facades. Don’t cut all the way through; imply the window frame by pressing a cross (‘+’) shape into the center of each square. -
Carve the Doors:
Use the knife tip or a needle tool to lightly outline an arched door at the base of the houses. Add a tiny prick mark for the doorknob. -
Texturize the Surface:
To mimic the look of a porous cookie or stone, take a clean toothbrush or a ball of crumpled foil and very lightly tap it against the clay surface. This adds that lovely, subtle stippling seen in the photo. -
Add Roof Details:
Use a small tool to press a tiny indentation near the peak of the roof for a decorative vent or window. -
Drying Time:
Stand your houses on parchment paper and let them dry completely. This usually takes 24–48 hours depending on thickness and humidity. Flip them occasionally to ensure even drying.
Winter Village Upgrade
Before the varnish dries, sprinkle fine white glitter or clear embossing powder on the roof ridges to create a sparkling, sugared snow effect.
Step 3: The ‘Toasted’ Finish
-
Sand Imperfections:
Once fully bone-dry, lightly sand any sharp burrs or rough spots on the bottom or back of the houses. -
Prepare the ‘Toast’ Powder:
Scrape a brown and an ochre soft pastel stick with a blade to create a fine pile of pigmented powder. Mix them to get a warm, baked-bread color. -
Apply the Edging:
I like to use a soft, dry brush to pick up the pastel powder. Gently brush it along all the sharp edges of the house—the roofline, the corners, and the base. This mimics the browning of a baked cookie. -
Infill the Windows:
Use a smaller brush or a cotton swab to dab the brown dust into the recessed window frames and door outlines to create depth and shadow. -
Accentuate the Roof Vent:
Use a tiny amount of dark grey or black pastel dust specifically for the small hole near the roof peak to make it look deep and distinct. -
Seal the Work:
To keep the pastel dust from smudging, finish with a light coat of matte spray varnish. Glossy varnish will ruin the cookie effect, so stick to matte.
Arranged together on a slate board or mantle, your little clay village brings a wonderful sense of handcrafted warmth to any room
Alphabet and Monogram Relief Tags
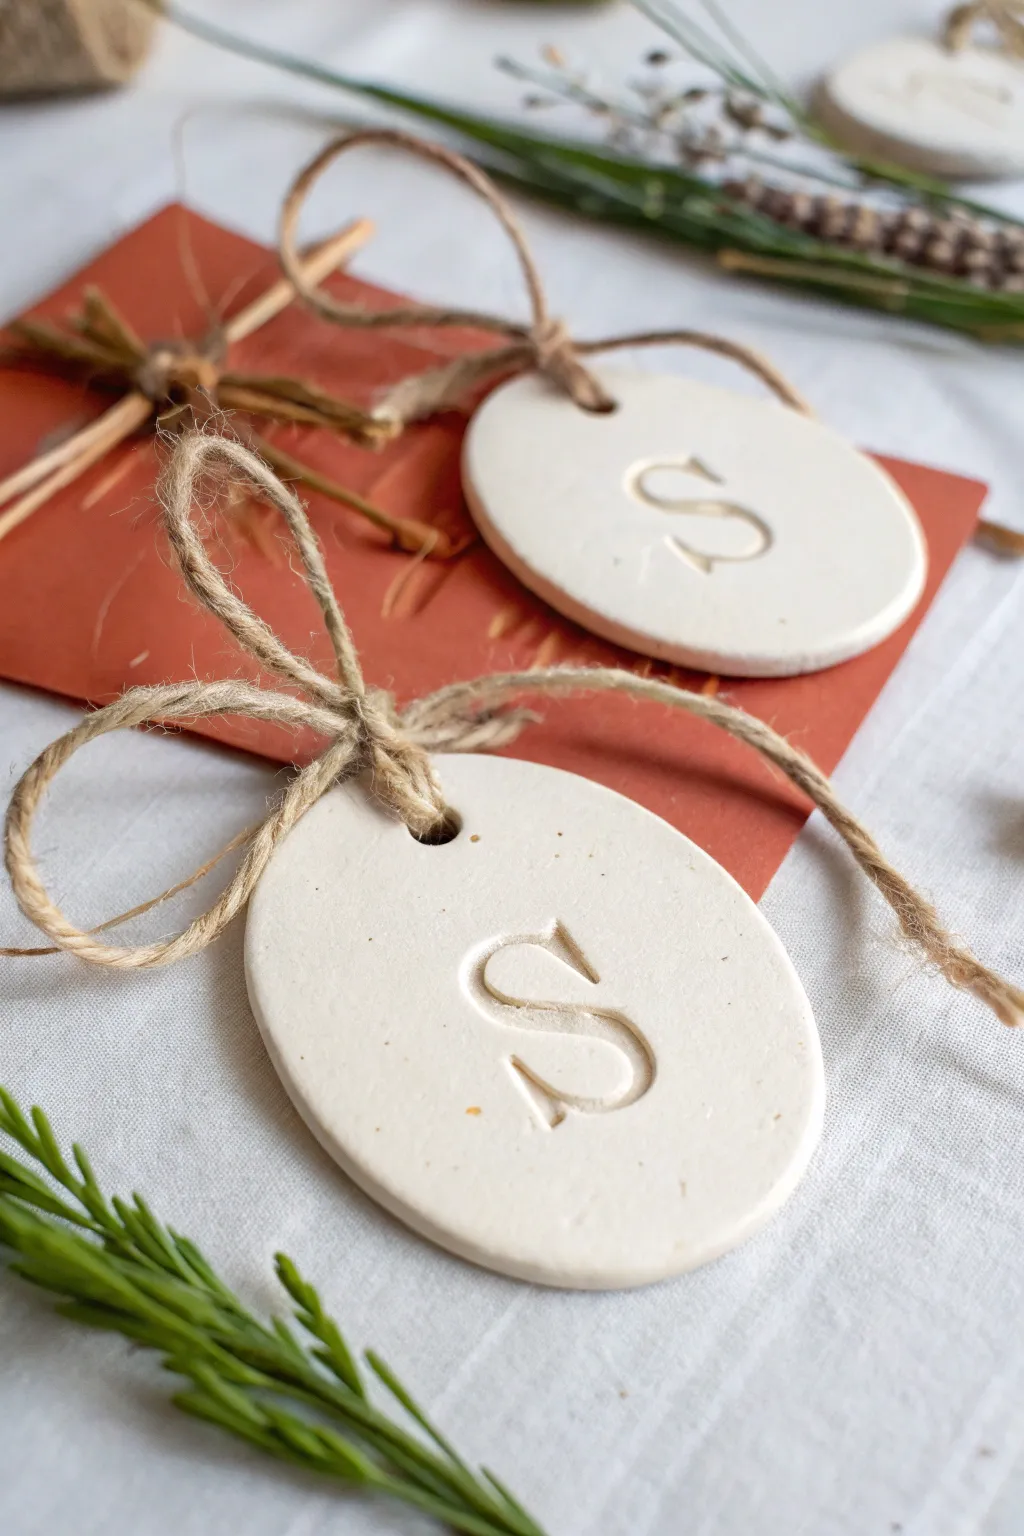
Create these elegantly simple clay monogram tags that add a personalized, organic touch to gifts or holiday décor. Featuring a creamy matte finish and deep relief lettering, they pair beautifully with natural textures like twine and pine.
How-To Guide
Materials
- White or cream air-dry clay (or polymer clay)
- Rolling pin
- Oval cookie cutter (approx. 2-3 inches)
- Letter stamps or alphabet imprint set
- Straw or small circular cutter (for the hole)
- Fine-grit sandpaper (300-400 grit)
- Jute twine
- Parchment paper or non-stick mat
- Small bowl of water
- Scissors
Step 1: Shaping the Clay
-
Condition the Clay:
Begin by taking a handful of clay and kneading it in your hands to warm and soften it. This conditioning process helps prevent cracks and makes the rolling surface smoother. -
Prepare Your Surface:
Lay down a sheet of parchment paper or use a non-stick silicone mat. This ensures you can easily lift the delicate shapes later without distorting them. -
Roll It Out:
Use your rolling pin to flatten the clay. Aim for a thickness of about 1/4 inch (6mm). If it’s too thin, the tags become fragile; too thick, and they look chunky. -
Cut the Shape:
Firmly press your oval cookie cutter into the clay slab. Wiggle it ever so slightly to separate the cut shape from the excess clay before lifting the cutter. -
Smooth the Edges:
Dip your finger into a small bowl of water and gently run it along the cut edge of the oval. This smooths out any harsh ridges or burrs left by the cutter.
Cracks Appearing?
If you see tiny cracks whilst drying, make a paste of clay and water (slip) and smooth it into the crack with your finger, then let it dry again.
Step 2: Stamping and Detailing
-
Position the Stamp:
Select your desired letter stamp. Hover it over the center of the oval to align it visually. I find it helps to look directly from above rather than at an angle. -
Make the Impression:
Press the stamp straight down into the clay with firm, even pressure. Avoid rocking the stamp, as this can create double lines or uneven depths. -
Lift Cleanly:
Pull the stamp straight up. If any clay sticks to the crevices of the letter, use a needle tool or toothpick to gently clean up the impression immediately. -
Create the Hanging Hole:
Use a drinking straw or a small circular cutter to punch a hole at the top of the oval. Make sure you don’t get too close to the edge; leave at least 1/4 inch of clay for strength. -
Final Smoothing:
Perform one last check. Lightly smooth over the surface with a damp finger to erase any fingerprints that occurred during the stamping process.
Golden Glow
Rub a tiny amount of gold wax or acrylic paint into the impressed letter, then wipe the surface clean to leave just the monogram highlighted in gold.
Step 3: Finishing Touches
-
Drying Time:
If using air-dry clay, leave the tags on a flat surface away from direct sunlight for 24-48 hours. Flip them halfway through so the bottom dries evenly. -
Baking (If Polymer):
If you used polymer clay, bake according to the package instructions (usually around 275°F or 135°C for 15-30 minutes). -
Sanding Edges:
Once fully cured and hard, take your fine-grit sandpaper and gently buff the edges of the tag. This gives it that professional, high-end stone look. -
Prepare the Twine:
Cut a length of jute twine, approximately 8 to 10 inches long. This rustic material complements the natural tone of the clay perfectly. -
Loop the Jute:
Fold the twine in half to create a loop. Push the folded loop end through the hole in the tag from front to back. -
Secure the Knot:
Feed the loose ends of the twine through the loop and pull tight (a lark’s head knot). This secures the tag without bulky knots in the back. -
Tie the Bow:
Take the two loose ends and tie a simple bow about an inch above the tag. Adjust the loops so they are symmetrical and trim the ends if they are too long.
Now you have a set of personalized tags ready to elevate your gift wrapping or serve as minimal ornaments
Mini Scene Shadowbox Sculptures
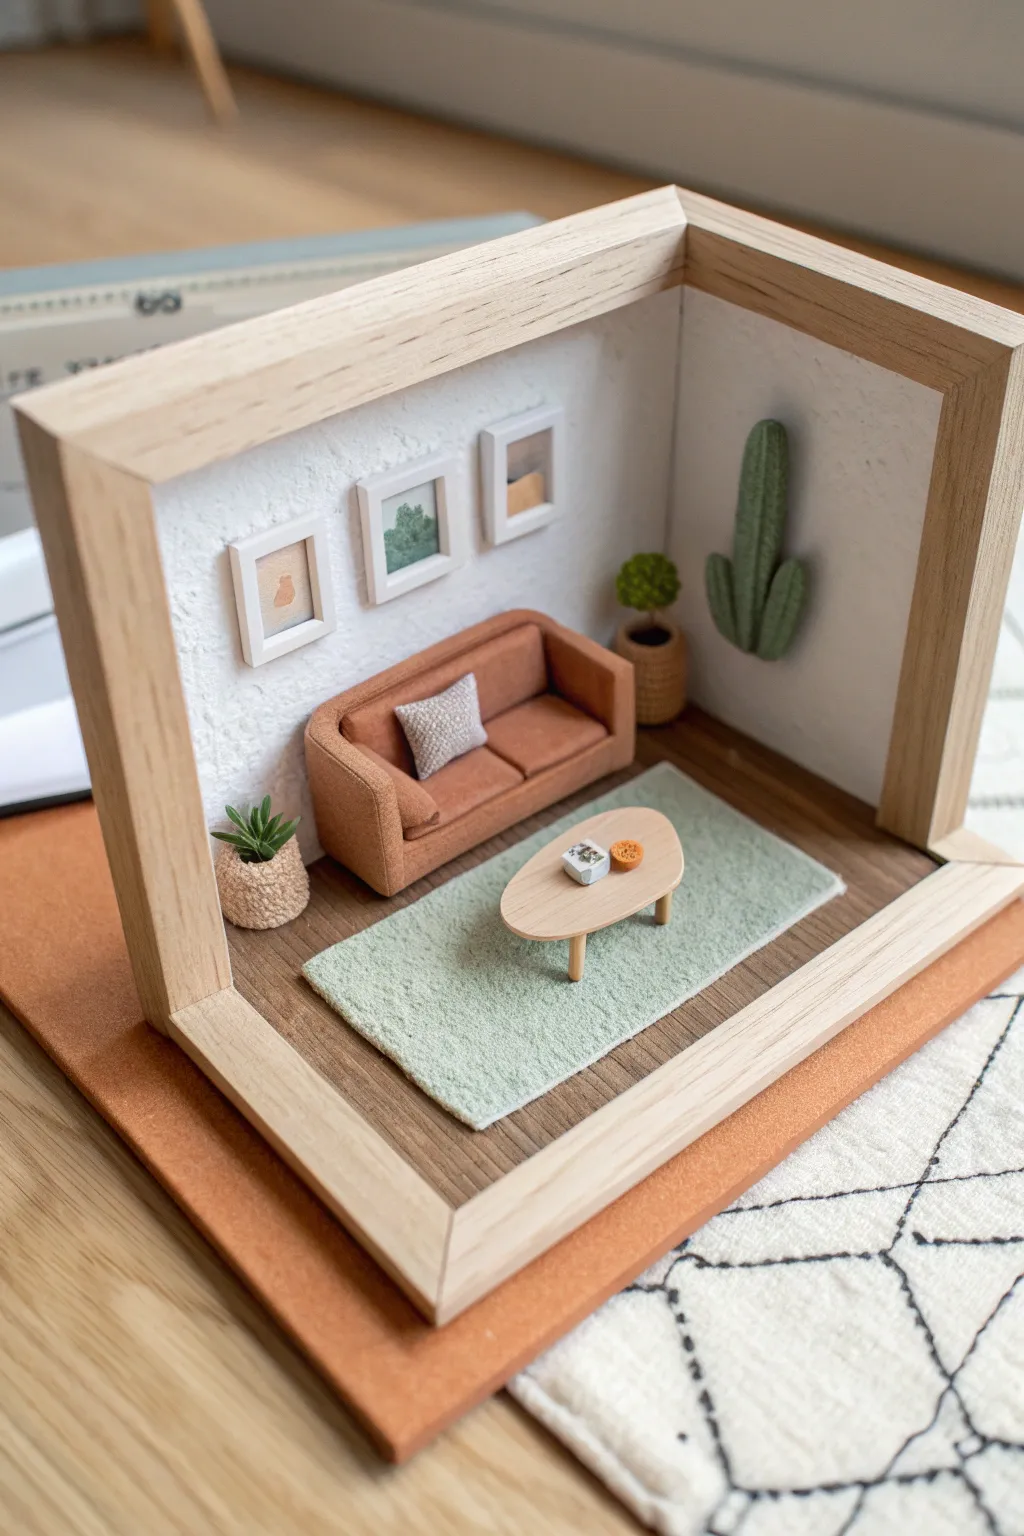
Capture the cozy essence of a stylish living space in miniature form with this adorable shadowbox sculpture. Using polymer clay and a simple wooden frame, you’ll construct a textured, three-dimensional room that fits in the palm of your hand.
Detailed Instructions
Materials
- Deep wooden shadowbox frame (approx. 6×6 inches)
- Polymer clay (terracotta, white, sage green, dark green, brown)
- Textured scrapbook paper or balsa wood sheet (for flooring)
- White acrylic paint & baking soda (for wall texture)
- Small craft wood scraps or matchsticks
- Felt sheet (sage green)
- Super glue or tacky glue
- Sculpting tools (needle tool, ball stylus)
- Rolling pin
- X-acto knife
Step 1: Preparing the Room Shell
-
Frame Prep:
Begin by removing the glass and backing from your shadowbox frame. You need open access to the interior corners. -
Flooring Installation:
Measure the inside bottom surface of the frame. Cut a piece of wood-patterned scrapbook paper or thin balsa wood to fit perfectly. Glue this down to create your hardwood floor base. -
Texturing the Walls:
Mix white acrylic paint with a teaspoon of baking soda to create a thick, stucco-like paste. Paint the back and side interior walls of the frame with this mixture to mimic a real plaster wall finish. Let it dry completely.
Sticky Situation?
If small clay parts (like the frames) won’t stick to the textured wall, sand the back of the clay slightly and use a dot of gel super glue for an instant hold.
Step 2: Sculpting the Furniture
-
Sofa Base:
Condition your terracotta-colored clay. Shape a rectangular block for the seat and a taller, thinner rectangular block for the backrest. Join them pressing firmly. -
Sofa Arms and Cushions:
Create two rounded rectangles for the sofa arms and attach them to the sides. Use a needle tool to gently score lines separating the seat cushions and back cushions for realism. -
Adding Fabric Texture:
Take a piece of sandpaper or a stiff toothbrush and gently tap it all over the sofa’s surface. This removes fingerprints and creates a lovely upholstery fabric look. -
Coffee Table Top:
Roll out light brown or beige clay into a thick slab. Cut out an organic, kidney-bean shape for the table surface using your craft knife. -
Pillow Accent:
Make a tiny square from white clay for the throw pillow. Texture it heavily with a needle tool to look like a woven knit, then place it on the sofa.
Light It Up
Drill a tiny hole in the top corner of the wooden frame and thread a single warm-white LED fairy light through to create a functioning ‘ceiling lamp’ for your room.
Step 3: Creating Décor Elements
-
Wall Cactus:
Using dark green clay, roll three energetic sausage shapes—one large and two small. Press them together to form a saguaro cactus shape. Flatten the back slightly so it will sit flush against the wall. -
Cactus Texture:
Use a knife to score vertical lines down the length of the cactus arms to mimic the plant’s ribs. -
Potted Plants:
Form two small pots using brown clay. For the floor plant, roll tiny green spikes for an aloe vera look. For the corner plant, create a small green ball and texture it with a toothbrush to look like a moss bush. -
Miniature Art Frames:
Roll very thin snakes of white clay. Cut them into segments to create three tiny rectangular frames. Back them with tiny scraps of clay featuring simple abstract shapes inside. -
Table Accessories:
Sculpt a minute book (white rectangle with a black line) and a tiny bowl or cup to sit on the coffee table. -
Baking:
Arrange all your clay pieces on a tile or baking sheet. Bake according to your polymer clay package instructions (usually 275°F/135°C for 15-30 minutes). Let them cool completely.
Step 4: Final Assembly
-
Legs Assembly:
Cut three small pieces of matchstick or toothpick for the table legs. Glue them to the underside of the baked clay table top. -
Rug Placement:
Cut a rounded rectangle from the sage green felt. Place this on the wooden floor first, positioning it slightly off-center. -
Furniture Installation:
Glue the sofa onto the back edge of the rug. Glue the coffee table in front of it. Adhere the wall cactus to the right-hand wall and the picture frames to the back wall. -
Plant Styling:
Glue the tall aloe plant in its pot to the left of the sofa, and the smaller bush plant in the corner behind the sofa for depth.
Place your finished shadowbox on a shelf where the light can catch the tiny details of your handcrafted room
Negative-Space Sculptures as Decor
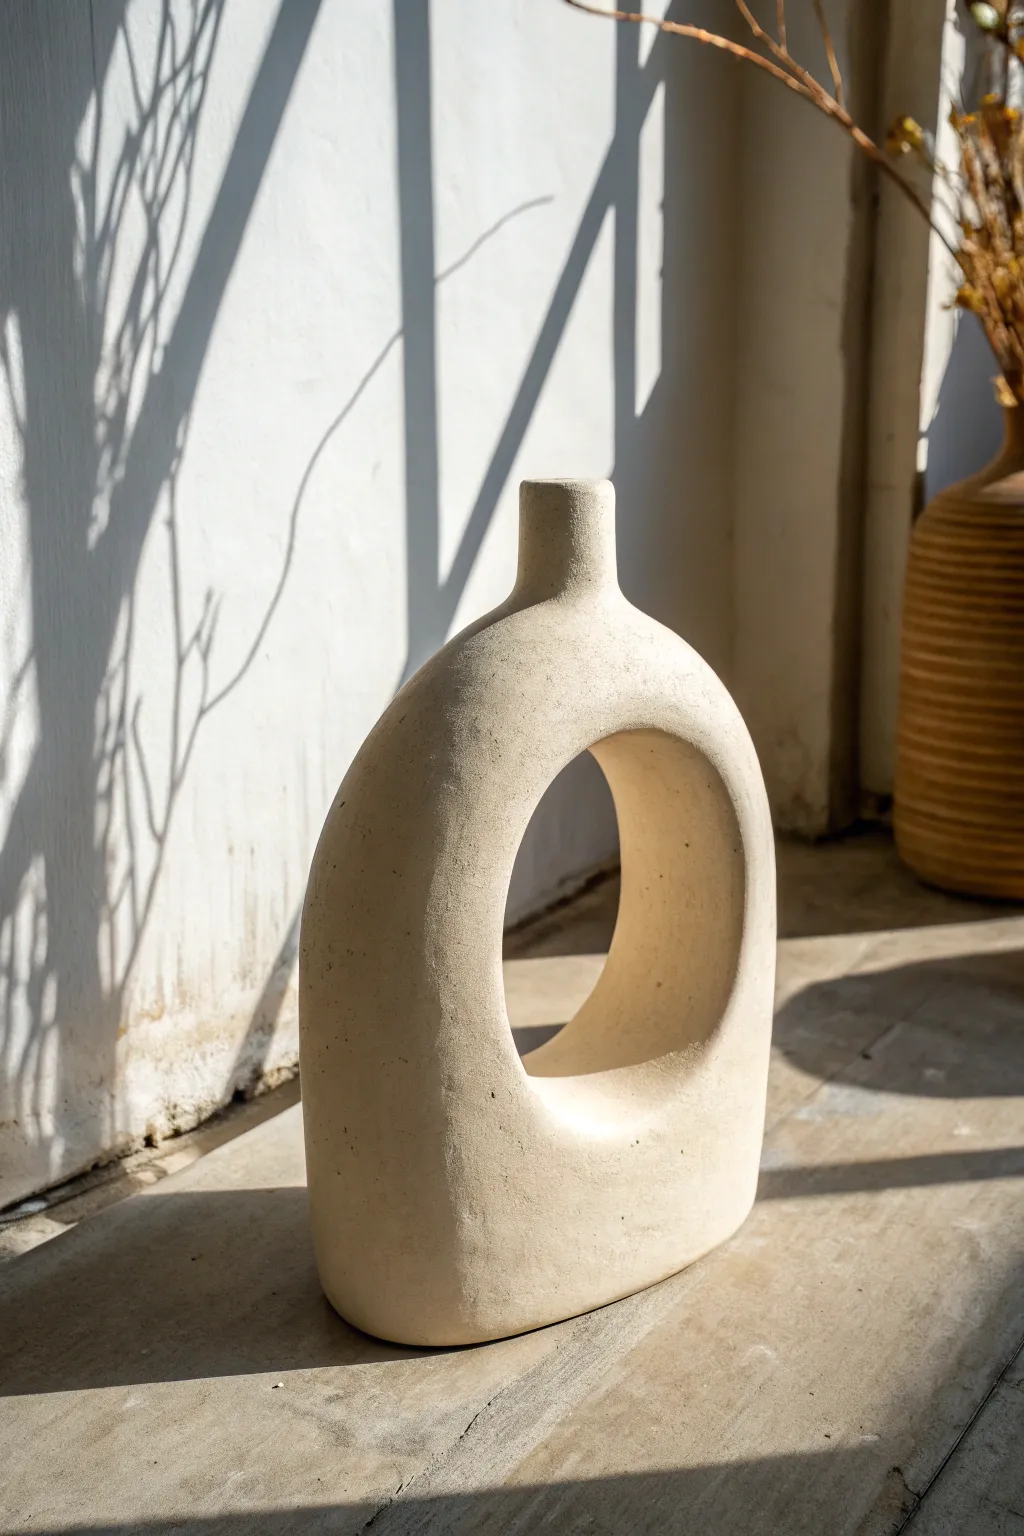
Embrace the beauty of void and form with this striking architectural vase. Featuring a prominent central cutout and a textured matte finish, this piece turns negative space into a focal point for modern minimalist decor.
Step-by-Step Guide
Materials
- Air-dry clay (stone or white color, approx. 1-1.5kg)
- Rolling pin
- Heavy-duty cardboard or thick plastic sheet (for templates)
- Craft knife or scalpel
- Slip (clay mixed with water)
- Scoring tool or needle tool
- Sponge
- Water bowl
- Wooden modeling tools
- Sandpaper (medium and fine grit)
- Acrylic paint (matte beige or stone color)
- Baking soda (for texturing paint)
- Matte sealant spray
Step 1: Preparation & Slab Building
-
Design the template:
Sketch your vase shape onto cardboard. Draw a wide arch shape with a flat bottom and extend a neck at the top. In the center, draw a large circle leaving about 1.5 to 2 inches of clay width around the sides and bottom. Cut this template out. -
Roll the slabs:
Knead your clay thoroughly to remove air bubbles. Roll out two large, even slabs of clay, approximately 1/4 inch thick. These will be the front and back faces of your vase. -
Cut the faces:
Place your cardboard template onto the first slab and trace around it with a needle tool. Use your craft knife to cut out the shape, including the center circle. Repeat this process for the second slab. -
Create the side walls:
Roll out long rectangular strips of clay, also 1/4 inch thick. The width of these strips will determine the depth of your vase (around 2-3 inches is standard). You will need strips for the outer perimeter and the inner circle.
Sagging Walls?
If the clay feels too soft to hold its shape during assembly, let the slabs stiffen to a ‘leather hard’ state (about 30-60 mins) before building vertical walls.
Step 2: Assembly
-
Score and slip:
Take the front face piece. Score (scratch) the outer edges and the edge of the inner circle. Do the same to the edges of your side wall strips. Apply slip generously to all scored areas. -
Attach the inner wall:
Carefully curve a strip of clay to fit inside the central circular cutout. Press it firmly against the back face’s inner edge. Join the ends of the strip smoothly. -
Attach the outer walls:
Attach the long strips to the outer perimeter of the front face. Stand them up vertically. Reinforce the seams on the inside with a small coil of clay, smoothing it down with a modeling tool. -
Close the form:
Apply slip to the top edges of the standing walls. Carefully lower the back face piece onto the walls, aligning the outlines and the central hole. -
Seal the seams:
Gently press the back face down to secure the bond. Use your fingers or a wooden tool to blend the clay across the seams on the outside, merging the top slab with the walls until the join is invisible. -
Refine the shape:
I like to gently paddle the sides with a flat wooden spatula while the clay is still workable; this straightens any walls that may have bowed outward during handling.
Seamless Finish
Use a metal rib tool to scrape across the joined seams when the clay is leather hard. This removes excess clay ‘bumps’ better than a sponge alone.
Step 3: Finishing & Texture
-
Form the neck:
Roll a small rectangle of clay into a cylinder. Attach this to the neck opening at the top of your vase using the score and slip method. Smooth the transition so it looks like one continuous piece. -
Smoothing:
Use a slightly damp sponge to wipe away fingerprints and smooth out harsh textural irregularities. Pay special attention to the inner circle, ensuring the curve is continuous. -
Drying:
Let the sculpture dry slowly away from direct sunlight or heat sources. Tent it loosely with plastic for the first 24 hours to prevent cracking, then uncover to dry fully (usually 2-3 days). -
Sanding:
Once bone dry, use sandpaper to suffer down any sharp ridges or bumps. Wear a mask during this step to avoid inhaling clay dust. -
Creating the stone texture:
Mix your beige acrylic paint with a teaspoon of baking soda. The baking soda adds a gritty, stone-like texture that mimics unglazed ceramic. -
Painting:
Apply the textured paint in multiple thin layers. Dab the brush rather than stroking it to enhance the pitted, organic surface look seen in the photo. -
Sealing:
Finish with a matte sealant spray to protect the paint without adding unnatural shine.
Place your new sculpture near a window to watch the sunlight interact with the negative space you created
Mixed-Media Clay Suncatcher Shapes
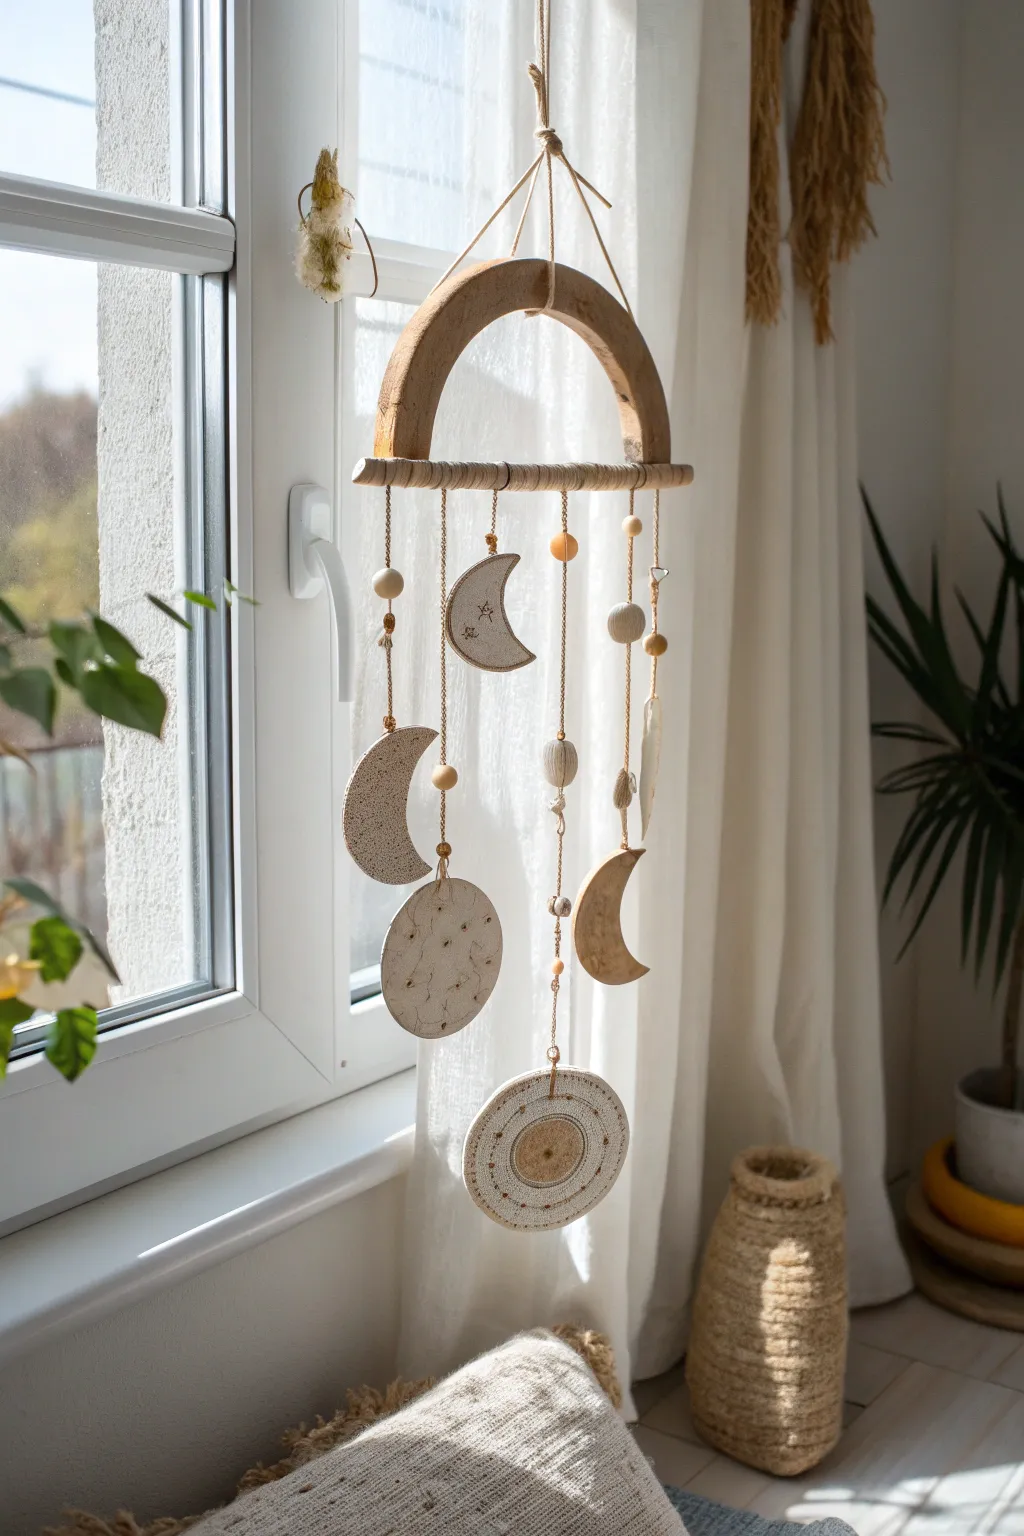
Bring a touch of cosmic serenity to your window with this mixed-media mobile, featuring textured air-dry clay shapes and warm wooden accents. The combination of moons, celestial circles, and natural beads creates a sophisticated yet earthy piece that catches the light beautifully.
Step-by-Step Tutorial
Materials
- White or speckled air-dry clay (or polymer clay)
- Rolling pin
- Circle cutters (various sizes based on preference)
- Moon-shaped cutter (or paper template and craft knife)
- Wooden arch frame (pre-made) or thick cardboard and wood veneer
- Wooden dowel (to fit width of arch)
- Jute twine or cotton macramé cord
- Assorted wooden beads (natural finish, various sizes)
- Small eye hooks (optional)
- Texture tools (lace, stamps, or random household objects)
- Sandpaper (fine grit)
- Strong craft glue or hot glue gun
- Awl or toothpick for making holes
Step 1: Planning and Shaping the Clay
-
Condition the clay:
Start by kneading your clay until it’s soft, pliable, and free of cracks. This ensures the shapes won’t be brittle once dried. -
Roll out slabs:
Roll the clay out to a uniform thickness, about 1/4 inch thick. I find using guide sticks on either side helps keep the surface perfectly level. -
Cut the shapes:
Using your cutters or a knife, cut out two large crescent moons, one smaller moon, a medium circle with moon-phase details, and a large decorative disc. -
Add surface texture:
For the “full moon” circle, gently press dried flowers or small stamps into the surface to create craters. For the crescent moons, you can leave them smooth or add a subtle speckled texture with a toothbrush bristles. -
Detail the sun-disc:
For the largest bottom circle, create a concentric design. Press a smaller circle tool gently into the center, and use a needle tool to create radiating dot patterns around the rim. -
Pierce the hanging holes:
Use an awl or straw to poke holes at the top (and bottom, if connecting pieces) of each shape. Make sure the holes are large enough for your twine to pass through easily. -
Dry and refine:
Let the clay shapes air dry completely on a flat surface for 24-48 hours, flipping them occasionally to prevent warping. Once bone dry, lightly sand the edges to remove any roughness.
Step 2: Preparing the Frame
-
Secure the dowel:
Take your wooden arch and the straight dowel. Glue the dowel horizontally across the bottom of the arch to create a hanger bar. -
Wrap the bar:
To hide the join and add texture, wrap the horizontal dowel tightly with jute twine. Secure the ends with a dab of glue on the backside. -
Install the top hanger:
Attach a loop of strong twine to the very top center of the wooden arch so the mobile can be suspended.
Avoid Warping
Dry clay shapes on a wire cooling rack rather than a solid table. This allows airflow underneath, ensuring they dry evenly and stay perfectly flat.
Step 3: Assembly and Balance
-
Cut suspension cords:
Cut five lengths of twine. You’ll need varying lengths to create a staggered, waterfall effect with your clay pieces. -
String the beads:
Tie a knot at the bottom of a cord, thread on a clay shape, and then add decorative beads above it. Tie small knots under beads if you want them to stay at specific heights on the string. -
Attach detailed strands:
For the complex center strand, thread the large sun-disc at the bottom, add beads, then attach a connecting cord to the moon-phase circle above it. -
Tie to the frame:
Tie each completed strand onto the twine-wrapped dowel. Arrange them symmetrically or asymmetrically, depending on the visual balance you prefer. -
Space and secure:
Adjust the spacing between the strings on the dowel. Once you are happy with the arrangement, add a tiny drop of glue to the knot on the dowel to stop the strings from sliding. -
Final adjustment:
Hang the mobile up temporarily to check if it leans. If it tilts, adjust the position of the heavy clay pieces or slide the strings along the dowel until it hangs perfectly straight.
Add Subtle Shimmer
Mix a tiny amount of gold mica powder into your clay before rolling, or brush gold luster dust onto the textured craters of the moon shapes.
Hang your luminous clay creation in a sunny spot and enjoy the peaceful vibe it brings to your room