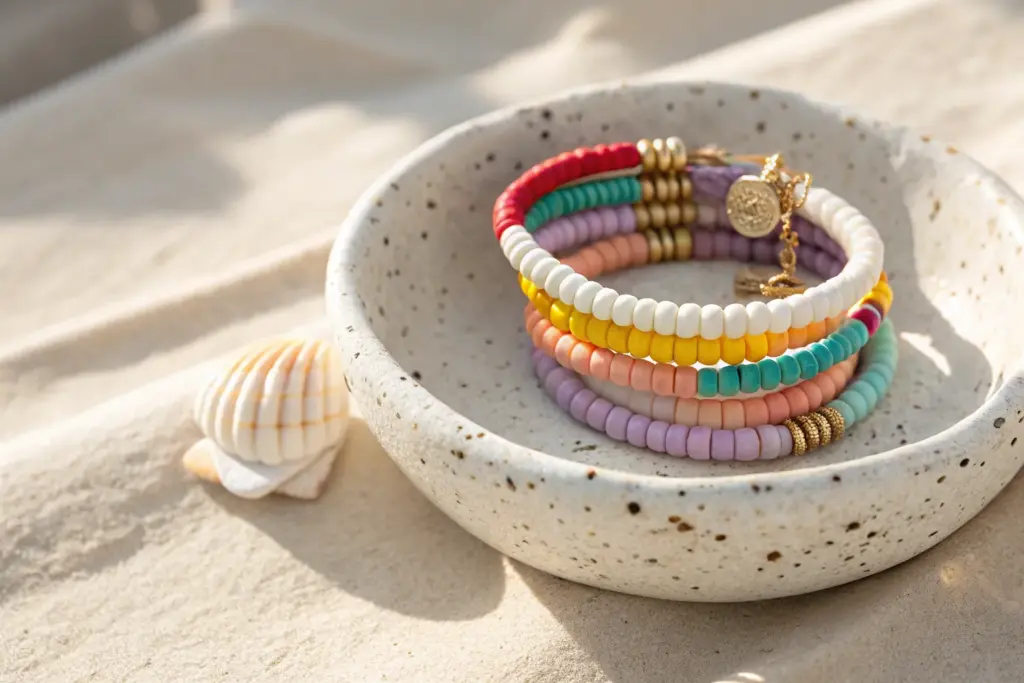
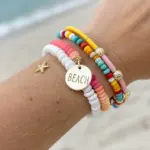
When the weather turns hot, I reach for clay bead bracelets that feel light, colorful, and totally aesthetic summer. Here are my favorite bracelet ideas for that beachy, sun-soaked vibe—perfect for stacking and mixing like you’re hanging out in the studio with me.
Classic Cowrie Shell Heishi Stack
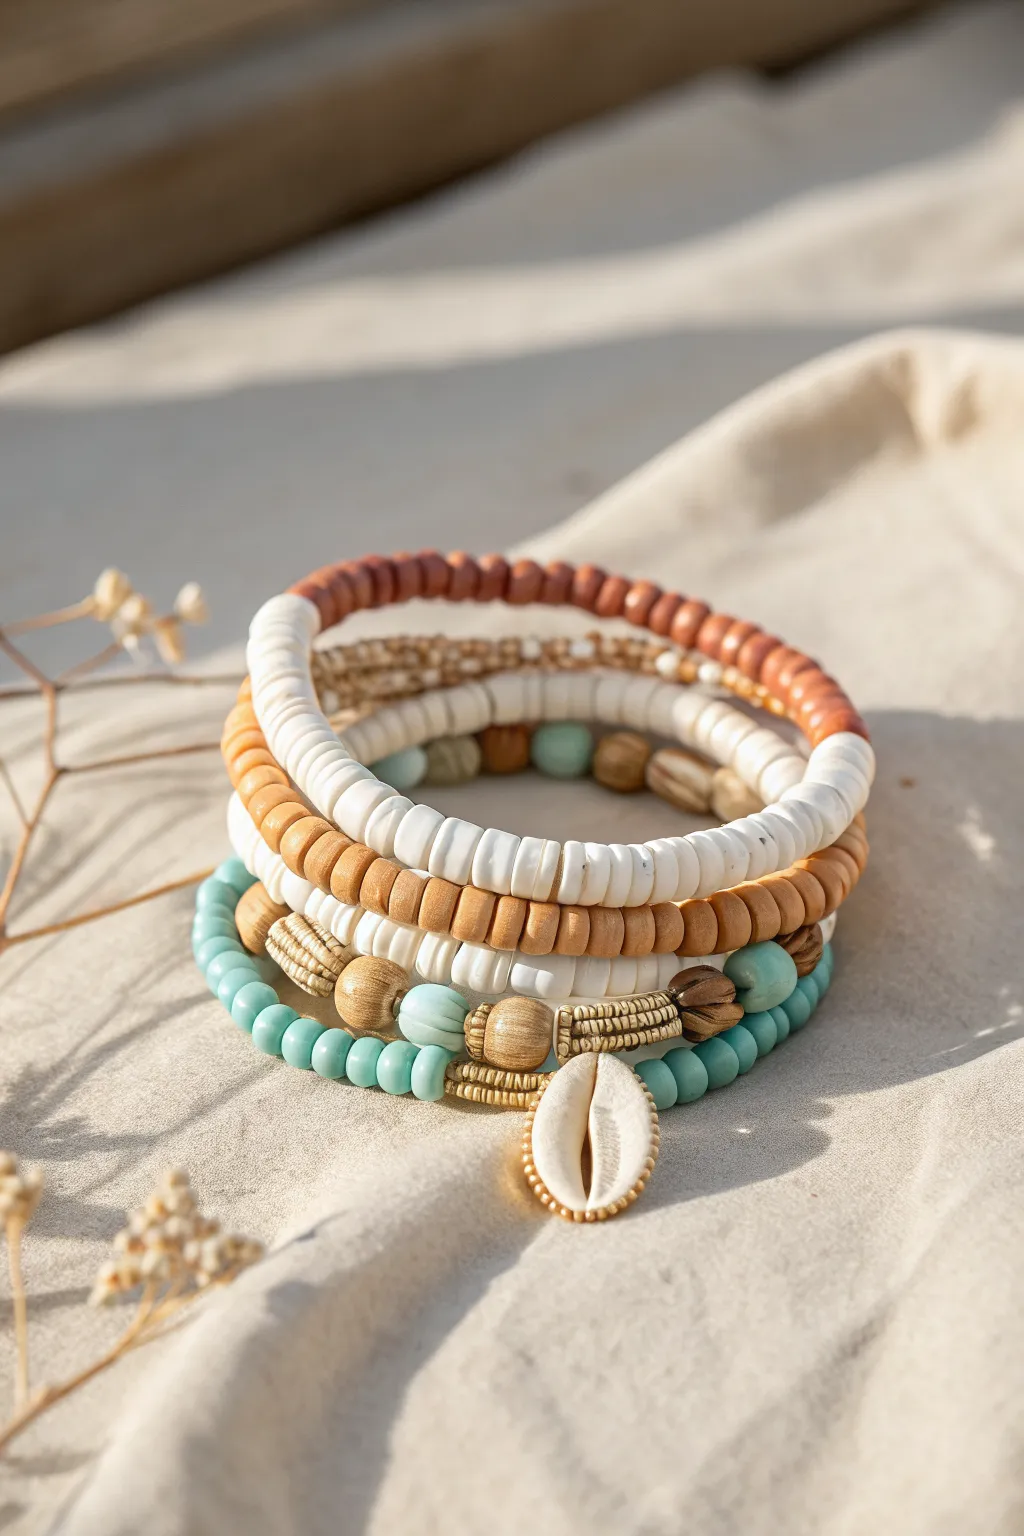
Embrace the essence of a beach vacation with this multi-strand bracelet stack that captures the look of sun-bleached wood and turquoise waters. This five-layer stack mixes natural textures with vibrant pops of color for the ultimate boho-chic summer accessory.
Step-by-Step Guide
Materials
- White polymer clay heishi beads (approx. 6mm disc)
- Light brown/terracotta polymer clay heishi beads (approx. 6mm disc)
- Turquoise blue round beads (approx. 4mm – glass or acrylic)
- Natural wood beads (round, various sizes: 8mm and 10mm)
- Small natural cowrie shell charm with gold electroplated edge
- Gold-tone metal spacer beads (small flat discs)
- Gold-tone corrugated tube beads or patterned spacers
- Small gold seed beads (for spacing)
- Elastic stretch cord (0.8mm clear)
- Jewelry glue (GS Hypo Cement or superglue gel)
- Scissors
Step 1: Strand 1: The Terracotta Foundation
-
Cut the cord:
Begin by cutting a piece of elastic cord about 10-12 inches long. This generous length makes tying knots much easier later on so you aren’t struggling with short ends. -
Pre-stretch:
Gently pull the elastic cord between your hands a few times. This pre-stretching technique helps prevent the finished bracelet from sagging after you wear it for a while. -
Secure the end:
Use a piece of tape or a bead stopper clip on one end of your cord to prevent beads from sliding off while you work. -
String the beads:
Thread on your terracotta-colored polymer clay heishi beads continuously until you reach your desired wrist length, usually about 6.5 to 7 inches for an average fit. -
Check the fit:
Wrap the strand around your wrist to ensure it sits comfortably without digging in, remembering that the knot will take up a tiny bit of slack.
Knot Security Pro Tip
After tying your knots, let the bracelets sit untouched for at least 15 minutes. This allows the glue to cure fully inside the bead channel, preventing any snaps.
Step 2: Strand 2 & 3: The White Classics
-
Prepare the cords:
Cut and pre-stretch two more lengths of elastic cord, exactly like you did for the first strand. -
String the first white layer:
For the second bracelet, string strictly white polymer clay heishi beads. I like to occasionally check the length against the terracotta strand to ensure they will stack uniformly. -
Create the mixed texture strand:
For the third bracelet, start with a base of white heishi beads, filling about 80% of the strand. -
Add accent beads:
In one section, instead of white discs, insert a small assortment of mixed beads: a few wooden rounds, a small turquoise bead, and perhaps a gold spacer to create a hidden ‘back’ detail.
Step 3: Strand 4: The Mixed Pattern
-
Start the pattern:
Cut a new cord. Create a pattern that alternates sections of white heishi beads with sections of light brown heishi beads. -
Refine the rhythm:
Try doing about 1 inch of white followed by 1 inch of brown to mimic the striped look seen in the specific inspiration stack.
Shell Orientation Fix
If your cowrie shell keeps flipping backward, string it between two flat gold spacers rather than round beads. The flat surface helps stabilize the shell against your wrist.
Step 4: Strand 5: The Turquoise Focal Point
-
Base layer:
On your final cord, string the 4mm turquoise round beads for about three-quarters of the length. -
Build the focal section:
Pause stringing turquoise beads when you have about 1.5 inches of space left in the center. -
Add wood and gold:
Thread on a specific sequence: a small gold spacer, a medium wood bead, a gold corrugated spacer, and then a larger wood bead. -
Attach the shell:
Thread on your cowrie shell charm. Ensure the shell faces outward. -
Mirror the design:
After the shell, repeat the pattern in reverse: large wood bead, gold corrugated spacer, medium wood bead, and a gold spacer. -
Finish the loop:
Fill any remaining space with your turquoise beads until it matches the length of the other four strands.
Step 5: Finishing and Tying
-
Tie the surgeon’s knot:
For each bracelet, remove the tape/clip and tie a surgeon’s knot. This is just like a standard square knot, but loop the end through twice on the first pass for extra grip. -
Apply glue:
Dab a tiny drop of jewelry glue onto the knot. Be careful not to get glue on the visible parts of the beads. -
Hide the knot:
Once the glue is tacky but not fully hard, pull the knot inside the hole of the nearest heishi or large bead to conceal it. -
Trim excess:
Trim the excess cord ends close to the bead hole. Repeat this finishing process for all five bracelets in your new stack.
Slide on your new ocean-inspired stack and enjoy the beachy vibes wherever you go.


Bold Rainbow Summer Arm Stack
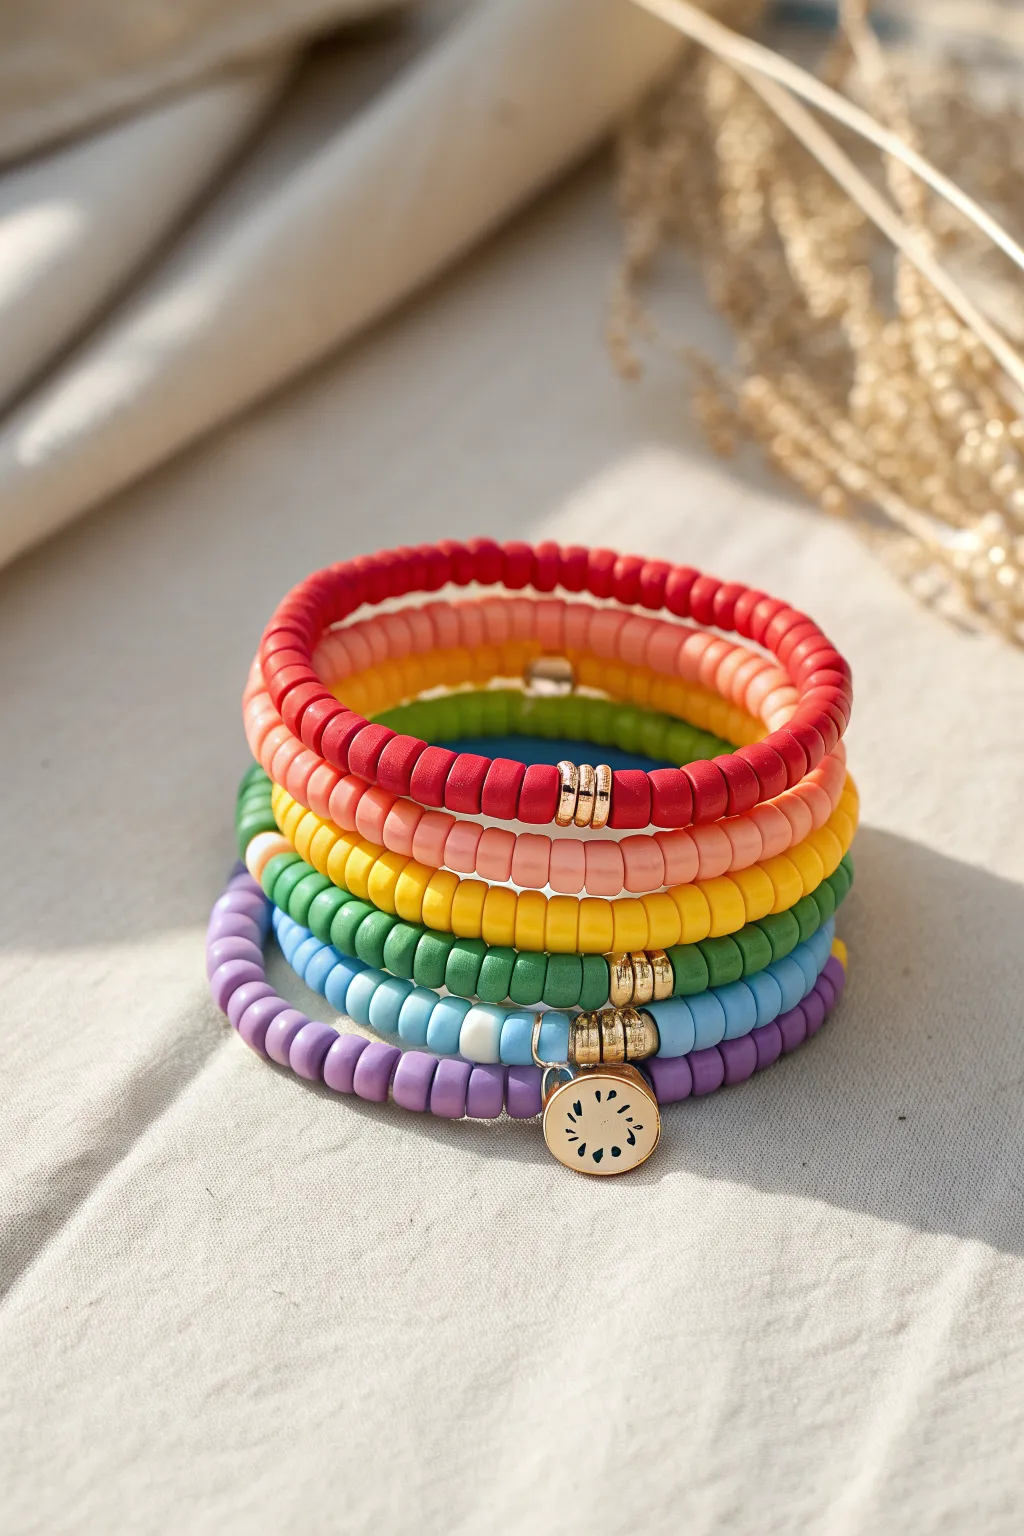
Brighten up your summer wardrobe with this vibrant set of seven stacked heishi bracelets that creates a bold, cohesive rainbow gradient. The mix of matte vinyl texture with shiny gold hardware offers a high-end look that’s deceptively simple to string together yourself.
Detailed Instructions
Materials
- 6mm polymer clay (heishi) disc beads in 7 colors: dark red, coral/peach, bright yellow, grass green, forest green, light blue, purple
- 0.8mm clear elastic stretch cord
- Gold tone metal tube spacer beads (ridged texture)
- Gold tone jump ring (6mm or 8mm)
- Gold enamel fruit charm (watermelon slice or similar round motif)
- Super glue or jewelry cement
- Scissors
Step 1: Planning Your Palette
-
Measure your wrist:
Wrap a piece of string around your wrist to find your size, then add about half an inch for a comfortable fit; cut seven lengths of elastic cord to this size plus 4 extra inches for knotting. -
Pre-stretch the cord:
Hold each piece of elastic and give it a gentle tug a few times, which helps prevent the finished bracelets from sagging later on. -
Organize the gradient:
Lay out your bead strands in rainbow order: Dark Red, Coral, Yellow, Light Green, Dark Green, Light Blue, and Purple to visualize the final stack.
Step 2: Stringing the Solids
-
Start the Red bangle:
Begin threading the dark red heishi beads onto your first cord, filling it until you reach the halfway point of your desired length. -
Add gold accents:
String on three of the gold ridged tube spacers to create the metallic focal point. -
Finish the Red strand:
Continue adding red beads until the bracelet reaches your measured length. -
Repeat for Coral:
Replicate this process for the coral/peach colored bracelet, placing the three gold spacers in the exact middle. -
String the Yellow:
Thread the bright yellow beads, adding the gold spacers midway just like the previous layers. -
Assemble the Greens:
Create two separate green bracelets using the same formula—one with the lighter grass green beads and one with the darker forest green beads. -
Create the Blue layer:
String the light blue beads, remembering to insert the trio of gold spacers at the center.
Pro Tip: Bead Board
Use a flocked bead board to lay out the seven strands before stringing. It keeps the round beads from rolling away and helps you check lengths.
Step 3: The Charm Bracelet
-
Start the Purple strand:
For the final purple bracelet, string beads until you hit the halfway mark. -
Attach the charm:
Slide on three gold spacers, but before adding the rest of the beads, use pliers to open a jump ring and attach your gold fruit charm to the middle spacer. -
Secure the charm:
Close the jump ring securely so the charm dangles freely from the central gold bead. -
Complete the strand:
Finish stringing the rest of the purple beads to match the length of the other six bracelets.
Level Up: Mix Textures
Swap the solid beads on one strand for ‘fruit salad’ polymer clay slices or letter beads to personalize the stack with a name or phrase.
Step 4: Finishing Touches
-
The surgeon’s knot:
For the first bracelet, cross the ends of the elastic and loop one end through twice before pulling tight; this is stronger than a standard knot. -
Secure with glue:
I like to dab a tiny drop of super glue or jewelry cement directly onto the knot to ensure it never slips. -
Hide the knot:
Once the glue is tacky but not fully dry, slide a nearby bead over the knot to conceal it inside the hole. -
Trim excess:
After the glue has fully cured (wait about 10 minutes), snip off the excess elastic tails as close to the beads as possible. -
Final assembly:
Repeat the knotting and gluing process for all remaining bracelets until your rainbow stack is complete.
Now slide on your colorful arm candy and enjoy the bright summer vibes


Ocean Pastel Gradient Bracelet

Capture the tranquil vibes of a beach day with this ocean pastel gradient bracelet. Using alternating teal, white, and sand-colored clay beads alongside elegant gold accents, creates a soothing accessory perfect for warm summer days.
Step-by-Step
Materials
- Polymer clay heishi beads (6mm) in teal/turquoise
- Polymer clay heishi beads (6mm) in white
- Polymer clay heishi beads (6mm) in cream/sand/beige
- Flat gold disc spacer beads or gold heishi beads
- Small gold ball spacer beads
- Gold finish lobster clasp
- Gold finish jump rings (4mm or 5mm)
- Small length of gold extension chain (optional)
- Flexible beading wire (e.g., 0.38mm or 0.45mm)
- 2 Crimp beads (gold tone)
- 2 Crimp covers (gold tone, optional)
- Wire cutters
- Flat nose pliers
Step 1: Setting the Foundation
-
Measure the wire:
Cut a piece of flexible beading wire about 10 inches long. This gives you plenty of extra room to work with the clasps and keeps beads from sliding off while you string. -
Attach the first clasp:
Thread a crimp bead onto one end of the wire, followed by a jump ring attached to your lobster clasp (or simply the clasp loop itself). -
Secure the crimp:
Loop the wire back through the crimp bead. Use your flat nose pliers to squash the crimp bead firmly flat, securing the wire. -
Hide the tail:
Thread a small gold ball bead onto the wire. Make sure you push it over both the main wire and the short tail left over from the crimp to tuck it away neatly.
Natural Variation
Don’t stress about exact counts. Varying the number of beads in each color block (Doing 5 teal then 7 teal later) makes the design feel more organic and beachy.
Step 2: Creating the Bead Pattern
-
Start the teal section:
Begin stringing with your teal clay beads. Add about 5 to 7 beads to create the first block of color. -
First transition:
Place a single white heishi bead to act as a crisp divider. -
Sand section:
String on a larger section of the cream or sand-colored beads. Aim for about 8 to 10 beads here for a longer block of neutral tone. -
Second transition:
Add another single white bead followed by a short run of 3 to 4 teal beads. -
Insert gold accent:
Slide on 3 or 4 gold spacer discs. This metallic flash separates the color blocks beautifully. -
Continue the pattern:
Add a few white beads, then a longer section of teal (about 6 beads), followed by a single white bead. -
Cream block:
Add a section of cream beads (around 6) and then switch back to teal. The key is to keep the pattern organic rather than perfectly symmetrical, mimicking the random beauty of sea glass. -
Midpoint check:
Wrap the strand around your wrist. If it reaches halfway, you are on track. Continue replicating the blocky pattern: teal section, white spacer, cream section, repeating until you are about 0.5 inches from your desired length.
Stiff Bracelet?
If the bracelet sticks out in a rigid circle, you pulled the wire too tight. Leave a tiny hair’s breadth of slack before crimping so beads can rotate and drape.
Step 3: Finishing Touches
-
Final beads:
End your stringing pattern with a small gold ball bead, just like the one you started with. -
Prepare the closer:
Thread on your second crimp bead, followed by a jump ring attached to your extension chain or receiving ring. -
Loop back:
Pass the wire back through the crimp bead and through the first few beads of your design (the gold ball and perhaps one teal bead). -
Tighten the wire:
Pull the wire taut so there are no gaps between the beads, but not so tight that the bracelet becomes stiff; it should drape naturally. -
Crimp and trim:
Flatten the crimp bead with your pliers to lock everything in place. -
Cut excess wire:
Use your wire cutters to snip off the remaining tail of wire as close to the beads as possible without nicking your main strand. -
Cover crimps (Optional):
If you have crimp covers, carefully place them over the flattened crimp beads and gently close them with pliers to make them look like smooth gold rounds.
Now you have a serene accessory ready to pair with linen outfits or swimwear for that perfect summer look


Sunset Ombre Color Melt
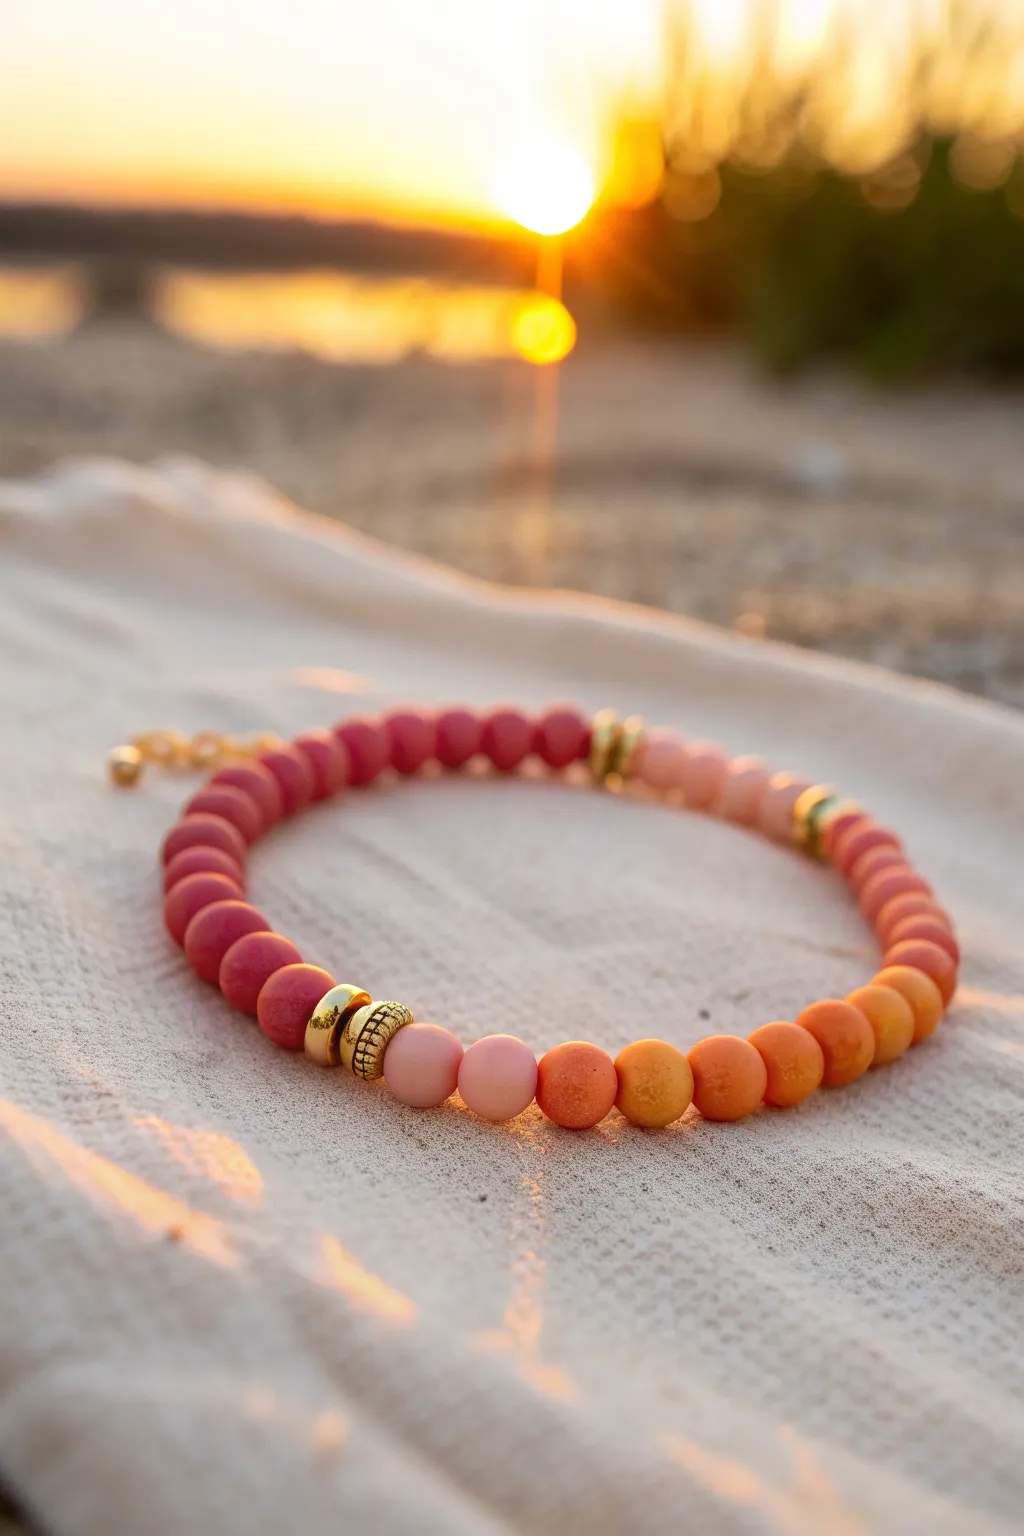
Capture the fleeting beauty of a summer sunset on your wrist with this stunning ombre design. Using matte beads in shades of dusk pink, coral, and burnt orange, accented with gold spacers, this bracelet radiates warm, glowing energy.
Step-by-Step Guide
Materials
- Matte round beads (6mm or 8mm) in deep berry pink
- Matte round beads in rose pink
- Matte round beads in coral orange
- Matte round beads in peach
- Gold tone disc spacer beads
- Gold tone textured round spacer beads
- Strong elastic beading cord (0.8mm)
- Gold tone crimp covers (optional)
- Small gold jump ring and chain extension (optional for adjustable fit)
- Jewelry glue (e.g., G-S Hypo Cement)
- Scissors
Step 1: Planning the Ombre Fade
-
Sort your palette:
Begin by laying out your beads on a bead board or a soft towel to prevent them from rolling away. Organize them by color gradients: deep berry pinks, transitioning into rose, then coral, and finally the lightest peach tones. -
Establish the pattern:
Design your sequence to mimic a sunset. A common approach is to group 5-7 beads of one shade before transitioning to the next. I find laying the entire circle out before stringing helps visualize the final color melt. -
Insert gold accents:
Plan where your gold spacers will live. In this design, place a textured gold bead sandwiched between two smooth gold disc spacers at the transition points between major color blocks, particularly between the pinks and the oranges.
Step 2: Stringing the Beads
-
Prepare the cord:
Cut a piece of elastic cord about 10-12 inches long. This generous length gives you plenty of room to tie knots later without struggling with tight ends. -
Pre-stretch the elastic:
Give your elastic cord a few firm tugs. This crucial step prevents the bracelet from stretching out and becoming loose after you wear it a few times. -
Start with the darkest shade:
Begin stringing with your deep berry pink beads. Thread on about 6-8 of them depending on your wrist size and desired pattern length. -
Add the first transition:
Slide on a smooth gold disc spacer, followed by a textured gold round bead, and another smooth disc spacer. -
Shift to lighter pinks:
String on two lighter rose pink beads immediately after the gold section to start softening the gradient. -
Continue the gradient:
Add your section of coral and orange beads. As you move around the circle, ensure the colors flow naturally from dark to light, just like the sky fading into twilight. -
Complete the circle:
Finish stringing with your lightest peach or yellow-orange tones, bringing the design back around to meet the starting dark pink beads. -
Check the sizing:
Carefully wrap the strung beads around your wrist to check the fit. It should sit comfortably without pinching or drooping too much. Add or remove a bead from the back section if needed.
Knot Slipping?
If your elastic knot feels insecure, try ‘pre-stretching’ the knot itself while tightening. Pulling all four strands (two tails, two loops) simultaneously helps lock it.
Step 3: Finishing Touches
-
Tie the knot:
Bring the two ends of the elastic together. Tie a simple overhand knot, but don’t pull it fully tight yet. -
Secure with a surgeon’s knot:
Tie a second knot, but loop the elastic through twice instead of once (a surgeon’s knot). Pull the cords firmly to tighten the beads together, ensuring there are no gaps. -
Apply adhesive:
Dab a tiny drop of jewelry glue directly onto the knot. This prevents the slippery elastic from slowly undoing itself over time. -
Hide the knot:
If one of your beads has a large enough hole, gently tug on the elastic to slide the knot inside that bead. This creates a seamless, professional finish. -
Trim the excess:
Once the glue is tacky or dry, trim the excess elastic cord close to the bead, being careful not to snip the main knot. -
Optional accent chain:
For the look in the photo, attach a small gold jump ring between two beads and loop a short length of extension chain onto it for a decorative dangle.
Pro Tip: Matte Magic
To maintain the soft velvety texture of matte beads, avoid getting lotions or oils directly on them, as this can turn spots of the bead shiny or dark over time.
Now you have a piece of the golden hour to wear all day long

The Complete Guide to Pottery Troubleshooting
Uncover the most common ceramic mistakes—from cracking clay to failed glazes—and learn how to fix them fast.
Pearl-Accented Mermaid Mix
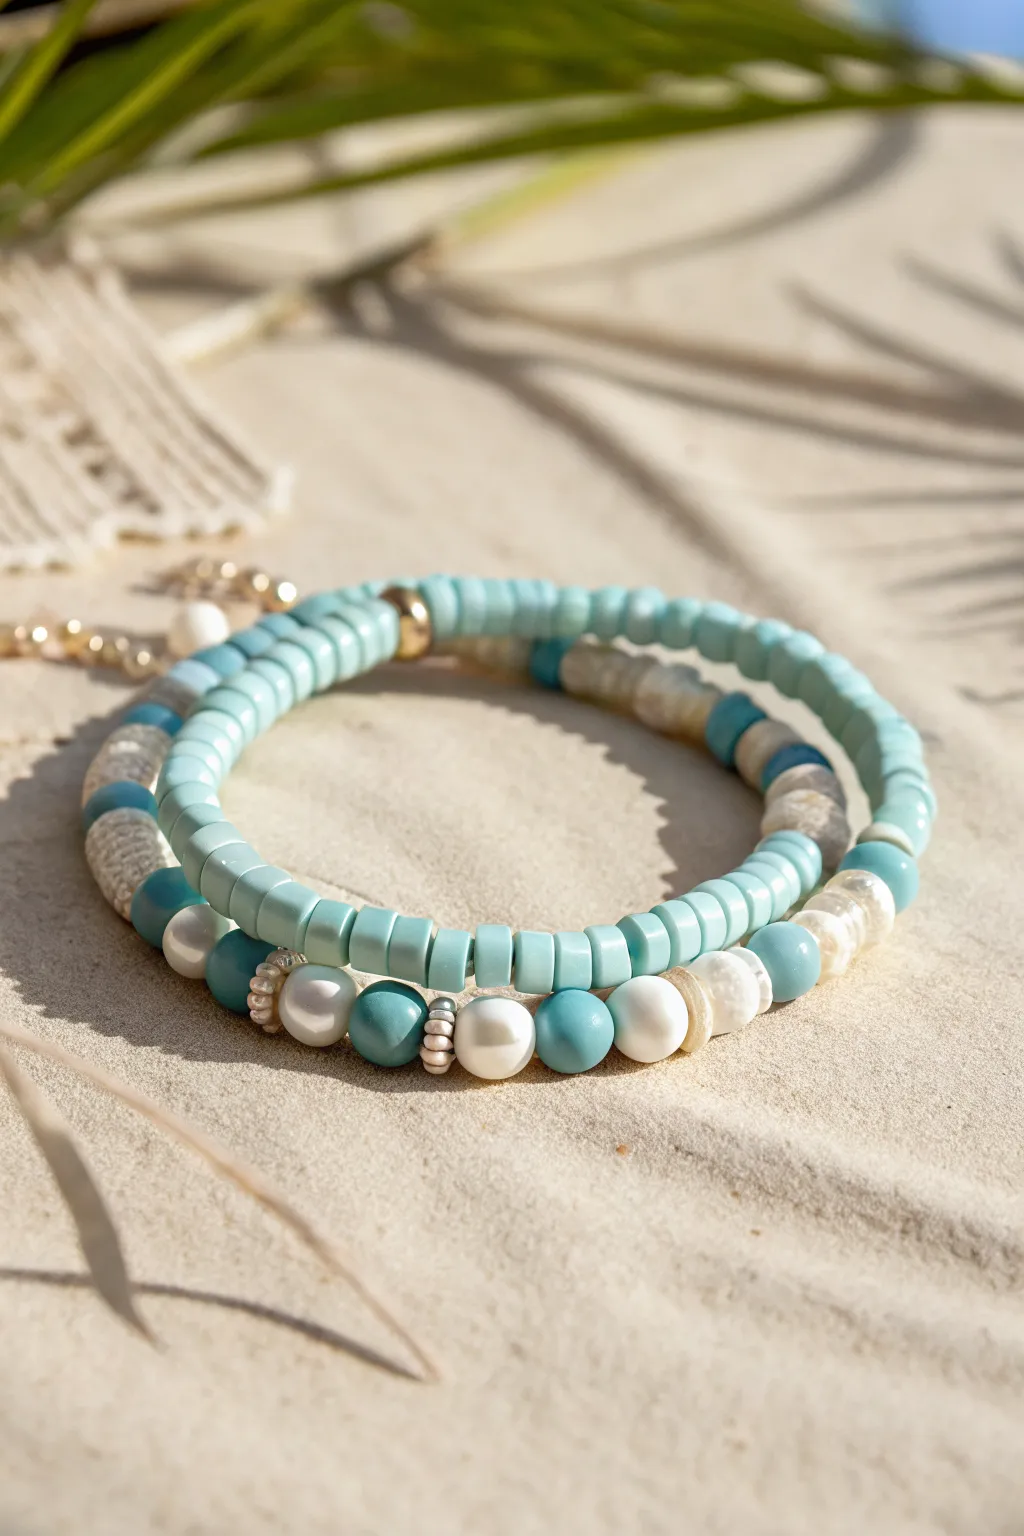
Capture the essence of a serene beach day with this beautiful bracelet stack that pairs uniform turquoise heishi beads with a textured mix of pearls and stone. The combination of smooth clay discs and organic round beads creates a sophisticated coastal look perfect for summer styling.
How-To Guide
Materials
- 4mm flat disc heishi beads in light turquoise/aqua
- 6mm-8mm round beads in turquoise (matte finish)
- 6mm-8mm round freshwater pearls (white/cream)
- Textured or lava stone beads in white/cream (rondelle or round shape)
- Small silver spacer beads (daisy or textured ring style)
- One medium gold round accent bead
- Strong elastic cord (0.8mm recommended)
- Jewelry glue or clear nail polish
- Scissors
Step 1: Creating the Heishi Strand
-
Measure and Cut:
Cut a piece of elastic cord about 10-12 inches long. This generous length prevents beads from slipping off while you work and makes tying the final knot much easier. -
Pre-stretch the Elastic:
Give your elastic cord a few gentle tugs. Pre-stretching is a crucial step that helps prevent your finished bracelet from sagging or stretching out permanently after the first wear. -
Start Beading:
Begin threading the turquoise heishi disc beads onto the elastic. You will need a significant number of these to form the bulk of the bracelet. -
Check Length:
Continue adding heishi beads until you seek a length that covers almost your entire wrist circumference, leaving just a small gap. -
Add the Focal Point:
Slide on the single gold round accent bead. This breaks up the color and adds a flash of metallic shine. -
Finish the Loop:
Add a final few turquoise heishi beads if needed to reach your desired total length, ensuring the gold bead sits nicely as an asymmetrical accent. -
Secure the Knot:
Tie a secure surgeon’s knot (right over left, left over right, looping through twice). Pull tight, secure with a dab of glue, and trim the excess cord once dry. Hide the knot inside the hole of a nearby bead if possible.
Step 2: Crafting the Mixed Texture Strand
-
Plan the Pattern:
Cut a second length of elastic. For this bracelet, you are creating a more random, organic pattern rather than a strict sequence. -
Create Sections:
Start with a section of the turquoise heishi beads, about an inch long, to tie the two bracelets together visually. -
Introduce Texture:
Switch to your larger beads. Thread on a pattern like: one white textured stone bead, one turquoise round bead, and one freshwater pearl. -
Add Spacers:
Between the larger round beads, insert the small silver spacer beads. These tiny metal rings add professional polish and separation. -
Build the Focal Section:
Create the main decorative run: I like to place a round turquoise bead, a silver spacer, a pearl, a spacer, and another turquoise bead. Repeat variations of this combination. -
Balance with Whites:
Interject the white textured or lava stone beads occasionally to keep the palette light and airy. -
Check the Fit:
Wrap the strand around your wrist to check the sizing. Because the beads are larger, this bracelet might need to be slightly longer than the heishi one to fit comfortably. -
Final Adjustments:
Ensure the pattern ends in a way that blends well when joined. Avoid ending with a large bead right next to the knot if possible. -
Knot and Seal:
Tie off this strand using a strong surgeon’s knot. Apply a small dot of jewelry glue to the knot. -
Hide the Knot:
Gently pull the elastic so the knot slides inside the hole of one of the larger round beads or pearls, which usually accommodate knots better than heishi beads.
Knot Security
Use a surgeon’s knot for elastic: cross ends, loop one side through twice, pull tight. Repeat. The extra loop creates friction that holds tight.
Bead Hole Issues
If a pearl’s hole is too small for the cord, use a bead reamer or a thick needle to gently widen it, or switch to a slightly thinner elastic gauge.
Now you have a stunning, beach-ready set that brings a touch of oceanic elegance to any outfit
Gold Spacer Glow-Up Bracelet
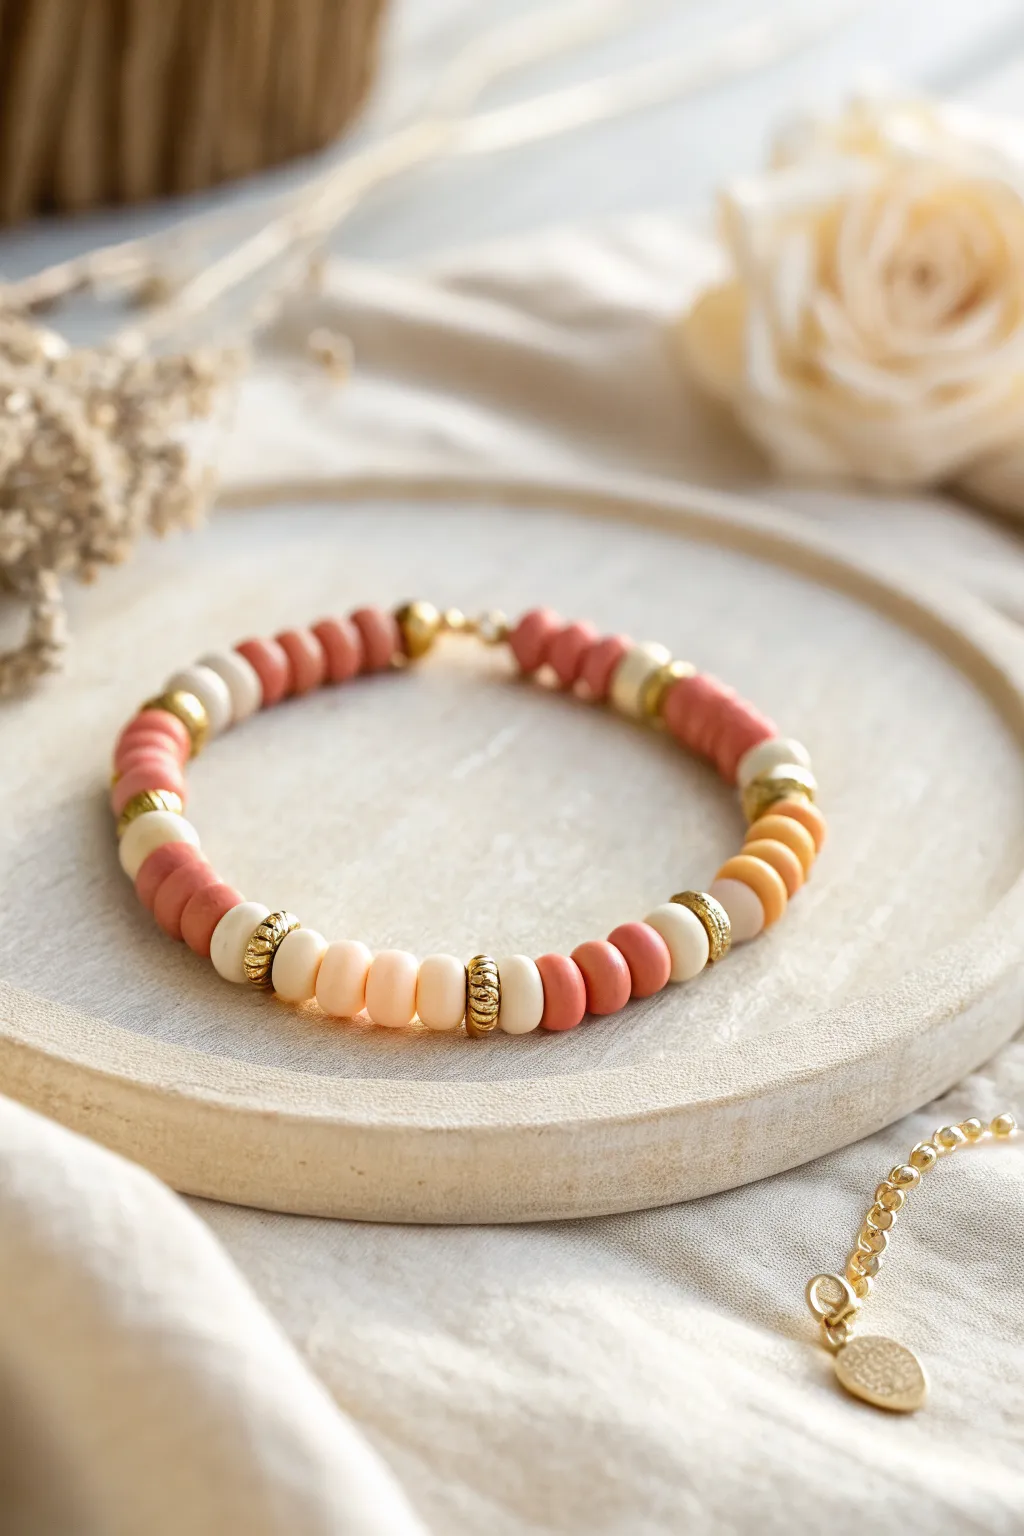
This radiant bracelet combines the earthy warmth of terracotta and cream clay beads with the sophistication of textured gold accents. It’s the perfect summer accessory that bridges the gap between casual beach vibes and evening elegance.
Step-by-Step Guide
Materials
- Polymer clay Heishi beads (Terracotta/Brick Red)
- Polymer clay Heishi beads (Cream/Off-white)
- Polymer clay Heishi beads (Peach/Light Orange)
- Textured gold spacer beads (thick/rounded donut shape)
- Small gold round crimp beads (optional, for decorative spacing)
- Strong elastic cord (0.7mm or 0.8mm)
- Jewelry glue or clear nail polish
- Scissors
Step 1: Preparation
-
Measure your wrist:
Wrap a piece of string or a soft measuring tape around your wrist to find your size. Add about half an inch to this measurement to ensure the bracelet fits comfortably without pinching. -
Cut the cord:
Cut a length of elastic cord about 10-12 inches long. Having this extra length makes it much easier to tie the finishing knot securely without struggling. -
Pre-stretch the elastic:
Give your cut piece of elastic a few gentle tugs. This pre-stretching helps prevent the bracelet from loosening up over time once you start wearing it. -
Secure the end:
Place a piece of tape on one end of the cord or attach a binder clip. This acts as a stopper so your beads don’t slide right off while you’re working.
Step 2: Creating the Pattern
-
Start with a gold anchor:
Begin your pattern by threading on a single textured gold spacer bead. This will act as the visual anchor for your repeating sections. -
The cream section:
Thread on two cream-colored clay beads. These lighter tones provide a soft contrast against the metallic gold. -
Adding warmth:
Follow the cream beads with three terracotta (brick red) clay beads. This creates the main block of robust color. -
Mirror the pattern:
Add two more cream beads to symmetry off this section before adding your next gold spacer. -
Insert the spacer:
Slide on another textured gold spacer bead. Using these thicker, ornate spacers rather than thin flat discs is key to achieving the ‘glow-up’ look. -
Varying shades:
For the next section, I like to swap the terracotta for the peach/light orange beads to create a gentle gradient effect, keeping the cream beads as the constant border. -
Repeat the sequence:
Continue alternating your color blocks—Cream/Terracotta/Cream then Gold, followed by Cream/Peach/Cream then Gold—until you reach your desired length. -
Check the fit:
Wrap the beaded strand around your wrist to check the sizing. The ends should meet comfortably without gaps.
Golden Rule
Use textured or ‘stardust’ finish gold beads instead of smooth ones. The texture catches the light better and hides fingerprints or scratches.
Step 3: Finishing Touches
-
Remove the stopper:
Carefully remove the tape or clip from the end of your cord, ensuring you hold both ends tightly so no beads escape. -
Tie the first knot:
Cross the ends and tie a simple overhand knot. Pull it down gently but firmly so the beads sit snug against each other. -
Secure with a surgeon’s knot:
For the main knot, loop the elastic through twice before pulling tight. This is a surgeon’s knot and it holds much better than a standard square knot. -
Apply adhesive:
Dab a tiny drop of jewelry glue or clear nail polish onto the knot. This seals it and prevents it from slipping undone. -
Hide the knot:
While the glue is still tacky, try to slide the knot inside the hole of the nearest large gold spacer bead if possible. -
Trim the excess:
Once the glue is fully dry, trim the excess elastic cord close to the knot using your sharp scissors.
Knot Slipping?
If your elastic feels too slippery to hold a knot, rub the ends with a little beeswax or even a glue stick before tying to add friction.
Slip on your new creation and enjoy the customized, high-end feel of your handcrafted jewelry


What Really Happens Inside the Kiln
Learn how time and temperature work together inside the kiln to transform clay into durable ceramic.
Fruit Slice Charm Pop
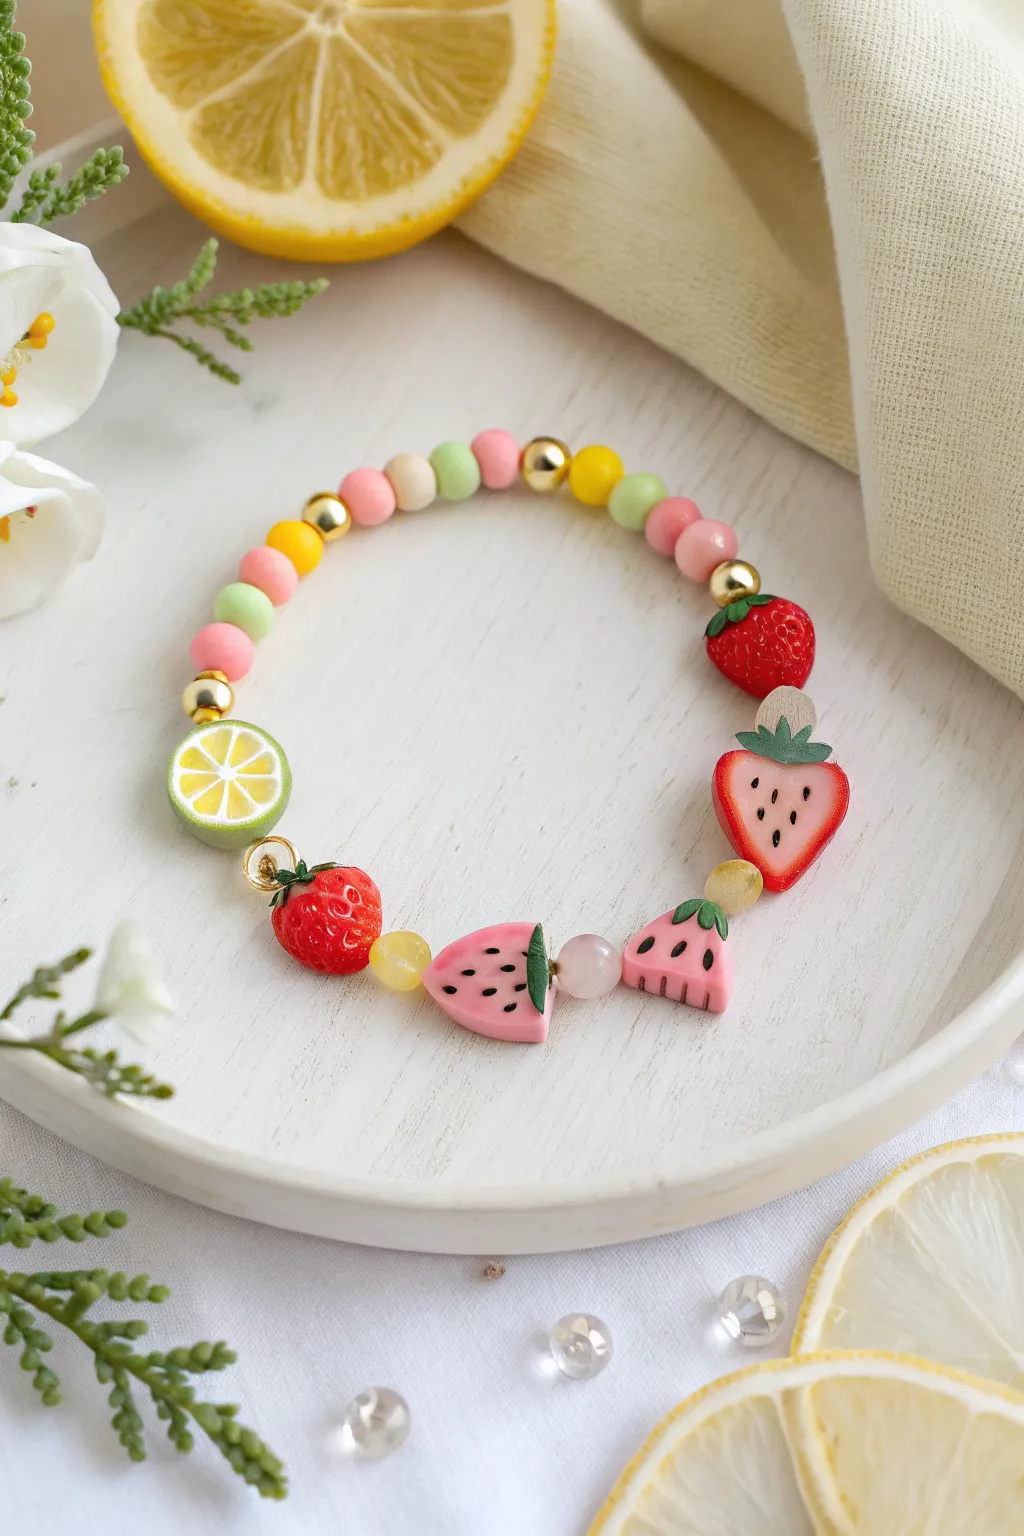
Embrace the zest of summer with this delightful fruit-salad-inspired accessory. Featuring juicy polymer clay strawberries, watermelon slices, and lemon wedges interspersed with pastel matte beads and gold accents, this bracelet is vibrant enough to sweeten any outfit.
Detailed Instructions
Materials
- Elastic stretch cord (0.8mm clear)
- Polymer clay fruit charms: Whole strawberries (red)
- Polymer clay fruit charms: Sliced strawberries (heart shape)
- Polymer clay fruit charms: Watermelon slices (pink)
- Polymer clay fruit charms: Lemon/Lime slice (round)
- 8mm round matte acrylic beads: Light pink, pastel green, yellow, peach
- 4mm gold spacer beads (round)
- Small clear or translucent pink faceted spacer beads
- Gold jump rings (4mm or 5mm)
- Jewelry adhesive (optional but recommended)
- Scissors
- Chain nose pliers
- Bead stopper or tape
Step 1: Preparation & Layout
-
Measure the cord:
Cut a piece of elastic cord about 10-12 inches long. This gives you plenty of extra slack for tying the knot later without losing beads. -
Secure the end:
Place a bead stopper or a piece of tape on one end of the cord to prevent your colorful arrangement from sliding off while you work. -
Plan your pattern:
Before threading, lay out your beads on a soft surface or bead board. The design featured here uses an asymmetrical pattern, grouping the large fruit charms on one side and a repeating pastel bead sequence on the back.
Charms Flipping?
If flat charms (like the watermelon) keep flipping over, string a tiny seed bead on both sides of the charm. This tighter fit restricts rotation and keeps the design facing outward.
Step 2: Stringing the Fruit Section
-
Start with the main charms:
Thread a whole strawberry charm first to anchor the focal section. -
Add separation:
Slide on a sliced strawberry charm next. Notice how the flat shape sits differently than the 3D strawberry, adding nice texture variety. -
Insert a spacer:
Place a small translucent yellow or clear faceted bead. This tiny gap prevents the large clay charms from crowding each other. -
Add watermelon slices:
Thread two watermelon slice charms. Arrange them so they fan out slightly away from each other rather than stacking perfectly flat. -
Another spacer:
Add a small translucent pink faceted bead here to transition colors. -
Add a whole strawberry:
Slide on a second whole red strawberry charm. -
Attach the lemon slice:
The lemon slice charm likely needs a jump ring to sit flat. Use your pliers to open a gold jump ring, loop it through the charm’s eyelet, and close it securely. Then, thread the cord through this jump ring.
Aesthetic Balance
Don’t aim for perfect symmetry! Grouping the fruit charms heavily on one side creates a modern ‘statement’ front, while the simpler beaded back ensures comfort on your inner wrist.
Step 3: Beading the Strap
-
Start the bead pattern:
Begin the back section with a gold spacer bead, followed by a pink matte bead. -
Create the repeating sequence:
Follow a pattern of: pastel green bead, pink bead, gold spacer, yellow bead, peach bead. -
Continue the sequence:
Repeat the pattern—green, pink, gold spacer, yellow bead pink/peach—adjusting the specific color order to look random yet balanced. Aim for a ‘confetti’ look rather than a strict stripe. -
Check the fit:
Wrap the unfinished bracelet around your wrist. The ends should touch comfortably without stretching the elastic too much. Add or remove the matte beads as needed for your size. -
Finish the loop:
End your beading sequence with a gold spacer bead so it mirrors the start of the strap section.
Step 4: Finishing Touches
-
Pre-stretch the cord:
Gently pull tightly on both ends of the elastic a few times. This pre-stretching prevents the bracelet from loosening up after the first time you wear it. -
Tie the knot:
Remove the tape or stopper. Tie a strong surgeon’s knot (right over left, left over right, and loop through an extra time). -
Secure the knot:
I prefer to add a tiny drop of jewelry adhesive to the knot for extra security. Let it dry for a distinct moment before trimming. -
Hide the mechanism:
Trim the excess cord close to the knot. If the hole of a neighboring bead is large enough, gently tug the knot inside to hide it.
Enjoy wearing your slice of summer sunshine
Citrus Color-Block Bracelet
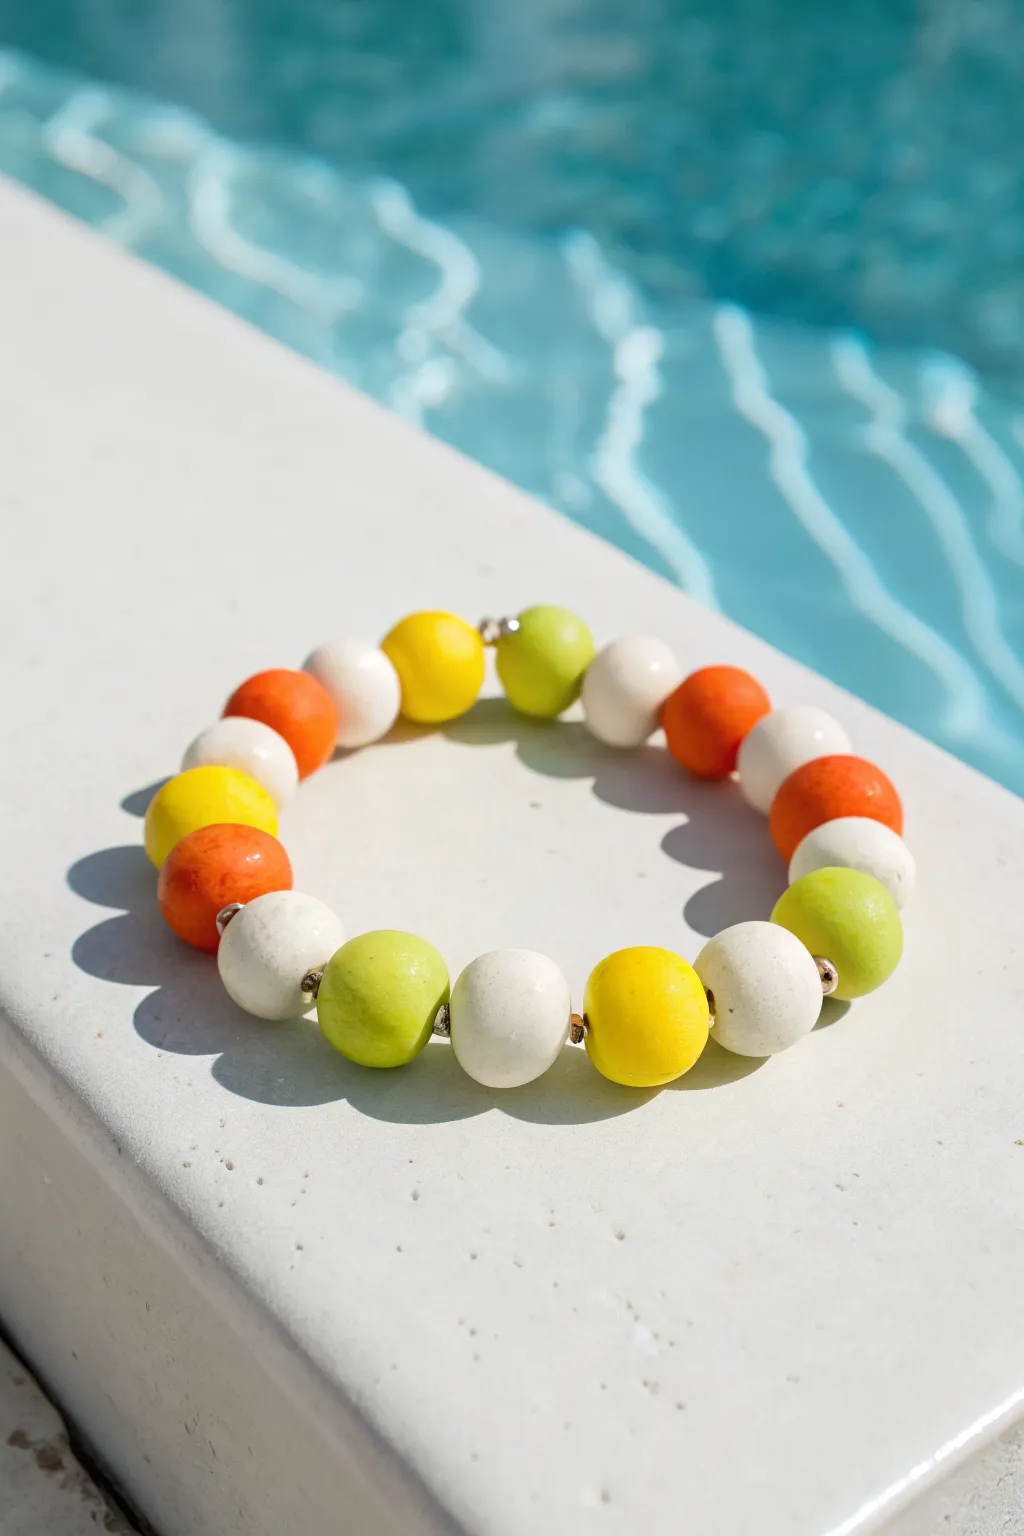
Capture the essence of a refreshing summer day with this chunky beaded bracelet featuring a vibrant citrus palette. The simple color-blocking pattern mimics lime, orange, and lemon slices against clean white, perfect for wearing right by the water.
Step-by-Step Tutorial
Materials
- Large round polymer clay beads (12mm or 14mm)
- Stretch cord (0.8mm or 1mm thickness)
- Acrylic paints: White, Bright Yellow, Lime Green, vibrant Orange
- Paintbrushes (small detail brush and medium flat brush)
- Small crumpled piece of aluminum foil
- Skewers or toothpicks (for bead drying)
- Super glue or jewelry knot cement
- Scissors
- Small metal spacer beads (silver or gold, optional)
Step 1: Prepping and Painting the Beads
-
Select your beads:
Gather about 16-18 large round wooden or plain unfinished clay beads. If you are starting with raw polymer clay, roll uniform balls and poke holes through them before baking according to package instructions. -
Set up a painting station:
Place your beads on skewers or toothpicks. This makes it much easier to paint the entire surface without getting fingerprints on the wet paint. -
Apply the white base:
Paint roughly one-third of your beads with a solid coat of white acrylic paint. You may need two coats to get full opacity. -
Create the citrus shades:
Paint the remaining beads in your yellow, lime green, and orange shades. Aim for an equal distribution: usually 3-4 beads per color. -
Add texture (optional):
Once the base coats are tacky but almost dry, take a crumpled ball of foil and gently dab the surface of the beads. This creates that slight ‘citrus rind’ texture visible in the reference. -
Let them dry completely:
Stand the skewers in a jar or foam block so the beads don’t touch anything while drying. Wait at least one hour.
Step 2: Designing the Pattern
-
Plan the layout:
Lay your dried beads out on a flat surface or a bead board. The pattern shown uses a color-blocking technique rather than a perfectly repeating sequence. -
Group the colors:
Try grouping two similar colors together, separated by a white bead. For example: Orange, White, Yellow, Orange, White, Green. -
Check the variation:
Ensure no two identical colored beads touch directly unless you specifically want a ‘double bead’ look. Using white as a spacer keeps the colors popping. -
Insert metal spacers:
If you are using tiny metal spacer beads, place them sporadically between some of the large colored beads to add a hint of shine.
Paint Durability Tip
For a finish that withstands splashes, apply a coat of matte or satin varnish over the beads after the paint dries but before stringing.
Step 3: Stringing and Finishing
-
Cut the cord:
Cut a piece of stretch cord about 10-12 inches long. I always cut extra to make knotting easier at the end. -
Pre-stretch the cord:
Give the cord a few gentle tugs. This ‘pre-stretching’ technique prevents the bracelet from loosening up the first time you wear it. -
Thread the beads:
String your beads onto the cord following your laid-out pattern. Be careful with the hand-painted beads to avoid scratching the paint. -
Check the fit:
Wrap the strung beads around your wrist to check the size. Add or remove beads as necessary for a comfortable fit. -
Tie the knot:
Tie a surrealist knot or a square knot. Pull it tight, ensuring there are no gaps between the beads. -
Secure the knot:
Add a tiny drop of super glue or jewelry cement directly onto the knot. Let it dry for a few minutes. -
Hide the knot:
Trim the excess cord ends close to the knot. If the holes in your beads are large enough, gently tug the cord to pull the knot inside one of the adjacent beads.
Mix Up The Scale
Add visual interest by mixing 12mm beads with slightly larger 16mm focal beads in the brightest citrus color.
Slip on your new bracelet and enjoy the pop of happy color all summer long

TRACK YOUR CERAMIC JOURNEY
Capture glaze tests, firing details, and creative progress—all in one simple printable. Make your projects easier to repeat and improve.
Smiley Center Bead Summer Bracelet
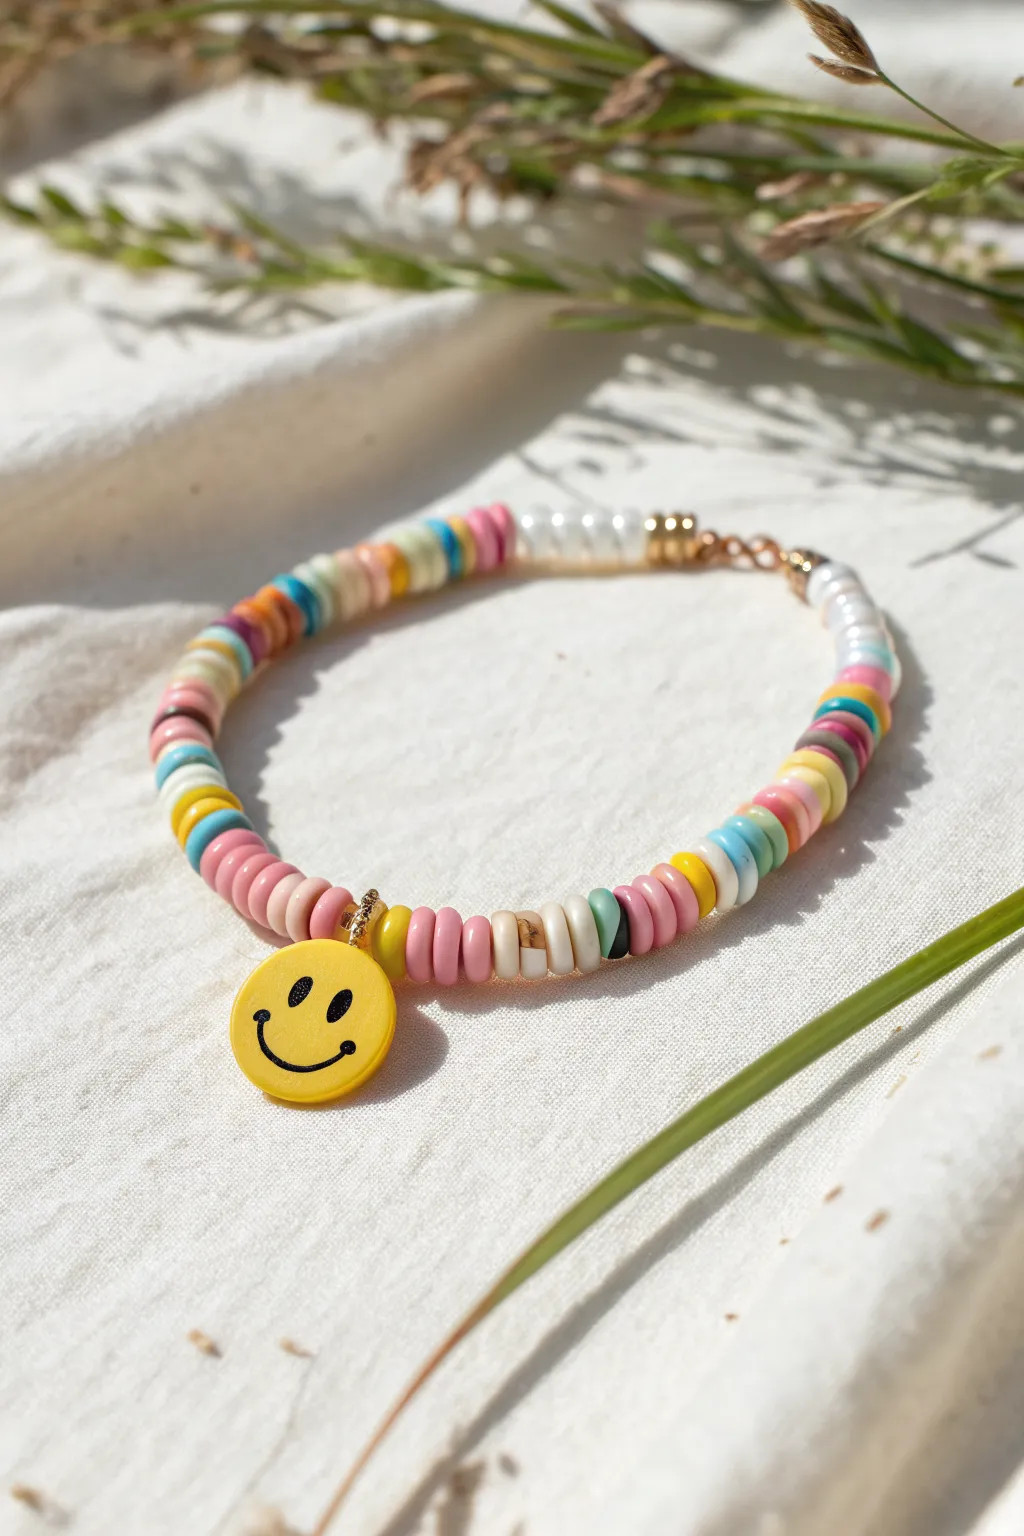
Bring a burst of joy to your wrist with this cheerful summer accessory featuring a bright yellow smiley face charm. The playful mix of pastel clay discs, faux pearls, and gold accents creates a perfect balance of fun and elegance.
Step-by-Step
Materials
- Polymer clay disc beads (heishi beads) in assorted pastel colors: pink, yellow, blue, teal, white, mint
- Small white faux pearl beads (approx 4mm)
- Yellow smiley face charm
- Gold open jump ring (4-6mm)
- Gold crimp beads or small gold spacer beads
- Beading wire or strong elastic cord
- Gold lobster clasp
- Gold extension chain
- Jewelry pliers (flat nose and cutting pliers)
- Crimp tubes (if using beading wire)
Step 1: Planning Your Pattern
-
Lay out the charm:
Place your smiley face charm in the center of your workspace. This will be the focal point of the bracelet. -
Establish the color blocks:
To the immediate left and right of the charm, plan for a section of solid pink clay beads to frame the yellow face. -
Mix the colors:
Beyond the pink sections, arrange a random but balanced mix of pastel colors—yellows, teals, blues, and whites—interspersed with occasional darker contrast beads. -
Plan the pearl finish:
Select about 6-8 small faux pearls for one end of the bracelet. This asymmetrical touch adds a classy finish near the clasp.
Step 2: Stringing the Beads
-
Prepare your cord:
Cut a length of beading wire or elastic cord about 9-10 inches long to give yourself plenty of room to work. -
Secure the first end:
If using wire, thread a crimp tube and one part of your clasp (either the lobster or the extension chain) onto one end. Loop the wire back through the crimp tube and use flat nose pliers to squash it flat securely. -
Start with pearls:
Begin stringing from the clasp end with your small section of white faux pearls. Add a small gold spacer bead after the pearls for a metallic transition. -
Begin the clay pattern:
Start threading your mixed pastel clay beads. Create small clusters of colors, perhaps 2-3 beads of the same color before switching, to mimic the organic feel of the original. -
Add gold accents:
Every inch or so, slip in a thin gold spacer bead or a single white bead to break up the color blocks.
Pro Tip: Flexibility is Key
Don’t pull the wire too tight before crimping! I leave a tiny 1-2mm gap so the stiff clay discs can curve comfortably around the wrist without buckling.
Step 3: Adding the Feature Charm
-
Attach the jump ring:
Open your gold jump ring by twisting it sideways with pliers. Hook the loop of the smiley face charm onto it, then close the ring securely. -
Position the center:
Once you have strung about half the bracelet’s length in clay beads (ending with your planned pink section), slide the jump ring with the charm onto the wire. -
Continue stringing:
Resume beading on the other side of the charm, starting with the matching pink section to mirror the other side. -
Finish the pattern:
Continue with your mixed pastel pattern until the bracelet reaches your desired length (usually about 6.5 to 7 inches for an average wrist).
Level Up: Personalized Glam
Replace the random pastel section with gold letter beads to spell out a name or word like ‘HAPPY’ or ‘SUMMER’ alongside the smiley charm.
Step 4: Finishing Touches
-
Check the fit:
Wrap the unfinished strand around your wrist to ensure the size is correct and the charm sits pleasingly in the middle. -
Add final spacers:
Add a final gold spacer bead or crimp bead at the very end of your bead strand. -
Secure the second end:
Thread a crimp tube and the remaining part of your clasp assembly onto the wire. -
Loop and crimp:
Pass the wire back through the crimp tube and pull it tight, ensuring there is no slack in the beads but enough room for them to move. -
Trim excess wire:
Flatten the crimp tube firmly with pliers. Snip off the excess wire tail as close to the bead as possible using cutting pliers.
Enjoy wearing your dash of sunshine and sharing the smiles all summer long
Personalized Summer Word Bracelet
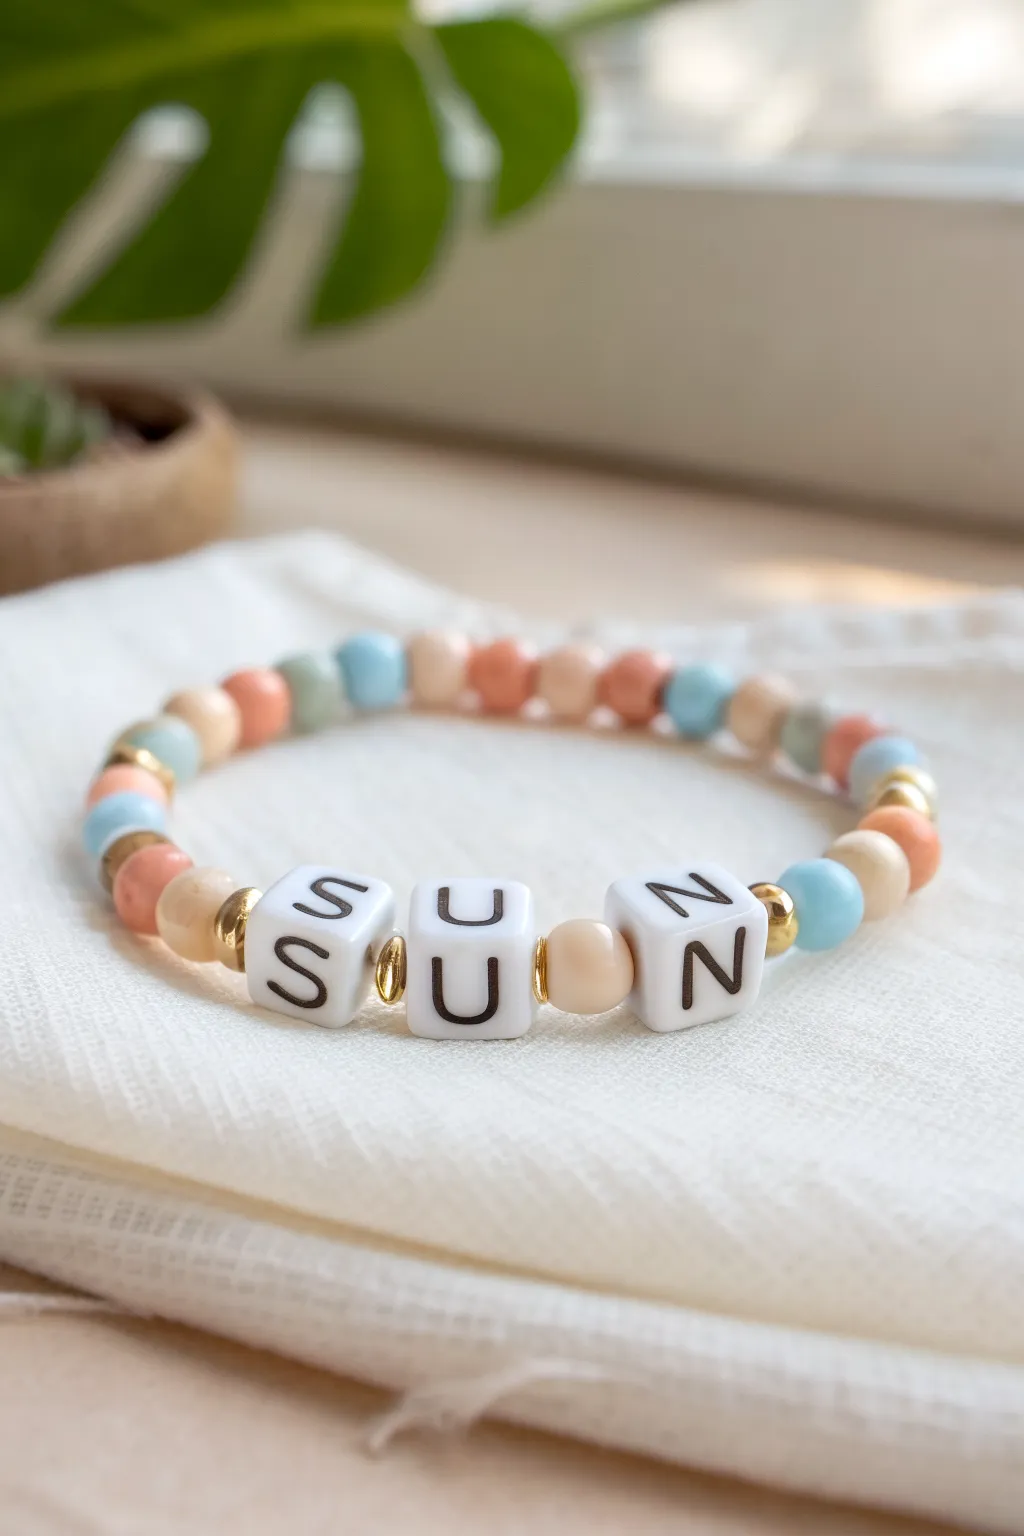
Capture the warmth of a perfect summer day with this dainty beaded bracelet featuring a charming ‘SUN’ centerpiece. The soft pastel palette of peach, sky blue, and cream pairs beautifully with gold accents for a look that is both relaxed and radiant.
Step-by-Step Tutorial
Materials
- Elastic stretch cord (0.7mm or 0.8mm typical)
- Round beads (6mm or 8mm) in peach/coral
- Round beads (6mm or 8mm) in light blue
- Round beads (6mm or 8mm) in beige/cream
- Square white alphabet beads (black lettering) – ‘S’, ‘U’, ‘N’
- Small gold spacer beads or rings (approx 3-4mm)
- Scissors
- Jewelry glue or clear nail polish
- Bead stopper or tape
- Beading needle (optional, for easier threading)
Step 1: Planning and Layout
-
Measure your wrist:
Before cutting anything, wrap a piece of string around your wrist to find your comfortable size. Add about 3-4 inches to this measurement to ensure you have plenty of slack for tying the knot later. -
Cut the cord:
Cut your elastic cord based on the measurement you just took. I always prefer to cut a little extra than to struggle with short ends. -
Secure the end:
Place a bead stopper or a piece of masking tape on one end of the cord to prevent your beads from sliding right off as you work. -
Pre-stretch the cord:
Give your elastic cord a few gentle tugs. This pre-stretching helps prevent the bracelet from loosening up immediately after you finish wearing it for the first time.
Knot Slipping?
If your elastic knot keeps untying before you can glue it, keep tension on the cord while tying. Using a textured cord rather than a smooth clear one also adds friction.
Step 2: Creating the Focal Point
-
Start the center:
Locate the middle of your design by starting with the word ‘SUN’. Thread on the letter beads: first ‘N’, then ‘U’, then ‘S’ if working from right to left, or vice versa depending on your hold. -
Add first spacers:
Slide one gold spacer ring onto the cord immediately following the ‘N’ bead, and another gold spacer before the ‘S’ bead. These gold accents frame the word beautifully. -
Add inner beads:
Next to the gold spacer on the right side (by that N), add one cream/beige bead. Do the same on the left side (next to the S). -
Add second spacers:
Slide another gold spacer ring onto the cord after each of those cream beads you just placed. This creates a symmetrical ‘bead-spacer-bead’ pattern extending from the center.
Step 3: Building the Pattern
-
Establish the sequence:
The pattern shown uses a random but balanced mix. A good rhythm is to alternate colors: pick up a blue bead, then a peach/coral bead, then perhaps a cream one. -
Thread the left side:
On the left side of your centerpiece, string roughly 8-10 colored beads. Mix the order—maybe two blues, a peach, a cream, then a blue—to keep it looking organic and relaxed. -
Thread the right side:
Repeat the process on the right side with another 8-10 colored beads. Try not to mirror the left side exactly; random placement looks more effortless. -
Incorporate gold accents:
Every few inches, slip in a gold spacer ring between two colored beads. This carries the metallic shine from the center all around the wrist. -
Check the length:
Wrap the unfinished strand around your wrist to check the fit. If there are gaps, add a few more beads to each end until the ends meet comfortably without stretching the cord.
Level Up Your Stack
Make two more bracelets using just the colored beads and gold accents without words. Wear them as a set of three for a chunky, colorful arm party.
Step 4: Finishing Touches
-
Prepare the knot:
Remove the tape or bead stopper carefully while holding both ends of the elastic securely. -
Tie the surgeon’s knot:
Cross the ends, wrap one end under the other twice, and pull tight. Repeat this knotting process 2-3 times for security. -
Secure with glue:
Place a tiny dab of jewelry glue or clear nail polish on the knot. Let this dry completely before moving it; this prevents the slick elastic from unraveling. -
Hide the knot:
Once dry, clip the excess string close to the knot. Gently tug the bracelet so the knot slides inside the hole of the nearest large bead to hide it.
Enjoy wearing your new bracelet as a little reminder of sunny days ahead
Nautical Stripe Navy-and-White
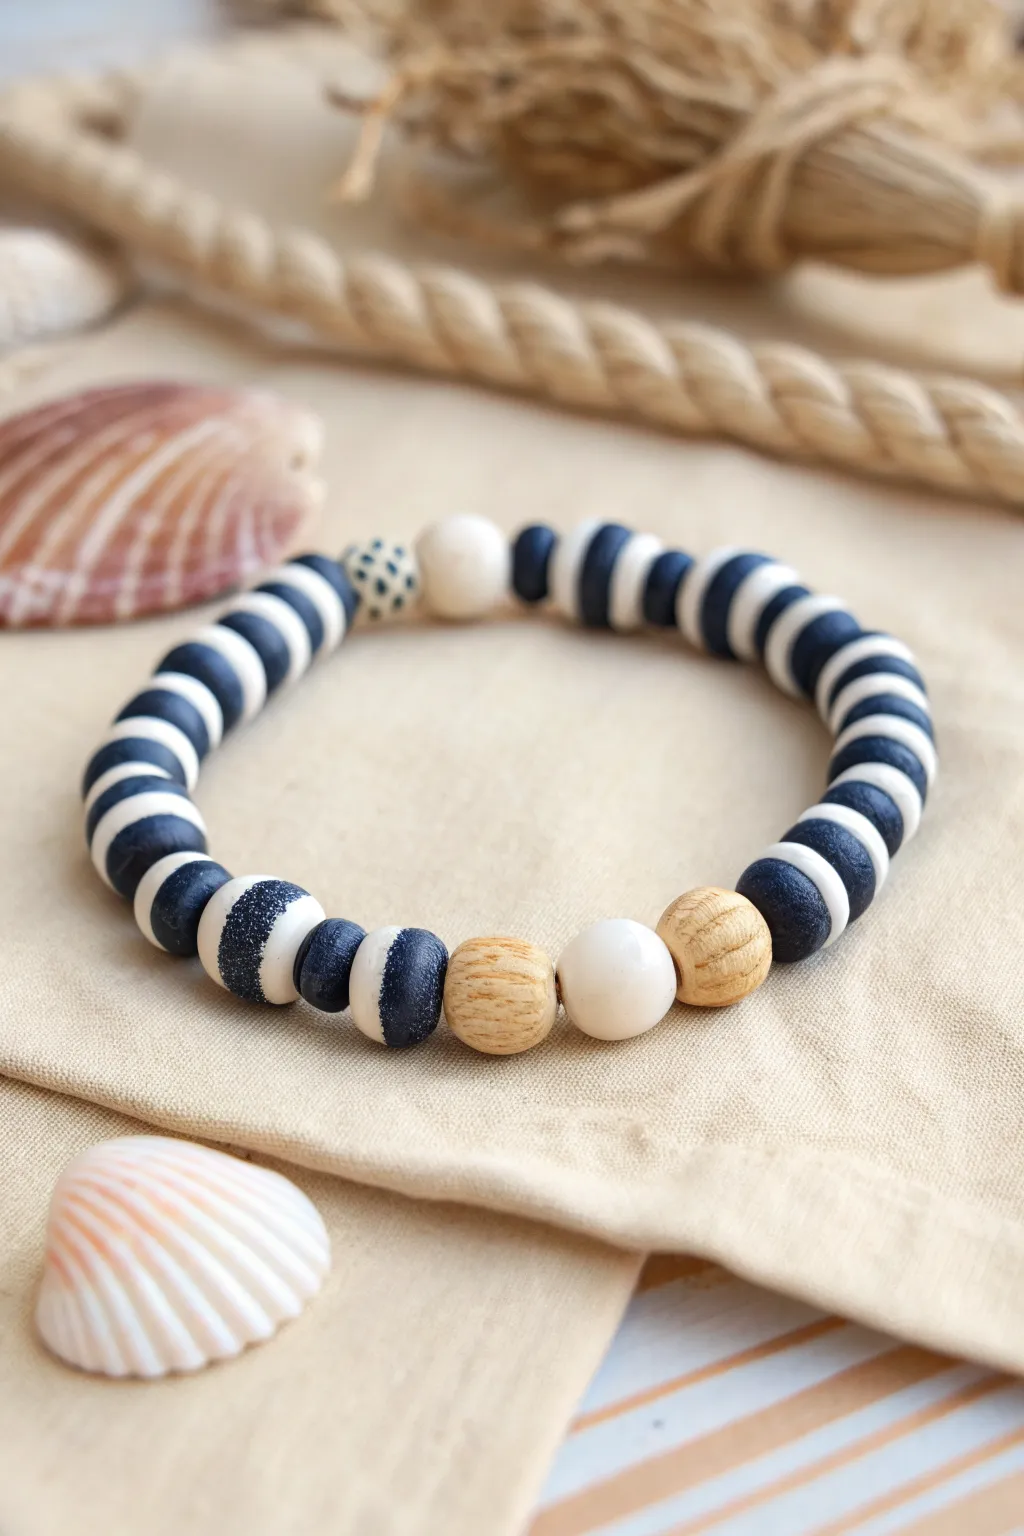
Embrace the timeless appeal of the seaside with this classic navy and white striped bracelet. Featuring a mix of bold striped clay beads, natural wood accents, and a smooth white focal bead, this accessory perfectly captures a crisp, nautical summer aesthetic.
Detailed Instructions
Materials
- Navy blue and white striped clay beads (approx. 8mm disc or rondelle shape)
- 2 Natural light wood beads (8-10mm round)
- 1 Smooth white focal bead (10mm round, acrylic or ceramic)
- 1 Speckled grey/white transition bead (optional)
- 1 Small cream spacer bead
- Strong elastic cord (0.8mm or 1mm)
- Jewelry glue (E6000 or Hypo Cement)
- Scissors
Step 1: Preparation
-
Measure your wrist:
Wrap a piece of string around your wrist to find the circumference, then add about half an inch for a comfortable fit. -
Cut the elastic:
Cut a length of elastic cord about 10-12 inches long. Having this extra length makes tying the knot significantly easier at the end. -
Pre-stretch the cord:
Give the elastic a few firm tugs before you start beading. This ‘pre-stretching’ helps prevent the bracelet from loosening up immediately after you wear it. -
Lay out the design:
Arrange your beads on a bead board or a towel in the order shown in the photo. This lets you check the symmetry and make sure the pattern fits your measured length.
Use Bead Stoppers
Clip a binder clip or tape the end of your elastic to the table so beads don’t slide off while you work.
Step 2: Creating the Focal Section
-
Start the sequence:
Begin threading your beads onto the elastic. I prefer to start right in the middle of the focal point so the knot ends up hidden in the back, but you can also start at the focal point itself. -
Thread the wood anchor:
Slide on one of the natural wooden beads. These act as bookends for your central white bead. -
Add the centerpiece:
Thread the large, smooth white focal bead next to the wood bead. -
Complete the center:
Add the second wooden bead on the other side of the white focal bead. You should now have a Wood-White-Wood sequence.
Step 3: Building the Pattern
-
Begin the striped pattern:
Start threading the navy and white striped clay beads on one side of your focal section. Notice that the stripes should align generally, but slight variations give it organic charm. -
Continue threading:
Keep adding the striped beads until you’ve covered about half of the remaining length needed for your wrist. -
Add the back accent:
On the opposite side (or at the back, depending on where you started), thread the speckled transition bead and the small cream spacer bead. This adds a subtle detail to the back of the wrist. -
Finish the loop:
Fill in the rest of the bracelet with the remaining navy and white striped beads until the ends of the elastic meet comfortably around your wrist.
Knot Slipping?
If the elastic feels slippery, rough up the ends slightly with sandpaper before tying to help the knot grip better.
Step 4: Finishing Touches
-
The first knot:
Tie a simple overhand knot with the two ends of the elastic, pulling it tight against the beads without causing them to buckle. -
The surgeon’s knot:
Follow up with a surgeon’s knot: cross the threads, loop one end through twice instead of once, and pull tight. This creates a secure hold. -
Secure with glue:
Apply a tiny dab of jewelry glue specifically to the knot. Be careful not to get glue on the neighboring beads, as it can ruin the finish. -
Hide the knot:
While the glue is still tacky but not wet, gently pull the elastic so the knot slides inside the hole of one of the larger wooden beads or the striped beads. -
Trim the ends:
Once dry, trim the excess elastic cord close to the bead hole using your scissors.
Slide this classic piece onto your wrist and enjoy a bit of nautical flair wherever you go
Starfish or Turtle Charm Accent
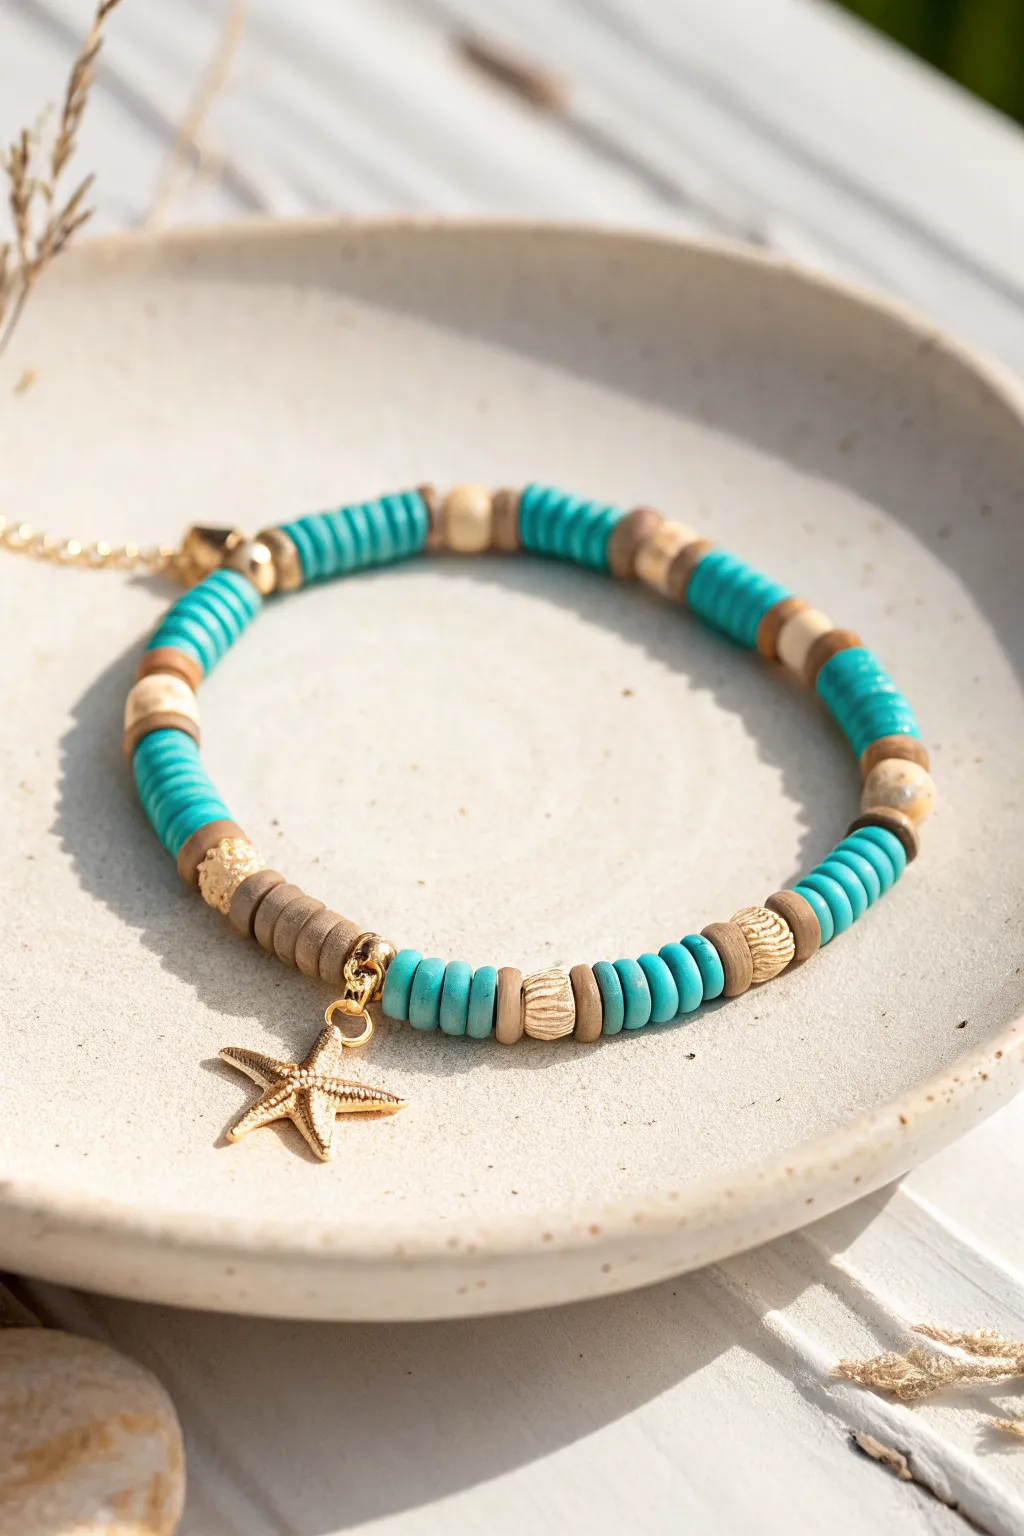
Capture the essence of a beach day with this calming assembly of turquoise heishi beads and earthy wooden accents. The centerpiece is a delicate gold starfish charm that dangles playfully, making this the perfect accessory for your warm-weather wardrobe.
How-To Guide
Materials
- Turquoise polymer clay heishi beads (4-6mm)
- Tan or light brown polymer clay heishi beads (4-6mm)
- Small wooden rondelle beads (natural finish)
- Textured gold spacer beads (round or saucer shape)
- Gold starfish charm with a jump ring
- Elastic stretch cord (0.8mm clear)
- Jewelry glue or clear nail polish
- Scissors
Step 1: Preparation and Planning
-
Measure your wrist:
Wrap a flexible measuring tape or a piece of string around your wrist to find your size. Add about half an inch to this measurement to ensure the finished bracelet fits comfortably without pinching. -
Cut the cord:
Cut a piece of elastic stretch cord that is roughly 10-12 inches long. This generous length gives you plenty of room to string beads and tie the final knot without struggling. -
Stretch the elastic:
Before adding any beads, firmly pull on the elastic cord several times. Pre-stretching prevents the bracelet from sagging or loosening up immediately after you wear it. -
Secure the end:
Attach a piece of tape or a bead clip to one end of your cord. This acts as a stopper so your beads won’t slide right off the other side while you work.
Knot Hiding Trick
Try to arrange your pattern so the knot falls inside one of the gold spacer beads or wooden beads. Their holes appear larger, making it easy to tuck the knot away.
Step 2: Creating the Pattern
-
Start the sequence:
Begin by threading on a block of turquoise heishi beads. Aim for about 5 to 7 beads to create a solid pop of color. -
Add first spacers:
Slide on a single tan heishi bead, followed by a wooden rondelle bead, and then another tan heishi bead. This creates a natural transition between the colors. -
Repeat the turquoise block:
Thread on another segment of 5 to 7 turquoise beads. Try to keep this number consistent with your first block for symmetry. -
Introduce gold accents:
Now, add a textured gold spacer bead. Follow it with a few tan heishi beads—I usually do about three here—and then another gold spacer bead. -
Continue the rhythm:
Go back to your turquoise blocks, alternating between the wooden bead transition and the gold spacer transition until you’ve filled about half the length of the bracelet.
Step 3: The Centerpiece and Finishing
-
Position the charm:
Once you reach the midpoint of your design, pause the regular pattern. Thread a gold spacer bead, followed by three or four tan heishi beads. -
Attach the starfish:
Slide the loop of your gold starfish charm onto the cord so it sits directly against the tan beads. -
Mirror the design:
immediately follow the charm with three or four more tan heishi beads and a gold spacer bead to lock the charm visually in the center. -
Complete the length:
Continue your original pattern of turquoise blocks and alternating spacers until the beaded section matches your wrist measurement. -
Check the fit:
Wrap the unfinished strand around your wrist to double-check the size. Add or remove a bead or two if necessary to get perfect tension. -
Tie the knot:
Remove the tape or clip. Bring both ends together and tie a sturdy surgeon’s knot (right over left, left over right), pulling the elastic tight to eliminate gaps. -
Secure with glue:
Dab a tiny drop of jewelry glue or clear nail polish onto the knot. Let it dry completely before trimming the excess cord close to the knot.
Wonky Pattern?
If the bracelet looks uneven, count your turquoise discs in each section before tying. Clay bead thickness varies, so you might need 6 in one spot and 7 in another.
Slip on your new creation and enjoy the beachy vibes wherever you go
Beach Glass-Inspired Translucent Beads
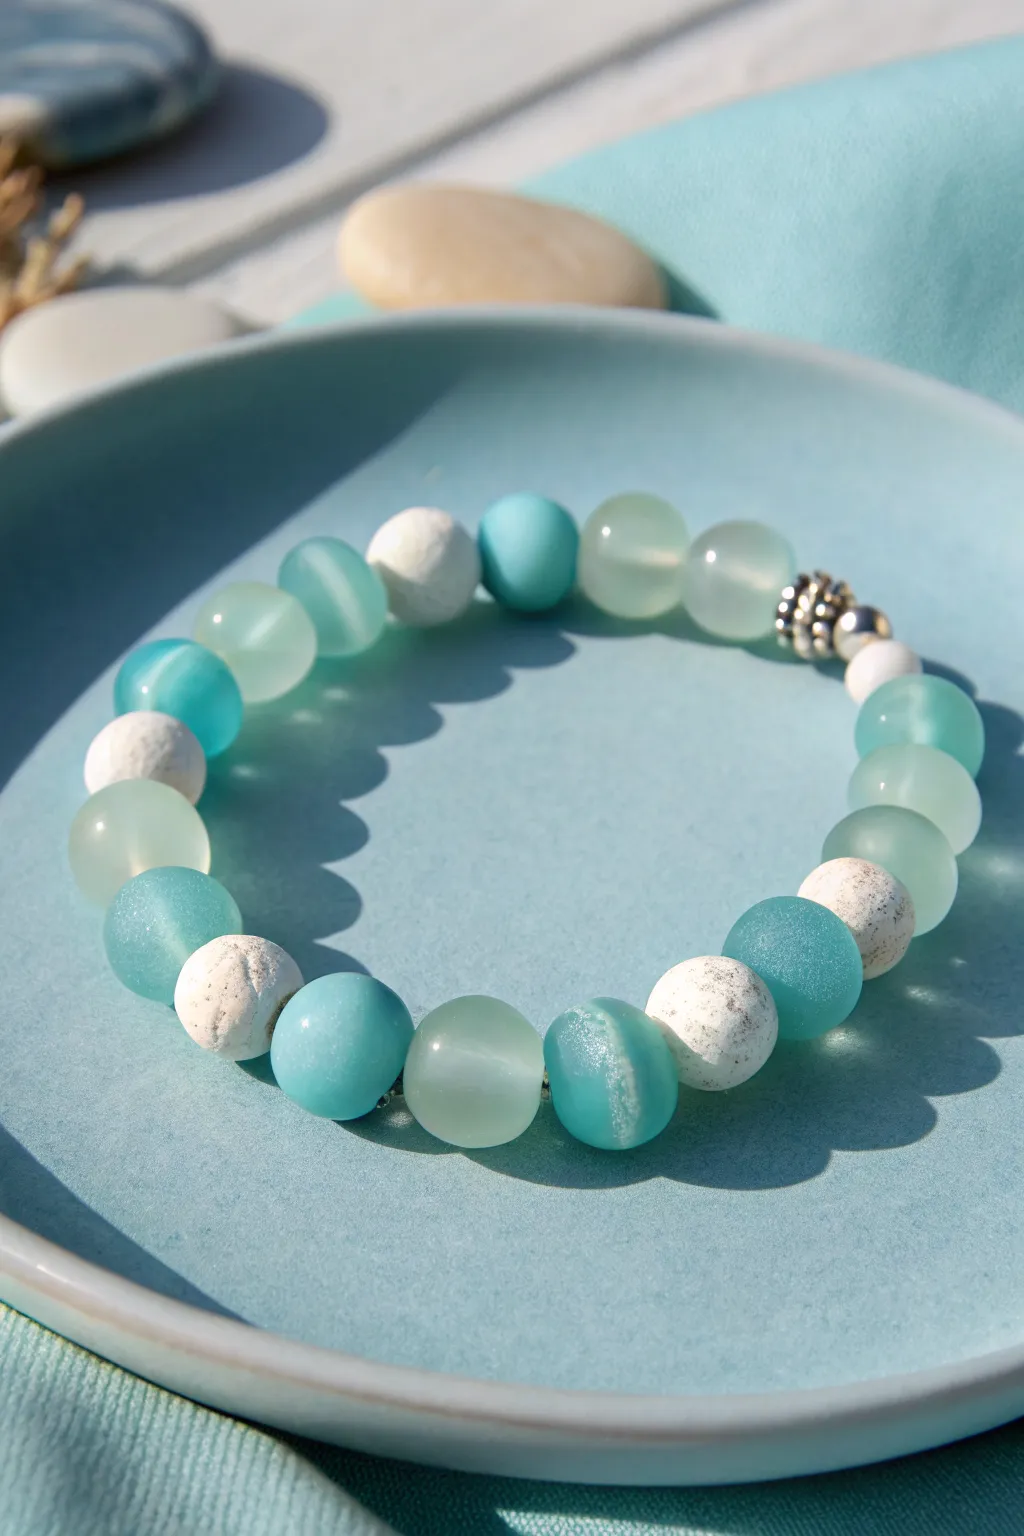
Capture the essence of a tranquil shoreline with this soothing bracelet design that mixes textures and translucency. Combining matte sea-glass style beads with porous white lava stones and polished aqua rounds creates a tactile piece perfect for breezy summer days.
Step-by-Step Guide
Materials
- 8mm translucent matte glass beads (sea foam green)
- 8mm polished agate or jade beads (light teal/aqua)
- 8mm white lava stone beads (porous/pitted texture)
- 8mm frosted glass beads (cornflower blue)
- Silver spacer bead or bead cap (optional)
- Silver accent bail or focal bead
- 0.8mm clear elastic stretch cord
- Bead design board or soft mat
- Jewelry glue (e.g., G-S Hypo Cement)
- Scissors
Step 1: Preparation and Design
-
Measure your wrist:
Before cutting any cord, wrap a measuring tape around your wrist to find your size. Add about 0.5 inches to this measurement for a comfortable fit that isn’t too tight. -
Cut the elastic:
Cut a piece of elastic cord about 10-12 inches long. Having this extra length makes tying the final knot much easier than struggling with short ends. -
Pre-stretch the cord:
Hold the cord between your hands and give it a few firm (but not breaking) tugs. This crucial step prevents the bracelet from stretching out and becoming loose after only a few wears. -
Secure the end:
Place a bead stopper or simply a piece of strong tape on one end of your cord to stop beads from sliding off while you work. -
Plan your pattern:
Lay your beads out on a bead board or a soft towel. The goal is a random but balanced look, alternating between the translucent sea glass, the solid aqua beads, and the textured white lava stones.
Knot Security
Use a surgeon’s knot (looping the tie through twice) for maximum hold. Using a bead with a slightly larger hole next to the knot makes hiding it much easier.
Step 2: Stringing the Beads
-
Start strong:
Begin threading your beads. I like to start with a standard round bead rather than a lava stone, as the knot hides better inside smoother holes. -
Establish the rhythm:
Follow the sequence shown in the photo: group similar colors but break them up with textures. Try a sequence like: one white lava stone, one frosted blue, one translucent green, and one polished aqua. -
Add the focal point:
About halfway through stringing, or wherever you want the visual center, add your silver accent bead or bail. This acts as a metallic anchor for the softer glass colors. -
Check the mixture:
Ensure you aren’t bunching too many of the same bead type together. The beauty of this piece is in the interplay between the pitted lava texture and the smooth, glowing glass. -
Test the length:
Once all beads are strung, carefully wrap the strand around your wrist to check the fit. There should be a little movement, but it shouldn’t slide halfway up your arm.
Aromatic Upgrade
Add a drop of ocean breeze essential oil to the white lava beads. Their porous nature absorbs the scent and acts as a diffuser throughout the day.
Step 3: Finishing Touches
-
Prepare for the knot:
Remove the tape or bead stopper. Bring both ends of the elastic together, ensuring there are no gaps between the beads. -
Tie a surgeon’s knot:
Cross the ends like a regular shoe-tying knot, but loop the top clear end through the bottom loop twice instead of once. Pull tight securely. -
Secure with glue:
Apply a tiny dab of jewelry glue directly onto the knot. Be careful not to get glue on the beautiful matte finish of the adjacent beads. -
Hide the knot:
While the glue is still slightly tacky, gently pull the elastic so the knot slides inside the hole of the nearest bead. This makes the finish seamless. -
Let it cure:
Allow the glue to dry completely—usually at least 15 minutes—before trimming the excess cord ends close to the bead.
Now you have a refreshing wrist accessory that brings a touch of the ocean to any outfit
Sand-and-Sea Neutral Summer Stack
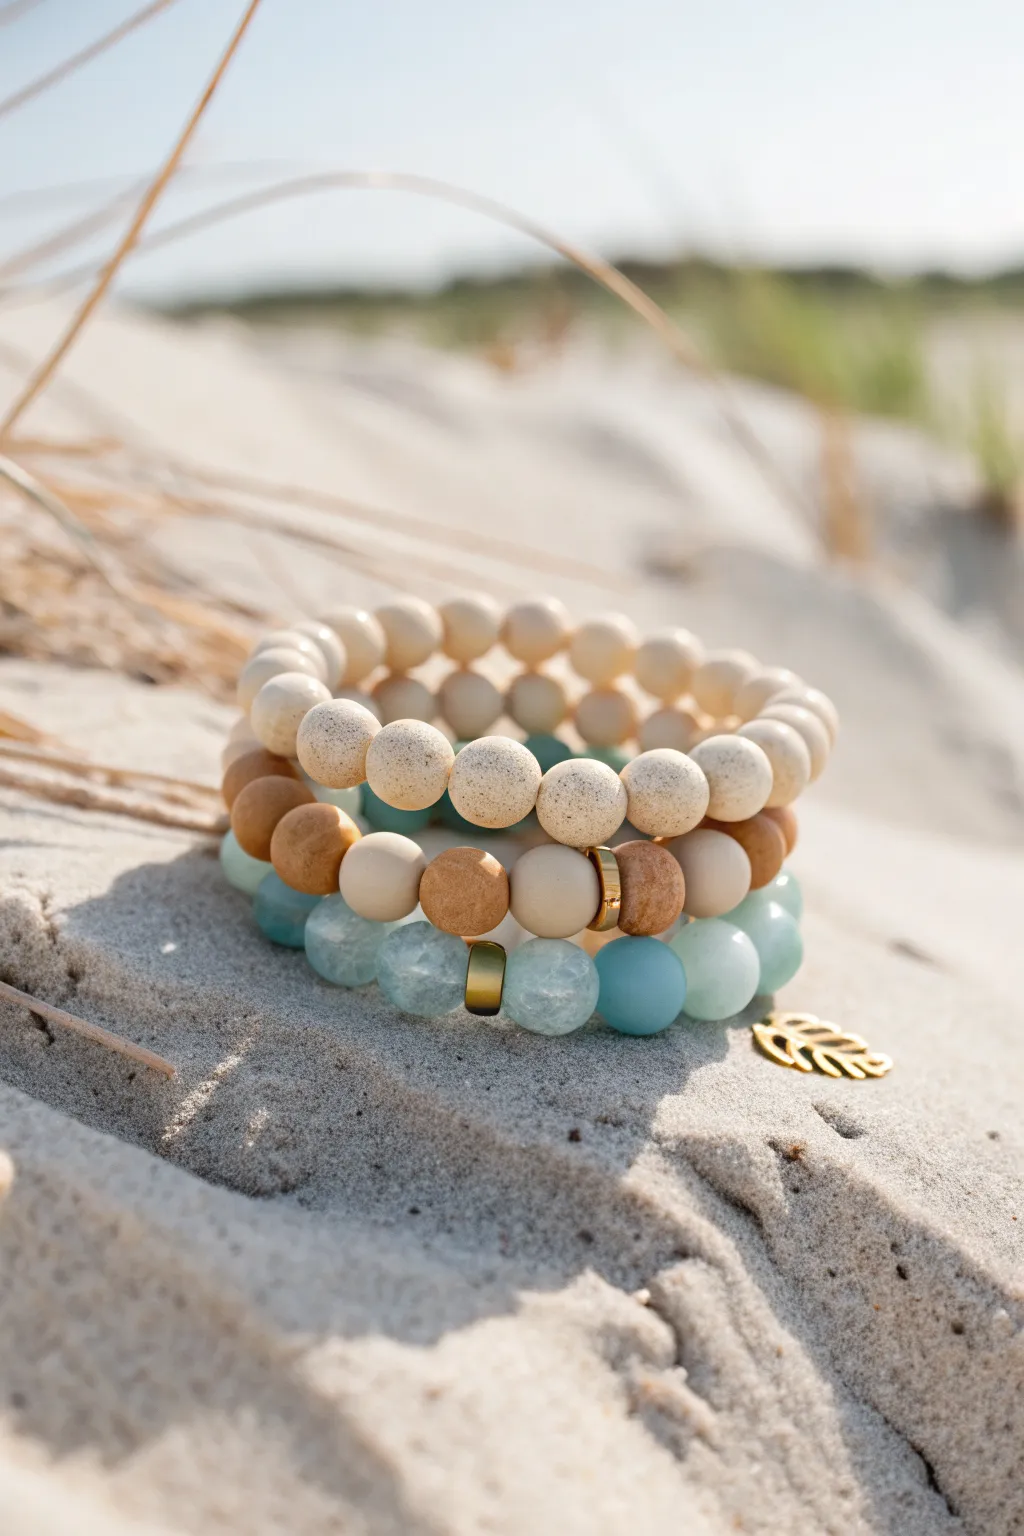
Capture the serene palette of a quiet beach morning with this trio of textured bracelets. Combining sandy beige tones with soft sea-glass blues creates an effortless, natural stack perfect for summer days.
How-To Guide
Materials
- Elastic beading cord (0.7mm or 0.8mm)
- Beige polymer clay or stone beads (matte, speckled finish)
- Blue-green amazonite or jade beads (8mm and 10mm)
- Cream wooden or matte acrylic beads (smooth finish)
- Dark brown wood beads
- Gold flat disc spacer beads
- Gold leaf charm
- Gold jump ring
- Jewelry glue (e.g., E6000 or GS Hypo Cement)
- Scissors
Step 1: The Sandy Base Layer
-
Measure the cord:
Cut a piece of elastic cord about 10-12 inches long. This generous length ensures you have plenty of room to tie knots without struggling. -
Anchor the cord:
Attach a piece of tape or a bead stopper to one end of the cord so your beads don’t slide off into the sand as you work. -
Select textured beads:
For this first bracelet, focus on the speckled beige beads that mimic the texture of sand. These should be roughly 8mm in size. -
String the beads:
Thread the beige beads onto the cord until the design measures about 6.5 to 7 inches, or fits comfortably around your wrist. -
Tie the knot:
Remove the stopper and tie a surgeon’s knot (right over left, left over right, and loop through an extra time) to secure the bracelet. Pull tight. -
Secure and trim:
Place a tiny drop of jewelry glue on the knot. Let it dry for a moment, then trim the excess cord close to the knot.
Knot Security
Pre-stretch your elastic cord by pulling it firmly a few times before stringing. This prevents the bracelet from loosening up after the first wear.
Step 2: The Mixed Texture Middle
-
Prepare the second cord:
Cut another 12-inch length of elastic cord and secure one end as before. -
Plan the pattern:
This layer uses a mix. Alternate between smooth cream beads, dark brown wood beads, and the speckled beige beads. -
Add gold accents:
Insert a gold flat disc spacer bead between select focal beads to add a touch of warmth and separation between the earthy tones. -
Insert the charm:
On this middle strand, slide on a gold jump ring holding your leaf charm. I like to place it so it sits centrally between two contrasting beads. -
Finish the strand:
Continue stringing until you reach the desired length, ensuring the pattern looks balanced on both sides of the charm. -
Knot and glue:
Tie off this bracelet with a strong surgeon’s knot, apply a dab of glue, and trim the ends carefully.
Level Up: Scent Infusion
Use unfinished wood or lava stone beads in the middle stack. Add a drop of coconut or sea salt fragrance oil to them for a sensory experience.
Step 3: The Sea Glass Accent
-
Start the final strand:
Cut your last piece of elastic cord. This layer brings in the color of the ocean. -
Choose blue tones:
Select the semi-translucent blue-green beads. Amazonite or tinted jade works beautifully here to replicate sea glass. -
Incorporate spacers:
String the blue beads, placing a gold disc spacer periodically. Try placing spacers every 4-5 beads for a rhythmic shine. -
Check the fit:
Before tying, wrap the strand around your wrist alongside the other two finished bracelets to ensure the sizes match perfectly. -
Final closure:
Tie your final secure knot, glue it, and trim the excess cord. -
Hide the knot:
Gently tug the elastic so the knot slides inside the hole of the nearest large bead, slipping it out of sight.
Slip on your new stack and enjoy the calming coastal vibes wherever you go
Tiny Daisy Bead Summer Bracelet
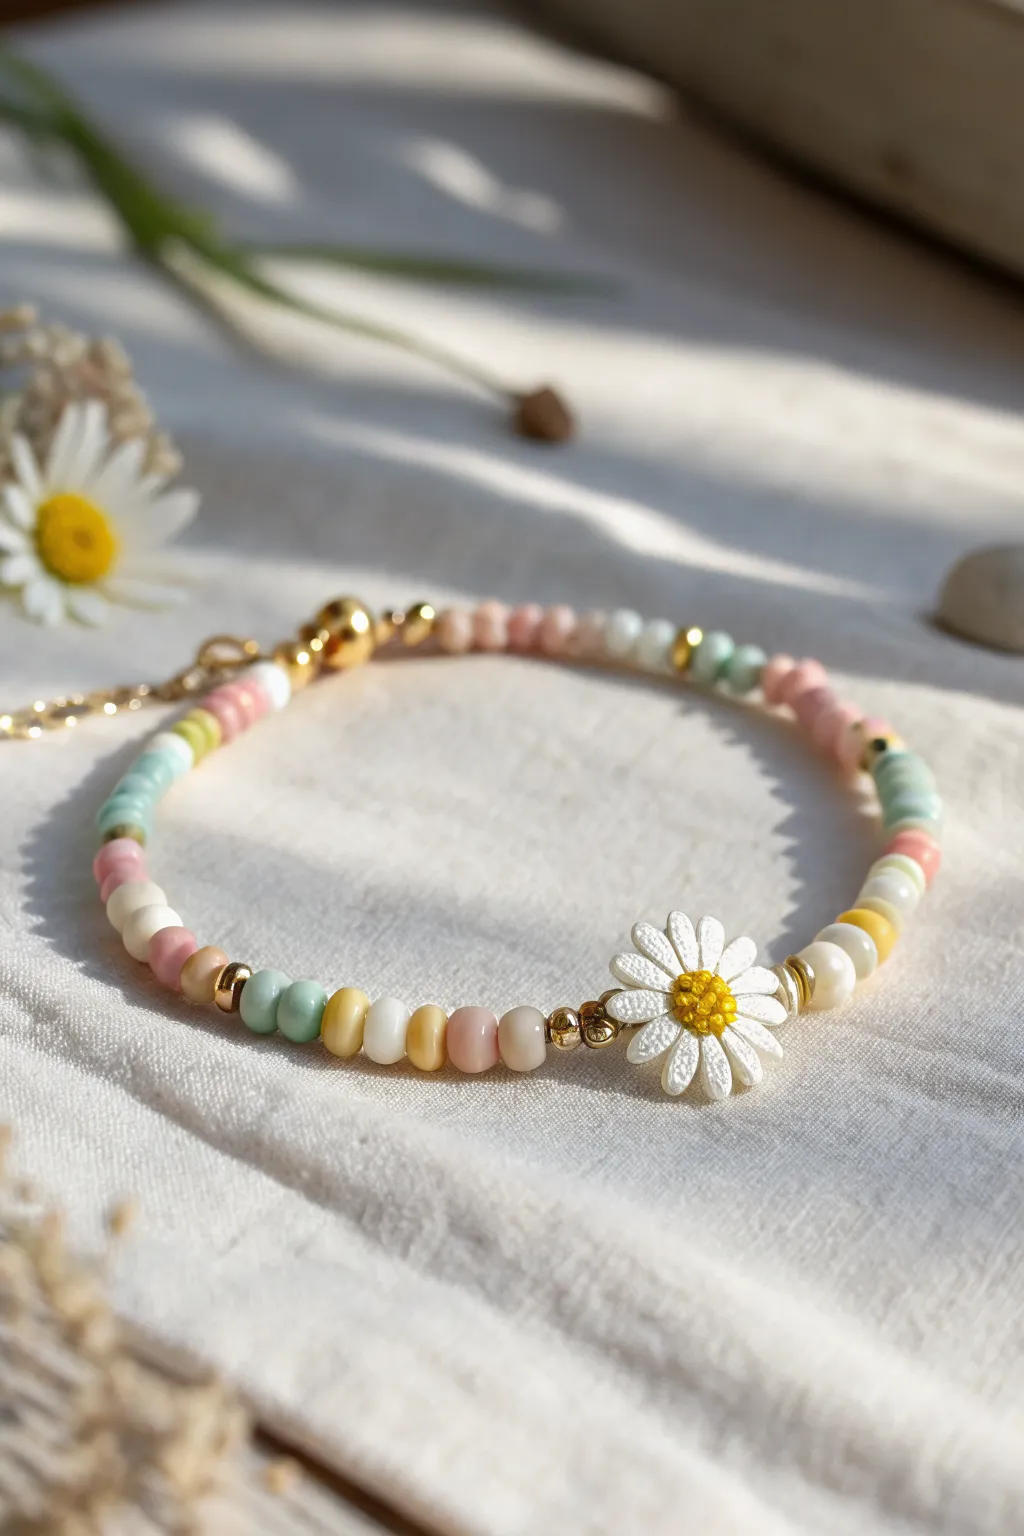
Capture the soft, hazy essence of summer with this delicate pastel seed bead bracelet. Featuring a sweet daisy charm as the centerpiece and interspersed with tiny gold accents, this accessory feels like wearing a meadow on your wrist.
Step-by-Step
Materials
- Size 8/0 seed beads (pastel pink, peach, yellow, mint green, white, cream)
- Gold spacer beads (small, round, approx. 2-3mm)
- Daisy charm (white enamel with yellow center, single loop)
- Beading wire or strong stretch cord (0.5mm – 0.7mm)
- 2 small gold crimp beads
- 2 gold jump rings
- Gold lobster clasp
- Extension chain (optional)
- Crimping pliers
- Wire cutters
- Measuring tape
Step 1: Planning Your Palette
-
Select your colors:
Gather your pastel seed beads. For this look, you want a soft, milky palette. Choose colors like buttercream yellow, baby pink, mint green, and pale peach. -
Determine length:
Measure your wrist and add about half an inch for a comfortable fit. Since we are using a clasp, accuracy helps, though an extender chain can offer flexibility later. -
Prepare the wire:
Cut a piece of beading wire about 4 inches longer than your desired finished length. This gives you plenty of room to work with the clasp ends without frustration.
Step 2: Starting the Strand
-
Attach the first clasp component:
Thread a crimp bead onto one end of the wire, followed by a jump ring (and your lobster clasp if attaching directly). -
Secure the wire:
Loop the wire back through the crimp bead to create a small loop holding the hardware. Use your crimping pliers to flatten the crimp bead securely. -
Begin the bead pattern:
Start threading your seed beads. I like to begin with a random but balanced mix—try a pattern like ‘pink, white, peach’ to warm up the design. -
Insert gold spacers:
every 5 to 7 colorful beads, slide on a small gold spacer bead. This breaks up the pastels and adds that subtle shimmer seen in the photo.
Loose loops?
If your wire loop near the clasp is too large, the hardware will slide around awkwardly. Pull the tail end tight with pliers before crimping to shrink the loop down close to the clasp.
Step 3: Adding the Centerpiece
-
Reach the midpoint:
Continue your bead and spacer pattern until you have reached the halfway point of your bracelet’s length. -
Frame the daisy:
Just before the charm, add a specific sequence to highlight it: one gold spacer, one white bead, then another gold spacer. -
Attach the daisy charm:
Slide your daisy charm onto the wire so it sits right in the middle. -
Mirror the frame:
Immediately after the charm, add a gold spacer, a white bead, and another gold spacer to create symmetry around the flower.
Fresh Flowers
Instead of a metal charm, create a beaded daisy! Thread 4 white beads, 1 yellow, loop back through first white, add 2 more white, and thread through fourth white.
Step 4: Completing the Circle
-
Finish the beading:
Resume your random pastel pattern for the second half of the bracelet. Try to mirror the color density of the first side, but don’t worry about being perfectly symmetrical with the color order. -
Check the fit:
Wrap the unfinished strand around your wrist to verify the length. Add or remove a few beads if necessary. -
Add final hardware:
Thread on your second crimp bead, followed by the ring for your extension chain or the receiving jump ring. -
Secure the loop:
Pass the tail of the wire back through the crimp bead and into the last 1-2 seed beads you strung. -
Crimp and trim:
Pull the wire taut (but leave a tiny bit of wiggle room so the bracelet isn’t stiff), crimp the bead flat with your pliers, and trim the excess wire close to the beads.
Enjoy the gentle pop of color this sweet floral accessory adds to your day
Poolside Checkerboard Tile Beads
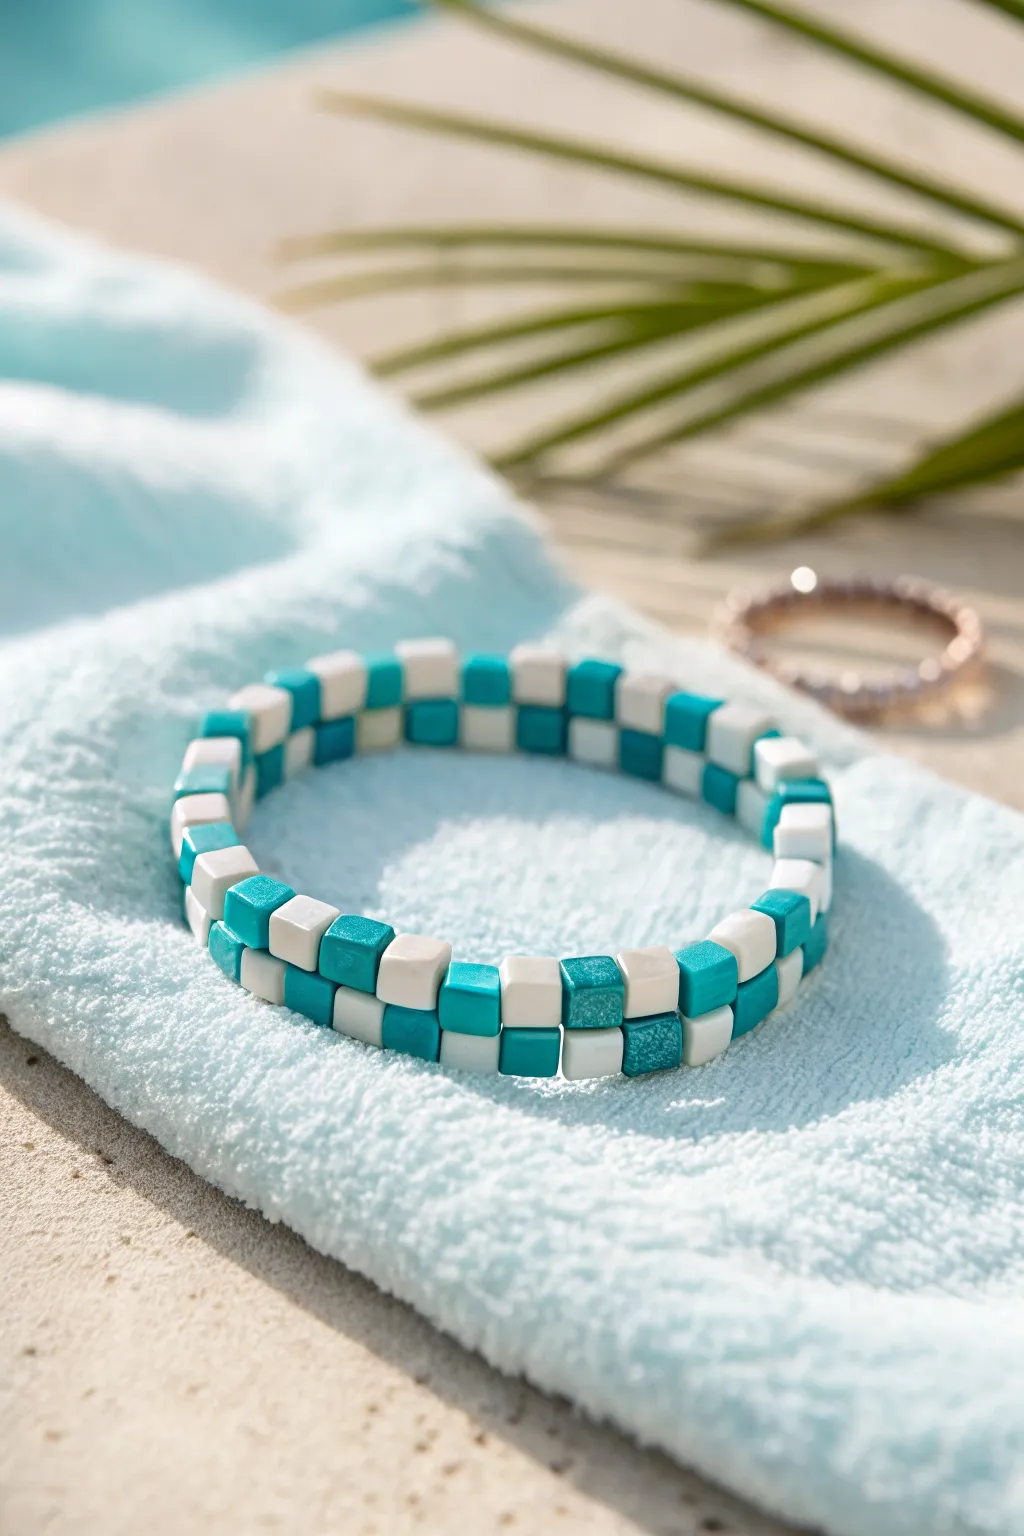
Capture the essence of a refreshing dip in the pool with this vibrant checkerboard bracelet. Using two-hole tile beads in crisp white and shimmering turquoise creates a modern, geometric accessory that feels perfectly summery.
How-To Guide
Materials
- 5mm two-hole square tile beads (Turquoise/Teal)
- 5mm two-hole square tile beads (White)
- 0.5mm or 0.8mm elastic stretch cord (clear)
- Hypo-cement or strong jewelry glue
- Scissors
Step 1: Preparation
-
Cut the cord:
Cut two equal lengths of elastic cord, each about 12 inches long. This generous length gives you plenty of room to tie secure knots later without struggling with tight ends. -
Pre-stretch:
Hold the ends of each cord piece and give them a few firm tugs. Pre-stretching prevents the bracelet from loosening up and becoming baggy after you wear it a few times. -
Align the cords:
Lay the two cords parallel to each other on your work surface. To keep things organized, I sometimes tape one end of both cords down to the table so they don’t slide around while I’m beading.
Wobbly Bracelet?
If the bracelet twists, your elastic tension is uneven. Ensure both cords are pulled equally tight before knotting. One loose cord causes the row to buckle.
Step 2: Beading the Pattern
-
Start the checkerboard:
Pick up a turquoise tile bead. Thread the top cord through the top hole of the bead and the bottom cord through the bottom hole of the same bead. -
Add the contrast:
Next, pick up a white tile bead. Thread the top cord through its top hole and the bottom cord through its bottom hole. Push it down so it sits flush against the turquoise bead. -
Check the alignment:
Ensure both beads are facing the same way (shiniest side up) and that the cords aren’t twisted between the beads. The beads should stack neatly side-by-side. -
Continue the pattern:
Repeat the process, alternating between one turquoise bead and one white bead. Always feed both cords through their respective holes simultaneously to maintain the parallel structure. -
Maintain tension:
Every few inches, pause to push the beads gently together. You want them touching snugly, but not so tight that the bracelet starts to buckle or curve weirdly. -
Measure length:
Wrap the beaded section around your wrist to check the fit. Aim for the ends to just meet without stretching the elastic, as the beads themselves don’t stretch. -
Finish the sequence:
Ensure your pattern ends on a white bead (if you started with turquoise) so the checkerboard pattern remains continuous when joined.
Step 3: Finishing Touches
-
Prepare to tie:
Remove any tape holding the cords. Bring the two ends of the bracelet together, creating a circle. -
Tie the top row:
Take the two ends of the *top* cord only. Tie a simple overhand knot, pulling it down close to the beads but not overly tight yet. -
Tie the bottom row:
Repeat this with the two ends of the *bottom* cord, tying a preliminary overhand knot. -
Secure the knots:
Go back to the top cord and tie a surgical knot (loop it through twice instead of once) or a square knot. Pull it very tight. Repeat firmly for the bottom cord. -
Apply adhesive:
Dab a tiny drop of jewelry glue or Hypo-cement onto each knot. Be careful not to get glue on the visible face of the beads. -
Hide the knots:
While the glue is still slightly tacky but not wet, gently pull the cord so the knots slide inside the hole of the nearest bead. -
Trim excess:
Once dry, use your scissors to snip the excess elastic tails as close to the bead hole as possible without nicking the knot itself.
Pro Tip: Bead Check
Check bead holes before stringing! Sometimes coating clogs them. Use a pin or needle to clear any blockages so you don’t struggle mid-thread.
Slip on your new waterproof accessory and enjoy the cool, tiled texture against your wrist
Asymmetrical Vacation Souvenir Mix
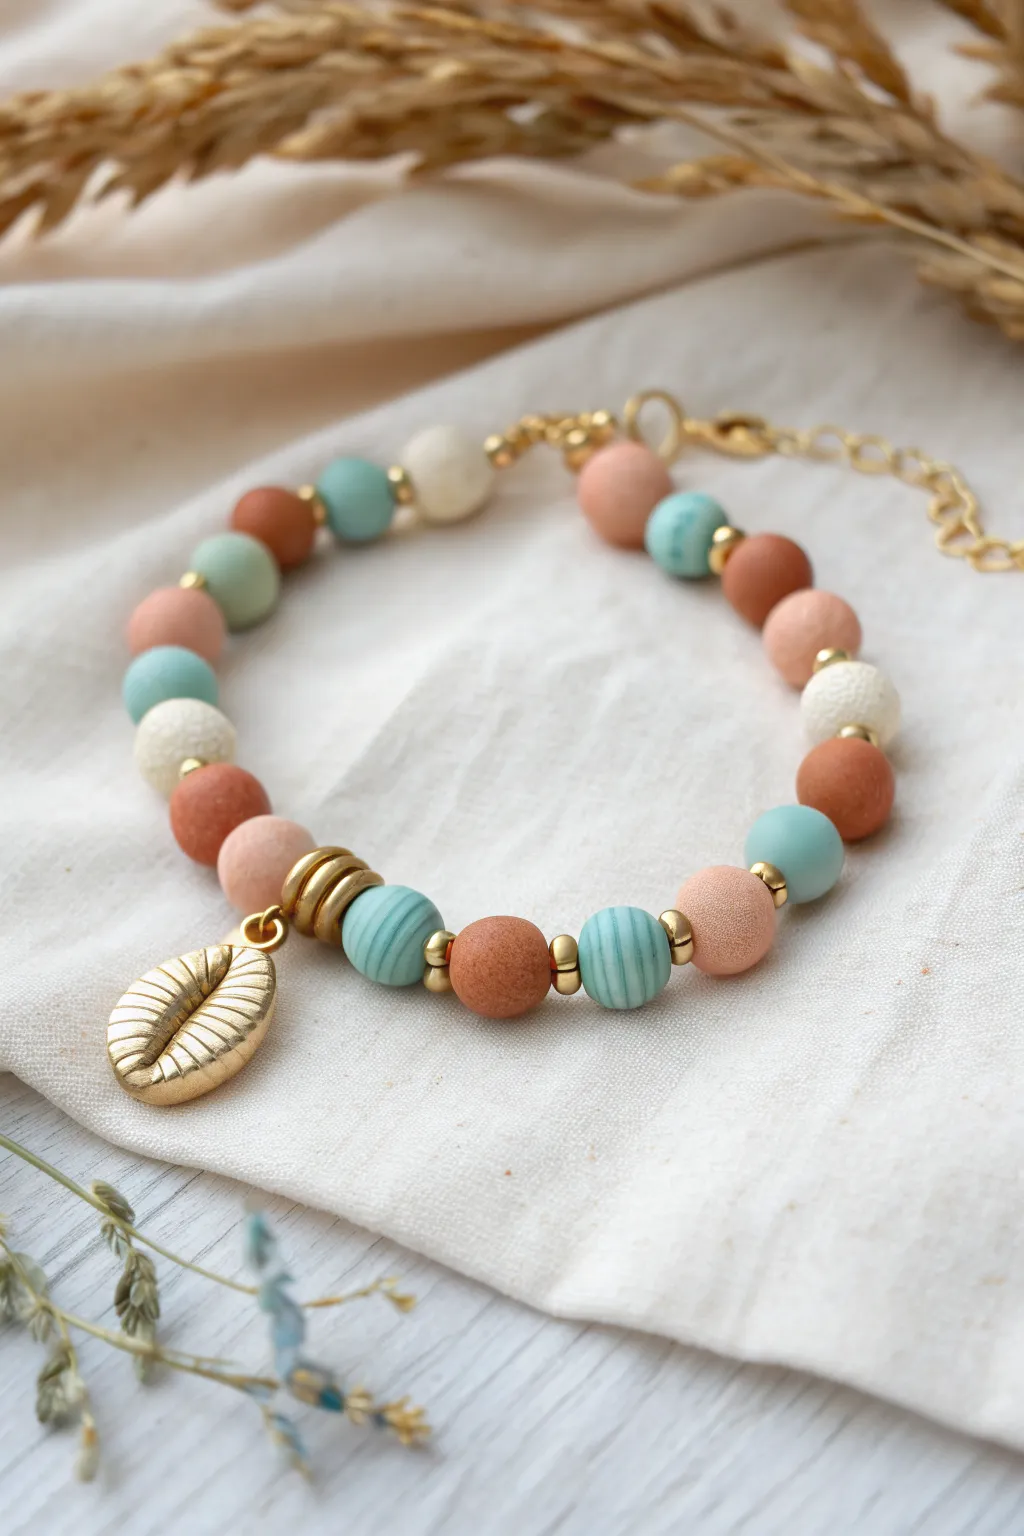
Capture the essence of a serene beach day with this beautiful polymer clay bead bracelet featuring a golden shell charm. Its palette of muted terracotta, soft turquoise, and creamy sands creates a sophisticated, asymmetrical aesthetic perfect for summer layering.
Step-by-Step Tutorial
Materials
- Polymer clay round beads (8mm-10mm): terracotta, peach, teal/turquoise, cream
- Gold tone metal spacer beads (small rounds and disc shapes)
- Gold tone cowrie shell charm
- Large jump ring (gold tone)
- Beading wire (flexible nylon-coated)
- 2 Crimp beads
- 2 Crimp covers
- 2 Wire guardians (gold tone)
- Lobster clasp and extension chain set
- Crimping pliers
- Wire cutters
- Chain nose pliers
- Bead design board (optional)
Step 1: Planning the Pattern
-
Lay out your beads:
Begin by arranging your beads on a bead board or soft cloth. This bracelet relies on an asymmetrical, organic look rather than a strict repeating pattern, so layout is crucial before stringing. -
Establish the center:
Place your gold cowrie shell charm in the center. Flank it immediately with two gold disc spacers, followed by two teal grooved beads to frame the focal point. -
Build the right side:
Continuing from the center to the right, add a small gold spacer, a terracotta bead, a gold spacer, a teal bead, a gold spacer, a peach bead, and so on. Aim for a random mix of colors. -
Build the left side:
Create the left side of the strand. Don’t mirror the right side exactly; instead, balance the colors visually. For example, if you used a cream bead on the right, use a peach one on the left at roughly the same distance. -
Check the length:
Measure the laid-out design against your wrist or a ruler. A standard bracelet length is about 6.5 to 7 inches, excluding the clasp assembly.
Textured Touch
Mix smooth round beads with grooved or ‘heishi’ style clay beads. The subtle texture difference makes the simple design look much more expensive.
Step 2: Attaching the Charm
-
Open the jump ring:
Using two pairs of pliers (chain nose works best), gently twist the jump ring open laterally—don’t pull it apart—so you don’t distort the circle. -
Secure the charm:
Slip the loop of the cowrie shell charm onto the open jump ring. Close the ring securely by twisting it back until the ends meet perfectly flush. -
String the center:
Cut a piece of beading wire about 10-12 inches long. Slide the jump ring with the charm onto the wire, threading the wire through the jump ring itself so the charm hangs down.
Stiff Wire?
If your finished bracelet feels rigid or kinks, you pulled the wire too tight before the final crimp. Leave a 1-2mm gap of bare wire inside the bead stack for flexibility.
Step 3: Stringing and Finishing
-
Thread the beads:
Start stringing your beads onto the wire, working outward from the center charm in both directions according to your planned layout. -
Add spacers:
Be diligent about placing the small gold spacer beads between every single clay bead. This separation gives the piece a professional, airy finish. -
Prepare the first crimp:
On one end, slide on a crimp bead followed by a wire guardian. Thread the wire up through one side of the guardian and down the other. -
Attach the clasp:
Slide the lobster clasp onto the loop created by the wire guardian. Pass the wire tail back through the crimp bead and pull tight, leaving just a tiny bit of slack for movement. -
Crimp the bead:
Use your crimping pliers to flatten the crimp bead securely, locking the wire in place. Trim the excess wire tail close to the crimp. -
Cover the crimp:
Place a crimp cover over the flattened crimp bead. Using chain nose pliers, gently close the cover until it looks like a round gold bead. -
Finish the second end:
Repeat the crimping process on the other end of the bracelet. Slide on a crimp bead, wire guardian, and the extension chain loop. -
Tighten and trim:
Thread the wire back through the crimp bead and pull tight. Before crimping, coil the bracelet into a circle to ensure it isn’t too stiff. Crimp, trim, and add the final crimp cover.
Enjoy styling this warm, beachy accessory with your favorite summer outfits
Glow-at-Dusk Summer Night Bracelet
Capture the magic of a warm summer evening with this elegant clay bead bracelet. Featuring matte terracotta, soft cream, and hints of sage green interspersed with textured gold accents, this piece brings a sophisticated yet beachy vibe to any wrist stack.
Step-by-Step
Materials
- 6mm flat polymer clay heishi beads (Terracotta/Coral)
- 6mm flat polymer clay heishi beads (Cream/Off-White)
- 6mm flat polymer clay heishi beads (Light Sage/Mint)
- 6mm flat polymer clay heishi beads (Peach/Amber)
- 4mm gold plated textured disc spacers (daisy or gear style)
- Gold plated crimp covers (or wire guardians)
- Gold tone lobster clasp and 2-inch extension chain
- Flexible beading wire (0.38mm or 0.45mm)
- 2mm crimp beads
- Wire cutters
- Flat nose pliers
- Crimping pliers
Step 1: Planning and Prep
-
Measure the wire:
Cut a piece of beading wire approximately 10 inches long. This gives you plenty of extra room to work with the clasps without beads sliding off the ends. -
Secure the first end:
Thread one crimp bead onto the wire, followed by a wire guardian or just loop the wire back through the crimp bead to create a small loop. If you are attaching the clasp directly, include the lobster clasp in this loop. -
Crimp firmly:
Use your crimping pliers to flatten the crimp bead securely. I like to give a gentle tug to ensure it holds tight. -
Cover the mechanics:
Place a gold crimp cover over the flattened crimp bead. Gently squeeze it shut with flat nose pliers until it resembles a smooth gold bead. This hides the industrial-looking crimp. -
Start the pattern:
Begin your stringing with a decorative gold coiled wire bead or a stack of 3-4 gold spacer discs to act as a sleek end cap before the clay beads begin.
Step 2: Creating the Bead Pattern
-
The color block sequence:
The main visual rhythm relies on blocks of color. Start with 8-10 peach/amber clay beads. -
Add a gold accent:
After the peach block, slide on one textured gold disc spacer. -
The transition segment:
Add 2-3 cream beads, followed by one sage green bead, and then 2-3 more cream beads. This creates a soft, sandy transition. -
Gold detailing:
Insert another textured gold spacer to bracket this lighter section. -
The bold terracotta section:
String on a long segment of the terracotta/coral beads. Use about 10-12 beads here to make this the dominant color pop. -
Highlight the center:
Create a focal point by adding a specific sequence: Gold spacer, one cream bead, gold spacer, one cream bead, gold spacer. -
Repeat the pattern:
Mirror the pattern on the other side of the central focal point. Add the terracotta block, then the lighter transition segment with sage green, and finally the peach section. -
Check the length:
Wrap the unfinished strand around your wrist. The beads should cover the top and sides of your wrist, leaving about an inch gap underneath for the chain extender.
Stiff Bracelet?
If the finished bracelet feels rigid or kinks, you likely pulled the wire too tight before the final crimp. Leave a tiny bit of slack (1mm) so beads can rotate.
Step 3: Finishing Touches
-
Finish the bead line:
End the beading exactly as you started, with a stack of 3-4 gold spacer discs or a coiled wire bead to mirror the beginning. -
Attach the end crimp:
Thread on a crimp bead. Loop the wire through the first link of your extension chain (or a jump ring), then pass the wire back down through the crimp bead and into the last few beads you strung. -
Pull and secure:
Pull the wire taut so there are no gaps between beads, but not so tight that the bracelet becomes stiff. It should drape fluidly. -
Final crimping:
Flatten the crimp bead with your pliers. Trim the excess wire tail flush against the beads so it doesn’t poke the skin. -
Conceal the hardware:
Place your second gold crimp cover over this final crimp bead and gently close it with flat nose pliers for a polished, professional finish.
Mix textures
Swap the standard flat gold spacers for ‘stardust’ or hammered finish metal beads. This catches the light differently and mimics the texture of sand.
Now you have a stunning, professional-looking accessory ready for your next seaside adventure