There’s something ridiculously satisfying about sculpting a dragon eye—it’s tiny, dramatic, and instantly tells a story. Here are my favorite clay dragon eye ideas to help you nail the eyelids, textures, and colors that make your dragon feel alive.
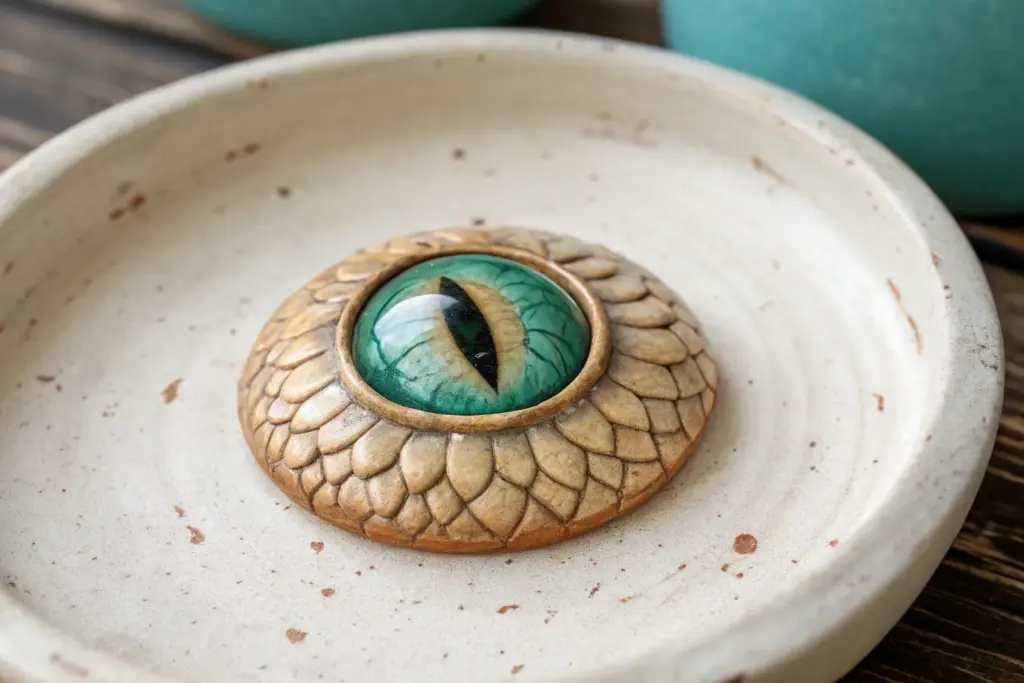
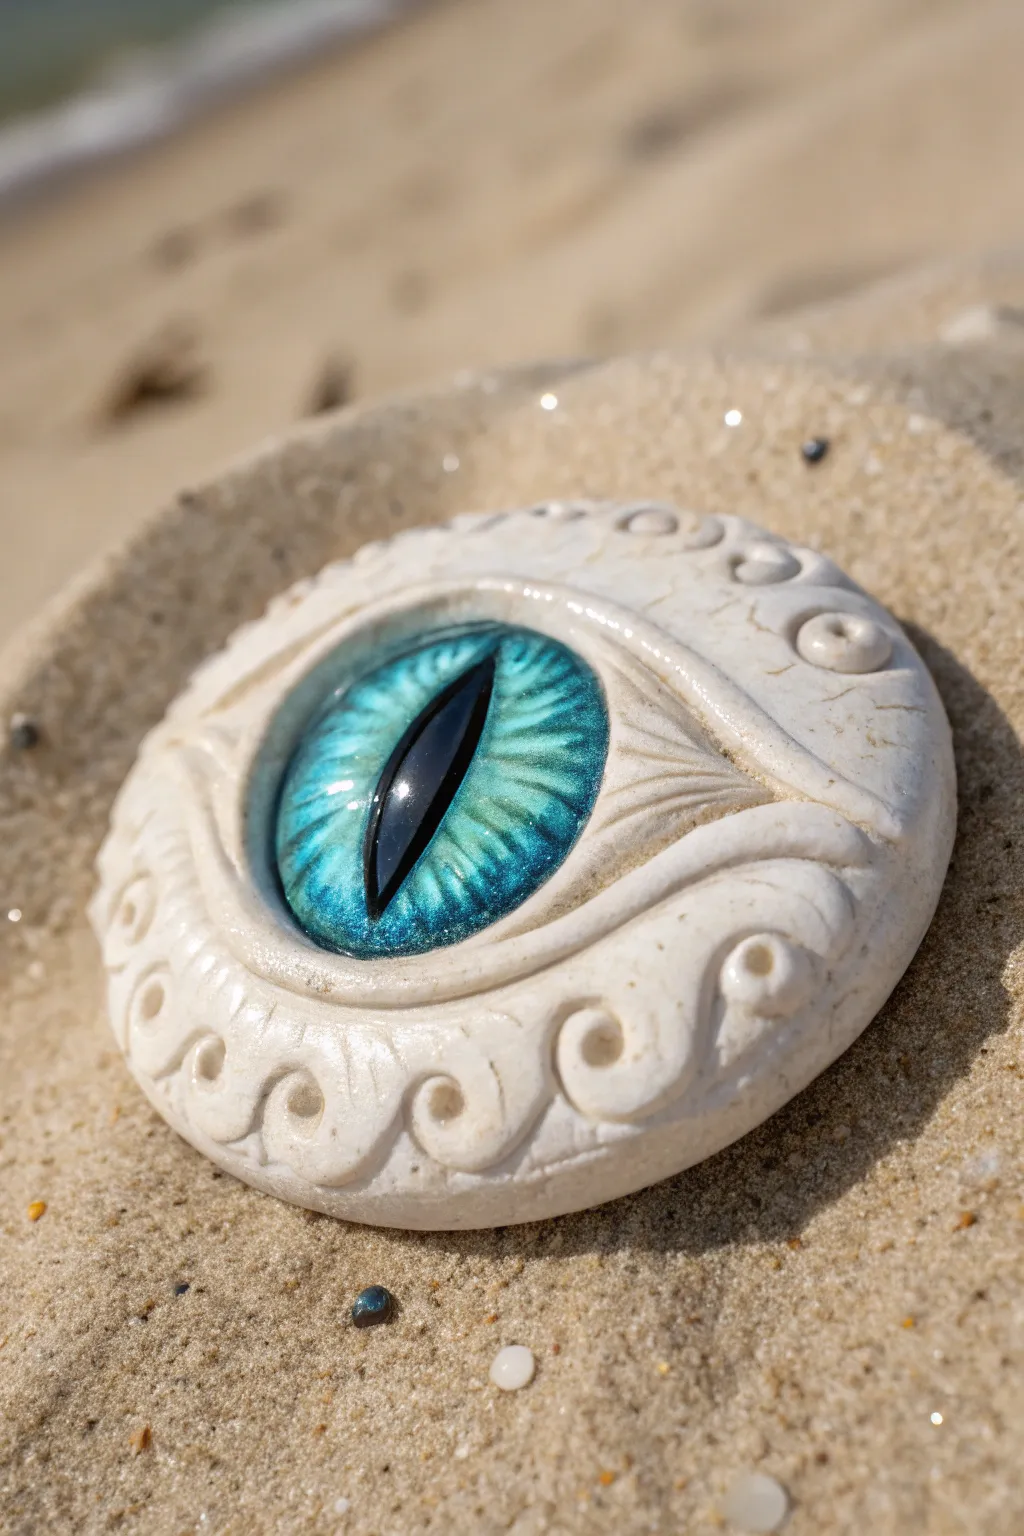
Classic Almond Dragon Eye With Scales
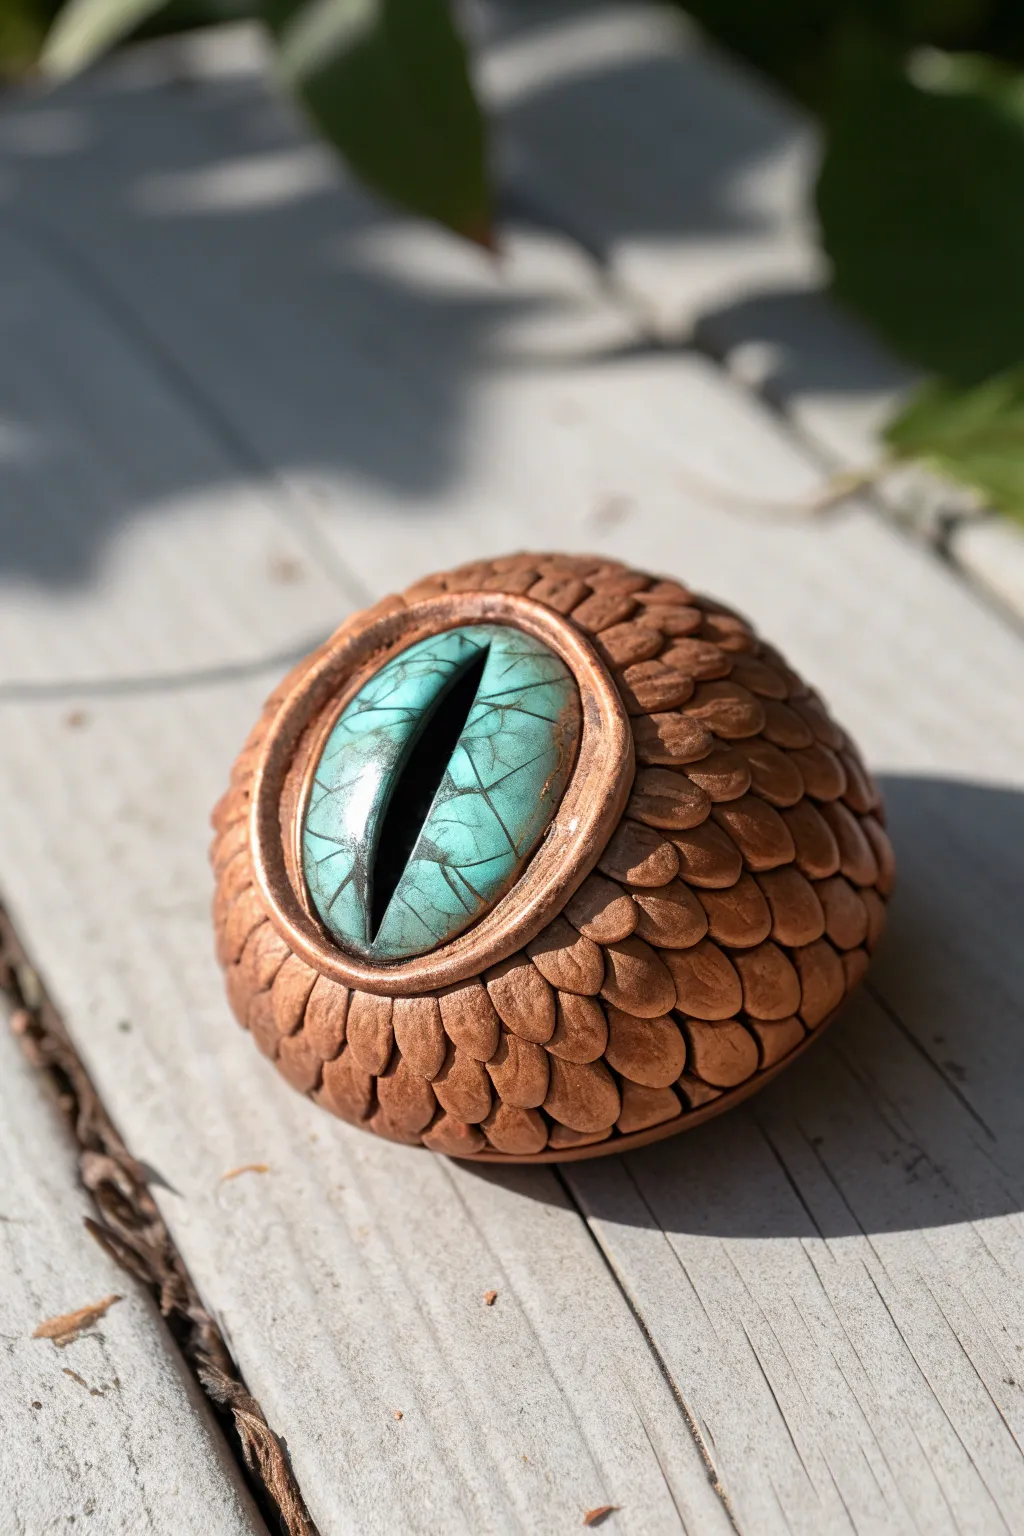
This striking circular relief sculpture features a piercing green dragon eye surrounded by radiating organic scales that resemble sun-dappled leaves. The finished piece serves as a mystical incense holder or a captivating standalone wall ornament.
Detailed Instructions
Materials
- Polymer clay (green, brown, and translucent)
- Circle clay cutter (approx. 4-5 inches)
- Small leaf-shaped cutter
- Sculpting tools (needle tool, ball stylus)
- Acrylic paints (dark green, earthy brown, metallic gold)
- Finishing glaze or matte varnish
- Textured stamp or sandpaper (optional)
- Rolling pin
- Oven-safe work surface
Step 1: Forming the Base and Eye
-
Create the foundation:
Note: For this project, you can use air-dry clay or ceramic clay, but polymer clay is most accessible for home crafters. Start by conditioning your clay and rolling it out to a uniform thickness of about 1/4 inch. Use your large circle cutter to stamp out a perfect disc. -
Sculpt the eyeball:
Roll a sphere of green clay, flatten it slightly into a dome, and press it gently into the exact center of your disc. Smooth the edges down so it merges seamlessly with the base. -
Carve the pupil:
Using a sharp needle tool or knife, carefully carve out a vertical, almond-shaped slit in the center of the eye dome. Create depth by removing a sliver of clay to simulate the pupil’s hollow. -
Add texture to the iris:
Take a needle tool and gently scratch tiny, radiating lines extending from the pupil toward the outer edge of the iris to give the eye a realistic, fibrous look.
Texturing Shortcut
Press a real leaf or a piece of rough sandpaper into your clay sheet before cutting out your scales for instant, organic surface texture.
Step 2: Building the Eyelids
-
Form the upper lid:
Roll a snake of brown clay and flatten it into a long crescent shape. Place this over the top half of the eye dome, arching it to create a heavy, ancient-looking eyelid. -
Form the lower lid:
Repeat the previous step for the bottom lid, ensuring the corners where the two lids meet are sharp and elongated, giving that classic almond dragon shape. -
Refine the shape:
Use a smooth blending tool or your fingertip to smooth the outer edges of the eyelids onto the base plate, leaving the inner rim (touching the eyeball) sharp and defined.
Step 3: Adding the Scales
-
Prepare the leaf scales:
Roll out a sheet of brownish-green clay. Use your small leaf cutter to punch out approximately 20-30 scales. If you don’t have a cutter, you can hand-mold small teardrop shapes and flatten them. -
Texture the scales:
Before attaching, use a needle tool to score a central vein down each scale. Add tiny branching veins or dots for extra biological realism. -
Attach the inner ring:
Begin placing scales around the eyelids. The pointed ends should face outward toward the edge of the disc. I usually start at the corners of the eye and work my way around. -
Layer the outer ring:
Place a second row of scales behind the first, staggering them so they peek through the gaps of the inner ring. Ensure the tips reach near the edge of the base circle. -
Add accent dots:
Roll tiny balls of clay and press them into the gaps between the outer scale tips to fill empty space and add rhythmic detail.
Make it Functional
Poke a small hole at an angle into the clay near the pupil or in the rim before baking to turn this sculpture into a stick incense holder.
Step 4: Finishing Touches
-
Create the rim:
Roll a long, thin snake of brown clay. Wrap it around the entire circumference of the disc to frame the artwork. Press it down firmly. -
Texture the rim:
Use the side of a needle tool or a dull knife to press diagonal hash marks all along the rim, giving it a rope-like or tooled leather appearance. -
Bake the piece:
Follow the baking instructions specific to your brand of polymer clay. Let the piece cool completely before handling. -
Apply a wash:
Mix dark decorative paint with a little water. Brush this wash over the entire piece, letting it settle into the veins and crevices. -
Wipe away excess:
Quickly wipe the surface with a damp cloth or sponge. The dark paint will remain in the textures, highlighting the details while revealing the green base color. -
Dry brush highlights:
Dip a dry brush into a lighter green or metallic gold paint. Lightly dust the tops of the scales, the eyelids, and the rim to make the textures pop.
Display your ancient artifact proudly on a shelf or wall to keep a watchful eye on your dragon hoard


Slitted Pupil Eye With Heavy Upper Lid
Capture the mysterious allure of a dragon with this sculpted eye project featuring a deep green iris and a heavily textured, ancient-looking eyelid. The combination of a painted glass cabochon and sculpted polymer clay creates a stunningly realistic depth that seems to follow you around the room.
Step-by-Step
Materials
- 25mm clear glass cabochon (domed)
- Black polymer clay
- Green acrylic paint (metallic emerald and dark forest)
- Black acrylic paint
- Fine detail paintbrush
- Needle tool or dental pick
- Gloss varnish or UV resin
- X-Acto knife
- Oven for baking clay
Step 1: Painting the Eye
-
Prepare the pupil:
Begin by cleaning the flat back of your glass cabochon with alcohol to remove fingerprints. Using a fine brush and black acrylic paint, key in a vertical, slit-shaped pupil right in the center. -
Refine the slit:
Ensure the edges of the pupil are sharp and tapered at the top and bottom. Let this black layer dry completely before moving on. -
First iris layer:
Paint fine, radiating lines outward from the pupil using your metallic emerald green. Don’t cover the entire back yet; leave small gaps for depth. -
Second iris layer:
Once the first green layer is dry, apply a darker forest green over the emerald strokes and fill in the remaining clear spaces. This layering creates the illusion of a complex iris. -
Backing the eye:
After the green paint is fully dry, cover the entire back of the cabochon with a solid coat of black paint or white paint, depending on how bright you want the final eye to reflect light. Let dry.
Paint Peeling?
If the paint peels off the smooth glass back, try lightly scuffing the back of the cabochon with fine-grit sandpaper before painting to give it ‘tooth’.
Step 2: Sculpting the Eyelid
-
Clay preparation:
Condition a small amount of black polymer clay until it is soft and pliable. Roll it into a ball about half the size of the cabochon. -
Setting the cabochon:
Flatten the clay ball slightly and press the painted cabochon (paint side down) firmly into the center. The clay should wrap around the edges of the glass. -
Forming the bezel:
Push the clay up around the sides of the glass to form a rim. I prefer to keep this rim thick initially to allow for deep carving later. -
Shaping the heavy lid:
Add a small snake of clay to the top portion of the eye to create the heavy upper lid. Smooth the seams so it blends seamlessly into the base. -
Creating the basic rim:
Ensure the clay overlaps the edge of the glass uniformly, creating an oval frame that directs focus to the slit pupil.
Scaly Detail
Before baking, press real reptile skin shed or a coarse sandpaper into the clay for micro-texture, then dry brush with gold for a magical finish.
Step 3: Texturing and Finishing
-
Carving the radiating lines:
Using a needle tool, press deep, radiating grooves into the clay rim, starting near the glass and pulling outward. This mimics the heavy, scaled skin of a reptile. -
Refining the texture:
Between the main grooves, add smaller, lighter scratches to create a fibrous, leathery texture on the skin. -
Cleaning the glass:
Before baking, use a cotton swab with a little rubbing alcohol to wipe any clay residue or fingerprints off the front of the glass cabochon. -
Baking:
Bake the piece according to your polymer clay manufacturer’s instructions. Usually, this is around 275°F (130°C) for 15-30 minutes. -
Dry brushing:
Once cooled, dry brush a tiny amount of metallic green paint over the raised textures of the black clay. This highlights the sculpture and ties the skin color to the iris. -
Sealing:
Apply a coat of gloss varnish or UV resin over the clay parts to give it a wet, biological look and protect the paint.
Now you have a fierce dragon eye ready to guard your treasures or act as a striking centerpiece for a necklace


Soft Rounded Lids for a Friendly Dragon
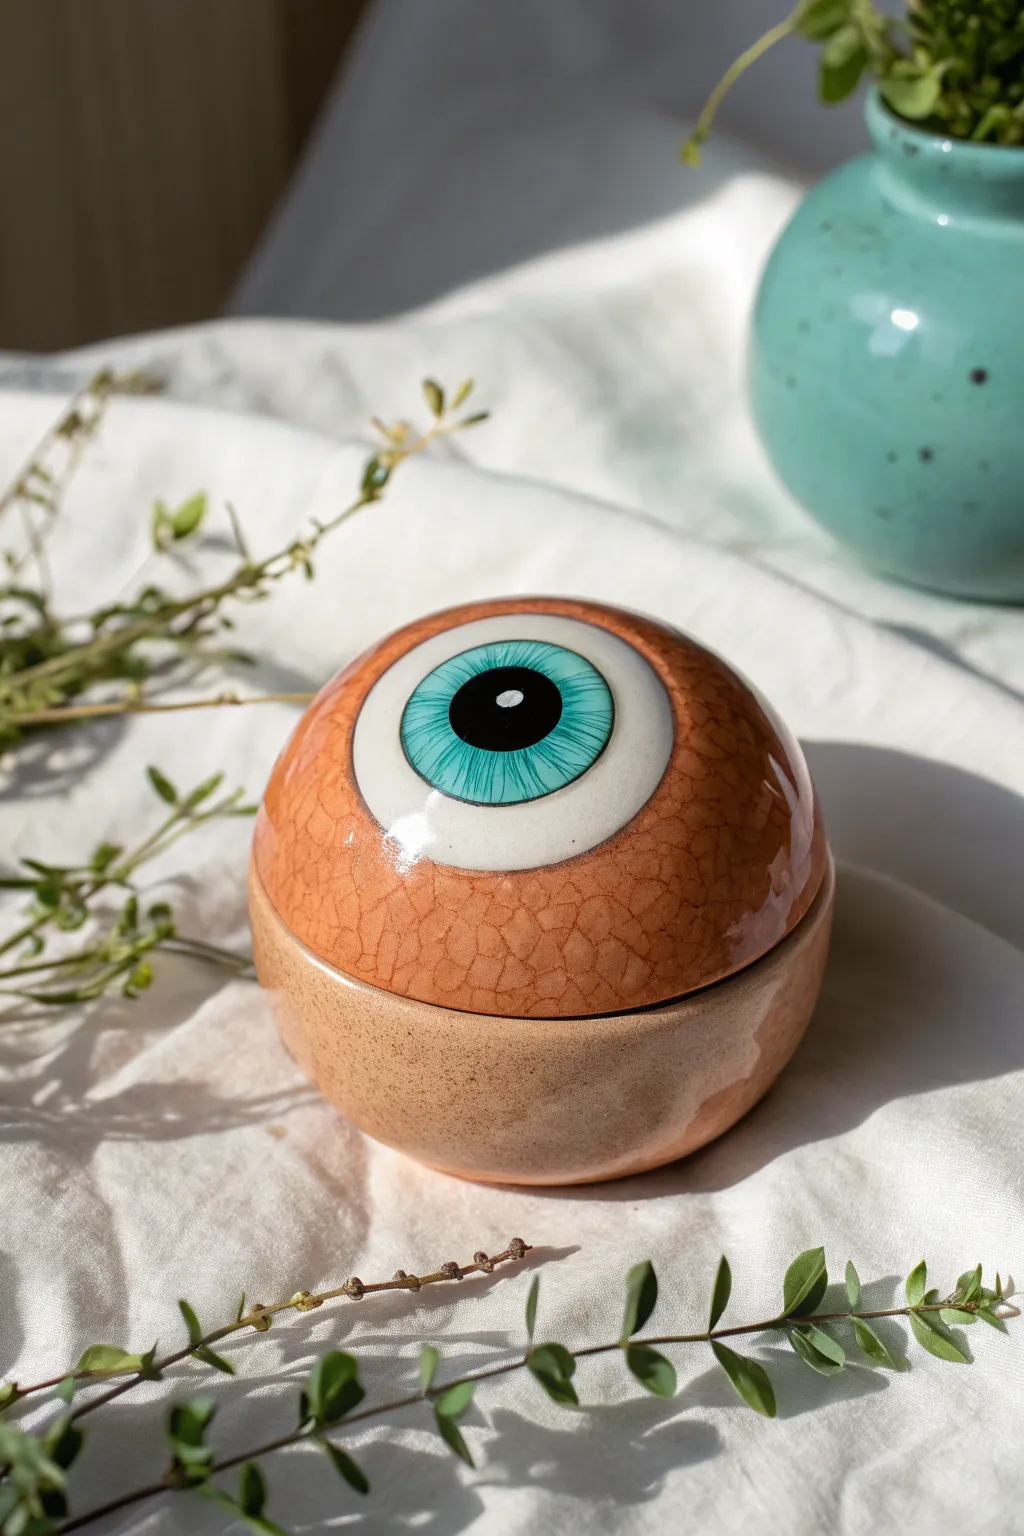
This whimsical ceramic jar features a striking dragon eye design integrated seamlessly into a smooth, spherical lid. The soft orange crackle glaze combined with a detailed teal iris creates a piece that feels both ancient and curiously friendly.
Step-by-Step Tutorial
Materials
- White stoneware or porcelain clay
- Pottery wheel (or hand-building tools for pinch pots)
- Rib tools (metal and rubber)
- Needle tool
- Trimming tools
- Underglazes: Black, Teal/Turquoise
- Clear glaze
- Specialty glaze: Orange/Amber Crackle
- Small detail brushes
- Wax resist
- Sponge
Step 1: Forming the Base and Lid
-
Throwing the vessel:
Begin by centering your clay on the wheel. Open and pull the walls to create a small, rounded bowl shape. This will be the bottom half of your jar; keep the walls even but sturdy enough to support the lid. -
Refining the gallery:
Create a distinct gallery—the little shelf inside the rim—where the lid will eventually sit. Use a wooden modeling tool or the corner of a rib to make this ledge sharp and precise so the lid fits snugly later. -
Measuring:
Before removing the bowl from the wheel, carefully measure the diameter of the gallery using calipers. Set the calipers aside without bumping them; accurate measurement is crucial for a locking lid. -
Throwing the lid:
With a new ball of clay, throw a low, domed shape upside down (like a small bowl). Use your caliper measurement to shape the rim so it matches the gallery of your bottom piece perfectly. -
Trimming into a sphere:
Once both pieces are leather hard, trim the excess clay. Place the lid onto the base to check the fit, then trim the exterior curve of the lid so it continues the arc of the bowl, creating a continuous sphere shape when closed. -
Smoothing the surface:
Use a soft rubber rib or a damp sponge to eliminate all grog or texture marks. The surface needs to be incredibly smooth to mimic the slickness of an eyeball.
Step 2: Designing the Iris
-
Mapping the pupil:
On the very top center of the domed lid, lightly sketch a circle for the iris and a smaller inner circle for the pupil using a pencil. The graphite will burn off in the kiln. -
Painting the pupil:
Using a fine liner brush and black underglaze, fill in the center pupil. To bring it to life, leave a tiny, unpainted white circle (or add a dot of white underglaze) as a reflection highlight. This ‘catchlight’ is essential for realism. -
Adding iris color:
Fill the ring around the pupil with a bright teal or turquoise underglaze. Apply 2-3 coats to ensure the color is opaque and vibrant. -
Detailing the iris:
Once the teal layer is dry, I like to take a very thin brush with black underglaze and paint fine, radiating lines from the pupil outward to the edge of the iris. This mimics the muscle structure of a real eye. -
Bisque firing:
Let the piece dry completely, covering it loosely with plastic if you need to slow down the process. Fire it to your clay body’s bisque temperature (usually cone 04).
Lid Won’t Fit?
If the lid is slightly too large after bisque firing, use wet sanding paper or a diamond sanding pad under running water to gently grind down the rim until it seats perfectly.
Step 3: Glazing and Finishing
-
Waxing the eye:
Apply wax resist carefully over the entire painted eye area (pupil, iris, and the white sclera ring around it). This protects your detail work from the overlay glaze. -
Applying the crackle glaze:
Dip or brush the orange crackle glaze over the rest of the lid and the exterior of the bottom bowl. The crackle effect will develop during cooling, giving that ‘reptilian skin’ texture. -
Clear coating the eye:
If your wax resist isn’t the type that burns off cleanly to reveal raw clay, wipe it back. Carefully dab a clear glossy glaze over the eye section only. This gives the eyeball a wet, lifelike sheen. -
Cleaning the foot:
Wipe any glaze off the bottom foot ring of the bowl and the rim where the lid touches the gallery. Glaze in these locking areas will fuse the jar shut permanently. -
Final firing:
Fire the piece to the maturity temperature of your glaze (likely cone 5 or 6). Allow the kiln to cool naturally to let the crackle pattern develop fully.
Level Up: Texture
Instead of relying solely on crackle glaze, gently carve shallow veins or scales into the leather-hard clay around the eye before firing for a tactile 3D dragon skin effect.
Place your finished jar on a shelf where its unblinking gaze can guard your small treasures


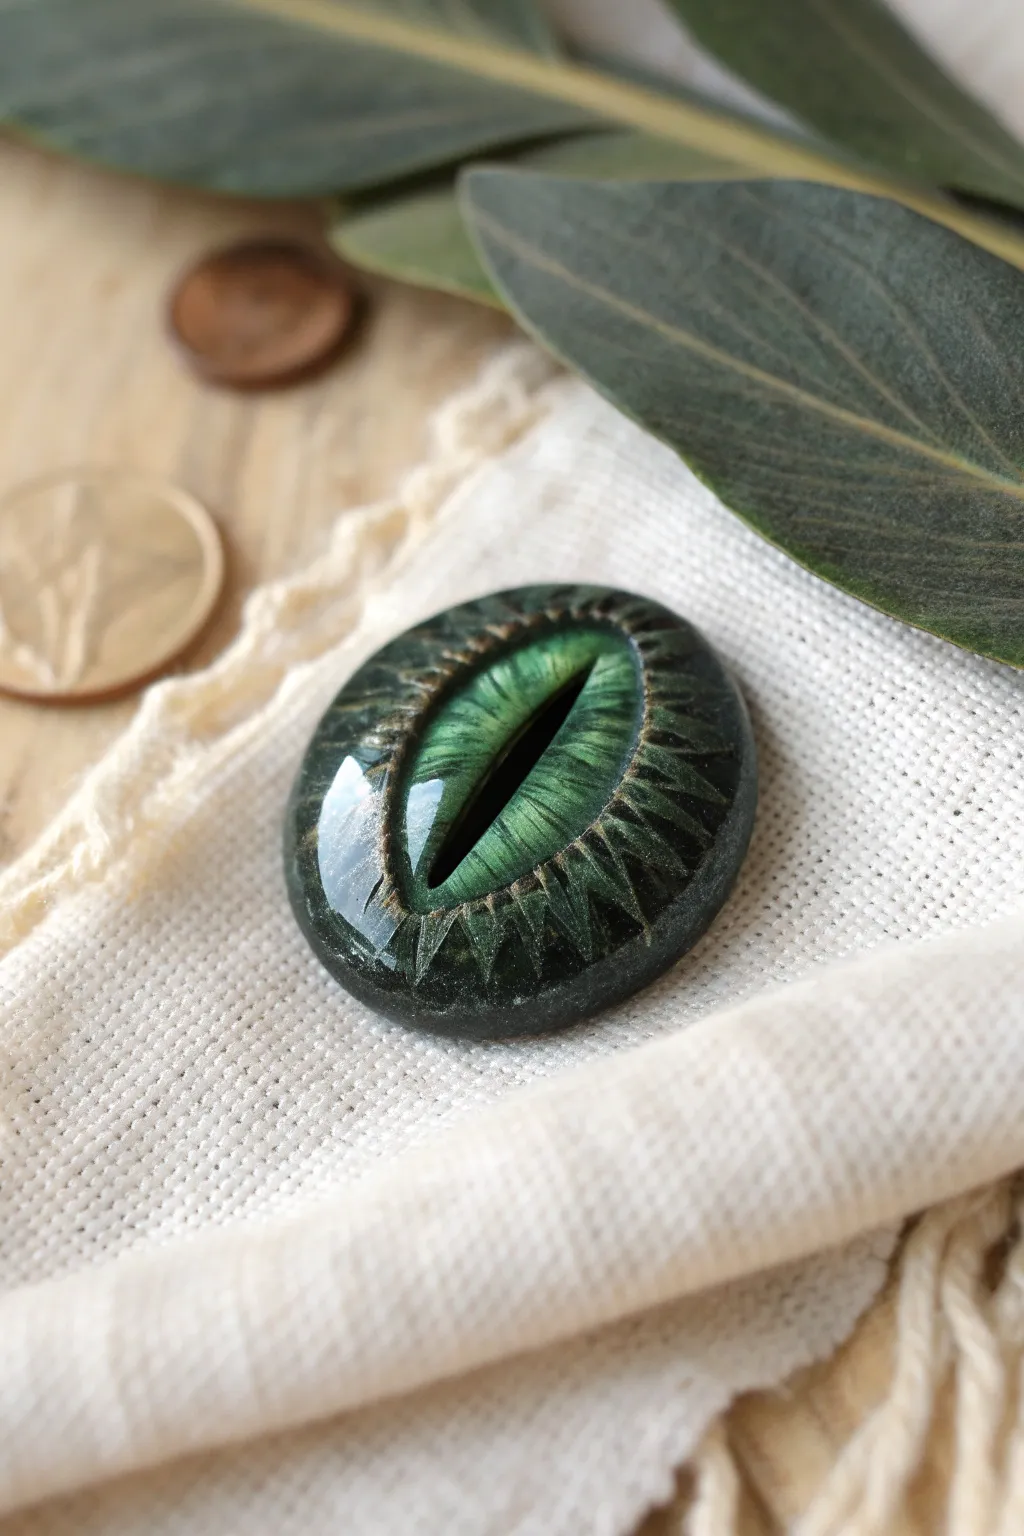
Pebbled Reptile Skin Texture Around the Eye
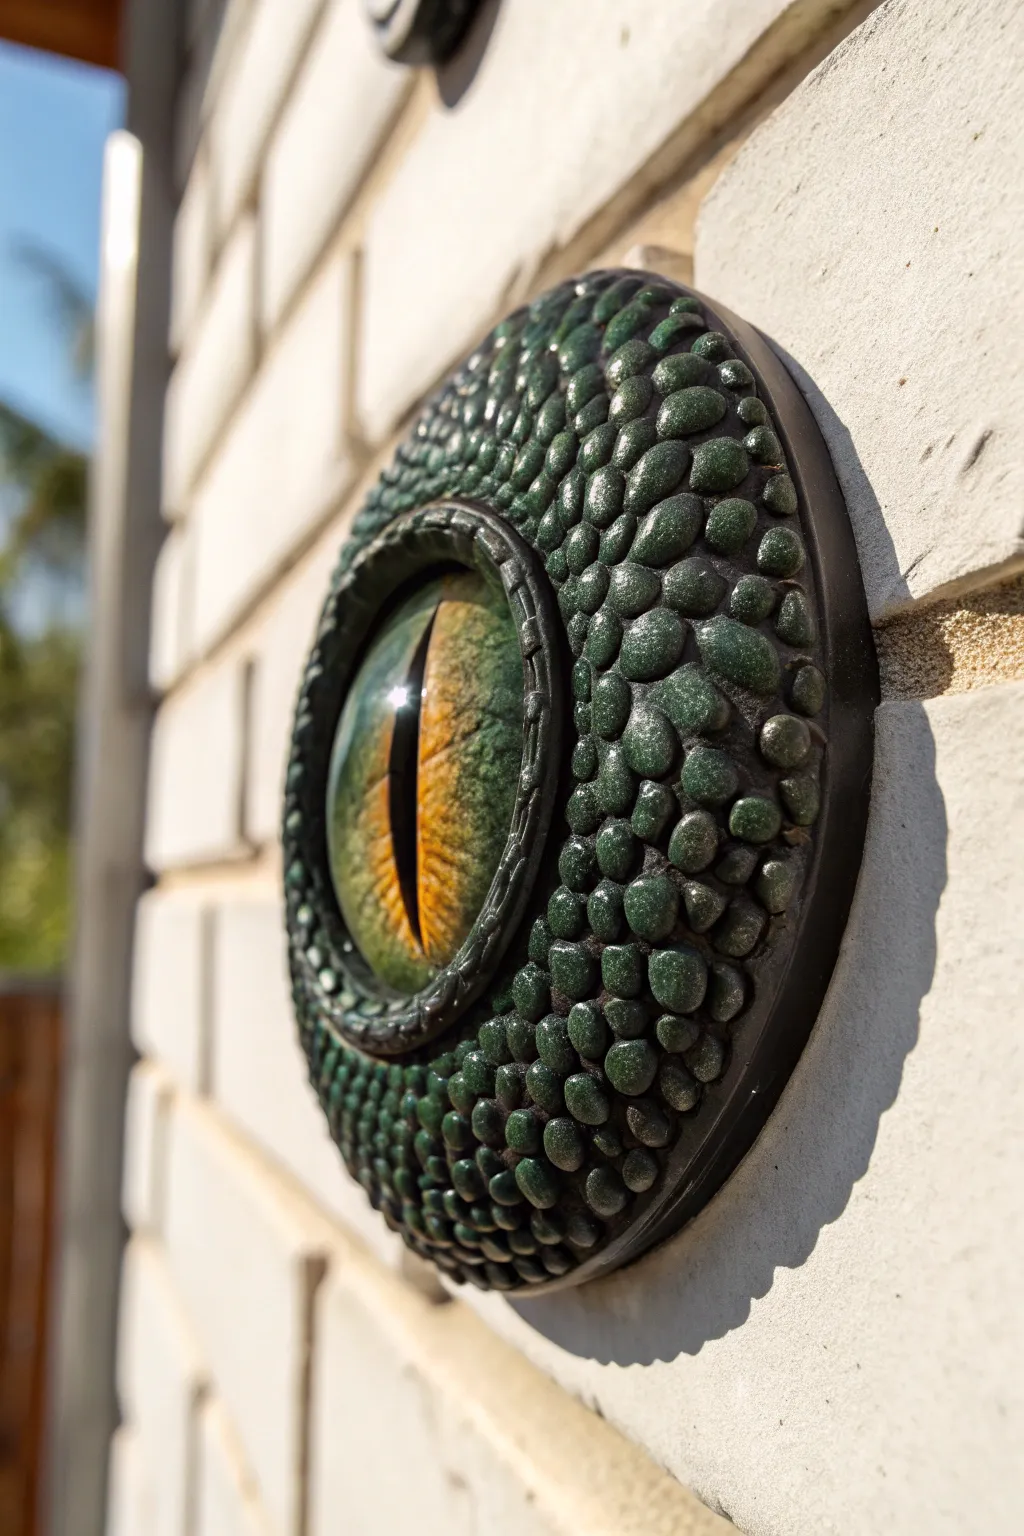
This striking dragon eye sculpture features a realistic vertical pupil and a mesmerizing, scaled texture created with a simple pebbling technique. The finished piece makes for a fantastical wall accent that looks like it’s watching from the bricks.
Step-by-Step
Materials
- Polymer clay (black and dark green)
- Glass cabochon (clear, round, approx. 40-50mm)
- Acrylic paints (metallic green, gold, yellow, black)
- Fine detail paintbrushes
- Dotting tools or ball stylus set
- Circular cookie cutter or clay cutter (approx. 4 inches)
- Texture sponge or sandpaper (optional)
- Gloss varnish or UV resin
- Strong craft glue (E6000)
- Rolling pin
- Backing board or wood circle (optional for mounting)
Step 1: The Eye Iris
-
Prepare the pupil:
Flip your glass cabochon flat side up. Paint a sharp, vertical slit down the center using black acrylic paint. Taper the ends to points to create that reptilian look and let it dry completely. -
Add iris color:
Once the black is dry, sponge or brush on a mix of yellow and gold paint radiating outward from the pupil. Layer in some green towards the outer edges to create depth. -
Seal the back:
After the paint is fully cured, seal the back of the cabochon with a layer of white paint or glue to make the colors pop from the front.
Gaps in Scales?
If you see gaps between your pebbles, use a small dotting tool to push the clay balls slightly wider until they touch their neighbors, hiding the base layer.
Step 2: Sculpting the Base
-
Create the base:
Condition your black polymer clay and roll it out into a sheet about 1/4 inch thick. Use your large circular cutter to stamp out a perfect circle. -
Embed the eye:
Place the painted cabochon in the exact center of your clay circle. Press it down gently so the clay grips the edges of the glass. -
Form the eyelid border:
Roll a thin snake of clay and wrap it directly around the glass cabochon to form the primary eyelid rim. Smooth the seam where the snake meets the base clay using a sculpting tool. -
Texturize the rim:
Use a small needle tool to score tiny radiating lines into that eyelid rim, giving it a wrinkled, organic appearance.
Step 3: Creating the Pebble Texture
-
Roll scale balls:
This step requires patience. Roll dozens of tiny balls of clay in varying sizes. You’ll need smaller ones for the inner area and slightly larger ones for the outer edge. -
Apply the first row:
Starting immediately next to the eyelid rim, press your smallest clay balls onto the base. They should be touching each other tightly. -
Flatten and shape:
Gently press down on each ball with your finger or a large ball stylus to flatten it into a ‘pebble’ shape. Don’t flatten them completely; keep a domed profile. -
Fill the surface:
Continue adding rows of clay balls, gradually increasing their size as you move toward the outer edge of the circle. Create a dense, paved look with no gaps showing the base layer. -
Add surface texture:
I like to take a piece of coarse sandpaper or a texture sponge and lightly tap the tops of the pebbles to remove fingerprints and add a leathery grit.
Color Shift Magic
For a magical effect, use color-shifting chameleon mica powder on the raw clay scales before baking instead of painting them later.
Step 4: Finishing Touches
-
Bake the clay:
Bake your piece according to the manufacturer’s instructions for your specific brand of polymer clay. Let it cool completely before handling. -
Base coat:
Paint the entire clay surface (avoiding the glass eye) with a dark black or deep green acrylic wash to get into the crevices between the pebbles. -
Dry brushing:
Dip a dry brush into metallic green paint and wipe most of it off. Lightly brush over the tops of the pebbles. This highlights the texture while keeping the cracks dark. -
Highlighting:
Add very subtle highlights of lighter green or silver to just the highest points of the largest scales for a glistening, wet look. -
Final varnish:
Coat the clay scales with a satin or gloss varnish to protect the paint and give it a reptile sheen. Ensure the glass eye remains clean. -
Mounting:
Glue a strong magnet or a hanging loop to the back of the solid clay disc so you can display your dragon eye on a wall or metal surface.
Now you have a watchful guardian ready to add a mythical touch to your decor

The Complete Guide to Pottery Troubleshooting
Uncover the most common ceramic mistakes—from cracking clay to failed glazes—and learn how to fix them fast.
Cracked Earth Texture for an Ancient Drake
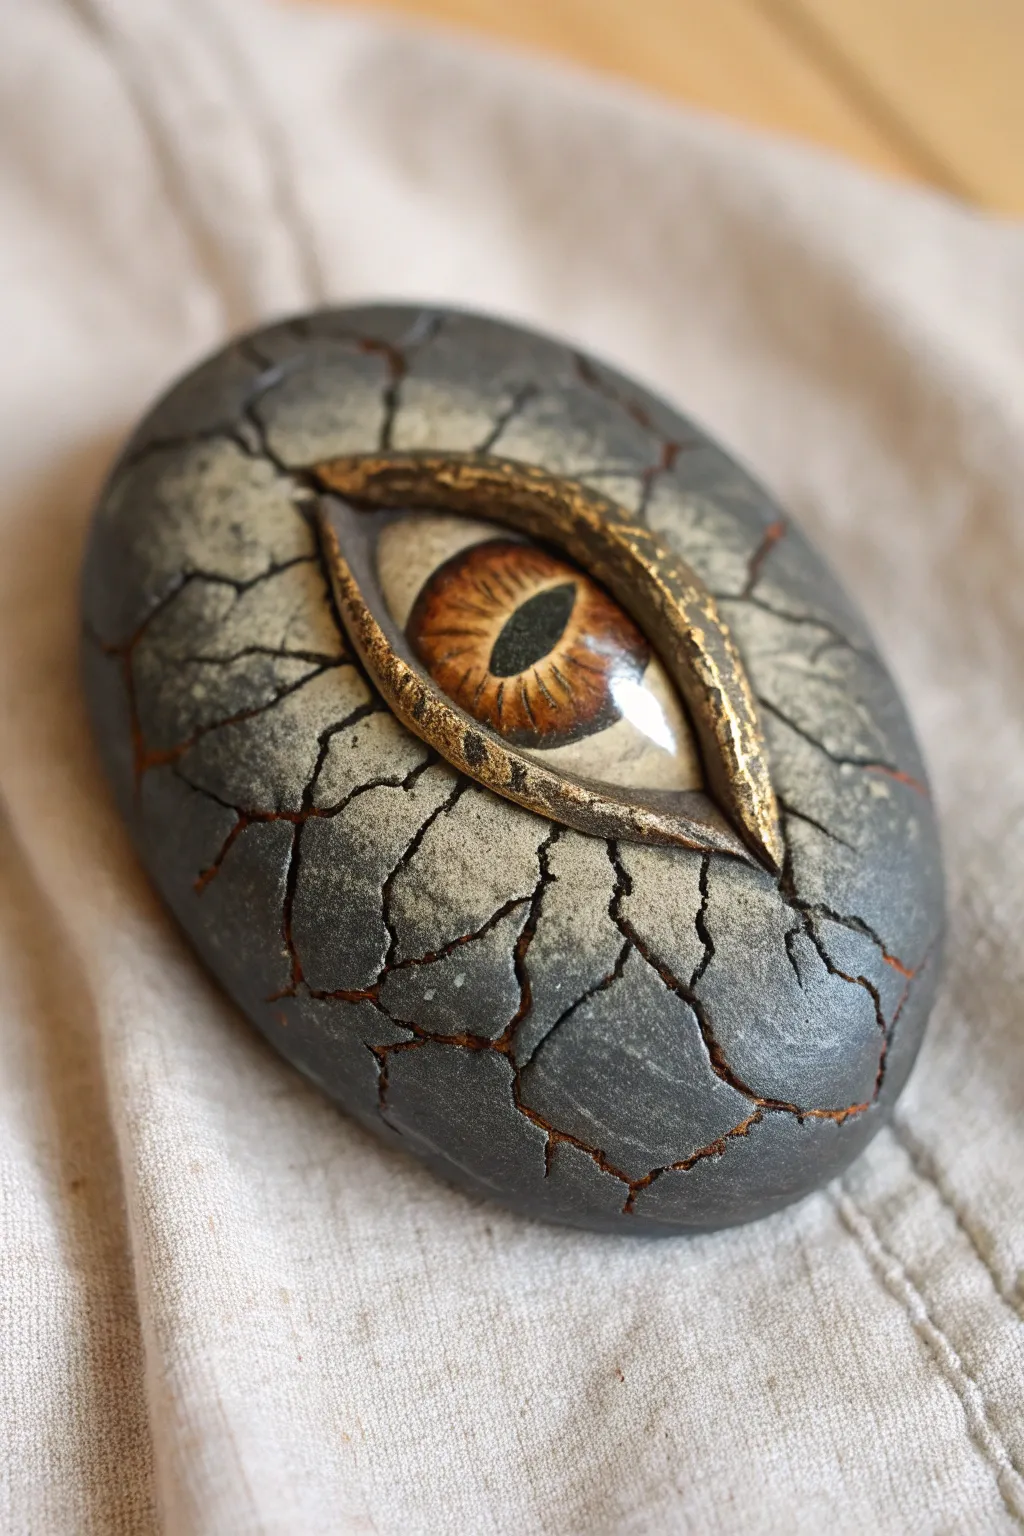
Channel the power of an ancient, slumbering beast with this dragon eye project featuring a stunning cracked earth texture. By layering polymer clay over a glass cabochon and using a special heavy body paint technique, you’ll create a relic that looks like it’s been weathering the elements for centuries.
Detailed Instructions
Materials
- Glass eye cabochon (1 inch/25mm)
- Black polymer clay
- Grey polymer clay
- Gold polymer clay or mica powder
- Golden acrylic paint
- Heavy body white acrylic paint or texture paste
- Dark grey/charcoal acrylic paint
- Reddish-brown acrylic wash
- Detail paintbrush
- Clay sculpting tools (needle tool, ball stylus)
- Heat gun or craft oven
- Gloss varnish (water-based)
Step 1: The Core Structure
-
Prepare the Base:
Condition a ball of black polymer clay until it is soft and pliable. Flatten it into an oval shape about 2.5 inches wide and 1 inch thick to serve as the stone foundation. -
Embed the Eye:
Press your glass dragon eye cabochon firmly into the center of the black clay oval. Push it deep enough so the clay naturally rises slightly around the edges. -
Shape the Eyelids:
Roll two thin snakes of black clay. Position one over the top of the eye and one underneath to form eyelids. Blend the outer edges into the base clay, but leave the inner edges crisp against the glass. -
Initial Bake:
Bake this base structure according to your clay manufacturer’s instructions (usually 275°F for 15 minutes) to set the shape before adding the delicate texture layer.
Cracks Not Showing?
If your texture paste isn’t cracking enough, try applying a thicker layer initially or gently flexing the cured clay base before the paint fully hardens to force fissures.
Step 2: Creating the Cracked Skin
-
Apply Texture Paste:
Once cool, coat the entire clay surface (avoiding the glass eye and the immediate rim of the eyelids) with a thick layer of heavy body white acrylic paint or specialized crackle texture paste. -
Drying Process:
Let the medium dry completely. If you used a crackle medium, cracks will form naturally. If using heavy paint, you may need to use a heat gun carefully to encourage surface cracking. -
Paint the Base Coat:
Paint the entire textured surface with a dark charcoal grey acrylic. Ensure you get the paint into every crevice and texture point. -
Add Depth with Wash:
Mix a watery wash using reddish-brown acrylic paint. Brush this liberally over the dried grey paint, letting it seep deep into the cracks of the texture. -
Wipe Back:
While the wash is still wet, use a damp paper towel or sponge to gently wipe the surface. This removes the brown from the high points (the ‘stone’) but leaves that rusty color inside the cracks, simulating magma or oxidized earth underneath.
Step 3: Detailing and Gilding
-
Dry Brush Highlights:
Load a flat brush with a lighter grey paint and wipe almost all of it off on a paper towel. Lightly dust the surface of the clay to highlight the rocky texture. -
Sculpt the Gold Trim:
Roll two very thin tapered snakes of clay. If your base is already fully baked and painted, you can use liquid clay as glue to attach these new snakes directly onto the eyelids for a raised reptilian rim. -
Texture the Trim:
Use a needle tool to gently poke and drag small lines into the new eyelid trim, giving it a rough, metallic cast appearance. -
Gilding the Lids:
Carefully paint the eyelid trim with rich metallic gold acrylic paint. You may need two coats for full opacity. -
Final Bake:
Generally, it is safe to re-bake polymer clay. Place the piece back in the oven for a final set (15-20 minutes) to cure any raw clay added to the eyelids. -
Seal the Finish:
Once fully cooled, apply a gloss varnish to the glass eye to remove any accidental fingerprints or paint smudges and restore its shine. -
Optional Matte Coat:
For contrast, apply a matte varnish to the grey stony areas. This makes the glossy eye and metallic gold pop even more.
Clean Edges Pro-Tip
Keep a cotton swab dipped in rubbing alcohol nearby. Before baking, use it to clean the glass cabochon, ensuring your dragon’s vision remains crystal clear and free of clay residue.
Display your ancient artifact on a shelf or turn it into a magnificent pendant for a fellow fantasy lover
Double-Layer Eyelids for Extra Depth
This striking dragon eye sculpture features a textured bronze finish and a piercing turquoise slit pupil that seems to glow from within. By layering polymer clay scales and using a double-eyelid technique, you’ll create a piece with incredible depth and realism.
Step-by-Step
Materials
- Polymer clay (black or scrap clay for the core)
- Bronze or Copper mica powder
- Glass eye cabochon (turquoise slit pupil)
- Small teardrop cutter or sculpting tools
- Ball stylus tool
- Needle tool
- Liquid polymer clay (optional)
- Gloss varnish
- Oven for baking
Step 1: Preparing the Core and Eye
-
Form the base:
Start by conditioning a ball of scrap clay about the size of a golf ball. Flatten the bottom slightly so it sits stable on your work surface, creating a dome shape. -
Place the eye:
Push your glass dragon eye cabochon firmly into the center of the dome. If you need extra security, add a drop of liquid polymer clay behind the cabochon before seating it deep into the clay. -
Create the first eyelid:
Roll two small snakes of clay and flatten them. Place them directly bordering the glass cabochon—one on top and one on bottom—to form the inner eyelid rim. Smooth the edges into the base clay.
Step 2: Scaling the Beast
-
Prepare the scales:
Roll out a sheet of clay to a medium thickness. Use a small teardrop cutter to punch out numerous individual scales. If you don’t have a cutter, roll tiny balls and flatten them into teardrops with your finger. -
Apply mica powder:
Brush your bronze mica powder over the raw clay scales before attaching them. This gives a much smoother metallic finish than painting later. -
Begin the outer ring:
Start placing scales at the very bottom edge of the dome, with the pointed end of the teardrop facing outward. Overlap them slightly as you complete the first circle around the base. -
Layer upwards:
add the next row of scales above the first, offsetting them like bricks so the tip of the new scale lies between the two below it. Continue this pattern up the sides of the dome. -
Refine the shape:
As you get closer to the eye, you may need to make the scales slightly smaller. Use your finger to gently press them down so they conform to the spherical shape without losing their texture.
Scales won’t stick?
If scales are falling off the base dome while you work, your base might be too dry. try brushing a very thin layer of liquid clay or translucent liquid sculpey onto the base to act as an adhesive.
Step 3: The Double Eyelid Detail
-
Form the outer lid:
Roll two thicker snakes of clay for the heavy upper and lower outer lids. Taper the ends so they blend nicely at the corners of the eye. -
Coat and attach:
Dust these snakes generously with the bronze mica powder. Apply them over the inner rim you made earlier, creating a distinct ridge that hangs slightly over the eye. -
Blend the transition:
The final row of scales should tuck neatly under or merge with this outer eyelid. Use a sculpting tool to smooth any gaps where the scales meet the heavy lid. -
Add heavy texture:
Using a needle tool or a stiff brush, texture the outer eyelid slightly so it looks like rough, leathery skin, contrasting with the smooth glass eye.
Depth perception
To make the scales pop, apply a dark acrylic wash (watered down black paint) after baking. Wipe it off the raised surfaces immediately, leaving the dark color only in the crevices.
Step 4: Finishing
-
Final check:
Look closely at the piece for any fingerprints on the mica powder. Gently buff them away with a soft brush or add a tiny bit more powder if needed. -
Bake:
Bake the sculpture according to the manufacturer’s instructions for your specific brand of polymer clay. Let it cool completely. -
Clean the eye:
If any mica powder got onto the glass cabochon, use a damp cotton swab or a little alcohol to wipe the glass clean. -
Varnish:
For a wet look, you can apply gloss varnish to the clay eyelids, but I prefer leaving the metallic scales matte to let the glass eye really shine as the focal point.
Enjoy the creative process and displaying your ancient dragon artifact


What Really Happens Inside the Kiln
Learn how time and temperature work together inside the kiln to transform clay into durable ceramic.
Fire Element Eye With Flame Ridges
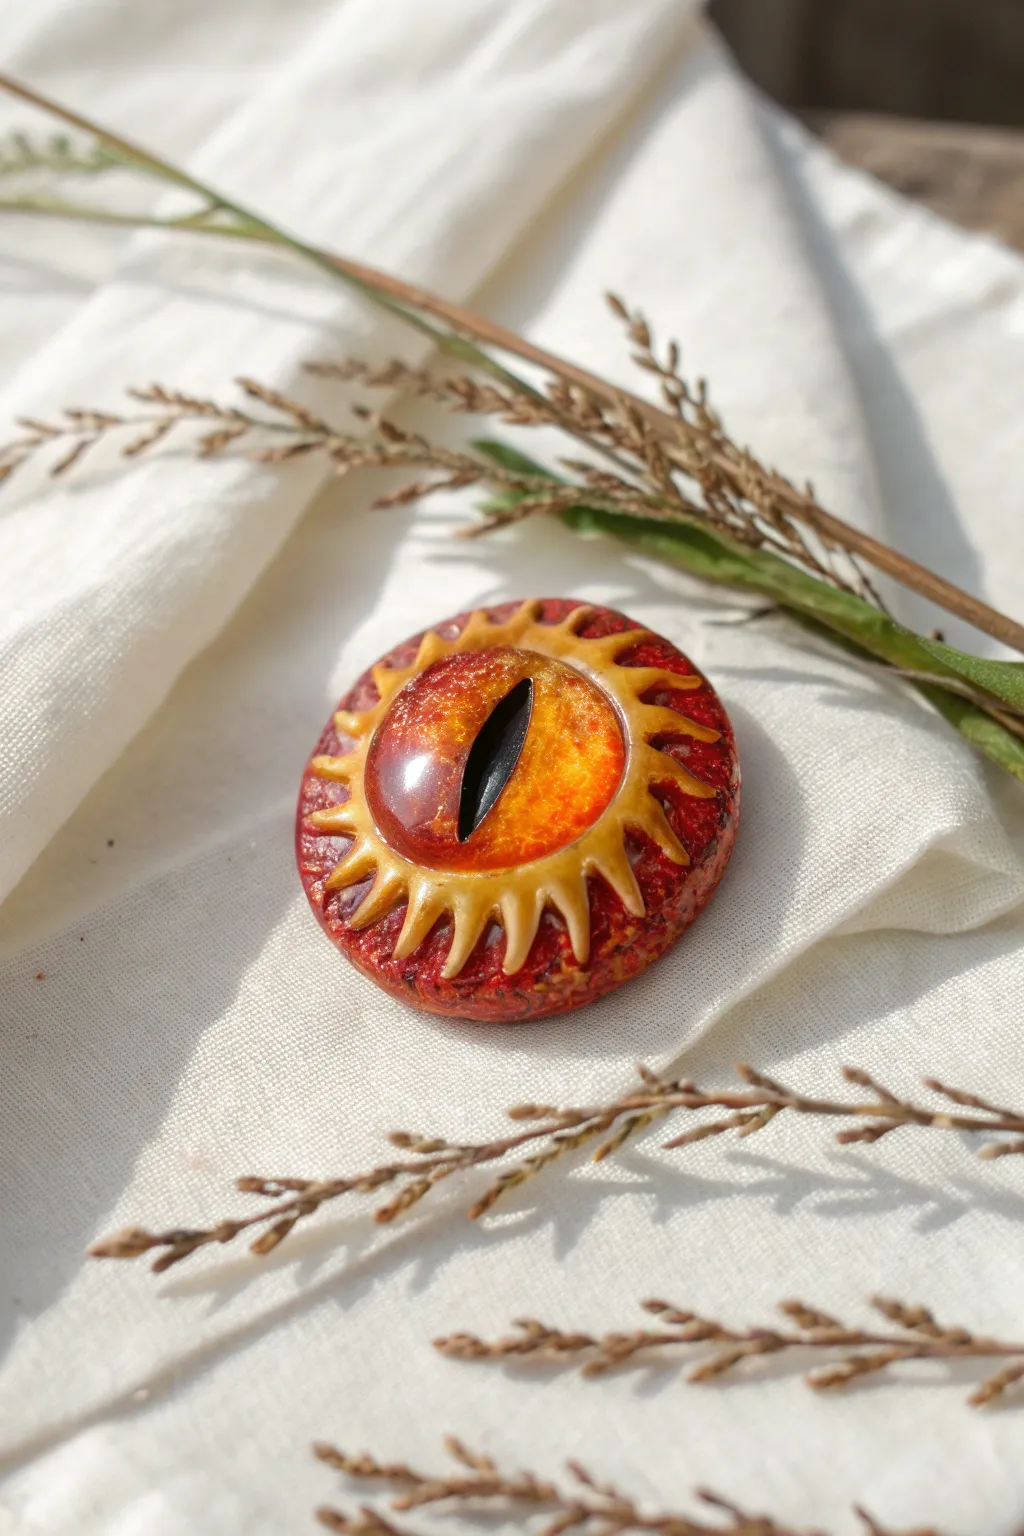
Capture the essence of a blazing sun with this fiery dragon eye sculpture. Featuring a mesmerizing glass cabochon iris surrounded by jagged, sun-ray ridges, this piece glows with intense reds, oranges, and golds.
Step-by-Step
Materials
- Polymer clay (red, gold, and translucent)
- Glass cabochon (round, approximately 1 inch)
- Acrylic paints (black, bright orange, metallic gold, deep red)
- High-gloss varnish or UV resin
- Sculpting tools (needle tool, ball stylus)
- Detail paintbrush
- Rolling pin or pasta machine
- Texture sponge or sandpaper
Step 1: Creating the Fiery Iris
-
Cabochon prep:
Begin by cleaning the flat side of your glass cabochon with alcohol to remove any fingerprints or oils. -
Painting the pupil:
Using a fine detail brush and black acrylic paint, paint a sharp, vertical slit down the center of the flat side of the glass. Let this dry completely. -
Adding the glow:
Sponge or dab bright orange paint over the dried black pupil, feathering it out towards the edges. While wet, blend in some shimmering gold paint near the outer rim to create depth. Allow to dry. -
Backing the eye:
Once the paint is fully dry, press a thin disk of white or light-colored clay onto the painted back. This reflects light through the glass, making the colors pop.
Heat Wave Trick
Mix yellow chalk pastel heavy dust into translucent clay for the spikes. It creates a stunning ‘inner glow’ effect that paint can’t replicate.
Step 2: Sculpting the Base and Texture
-
Forming the base:
Roll a ball of red polymer clay and flatten it into a thick cookie shape, slightly larger than your cabochon. -
Embedding the eye:
Press the painted cabochon firmly into the center of the red clay base. Ensure the clay hugs the edges of the glass securely. -
Adding texture:
Use a coarse texture sponge or a crumpled ball of aluminum foil to press a rough, stony texture into the red clay surrounding the eye. -
Creating dimension:
Mix a small amount of black clay into your red clay to create a darker red. Roll this into tiny snakes and press them randomly into the textured base to simulate cracked earth.
Turn Up the Heat
Embed tiny glass rhinestones into the red clay base before baking to simulate sparking embers scattered around the main eye for extra sparkle.
Step 3: Sculpting the Flame Ridges
-
Mixing the ridge color:
Blend gold polymer clay with a touch of translucent clay. This will give the flame ridges a semi-transparent, glowing effect after baking. -
Rolling the coils:
Roll your gold mixture into a long, thin snake. Cut it into small segments, about half an inch long each. -
Shaping the spikes:
Roll one end of each segment into a sharp point to create a tear-drop or tooth shape. -
Attaching the ridges:
Place these gold spikes around the perimeter of the glass eye, pointing outward like the rays of a sun. Gently press the base of each spike into the red clay to bond them. -
Refining the shape:
Use a silicone tool or your finger to smooth the transition between the gold spikes and the red base, ensuring they look like they are erupting from the skin. -
Baking:
Bake the piece according to your polymer clay package instructions. Let it cool completely before moving to the finishing touches.
Step 4: Finishing Touches
-
Applying a wash:
Dilute black or dark brown acrylic paint with water. Brush it over the entire red textured area (avoiding the gold spikes), then quickly wipe away the excess with a paper towel. This highlights the cracks and texture. -
Dry brushing:
Dip a dry brush into metallic red or copper paint. Lightly graze it over the textured red areas to bring back the fiery intensity. -
Sealing the eye:
I usually apply a coat of gloss varnish or UV resin specifically to the glass eye to make it shine and protect the seam where clay meets glass.
Display your finished dragon eye as a powerful talisman or turn it into a statement necklace pendant
Ice Element Eye With Frosted Scale Edges
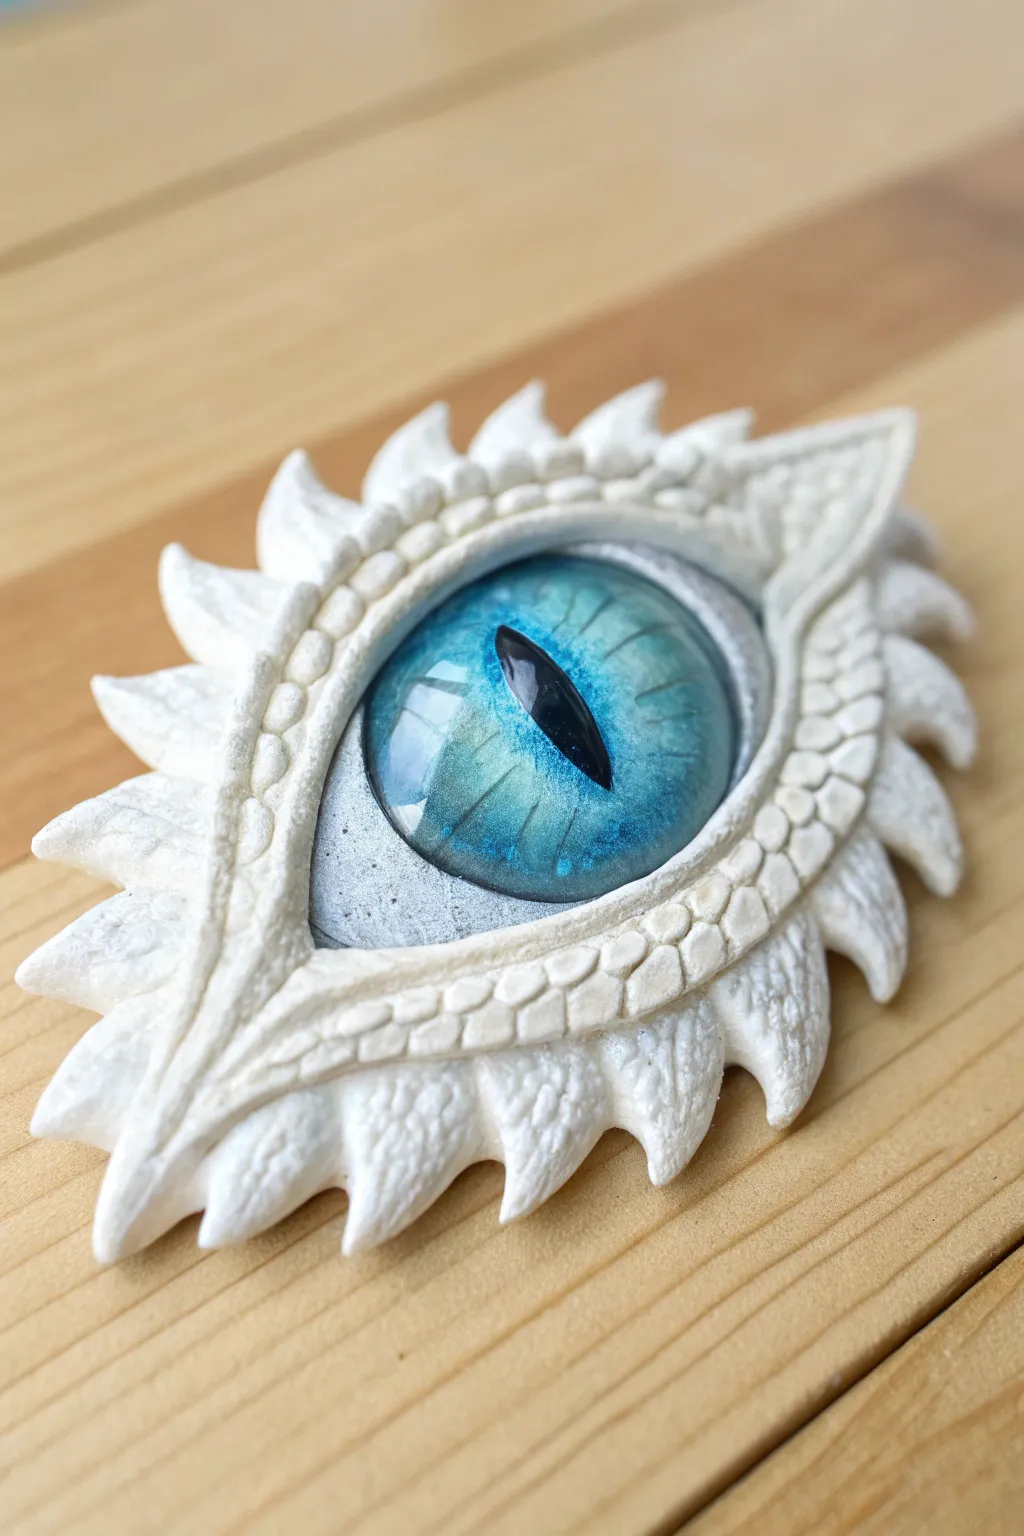
Channel the chill of winter with this striking ice dragon eye sculpture, featuring a piercing blue gaze framed by jagged, frost-white scales. The combination of shimmering metallic accents and textured polymer clay creates a magical artifact that looks as though it was carved directly from an ancient glacier.
Step-by-Step Tutorial
Materials
- White polymer clay
- Clear glass cabochon (approx. 20-25mm)
- Black polymer clay (tiny amount for pupil)
- Metallic blue acrylic paint or mica powder
- Silver acrylic paint
- Sculpting tools (needle tool, ball stylus, rubber shaper)
- Texture tool or stiff brush
- Gloss glaze or UV resin
- Oven for baking
Step 1: The Frozen Gaze
-
Prepare the pupil:
Begin by taking a tiny sliver of black polymer clay. Roll it into a thin spindle shape to create a vertical slit pupil. -
Attach to cabochon:
Press this black clay pupil firmly onto the flat back of your clear glass cabochon. Ensure it is centered and smooth. -
Add the iris color:
Paint the entire flat back of the cabochon, covering the pupil, with a shimmering metallic blue acrylic paint. You might need two coats for opacity. Alternatively, brush blue mica powder onto a thin layer of liquid clay on the back for extra sparkle. -
Create the base:
Roll a sheet of white polymer clay to about 3-4mm thickness. Cut an oval shape slightly larger than your eye cabochon to serve as the backing foundation. -
Mount the eye:
Place the painted cabochon (paint side down) into the center of your white clay base. Press it gently so it adheres.
Step 2: Sculpting the Eyelids
-
Upper and lower lids:
tRoll two thick coils of white clay. Place one curving over the top of the eye and one under the bottom, creating an almond shape. -
Blend the seams:
Use a modeling tool to blend the outer edges of these coils onto the base clay, ensuring a seamless transition. Leave the inner edges touching the glass sharp and defined. -
Basic scale texture:
With a small loop tool or a detailing needle, gently press a scale pattern into the eyelids. Start near the corner of the eye and work outward, creating small, interlocking U-shapes. -
Define the rim:
Run a tool along the very edge of the eyelid where it meets the glass to create a smooth, distinct rim separate from the scaly texture. -
Silver accent:
Before adding the outer spikes, I like to brush a tiny amount of silver mica powder or metallic paint into the crevices of the inner eyelids to give them depth.
Cloudy Eye Fix
If the glass eye looks cloudy after baking, trapped air might be the culprit. Always press the pupil and paint firmly to the glass back to remove bubbles before attaching it to clay.
Step 3: The Icy Spikes
-
Forming spike triangles:
Create numerous small triangles of white clay. Make them vary in size, with larger ones for the center top and bottom, tapering to smaller ones at the corners. -
Attaching the fringe:
Press these triangles onto the outer perimeter of your eye sculpture. Arrange them so they point outwards like sun rays or jagged ice shards. -
Texturing the spikes:
Use a needle tool to drag lines from the base of each spike toward the tip. This creates a striated, feathery texture resembling frost patterns. -
Adding surface detail:
Stipple the surface of the spikes lightly with a stiff toothbrush or texture sponge to remove fingerprints and add a porous, organic look. -
Final shaping:
Gently curve the tips of the spikes upward or downward to give the piece movement and a more natural, biological flow.
Glacial Glow
Mix glow-in-the-dark powder into your white clay for the outer spikes. When the lights go out, your dragon eye will emit a ghostly, frozen luminescence.
Step 4: Baking and Finishing
-
Bake carefully:
Bake the piece according to your polymer clay manufacturer’s instructions. Usually, this is around 275°F (130°C) for 15-30 minutes. -
Cool down:
Let the sculpture cool completely in the oven to prevent the glass cabochon from cracking due to thermal shock. -
Whitewash finish:
Apply a very diluted wash of grey or silver acrylic paint over the textured white clay, then immediately wipe off the high points. This shadows the crevices. -
Dry brushing:
Using a dry brush with pure white paint, lightly brush over the tips of the scales and spikes to highlight the frost texture. -
Protective glaze:
Finish by applying a coat of gloss glaze or UV resin strictly to the glass eye to make it look wet and alive, keeping the clay matte.
Display your frozen creation on a treasure chest or turn it into a powerful pendant to ward off the heat

TRACK YOUR CERAMIC JOURNEY
Capture glaze tests, firing details, and creative progress—all in one simple printable. Make your projects easier to repeat and improve.
Ocean Element Eye With Waves and Bubbles
Capture the spirit of the sea with this stunning dragon eye sculpture, featuring swirling wave patterns and a mesmerizing teal gaze. The combination of pearl-white clay and a deep oceanic glass eye creates a mysterious artifact that looks like it washed ashore from a lost kingdom.
Step-by-Step Tutorial
Materials
- White or pearl polymer clay (e.g., Premo or Fimo)
- 30mm or 40mm glass cabochon (clear)
- Teal and black metallic acrylic paint
- Fine iridescent blue glitter
- Sculpting tools (needle tool, ball stylus set)
- Small paintbrush
- Rolling pin or pasta machine
- Circle cutter (slightly larger than the eye)
- Clear gloss varnish or UV resin
- Baking sheet and parchment paper
- Oven (dedicated to crafting)
Step 1: Crafting the Iris
-
Paint the pupil:
Begin with your clear glass cabochon. On the flat back side, use a fine detail brush and black paint to draw a sharp, vertical slit pupil. Let this dry completely before moving on. -
Add the iris color:
Mix a small amount of teal metallic paint with fine blue glitter. Apply this mixture in radial strokes moving outward from the black pupil to the edge of the glass. The brush strokes help mimic real eye fibers. -
Backing layer:
Once the iris layer is dry, paint the entire back of the cabochon with a solid coat of white or silver paint to make the colors pop from the front. Allow this to cure fully.
Clean Clay Tip
White clay picks up lint easily. Keep a scrap piece of ‘garbage clay’ nearby to roll in your hands periodically, which pulls dust off your fingers before you touch the main project.
Step 2: Sculpting the Base
-
Prepare the base:
Condition your white or pearl polymer clay until it is soft and pliable. Roll a ball of clay and flatten it into a thick disc, slightly larger than your glass eye. -
Embed the eye:
Press the painted glass cabochon firmly into the center of the clay disc. Pull the clay up slightly around the edges of the glass to secure it. -
Form the eyelids:
Roll two snakes of clay, tapering them at both ends. Place one over the top of the eye and one across the bottom to create the eyelids. -
Bevel the edges:
Use a modeling tool or your finger to smooth the outer edges of the eyelid snakes down into the base, blending the seams so they disappear. Keep the inner edge against the glass sharp. -
Detail the inner eye:
Using a needle tool, gently etch fine lines into the eyelids radiating outward from the corner of the eye to simulate wrinkled skin or fine scales.
Step 3: Creating the Ocean Texture
-
Add the wave border:
Roll a longer, slightly thicker snake of clay. Wrap this around the entire perimeter of the eye sculpture to form a border rim. -
Blend the rim:
Smooth the inner edge of this border snake into the main body of the sculpture, creating a seamless transition. -
Sculpt the swirls:
Using a medium-sized ball tool, press into the clay border and drag it into a curl shape to create the stylized ocean waves seen in the image. Repeat this swirling pattern all the way around the rim. -
Add bubble accents:
Roll very tiny balls of clay and press them gently into the centers of the swirls or the negative spaces between waves. Use a small ball tool to indentation the center of some bubbles for texture. -
Refine the surface:
Lightly brush the clay with a little baby oil or clay softener to smooth out any fingerprints before baking. I find this step crucial for that polished, stone-like finish. -
Bake the piece:
Bake the sculpture according to your polymer clay manufacturer’s instructions (usually 275°F/135°C for 15-30 minutes). Let it cool completely in the oven. -
Antique finish (Optional):
To enhance the texture, apply a very watered-down wash of light brown acrylic paint. Wipe it away almost immediately with a damp detailing cloth, leaving pigment only in the deep crevices.
Sea Glass Effect
Mix translucent clay with a tiny dot of blue alcohol ink and use this for the wave border. After baking, it will have a semi-clear, frosty look like real sea glass found on the beach.
Set your finished dragon eye on a shelf or turn it into a unique pendant to carry a piece of the ocean with you
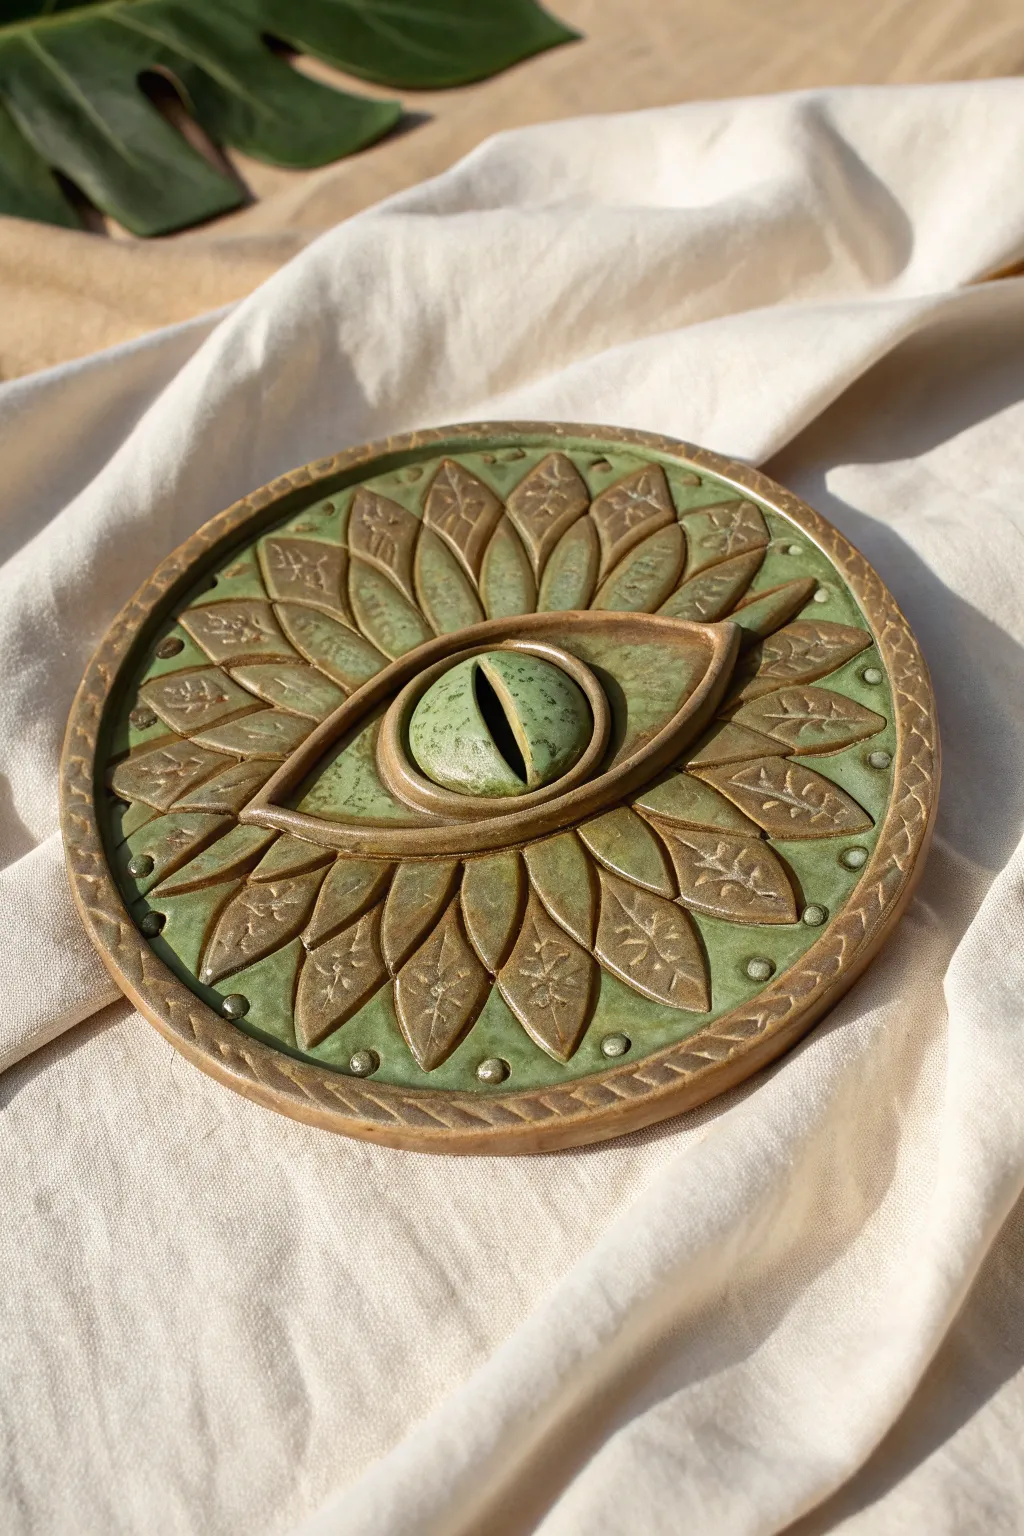
Mini Dragon Eye Pendant-Style Plaque
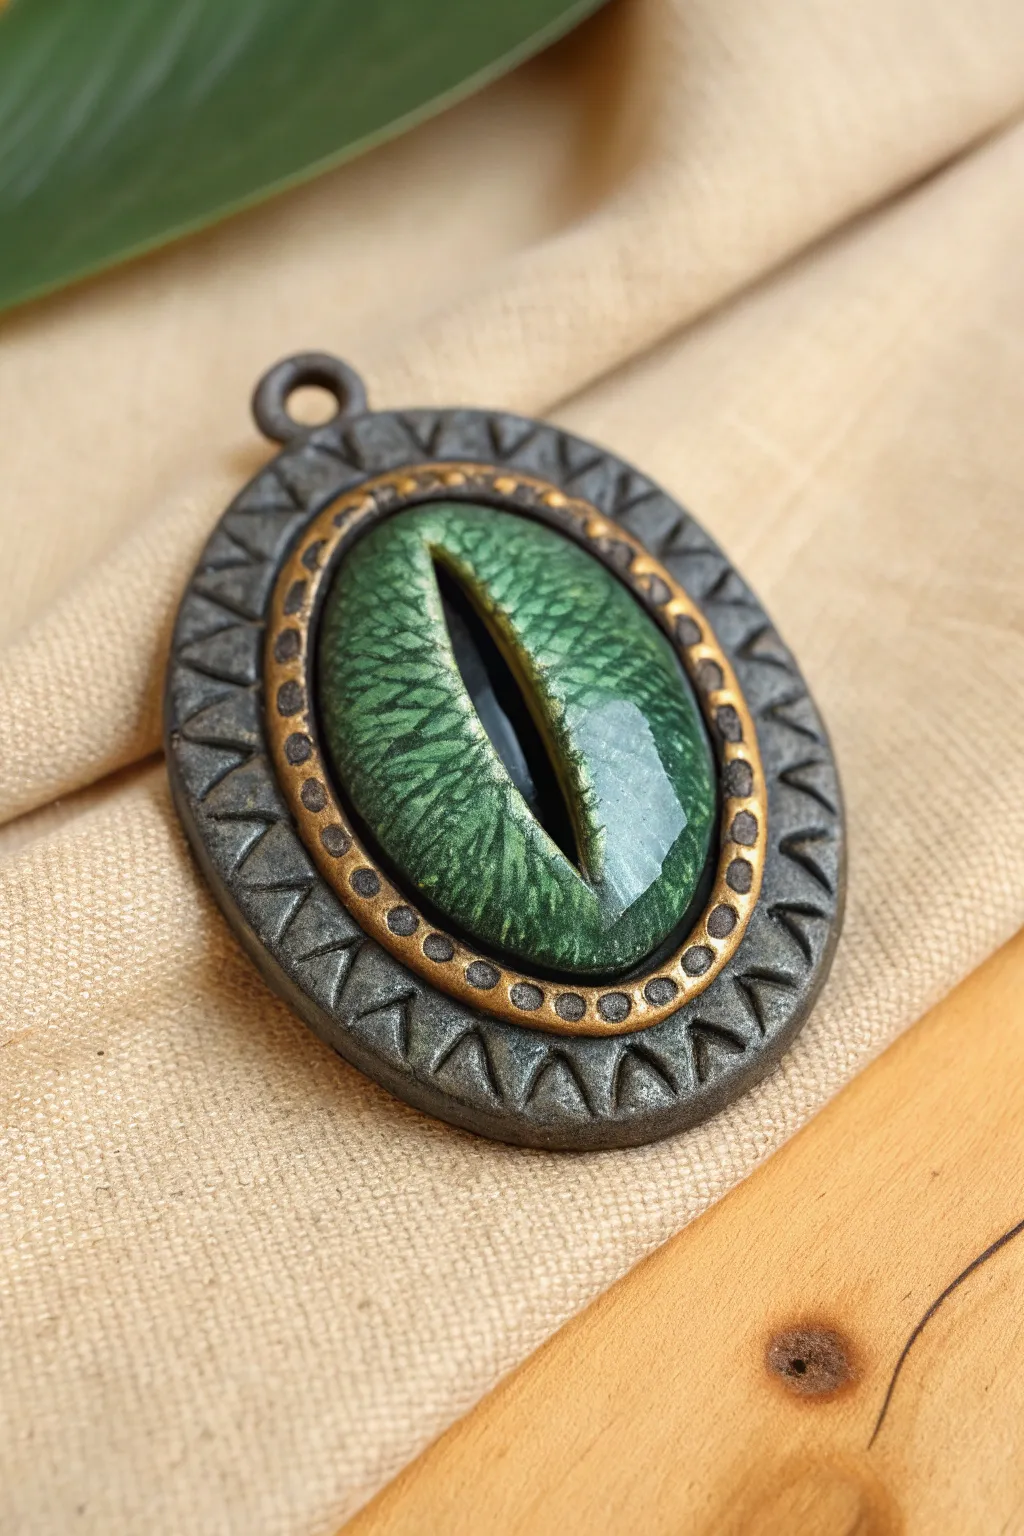
This striking oval pendant captures the gaze of a mystical beast, featuring a textured green slit-pupil eye set within an ornate, metallic-finish frame. The dual-layered bezel combines rustic stamping with elegant gold detailing to create an artifact that looks centuries old.
Detailed Instructions
Materials
- Polymer clay (black, white, and translucent)
- Glass cabochon (oval, approx. 25mm)
- Acrylic paints (metallic green, black, gold, silver/pewter)
- Fine detail paintbrush
- Sculpting tools (needle tool, small ball stylus)
- Triangle stamping tool (or a shaped wire cutter)
- UV resin or gloss varnish
- Jump ring or eye pin for hanging
- Pasta machine or rolling pin
- Oval cutter set
Step 1: Crafting the Iris
-
Prepare the base:
Start by mixing a small amount of green metallic acrylic paint into translucent polymer clay until you achieve a rich, shimmering jade color. Roll this into a small ball. -
Shape the pupil:
Roll a very thin snake of black clay. Position this vertically in the center of your green ball and press it flat to create the slit pupil characteristic of dragon eyes. -
Add texture:
Using a needle tool, gently scratch fine lines radiating outward from the black pupil through the green clay to simulate fibrous iris texture. -
Attach the lens:
Press your oval glass cabochon firmly onto the clay eye designs, ensuring no air bubbles are trapped. The magnification will instantly bring the texture to life. -
Trim excess:
Trim away any clay that squishes out past the edges of the glass cabochon so you have a clean, self-contained eye unit.
Step 2: Sculpting the Bezel
-
Create the backplate:
Roll out a sheet of black clay to about 3mm thickness. Use an oval cutter slightly larger than your cabochon to create the base. -
Position the eye:
Place your finished glass eye directly in the center of the black oval base, pressing gently to secure it. -
Form the inner rim:
Roll a thin snake of black clay and wrap it snugly around the base of the glass cabochon. Flatten it slightly with a modeling tool to create a smooth transition. -
Add detail dots:
Using a small ball stylus or a dotting tool, press indentations evenly around this inner clay rim. These will become the gold faux-rivets later. -
Create the outer frame:
Roll a second, slightly thicker snake of black clay. Wrap this around the outside of the inner rim to broaden the pendant’s profile. -
Stamp the pattern:
Using a triangle-shaped tool or the edge of a clay knife, stamp a repeating triangular pattern into this outer ring. Ensure the points of the triangles face inward toward the eye. -
Add the hardware:
Insert a metal eye pin into the top of the clay oval for hanging. I usually add a drop of liquid clay on the pin’s shaft for extra bonding strength. -
Bake the piece:
Bake the pendant according to your polymer clay manufacturer’s instructions (usually 275°F/135°C for 15-30 minutes). Let it cool completely.
Pro Tip: Depth of Gaze
Before placing the glass cabochon, paint the back of the glass with a thin layer of interfere green paint. It adds a ghostly shimmer that changes depending on the light angle.
Step 3: Metallic Finishing
-
Dry brush the metal:
To achieve the aged pewter look, dip a stiff brush into silver or pewter metallic paint and wipe most of it off on a paper towel. Lightly brush over the textured outer ring, catching only the raised surfaces. -
Highlight the rivets:
Use a fine detail brush and metallic gold paint to carefully fill in the inner ring of dots and the rim immediately surrounding the glass eye. -
Antiquing wash:
Mix a very watery wash of black acrylic paint. Brush it over the entire metal frame and quickly wipe the surface with a damp cloth/paper towel. This leaves dark paint in the deep crevices of the triangle stamps. -
Final seal:
Once the paint is fully dry, coat the clay parts with a matte or satin varnish to protect the finish without competing with the glossy glass eye.
Level Up: Gemstone Scales
Instead of a plain texture for the iris, press tiny metallic flakes or nail art glitter powder into the green clay before attaching the glass lens for a magical, crystalline effect.
Now you have a mysterious talisman ready to guard your neck or display on your wall