If you’ve been craving a little gothic charm on your shelf, a clay gargoyle is the perfect mix of spooky and cute. I love how you can start with a simple lump of air-dry clay or ceramic clay and end up with a character that feels totally yours.
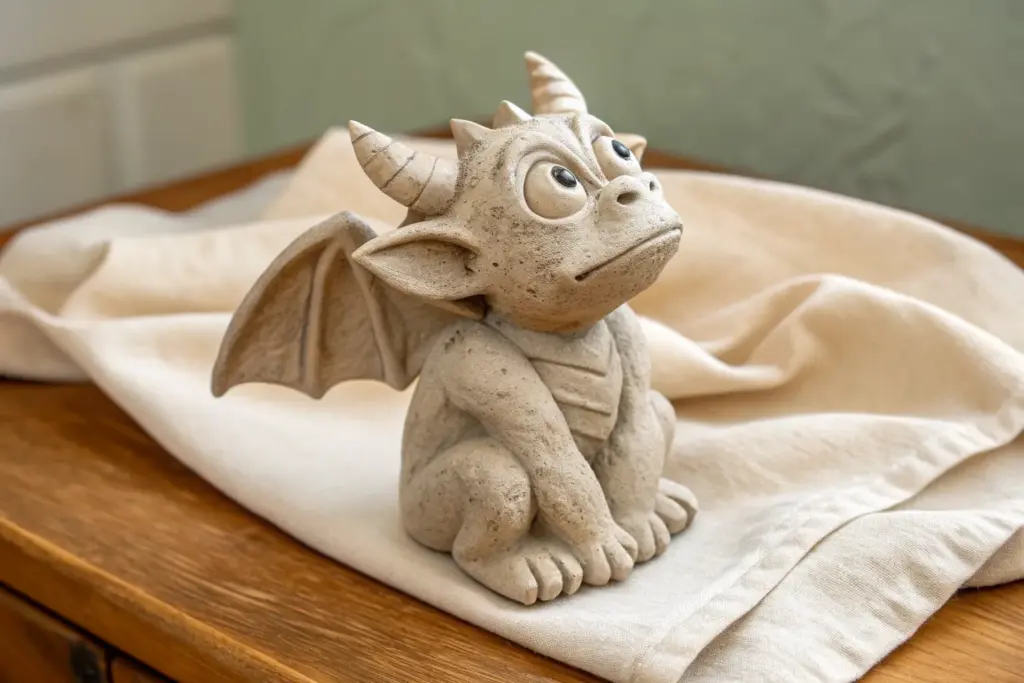
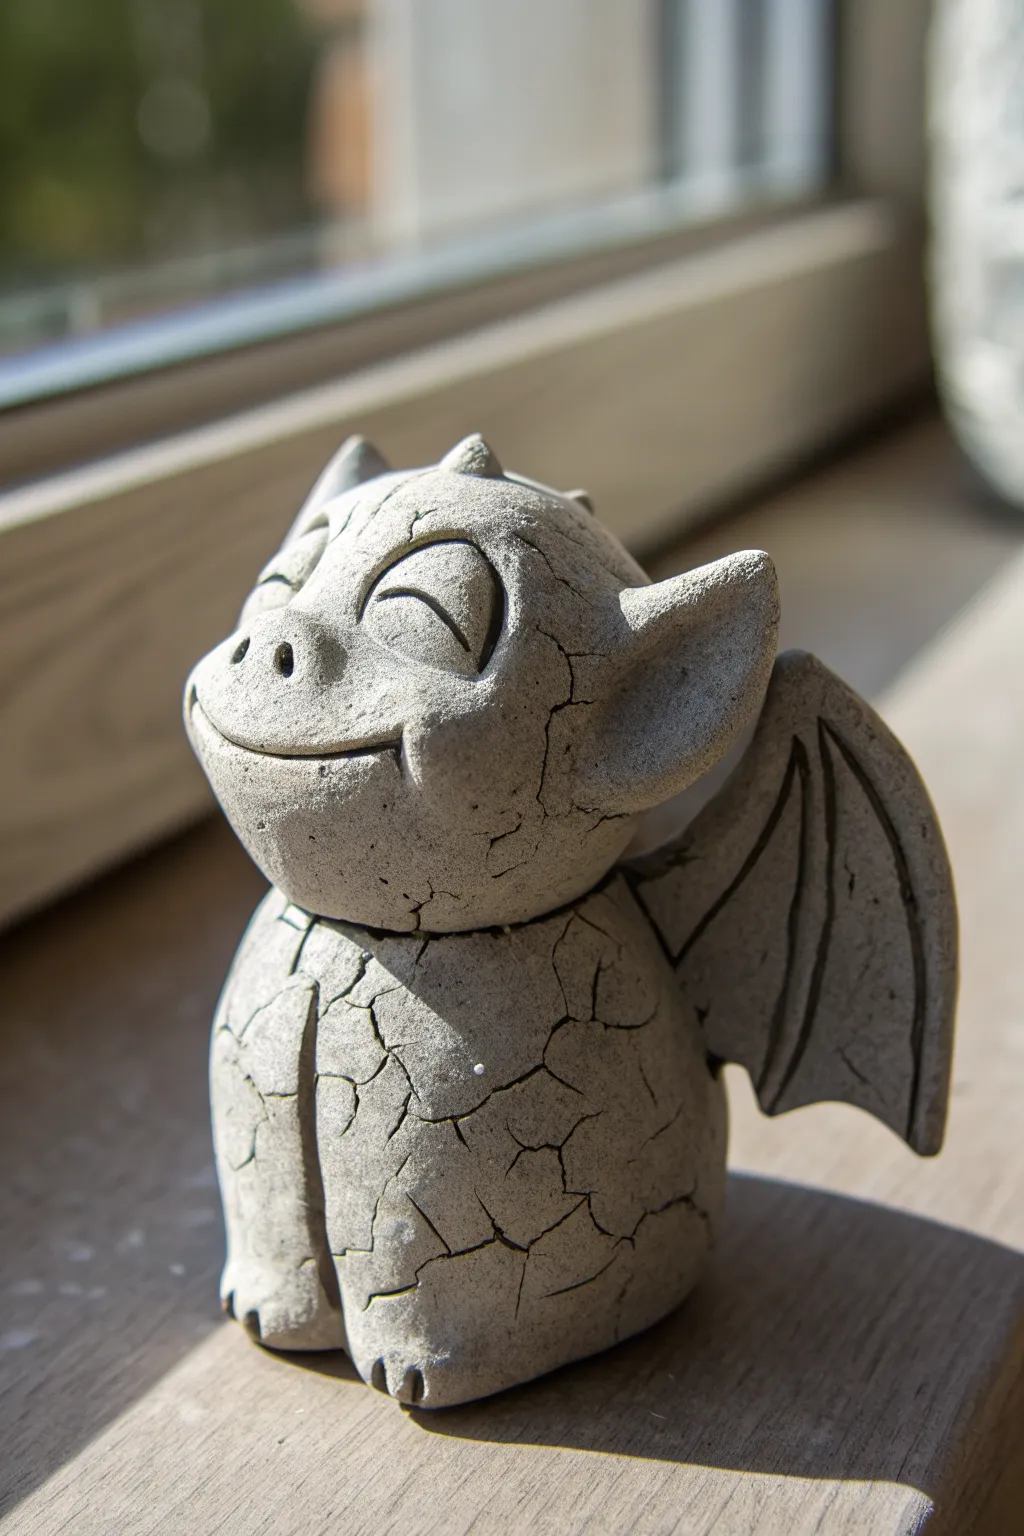
Big Open-Mouth Gargoyle “Howl”
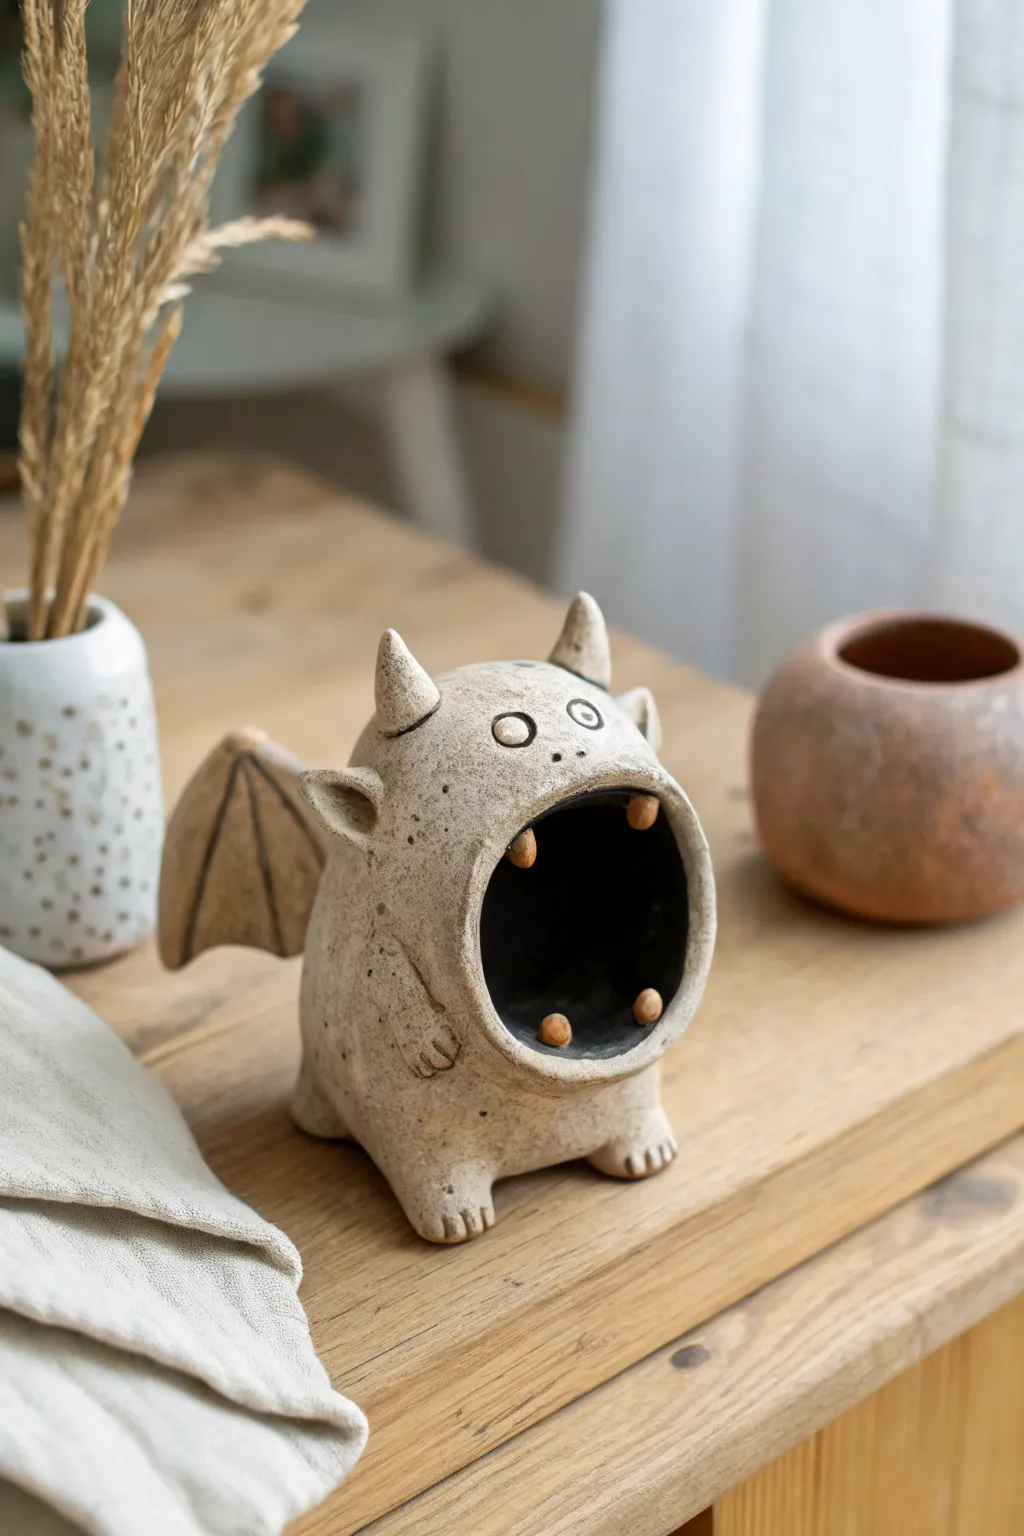
This whimsical little monster features a massive open mouth perfect for holding trinkets, air plants, or simply looking surprised. With its textured, speckled beige clay and stubby wings, it adds a touch of adorable spookiness to any shelf.
Detailed Instructions
Materials
- Speckled sandstone or stoneware clay
- Pottery tools (needle tool, wood modeling tool, rib)
- Black underglaze
- Clear matte glaze
- Small sponge
- Scoring tool (or fork)
- Slip (clay + water slurry)
- Rolling pin
- Canvas work surface
Step 1: Forming the Body
-
Pinch the base:
Start with a ball of clay roughly the size of a large orange. Insert your thumb and begin pinching the walls to create a hollow, rounded pot shape. This will be the main body. -
Shape the howl:
Instead of keeping the rim level like a bowl, gently pull and stretch one side of the opening upwards to create a high forehead, leaving the bottom lip lower. The opening should face forward, not straight up. -
Refine the surface:
Use a smooth kidney rib to compress the exterior walls, but don’t smooth it perfectly—the speckled clay looks best with a slightly organic, hand-built texture. -
Add stubborn legs:
Roll four small, chunky cylinders of clay. Score and slip the bottom of the body and attach these legs. Use a wood tool to blend the seams thoroughly so they look like they grow out of the body. -
sculpt toes:
Press a small wood modeling tool into the front of each foot to create three distinct little toes.
Mouth Collapse?
If the wide mouth sags while working, wad up a piece of newspaper or paper towel and stuff it inside the oral cavity to support the roof of the mouth while the clay stiffens.
Step 2: Adding Character Features
-
Craft the wings:
Roll out a small slab of clay about 1/4 inch thick. Cut out two triangle shapes with curved edges. -
Wing details:
Use a needle tool to incise lines radiating from the corner of the wing to mimic bat-like webbing. Score and slip them onto the back of the monster. -
Arm placement:
Create two small tapered coils for arms. Attach them to the sides of the belly so they rest lazily against the body. Add tiny incised lines for fingers. -
Horns and ears:
Roll two small cones for horns and two slightly flatter, leaf-shaped pieces for ears. Attach the horns high on the forehead and the ears just below them, blending the clay smoothly. -
The eyes:
Make two small, flat discs of clay and press them onto the upper face. Use a small tube or the back of a tool to impress a pupil circle in the center of each. -
The teeth:
Roll very tiny balls of clay for the teeth. Slip and score four of them specifically inside the mouth rim—two on top, two on the bottom—so they peek out.
Incense Upgrade
Before firing, poke a small hole in the back of the mouth leading to the interior. This turns your gargoyle into an incense cone burner where smoke drifts out the mouth.
Step 3: Firing and Glazing
-
Bisque fire:
Allow the piece to dry slowly under plastic for at least a week to prevent cracking, then bisque fire it to your clay body’s specifications (usually Cone 04). -
Apply black underglaze:
Paint the entire interior of the mouth with solid black underglaze. Also, carefully paint the pupil circles and the incised lines of the wings. -
Wipe back detail:
I like to use a damp sponge to wipe the surface of the wings gently. This leaves the black in the recessed lines but reveals the clay color on the high points. -
Glaze the teeth:
Apply a tiny dot of a warm brown or orange underglaze or glaze just to the teeth tips to make them stand out against the black mouth. -
Final coat:
Dip or brush the entire piece in a clear matte glaze. This seals the clay and enhances the natural speckles without making it overly shiny. -
Final fire:
Fire the piece a second time to the maturation temperature of your clay and glaze (often Cone 5 or 6 for stoneware).
Once cooled, your little monster is ready to guard your desk with its wide-mouthed charm


Crouching Roofline Gargoyle Pose
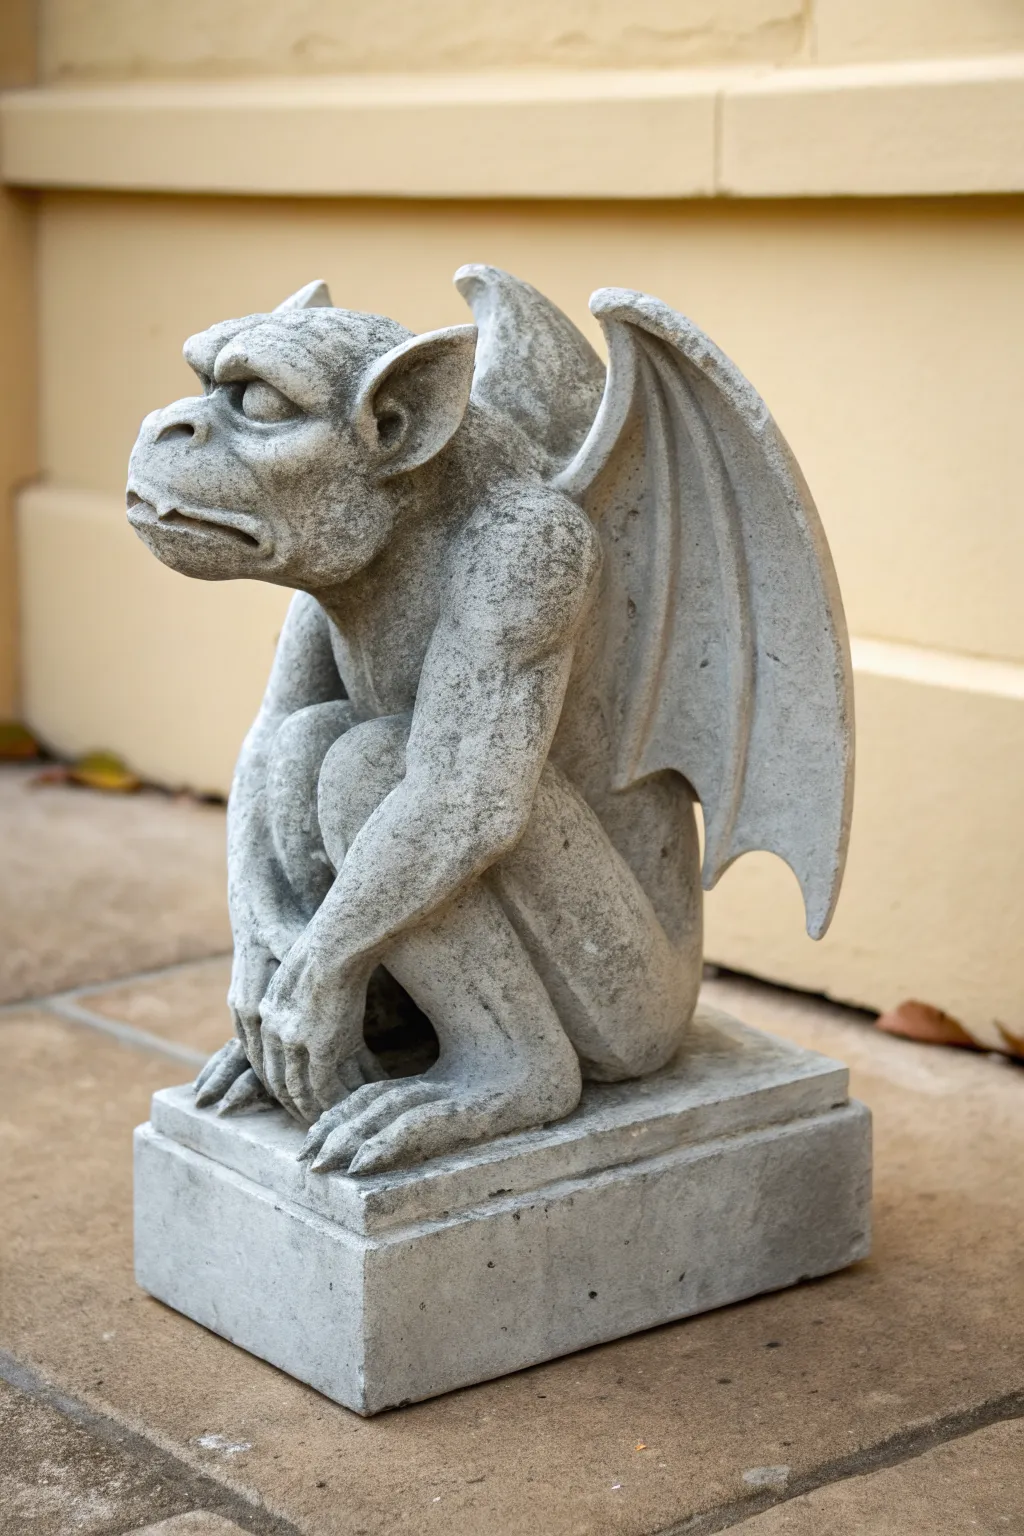
Summon a touch of gothic architecture into your garden or shelf with this crouching roofline gargoyle. Sculpted to capture the brooding posture of classic cathedral grotesques, this project focuses heavily on achieving a convincing, weathered stone texture on a sturdy base.
Step-by-Step Tutorial
Materials
- Polymer clay or air-dry stoneware clay (grey or granite color)
- Strong wire armature wire (12-14 gauge)
- Aluminum foil
- Plywood or wooden square (for the base foundation)
- Sculpting tools (loop tool, needle tool, smoothing rib)
- Texture sponges (natural sea sponge or stiff stippling brush)
- Black acrylic paint (for the wash)
- White or light grey acrylic paint (for dry brushing)
- Masking tape
- Water spray bottle
Step 1: Building the Bones
-
Construct the base armature:
Begin by securing a thick block of foil to your wooden square foundation using masking tape to create the rectangular pedestal. This saves clay and ensures the base is perfectly straight. -
Wire the body:
Twist your heavy-gauge wire to create a spinal column that bends forward into a hunch. Add wire loops for the legs, positioned so the knees will come high up toward the chest. -
Form the wings:
Attach two separate wire structures for the wings to the back of the spine. Shape them into bat-like triangles, ensuring the wire extends to where the wing tips will be. -
Bulk up with foil:
Wrap aluminum foil tightly around your wire skeleton. Focus on building the mass of the hunched back and the crouching thighs. The foil should do 70% of the volume work here.
Stone Texture Secret
Mix a small amount of coarse sand or used coffee grounds directly into your clay before sculpting. This creates an authentic gritty texture that looks incredible when dry-brushed later.
Step 2: Basic Sculpting
-
Apply the base clay layer:
Roll out sheets of your clay (about 1/4 inch thick) and cover the foil armature completely. Press it firmly to eliminate air pockets, blending the seams where sheets meet. -
Define the limbs:
Add coils of clay to the legs to define the high thigh muscles and the shins. The gargoyle is in a deep squat, so emphasize the compression of the calf against the back of the thigh. -
Position the hands and feet:
Form blocky, three-toed feet gripping the edge of the pedestal. For the hands, sculpt them resting heavily on the pedestal surface, with fingers splayed for support. -
Shape the head:
Create a slightly flattened sphere for the head. Push the clay in to create deep eye sockets and pull clay out to form a protruding, snout-like jaw. -
Add the wings:
Cover the wing wires with thin slabs of clay. Score the clay to create the ribbed ‘finger’ bones of the wings, keeping the membrane areas between them slightly concave.
Mossy Overgrowth
For an ancient ruin look, dab tiny amounts of watery green and brown paint into the deepest crevices after sealing, imitating moss growth on the stone.
Step 3: Detailing and Texture
-
Carve the face:
Using a small loop tool, carve out the frown lines around the mouth and the brow ridge. Add a small triangular nose and distinct ears that point backward. -
Add muscular definition:
Use your thumbs to smooth hollows into the torso and neck, suggesting a wiry, muscular build under the ‘skin.’ Don’t over-smooth; a little roughness adds character. -
Texture the surface:
This is crucial for the stone look. Take a stiff brush or a coarse rock and press it gently all over the clay surface. I prefer to use a crumpled ball of aluminum foil for this to get random pitting. -
Refine the pedestal:
Use a straight edge or ruler to sharpen the corners of the rectangular base. Add subtle cracks or chips to the edges to make it look like ancient masonry. -
Create the claws:
Roll tiny cones of clay and attach them to the fingertips and toes for sharp claws. Blend the attachment points smooth.
Step 4: Faux Stone Finish
-
Dry or Bake:
Follow the specific instructions for your clay type. If using air-dry clay, allow at least 48 hours for drying due to the thickness. -
Apply the dark wash:
Mix black acrylic paint with water until it’s very runny. Paint this over the entire sculpture, letting it flow into the deep crevices, textures, and muscle lines. -
Wipe back:
Before the wash is fully dry, use a damp sponge to wipe the paint off the raised surfaces. The black should remain only in the cracks and low points. -
Dry brush the highlights:
Dip a dry, stiff brush into white or light grey paint. Offload almost all the paint onto a paper towel, then lightly whisk the brush over the raised areas to catch the texture. -
Seal the work:
Finish with a matte spray varnish to protect the paint job and remove any unwanted shine, locking in that convincing stone effect.
Place your new guardian on a high shelf or garden wall where he can keep a watchful eye over your domain


Bat-Winged Gargoyle With Slab Wings
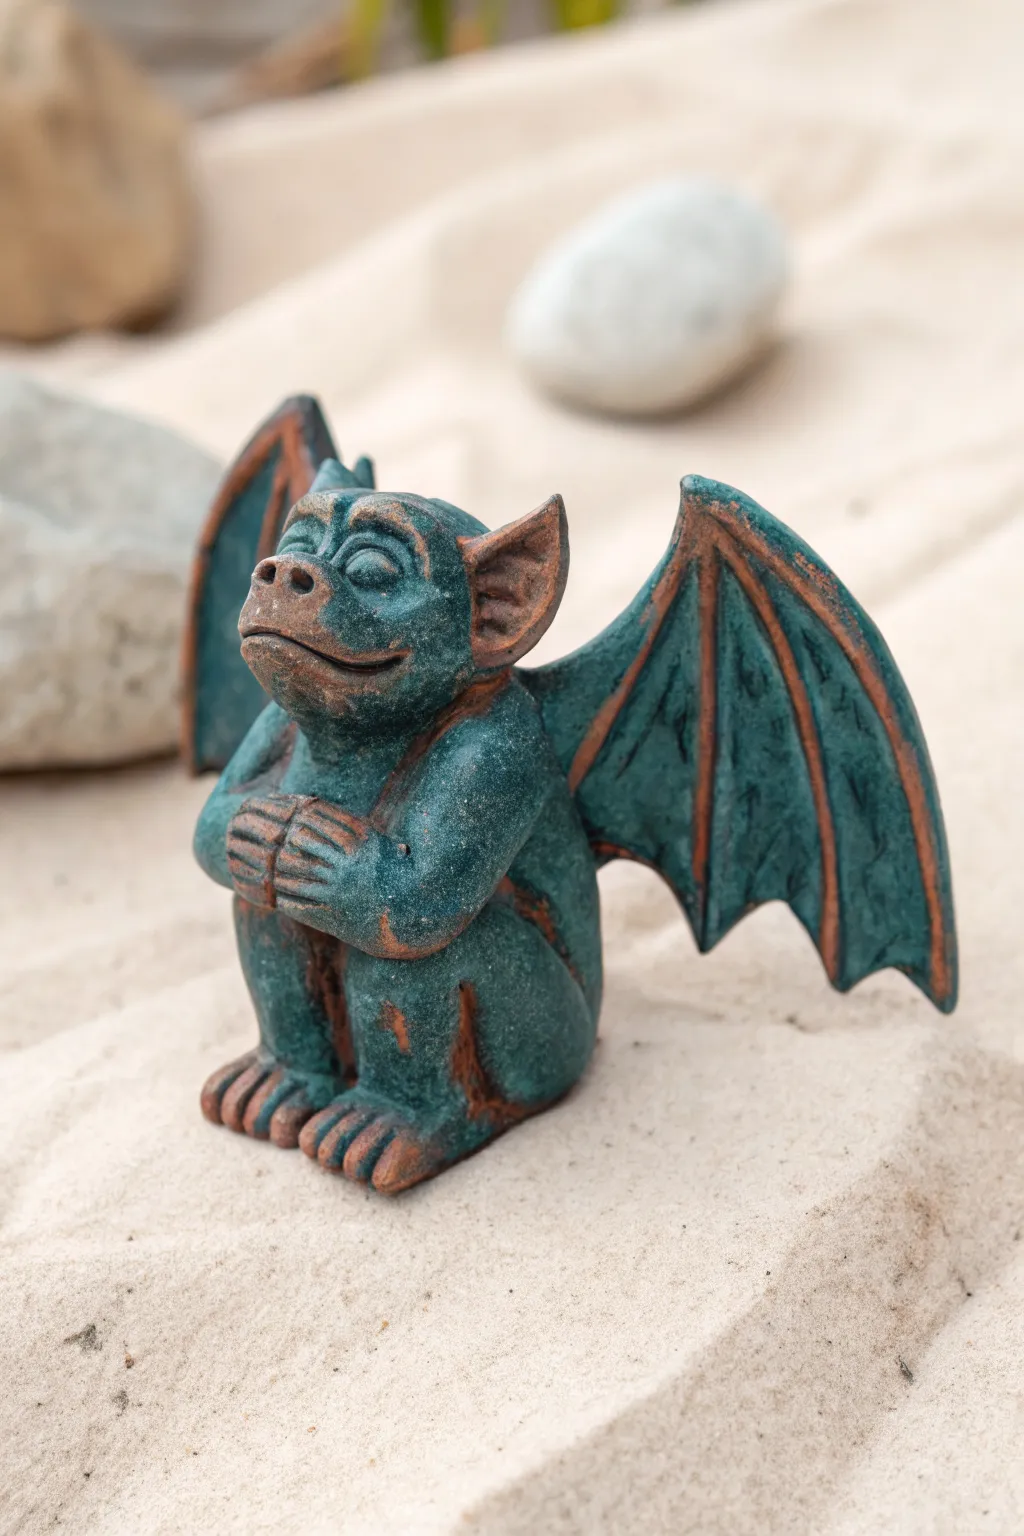
This charmingly mischievous gargoyle sits in a huddled pose, showing off expansive, slab-built bat wings and a heavily textured, oxidized copper finish. The design combines simple pinch-pot techniques with slab construction to create a sturdy, character-filled garden guardian.
Step-by-Step
Materials
- Stoneware clay (groggy for texture)
- Rolling pin and guide strips (wood slats)
- Fettling knife
- Serrated rib tool
- Slip (clay slurry)
- Modeling tools (wooden sculpting sticks)
- Needle tool
- Dark green oxide wash or faux-finish acrylics (dark teal, rust orange, black)
- Sponge
- Clear sealant (if using acrylics)
Step 1: Forming the Body and Head
-
Pinch the base:
Start with a softball-sized lump of clay. Create two pinch pots of roughly equal size. Score and slip the rims, then join them together to form a hollow, enclosed oval shape. Paddle it gently to compress the join and form a sturdy torso. -
Shape the head:
Create a slightly smaller pinch pot sphere for the head. Attach this securely to the top of your torso oval. Blend the clay downwards to create a thick neck, ensuring no trap air pockets exist between the segments. -
Add the legs:
Roll two thick coils of clay for the legs. Attach them to the sides of the body, blending the upper thigh into the torso. Bend the coils at the ‘knee’ so the gargoyle looks like it is squatting. Create large, flat feet with three distinct toes for stability. -
Establish the arms:
Roll two smaller coils for arms. Position them so they wrap around the front of the belly, meeting in the middle. I like to interlace the fingers or have them clasping each other to give the gargoyle a patient, waiting look. -
Refine the hands:
Flatten the ends of the arm coils slightly where they meet. Use a needle tool to carve definition for the fingers, making them look slightly knobby and ancient.
Droopy Wings?
If wings slump while working, prop them up with sponges or crumpled newspaper. Leave these supports in place until the clay becomes leather-hard and can hold its own weight.
Step 2: Sculpting the Face and Wings
-
Build the facial features:
Add small balls of clay for the eyes and a larger lump for the snout. Use a modeling tool to carve out wide nostrils and a long, satisfied grin that stretches across the face. -
Detail the eyes:
Press deep sockets around the eyeballs to give them a heavy-lidded appearance. Carve pupils or leave them blank for a stony look. Add pronounced brow ridges to enhance the gargoyle’s expression. -
Create the ears:
Shape two triangles of clay into pointed ears. Hollow them out slightly with a loop tool. Attach them to the sides of the head, blending the clay thoroughly behind the ears for a strong bond. -
Prepare the wing slabs:
Roll out a slab of clay to about 1/4 inch thickness. Use a needle tool to cut out two large bat-wing shapes. These need to be substantial enough to balance the figure visually. -
Detail the wing membranes:
Roll thin ‘snakes’ of clay and attach them to the surface of the wings to act as the wing bones. Radiate them from the corner where the wing attaches to the body out to the pointed tips. -
Attach the wings:
Score the back of the gargoyle heavily and slip generously. Press the wings onto the back, blending the clay from the wing base into the shoulder blade area. You might need to prop the wings up with folded newspaper or foam while they dry to the leather-hard stage.
Step 3: Finishing and Patina
-
Texture the surface:
Take a stiff bristle brush or a rough sponge and stipple the entire surface of the ‘skin’ to simulate weathered stone. Avoid smoothing it out; texture is key here. -
Bisque fire:
Allow the piece to dry slowly under plastic to prevent warping, especially the wings. Once bone dry, bisque fire the piece according to your clay body’s specifications. -
Apply the base color:
If using acrylics for a faux finish, paint the entire piece a dark brownish-black to get deep into the crevices. Wipe away the high points with a damp rag. -
Add the verdigris:
Dry brush a teal or oxidized copper green over the raised surfaces. Go lighter on the green in deep recesses like the armpits and under the chin to keep the depth. -
Highlight with rust:
Using a small brush, dab distinct rust-orange paint onto the ‘bones’ of the wings, the tips of the toes, the ears, and edges of the fingers. This mimics the weathering of iron or bronze showing through.
Glow-in-the-Dark Gaze
Mix a small amount of glow-in-the-dark powder into your final clear sealant or glaze and apply it only to the eyes. At night, your garden guardian will watch over your plants.
Set your finished protector on a garden rock or bookshelf and enjoy the quiet mischief it brings to the space


Jagged Teeth and Tongue-Out Goofiness
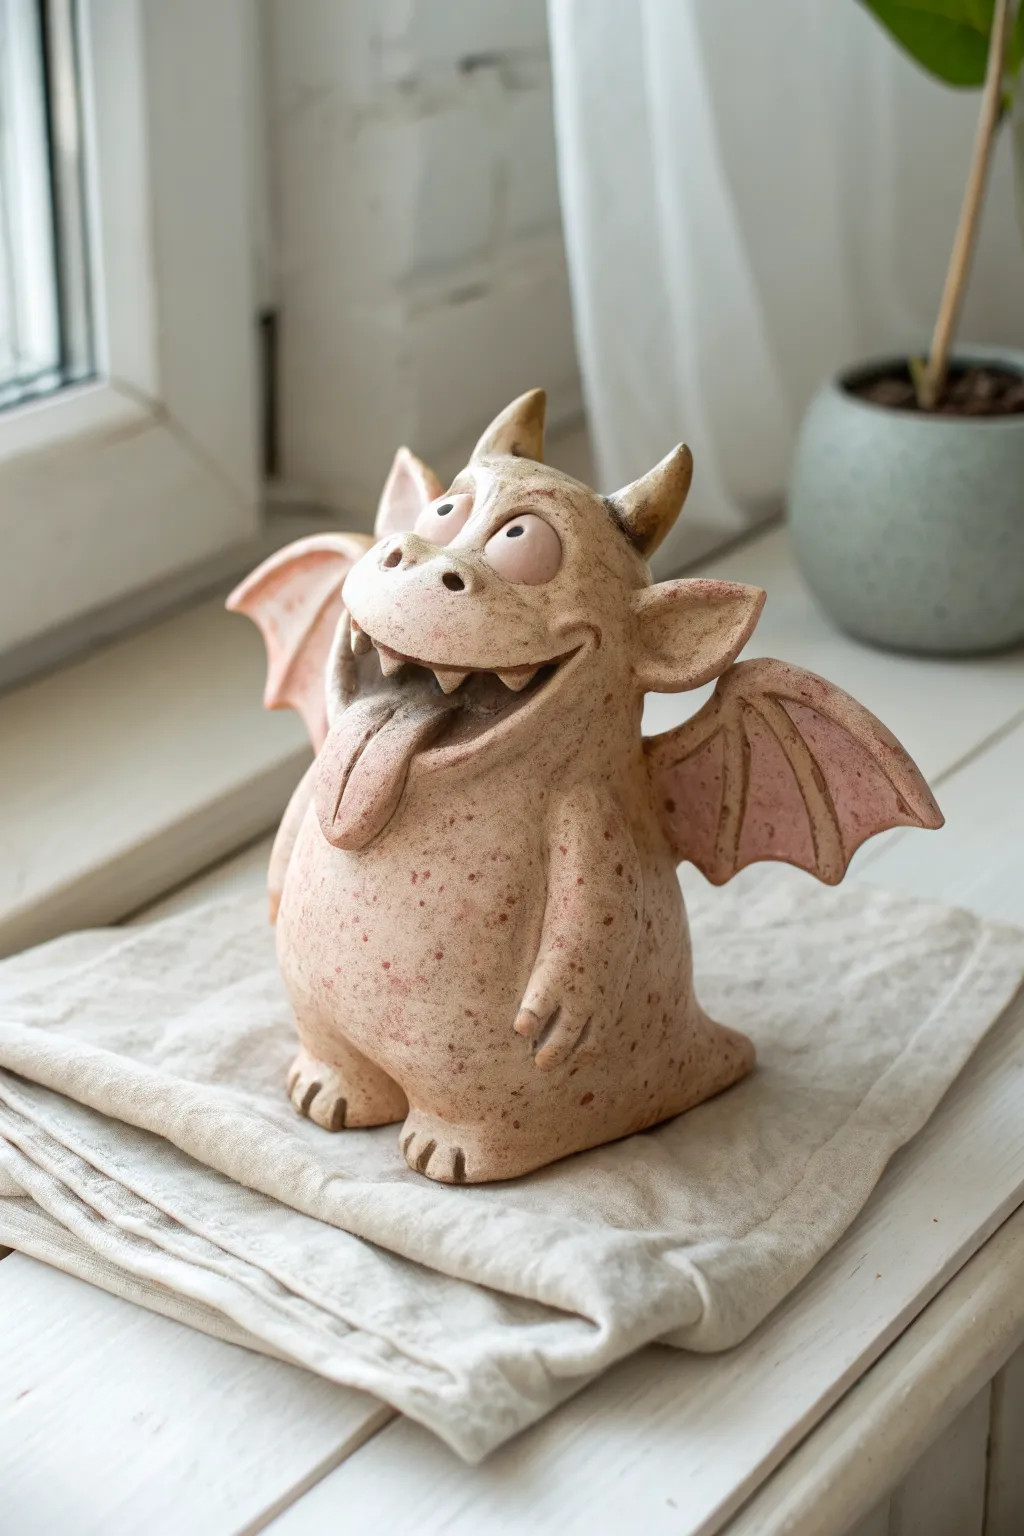
Capture a spirit of pure silliness with this whimsical clay gargoyle, featuring a chubby belly, oversized horns, and a signature tongue-out expression. The speckled, earthy finish gives it a charming, rustic pottery feel perfect for a windowsill companion.
Step-by-Step Tutorial
Materials
- Stoneware or earthenware clay (beige/buff body)
- Needle tool
- Loop tool or carving tool
- Slip (clay mixed with water)
- Scoring tool or old fork
- Small sponge
- Wait-reddish or brown underglaze (for speckling)
- Small paintbrush
- Clear matte or satin glaze
- Kiln access
Step 1: Forming the Body and Head
-
Shape the base:
Start with a softball-sized lump of well-wedged clay. Gently roll and tap it on your work surface to form a pear shape, creating a wide, stable bottom for the belly and a slightly narrower top for the neck area. -
Hollow the form:
Using your thumb, press into the bottom of the pear shape to start a pinch pot. Ideally, you want the walls to be roughly 1/4 to 1/2 inch thick throughout so it doesn’t explode in the kiln. I find using a loop tool helps even out the interior walls if my pinching gets uneven. -
Define the head:
Pinch and manipulate the top third of the pear shape to define a bulbous head. While the clay is still plastic, gently push from the inside out to create a distinct snout area. -
Add the feet:
Roll two small balls of clay and slightly flatten them. Score and slip the bottom front of the body, then attach these balls to form the feet. Use a needle tool to press in three lines on each foot to create toes. -
Create the arms:
Roll two small coils (snake shapes) that taper at one end. Attach the thicker ends to the side of the body, blending the clay seamlessly. Curve the tapered ends down to rest on the belly and add tiny indentations for fingers.
Step 2: Adding the Face and Features
-
Open the mouth:
Cut a wide, curved smile into the snout area using a fettling knife or needle tool. Gently press the lower lip down and the upper lip up to widen the gap, making plenty of room for that big tongue. -
Sculpt the tongue:
Fashion a flat, broad strip of clay that looks like a tongue. Attach it firmly to the back of the mouth cavity. Drape it over the lower lip so it looks like it’s flopping out, and use a tool to draw a line down the center. -
Install the teeth:
Form tiny triangles of clay for the jagged teeth. Slip and score them carefully onto the upper and lower gums. Don’t worry about them being perfect; irregularity adds to the goofy charm. -
Pop on the eyes:
Roll two spheres of clay about the size of large marbles. Attach them to the top of the snout. Use the back of a small paintbrush or a detail tool to press a pupil into each eye. -
Shape the horns:
Roll two cones of clay for the main horns. Score the attachment points on top of the head and secure them. Slightly curve the tips backward or outward for extra character. -
Add the ears:
Create two large triangles. Pinch them slightly to give them a curve, then attach them below the horns. They should stick out sideways like oversized goblin ears.
Air Escape Route
Make sure to poke a discreet pinhole in the bottom of the hollow body and another hidden behind an ear to let expanding hot air escape in the kiln, preventing explosions.
Step 3: Wings and Finishing Touches
-
Build the wings:
Roll out a slab of clay about 1/4 inch thick. Cut out two bat-wing shapes. Use a modeling tool to carve deep lines into the wings to represent the bone structure and membrane folds. -
Attach the wings:
Score the back of the gargoyle heavily and slip the attachment points. Press the wings on firmly. Since they are heavy, support them with small balls of scrap clay underneath while they dry to leather hard. -
Create the tail:
Add a small triangular nub to the lower back base to act as a tail, blending it smoothly into the body. -
Sponge smooth:
Take a slightly damp sponge and wipe over the entire piece to remove hard fingerprints and smooth out rough connection points. This gives it a professional finish. -
Add speckling:
Dip a stiff toothbrush or a splatter brush into watered-down reddish-brown underglaze. Flick the bristles to spray fine speckles all over the raw clay body to mimic a stony texture. -
Bisque fire:
Allow the piece to dry completely (slowly, under loose plastic for a few days to prevent cracking). Consult your clay’s guidelines, but typically bisque fire to cone 04. -
Glaze and final fire:
Once bisqued, apply a wash of diluted iron oxide or a tan stain to the recesses (wings, mouth) and wipe back the high points. You can add a faint pink wash inside the ears and wings. Dip or brush on a clear matte glaze and fire to the clay’s maturity temperature.
Goofy Gaze Trick
Make the pupils slightly different sizes or point them in slightly different directions (strabismus) to instantly maximize the ‘derpy’ and lovable factor.
Place your finished gargoyle near a window or garden path to greet visitors with a cheeky grin

The Complete Guide to Pottery Troubleshooting
Uncover the most common ceramic mistakes—from cracking clay to failed glazes—and learn how to fix them fast.
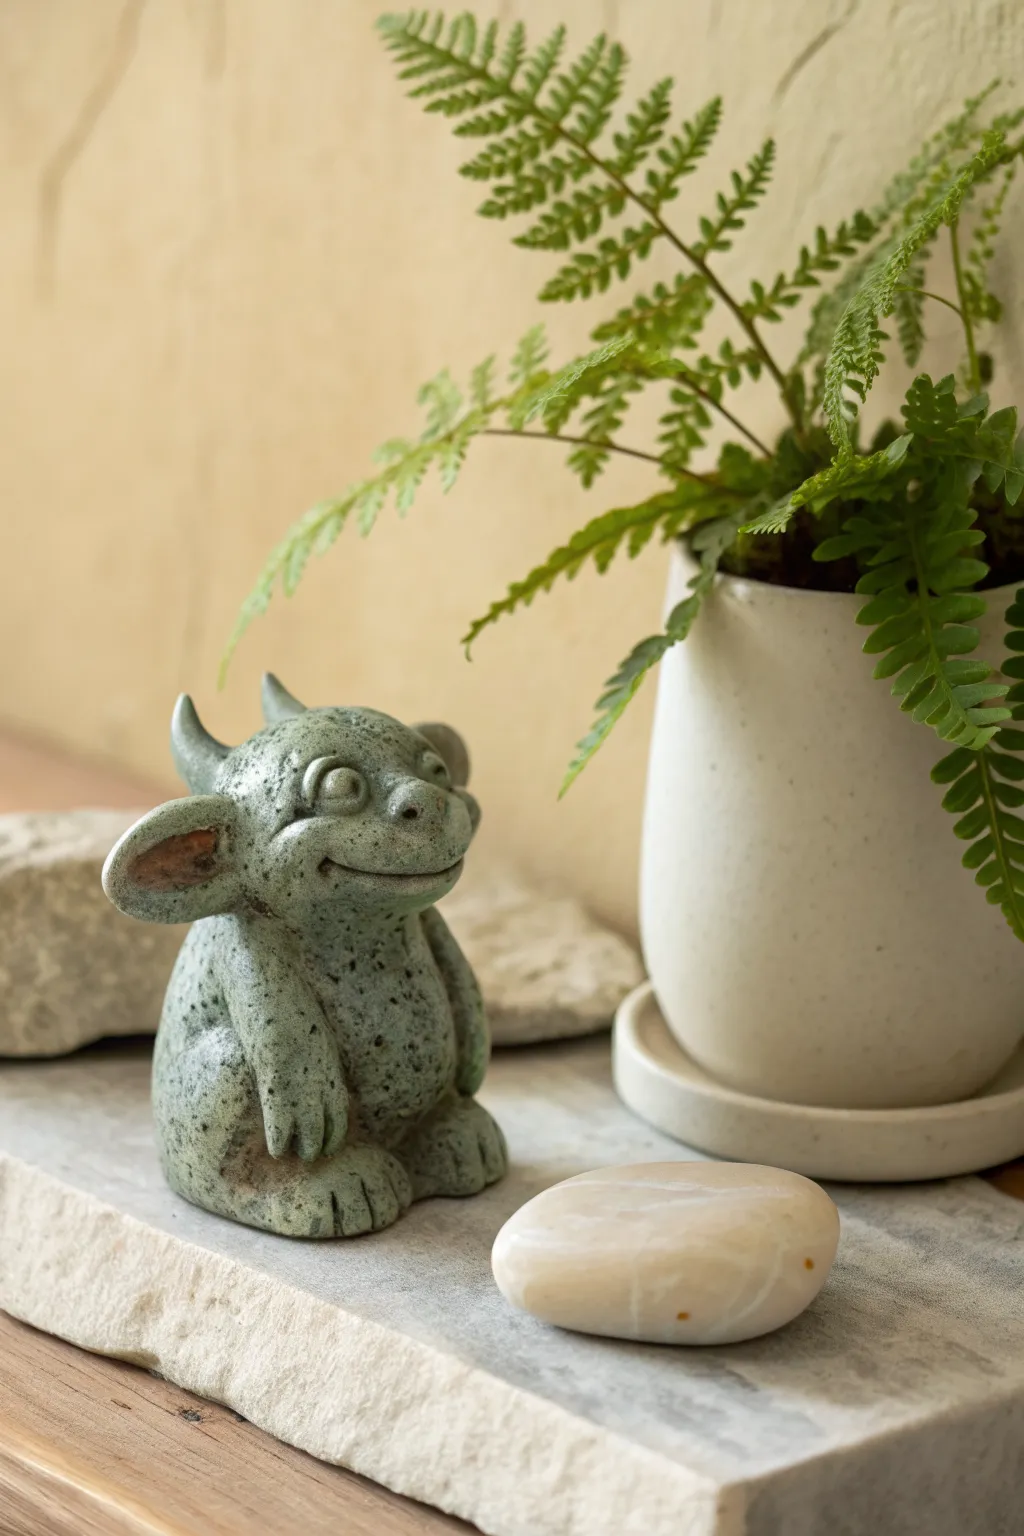
Mini Gargoyle Trio With Different Moods
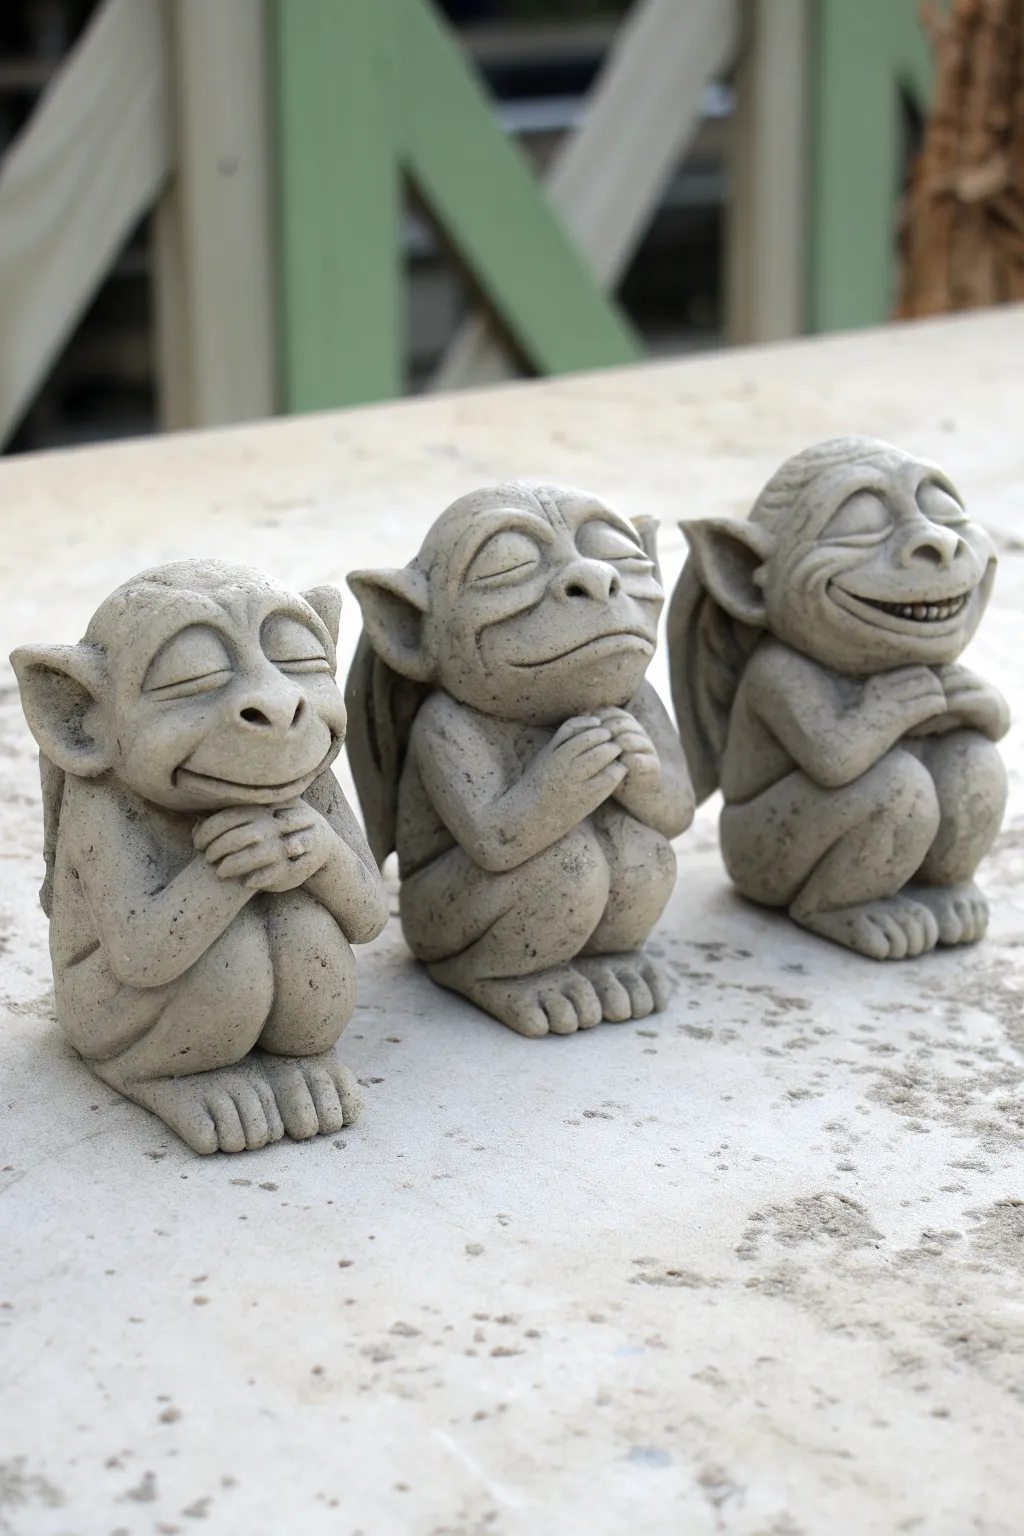
Create your own mischievous little garden guardians with this sculpting project that captures three distinct personalities. These charming mini gargoyles feature stone-like textures and expressive faces, perfect for perching on a shelf or hiding among your potted plants.
How-To Guide
Materials
- Polymer clay (grey or granite effect) or air-dry clay
- Basic sculpting tools (ball stylus, needle tool, silicone shapers)
- Aluminum foil (for armatures)
- Acrylic paint (black, dark grey, white for dry brushing)
- Paintbrushes (stiff bristle for texturing, soft for painting)
- Toothbrush (for texture)
- Toothpicks or armature wire
- Sealant (matte varnish)
Step 1: Forming the Base Structure
-
Create foil cores:
Start by crumpling three small balls of aluminum foil, each roughly the size of a golf ball or slightly smaller. Tightly compress them into egg shapes to serve as the main body cores, saving you clay and reducing baking time. -
Cover with clay:
Condition your grey clay until it’s pliable. Roll out three sheets of clay about 1/4 inch thick and wrap them completely around each foil core, smoothing the seams so no foil is visible. -
Shape the bodies:
Gently mold the clay-covered forms into a squat, pear-like shape. The wider bottom will be the seated area, and the narrower top will become the head and shoulders. -
Add legs and feet:
Roll six short, thick sausages of clay for legs. Attach two to the bottom front of each body. Flatten the ends slightly and use a needle tool to press in three or four lines to define the toes. -
Sculpt the arms:
Roll six slightly thinner coils for arms. Attach them starting from the shoulder area, bending them so the hands meet in the center of the chest or rest on the knees, depending on the pose you want for each figure.
Cracks Appearing?
If you see cracks while using air-dry clay, smooth a slip (clay mixed with water) into the fissure. For polymer, fill cracks with a mix of liquid clay and raw clay, then re-bake briefly to set.
Step 2: Sculpting the Faces
-
Attach the heads:
If your body shape doesn’t have enough height, add a ball of clay on top for the head, blending the neck seam thoroughly. The head should look large and slightly exaggerated compared to the body. -
Define facial features:
Use a ball stylus to press indentations for eye sockets. Add a small triangle of clay for the nose and blend it onto the face. Use a needle tool to carve a wide, curving mouth line. -
Create expressions:
This is where the personality shines. For the laughing gargoyle, carve the mouth open and scratch in teeth. For the content ones, curve the mouth line upward deeply at the corners and add small puffed cheeks. -
Add the ears:
Shape two triangular pieces of clay for each gargoyle. Attach them to the sides of the head, pointing them slightly backward or drooping them down. Blend the connection points smoothly. -
Sculpt the eyes:
Roll tiny spheres for eyes and place them in the sockets. For the sleeping or laughing ones, simply carve a crescent slit to show closed eyelids. Add brow ridges with small snakes of clay to enhance the expression.
Make Them Mossy
For an ancient look, dab patches of diluted green acrylic paint in the deepest crevices. You can even glue on tiny bits of dried craft moss using superglue after the sealant dries.
Step 3: Adding Details and Texture
-
Attach the wings:
Roll out flat sheets of clay and cut out small bat-wing shapes. Press them firmly onto the back of each gargoyle. I find using a little liquid clay or water (if using air-dry) helps these stick securely. -
Apply stone texture:
Take an old toothbrush or a stiff-bristled brush and firmly stipple the entire surface of the clay. This creates a pitted, stone-like texture that removes fingerprints and adds realism. -
Refine the details:
Go back over the toes, fingers, and facial lines with your needle tool to ensure they remain sharp and haven’t been lost during the texturing process. -
Cure or dry:
If using polymer clay, bake according to the package instructions (usually 275°F for 15-30 minutes per 1/4 inch thickness). If using air-dry clay, allow them to dry fully for 24-48 hours.
Step 4: Finishing the Stone Look
-
Apply a dark wash:
Mix a small amount of black acrylic paint with water to create a thin wash. Paint this over the entire sculpture, letting it seep into the crevices, then wipe away the excess with a paper towel or rag. -
Dry brush highlights:
Dip a dry, stiff brush into a tiny amount of light grey or off-white paint. Wipe most of it off on a paper towel, then lightly flick the brush over the raised textures to highlight the ‘stone’ surface. -
Seal the work:
Once the paint is fully dry, apply a coat of matte spray varnish or brush-on sealer to protect your gargoyles, especially if they are intended for outdoor use.
Arrange your finished trio together to spark conversation and bring a touch of playful charm to your decor
Stone-Crack Texture Gargoyle
Transform ordinary clay into this charming little guardian that looks like it has been weathering storms for centuries. With its joyous expression and convincing faux-stone crackle finish, this project proves that even gargoyles can have a soft side.
Step-by-Step
Materials
- Air-dry clay or polymer clay (grey or white)
- Faux stone spray paint (grey granite texture)
- Acrylic paints (dark grey, black, light grey)
- Crackling medium or white school glue
- Sculpting tools (ball styluses, needle tool)
- Aluminum foil (for armature)
- Sponge or stiff bristle brush
- Matte clear sealant spray
Step 1: Sculpting the Body
-
Form the Core:
Crumple a piece of aluminum foil into a pear shape to create a sturdy, lightweight armature for the gargoyle’s body. This saves clay and speeds up drying. -
Base Layer:
Roll out a sheet of clay to about 1/4 inch thickness and wrap it completely around your foil pear, smoothing the seams with a little water until the surface is uniform. -
Head Shape:
Shape a separate, slightly flattened sphere of clay for the head. Attach it firmly to the narrower top part of the body using the score-and-slip method to ensure a strong bond. -
Adding feet:
Roll two thick logs of clay for the legs. Press them vertically against the front of the body, blending the top edge into the torso while leaving the bottom slightly bulbous for paws. -
Detailing Paws:
Use a modeling tool or knife to gently press indentations into the bottom of the legs to define three simple toes on each foot.
Cracks not dark enough?
If your weathered cracks aren’t showing up well, re-apply the black wash specifically into the grooves with a fine liner brush, then wipe the surface clean immediately.
Step 2: Face and Wings
-
Snout Construction:
Add a small oval of clay to the lower center of the face for the snout. Smooth the edges down so it transitions seamlessly into the head. -
Creating the Smile:
This is the most crucial part for personality. Use a curved tool to carve a wide, upturned smile line that cuts deeply into the snout and cheeks, curling up at the ends. -
Nostrils and Eyes:
Poke two teardrop-shaped holes for nostrils. For the eyes, outline two large arches above the snout, sculpting them as closed, happy crescents rather than open eyes. -
Adding Ears:
Shape two triangular wedges for ears. Attach them to the sides of the head, pointing slightly backward, and blend the seams thoroughly. -
Wing Assembly:
Cut two bat-wing shapes from a flattened slab of clay. Attach them to the back of the figure. Add thin clay coils to the wing surface to simulate the skeletal structure or bones. -
Spiny Ridge:
Create a series of tiny triangular spikes and run them down the center of the head and back for that classic reptilian look.
Pro Texture Tip
Press a piece of real sandpaper or a coarse rock against the raw clay surface before baking. This imitates pitting and erosion far better than just painting it on later.
Step 3: The Stone Finishes
-
Creating Cracks:
Before the clay fully hardens, use a needle tool to etch irregular, jagged lines across the body, head, and wings to simulate deep stress fractures in old stone. -
Drying:
Allow the sculpture to dry completely. For air-dry clay, this may take 24-48 hours; for polymer, bake according to package instructions. -
Base Coat:
Spray the entire figure with a faux stone texture spray. Use light, even coats to build up a gritty, granite-like surface without dripping. -
Crackle Technique:
Once the base is dry, apply a layer of crackle medium immediately followed by a top coat of lighter grey acrylic paint. As it dries, the paint will separate to enhance the aged look. -
Dark Wash:
I like to water down some black acrylic paint until it’s very runny. Brush this wash over the entire piece, letting it pool in the sculpted cracks and crevices. -
Wipe Back:
While the wash is still wet, use a damp sponge or paper towel to wipe the paint off the high points. The dark paint will remain in the cracks, effectively highlighting the texture. -
Dry Brushing:
Dip a stiff dry brush into very light grey or white paint. Remove almost all the paint on a paper towel, then lightly flick the brush over the raised edges to make the texture pop. -
Sealing:
Finish with a matte clear coat to protect the paint job while maintaining that non-glossy, stone-like appearance.
Now you have a delightfully ancient-looking creature to guard your bookshelf


What Really Happens Inside the Kiln
Learn how time and temperature work together inside the kiln to transform clay into durable ceramic.
Mossy Patina Gargoyle Finish
Transform raw clay into this charming, ancient-looking guardian with a faux stone finish. This project focuses on sculpting a friendly, rounded character and applying a specialized paint technique to mimic weathered, mossy rock found in deep forests.
How-To Guide
Materials
- Air-dry clay or polymer clay (grey or white base)
- Sculpting tools (needle tool, ball stylus, loop tool)
- Aluminum foil (for the core)
- Acrylic paints: Dark grey, light grey, moss green, brown, cream
- Sea sponge or coarse texture sponge
- Stiff bristle brush (e.g., old toothbrush)
- Matte spray sealant
- Water spray bottle
Step 1: Sculpting the Base Form
-
Create the Core:
Begin by crumpling aluminum foil into a pear shape. This will act as the armature for the body, saving clay and reducing weight. Make it about the size of a large lemon. -
Cover with Clay:
Roll out a thick sheet of your chosen clay and wrap it fully around the foil core. Smooth all seams with wet fingers until you have a solid, seamless pear shape. -
Form the Legs:
Roll two thick, short logs of clay for the legs. Attach them to the bottom front of the body, blending the clay upwards into the torso so they are securely attached. -
Add Feet and Toes:
Flatten the ends of the leg logs slightly. Use a needle tool or knife to press define three simple, rounded toes on each foot. -
Sculpt the Arms:
Create two long teardrop shapes for the arms. Attach them at the ‘shoulders’ of the pear shape, letting them hang down relaxedly against the belly. -
Define the Hands:
At the bottom of the arms, cut small slits to create fingers. Gently round the tips so they don’t look sharp; we want a soft, stony appearance.
Make It Look Antique
For deeper shadows, apply a dilute brown/black wash over the dried texture. Wipe it off immediately with a rag, leaving dark pigment only in the cracks.
Step 2: Adding Character Details
-
Shape the Head:
Roll a slightly flattened ball of clay for the head. Attach it firmly to the top of the body. You might need to insert a small piece of toothpick or wire for neck support if the clay is soft. -
Add the Ears:
Form two large, leaf-shaped pieces for ears. Attach them to the sides of the head. Press a thumb or ball tool into the center of each ear to create a deep hollow. -
Adding Horns:
Roll two small cones for horns. Attach them to the top of the head, curving slightly backward or outward for a playful look. -
Facial Features:
Add a small oval for the nose and two balls for eyes. Use a tool to carve a wide, slight smile. For the eyes, I like to add thin coils of clay above and below to form eyelids, making the expression softer. -
Texturing the Surface:
Before the clay dries, take a stiff bristle brush or a crumpled ball of aluminum foil and tap it gently all over the sculpture. This pitting creates a realistic stone texture. -
Drying Time:
Allow the sculpture to dry completely according to your clay manufacturer’s instructions. This usually takes 24-48 hours for air-dry clay.
Garden Ready
Make a hollow version by pressing clay into a mold, then fill the back with soil to turn your gargoyle into a tiny functional planter for succulents.
Step 3: The Faux Stone Paint Finish
-
Base Coat:
Paint the entire sculpture with a solid coat of dark grey acrylic paint. Ensure you get into every crevice and texture pit. -
Sponging Light Grey:
Dip a sea sponge into light grey paint and dab off the excess on a paper towel. Lightly sponge over the high points of the texture, leaving the dark grey visible in the deep recesses. -
Adding the Green Hue:
Mix a watery wash of moss green paint. Brush this selectively over the back, shoulders, and top of the head—areas where moss would naturally grow. -
Speckling Effect:
Load a stiff toothbrush with watered-down black or dark green paint. Run your thumb over the bristles to flick tiny speckles onto the sculpture. This mimics the mineral inclusions in real rock. -
Highlighting:
Using a dry brush with a tiny amount of cream or white paint, very gently dust the tips of the ears, nose, and toes to make the details pop. -
Sealing:
Once all paint is fully dry, finish with a matte spray sealant to protect your work without adding an unnatural glossy shine.
Place your little stone guardian on a shelf or among your houseplants to add a touch of ancient mystery to your home
High-Contrast Mouth Interior Color Pop
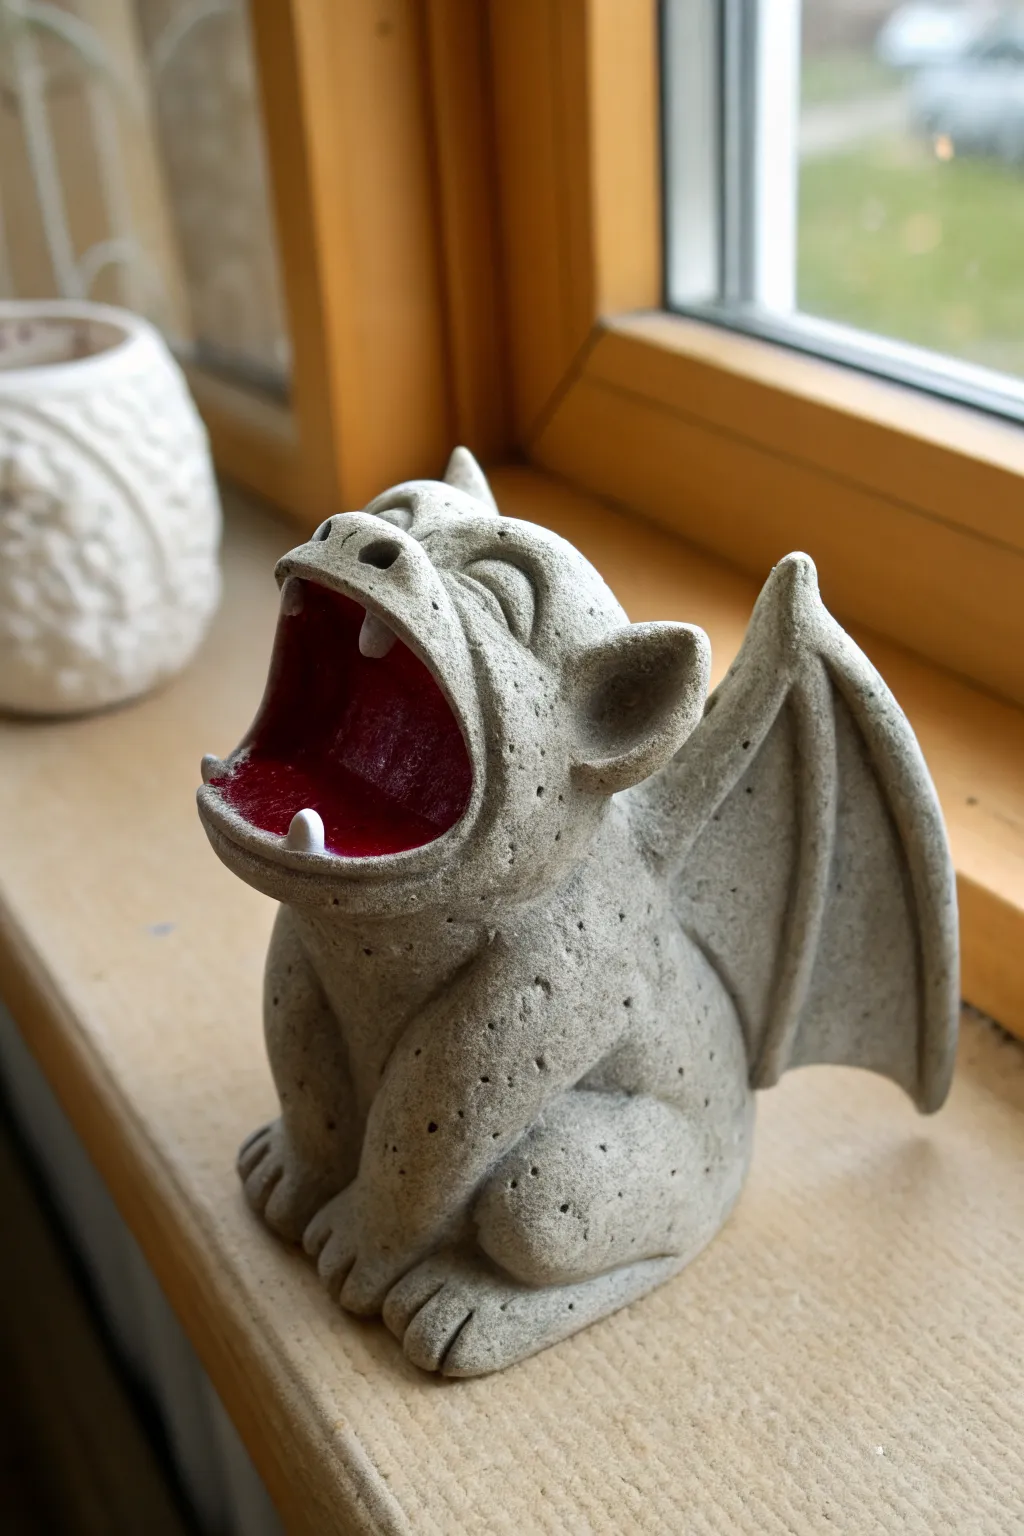
This whimsical little guardian combines the classic appearance of weathered stone with a surprising pop of modern color. By sculpting a wide, expressive mouth and filling it with a deep glossy red, you turn a traditional grotesque into a fun conversation piece that brightens up any windowsill.
Step-by-Step Guide
Materials
- Air-dry clay or polymer clay (stone gray or neutral color)
- Sculpting tools (needle tool, ball stylus)
- Acrylic paints: Stone Gray, Black, White, Deep Red (Crimson)
- High-gloss varnish or clear nail polish
- Matte sealant spray
- Stiff bristle brush (e.g., old toothbrush)
- Sponge or textured foil
- Water cup
Step 1: Shaping the Base Beast
-
Establish the Foundation:
Start with a ball of clay roughly the size of a large orange. Squish the bottom flat so the figure sits remarkably stable, then gently pull the top portion upward to form a pear-like shape that will become the torso and head. -
Carve the Mouth Cavity:
Using a spoon or loop tool, carve out a large, generous scoop from the ‘head’ area. The mouth needs to be the focal point, so don’t be shy—make it wide and deep, smoothing the interior walls with a wet finger. -
Add the Legs:
Roll two thick sausages for the hind legs and two slightly smaller ones for the front arms. Press the hind legs onto the sides of the body, blending the clay seamlessly at the hip joint for a sturdy connection. -
Form the Paws:
Position the front arms so they rest on the ground between the hind legs. Use a knife tool or dull blade to press three distinct indentations into the end of each limb, creating toes. -
Attach the Wings:
Roll out a slab of clay about 1/4 inch thick and cut two bat-wing shapes. Attach these to the back of the figure, scoring the clay surfaces (scratching them up) and adding a dab of water or slip to ensure they stick firmly. -
Detail the Wings:
Roll thin snakes of clay to acting as the ‘bones’ of the wings. Press these along the top edge and vertically down the wing surface to give it structural definition.
Step 2: The Gargoyle Face & Texture
-
Sculpt the Snout:
Add a small mound of clay above the open mouth gap. Use your thumb to smooth it upward into the forehead, then press two nostrils into the front using a ball tool. -
Create the Eyes:
Roll two small spheres and press them into sockets above the snout. Add heavy ridges of clay over the top for eyebrows, angling them sharply downwards to give him a fierce or grumpy expression. -
Give Him Ears:
Shape two triangular pieces, slightly curved like leaves. Attach them to the sides of the head, blending the seams well so they look like they grew there naturally. -
Add the Teeth:
Roll tiny cones of clay for the fangs. Place two on the upper jaw and two specific ones on the bottom lip, pressing them gently so they don’t fall off during drying. Keep them relatively blunt to mimic old carvings. -
Texturize the Skin:
This is crucial for the stone look. Take a ball of crumpled aluminum foil or a stiff-bristled toothbrush and tap it aggressively all over the gargoyle’s skin (avoiding the inside of the mouth and the teeth). This pitting mimics porous concrete. -
Dry or Bake:
Follow the instructions for your specific clay type. If using air-dry clay, let it sit for at least 24-48 hours until completely hard and light in color.
Stone Texture Trick
Mix a small amount of sand or coffee grounds into your gray base paint. This adds gritty, physical texture that feels like real concrete when dry.
Step 3: Painting the Stone Pop
-
Base Coat:
Paint the entire exterior (skin, wings, face) with a solid coat of medium stone gray. Do not paint the inside of the mouth or the teeth just yet. -
Speckle Effect:
To enhance the faux-stone realism, dip an old toothbrush into watered-down black paint. Run your thumb over the bristles to flick tiny specks of black paint all over the gray skin. I tend to do this inside a cardboard box to contain the mess. -
The Crimson Mouth:
Using a fine brush, carefully paint the entire interior of the mouth with a Deep Red or Crimson acrylic. You may need two coats for full opacity. -
Detailing Fangs:
Paint the teeth a crisp, flat white. Clean up any red that might have smeared onto them. -
Final Finishes:
Once all paint is dry, spray the exterior body with a matte sealant to keep it looking like dry stone. Finally, apply a high-gloss varnish (or clear nail polish) specifically to the red mouth interior to make it look wet and alive.
Glow Up
Paint the eyes with glow-in-the-dark paint, or use a fluorescent neon color for the mouth interior to make it react under UV blacklight.
Place your new stony friend near a light source to let that glossy mouth shine.

TRACK YOUR CERAMIC JOURNEY
Capture glaze tests, firing details, and creative progress—all in one simple printable. Make your projects easier to repeat and improve.
Gargoyle Lantern With Glowing Eyes
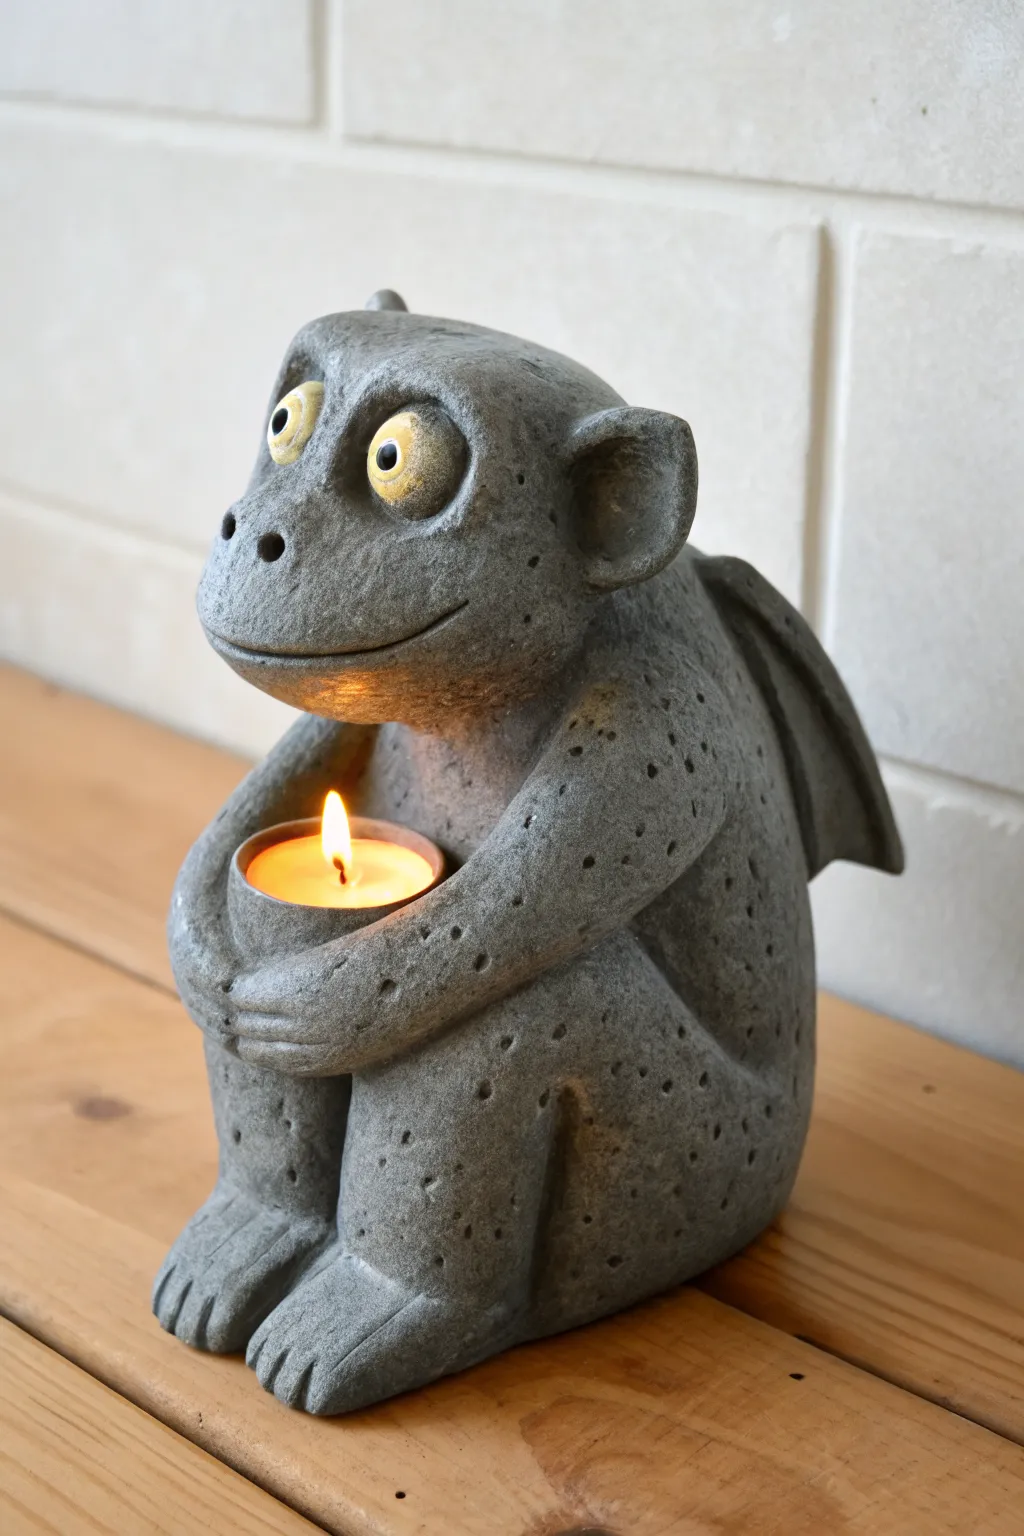
Sculpt this charming, slightly goofy gargoyle guardian to add a warm glow to your shelf or patio. With his stone-effect texture and oversized eyes, he looks just like an ancient carving brought to life, patiently cradling a tea light in his paws.
Step-by-Step Tutorial
Materials
- Stone-colored air-dry clay or polymer clay (grey)
- Aluminum foil (for armature)
- Basic sculpting tools (loop tool, modeling tool)
- Stiff bristle brush or toothbrush (for texturing)
- Small rolling pin
- Yellow acrylic paint
- Black acrylic paint
- White acrylic paint
- Matte sealant or varnish
- Tea light candle (for sizing)
- Fine detail paintbrush
Step 1: Building the Armature
-
Shape the core:
Crumple aluminum foil into a pear shape for the body and a rounded oval for the head. The body should be stout and stable at the base. -
Form the limbs:
Create two smaller sausage shapes from foil for the legs and two for the arms. Keep them slightly bent to mimic a sitting crouching pose. -
Connect the parts:
Attach the head and limbs to the main body core using masking tape if necessary to hold the shape before adding clay.
Step 2: Sculpting the Form
-
Cover with clay:
Roll your grey clay into sheets about 1/4 inch thick. Wrap the foil armature completely, smoothing the seams together with a bit of water or slip. -
Refine the crouching pose:
Ensure the knees are pulled up high against the chest. The feet should be flat and large to stabilize the figure. -
Add the arms:
Position the arms wrapping around the front, leaving a gap between them perfectly sized for your tea light. Use the actual tea light to press a gentle indentation into the chest or arms to ensure a snug fit later. -
Create the candle holder:
Sculpt a shallow bowl shape in the hands. Check the fit with your tea light again—it should sit level and secure.
Fixing Cracks
If cracks appear while air-dry clay is drying, mix a small amount of fresh clay with water to make a paste and fill in the cracks, then smooth over.
Step 3: Detailing the Face & Wings
-
Shape the face:
Add a prominent, rounded muzzle to the face. Blend the edges smoothly into the head. -
Add the smile:
Use a modeling tool to slice a wide, curving grin into the muzzle. Curve the corners up towards the cheeks for that friendly expression. -
Sculpt the eyes:
Roll two balls of clay for eyes. Press them onto the upper face, creating eyelids by smoothing extra clay over the top halves. -
Form the ears:
Attach semi-circular ears to the sides of the head. Indent the centers to give them depth. -
Attach the wings:
Cut two triangular wing shapes from a clay slab. Attach them to the back, blending the clay firmly at the connection point so they don’t droop.
Glow Up
For a magical touch, paint the yellow eyes with phosphorescent (glow-in-the-dark) paint so he watches over you even after the candle goes out.
Step 4: Texturing and Finishing
-
Stone texture:
Take a stiff bristle brush or a toothbrush and firmly stipple the entire surface of the damp clay. This creates the pitted, weathered stone look. -
Add larger pits:
Use a tool with a small round tip to poke deeper, random holes scattered across the body and face, mimicking porous volcanic rock. -
Define the toes:
Use a knife tool to gently mark the separation of toes on the feet and fingers on the hands holding the bowl. -
Dry the sculpture:
Allow the piece to dry completely according to your clay’s instructions. Air-dry clay may take 24-48 hours depending on thickness. -
Paint the eyes:
Paint the eyeballs a bright, opaque yellow. Once dry, add a small black dot for the pupil in the center of each. -
Stone wash technique:
Mix black acrylic paint with plenty of water to create a wash. Brush it over the entire grey body, letting it settle into the texture pits. -
Wipe back:
While the wash is still wet, gently wipe the raised surfaces with a paper towel or sponge. This leaves the dark color in the crevices and creates realistic depth. -
Final drybrush:
Lightly drybrush a tiny amount of white or light grey over the highest points (nose, knees, wing tips) to highlight the texture. -
Seal:
Apply a coat of matte varnish to protect your new friend and give him a unified finish.
Place a tea light in his hands and enjoy the flickering shadows cast by your new stony companion