If you’re craving that extra-cute, colorful pop, clay bead earrings are the quickest little win in the studio. I love how heishi disc beads let you play with color combos and still end up with something lightweight you’ll actually wear.
Classic Rainbow Heishi Hoop Earrings
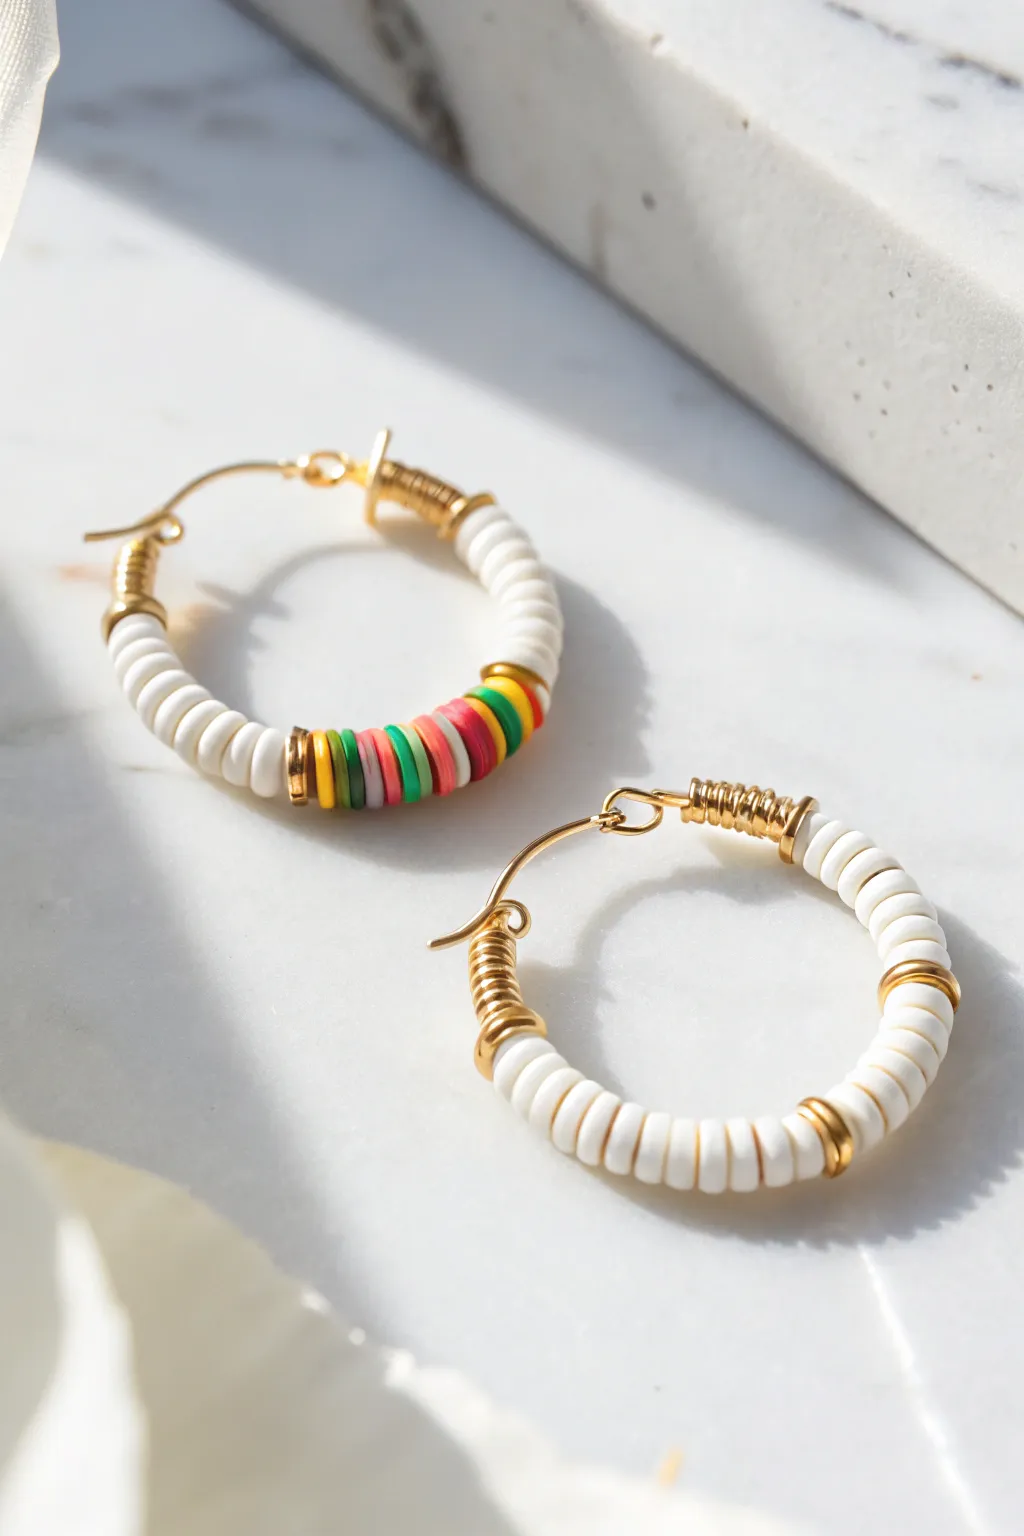
These breezy earrings combine the timeless elegance of gold hardware with the playful vibe of polymer clay beads. The asymmetry between the solid white hoop and its rainbow-accented partner creates a modern, effortless look perfect for summer styling.
Step-by-Step
Materials
- Gold hoop earring findings (25-30mm diameter)
- White heishi polymer clay beads (4-6mm)
- Assorted colorful heishi beads (red, pink, orange, yellow, green, teal)
- Gold spacer beads or small gold jump rings
- 24-gauge gold jewelry wire (for wrapping)
- Wire cutters
- Chain-nose pliers
- Flat-nose pliers
Step 1: Preparing the Hoop Base
-
Assess the findings:
Examine your hoop findings. If they have a pre-made loop clasp that opens fully, great. If they are continuous circles, you may need to gently open the clasp mechanism to slide beads on. -
Anchor the wire:
Cut a 4-inch piece of gold wire. Tightly coil it around the earring hoop base, near the hinge or clasp, about 5-6 times to create a decorative gold stopper. -
Trimming excess:
Use your wire cutters to snip the tail of your wire wrap as close to the coil as possible, then use flat-nose pliers to squeeze the cut end flush against the hoop so it doesn’t scratch your skin.
Wire Wrapping Pro-Tip
When wrapping the 24-gauge wire, use nylon-jaw pliers if you have them. They help straighten the wire as you wrap and prevent marring the gold finish.
Step 2: Creating the Solid White Hoop
-
Start the pattern:
Begin threading the white heishi beads onto the hoop wire. Slide on about 10-12 white discs to start. -
Add gold accents:
After your first section of white, slide on a gold spacer bead or a small gold jump ring to break up the texture. -
Continue the sequence:
Repeat the pattern of 10-12 white beads followed by a gold spacer until you reach the end of the wire, leaving just enough room for the closure mechanism. -
Secure the end:
Wrap another piece of 24-gauge gold wire around the end of the bead row (about 5-6 coils) to prevent the beads from sliding around and to mirror the start. -
Final adjustment:
Make sure the beads are snug but not so tight that the hoop warps. Trim and tuck the wire tail.
Step 3: Creating the Rainbow Accent Hoop
-
Initial anchor wrap:
Just like the first earring, wrap a 4-inch piece of gold wire 5-6 times around the hoop base near the hinge to create your starting stopper. -
First white section:
Thread on approximately 10-12 white heishi beads. This section should match the length of the white sections on the previous earring for cohesion. -
Gold transition:
Slide on a gold spacer bead to mark the beginning of the color section. -
Build the rainbow:
Select your colorful beads. Thread them in groups of 2-3 per color. A nice order is dark pink, light pink, red, orange, yellow, green, then teal. -
Check symmetry:
Ensure your color block is centered or placed exactly where you want the visual weight to be. -
Close the color block:
Add one more gold spacer bead after the last teal bead to frame the rainbow section. -
Finish with white:
Fill the rest of the hoop with white heishi beads until it matches the fill level of the first earring. -
Final wire wrap:
I always double-check the tightness here before wrapping the final gold wire coil (5-6 turns) to lock everything in place. -
Clean up:
Trim any sharp wire ends and give both earrings a gentle squeeze to ensure the circular shape is maintained.
Beads Won’t Fit?
If the hoop wire is too thick for your clay beads, use a bead reamer or a thick needle to gently widen the bead holes. Twist slowly to avoid cracking the clay.
Now you have a stunning, mismatched set ready to add a pop of color to any outfit
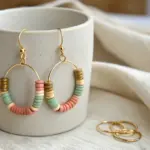


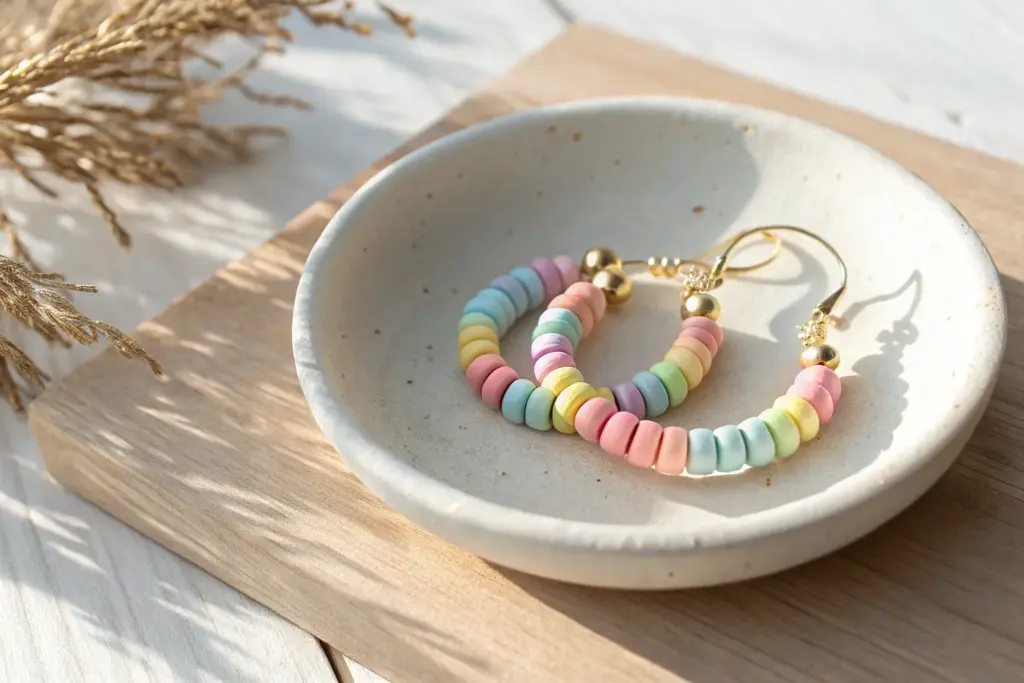
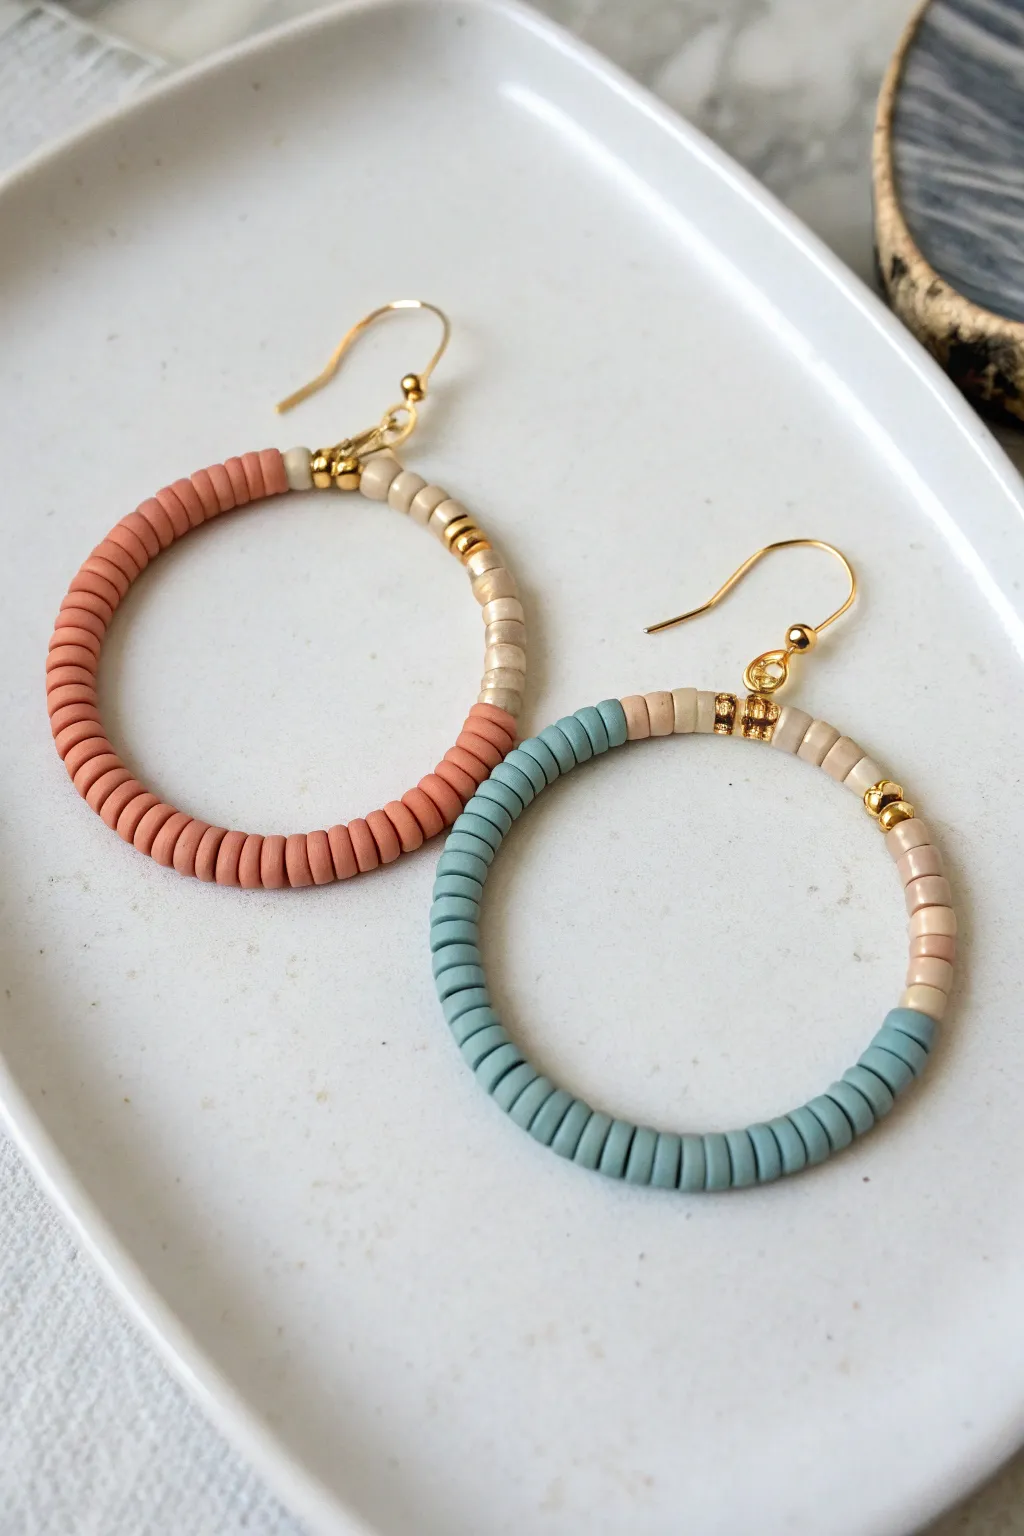
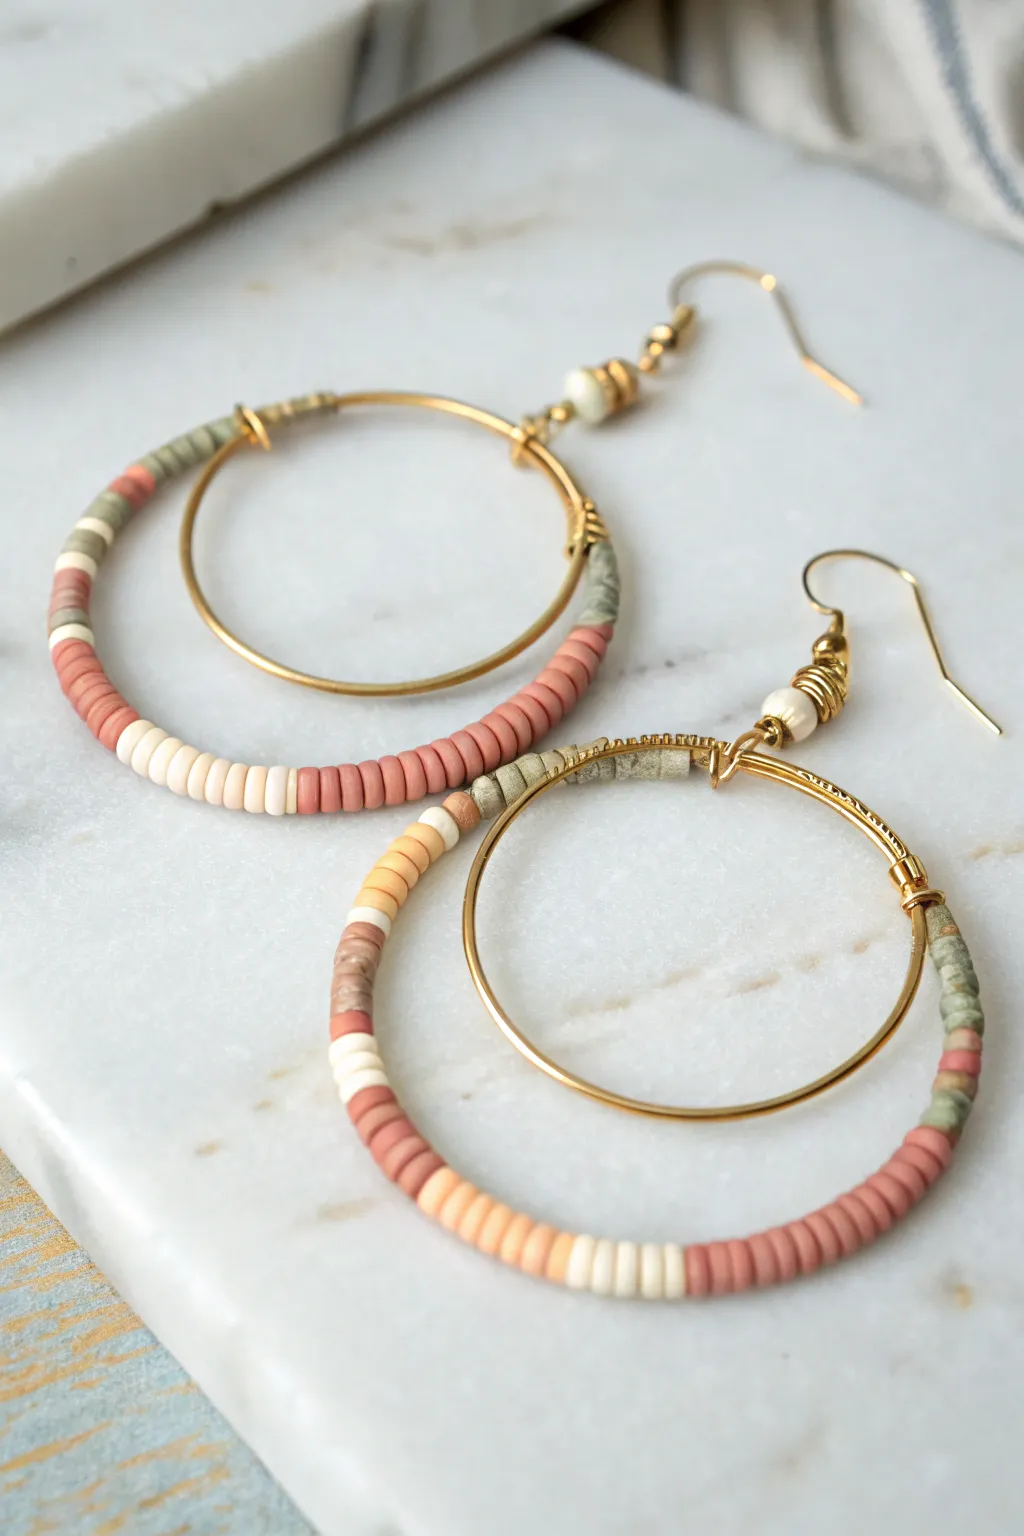
Pastel Color-Blocked Mini Hoops
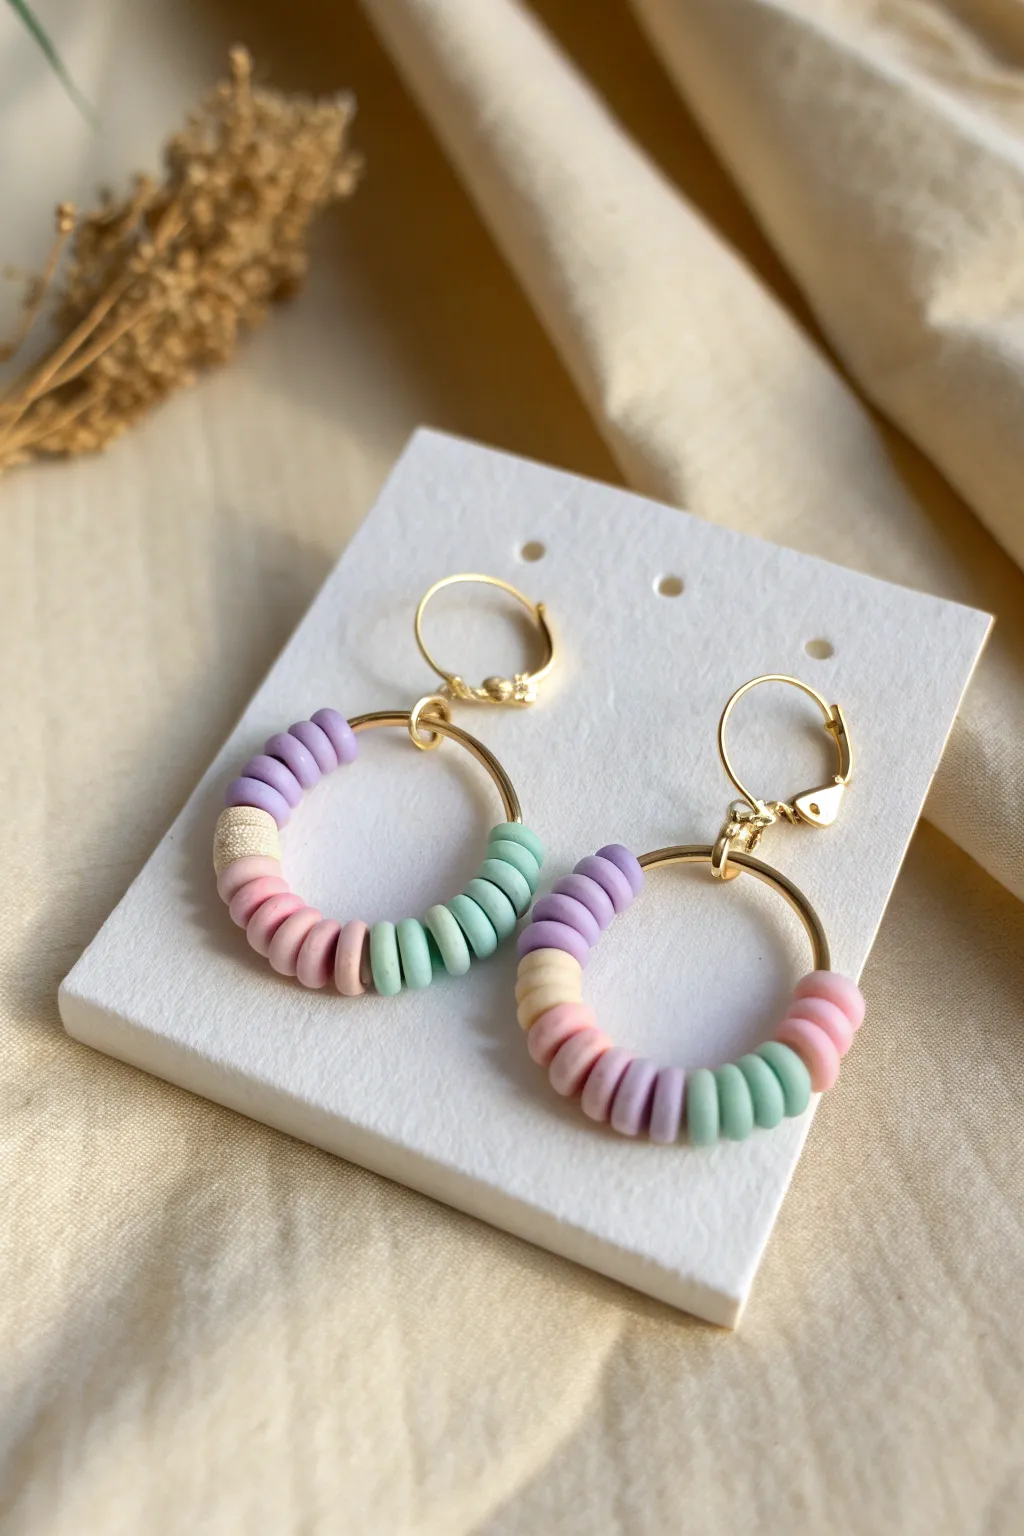
These sweet and simple earrings combine the classic appeal of gold hoops with the soft, playful texture of polymer clay heishi beads. The distinct color-blocking gives them a modern, tailored look that pairs beautifully with breezy summer outfits.
How-To Guide
Materials
- Gold-plated or brass hoop earring findings (approx. 25-30mm diameter)
- Gold-plated lever-back ear wires (or kidney wires)
- 4mm or 5mm polymer clay heishi beads in pastel colors (Lilac, Mint Green, Baby Pink, Cream/Beige)
- 2 Gold jump rings (4mm or 5mm)
- Chain nose pliers
- Round nose pliers (optional, helpful for jump rings)
- Small bead mat or tray
Step 1: Planning and Sorting
-
Sort your palette:
Begin by selecting your four pastel shades. Pour a small amount of each color onto your bead mat to easily visualize the sequence. -
Establish the pattern:
Look closely at the design. The pattern relies on ‘blocks’ of color rather than alternating single beads. Ideally, aim for 5-7 beads per color block to get that distinct striped effect shown in the photo. -
Check hoop mechanism:
Examine your hoop findings. If they have a latch or clasp that needs to open to slide beads on, open it now. If they are plain wire hoops meant to be bent, gently unhook the catch.
Tight Fit?
If beads are too tight on the curve and pucker outward, remove one bead from each color block to give them more breathing room on the wire.
Step 2: Beading the Hoops
-
Start the first block:
Pick up 5 to 7 beads of your first color, for example, the lilac shade. Slide them onto the gold hoop wire. -
Push and settle:
Gently push the beads around the curve of the hoop. They should sit snugly against each other but still allow the curve of the wire to show. -
Add the second color:
Continuing the pattern, add your next block of beads (e.g., the cream/beige color). Keep the count consistent with your first block to maintain symmetry. -
Continue the sequence:
Add the third color block (pink) and then the fourth (mint green). You can adjust the number of beads slightly if your hoop is smaller or larger. -
Repeat until full:
Depending on the size of your hoop, repeat the color sequence. I usually find that leaving about 1/4 inch of bare wire at the top near the closure looks cleaner than filling it completely. -
Close the hoop:
Once you are happy with the bead arrangement, secure the hoop wire back into its catch or closure mechanism so the beads cannot slide off.
Step 3: Assembly
-
Open the jump ring:
Using your chain nose pliers (and a second pair if you have them), grasp a jump ring. Twist the ends away from each other—front to back—never pull them apart sideways. -
Connect the components:
Slide the open jump ring through the top loop or closure of your beaded hoop. -
Attach the ear wire:
While the jump ring is still open, hook on the loop of your lever-back ear wire. -
Seal the connection:
Use your pliers to twist the jump ring back into a closed circle. Ensure the two ends meet perfectly flush so there is no gap for the wire to slip through. -
Verify movement:
Hold the earring up by the ear wire and give it a gentle shake. The hoop should dangle freely and swing without catching. -
Create the match:
Repeat all steps for the second earring, ensuring you start with the same color block so the pair is perfectly symmetrical.
Make it Luxe
Add tiny gold spacer beads between every color block transition. It adds a high-end metal accent that elevates the clay look.
Now you have a charming pair of lightweight hoops ready to add a pop of color to your day

Gold-Spacer Center Accent Hoops
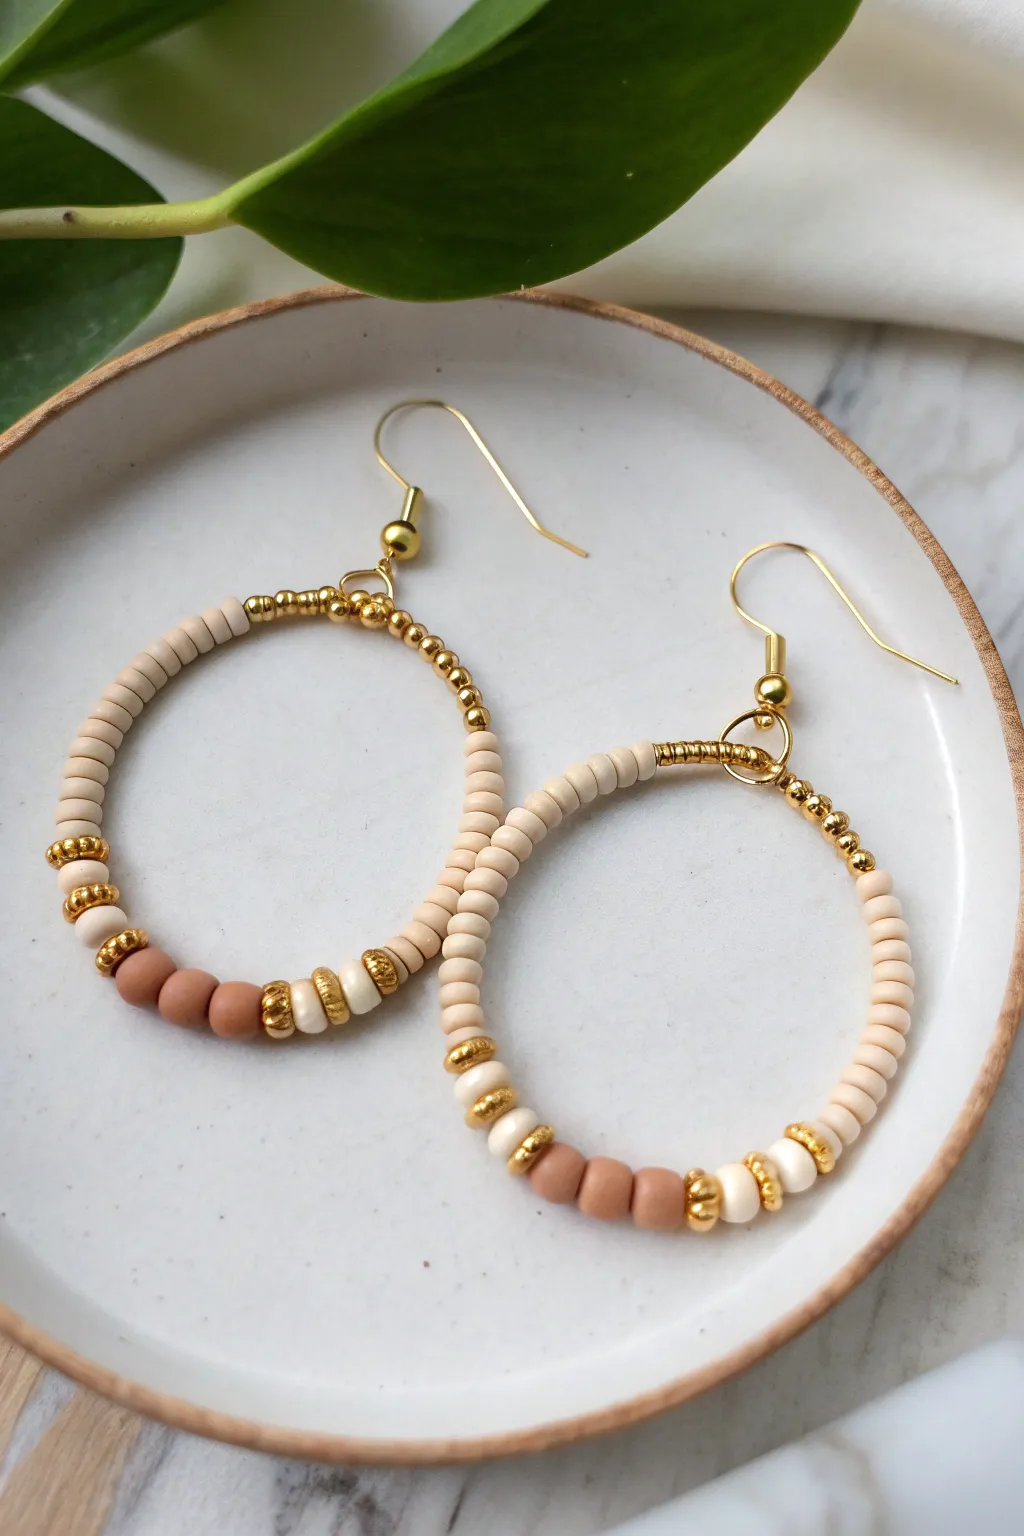
These stylish hoop earrings blend the earthy warmth of matte clay-colored beads with the polished shine of gold accents, creating a versatile accessory perfect for any season. The design features a symmetrical pattern that draws the eye to a central focal point of darker beads and metallic spacers.
Step-by-Step Tutorial
Materials
- Gold-colored beading wire or pre-formed wire hoop components (approx. 40-50mm diameter)
- Beige heishi clay beads (or small disc beads)
- Terracotta/clay-colored round beads (approx. 4-6mm)
- Gold disc spacer beads (heishi style)
- Small gold seed beads (size 11/0 or 8/0)
- Gold ear wires (fishhook style)
- Jump rings (4mm or 5mm gold)
- Round nose pliers
- Chain nose pliers
- Wire cutters
Step 1: Setting Up the Wire Base
-
Prepare the hoop wire:
Cut a length of beading wire approximately 5-6 inches long to form a hoop roughly 1.5 to 2 inches in diameter. If you are using pre-formed hoop wires, select a large size. -
Create the first loop:
Using your round nose pliers, gently bend one end of the wire back on itself to create a small, neat loop. This will stop the beads from sliding off while you work. Do not close it permanently yet if you plan to adjust the size later, but ensure it’s tight enough to hold beads.
Step 2: Starting the Bead Pattern
-
Begin the sequence:
Start threading from the top side of the hoop. Slide on approximately 8-10 small gold seed beads first. These will sit near the ear wire and provide a metallic finish to the top of the hoop. -
Add neutral texture:
Following the seed beads, thread on roughly 15-20 beige heishi (disc) beads. This creates the main light-colored body of the earring side. -
Introduce gold accents:
Slide on three gold spacer beads. These act as a transition point before the central focal beads. -
Add a beige spacer:
Add one single beige heishi bead after the three gold spacers. -
Add a textured gold bead:
Thread on a slightly larger, decorative gold spacer bead. This adds visual weight as you approach the bottom center.
Keep it Symmetrical
Count your heishi beads carefully! Since these disc beads are thin, discrepancies are hard to spot until the earring is finished and hangs crooked.
Step 3: Creating the Central Focal Point
-
Place the center beads:
Now, thread on three terracotta-colored round beads. These darker clay beads serve as the anchor for the design at the very bottom of the hoop. -
Mirror the accent beads:
Immediately after the terracotta beads, slide on another decorative textured gold bead. -
Mirror the transition:
Add one single beige heishi bead, followed by three gold spacer beads, exactly mirroring what you did on the first half.
Mix Up the Palette
Swap the terracotta center beads for turquoise or olive green stones for a completely different seasonal vibe while keeping the same layout.
Step 4: Finishing the Loop
-
Complete the neutral section:
Thread on another 15-20 beige heishi beads to match the quantity on the first side. -
Finish with seed beads:
End the beading sequence with 8-10 small gold seed beads, ensuring the pattern is perfectly symmetrical. -
Close the hoop:
Bend the remaining end of the wire into a loop using your round nose pliers. Before closing it fully, ensure the beads are snug but not overly tight, allowing the hoop to maintain its curved shape. -
Connect the ends:
At this point, you need to bring the two end loops together. Thread a jump ring through both wire loops at the top of your hoop.
Step 5: Assembly
-
Attach the ear wire:
While the jump ring is still open, slide on the loop of your gold fishhook ear wire. -
Secure the jump ring:
Using two pairs of pliers (chain nose and flat nose work best here), twist the jump ring closed securely so there is no gap for the wire to slip through. -
Tighten loops:
I like to gently squeeze the wire loops at the ends of the hoop with pliers to ensure they are fully closed and perpendicular to the main hoop shape, which helps them hang straight. -
Repeat for the second earring:
Repeat all steps to create the matching second earring, paying careful attention to bead counts to ensure they are identical twins.
Now you have a stunning pair of earrings ready to add a touch of handcrafted elegance to your outfit


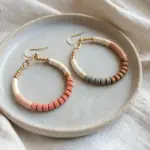
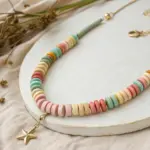
Sweet Ombré Gradient Hoops
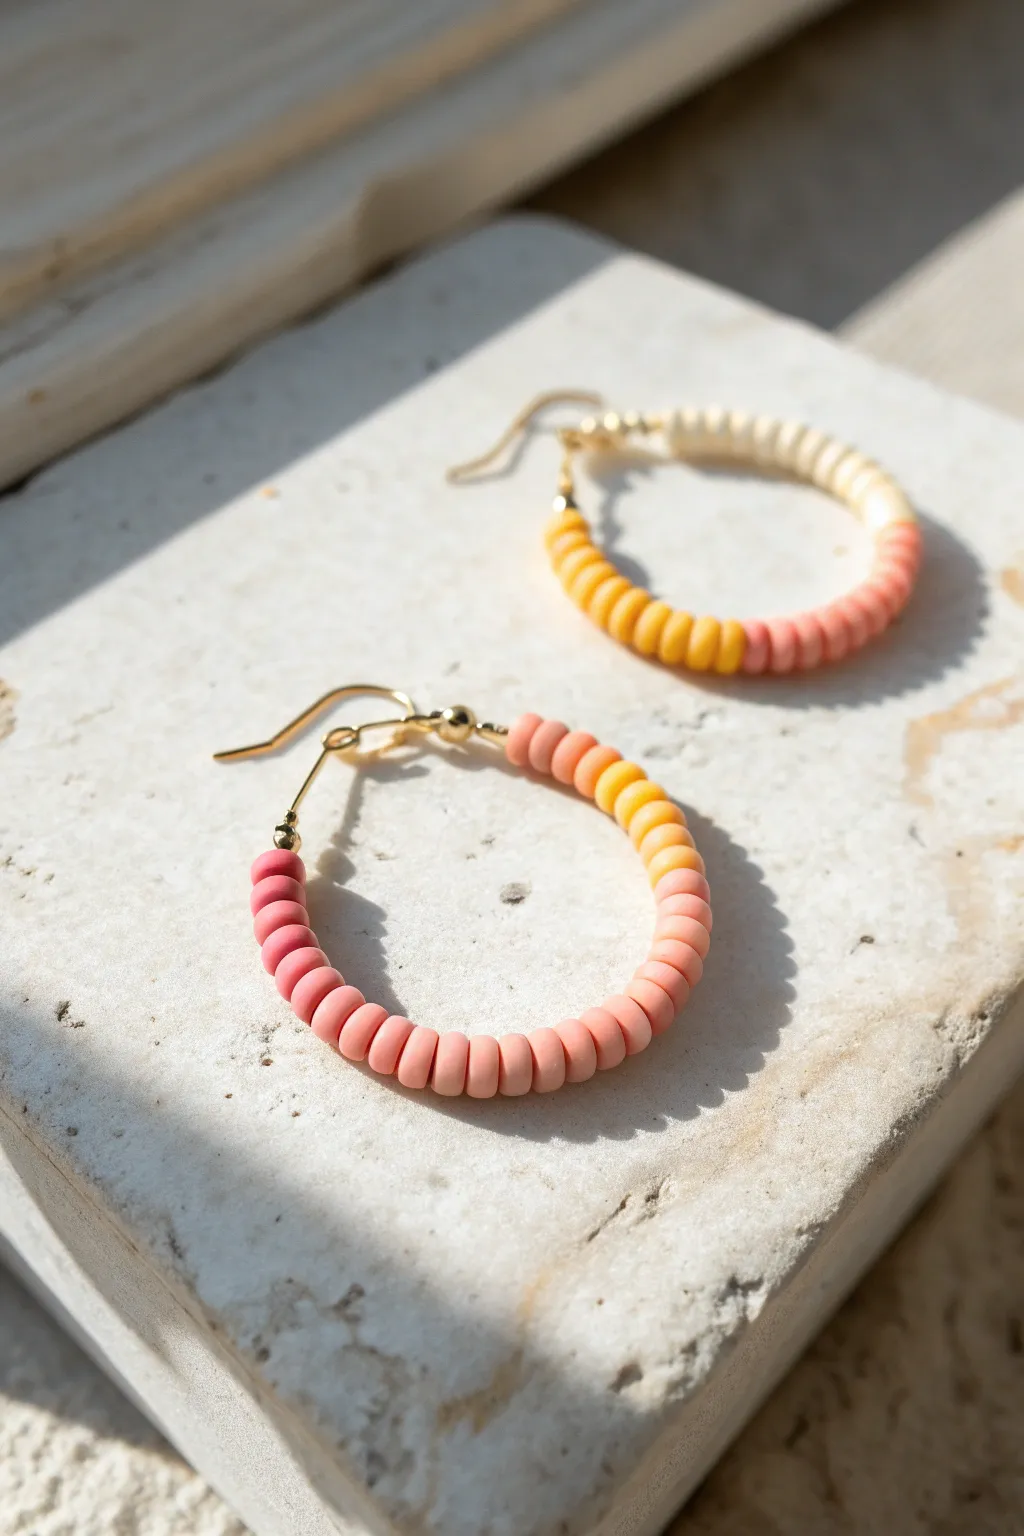
Capture the warmth of a summer evening with these delightful gradient hoop earrings. Using flat polymer clay heishi beads, you’ll create a seamless ombré transition from creamy white to vibrant coral that feels effortless and chic.
Step-by-Step Guide
Materials
- Polymer clay heishi beads (cream, butter yellow, coral/pink, dark pink)
- Gold-colored round earring hoops (approx. 30-40mm)
- Small gold beads or crimp beads (for stoppers)
- Chain nose pliers
- Gold fishhook ear wires
- Jump rings (optional, depending on hoop style)
Step 1: Planning and Preparation
-
Sort your palette:
Begin by laying out your clay heishi beads on a bead mat or soft cloth. Separate them into distinct color piles: cream/white, light yellow, peach/coral, and a deeper pink to visualize the full gradient. -
Design the gradient:
Before threading, arrange a single line of beads on your mat to test the transition. I find that using about 8-10 beads of each color block creates the smoothest ombré effect for a hoop of this size. -
Check the transition:
Look closely at where the colors meet. If the jump from yellow to pink looks too harsh, try mixing one or two beads of the alternating colors at the border to blend them softly.
Step 2: Assembling the Hoops
-
Prepare the hoop wire:
Open the latch or finding on your gold hoop wire. If your hoop doesn’t have a built-in stopper at one end, slide on a small gold metal bead or crimp bead to prevent the clay beads from sliding off the back curve. -
Bend the stopper end:
If using a plain wire hoop without a mechanism, use your pliers to make a tiny 90-degree bend at one end, about 2mm long. This acts as a catch for your first bead. -
Begin with the lightest shade:
Start threading the cream or white beads onto the hoop first. These will sit nearest to the ear lobe, keeping the look bright near your face. -
Thread the yellow section:
Add your stack of yellow beads next. Ensure they sit flush against the cream section without any gaps. -
Transition to warm tones:
Slide on the peach or coral-colored beads. As the curve of the hoop reaches its bottom point, this color change emphasizes the rounded shape. -
Finish with the darkest hue:
Thread on the final section of deep pink or reddish beads. This darker weight at the end of the gradient visually anchors the design. -
Secure the end:
Once all clay beads are on, add a small gold metal spacer bead at the very end. This adds a polished finish and protects the last clay bead. -
Create the closing loop:
Use your chain nose or round nose pliers to bend the remaining wire into a small, closed loop. This loop secures the beads and provides a connection point for the ear wire.
Smooth Gradients
For a softer look, mix one bead of the next color into the end of the previous color block. This breaks up the hard line between hues.
Step 3: Finishing Touches
-
Attach the ear wire:
Open the small loop on your fishhook ear wire by twisting it sideways with pliers—never pull it open like a jaw. -
Connect the components:
Slide the loop of your beaded hoop onto the open loop of the ear wire. Make sure the ‘front’ of the gradient faces forward. -
Close the finding:
Gently twist the ear wire loop back into a closed position, ensuring there is no gap where the hoop could slip out. -
Repeat for the second earring:
Follow the exact same bead count pattern for the second hoop so your pair matches perfectly.
Texture Twist
Add thin gold spacer discs between every color change area to add a hint of metallic shine that catches the light as you move.
Now you have a stunning pair of sunset-inspired hoops ready to brighten up any outfit

The Complete Guide to Pottery Troubleshooting
Uncover the most common ceramic mistakes—from cracking clay to failed glazes—and learn how to fix them fast.
Half-Hoop Minimal Stacks
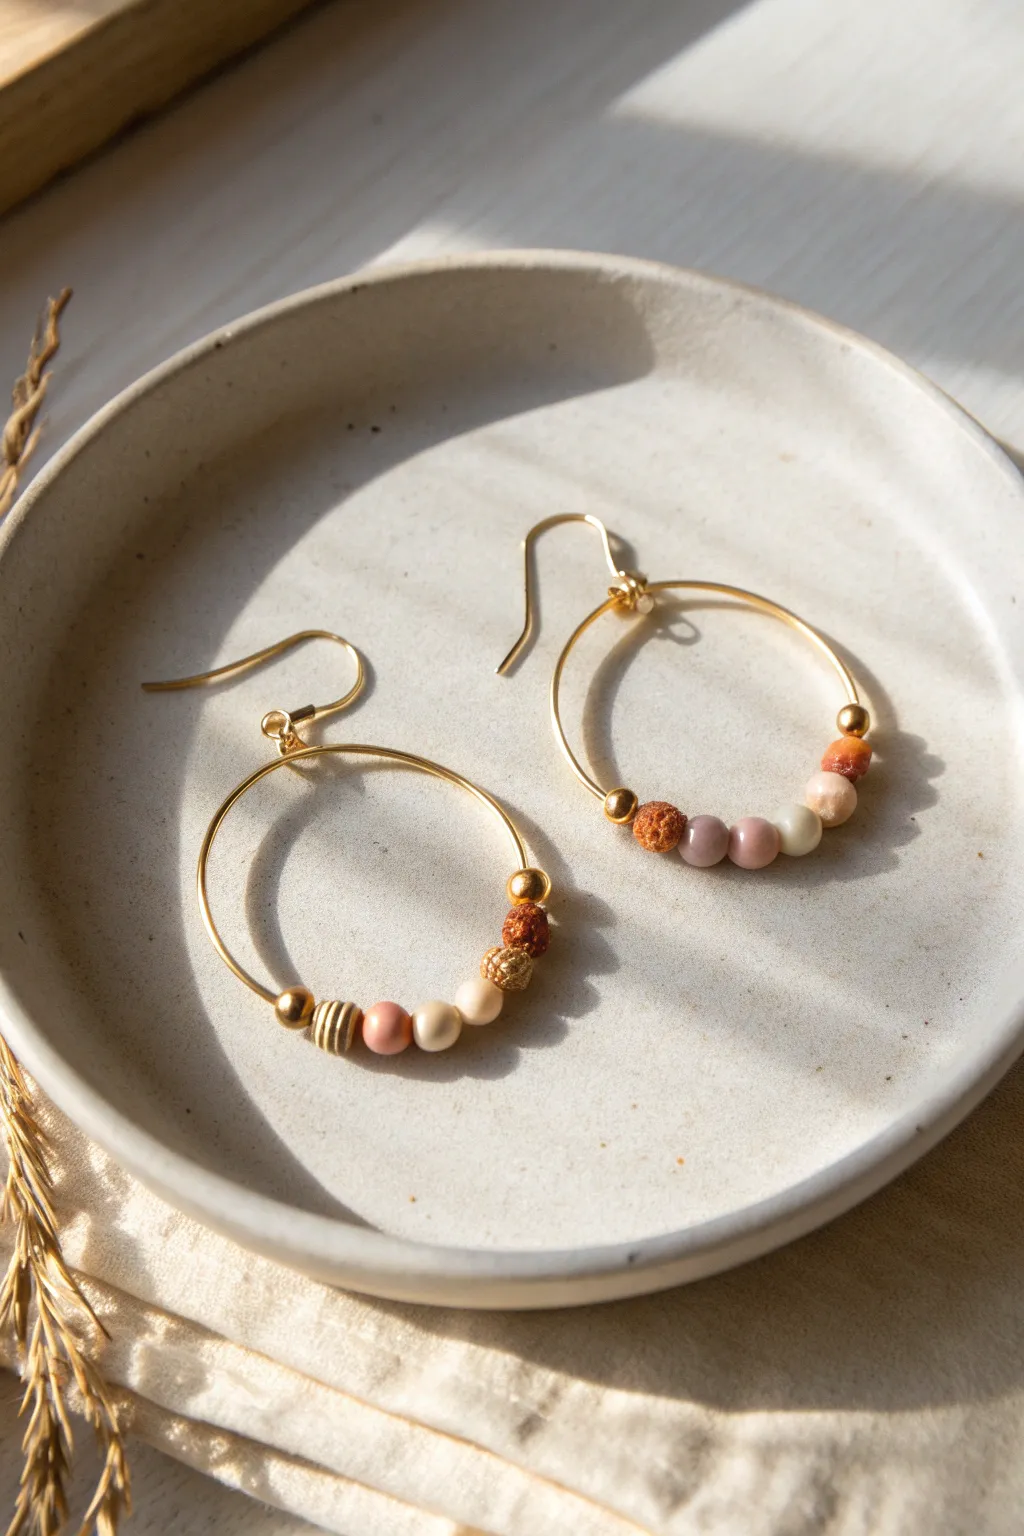
These effortless wire hoop earrings blend the warmth of earthen polymer clay with the subtle shine of gold accents. The design focuses on a soft, muted gradient of beads that settle naturally at the bottom of the curve for a look that is both modern and grounded.
How-To Guide
Materials
- Gold-plated or brass wire hoops (approx. 30-40mm diameter)
- Gold earwires (French hooks)
- Small polymer clay round beads (4-6mm) in earthy tones: cream, blush pink, terracotta, rust
- Gold metal spacer beads (small rounds and textured/ribbed cylinders)
- Needle-nose pliers
- Chain-nose pliers
- Jump rings (4-5mm gold)
- Optional: Texture tool or sponge (if making your own beads)
Step 1: Preparing the Base
-
Choose your hoop:
Select a pair of thin wire hoops. These earrings work best with hoops that can be opened completely to slide beads on, or you can use memory wire cut to size if you plan to form your own loops. -
Check the mechanics:
If using pre-made hoops intended for beading, locate the opening mechanism. Usually, one end of the wire is flattened or has a small hook that locks into an eyelet. Ensure it opens and closes securely before adding weight. -
Straighten the wire:
Gently run your fingers along the wire curve to ensure there are no kinks. If the wire is slightly bent out of shape, use your nylon-jaw pliers or fingers to smooth the arc back into a perfect circle.
Clay Texture Tip
To get the pitted look specifically on the rust-colored beads, roll raw clay in coarse sea salt or press with a stiff toothbrush before baking.
Step 2: Designing the Bead Pattern
-
Select your palette:
Gather your beads. For the specific look in the photo, you want a gradient of warm neutrals. I like to lay them out on a bead mat first to visualize the color transition. -
Establish the sequence (Left Earring):
Looking at the left earring in the image, the pattern (from left to right) is: one small gold spacer, a textured gold cylinder, a blush pink bead, a cream bead, a slightly larger pale beige bead, a textured gold accent, another rust clay bead, and a final small gold spacer. -
Establish the sequence (Right Earring):
For the right earring, the pattern appears slightly asymmetrical or just rotated. It runs: gold spacer, textured rust clay bead, mauve/brown bead, pink bead, cream bead, textured rust bead, and a gold spacer. Feel free to mix up the order slightly for an organic feel. -
Check bead fit:
Ensure all bead holes are large enough to slide smoothly over the curve of your hoop wire without getting stuck. If a clay bead is tight, carefully use a bead reamer to widen the hole.
Beads Won’t Stay Put?
If beads slide too far up the sides, add tiny crimp beads hidden inside the larger gold spacers to grip the wire and lock the arrangement in the center.
Step 3: Assembly
-
String the first side:
Open your first wire hoop. Begin threading your selected pattern onto the wire. Slide them all the way to the center of the hoop. -
Test the balance:
Hold the hoop up by the top connection point. Let the beads settle. They should naturally rest at the bottom, creating a ‘half-hoop’ stack effect. -
Adjusting spacing:
If the beads look too crowded or bunched, remove one. The beauty of this design is the negative space on the upper half of the hoop. -
String the second side:
Repeat the threading process for the second hoop. Double-check that the patterns complement each other, even if they aren’t identical twins. -
Close the hoop:
Once satisfied with the arrangement, secure the hoop wire back into its clasp or latch mechanism. Ensure it clicks or locks firmly.
Step 4: Finishing Touches
-
Prepare the earwires:
Take your gold French hook earwires. Use your chain-nose pliers to gently twist open the small loop at the bottom of the hook. Remember to twist sideways (like opening a door), not pull apart. -
Attach to hoop:
Slide the top loop or connection point of your beaded hoop onto the open loop of the earwire. -
Orientation check:
Before closing, make sure the hoop is facing forward relative to the hook, so the beads will be visible when worn. -
Secure the jump ring:
Using your pliers, twist the earwire loop back into a closed position. Ensure the gap is completely flush so the hoop doesn’t slip out. -
Final polish:
Give the gold beads and wire a quick wipe with a jewelry cloth to remove any fingerprints from handling.
Enjoy the subtle movement and earthy elegance of your new handmade stack earrings
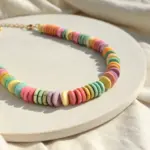
Daisy Break Beads in the Stack
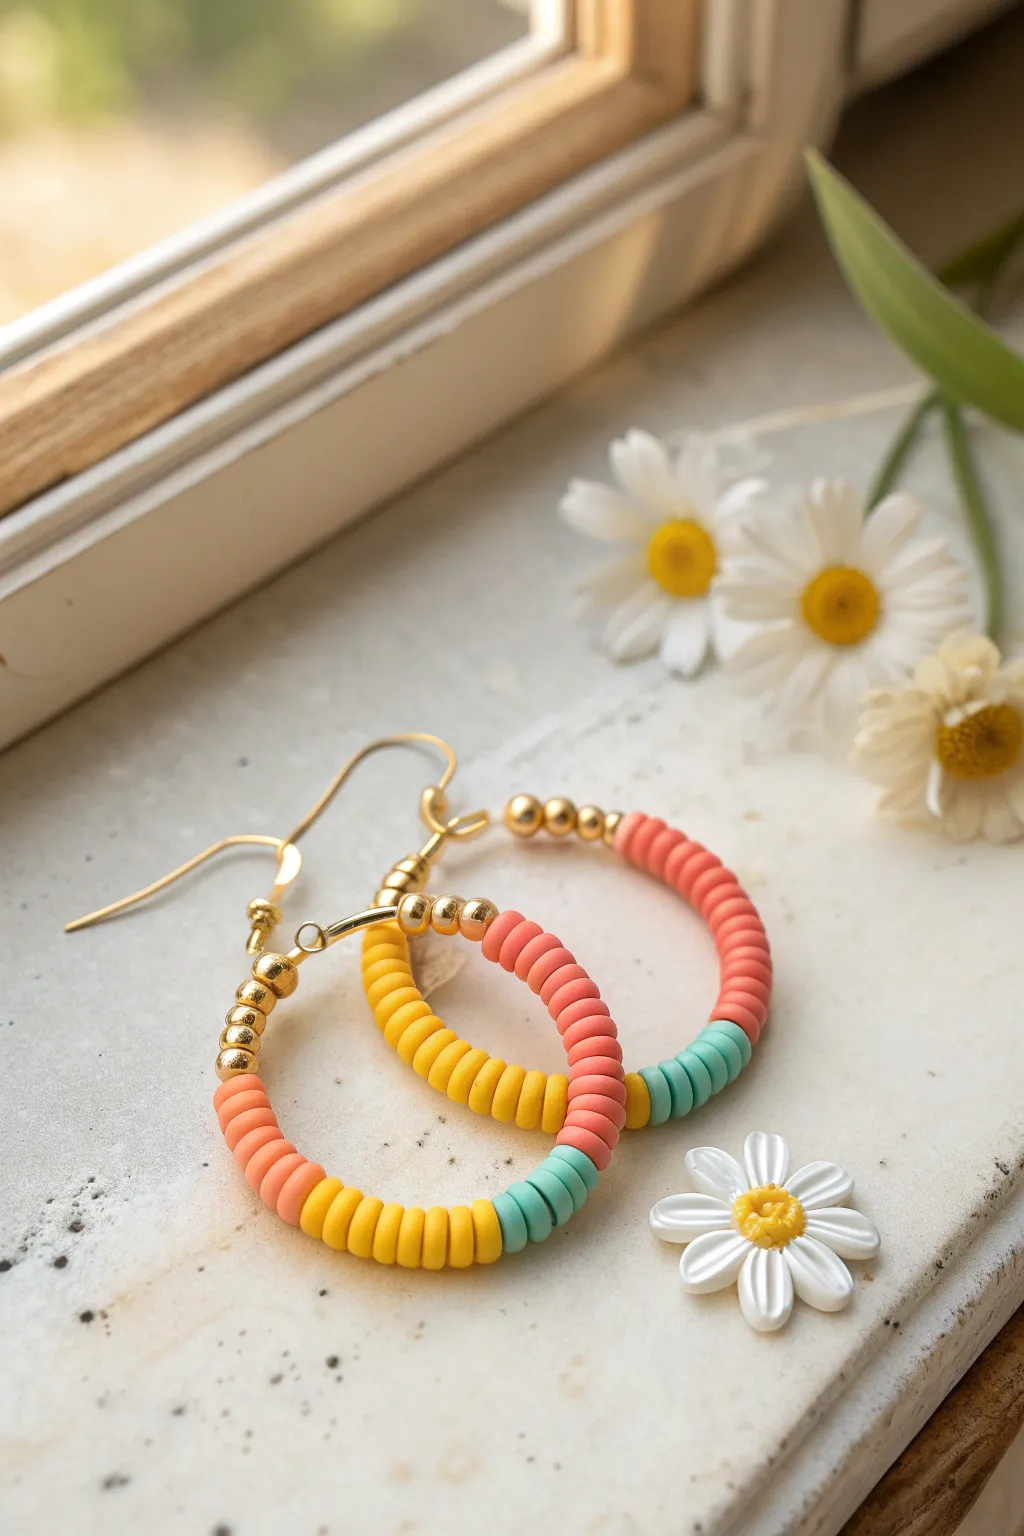
These cheerful hoop earrings combine a lovely sunset palette of coral, yellow, and teal with touches of elegant gold. Using flat clay disc beads creates a satisfyingly uniform texture that looks professionally made but is surprisingly simple to assemble at home.
Detailed Instructions
Materials
- Gold-tone hoop earring findings (approx. 25-30mm diameter)
- Flat polymer clay disc beads (heishi beads) in coral/salmon pink
- Flat polymer clay disc beads in mustard yellow
- Flat polymer clay disc beads in teal/mint green
- Small gold spherical spacer beads (3-4mm)
- Gold French hook ear wires
- Needle-nose pliers
Step 1: Planning and Preparation
-
Open the hoop:
Begin by taking one of your gold hoop findings. Locate the end of the wire that isn’t attached to the closure loop. If the wire is bent at a sharp angle to lock into place, carefully straighten just the very tip with your pliers so you can slide beads onto it easily. -
Sort your palette:
Lay out your clay beads on a bead mat or soft cloth so they don’t roll away. Group them by color: coral pink, sunny yellow, and teal. -
Check the pattern:
Before threading, visualize the color blocking. This design uses roughly equal sections of color, separated by the gold accents at the top.
Clean Tip
If your clay beads have rough edges or small tags of hanging clay from the manufacturing process, gently rub them with a nail buffer before stringing for a smoother look.
Step 2: Beading the Pattern
-
Start with gold:
Instead of starting directly with color, slide three small gold spherical spacer beads onto the hoop first to create a polished beginning to the stack. -
The coral section:
Thread on approximately 10 to 12 of the coral pink clay disc beads. Push them snugly against the gold spacers. -
Create the first transition:
This design relies on bold color blocking rather than complex patterns, so transition directly into the next color without a spacer. -
The yellow section:
Add your mustard yellow disc beads. You’ll want roughly the same amount as the coral section—about 10 to 12 beads—to keep the proportions balanced. -
The teal accent:
Finish the color stack with the teal beads. Use a slightly smaller amount here, perhaps 5 to 7 beads, to create an asymmetrical pop of cool color at the end. -
Verify the length:
Hold the hoop up to check the bead coverage. You need to leave about 5-8mm of bare wire at the end to comfortably close the loop later. -
Finish with gold:
Cap off the bead stack by adding three more gold spherical spacer beads, mirroring the start of the pattern.
Mix It Up
Add a tiny, seed-bead daisy in the middle of the yellow section by using white beads for petals and a gold spacer for the center to match the floral theme.
Step 3: Assembly and Finishing
-
Reform the wire:
Use your needle-nose pliers to carefully bend the very tip of the wire back into its original locking angle (usually a 90-degree upward bend). -
Secure the hoop:
Slide the bent tip into the receiving loop or hole on the other side of the hoop finding to ensure it locks securely. Give it a gentle tug to make sure it won’t pop open. -
Open the ear wire:
Take a gold French hook ear wire. Using your pliers, gently twist the small loop at the bottom open sideways (never pull it straight apart, as this weakens the metal). -
Attach the hoop:
Slide the main loop of your beaded hoop onto the open loop of the ear wire. Ensure the front of the hoop faces forward. -
Close the loop:
Use your pliers to twist the ear wire loop back into a closed position, ensuring the gap is completely sealed so the hoop doesn’t slip out. -
Repeat the process:
Repeat all steps for the second earring. I like to lay the finished earring next to the new one as I work to ensure the bead counts match exactly.
Now you have a vibrant pair of hoops ready to brighten up any casual outfit


What Really Happens Inside the Kiln
Learn how time and temperature work together inside the kiln to transform clay into durable ceramic.
Smiley Focal Heishi Dangles
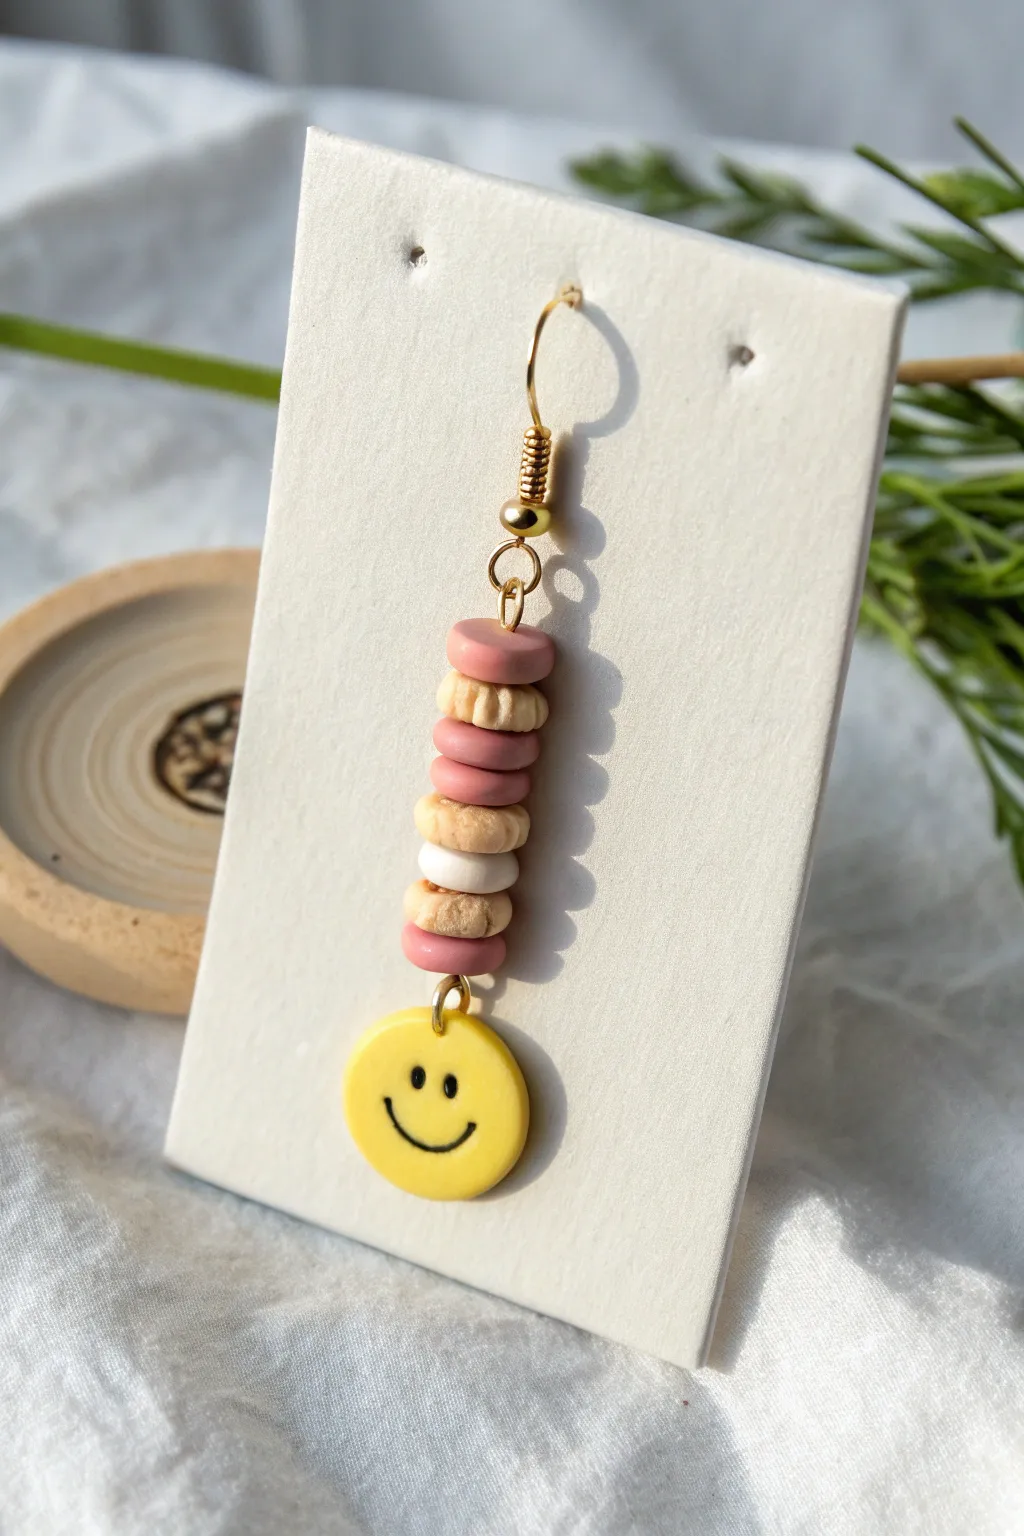
Brighten up your jewelry collection with these adorable dangles that combine earthy textures with playful vibes. Featuring a stack of polymer clay discs and a cheerful yellow smiley face, they are the perfect accessory for adding a pop of positivity to your day.
Step-by-Step Tutorial
Materials
- Polymer clay in dusty rose
- Polymer clay in beige/light tan
- Polymer clay in white
- Polymer clay in bright yellow
- Gold finish earring hook
- Gold finish eyepin (approx. 2 inches)
- Black acrylic paint or Posca pen
- Small round cutter (approx. 6-8mm)
- Slightly larger round cutter (approx. 10-12mm)
- Clay roller
- Needle tool or toothpick
- Round nose pliers
- Wire cutters
- Small jump ring (4-5mm)
- Oven for baking
Step 1: Prepping the Clay Discs
-
Condition the rose clay:
Start by gathering your dusty rose polymer clay. Knead it in your hands until it’s soft and pliable, ensuring there are no air bubbles trapped inside. -
Roll out the rose sheet:
Using your acrylic roller or pasta machine, roll the rose clay into a thick sheet, about 3-4mm thickness. -
Condition and roll beige clay:
Repeat the conditioning process with the beige clay. Roll this into a sheet of similar thickness to the rose clay. -
Create the white accent:
Condition a very small amount of white clay and roll it out to the same thickness as the others. -
Cut the heishi beads:
Using your smaller round cutter, punch out 4 circles from the rose clay, 3 from the beige clay, and 1 from the white clay. -
Texture the beige beads:
To get that rustic look seen in the photo, take your beige circles and gently press vertical indentations around the edges using a needle tool or the back of a knife blade. -
Piercing the beads:
Carefully poke a hole through the precise center of every small disc using your needle tool. Wiggle it slightly to ensure the hole is large enough for your eyepin.
Step 2: Making the Smiley Focal
-
Prepare yellow clay:
Condition the bright yellow clay and roll it out into a smooth sheet, slightly thinner than your heishi beads. -
Cut the smiley face:
Use the larger round cutter to punch out a single yellow circle. Smooth the edges with your finger if they look sharp. -
Add the smile:
Before baking, use a fine-tip tool to gently indent the smile curve and two eyes. Alternatively, wait until after baking to paint them on for a flush finish. -
Create the connection hole:
Pierce a small hole near the top edge of the yellow circle for the jump ring to pass through. -
Bake the components:
Arrange all your clay pieces on a parchment-lined baking sheet. Bake according to the manufacturer’s instructions (usually 275°F/135°C for 15-30 minutes). -
Paint details:
Once cooled, if you didn’t sculpt the face, use a fine black paint pen or acrylic paint and a tiny brush to draw the eyes and smile on the yellow disc. Let dry completely.
Smooth Edges Secret
Before baking, dip your finger in a tiny bit of cornstarch and gently rub the edges of your cut clay circles to instantly soften any sharp cutter lines.
Step 3: Assembly
-
Start the stack:
Take your gold eyepin. Thread the beads onto it in this specific order: Rose, Beige, Rose, Beige, White, Beige, Rose. I find visually checking the pattern against the photo helps keep it symmetrical. -
Secure the top loop:
Using round nose pliers, create a wrapped loop at the top of the eyepin, tightly securing your stack of beads so they don’t wiggle too much. -
Trim excess wire:
Snip off any remaining wire tail from your wrapped loop using your wire cutters. -
Attach the smiley:
Open a small gold jump ring using two pliers. Loop it through the hole in the yellow smiley charm and the bottom loop of your eyepin head (or create a loop at the bottom if using a headpin—though an eyepin is easier here). -
Add the ear wire:
Open the loop on your gold earring hook and attach it to the top wrapped loop of your bead stack. Close the loop securely.
Make it Organic
Instead of smooth round beads, shape the beige ‘cookie’ layers into imperfect, varying organic shapes for a more handcrafted, pottery-style aesthetic.
Enjoy wearing your cheerful new accessory that’s sure to bring a smile to everyone you meet
Strawberry Pink and Leafy Green Hoops
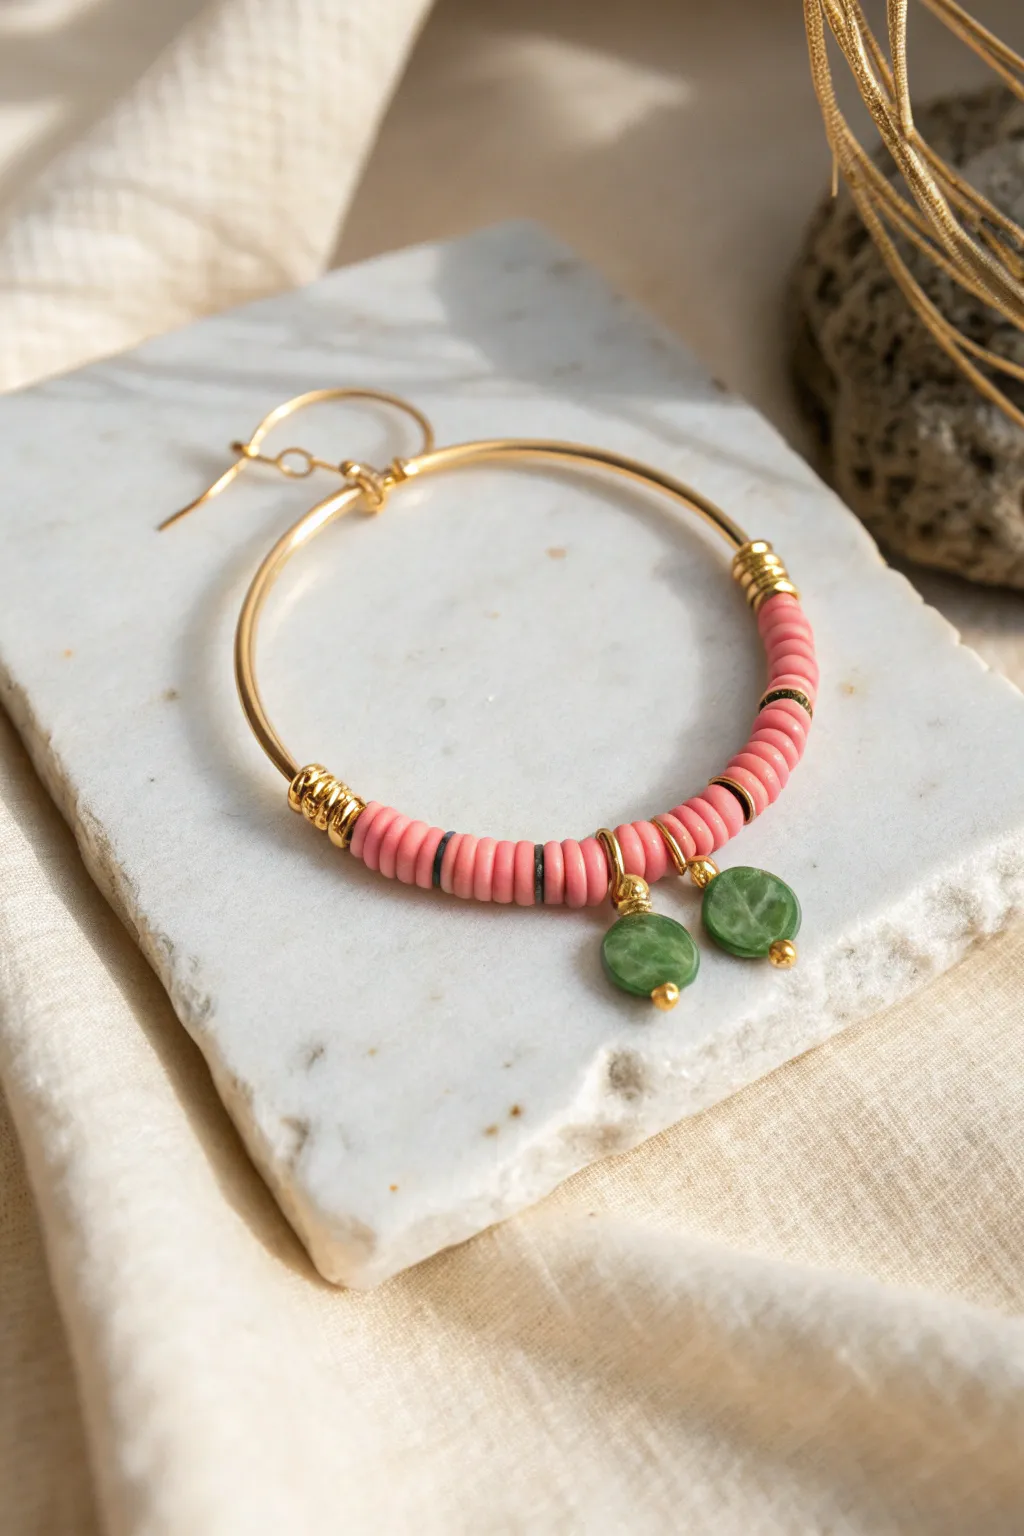
These charming earrings combine the playful pop of strawberry pink clay discs with the earthy elegance of green jade-like stones. The gold accents elevate the design, making it a perfect accessory for both casual brunches and summer garden parties.
How-To Guide
Materials
- Large gold-filled or brass hoop earring findings (approx. 40-50mm diameter) with wire loop clasp
- Pink polymer clay Heishi beads (disc beads, approx. 4-5mm)
- 2 flat round green stone beads (jade, aventurine, or dyed stone, approx. 8-10mm)
- Gold wire (24 gauge) for wrapping the green stones
- 4 thin gold spacer beads or tiny jump rings
- Gold coiled wire beads or crimp covers (to secure the bead ends)
- Round nose pliers
- Chain nose pliers
- Wire cutters
Step 1: Prepping the Charms
-
Cut the wire:
Start by cutting two pieces of 24-gauge gold wire, each about 3 inches long. This length gives you plenty of room to work comfortably without struggling with tiny ends. -
Start the wrap loop:
Using your round nose pliers, create a small loop about one-third of the way down one piece of wire. Don’t close it completely tight yet. -
Insert the stone:
Slide one flat green stone bead onto the longer end of the wire until it sits just below the loop you created. -
Create the messy wrap:
Hold the loop with your pliers and wrap the shorter tail of the wire messily around the neck of the loop just above the stone. Trim the excess tail close to the wrap. -
Finish the stone setting:
Take the bottom wire (sticking out under the bead), bend it up along the side of the stone, and wrap it around the neck loop again to secure the bottom. Alternatively, create a simple headpin-style stop at the bottom using a tiny gold ball or knot. -
Add the jump ring:
Attach a small gold jump ring to the top loop of your wrapped stone charm. This allows it to dangle freely from the hoop. Repeat these steps for the second green stone.
Loose Beads?
If the clay beads slide too freely on the hoop wire, add a dab of clear jewelry glue (like E6000) inside the final gold coil beads to fix the entire arrangement in place.
Step 2: Assembling the Hoop
-
Prepare the hoop:
Open your large gold hoop finding. Straighten the wire slightly if needed to make threading the beads easier. -
Start the pattern:
Thread on a gold coil bead or a small gold crimp cover first. This acts as a stopper and a decorative finish for the beaded section. -
Layer the pink beads:
Slide on approximately 15 to 20 pink Heishi clay beads. Ensure they sit flush against each other for a solid block of color. -
Add a gold spacer:
Place a thin gold spacer bead or a tiny gold disc bead after your first section of pink clay beads. -
Middle section:
Thread on another 5 to 7 pink Heishi beads. This smaller section creates a nice visual break before the charms. -
Attach the first charm:
Slide the jump ring holding your first green stone charm onto the hoop wire. -
Space the charms:
Add 2 or 3 pink Heishi beads. These will sit directly between the two dangling green stones. -
Attach the second charm:
Slide on the second green stone charm. I find checking the spacing here is crucial; hold it up to ensure the charms don’t crowd each other too much. -
Mirror the pattern:
Thread on another 5 to 7 pink Heishi beads, followed by a gold spacer bead. -
Finish the pink section:
Add the final long segment of 15 to 20 pink Heishi beads to mirror the starting side. -
Secure the beads:
Finish the threading with a final gold coil bead or crimp cover. -
Lock it in:
If your gold coil beads are tight enough, they will stay in place by friction. If using crimp covers, gently squeeze them with pliers to lock the beads in the center of the hoop loop so they don’t slide around.
Texture Twist
Swap the plain gold spacers for tiny freshwater pearls or faceted crystal rondelles to add a hint of unexpected sparkle and luxury to the matte clay texture.
Slip these beauties on and enjoy the fresh, fruity color palette you’ve just created.

TRACK YOUR CERAMIC JOURNEY
Capture glaze tests, firing details, and creative progress—all in one simple printable. Make your projects easier to repeat and improve.
Bright Checkerboard-Inspired Color Alternation
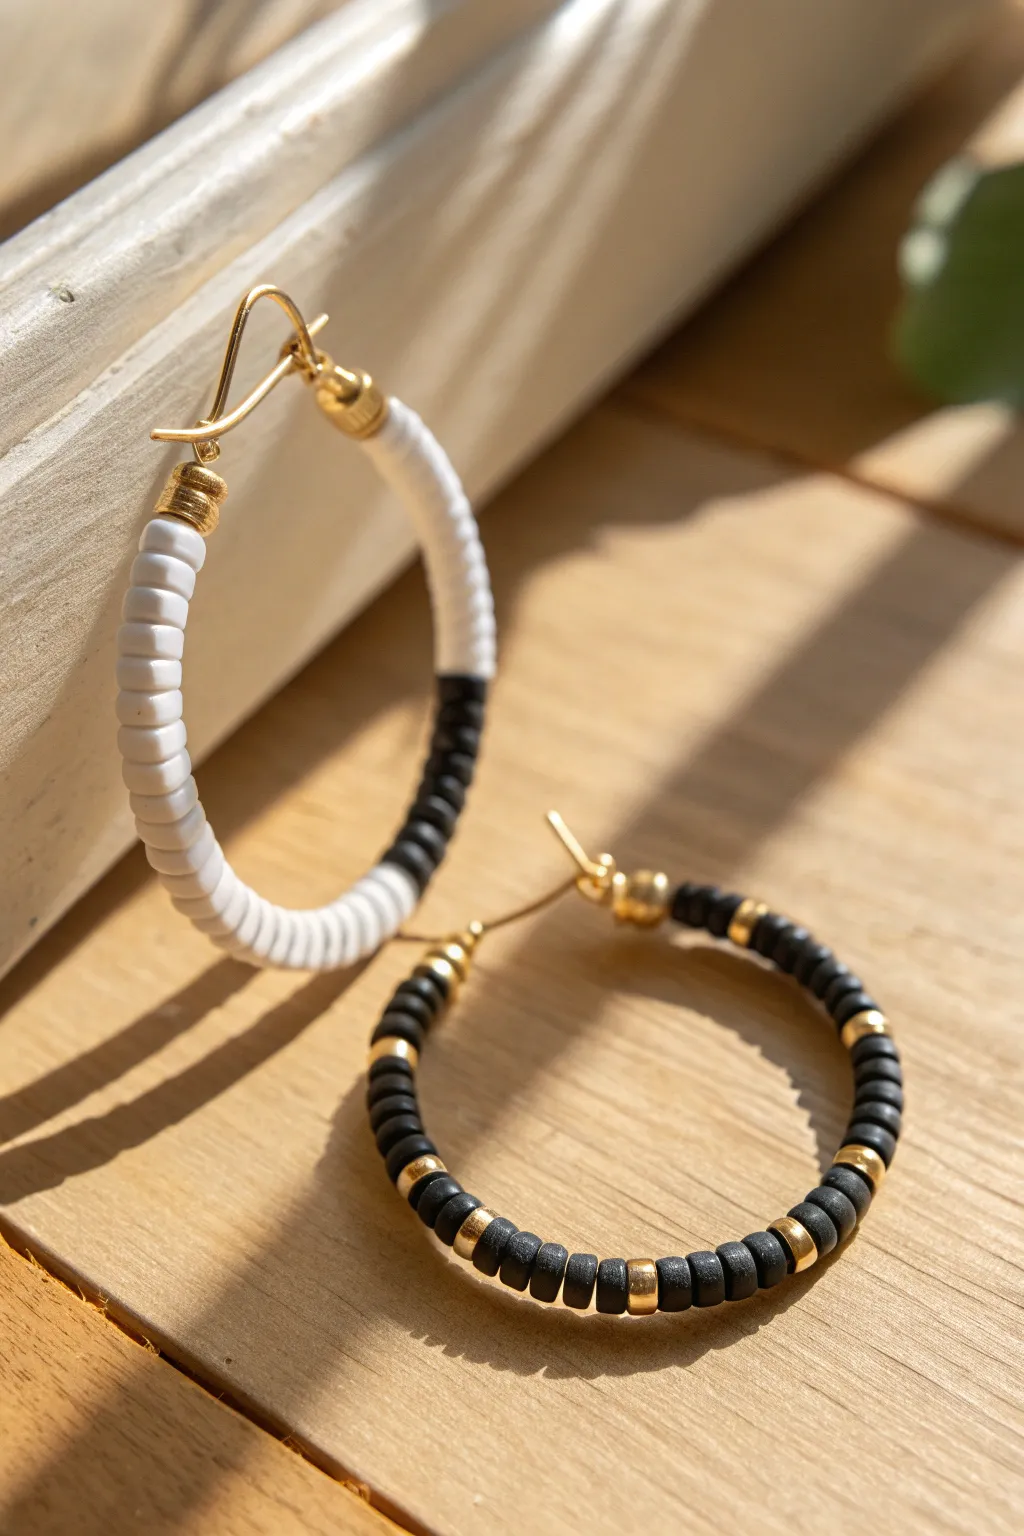
Achieve a chic, asymmetrical look with this hoop earring set, featuring one designed with bold color blocking and another with elegant gold accents. Using flat clay heishi beads creates a sleek, textured finish that pairs perfectly with warm gold hardware.
Detailed Instructions
Materials
- 4mm-6mm polymer clay heishi beads (matte white)
- 4mm-6mm polymer clay heishi beads (matte black)
- Gold-plated hoop earring findings (approx 40-50mm diameter) with a sliding or hinge mechanism
- Small gold spacer beads (brass, gold-filled, or gold-plated)
- Jewelry adhesive (e.g., E6000 or Hypo Cement)
- Bead stopper or masking tape
- Flat-nose jewelry pliers (optional, for bending wire ends)
Step 1: Preparing the Hoops
-
Inspect findings:
Begin by examining your gold hoops. Most beading hoops have a thin wire that unlatches. Open them up and check that the wire is straight enough for threading. -
Secure the end:
If your hoop wire doesn’t have a fixed stopper at the end, use a small piece of tape or a bead stopper to prevent beads from sliding off while you work, though many pre-formed hoops have a built-in loop or stopper.
Step 2: First Earring: The Color Block
-
Start with gold:
Thread a single gold spacer bead or a crimp bead onto the wire first to act as a decorative cap near the closure. -
Begin the white section:
Thread approximately 20-25 white heishi beads onto the hoop. Keep the tension loose so they curve naturally around the bend. -
Check the halfway point:
Hold the hoop up to verify that the white beads cover roughly half of the available wire space. Add or remove a bead or two to get the proportion right. -
Transition to black:
Immediately switch to the black heishi beads. Thread on an equal number, creating a stark contrast right where the colors meet. -
Finish the sequence:
Fill the rest of the wire until you reach the end mechanism, leaving about 2-3mm of wire bare for the clasp. -
Cap it off:
Add a final gold spacer bead corresponding to the one you started with. -
Secure the first hoop:
If the wire end needs to be bent to lock into the catch, use your flat-nose pliers to make a tiny 90-degree bend upwards. Apply a micro-dot of glue to the final bead if you want them permanently fixed in place.
Curve Control
Polymer clay beads are flat. If they look stiff or jagged on the hoop, simply roll the finished earring between your palms to warmth soften and settle them.
Step 3: Second Earring: Black & Gold Pattern
-
Establish the pattern:
For the second hoop, you will create a repeating pattern. Start with three to five black heishi beads. -
Add the accent:
Slide on one gold spacer bead. This adds a flash of metallic shine that breaks up the matte black. -
Repeat the sequence:
Continue threading: 4-5 black beads followed by 1 gold spacer. I prefer doing a ‘dry run’ on a table to ensure I have enough gold spacers before committing them to the wire. -
Monitor spacing:
As you work around the curve, pause occasionally to push the beads snugly together. Gaps can look messy on a curved wire. -
Complete the circle:
Continue the pattern until you reach the end of the wire, ensuring your last group of beads allows room for the closure. -
Final check:
Compare the second hoop to the first one. They don’t need to match in design, but the visual ‘fullness’ of the beading should look balanced. -
Secure the second hoop:
Just as before, bend the wire tip if necessary with your pliers to engage the locking mechanism. -
Final glue step:
Since these beads can spin, add a tiny dot of jewelry glue to the very first and very last bead on the wire to prevent them from shifting too much during wear.
Closing Tip
If the wire tip is too sharp after bending, file it gently with a nail file or sandpaper to prevent it from scratching your ear lobe.
Enjoy wearing these distinctively stylish hoops that blend minimalist color blocking with classic metallic details
Candy Stripe Patterns With Repeating Bands
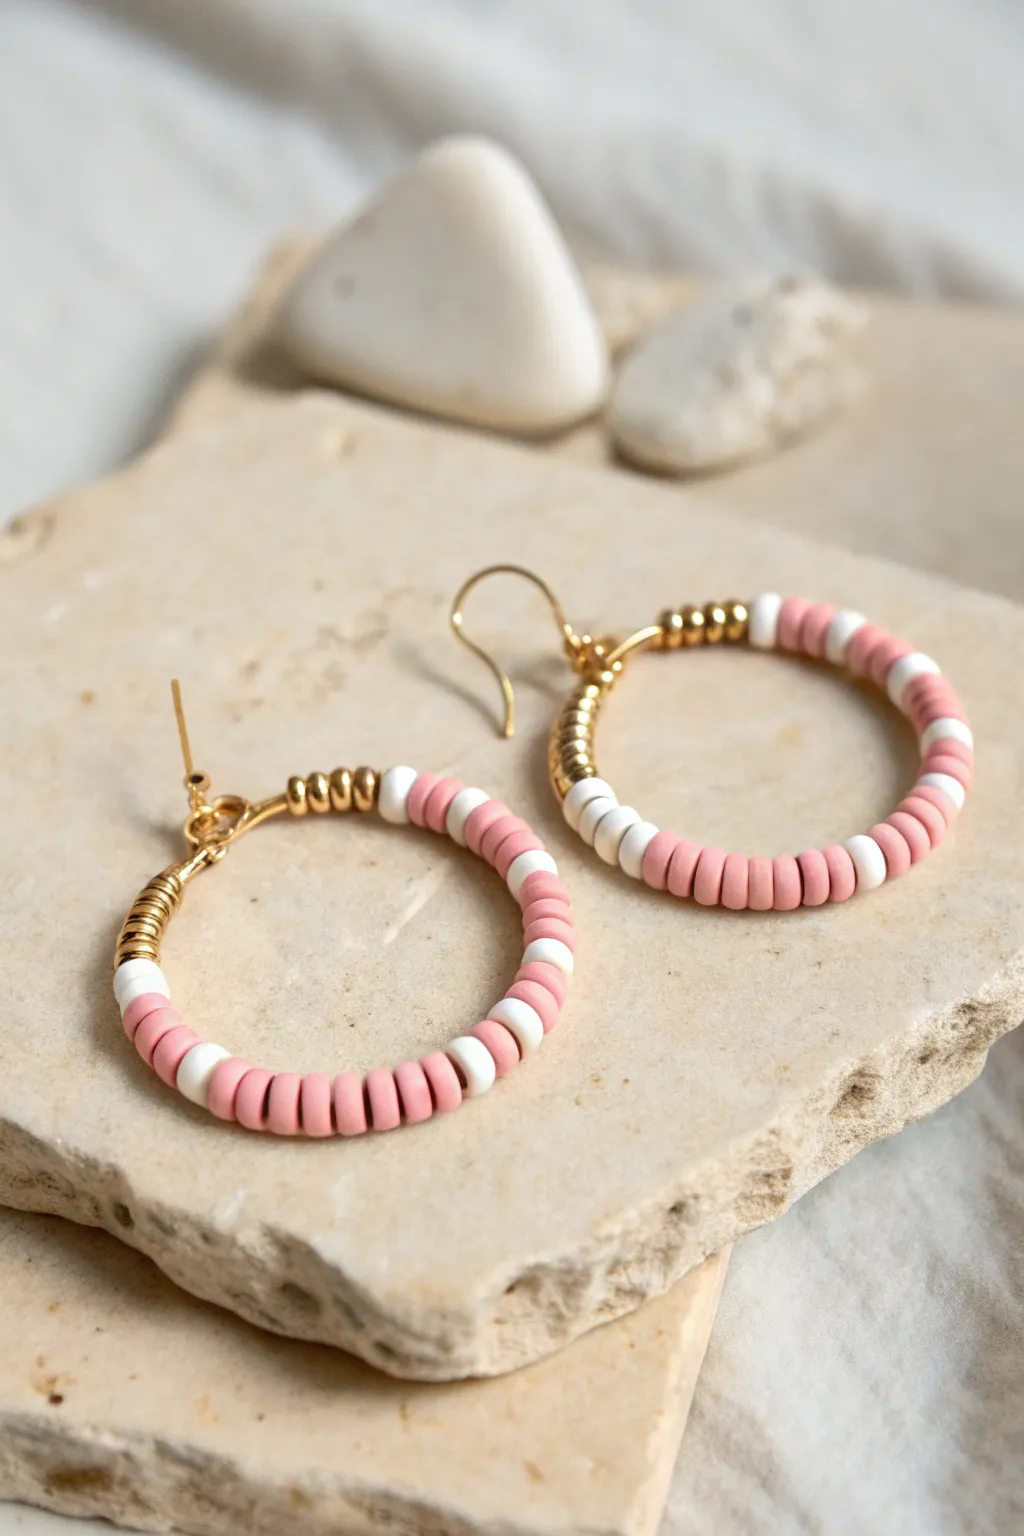
These sweet hoop earrings combine soft pink and crisp white clay discs with elegant gold accents for a classic candy-stripe look. The alternating pattern creates a playful rhythm that feels perfect for summer afternoons or brightening up a winter outfit.
How-To Guide
Materials
- 2 Gold-tone hoop earring findings (approx. 40mm diameter)
- 6mm Polymer clay Heishi beads (Matte Pink)
- 6mm Polymer clay Heishi beads (White)
- Small gold spacer beads or heishi beads
- Gold-tone jewelry wire (24 or 26 gauge) for wrapping
- 2 Earring hooks (French wire style)
- Chain nose pliers
- Wire cutters
- Super glue (optional)
Step 1: Prepping the Hoop Base
-
Open the hoop:
Locate the closure of your metal hoop finding. Depending on the style, you might need to gently unhook the latch or slide the wire out of its catch using your fingers. -
Straighten the end:
If the end of your hoop wire has a sharp 90-degree bend for the closure, use your chain nose pliers to gently straighten it out just enough so you can thread the beads on easily. -
Secure the start:
Before beading, take a short piece of your 24-gauge wire and wrap it tightly 3-4 times around the hoop base near the eyelet loop to act as a stopper. This prevents beads from sliding up the curve too far.
Loose Beads?
If the beads slide around too much on the wire hoop, add a tiny drop of super glue inside the first and last gold beads to lock the whole row in place.
Step 2: Creating the Bead Pattern
-
Begin with gold:
Thread approximately 4 to 5 small gold spacer beads onto the hoop first. These metallic accents frame the pattern beautifully and add a professional finish. -
Add first contrasting accent:
Slide on a single white clay bead after the gold spacers. This singular white bead acts as a clean break before the main color starts. -
Form the pink band:
Thread on 5 pink heishi beads. Push them snugly against the white bead to ensure there are no gaps. -
Add the stripe separator:
Add another single white clay bead. This alternating rhythm—one white, five pink—is the core of your candy stripe design. -
Repeat the pattern:
Continue adding groups of 5 pink beads separated by 1 white bead. You will repeat this sequence approximately 4 or 5 times, depending on the size of your hoop. -
Check the symmetry:
Pause when you get close to the end. Hold the hoop up to check the balance; you want the beading to cover the bottom three-quarters of the circle, leaving some bare wire near the top. -
Finish the far side:
Once your last pink section is done, add one final white bead to mirror the beginning of the design. -
End with gold:
Finish the beading sequence by adding another set of 4 to 5 gold spacer beads, matching the number used at the start.
Mix It Up
Try an ombré effect by using dark pink, medium pink, and light pink sections separated by gold spacers instead of white for a gradient look.
Step 3: Finishing Touches
-
Re-bend the closure:
If you straightened the hoop wire earlier, use your chain nose pliers to carefully bend the very tip back into its 90-degree catch shape. -
Secure the beads:
To keep the beads tight, wrap a small piece of 24-gauge wire just above the final gold spacers, mirroring the starting wrap. Trim excess wire closely. -
Attach the ear wire:
Open the small loop at the bottom of your French hook earring wire by twisting it sideways with pliers—never pull it open like a jaw. -
Connect the components:
Slide the hoop’s top loop onto the open ear wire loop. Close the ear wire loop securely by twisting it back into place. -
Repeat for the second earring:
Build the second earring exactly the same way. I always set the first one on the table right in front of me as a visual guide to ensure the patterns match perfectly.
Now you have a stylish, lightweight pair of hoops ready to wear or gift to a friend
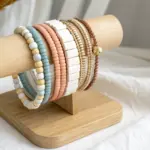
Mismatched But Coordinated Cute Pairs
Embrace the playful trend of asymmetry with these charming hoop earrings, featuring coordinated colors in mismatched patterns. The matte finish of the clay disc beads paired with shiny gold hardware creates a sophisticated yet relaxed bohemian vibe.
Step-by-Step Guide
Materials
- Heishi polymer clay disc beads (Terra Cotta/Rust color)
- Heishi polymer clay disc beads (Slate Blue/Teal color)
- Heishi polymer clay disc beads (Cream/Off-White color)
- Gold tone memory wire (ring size)
- 2 Gold French hook ear wires
- Small gold spacer beads or crimp beads
- Round nose pliers
- Wire cutters
- Flat nose pliers
Step 1: Preparing the Hoop Base
-
Cut the wire:
Begin by selecting a coil of memory wire that matches your desired hoop size. Using your heavy-duty wire cutters (memory wire is tough!), cut two full circles, leaving about half an inch of overlap on each circle to account for the loops you’ll create later. -
Form the first loop:
On one end of your first wire circle, use your round nose pliers to grasp the very tip. -
Roll the loop:
Rotate your wrist to roll the wire backward, creating a small, outward-facing loop. This acts as the stopper for your beads and the connection point for the ear wire. -
Add a gold accent:
Before adding any colorful beads, slide on two small gold spacer beads. These add a finished, professional look near the hardware.
Step 2: Designing the Terra Cotta Earring
-
Begin the pattern:
For the rust-colored earring, start by threading the cream-colored Heishi beads onto the wire. You’ll need about 10-12 beads for this initial section. -
Insert gold spacers:
Slide on two small gold spacer beads to separate the color blocks. -
Main color styling:
Now, thread on the terra cotta (rust) clay beads. Continue adding these until the wire is almost full, leaving just enough space at the end to create a closing loop. -
Finish the bead row:
Unlike the starting side, end this row with just the clay beads, or add a single gold spacer if you prefer symmetry. Ensure the beads sit snugly against each other but aren’t so tight that the hoop warps.
Hoop Shape Issues?
If your memory wire hoops looks oval instead of round after beading, the wire might be too crowded. Remove 1-2 beads to give the wire room to relax back into a circle.
Step 3: Designing the Teal Earring
-
Start with contrast:
For the second earring, we want a coordinated mismatch. Start this hoop by threading on the teal/slate blue beads first. Add a substantial section, covering about one-third of the hoop. -
Transition section:
For a smooth transition, add a single gold spacer, followed by a small section of cream beads (about 8-10 beads). -
Add the focal detail:
Slide on three gold spacer beads to create a shiny focal point in the pattern. -
Resume cream section:
Add a second small section of cream beads to mirror the previous block. -
Complete with teal:
Fill the remainder of the wire with the teal beads, matching the length of the first teal section.
Add Charm Texture
Make them jingle by attaching a tiny gold charm or a small tassel to the loop where the color transition happens for extra movement.
Step 4: Final Assembly
-
Create closing loops:
On the open end of each hoop, use your round nose pliers to create a second outward-facing loop. This loop needs to be perpendicular to the hoop’s curve so it can hang correctly. -
Trim excess:
If you have extra wire extending beyond your new loop, carefully snip it off with wire cutters. -
Adjust the angle:
Use flat nose pliers to gently bend both end loops upwards at a 90-degree angle relative to the circle. While doing this, bring the two loops together so they overlap and touch. -
Attach ear wires:
Open the small loop at the base of your French hook ear wire using pliers (twist sideways, never pull apart). Slide both loops of the hoop into this open ring. -
Secure the hooks:
Gently twist the ear wire loop closed again, ensuring the gap is completely sealed so the hoop doesn’t slip out. -
Double check:
Hold the earrings up to check that the patterns sit where you want them (usually the bead variation looks best slightly off-center) and adjust the loops if necessary.
Now you have a stylish pair of earrings that perfectly balances coordination with unique flair
Tiny Charm Cluster Above Heishi Hoops
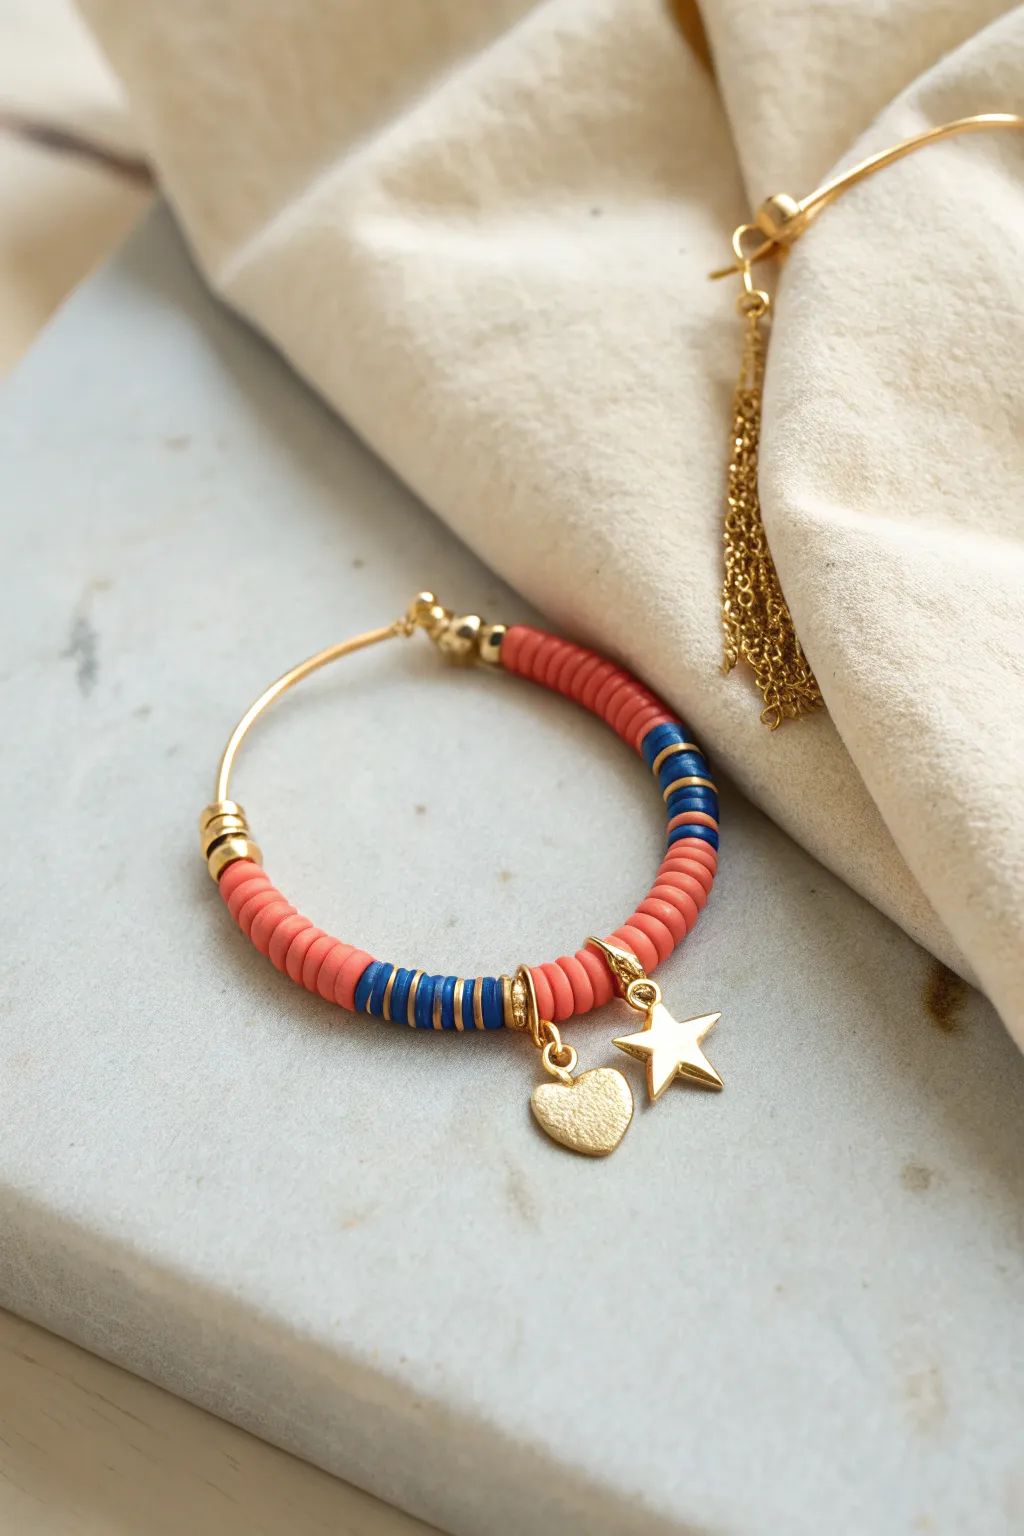
This charming hoop design combines the earthy texture of heishi clay beads with the classic shine of gold charms. The contrast between soft coral, deep blue, and bright metal creates a playful yet sophisticated accessory perfect for everyday wear.
Step-by-Step
Materials
- Gold-filled earring hoop wires (approx. 25-30mm diameter)
- 4mm-5mm polymer clay heishi beads in soft coral
- 4mm-5mm polymer clay heishi beads in deep blue
- Gold tone spacer beads (small discs or rondelles)
- Gold tone bead stopper or crimp bead covers (round, approx. 3mm)
- Small gold heart charm
- Small gold star charm
- 4mm gold jump rings
- Jewelry pliers (flat nose and chain nose)
Step 1: Preparing the Base
-
Open the hoop wire:
Begin by gently unhooking the closure of your gold hoop wire. If the wire is a bit stiff, flex it slightly to create enough space to thread beads easily, but be careful not to distort the circle shape. -
Secure the starting point:
Slide a gold bead stopper or a small round gold bead onto the wire first. Push it down about a quarter of the way along the hoop curve. This acts as a visual bookend for your bead design. -
Anchor firmly:
If using a crimp-style stopper, you can lightly pinch it with your pliers to keep the beads from sliding too far back, though a tight-fitting metal bead usually works well enough to hold the tension.
Step 2: Beading the Pattern
-
Start with coral:
Thread approximately twelve to fifteen coral heishi beads onto the wire. These clay discs can sometimes be uneven, so I like to rotate them as I stack to ensure they nestle together smoothly. -
Add first blue accent:
Slide on a single gold spacer bead, followed by three deep blue heishi beads, and cap it with another gold spacer. This creates a bold stripe of color. -
Continue the coral segment:
Add another long section of coral beads. Aim for a length slightly longer than your first section to account for the curve at the bottom of the hoop. -
Create the central focal point:
Thread on a gold spacer, then the charm holder or a jump ring that will eventually hold your charms. Follow this immediately with five blue heishi beads. -
Add the second charm holder:
Slide on another gold spacer and a second jump ring or charm loop. The charms will hang between the blue sections and the coral sections. -
Finish the bead pattern:
Complete the beading pattern in reverse: add a section of coral beads, followed by the blue stripe accent (gold spacer, three blue beads, gold spacer), and finally the last segment of coral beads. -
Secure the end:
Finish the beading sequence with a final gold stopper bead to match the one you placed at the beginning.
Uneven Clay Beads?
Heishi beads vary in thickness. If your pattern looks lopsided, count beads by total length (millimeters) rather than the number of discs.
Step 3: Attaching the Charms
-
Prep the charms:
Using two pairs of pliers, carefully open two jump rings. Hold the ring on either side of the split and twist one hand away from you—never pull them apart horizontally. -
Connect the heart:
Slip the heart charm onto one open jump ring. Hook this ring onto the small loop or directly onto the wire gap you created between the spacers earlier. -
Close the heart ring:
Use your pliers to twist the jump ring back into a closed circle until you hear a tiny ‘click’ or feel the ends meet perfectly flush. -
Connect the star:
Repeat the process with the star charm, attaching it to the second location near the center. Staggering them slightly allows them to jingle without constantly tangling. -
Final adjustment:
Slide all the beads down the hoop wire to center the entire arrangement. Ensure there is equal bare wire on both ends of the hoop for a balanced look near the earlobe. -
Bend the catch (optional):
If your wire hoop doesn’t have a pre-made latch, use pliers to bend the very tip of the wire upward at a 90-degree angle to create a catch for the loop closure.
Pro Tip: Glue Security
Add a tiny dot of jewelry glue (like E6000) inside the final gold stopper bead. This prevents the entire bead stack from shifting while wearing.
Enjoy the delicate jingle of your new celestial charm hoops as you move through your day
Teardrop Hoop Frames With Bottom Bead Stack
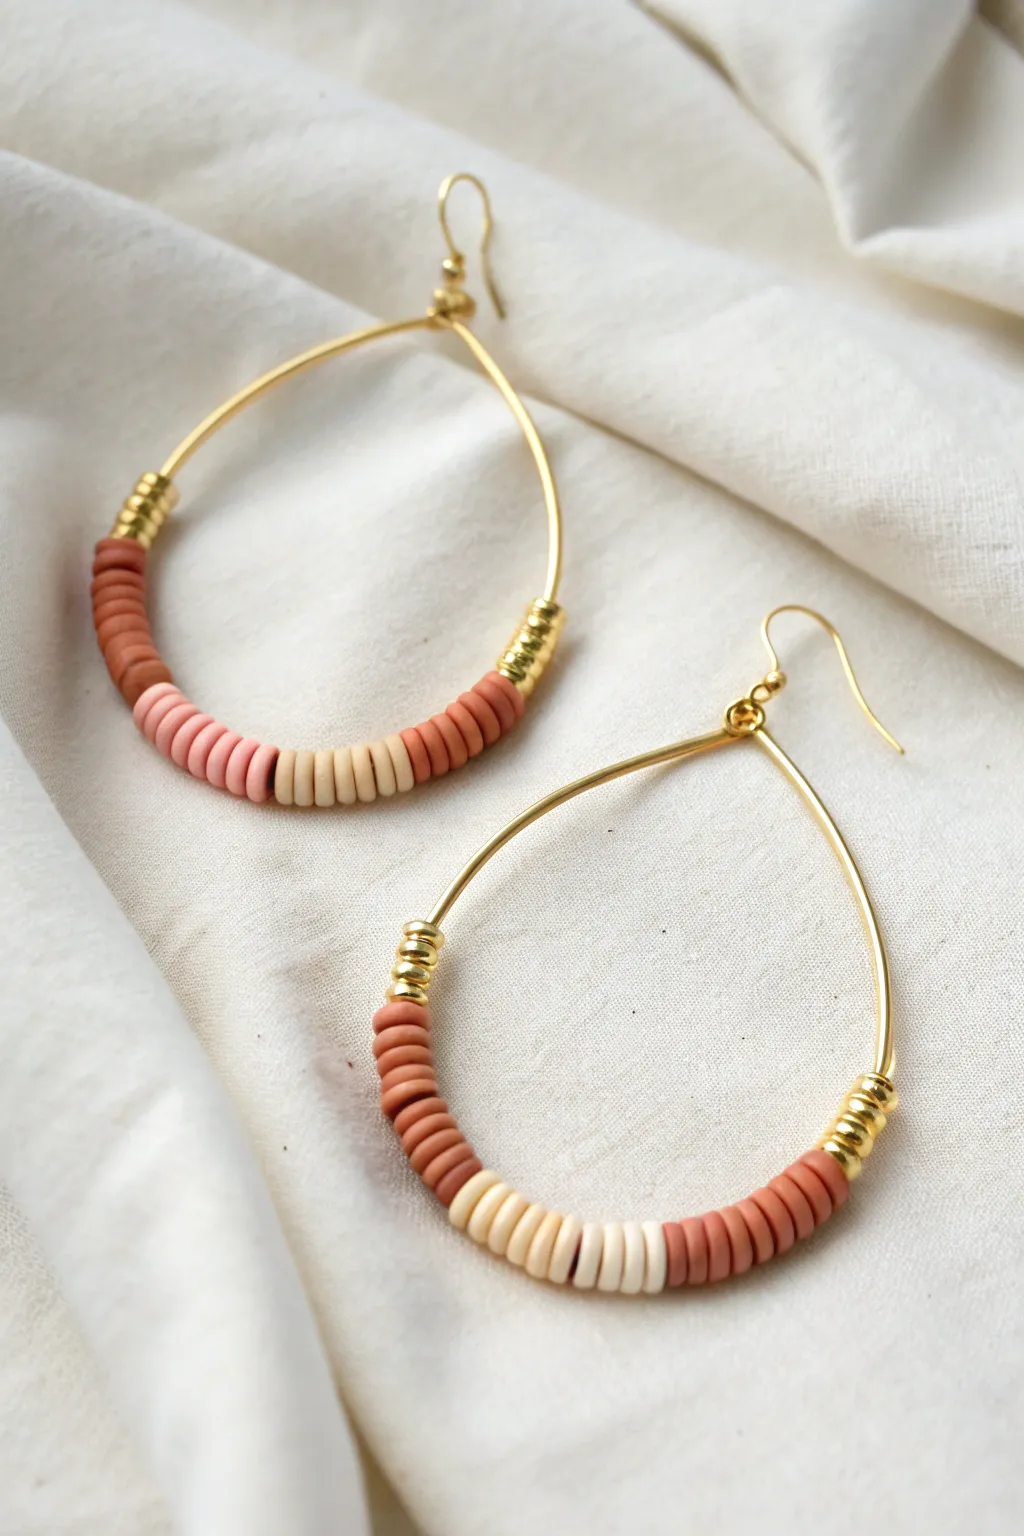
These elegant earrings combine rustic terracotta tones with the shine of polished gold, creating a sophisticated yet down-to-earth aesthetic. Using pre-formed teardrop hoops makes this project surprisingly quick while maintaining a high-end, boutique jewelry look.
Detailed Instructions
Materials
- Gold teardrop earring hoop frames (approx. 2 inches)
- Heishi clay disc beads (terracotta, cream/beige, and rust)
- Small gold spacer beads (heishi or round)
- Earring hooks (gold-plated or gold-filled)
- Jump rings (4mm, gold)
- Chain nose pliers
- Round nose pliers
- Jewelry adhesive (optional)
- Bead mat or tray
Step 1: Preparation & Planning
-
Examine Your Beading Wire:
Standard teardrop hoops usually come with a locking mechanism at the top. Locate the side that unhooks or has a small loop that can be opened to slide beads on. -
Open the Frame:
Depending on your specific hoop style, gently unlatch the top wire. If it is a solid wire form meant to be bent, carefully deflect the wire just enough to create an opening. -
Sort Your Color Palette:
Pour out a small amount of your clay heishi beads onto your bead mat. You’ll need three distinct sections: the dark rust/terracotta color, a lighter dusty pink or bleached terracotta, and a creamy beige.
Smooth Curves
If the flat heishi beads look jagged on the sharp curve, place a tiny round gold seed bead between color sections. This acts as a hinge, helping the stack turn the corner gracefully.
Step 2: Creating the Bead Stack
-
Start the Sequence:
Begin threading the beads onto the open wire. Start with four to five gold spacer beads to create a shiny metallic bookend for your design. -
Add the Dark Clay Layer:
Thread on approximately 10 to 12 of the darkest rust-colored clay heishi beads. This forms the outer edge of your color block. -
Transition the Color:
Now, switch to your secondary color. In the photo, the top earring uses a soft pink and the bottom earring uses cream here, showing how you can mix it up. Add about 6 to 8 of these lighter beads. -
Create the Centerpiece:
For the very bottom of the curve, thread on your lightest cream or beige beads. Use about 8 to 10 beads here to highlight the lowest point of the teardrop. -
Mirror the Pattern:
Now work backwards through your colors. Add the same number of the secondary color beads (pink or light rust) that you used on the first side. -
Complete the Clay Section:
Finish the clay portion by adding the final 10 to 12 dark rust beads, matching the start of your pattern exactly. -
Finish the Stack:
Slide on the final set of gold spacer beads (4 to 5) to cap off the other end, mirroring the metallic start. -
Check for Symmetry:
Hold the loop up and let the beads settle at the bottom. Ensure the color blocking looks balanced and sits nicely in the curve of the teardrop.
Step 3: Assembly & Finishing
-
Technique Check:
Sometimes the curve of the wire makes the flat heishi beads sit awkwardly. You can gently massage the bead stack with your fingers to help them align smoothly along the bend. -
Close the Hoop:
Re-latch the hoop wire at the top. If your frame requires bending the wire back into a loop, use your round nose pliers to re-form that small secure circle. -
Secure the Latch (Optional):
If I am worried about the thin wire slipping out of the catch over time, I sometimes add a tiny dab of jewelry glue to the closure point for extra security. -
Attach the Earwire:
Open a 4mm jump ring by twisting it sideways with two pairs of pliers (never pull it apart). -
Connect the Components:
Slide the jump ring through the loop at the top of your teardrop frame and then through the loop of your earring hook. -
Seal the Connection:
Twist the jump ring closed again, ensuring the ends meet perfectly flush so there is no gap for the thread or wire to escape. -
Repeat for the Second Earring:
Follow the exact same steps for the second earring. You can choose to make it identical (like the bottom earring in the photo) or slightly varied in tone (like the top one).
Texture Twist
Replace the smooth gold spacer beads with faceted brass beads or tiny freshwater pearls. Mixing textures elevates the clay and gives it a more eclectic, expensive feel.
Now you have a stunning pair of lightweight statement earrings ready to wear with your favorite casual outfit
Vertical Heishi Stack Drop Earrings
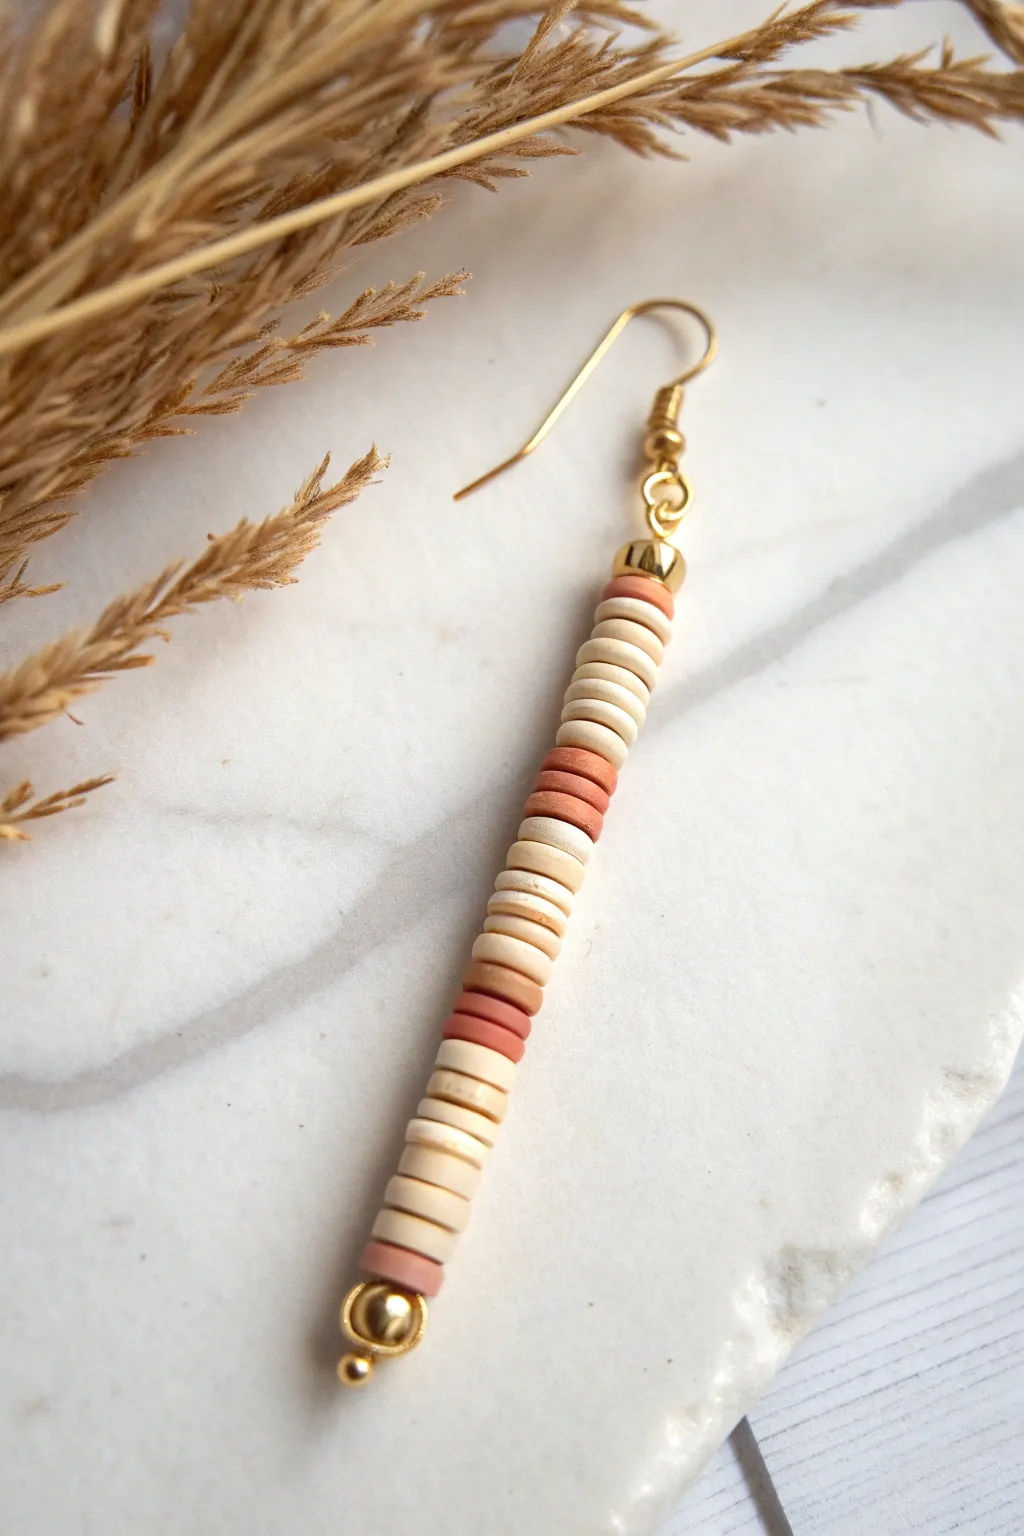
Embrace earthy elegance with these simple yet striking vertical drop earrings. By stacking polymer clay heishi beads in a soothing gradient of cream, sand, and terracotta, you can create a versatile accessory that pairs perfectly with everything from linen dresses to cozy knitwear.
Step-by-Step Tutorial
Materials
- Polymer clay heishi beads (6mm or similar) in off-white/cream
- Polymer clay heishi beads in light beige/sand
- Polymer clay heishi beads in terracotta/rust
- Gold tone eye pins (approx. 2 inches long)
- Gold tone French hook ear wires
- Small gold spacer beads (3-4mm, round)
- Gold crimp beads or tiny seed beads (optional for spacing)
- Chain nose pliers
- Round nose pliers
- Flush cutters
Step 1: Planning and Preparation
-
Lay out your design:
Before stringing anything, arrange your heishi beads on a bead mat or piece of felt. This allows you to visualize the pattern. For this design, aim for blocks of color rather than a mixed scramble. -
Establish the pattern:
Create a pattern that alternates between larger sections of the cream/sand colors and smaller accent sections of the terracotta. -
Check the length:
Line up your beads next to the eye pin to ensure your design won’t exceed the pin’s length, leaving about 1cm of wire free at the top for the loop.
Wobbly Line Fix
If your bead stack looks crooked, the hole in the heishi beads might be too large for the wire. Thread a seed bead between color sections to act as a stabilizer.
Step 2: Assembling the Drop
-
Start the stack:
Thread a small gold round spacer bead onto your eye pin first. This acts as a sturdy base and adds a polished finish to the bottom of the earring. -
Add the first color block:
Slide on one terracotta bead followed by about four cream beads to begin the bottom section. -
Build the middle section:
Continue your pattern upwards. I like to transition into a longer section of roughly 15-20 cream/sand beads to create the main body of the earring. -
Insert an accent:
Break up the neutral column by adding a small stack of 3-4 terracotta beads. -
Finish the clay stack:
Top off the design with another small section of 4-5 cream beads. -
Add the top gold accent:
Place a second small gold round spacer bead at the very top of your clay stack. This mirrors the bottom bead and gives the design a cohesive, professional look. -
Compress the beads:
Gently push all the beads down toward the bottom of the pin to ensure there are no gaps between the discs.
Step 3: Final Construction
-
Prepare the wire:
Using your flush cutters, trim the excess wire at the top, leaving about 1cm (roughly 3/8 inch) extending above the top gold bead. -
Start the loop:
Grasp the very tip of the wire with your round nose pliers. -
Form the loop:
Roll the pliers toward you to curl the wire down, creating a simple loop. Don’t close it completely tight just yet. -
Attach the ear wire:
Slide the loop of your gold French hook ear wire into the loop you just formed on the eye pin. -
Secure the closure:
Using your chain nose pliers, gently grip the loop and close it securely so the ear wire cannot slip out. -
Straighten the assembly:
Hold the earring up and check if the wire is straight. If it looks slightly bent from the loop-making process, use your fingers or nylon-jaw pliers to gently straighten the main shaft. -
Repeat for the second earring:
Recreate the exact same bead pattern on a second eye pin to complete the pair.
Texture Play
Swap the smooth gold spacer beads for faceted or hammered gold beads. This tiny change catches the light differently and adds instant high-end appeal.
Enjoy styling these effortless, earthy drops with your favorite casual outfits
Double-Hoop Layered Bead Earrings
These bohemian-inspired earrings feature a clever double-hoop construction, layering earthy toned clay heishi beads over a larger outer ring while keeping a smaller inner ring sleek and golden. The mix of muted terracotta, cream, sage, and sand colors creates a versatile accessory perfect for any season.
Step-by-Step Guide
Materials
- 2 large gold-tone beading hoops (approx. 40-50mm diameter)
- 2 medium gold-tone closed jump rings or solid rings (approx. 25-30mm diameter)
- Polymer clay heishi beads (terracotta, cream/white, sage green, sand/beige)
- 2 gold-tone ear wires (French hook style)
- 26-gauge or 24-gauge gold craft wire
- Small spacer beads (gold or bronze)
- Small round accent beads (white or cream)
- Chain nose pliers
- Round nose pliers
- Wire cutters
Step 1: Preparing the Hoop Base
-
Open the large hoop:
Begin with your larger adjustable beading hoop. Locate the end that slides out or unhooks to allow for beading. -
Anchor the inner ring:
Before adding any beads, you need to attach the smaller inner gold ring. Cut a 2-inch piece of thin craft wire. -
Wire wrap the connection:
Hold the smaller closed ring inside the larger open hoop so their tops touch. Tightly wrap the craft wire around both hoops 4-5 times to secure them together at the top center. Trim any excess wire ends close to the coil so they don’t snag. -
Secure the wrap:
Use your chain nose pliers to gently squash the wire coil flat against the hoops, ensuring the connection is rigid and the inner hoop hangs centered.
Step 2: Beading the Outer Hoop
-
Plan your pattern:
Lay out your heishi beads on a mat. The pattern shown uses blocks of color: a long section of terracotta, followed by small segments of cream and sand, transitioning into sage green near the top. -
Thread the first side:
Gently gently bend the large hoop’s wire end open enough to thread beads. Slide beads onto one side of the large hoop, stopping when they hit the bottom center or just creating a continuous loop if your hoop allows. -
Navigate the join:
If using a standard beading hoop with a fixed end, you might need to thread all beads from one side. Ensure the beads slide all the way around, covering the bottom arc of the hoop completely. -
Complete the circle:
Fill the hoop until you reach the wire-wrapped top section on both sides. The beads should sit snugly against the wire wrap we created earlier, effectively hiding the mechanics of the hoop for a polished look. -
Close the hoop:
Re-insert the wire end into the hoop’s closure mechanism or bend the tip into a locking loop using round nose pliers to secure the circle.
Wobbly Inner Hoop?
If the inner circle swings too much or sits crooked, add a tiny drop of clear jewelry glue (like E6000) to the wire wrap at the top connection point to freeze it in place.
Step 3: Creating the Connector
-
Start the connector link:
Cut a fresh 3-inch piece of craft wire. Create a wrapped loop at one end using your round nose pliers, but don’t close it fully yet. -
Attach to the main body:
Hook this open loop through the top of your double-hoop assembly (right over the wire wrap holding the two hoops together). Close the loop securely. -
Add decorative accents:
Thread a small gold spacer bead, followed by a round white accent bead, and another gold spacer onto this vertical wire. -
Create the top loop:
Directly above the top spacer bead, use your round nose pliers to bend the wire 90 degrees. -
Finish the wrap:
Form a loop for the ear wire. Wrap the tail of the wire around the stem (between the loop and the top bead) creating a ‘messy’ or coiled look for texture. I prefer winding it 3-4 times for that boho aesthetic. -
Trim and tuck:
Snip off any excess wire and use pliers to tuck the sharp end in so it doesn’t scratch. -
Attach the ear wire:
Open the loop on your French hook ear wire with pliers (twist sideways, don’t pull apart). Slide it onto the top loop of your connector and close it back up.
add texture
Mix different bead textures! Try swapping a few clay heishi beads for raw brass spacers or faceted crystal beads in matching tones to catch the light.
Now you have a stunning pair of layered earrings that look professionally made and ready for brunch.
Soft Neutral Heishi With One Pop Color
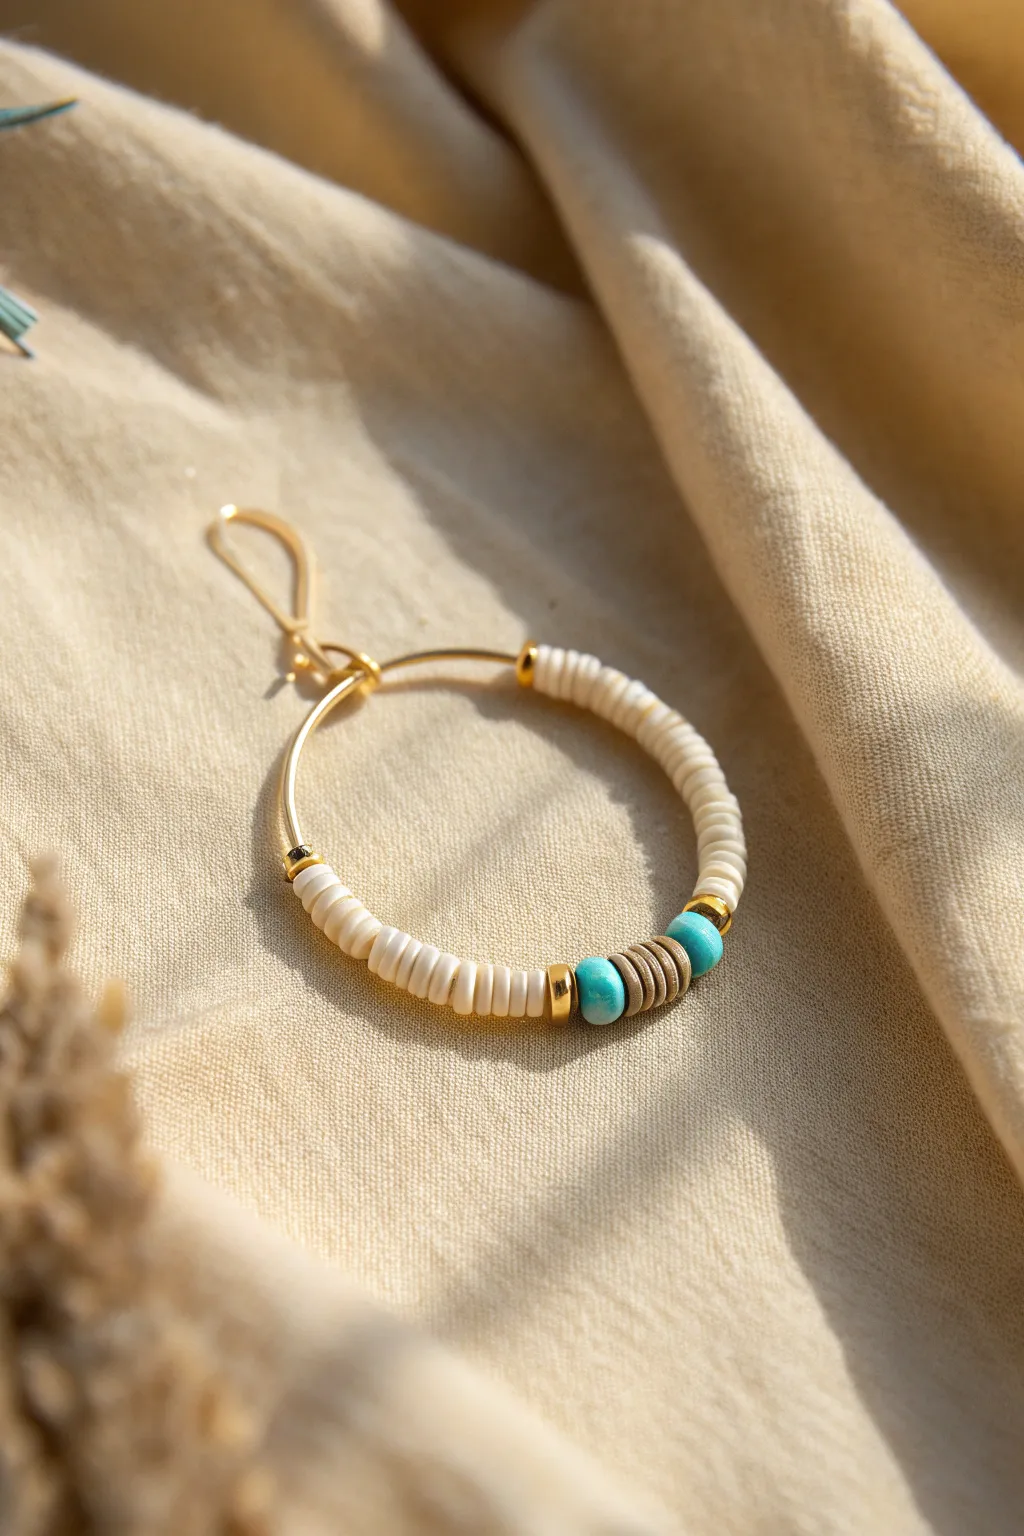
Capture the essence of relaxed summer style with these delightful hoop earrings featuring a blend of creamy neutrals and a striking pop of turquoise. This project combines classic gold hoops with the trendy texture of clay heishi beads for a sophisticated yet effortless accessory.
Step-by-Step Tutorial
Materials
- Gold tone earring hoops (approx. 30-40mm diameter)
- Gold tone ear wires (French hooks)
- 4mm polymer clay heishi beads in Cream/Off-White
- 4mm polymer clay heishi beads in Grey/Taupe
- 4mm polymer clay heishi beads in Turquoise/Teal
- Small gold spacer beads or rondelles (approx. 4mm)
- Jewelry pliers (chain nose and flat nose)
- Jump rings (4mm or 5mm, gold tone)
Step 1: Preparation & First Side
-
Prepare your hoop:
Begin by selecting your gold wire hoop. If your hoop has a pre-formed loop at the top for attaching to the ear wire, ensure it is secure. If it is a bare wire hoop that needs forming, use your round nose pliers to create a small loop at one end now so your beads won’t slide off immediately. -
Open the hoop:
Most beading hoops have a small latch or a 90-degree bend that locks into a loop. Gently unhook the wire so the straight end is accessible for threading beads. -
Thread the first gold accent:
Start the design by sliding on one small gold spacer bead. This acts as a polished bookend for your clay beads and gives the design a professional finish right from the start. -
Add the cream base:
Thread on approximately 20 to 25 of the cream-colored heishi beads. You want this section to cover about a third of the hoop’s circumference. Adjust the number based on your specific hoop size to ensure symmetry later. -
Secure the section:
Slide on another gold spacer bead. This marks the transition from the neutral base to the colorful focal point of the earring.
Beads Won’t Curve?
If the beads look blocky or stiff, you may have packed them too tightly. Remove one cream bead from each side to give the clay discs room to maneuver around the curve.
Step 2: Creating the Focal Point
-
Add the pop of color:
Now for the fun part. Slide on exactly one turquoise heishi bead. This singular bead acts as a bright border for the center detail. -
Create the center texture:
Add 4 to 5 grey or taupe heishi beads. This creates a subtle earthy contrast right in the middle of the design loop. -
Finish the focal section:
Slide on a second turquoise heishi bead to mirror the one you placed before the grey section. Symmetry is key here for a balanced look. -
Cap it off:
Place a third gold spacer bead onto the wire. This completes the central ‘pop of color’ section and prepares the hoop for the final neutral segment.
Step 3: Finishing the Earring
-
Complete the beading:
Thread on another set of cream heishi beads to match the first side. Count them carefully to ensure you use the exact same number (e.g., 20-25) as you did in the beginning. -
Final gold touch:
Finish the beaded row with one last gold spacer bead. Check your work to ensure the beads sit loosely enough to curve with the hoop without buckling. -
Close the hoop:
Carefully re-insert the wire end into the hoop’s locking mechanism or loop. If necessary, use your flat nose pliers to slightly bend the wire tip upwards to ensure a secure, permanent lock. -
Open the ear wire:
Take your gold ear wire hook. Use your chain nose pliers to gently twist the small loop at the bottom open sideways—never pull it directly apart, as this weakens the metal. -
Attach the hoop:
Slide the top loop of your beaded hoop onto the open loop of the ear wire. Make sure the ‘front’ of the earring is facing the right way. -
Seal the deal:
Using your pliers, twist the ear wire loop back into a closed position until the ends meet flush. -
Repeat for the pair:
Repeat the entire process for the second earring, paying close attention to the bead count to ensure both earrings are identical twins.
Go Asymmetrical
For a modern twist, try making the color blocks different lengths on either side of the center gold bead, or swap the turquoise for coral or navy blue.
Now you have a stunning, beach-ready pair of hoops perfect for everyday wear