When kids get their hands on magic clay, something clicks—suddenly a few simple shapes turn into tiny characters with big personalities. These magic clay ideas for kids are colorful, forgiving, and totally doable at the kitchen table when you want a fun project that actually dries into a keepsake.
Chubby Animal Minis
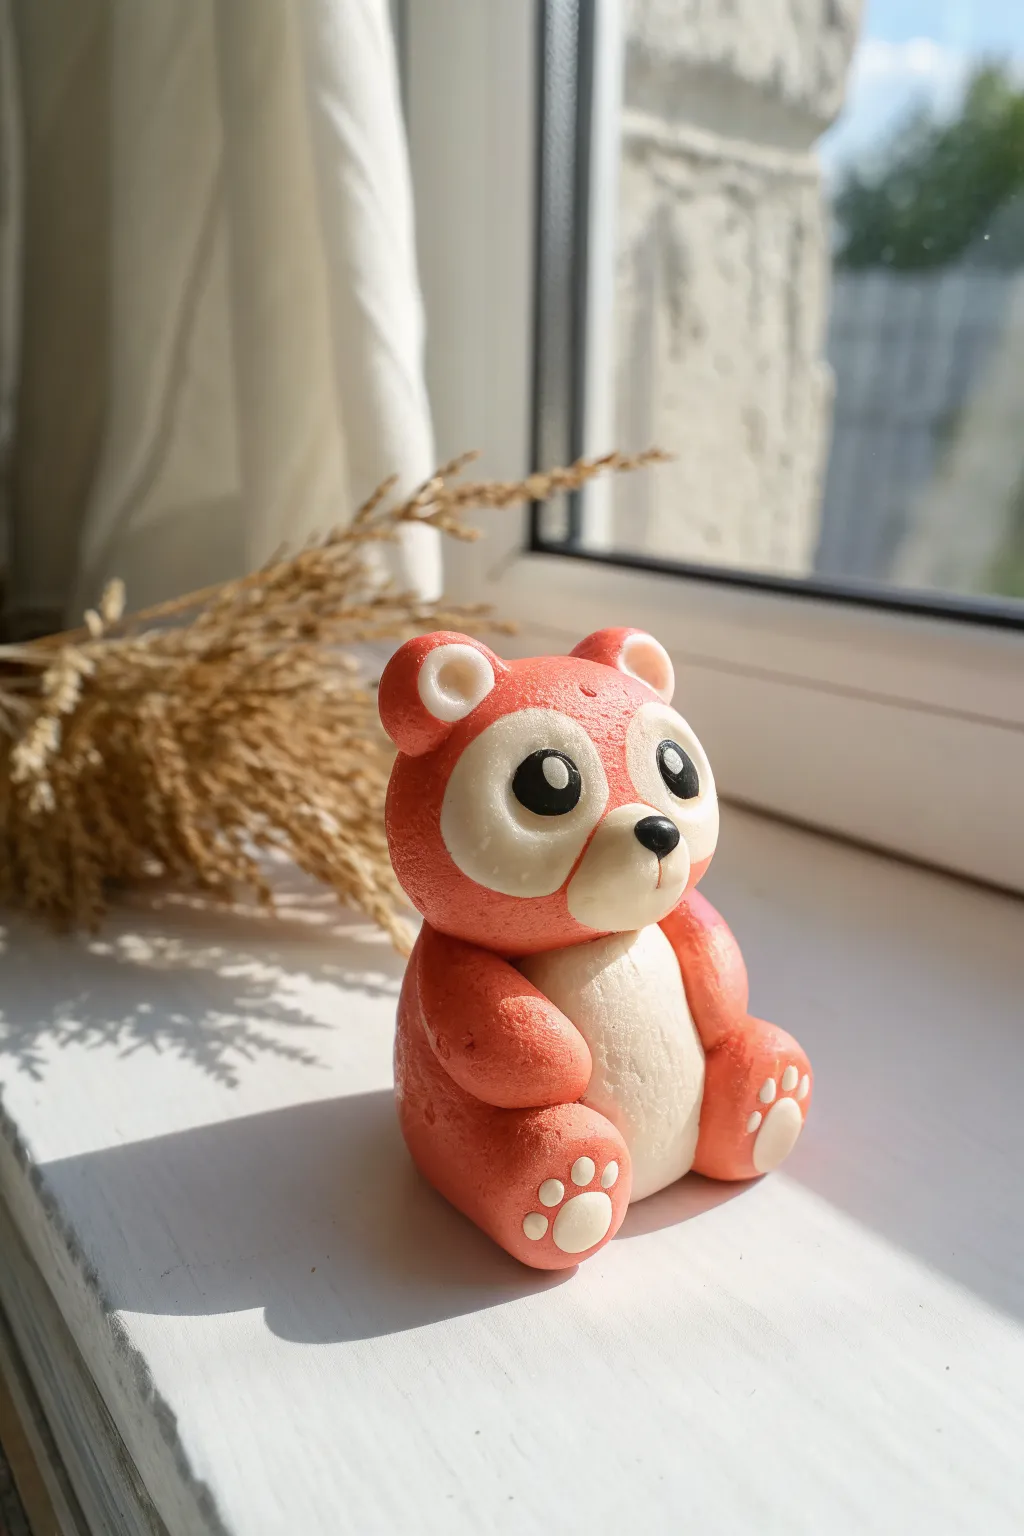
This adorable mini red panda captures hearts with its creamy face mask and bright expression. Using lightweight magic clay, you’ll sculpt chunky shapes to build a sitting buddy that looks perfect perched on a windowsill.
Step-by-Step Guide
Materials
- Reddish-orange magic clay (or air-dry clay)
- White magic clay
- Black magic clay
- Clay sculpting tools (specifically a small dotting tool)
- Clean work surface (silicone mat or wax paper)
- Toothpick (optional, for connecting the head)
Step 1: Body Basics
-
Shape the Torso:
Start by taking a chunk of reddish-orange clay about the size of a golf ball. Roll it into a smooth ball, then gently roll one end against your table to create a slightly pear-shaped oval. This will be the main body. -
Add the Tummy:
Take a smaller piece of white clay and flatten it into an oval disk. Press this gently onto the front of the body to make a soft, white belly patch. -
Form the Head:
Roll another ball of reddish-orange clay, slightly larger than the top of your pear-shaped body. Press it gently to flatten the bottom so it sits securely on the torso. If the clay feels dry, dull the connection point with a drop of water.
Step 2: Cute Facial Features
-
Create the Eye Mask:
Rolll two small balls of white clay and flatten them into large, thin circles. Place these on the face, covering the eye area. They should touch in the middle and wrap slightly around the sides. -
Sculpt the Muzzle:
Make a slightly puffed-out oval of white clay. Attach this right in the center, overlapping the bottom edges of the eye mask circles you just placed. -
Add the Eyes:
Roll two small balls of black clay and flatten them slightly. Press these onto the white eye mask area. For that sparkling look, add a tiny dot of white clay to the upper corner of each black eye. -
Nose Detail:
Roll a tiny, triangular piece of black clay with rounded corners. Press this onto the top center of the white muzzle. -
Ears:
Create two small red semicircles. Press a smaller white semicircle inside each one. Attach these firmly to the top of the head.
Cracks Appearing?
If you see tiny cracks while rolling, your magic clay might be too dry. Knead in a tiny drop of water or wet your fingers to rehydrate it before shaping.
Step 3: Limbs & Paws
-
Making Legs:
Roll two sausage shapes from the red clay for the legs. They should be thick and stubby. Gently curve them so they hug the sides of the white belly. -
Shaping Feet:
Flatten the bottom of each leg to create a distinct footpad area facing forward. -
Paw Pads:
This is the tricky part—press a medium white oval onto the main foot area. Then, roll three tiny white balls and press them above the main pad for toes. Repeat for the other foot. -
Adding Arms:
Roll two smaller teardrop shapes from red clay for the arms. Attach them to the sides of the body, just under the head, curving them forward as if the panda is reaching for a hug.
Shiny Eyes Trick
After the clay dries completely, paint a layer of clear nail polish or craft gloss just on the black parts of the eyes to make them look wet and alive.
Step 4: Finishing Touches
-
Smooth Connections:
Using your finger or a smooth sculpting tool, gently rub generally where the limbs join the body to seamless blend the clay without losing the chubby definition. -
Check Stability:
Set your panda on a flat surface to ensure it sits up straight without tipping over. If it leans, gently press the bottom flat again. -
Dry Time:
Allow your creation to dry completely. Magic clay usually takes 24 hours to cure fully into that fun, squishy foam texture.
Now you have a sweet forest friend to keep you company on your desk


Swirly Snail Friends
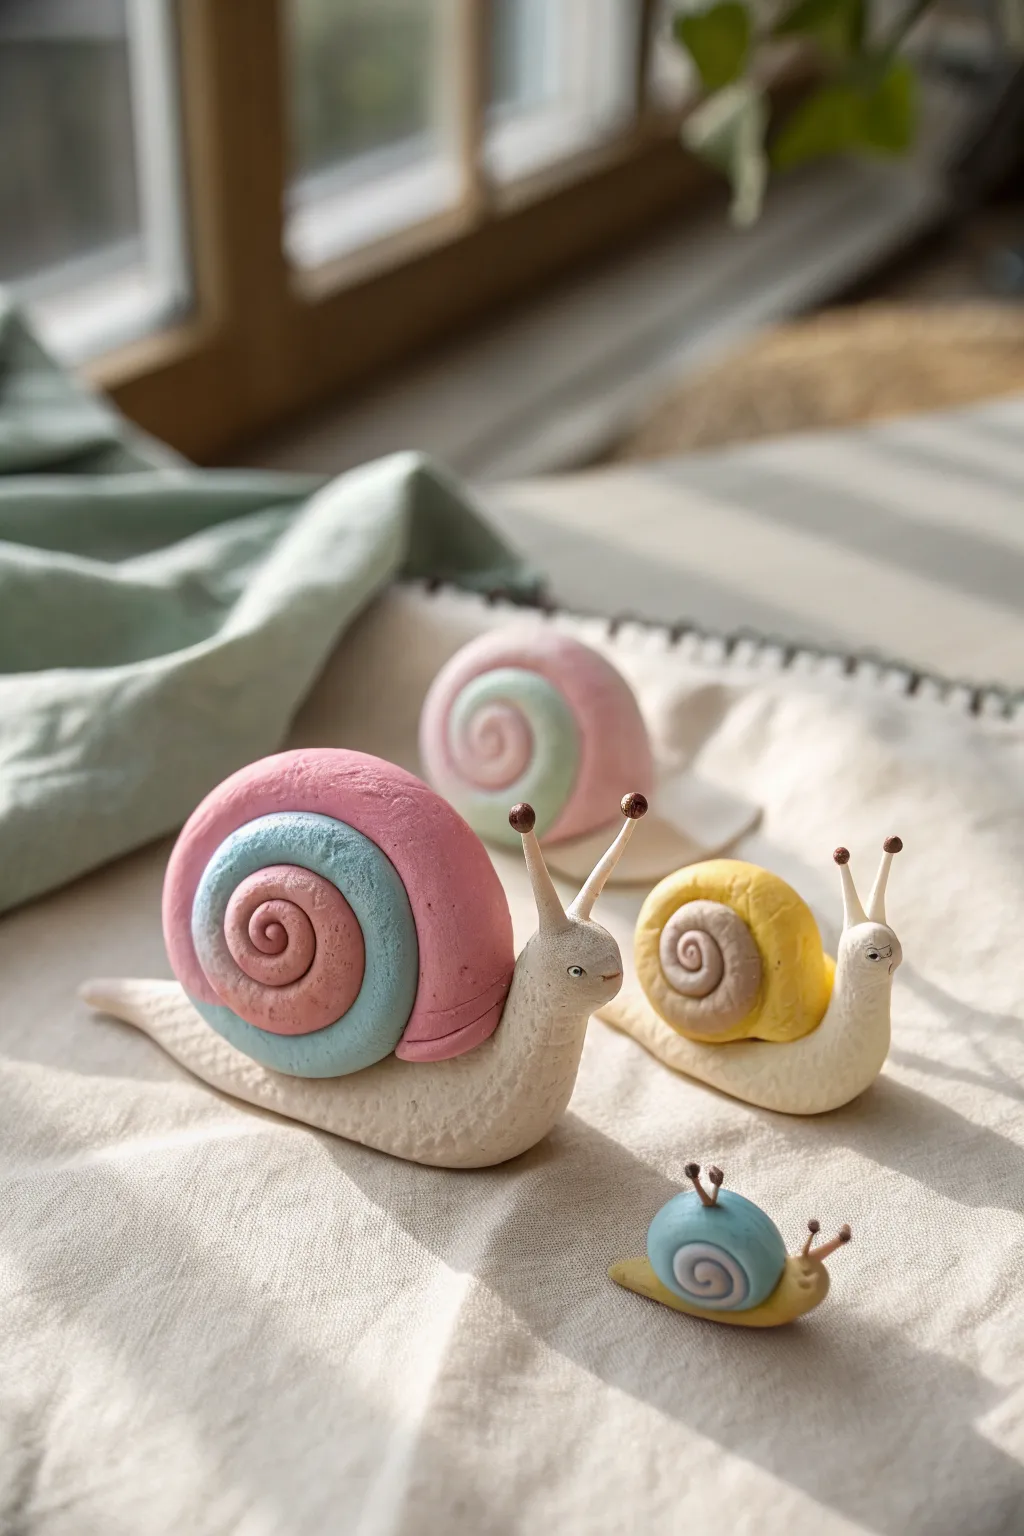
Create an adorable family of garden friends using soft, pastel air-dry clay. These snails feature mesmerizing spiraled shells and textured bodies, making them a delightful sensory project for crafters of all ages.
How-To Guide
Materials
- Lightweight air-dry clay (white, pink, light blue, yellow, mint green)
- Clay sculpting tools (specifically a needle tool or toothpick)
- Small ball-ended tool
- Wire or floral stems (thin gauge) for eye stalks
- Brown acrylic paint or marker (for eye tips)
- Black fine-liner pen or paint (for eyes)
- Texturing tool (clean toothbrush or sponge)
- Matte finish clay varnish (optional)
Step 1: Sculpting the Bodies
-
Form the base:
Start with a lump of white or cream clay. Roll it into a smooth log shape, tapering one end to a gentle point for the tail and keeping the other end slightly bulbous for the head. -
Curve the body:
Gently bend the front ‘head’ portion upwards so the snail looks like it is lifting its gaze. Flatten the bottom slightly so the figure sits stable on your work surface. -
Create texture:
To mimic the wriggly skin of a real snail, press a clean toothbrush or the rough side of a sponge gently all over the body, leaving the face area smooth. -
Repeat for sizes:
Make several bodies in different sizes—a large ‘parent’, a medium one, and a tiny baby snail—to create the full family seen in the photo.
Smooth Seams
dip your finger in a little water (or lotion if using polymer clay) to smooth out any fingerprints on the shell before it dries.
Step 2: Creating the Swirly Shells
-
Prepare the colors:
Select your pastel colors. For the large snail, you’ll need pink and light blue. For the medium, yellow and beige. For the baby, blue and white. -
Roll the coils:
Roll two long, even snakes of clay in your chosen colors. For the large shell, lay the pink and blue snakes side-by-side and gently press them together so they adhere but don’t blend. -
Start the spiral:
Beginning at one end, tightly roll the dual-colored snake inward like a cinnamon roll. Keep the coil tight to create a clearly defined spiral pattern. -
Shape the dome:
As you continue rolling, gently push the center of the spiral outwards creating a slight dome or cone shape, rather than a completely flat disc. This gives the shell volume. -
Attach to the body:
Score the bottom of the shell and the back of the snail body with a needle tool. Add a dab of water if the clay feels dry, then firmly press the shell onto the crawler’s back.
Step 3: Adding Faces and Details
-
Prepare eye stalks:
Cut very short pieces of thin wire (about 1-2 cm). Cover the bottom half of the wire with a tiny layer of white clay to thicken the stalk, leaving the top tip exposed. -
Insert stalks:
Carefully push the wire end of the stalks into the top of the snail’s head. Smooth the clay at the join point so it looks seamless. -
Make the eyes:
Roll tiny balls of dark brown clay (or use white clay painted brown later) and place them on the very tips of the stalks. -
Carve the mouth:
Use a needle tool or small blade to impress a tiny, simple smile near the front of the face. -
Refine the eyes:
Once dry, use a fine black pen or a tiny dot of black paint to add pupils to the side of the head or on the stalks for character. -
Final drying:
Let the snails sit undisturbed for 24 hours. I usually rotate them halfway through drying to ensure the bottom hardens evenly.
Cracking Issues?
If the clay cracks while rolling the shell, your coil is too dry. Knead in a drop of water and retry rolling the snake shape.
Arrange your finished snail family on a shelf or windowsill to bring a slow and steady charm to your room


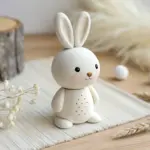
One-Blob Mini Monsters
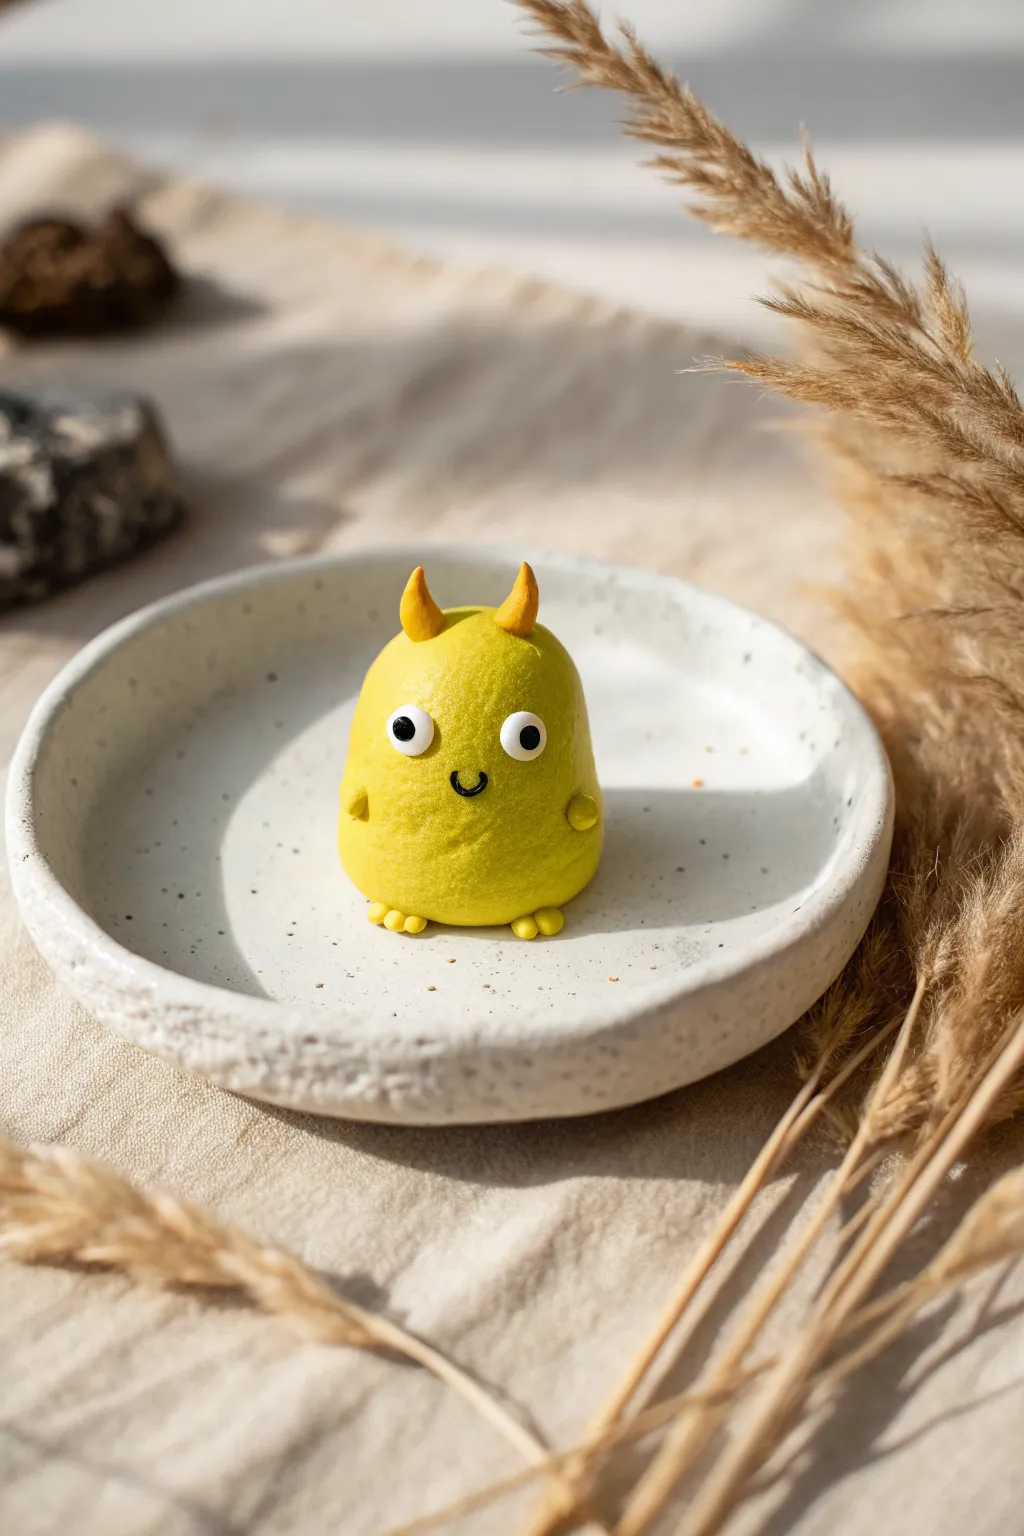
This friendly little desk companion is the perfect starting point for monster making because it starts with a simple egg shape. With its sunny yellow body and tiny contrasting orange horns, this mini monster adds a pop of cheer to any shelf.
Detailed Instructions
Materials
- Air-dry clay or polymer clay (Yellow, White, Black, Orange)
- Clean work surface (rolling mat)
- Small ball tool or rounded toothpick
- Plastic knife or clay sculpting tool
Step 1: Base Body Shape
-
Condition the yellow clay:
Start with a piece of bright yellow clay about the size of a golf ball. Knead it in your hands until it is pliable and warm to prevent cracking. -
Roll a smooth sphere:
Roll the clay between your palms to create a perfectly smooth ball. Check for any seam lines and smooth them out with your thumb. -
Form the egg shape:
Gently gently roll the ball on your work surface while applying slightly more pressure to the top half. You want a stout oval or egg shape with a slightly flattened bottom so it sits upright. -
Check stability:
Tap the bottom on the table to ensure it stands up on its own without wobbling.
Clay Won’t Stick?
If your little parts (like arms or horns) act stubborn and fall off, dab a tiny drop of water (for air-dry clay) or liquid sculpey (for polymer) on the joint before pressing them together.
Step 2: Adding Features
-
Create the arm indentations:
About halfway down the body, use your thumb or a rounded tool to gently press small indentations where the arms will go. -
Roll the arms:
Take two tiny pea-sized balls of yellow clay. Roll them into tiny tear-drop shapes. -
Attach the arms:
Press the arms into the sides of the body. I like to blend the clay slightly at the shoulder connection point to make it secure. -
Make the feet:
Roll two slightly larger balls of yellow clay for the feet. Flatten them slightly into oval pads. -
Detail the toes:
Use a toothpick or a clay knife to press two or three tiny lines into the front of each foot to imply toes. -
Attach the feet:
Place the body on top of the feet, positioning them slightly apart so they peek out from under the belly.
Texture Trick
To give your monster a soft, matte look like the photo, gently tap the surface of the yellow clay with a clean toothbrush before baking or drying. It removes shine and finger marks.
Step 3: Face & Details
-
Form the horns:
Take a very small amount of orange clay. Divide it into two equal parts and roll them into tiny cones with pointy tips. -
Position the horns:
Press the orange cones onto the very top of the head, spacing them out slightly. Curve the tips just a little bit for character. -
Make the eye whites:
Roll two small balls of white clay. Flatten them into discs and press them onto the upper third of the face. -
Add pupils:
Roll two minuscule specks of black clay. Press these onto the center of the white discs to complete the eyes. -
Create the smile:
Roll a very thin, short snake of black clay. It should be as thin as a thread. -
Place the smile:
Curve the black thread into a ‘U’ shape and gently press it into the yellow clay right between the eyes, slightly lower down. -
Final smoothing:
Check over your monster for any fingerprints. You can gently buff them out with a tiny bit of water on your finger. -
Dry or Bake:
If using air-dry clay, let it sit for 24-48 hours. If using polymer clay, bake according to the package instructions.
Place your little monster in a small dish or on your desk to keep you company while you work


Smiling Food Characters
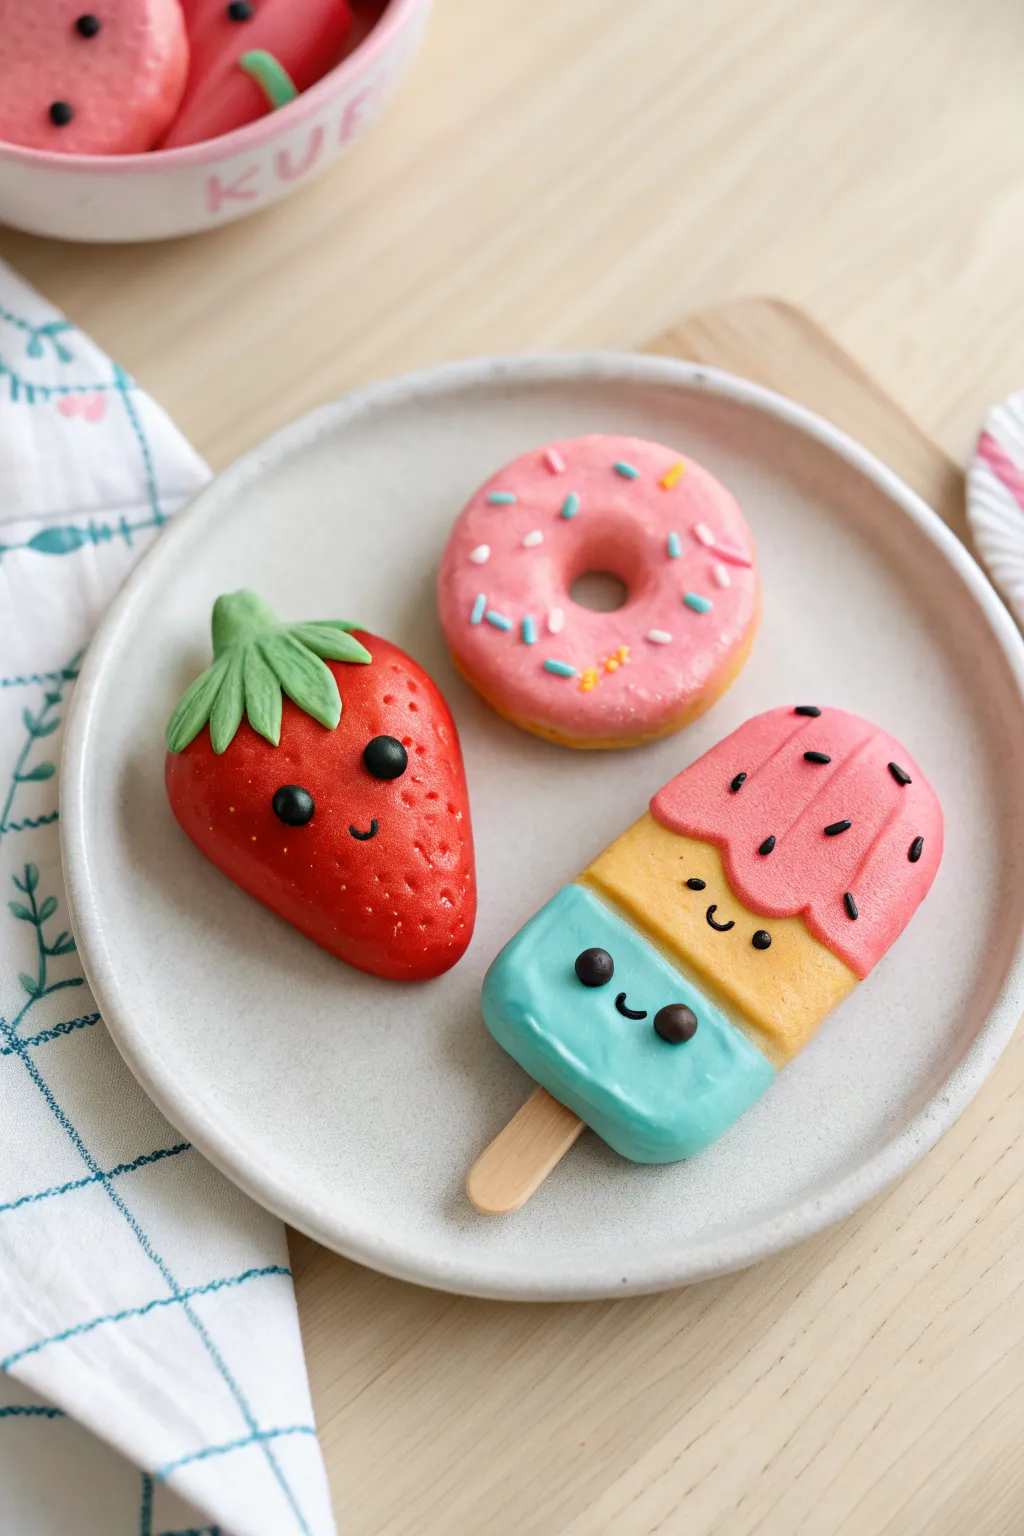
Bring a plate of dessert to life with this adorable set involving a strawberry, doughnut, and popsicle made from air-dry clay. Each character features tiny, expressive faces and vibrant colors that make them look good enough to eat—but remember, they’re just for show.
Step-by-Step Guide
Materials
- Air-dry clay (red, pink, orange/yellow, teal, green, brown, black, white)
- Clay sculpting tools (specifically a needle tool and a small ball tool)
- Small wooden craft stick (popsicle stick)
- Glossy glaze or mod podge
- Soft paintbrush
- Toothpick
Step 1: The Cheerful Strawberry
-
Shape the base:
Roll a medium-sized ball of red clay. Gently pinch and roll one end to create a tapered point, forming a classic strawberry teardrop shape. -
Add texture:
Using a needle tool or the tip of a toothpick, gently poke small indentations all over the red surface to mimic strawberry seeds. -
Create the leaves:
Take a small amount of green clay and flatten it into a star shape. Use your tool to impress veins into each leaf point. -
Attach the stem:
Press the green leaf cap onto the rounded top of the strawberry. Form a tiny green cylinder for the stem and attach it to the center of the leaves. -
Give it a face:
Roll two tiny black balls for eyes and press them into the front. Use a thin snake of black clay to form a small ‘U’ shape for the smile.
Step 2: The Sprinkled Doughnut
-
Form the dough:
Mix orange and yellow clay to get a light golden-brown ‘dough’ color. Roll it into a thick disc and smooth the edges. -
Make the hole:
Use the back of a paintbrush or your finger to push a hole through the center, widening it slightly until it looks like a classic ring doughnut. -
Add the frosting:
Flatten a piece of pink clay into a rough circle. Lay it over the top of the doughnut, gently pulling the edges down to look like dripping icing. -
Apply sprinkles:
Roll incredibly thin snakes of blue, yellow, and white clay. Chop them into tiny bits and gently press them onto the pink frosting.
Cracking Clay?
If your clay starts cracking while shaping the strawberry or popsicle, wet your finger with a tiny drop of water and smooth the fissure immediately.
Step 3: The Triple-Scoop Popsicle
-
Layer the colors:
Create three equal-sized blocks of clay: pink for the top, light orange for the middle, and teal for the bottom. -
Stack and smooth:
Stack the blocks vertically and gently press them together so they bond. Round off the top pink corners to give it a classic ice cream bar shape. -
Create the drip effect:
Use a ball tool to drag the pink clay slightly down over the orange section, making it look like melting strawberry coating. -
Insert the stick:
Cut a wooden craft stick short. Push the cut end into the bottom of the teal section, leaving a small handle exposed. -
Add detail:
Press tiny black clay “seeds” into the pink section. Add a cute face to the teal section using small black balls for eyes and a tiny smile. -
Central face:
Don’t forget the middle! Add slightly smaller eyes and a smile to the orange stripe so it matches its friend below.
Make it a Magnet
Make the backs of your treats completely flat instead of 3D rounded. Once dry, glue strong crafting magnets to the back for instant fridge decor.
Step 4: Finishing Touches
-
Check connections:
Look over all your pieces to ensure the eyes and mouths are securely pressed into the base clay. -
Glaze:
Once the clay is fully dry (usually 24 hours), brush a coat of glossy glaze over the ‘fruit’ and ‘frosting’ parts to give them a delicious shine.
Allow your clay treats to dry completely before displaying them on a miniature plate or shelf

The Complete Guide to Pottery Troubleshooting
Uncover the most common ceramic mistakes—from cracking clay to failed glazes—and learn how to fix them fast.
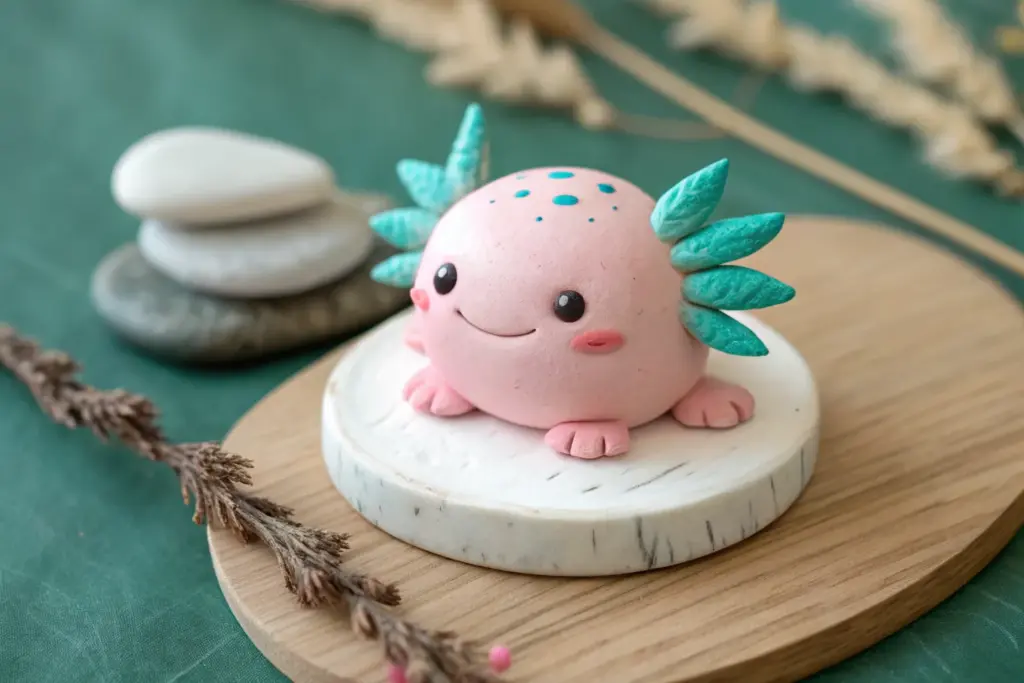
Rainbow Cloud Pal
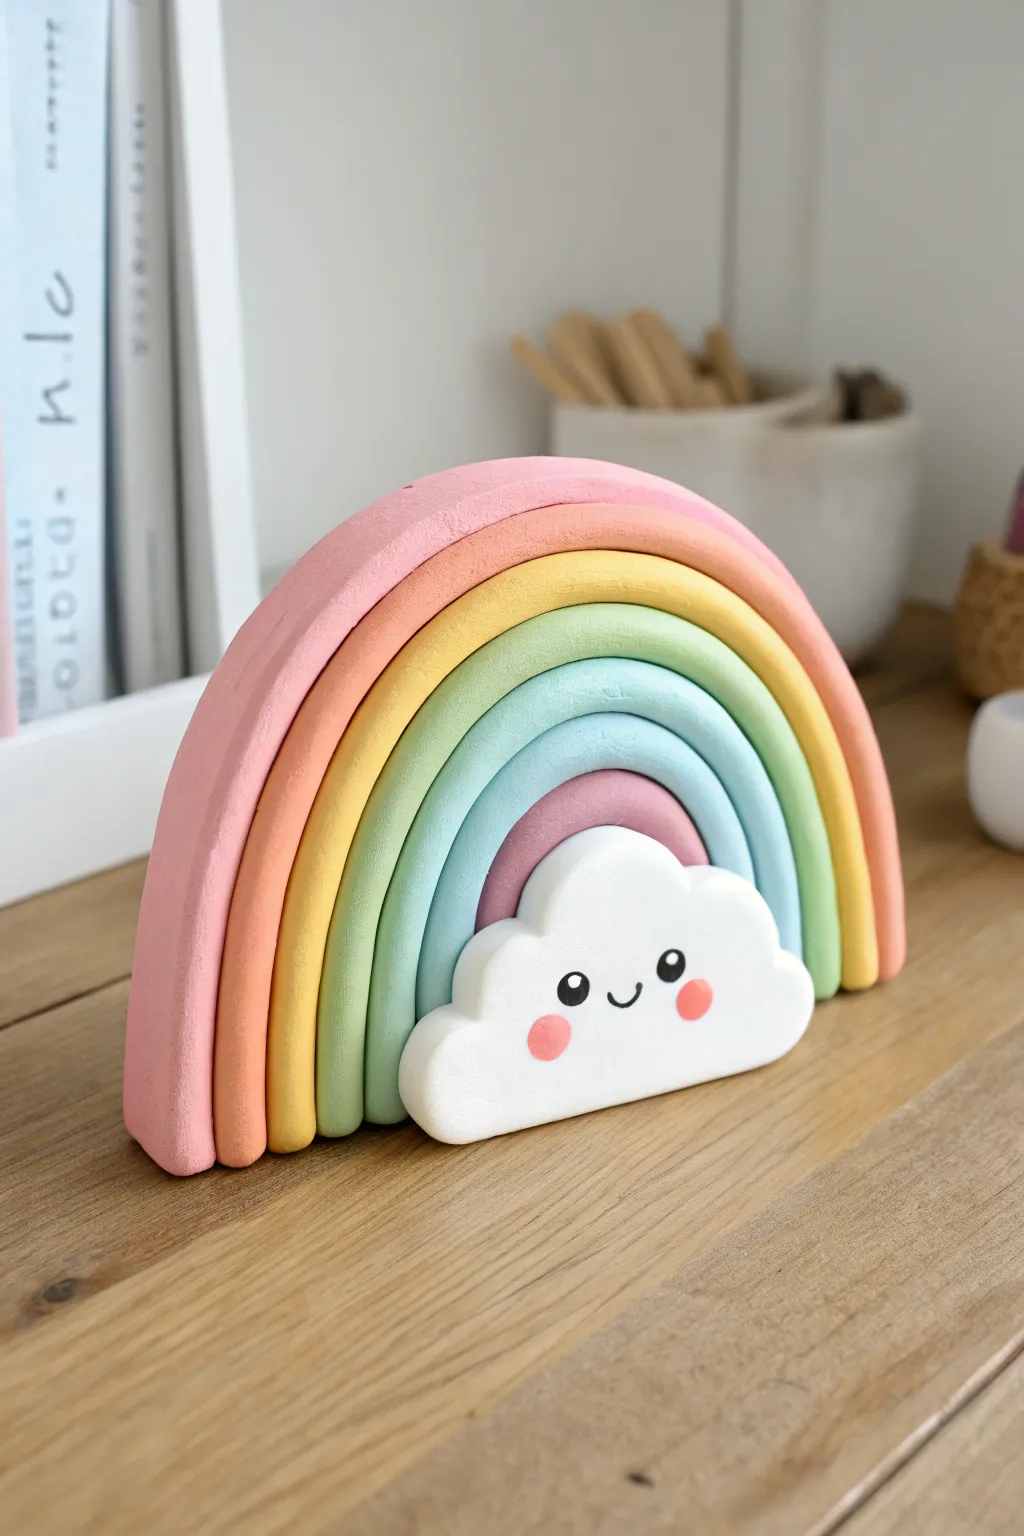
Brighten up any playroom shelf with this adorable, chunky rainbow sculpture featuring a friendly cloud companion. The soft, matte finish and gentle pastel palette give it a modern nursery feel that is surprisingly easy to achieve with magic clay.
Step-by-Step
Materials
- Magic clay or air-dry foam clay (Pink, Peach, Yellow, Light Green, Light Blue, Light Purple, White)
- Small amount of Black clay (for eyes/mouth)
- Small amount of Coral/Pink clay (for cheeks)
- Rolling pin or smooth round object
- Wax paper or non-stick silicone mat
- Modeling tool or toothpick
- Ruler
Step 1: Creating the Arches
-
Prepare the workspace:
Lay down your wax paper or silicone mat to prevent the clay from sticking to your table. Clean hands are essential here, especially when switching between these light pastel colors. -
Roll the first arch:
Start with the outermost color, the pink clay. Take a generous handful and roll it into a long, thick snake on your table. Aim for an even thickness, roughly the width of your thumb. -
Shape the pink arch:
Bend the pink snake into a wide ‘U’ shape. Gently flatten the bottom edges against the table so the arch can stand upright. It should look like a doorway. -
Add the peach layer:
Roll out a peach or light orange snake of clay. Make sure it’s the exact same thickness as the pink one but slightly shorter. Fit it snugly inside the pink arch, pressing them gently together so they bond. -
Continue the pattern:
Repeat the process with the yellow clay next. I find it helpful to constantly check that the bottoms are flat and aligned as I add each new color layer. -
Add the cool tones:
Roll and place the light green snake inside the yellow arch, followed by the light blue snake inside the green one. -
Finish with purple:
Add the final, smallest arch using the light purple clay. This will be the innermost layer. Ensure all the layers are pressed firmly together but try not to squish the nice rounded tops. -
Slice the base:
If the bottom of your rainbow is uneven, use a ruler or a long blade tool to slice straight across the bottom, creating a perfectly flat base for standing.
Step 2: Sculpting the Cloud Pal
-
Form the cloud body:
Take a ball of white clay and flatten it significantly until it’s about half an inch thick. It should be roughly rectangular but with very rounded corners. -
Create the fluff:
To make the scalloped edges, roll several small balls of white clay. Attach them around the top and side edges of your flattened shape, smoothing the seams on the back so they look like one cohesive fluffy cloud. -
Smooth the front:
Gently rub your finger over the front face of the cloud to ensure it is smooth and free of fingerprints, ready for the face. -
Position the cloud:
Place the white cloud in front of the rainbow. It should sit mainly in front of the blue and purple arches on one side, slightly overlapping the green. Press it gently onto the rainbow so it sticks. -
Add the cheeks:
Roll two tiny dots of coral or dark pink clay. Flatten them slightly and press them onto the cloud’s face area, spacing them wide apart. -
Make the eyes:
Roll two small spheres of black clay. Position them just above and inside the cheeks. For that extra ‘kawaii’ look, add a microscopically small dot of white clay to the top corner of each black eye. -
Create the smile:
Roll an incredibly thin thread of black clay. Snip a tiny piece and curve it into a ‘U’ shape. Place this centered between the cheeks for a happy little smile.
Sagging Arches?
If the large rainbow arches sag while wet, lay the rainbow flat on its back to dry for initial 2 hours. Once the surface hardens slightly, stand it up.
Step 3: Setting
-
Final check:
Stand the project up carefully. If it leans, gently press the bottom against the table again to level it out. -
Drying time:
Let the sculpture air dry completely in a safe spot. Magic clay can take 24–48 hours to fully cure depending on thickness, so be patient before moving it to a shelf.
Glitter Upgrade
Before the clay dries, lightly dust the white cloud with iridescent glitter powder. It adds a magical shimmer without changing the matte pastel look.
Now you have a charming piece of handmade decor to brighten up your desk or shelf
Tiny Dino Desk Buddy
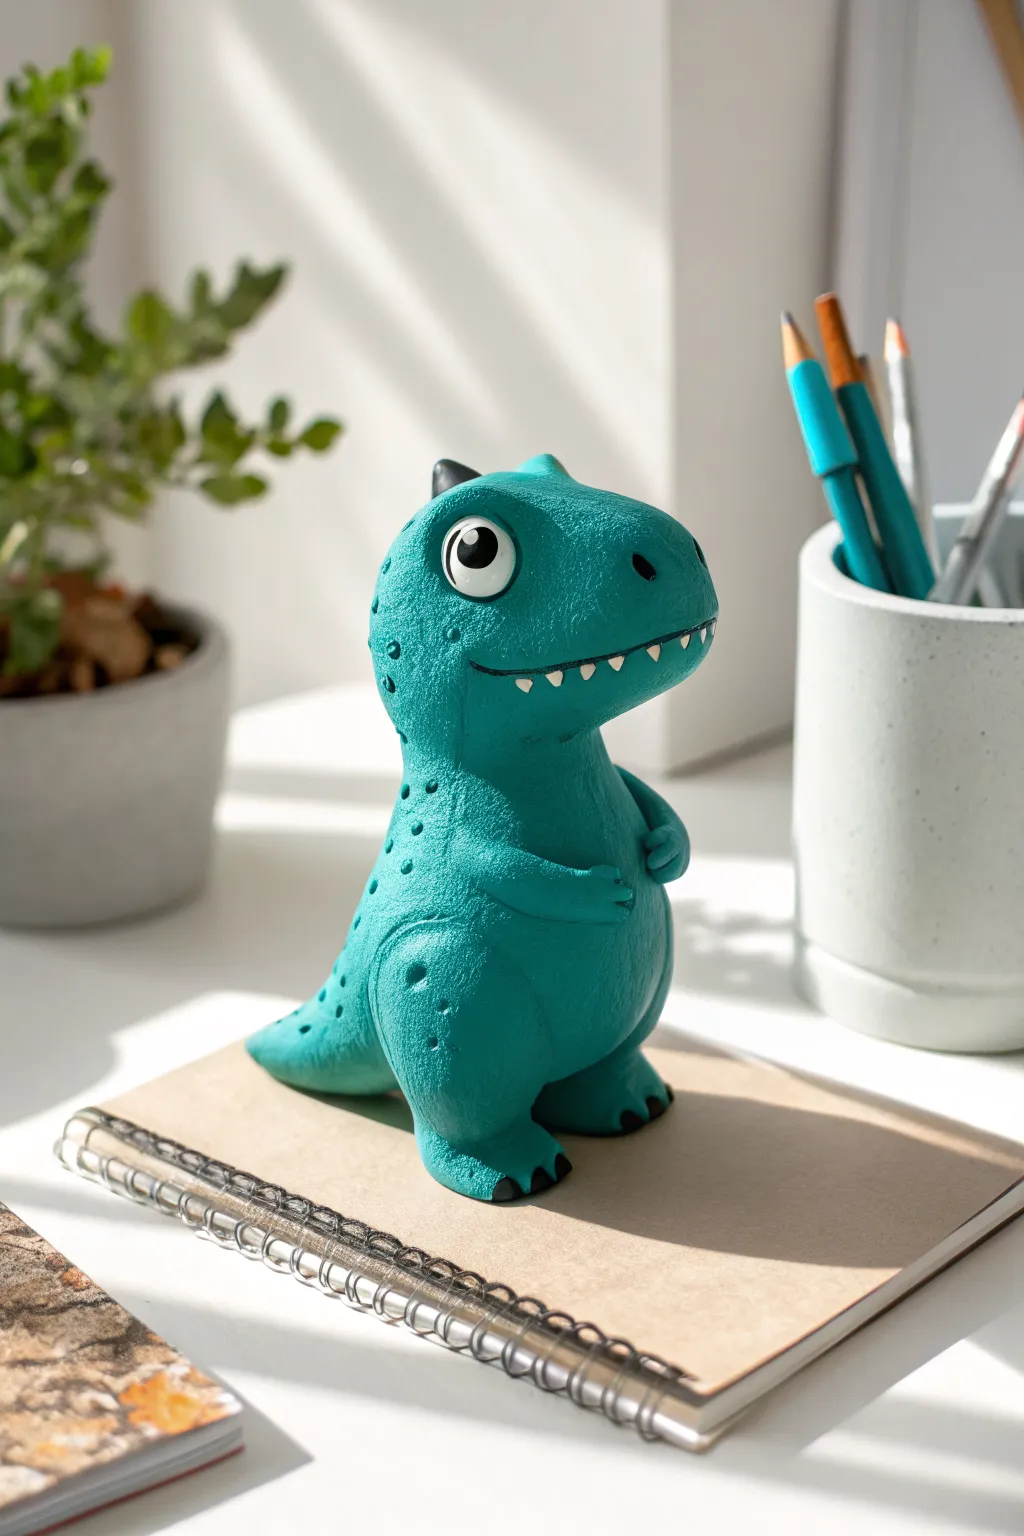
Create a prehistoric pal to guard your homework with this adorable dinosaur sculpting project. This teal T-Rex features a charmingly textured skin, big watchful eyes, and a friendly grin that makes him the perfect addition to any desk space.
How-To Guide
Materials
- Teal air-dry clay (or magic clay/polymer clay)
- White clay
- Black clay
- Small ball-ended sculpting tool
- Pointed detailing tool or toothpick
- Old toothbrush or stippling sponge (for texturing)
- Water (for smoothing)
- Plastic rolling pin
Step 1: Shaping the Body and Head
-
Form the main body:
Start with a large ball of teal clay. Roll it into a smooth, thick pear shape, flattening the bottom slightly so it stands upright securely on your work surface. -
Create the head:
Roll a second ball of teal clay, slightly smaller than the body. Gently press and mold one side to be slightly flatter for the snout, creating a rounded, boxy oval shape. -
Attach the head:
Place the head on top of the narrow part of the pear body. Blend the clay at the neck seam using your fingers or a modeling tool until the connection is smooth and invisible. -
Add texture:
Before adding limbs, gently tap the entire surface of the dinosaur with an old toothbrush or a stippling sponge. This creates the bumpy, dinosaur-skin texture seen in the photo.
Seamless Blending
To make parts stick better without falling off later, score (scratch) both surfaces and add a drop of water before pressing them together.
Step 2: Limbs and Tail
-
Create the legs:
Roll two medium-sized balls of teal clay for the legs. Flatten them slightly into thick discs and attach them to the lower sides of the body. -
Shape the feet:
Mold the front of these leg discs to protrude slightly, creating feet. Use a tool to make small indentations for toes. -
Make the tail:
Form a cone of teal clay. Attach the wider end to the lower back of the body, blending the seam thoroughly. Ensure the tail touches the ground to act as a ‘third leg’ for better stability. -
Form the arms:
Roll two small sausages of teal clay. Bend them slightly at the ‘elbow’ and attach them high on the chest. Use a tool to define tiny claws at the ends.
Step 3: Facial Features and Details
-
Sculpt the eye sockets:
Use a large ball tool or the rounded end of a paintbrush to press deep indentations on either side of the head where the eyes will go. -
Create the eyes:
Roll two balls of white clay and press them into the sockets. They should bulge out slightly. Add smaller black circles on top for the pupils. -
Add eye highlights:
Place a tiny speck of white clay onto the black pupil to bring the dinosaur to life with a reflective glint. -
Carve the mouth:
Use a sharp tool or clay knife to cut a long, curved smile line across the snout. -
Add teeth:
Roll tiny triangles of white clay. Carefully press these along the upper lip of the mouth line. I find it easiest to use tweezers for placing these tiny pieces. -
Make spinal details:
Using a pointed tool, poke small, distinct holes down the spine of the dinosaur, starting from the back of the head and trailing down the back and tail. -
Final touches:
Add three small triangles of black clay to the toes for claws. Finally, add a small black horn or spike to the very top of the head if desired.
Party Hat Upgrade
Make your dinosaur festive by sculpting a tiny cone hat from bright orange clay and placing it askew on his head instead of the top spike.
Let your new friend dry completely in a safe spot before introducing him to your desk setup


What Really Happens Inside the Kiln
Learn how time and temperature work together inside the kiln to transform clay into durable ceramic.
Undersea Creature Cuties

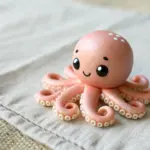
Dive into creativity with these adorable sea animals made from soft, air-dry magic clay. This project features a textured turtle-fish, two friendly octopuses, and a starfish resting on a sandy seabed display.
Step-by-Step
Materials
- Air-dry creative clay (teal, orange, purple, white, black)
- Small clay tools (knife tool, needle tool)
- A shallow round dish or plate
- Fine sand or semolina for the base
- Rolling pin
- Optional: Real seashells for decoration
Step 1: Setting the Scene
-
Prepare the base:
Take a shallow round dish or plate that will serve as your ocean floor. Ensure it is clean and dry. -
Add the sand:
Pour an even layer of fine floral sand or semolina into the dish to create a sandy texture for your creatures to rest on.
Clay Won’t Stick?
If fresh clay parts aren’t sticking together, dab a tiny drop of water on the connection point to act as glue.
Step 2: Crafting the Teal Turtle-Fish
-
Shape the body:
Start with a large ball of teal clay. Flatten it slightly into a dome shape for the main body. -
Texture the shell:
Using a plastic knife tool, gently press a grid pattern onto the back of the dome to mimic scales or a shell pattern. -
Create the fins:
Shape two smaller flat triangles for the side fins and a fan shape for the tail. -
Detail the fins:
Use your knife tool to press lines into the fins and tail for texture. Attach them firmly to the sides and back of the body. -
Add the face:
Roll two small white balls and two tiny black dots. Press the black dots onto the white balls to make eyes, then attach them to the front of the face. Use a needle tool to poke small nostrils and a smile.
Level Up: Glossy Finish
Once the clay is rock hard (24-48 hours), coat the eyes with clear nail polish or decoupage glue for a wet look.
Step 3: Making the Orange Jelly-Pus
-
Form the head:
Roll a smooth ball of orange-coral clay and flatten it into a teardrop or lightbulb shape. -
Shape the tentacles:
Flatten the bottom part of the shape and use scissors or a tool to cut short, stubby tentacles. Smooth the edges so they look soft. -
Add texture spots:
Use the tip of a small tool to press tiny circular indents onto the tips of the tentacles for suction cup details. -
Give it personality:
Create large eyes using white and black clay balls similar to the turtle. Use a curved tool to press a happy smile into the face.
Step 4: Sculpting the Purple Octopus
-
Create the body:
Roll a purple clay ball for the head and a thicker cylinder for the base where the legs will attach. -
Roll the tentacles:
Roll out four or five long, tapered snakes of purple clay. Curl the ends slightly to make them look like they are wriggling. -
Attach the legs:
Attach the tentacles to the underside of the head, smoothing the seams so it looks like one piece. -
Detailing the suckers:
Using a blunt tool neck or a straw, press a line of circles running down the length of each tentacle. -
Final touches:
Add the eyes and a small indented smile. I like to tilt the head slightly so it looks like it’s swimming.
Step 5: Finishing the Reef
-
Make the starfish:
Take a pinch of orange clay and shape a five-pointed star. Use your fingers to pinch the arms into points. -
Starfish texture:
Poke small holes all over the surface of the starfish for a bumpy, realistic texture. -
Create clay shells:
Use white clay to make small fan shapes. Press vertical lines into them to resemble clamshells. -
Arrange the scene:
Place all your finished clay creatures gently onto the sand bed. You can add real seashells around the edges for extra realism.
Now you have your very own miniature aquarium that doesn’t need any water
Wiggly Worm Name Plaques
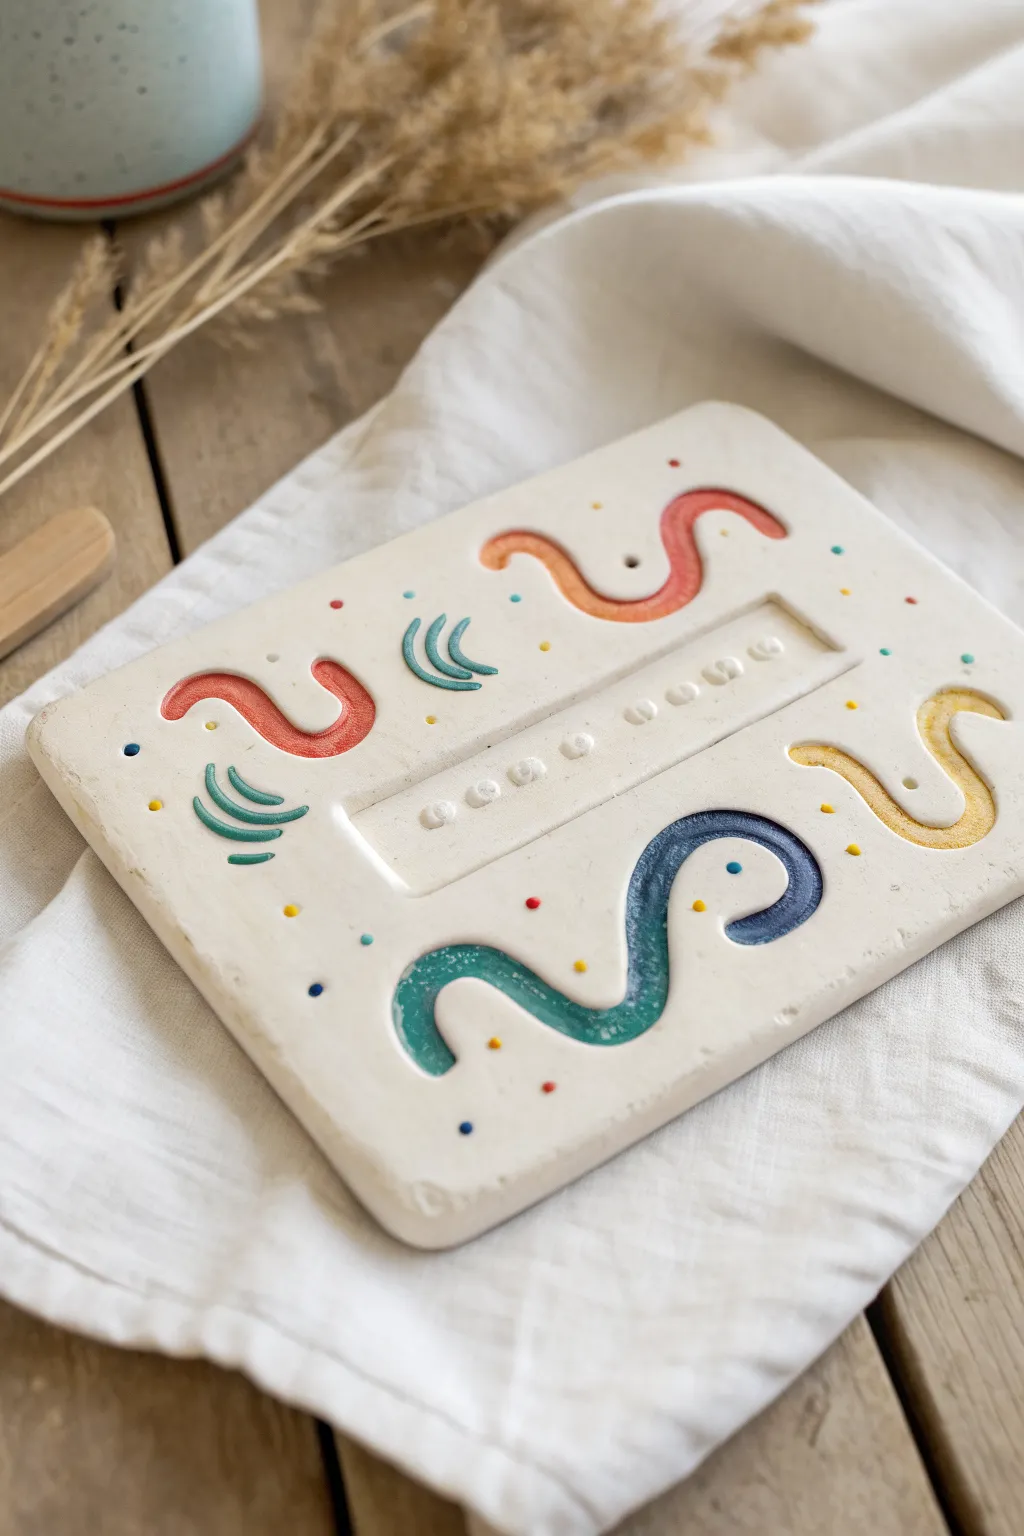
This cheerful rectangular plaque features whimsical indented swirls painted in vibrant gradients and a central space personalized with stamped lettering. It’s a delightful way to practice clay texturing and color blending while creating a custom room sign.
How-To Guide
Materials
- White creative air-dry clay (or polymer clay)
- Acrylic rolling pin
- Rectangle cookie cutter or knife
- Clay carving tools (ball stylus or loop tool)
- Small letter stamps
- Acrylic paints (red, orange, yellow, blue, turquoise)
- Fine detail paintbrush
- Sandpaper (fine grit)
- Clear matte varnish (optional)
Step 1: Shaping the Base
-
Prepare the clay:
Start with a bright white block of air-dry clay. Knead it in your hands until it becomes soft, pliable, and free of cracks. -
Roll the slab:
Using an acrylic rolling pin, flatten the clay into a smooth slab that is approximately 1/4 inch thick to ensure durability. -
Cut the rectangle:
Use a large rectangular cutter or a sharp craft knife to cut out a clean shape. Soften the sharp edges slightly by running a damp finger along the perimeter. -
Create the name recess:
In the center of the plaque, press a smaller rectangular object or stamp block gently into the clay to create a shallow recessed area for the name.
Paint Spilled Over?
Don’t wipe wet paint if it gets on the white area! Let it dry completely, then gently scrape it off with a craft knife or sand it away.
Step 2: Adding Texture & Details
-
Carve the wiggle paths:
Using a loop tool or a rounded sculpting tool, gently carve out deep, curving channels in the clay. Create a few separate ‘worms’ around the central nameplate—some long S-curves and some shorter U-shapes. -
Stamp the details:
Press a small circular tool or the end of a paintbrush handle into the clay to create random polka dot indentations scattered around the wiggles. -
Add texture lines:
Use a needle tool or small knife to press short, curved parallel lines near some of the wiggles for extra graphical interest, like little sound waves. -
Personalize it:
Press your small letter stamps into the recessed central rectangle to spell out a name or word. Press firmly enough to leave a clear impression but be careful not to poke through the back. -
Smooth imperfections:
Before the clay dries, dip your finger in a tiny bit of water and smooth out any little burrs or rough crumbs created by the carving tools. -
Let it dry:
Allow the plaque to dry completely according to your clay package’s instructions. This usually takes 24-48 hours. I like to flip it over halfway through so the back dries evenly too.
Create Cleaner Lines
Instead of carving channels, roll thin ‘snakes’ of clay and press them onto the surface, then gently flatten them for raised texture.
Step 3: Painting & Finishing
-
Sand the surface:
Once fully dry and hard, lightly sand the flat top surface with fine-grit sandpaper to ensure it is perfectly smooth and clean. -
Paint the red worm:
Using a fine detail brush, paint the inside of one carved channel. Start with red at one end and blend it into orange at the other for a gradient effect. -
Paint the yellow worm:
For the next wiggle, use yellow paint. Depending on your preference, you can keep it solid or create an ombre effect by mixing in a little white. -
Paint the blue worm:
Fill the largest wiggle with a cool gradient, transitioning from deep royal blue to a lighter turquoise teal. -
Add accent colors:
Paint the smaller carved details, like the curved ‘sound wave’ lines, in contrasting colors like teal or dark green. -
Fill the dots:
Carefully dab different colors of paint into the small recessed polka dots you created earlier. -
Clean the edges:
If any paint spilled onto the flat white surface, wait for it to dry and then gently sand it off, or paint over it with white for a crisp finish. -
Seal the piece:
Finish by applying a coat of clear matte varnish to protect the paint and give the clay a professional, finished look.
Now you have a charming, textured nameplate ready to display on a shelf or door

TRACK YOUR CERAMIC JOURNEY
Capture glaze tests, firing details, and creative progress—all in one simple printable. Make your projects easier to repeat and improve.
Clay Bead Keyring Charms
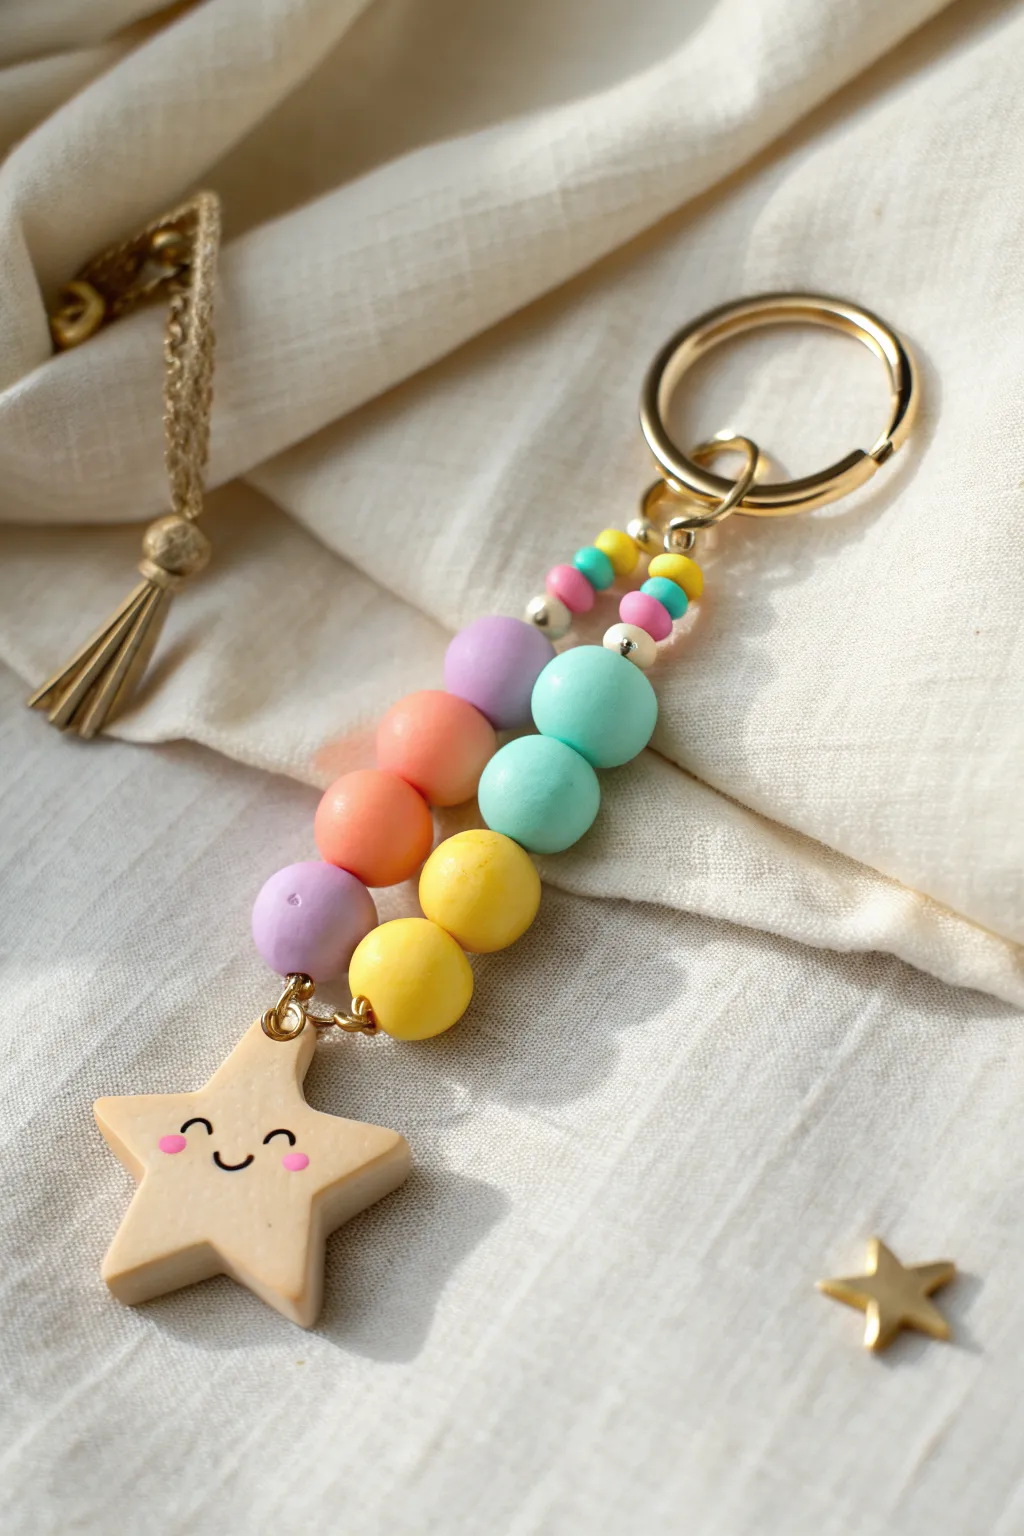
Brighten up your bag or keys with this delightful handmade charm featuring a cheerful, smiling star and a cascading rainbow of soft pastel beads. This project is a fantastic way to practice shaping consistent spheres and adding sweet painted details to your clay creations.
Step-by-Step Guide
Materials
- Air-dry modeling clay or polymer clay (white, purple, orange, teal, yellow, pink)
- Gold keyring split ring with chain
- Gold eye pins (at least 2 inches long)
- Jewelry pliers (round nose and wire cutters)
- Gold jump rings (small)
- Thin beading wire or strong cord (if not using eye pins)
- Small gold spacer beads (optional)
- Black acrylic paint or fine-tip permanent marker
- Pink acrylic paint or marker
- Fine-grit sandpaper
- Gloss glaze or varnish (optional)
Step 1: Crafting the Beads
-
Mix your colors:
Start by preparing your clay colors. You’ll need soft pastel shades of purple, orange, teal, and yellow. If you have bright primary colors, mix them with a generous amount of white clay to achieve that soft, matte sherbet look seen in the photo. -
Form the large beads:
Pinch off equal amounts of clay for each of your main colors. Roll them between your palms to create smooth, even spheres about the size of a marble. You will need roughly 8-10 medium-sized beads for the main body. -
Create mini accent beads:
Using smaller pinches of the same clay colors, roll tiny beads about the size of a pea. Make a mix of pink, teal, and yellow for the top section closest to the keyring. -
Pierce the beads:
While the clay is still soft, carefully use a toothpick or a needle tool to poke a hole through the center of each bead. Ensure the hole is wide enough for your eye pin or cord to pass through later. Give them a gentle wiggle to keep the hole open. -
Dry or bake:
Set your beads aside on a clean surface. If using air-dry clay, let them dry for 24-48 hours. If using polymer clay, bake according to the package instructions.
Keep it Clean
Pastel clay picks up dust easily! Wash your hands thoroughly before switching colors or rolling white clay, or keep a pack of baby wipes nearby.
Step 2: Sculpting the Star
-
Shape the star base:
Take a larger piece of white or pale cream clay. Flatten it slightly into a thick disk, then pinch five points outward to form a star shape. Soften the points so they are rounded and friendly, rather than sharp. -
Smooth the surface:
Gently embrace the clay with your fingers to smooth out any fingerprints. The surface should be flat but with slightly rounded edges, looking almost like a sugar cookie. -
Add the attachment point:
Insert a small screw eye pin or a regular eye pin into the top point of the star before the clay hardens. If using polymer clay, you can bake it right in; for air-dry, dip the end in a little glue before inserting for extra security. -
Cure the star:
Allow the star to dry or bake fully along with your beads. It’s crucial that this piece is completely hard before you paint firmly on it. -
Sand for perfection:
Once fully cured, I like to gently rub the edges of the star with fine-grit sandpaper to remove any rough texture and make it feel professional.
Uneven Holes?
If your bead holes shrink or distort during drying, gently re-drill them by hand using a small drill bit or a twisted paperclip before assembly.
Step 3: Adding the Face
-
Draw the eyes:
Using a fine-tip black marker or a very thin paintbrush with black acrylic paint, draw two small upward-curving arcs for the smiling eyes. Place them widely apart for a cute ‘kawaii’ look. -
Add the smile:
Draw a small, simple ‘U’ shape right between the eyes to create a happy little mouth. -
Give it rosy cheeks:
Dip the back end of a paintbrush into pink paint and gently dot it onto the clay just below each eye to create perfectly round rosy cheeks. -
Seal the face:
Once the paint is totally dry, apply a thin coat of clear varnish or glaze over the face area (or the whole star) to protect your artwork from scratching off.
Step 4: Assembly
-
Thread the main strand:
Take a long eye pin or a piece of wire. Thread on your beads in a double pattern as shown in the photo—mix up the sizes, perhaps placing two medium beads side-by-side if your wire allows, or stacking them vertically. -
Add spacers:
Between the clay beads, you can add tiny gold spacer beads or seed beads. This adds a nice metallic shimmer that matches the keyring hardware. -
Create the top loop:
Once your beads are stacked to your liking, use your round-nose pliers to bend the top of the wire into a secure loop. Trim any excess wire. -
Connect the star:
Open a small jump ring using your pliers. Slide on the loop of your star charm and the bottom loop of your beaded section, then close the jump ring securely. -
Attach to keyring:
Finally, attach the top loop of your bead stack to the large gold keyring. Give everything a gentle tug to make sure all connections are tight and secure.
Now you have a charming, handmade accessory ready to add a pop of joy to your day
Best-Friend Split Hearts
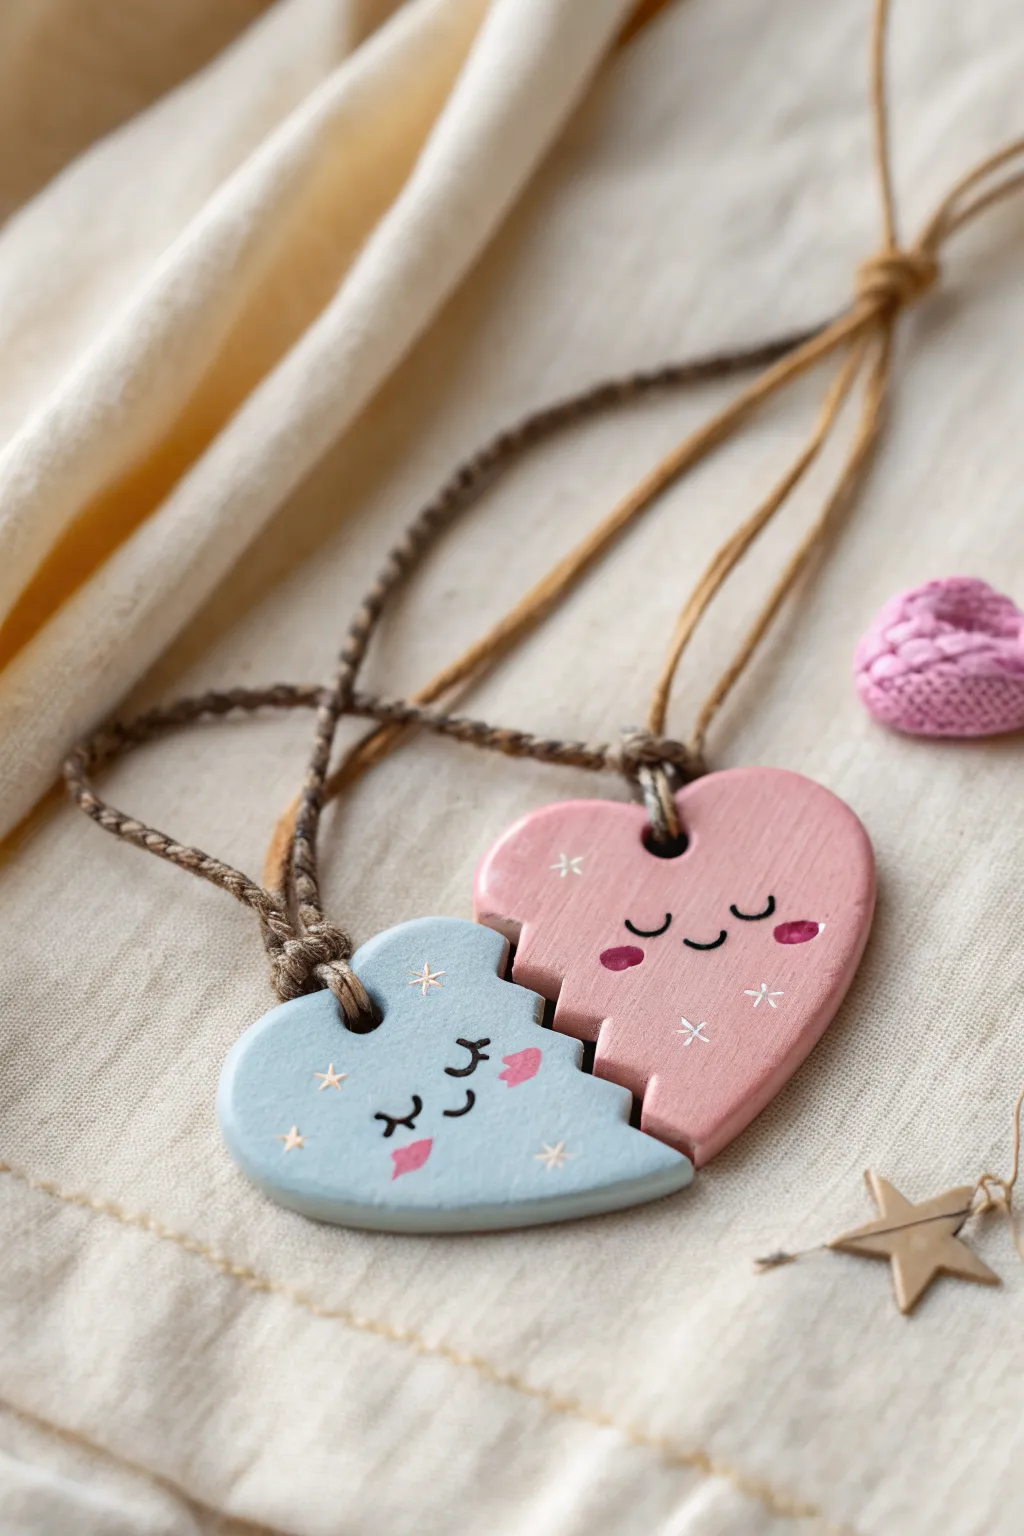
Celebrate friendship with these adorable split-heart necklaces that fit together perfectly like a puzzle. Using air-dry or polymer clay, you’ll create a pastel blue and pink set featuring sleepy smiley faces and scattered star details.
Detailed Instructions
Materials
- Air-dry or polymer clay (white)
- Rolling pin
- Heart-shaped cookie cutter (medium size)
- Craft knife or clay blade
- Toothpick or straw
- Sandpaper (fine grit)
- Acrylic paints (pastel blue, pastel pink, white, black, metallic gold)
- Small detail brushes
- Matte or satin varnish
- Brown cord/twine for necklaces
Step 1: Shaping the Base
-
Condition the Clay:
Begin by kneading a ball of white clay in your hands until it becomes soft, pliable, and free of cracks. -
Roll it Out:
Use your rolling pin to flatten the clay into a smooth sheet. Aim for a thickness of about 4-5mm so the pendants feel substantial but not too heavy. -
Cut the Heart:
Press your heart-shaped cookie cutter firmly into the clay sheet to create the main shape. Gently wiggle it to ensure a clean cut before lifting. -
Create the Split:
Using a craft knife or blade, carefully cut a jagged, zigzag line down the center of the heart. Try to make the ‘puzzle’ teeth distinct so they lock together clearly. -
Separate and Smooth:
Gently pull the two halves apart. Dip your finger in a little water (for air-dry clay) or baby oil (for polymer) and smooth out any rough edges along the cut line without distorting the shape. -
Add Suspension Holes:
Use a straw or a thick tool to poke a hole near the top center of each half-heart. Make sure the hole is big enough for your cord to pass through later. -
Drying or Baking:
If using air-dry clay, let the pieces dry on a flat surface for 24-48 hours. If using polymer clay, bake according to the package instructions. -
Sand for Smoothness:
Once fully cured and hard, gently sand the edges and surface with fine-grit sandpaper to remove any fingerprints or sharp burrs.
Smooth Jagged Edges
Before the clay dries, gently tap the cut ‘zigzag’ edges with a wet finger. This softens sharp corners so the final dried puzzle pieces slide together comfortably without scratching.
Step 2: Painting the Design
-
Plan Your Colors:
Designate one half for blue and one for pink. It helps to keep them next to each other while painting to ensure the colors look balanced. -
Base Coat – Blue:
Paint the entire front and sides of the first half with pastel blue acrylic paint. You may need two thin coats for full opacity. -
Base Coat – Pink:
Paint the second half with a soft pastel pink. Let both base coats dry completely before adding fine details. -
Draw the Eyes:
Using a very fine liner brush and black paint, create two curved ‘u’ shapes for sleeping eyes on each heart half. Add three tiny lashes to each eye. -
Add a Smile:
Paint a small, simple curved smile directly centered beneath the eyes on both pieces. -
Rosy Cheeks:
Dip a small brush in a darker shade of pink (or red mixed with white) and dab oval shapes next to the smiles for cheeks. I like to keep these soft and slightly imperfect. -
Starry Details:
Using white paint and your finest brush (or a toothpick), paint tiny asterisks and dots scattered across the background for a celestial look. -
Gold Accents:
Add a few tiny metallic gold stars or dots among the white ones to give the finish a magical shimmer.
Step 3: Assembly
-
Seal the Work:
Apply a layer of matte or satin varnish over the painted surface. This protects the paint from chipping and gives the clay a finished professional look. -
Thread the Cord:
Cut a length of brown cord or twine. Fold it in half, push the loop through the hole, and thread the ends through the loop to create a lark’s head knot. -
Finish the Necklace:
Tie the loose ends of the cord at your desired length with a secure knot, creating a complete necklace ready for wearing.
Make It Magnetic
Embed tiny neodymium magnets into the cut edges of the raw clay before drying. Ensure the poles attract, and bake/dry them in place so the hearts snap together when close.
Give one half to your best friend and keep the other so you are always connected
Mini Fairy Garden Houses
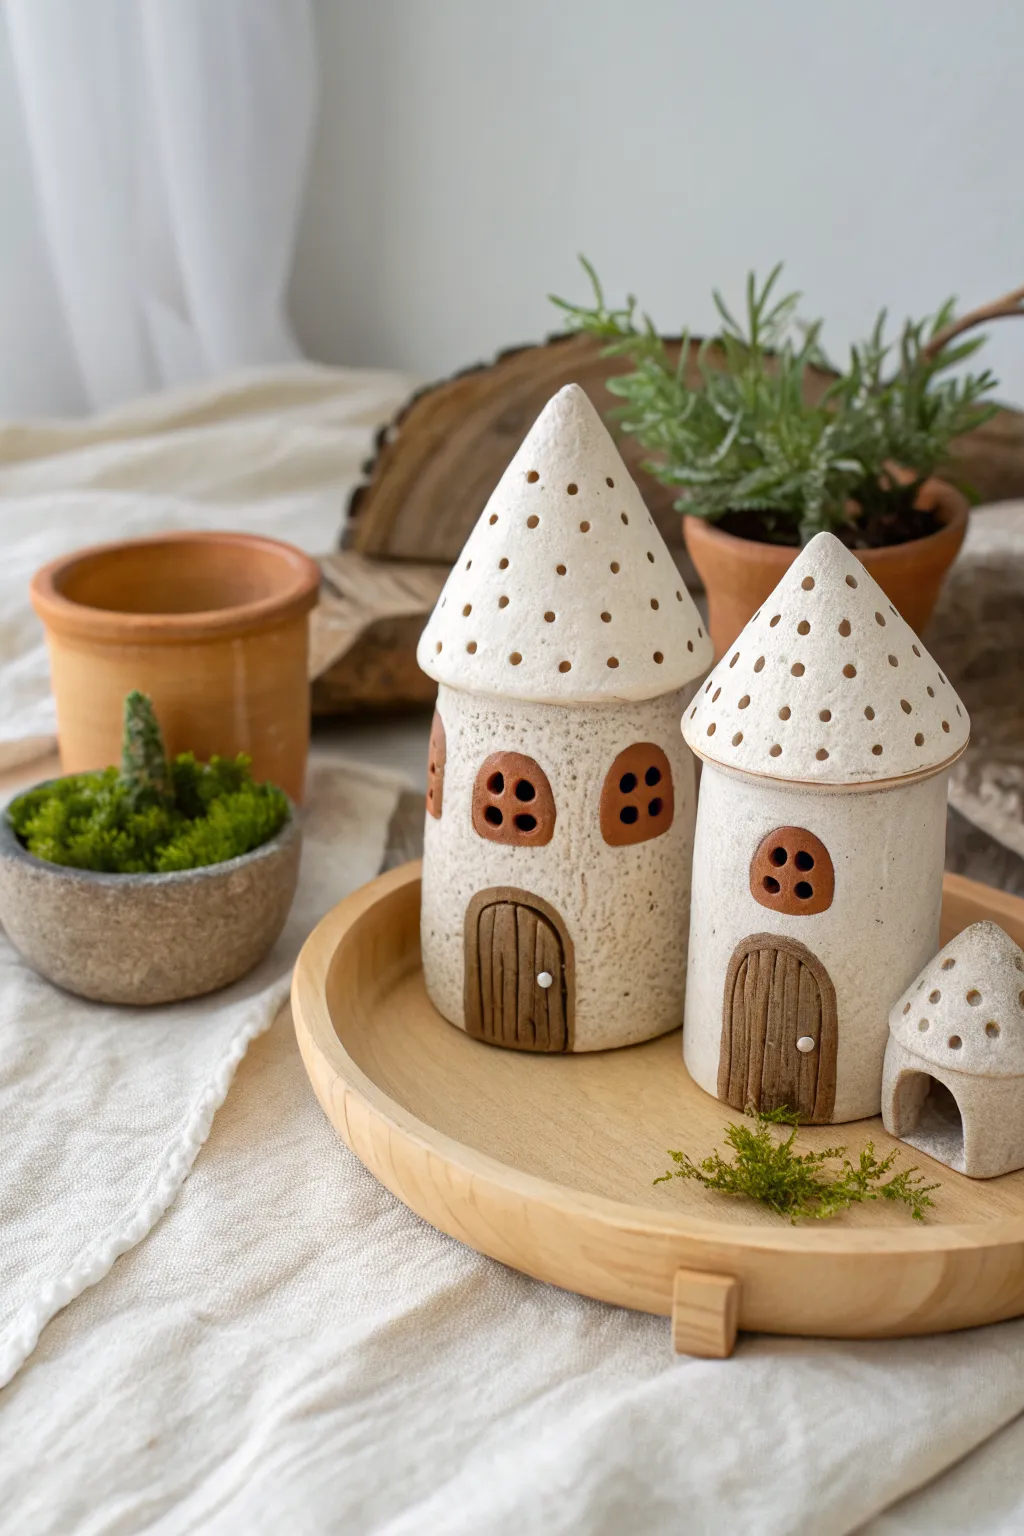
Bring a touch of whimsy to your shelves with these enchanting miniature dwellings, characterized by their textured white walls and distinctive dotted roofs. This project mimics the look of high-end speckled pottery using simple clay techniques, perfect for creating a cozy fairy village.
Step-by-Step Guide
Materials
- White polymer clay or air-dry clay
- Brown polymer clay (terracotta and dark wood tones)
- Speckled clay additive (like cracked pepper) or fine sand (optional)
- Rolling pin
- Circle cutters or a craft knife
- Needle tool or toothpick
- Small ball stylus tool
- Aluminum foil
- Tiny white beads or white clay for door knobs
- Liquid clay adhesive (optional)
- Texturing tool (old toothbrush or sandpaper)
Step 1: Forming the Base Structure
-
Create the core:
Start by rolling a ball of aluminum foil into a cylinder shape with a slightly rounded top. This saves clay and keeps the house lightweight. Compact the foil tightly so it doesn’t squish later. -
Prepare the wall clay:
Condition your white clay until soft. If you want that lovely speckled pottery look shown in the photo, knead in a tiny pinch of ‘cracked pepper’ embossing powder or very fine sand. -
Roll the slab:
Roll the white clay out into a long, even strip, about 1/4 inch thick. Trim the edges with a knife to create a clean rectangle. -
Wrap the walls:
Wrap the clay strip around your foil cylinder. Cut off any excess where the ends meet and smooth the seam completely with your finger or a clay tool until it disappears. -
Texture the surface:
To mimic the stone-like texture visible in the image, gently pat the surface of the walls with an old toothbrush or a piece of crumpled aluminum foil. This removes fingerprints and adds character.
Clean Clay Tip
White clay picks up dust instantly! Clean your hands and work surface with a baby wipe before handling the white clay, and keep a scrap piece nearby to roll repeatedly to lift off lint.
Step 2: Crafting the Roof
-
Shape the cone:
Fashion a cone shape out of aluminum foil to support the roof. Roll out a circle of white clay, cut a slit to the center, and wrap it around the foil cone to create the roof shape. -
Smooth and fit:
Smooth the roof seam carefully. Place this cone on top of your cylinder base to check the fit. It should slightly overhang the walls. -
Add the dotted detail:
Using a needle tool or toothpick, poke small, evenly spaced holes all over the roof surface. I like to keep the pattern random but dense to create that porous lantern look.
Step 3: Adding Windows and Doors
-
Make the windows:
Roll out a small amount of terracotta-colored clay. Cut out small arch shapes for the windows. Press these gently onto the white walls. -
Detail the panes:
Use a needle tool to poke four deep holes into each window arch to create the pane dividers. -
Sculpt the door:
Roll out a slightly darker, wood-tone brown clay. Cut an arch shape for the door, making it larger than your windows. -
Create wood grain:
Before attaching the door, use a needle tool to score vertical lines down the brown clay to simulate wood planks. -
Attach the door:
Press the door firmly onto the base of the house. You can add a tiny dab of liquid clay adhesive on the back if the clay feels dry. -
Add the doorknob:
Roll a minuscule distinct ball of white clay (or use a tiny seed bead) and press it into the right side of the door for a handle.
Level Up: Illumination
Make the houses hollow (remove the foil after shaping but before baking) so you can place battery-operated LED tea lights underneath. The light will shine through the roof holes!
Step 4: Finishing Touches
-
Assemble parts:
Place the embellished roof onto the base. Press gently to secure the connection. -
Make a mini companion:
If you have leftover clay, create a very small matching hut using just a small ball of clay pinched into a dome shape with a tiny arch cut out for an entrance. -
Bake or dry:
Follow the instructions for your specific clay. If baking polymer clay, tent foil over the houses to prevent the white clay from scorching or browning.
Once cooled or dried, display your textured cottages on a wooden tray with a bit of moss for a complete, magical scene
Glow-Look Galaxy Creatures
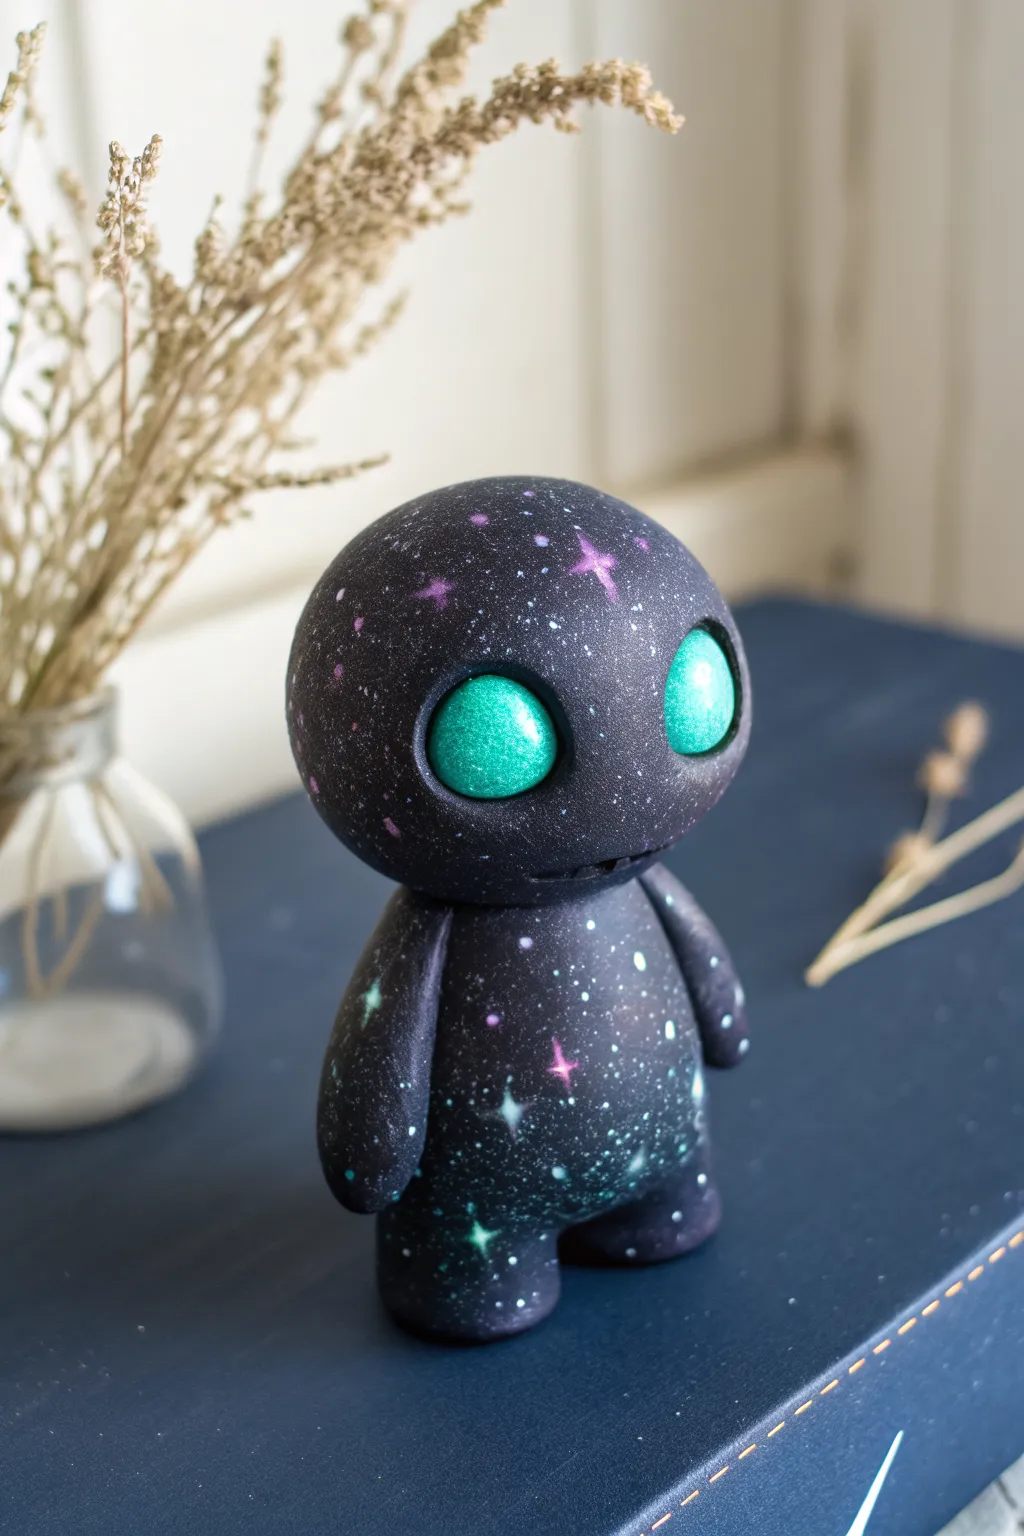
Bring a little piece of outer space into your room with this mysterious, starry-eyed visitor. Using black clay as a canvas, you’ll learn how to splatter paint a stunning galaxy effect that looks like it’s glowing from within.
Detailed Instructions
Materials
- Black air-dry clay (or polymer clay)
- Metallic emerald green acrylic paint
- White acrylic paint
- Purple and blue acrylic paints (for nebulae)
- Toothbrush (for splattering)
- Small detail paintbrush
- Dotting tool or ball stylus
- High-gloss varnish or sealant
- Water cup and paper towels
Step 1: Sculpting the Base Form
-
Roll the head:
Start with a generous ball of black clay. Roll it between your palms until it is perfectly smooth and spherical, slightly flattening the bottom where it will attach to the body. -
Form the body:
Take a slightly smaller amount of clay to form the body. Shape it into a chubby, rounded cylinder that is wider at the bottom for stability. -
Create the legs:
Pinch the bottom of the body cylinder into two short, stubby legs. You want them thick so the figure stands up easily on its own. -
Shape the arms:
Roll two small sausage shapes for arms. Gently press them onto the sides of the body so they hang down naturally, blending the clay at the shoulder connection point so they don’t fall off. -
Connect head to body:
Press the head firmly onto the neck area of the body. If the clay is getting dry, use a tiny drop of water or liquid clay to help it bond securely.
Starry Splatter Tip
Test your toothbrush splatter technique on a piece of scrap paper first. This helps you gauge how wet the brush should be to get tiny stars versus big blobs.
Step 2: Adding Facial Features
-
Indent the eye sockets:
Using your thumbs or a large ball tool, press two deep, large oval indentations into the face. These should take up a significant portion of the head to give it that cute alien look. -
Make the eyes:
Roll two balls of black clay that fit perfectly into the indentations you just made. Press them in gently so they bulge out slightly, creating a bug-eyed effect. -
Carve the mouth:
Use a clay knife or the edge of a ruler to press a simple, straight horizontal line near the bottom of the face for a minimal mouth. -
Let it dry:
Allow your sculpture to fully dry or cure according to your specific clay’s package instructions. Because the head is heavy, I usually let it dry lying on its back on a soft cloth to prevent flat spots.
Glow in the Dark
Mix glow-in-the-dark powder into your white paint before splattering the stars. When the lights go out, your little galaxy creature will actually light up the room.
Step 3: Painting the Galaxy
-
Sponge on nebulae:
Dip a small piece of sponge or a stiff brush into purple and blue paint. Wipe most of the paint off, then lightly dab subtle cloudy patches onto the black surface. -
Create the star field:
Dilute some white paint with a tiny bit of water. Dip an old toothbrush into it, point the bristles at your alien, and flick the bristles with your thumb to spray tiny white specks all over the figure. -
Hand-paint larger stars:
Using your finest detail brush, paint a few larger ‘cross’ shapes in white, pink, or light blue to look like twinkling distant stars. -
Paint the eyes:
Paint the bulging eye shapes with metallic emerald green acrylic. You might need two coats to get that rich, shimmering insect-eye look. -
Add eye details:
Once the green is dry, lightly dry-brush a tiny bit of lighter green or yellow in the center of the eyes to make them look rounded and reflective. -
Protect your work:
Finish by coating the entire figure, especially the eyes, with a glossy varnish. This deepens the black color and makes the galaxy speckles pop.
Now you have a cosmic companion ready to explore the universe from your bookshelf
Texture-Stamped Creature Tiles
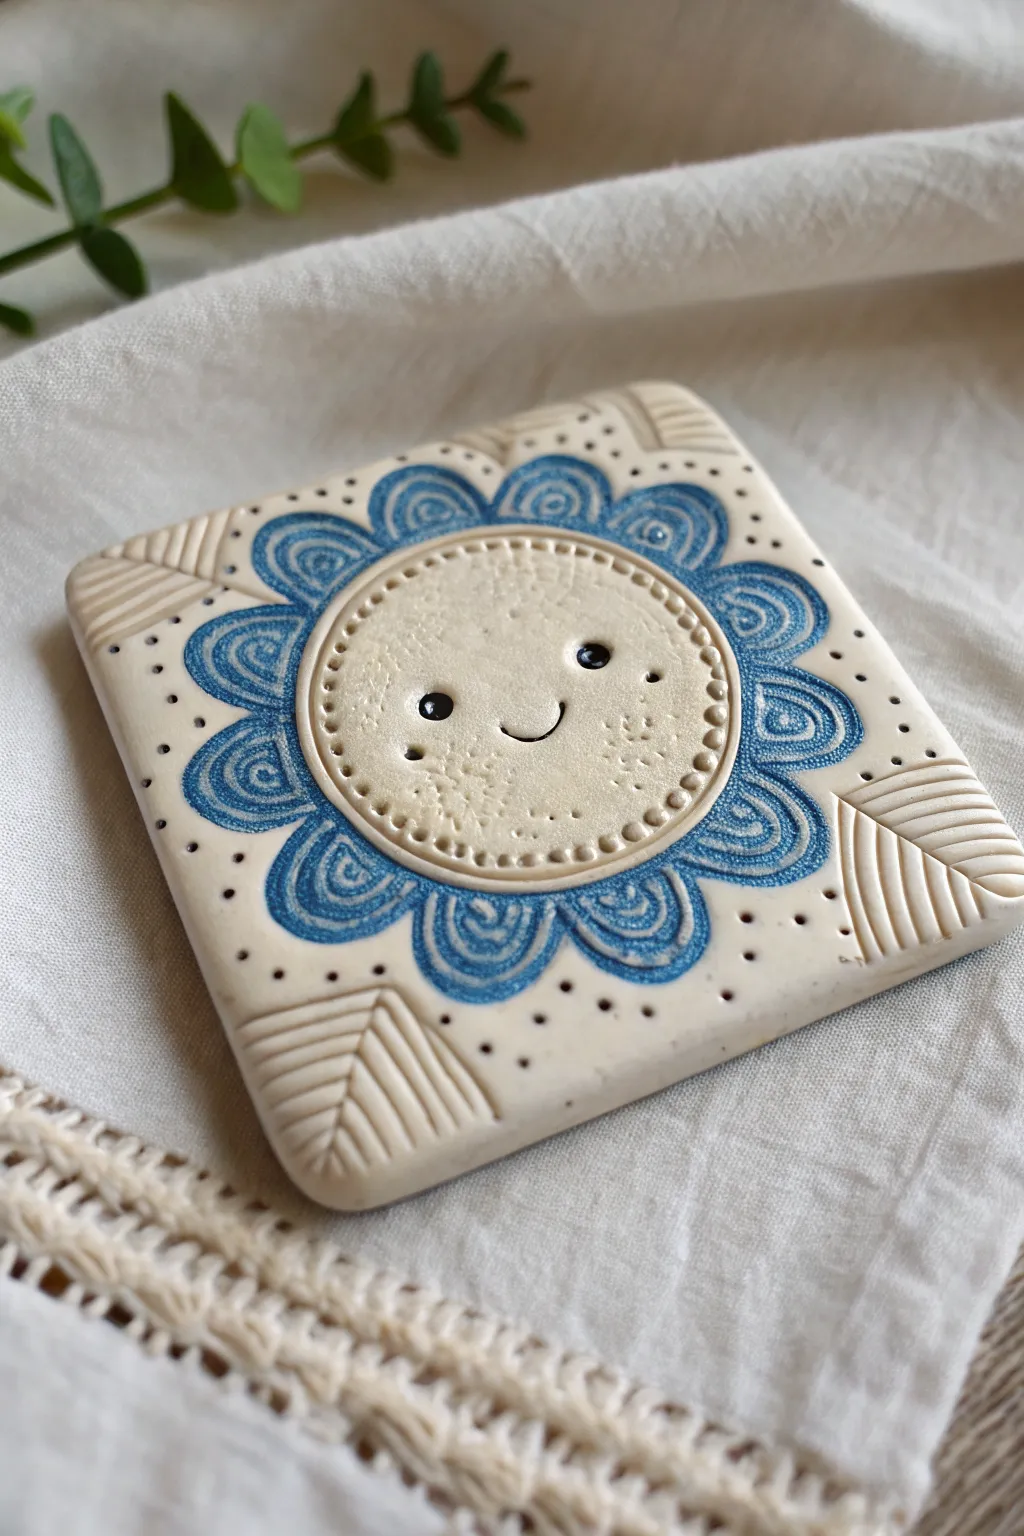
Brighten someone’s day with this charming little clay tile featuring a happy sun face surrounded by stamped blue petals. The design combines simple slab-building techniques with creative texture work for a polished, professional look that is deceptively easy to achieve.
Step-by-Step Guide
Materials
- White air-dry clay or polymer clay
- Rolling pin
- Square cookie cutter (approx. 3-4 inches) or ruler and knife
- Small round cutter (approx. 1.5 inches)
- Small ball stylus tool or dull pencil tip
- Needle tool or toothpick
- Clay carving tool or small U-shaped gouge
- Blue underglaze or acrylic paint
- Black acrylic paint or marker
- Fine paintbrush
- Sponge or damp cloth
- Clean work surface or clay mat
Step 1: Preparation & Base
-
Roll the Slab:
Begin with a ball of white clay about the size of a tangerine. Roll it out on your work surface until you have an even slab roughly 1/4 inch thick. Aim for a consistent thickness so it dries flat. -
Cut the Square:
Use your square cookie cutter to stamp out a clean shape. If you don’t have a cutter, measure a 3.5-inch square with a ruler and carefully cut it out with a craft knife or plastic clay tool. -
Smooth the Edges:
Dip your finger in a little water and gently run it along the cut edges of the square to soften any sharp corners or clay burrs.
Step 2: Stamping the Design
-
Center Circle:
Take your small round cutter and press it gently into the exact center of the square. Do not cut all the way through; you just want to create a clear indented ring for the sun’s face. -
Add the Dot Border:
Using a small ball stylus or a dull pencil, press a series of small dots all around the inside edge of that center circle imprint. Spacing them evenly gives it a nice stitched look. -
Carve the Petals:
With a needle tool, lightly sketch petal shapes radiating out from the circle. Once you’re happy with the placement, carve the outlines a bit deeper. -
Inner Petal Details:
Inside each petal, carve a smaller, mirroring petal shape. Add a tiny swirl or loop at the top of each inner petal for extra texture. -
Corner Textures:
In the four corners of the tile, use a carving tool or old credit card edge to press in chevron or leaf-vein patterns pointing toward the corners. -
Background Dots:
Fill the empty negative space between the petals and the corners with tiny poked dots using your needle tool. I find this simple step really ties the whole composition together.
Stamp Master
Look around the house for textures! Pen caps, screw heads, and marker lids make incredible stamps. The best patterns often come from everyday trash.
Step 3: Making the Face
-
Create the Eyes:
Press the rounded end of a paintbrush handle or a larger ball tool into the center circle to make two deep indents for the eyes. -
Carve the Smile:
Use your needle tool or a small curved tool to carve a simple, upward-curving smile line just below the eyes. -
Add Cheeks:
Gently texture the cheek area with very light taps of a stiff-bristled brush or a textured sponge to create a ‘blushing’ surface effect.
Make it hangable
Before drying, poke a hole in the top corner with a straw, or glue a magnet to the back after it’s fully dry to turn it into fridge art.
Step 4: Finishing Touches
-
Initial Drying:
Let the tile sit until it is ‘leather hard’—dry enough to hold its shape firmly but not completely hardened. This usually takes a few hours for air-dry clay. -
Apply Blue Color:
Dilute your blue paint slightly with water. Paint strictly inside the petal shapes. Don’t worry if it’s not perfect; the texture will help hold the color. -
Wipe Back:
If you want a weathered look, dampen a sponge and lightly wipe across the blue painted areas. This leaves pigment deep in the carved grooves while cleaning the high points. -
Detailed Eyes:
Once the clay is fully dry, fill the eye indentations with black paint. Add a tiny dot of white paint to each eye for a highlight. -
Final Sealing:
If using air-dry clay, seal your work with a matte or satin varnish to protect the paint and give the clay a finished ceramic sheen.
Now you have a cheerful little sun tile ready to sit on a desk or hang on a wall