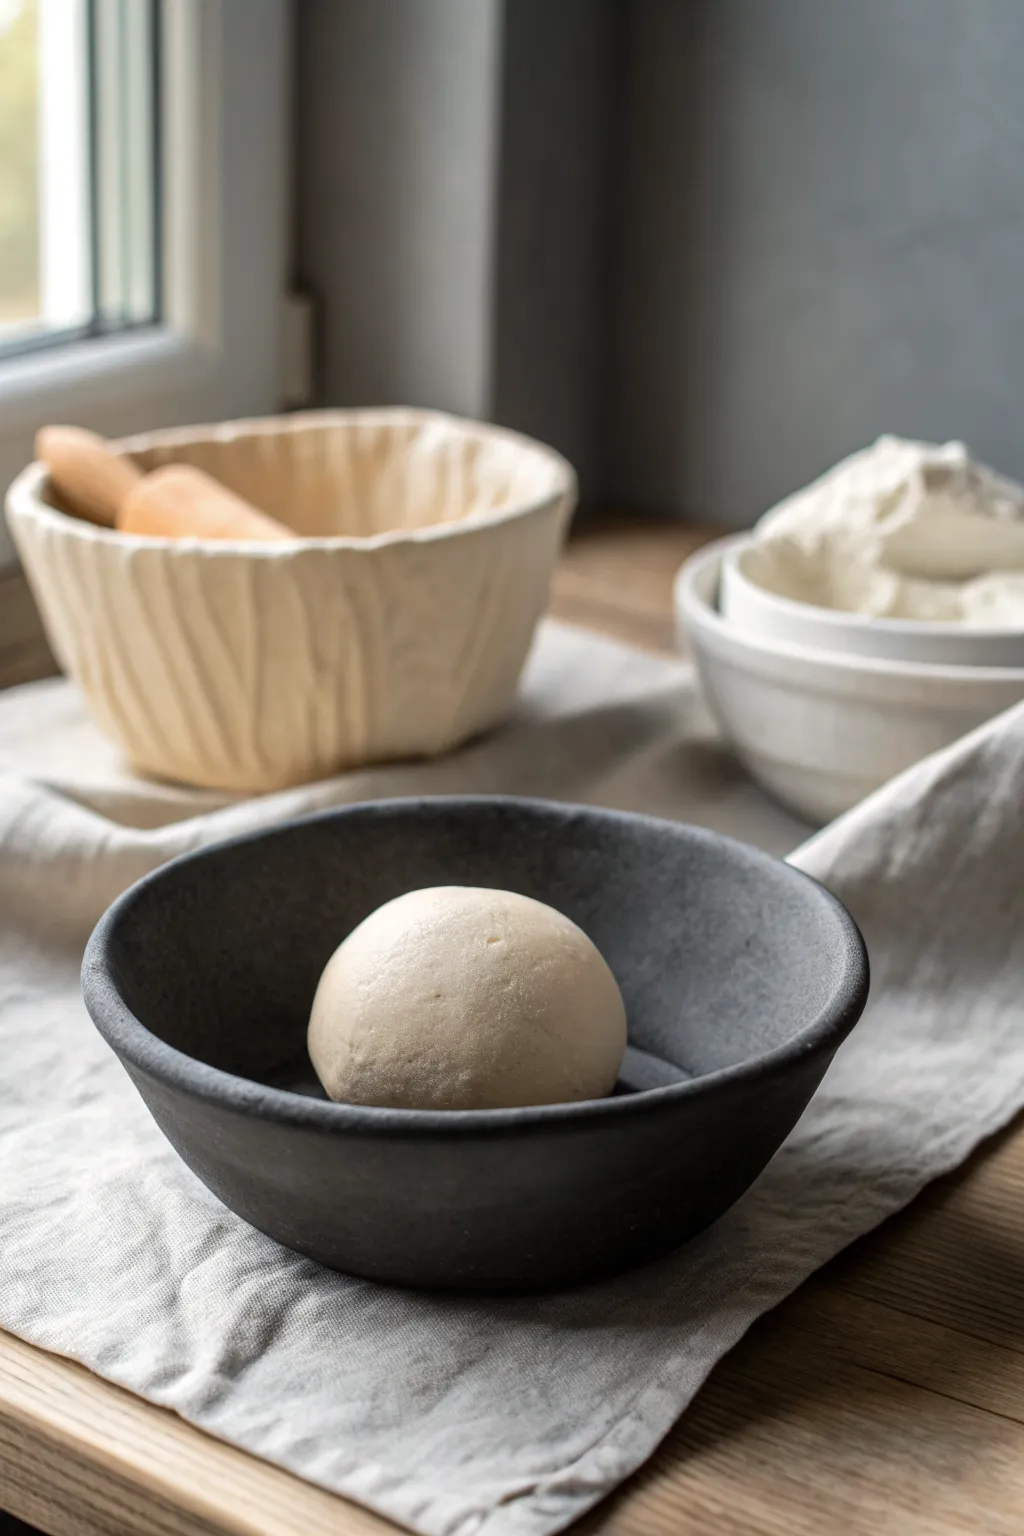
If you love the look of clay but want something lighter, thriftier, and super forgiving, paper mache clay is going to be your new studio obsession. I’m sharing my favorite paper mache clay ideas—starting with the classic “make the clay” basics and moving into the fun decor and sculpture projects that really show off what this material can do.
Basic Paper Mache Clay Recipe You’ll Use Forever
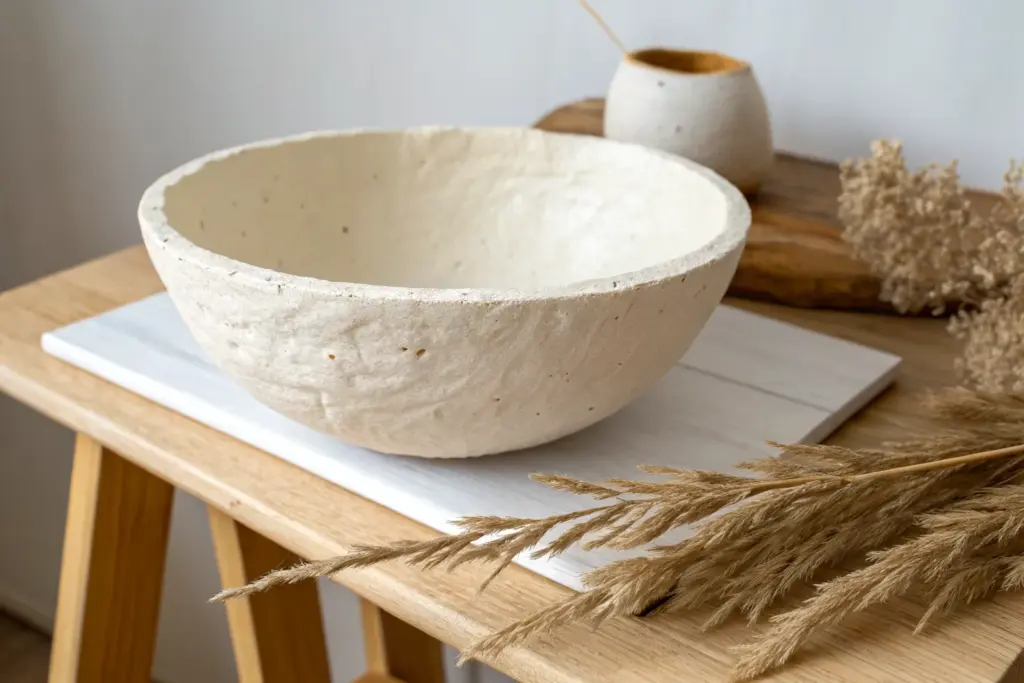
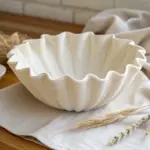
This fundamental recipe yields a silky smooth, pliable modeling compound that dries rock-hard and rivals commercial products. You will create a perfectly round, stone-like ball of raw clay that sits invitingly in a rustic bowl, ready for sculpting.
How-To Guide
Materials
- Cheap toilet paper (plain, no lotion or scent)
- PVA glue (white school glue or wood glue)
- Joint compound (drywall mud, regular, not lightweight)
- All-purpose flour
- Cornstarch
- Baby oil or mineral oil
- Large mixing bowl
- Electric hand mixer
- Cheesecloth or fine mesh strainer
- Ideally a dark ceramic bowl for storage/display
Step 1: Pulp Preparation
-
Soak the paper:
Unroll about half a roll of toilet paper into a bowl of hot water. Push it down so it is completely submerged and saturated. Let it sit for a few minutes until the fibers begin to break down. -
Squeeze out water:
Take handfuls of the wet paper and squeeze out as much water as you physically can. I like to then put the wet clumps into a strainer and press down firmly to remove even more moisture. -
Break down the pulp:
Tear the squeezed clumps into tiny thumbnail-sized pieces and drop them back into a dry mixing bowl. Run your electric mixer over these damp crumbs to fluff them up into a cloud-like texture.
Sticky Situation?
If the dough is relentlessly sticky, don’t just add flour. Let the dough rest uncovered for 10 minutes to let surface moisture evaporate, then knead again.
Step 2: Mixing the Clay Base
-
Add wet ingredients:
Pour about 3/4 cup of PVA glue and 1/2 cup of joint compound directly onto your fluffed paper pulp. Add 2 tablespoons of baby oil to help keep the final clay smooth and prevent it from sticking to your hands. -
Initial blend:
Use the electric mixer again to beat these ingredients together until you have a paste that resembles thick cottage cheese. Ensure no dry clumps of paper remain unmixed. -
Incorporate dry binders:
Add 1/2 cup of flour and 1/4 cup of cornstarch to the bowl. Switch from the mixer to manual kneading, or use dough hooks if your mixer is powerful enough, as the mixture will become quite stiff.
Step 3: Kneading and Refining
-
Knead vigorously:
Turn the dough out onto a clean surface dusting lightly with cornstarch. Knead it thoroughly for at least 5-10 minutes. The goal is to break down any remaining paper fibers until they are undetectable. -
Check consistency:
The clay should feel like soft cookie dough—moist but not tacky. If it sticks to your fingers, dust with a little more flour. If it’s cracking, add a teaspoon of glue. -
Form the ball:
Roll the clay between your palms to create a tight, smooth sphere like the one in the photo. Look for a surface texture that looks almost like a polished stone or unbaked bread dough. -
Smooth the surface:
Rub a tiny drop of baby oil over the surface of your finished sphere. This gives it that specific matte sheen visible in the reference image and helps seal moisture in temporarily.
Velvet Texture Tip
For the absolute smoothest finish, use an immersion blender to puree the wet paper pulp before squeezing out the water. It makes the fibers invisible.
Step 4: Storage and Presentation
-
Prepare the vessel:
Select a dark, matte bowl to contrast with the pale clay. The image uses a dark grey, shallow stoneware bowl which frames the white sphere beautifully. -
Place the clay:
Gently set your clay ball into the center of the bowl. It should hold its round shape without slumping; if it flattens significantly, your mix was too wet. -
Cover for storage:
While it looks lovely sitting out, this is air-dry clay. To keep it in this workable state, wrap it tightly in plastic wrap immediately after you finish admiring your handiwork.
Now you have a batch of professional-grade sculpting material ready for your next masterpiece


Silky-Smooth Paper Mache Clay for Tiny Details
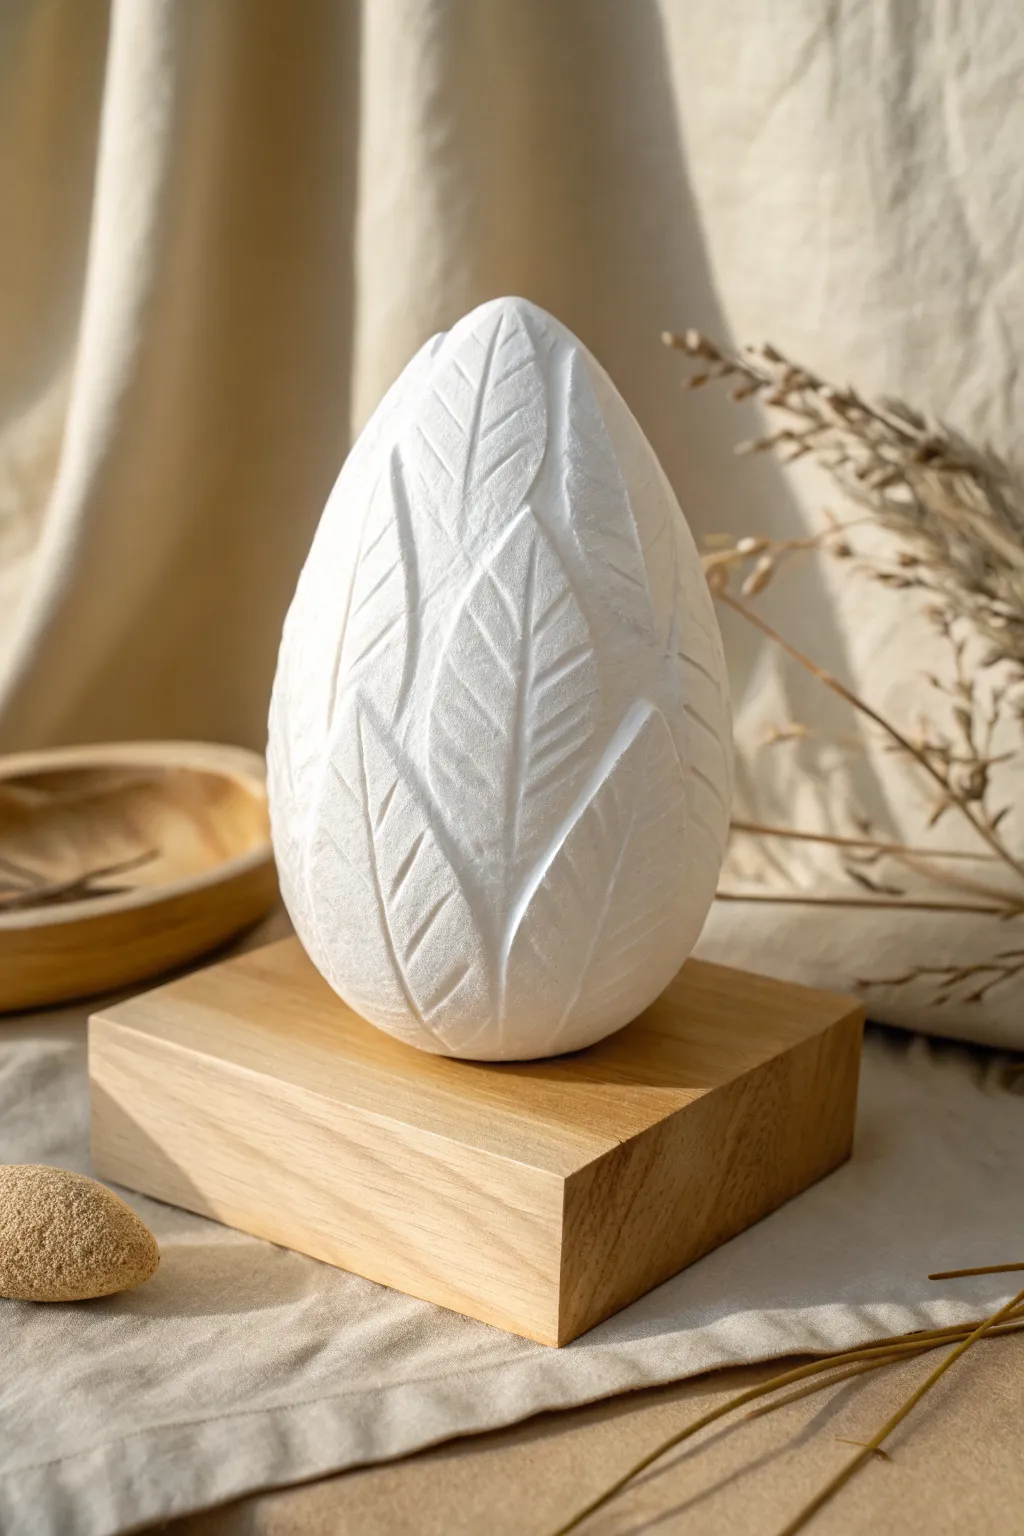
Sculpt a delicate, porcelain-like decorative egg using ultra-fine paper mache clay. This project focuses on achieving a pristine, matte white finish with crisp, raised botanical reliefs that look professionally carved.
Step-by-Step
Materials
- Styrofoam egg or plastic Easter egg (approx. 4-5 inches tall)
- Silky-smooth paper mache clay recipe (toilet paper, joint compound, PVA glue, flour)
- Fine grit sandpaper (220 and 400 grit)
- Modeling tools or clay carving tools
- Water in a spray bottle
- Gesso or white acrylic primer
- Matte white acrylic paint
- Soft synthetic brush
- Palette knife
- Small bowl of water
Step 1: Base Preparation
-
Prepare the Armature:
Begin with your Styrofoam or plastic egg core. If using a plastic egg, lightly sand the surface to give the clay some grip. If using Styrofoam, you can apply a thin layer of masking tape to smooth out the grainy texture before adding clay. -
Apply Base Layer:
Take a handful of your smooth paper mache clay and roll it into a thin sheet or press it flat between your palms. Apply a uniform layer, about 1/4 inch thick, over the entire egg. Use water on your fingertips to smooth out seams immediately. -
Refine the Shape:
While the clay is still wet, gently roll the egg on a non-stick surface to ensure it is perfectly round and symmetrical. Wet your hands and stroke the surface until it feels glass-smooth. -
Initial Drying:
Ideally, let this base layer dry completely before adding details. This provides a hard shell to work against. Place it in a warm, airy spot for 24-48 hours until bone dry.
Clay Consistency
For details this fine, blend your paper pulp until it’s practically a paste before mixing ingredients. Lumps are the enemy of sharp veins.
Step 2: Sculpting the Leaves
-
Sketch the Design:
Once the base is dry, lightly sketch overlapping leaf shapes directly onto the egg using a soft pencil. Aim for long, elegant leaves that curve upwards towards the pointed top of the egg. -
Form Leaf Shapes:
Take small pinches of fresh clay and flatten them into marquise (pointed oval) shapes. These will become your individual leaves. Keep them relatively thin, about 1/8 inch. -
Attach the Leaves:
Apply a tiny dab of PVA glue or water to the back of a clay leaf and press it onto your pencil guide. Smooth the edges of the leaf down onto the egg surface so they blend seamlessly at the bottom but retain height in the center. -
Define the Center Vein:
Use a sharp modeling tool or a knife edge to gently press a central vein line down the middle of the leaf. Don’t cut all the way through; just create a clean indentation. -
Add Side Veins:
With the same tool, press delicate diagonal lines branching from the center vein. Keep your tool clean and damp to prevent dragging the clay. I find wiping the tool after every few strokes keeps the lines sharp. -
Layering:
Continue adding leaves around the egg. Allow some leaves to slightly overlap others to create depth. Ensure the tips of the leaves taper beautifully and don’t look blunt. -
Smoothing Details:
Before the relief layer dries, use a slightly damp soft brush to gently go over the carved lines. This softens any jagged edges or crumbs without erasing the detail.
Step 3: Finishing Touches
-
Full Cure:
Let the sculpted egg dry thoroughly. Because of the added thickness, give it an extra day or two. It must be completely hard and room temperature to the touch. -
Fine Sanding:
Using 220 grit sandpaper, very gently sand the high points of the leaves to make them ultra-smooth. Be careful not to sand away your vein details. Switch to 400 grit for polishing the smooth areas between leaves. -
Dust Removal:
Wipe the entire sculpture with a dry microfiber cloth or a soft tack cloth to remove every speck of sanding dust. Dust in the crevices will ruin the paint finish. -
Prime:
Apply a coat of quality white gesso. This seals the paper mache clay and creates an even absorption surface for the final paint. -
Final Paint:
Paint the egg with a matte white acrylic. Apply thin layers rather than one thick one to avoid filling in the fine vein details. Two to three thin coats usually provide perfect opacity. -
Protective Seal (Optional):
If you want extra durability without shine, apply a spray matte varnish. Hold the can 12 inches away and apply a light mist.
Go Monochromatic
Instead of white, try a soft terracotta or sage green paint, then dry brush with a lighter shade to make the leaf veins pop.
Place your finished egg on a simple wooden block or minimal stand to let the textures shine.


Colored Paper Mache Clay That’s Tinted Through
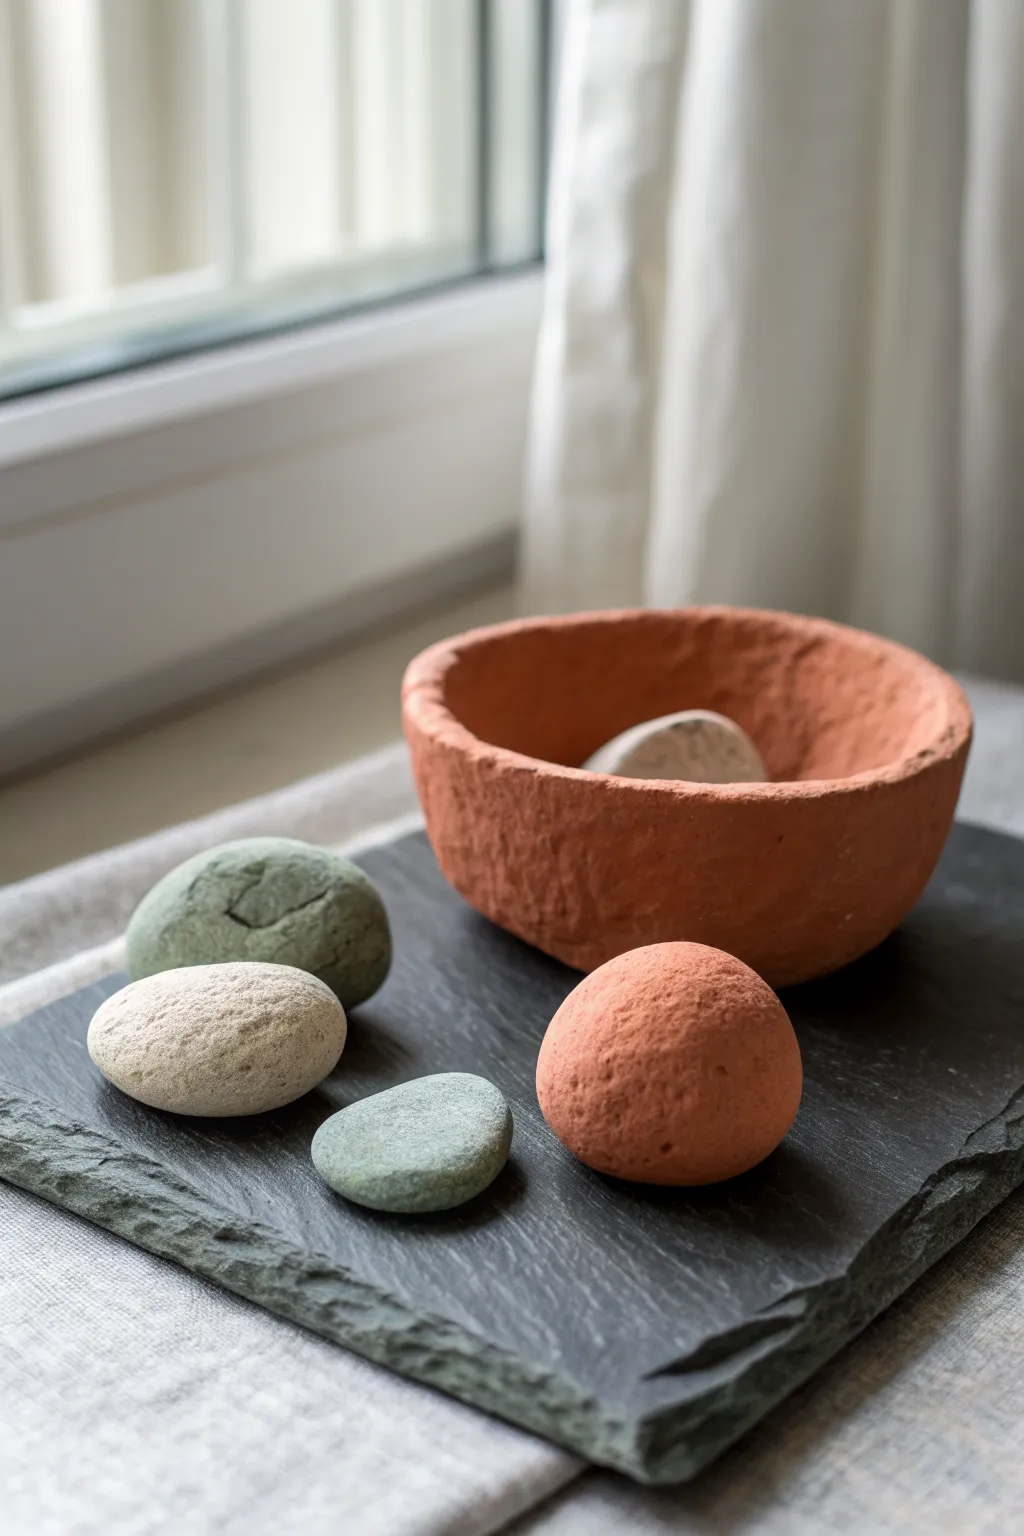
Learn to craft your own serene, naturalistic décor using tinted paper mache clay to mimic the look of river stones and terracotta pottery. This project creates a stunningly realistic textural finish without the need for a kiln or heavy carving tools.
Detailed Instructions
Materials
- Cellulose insulation or shredded toilet paper (for the pulp)
- PVA glue (white school glue) or wood glue
- Joint compound or drywall mud
- Flour and water (for paste)
- Acrylic paints (Terracotta, Sage Green, Warm White, beige)
- Mixing bowls and spoons
- Small balloons (optional, for bowl shape)
- Plastic wrap
- Fine-grit sandpaper (220 grit)
- A smooth slate or tile for display
Step 1: Preparing the Tinted Clay Base
-
Create the base pulp:
Begin by soaking your cellulose insulation or shredded paper in warm water until it is thoroughly saturated. If using paper, blend it vigorously with a mixer attachment to break down fibers into a fluffy pulp. -
Squeeze out excess water:
Strain the pulp through a mesh bag or old pillowcase, squeezing tightly until the material is damp but no longer dripping wet. You want a crumbly, cottage-cheese consistency. -
Mix the clay ingredients:
In a large bowl, combine 1 cup of damp pulp with 1/2 cup of joint compound and 1/2 cup of PVA glue. Mix thoroughly until smooth. -
Thicken slightly:
Gradually add dusting of flour if the mixture feels too sticky or loose. You want a dough-like consistency that holds its shape when squeezed without slumping. -
Divide the batch:
Separate your clay into three distinct piles. One pile will be for the terracotta color, one for sage green, and one for the stone white. -
Tint the clay directly:
Add a generous dollop of terracotta acrylic paint into the first pile and knead it in with your hands (wearing gloves is helpful here). Repeat with sage green for the second pile and warm white/beige for the third. The color will dry slightly darker than it looks wet.
Smooth Operator
To get super smooth stones without sanding later, use the back of a metal spoon dipped in water to burnish the wet clay. It compresses fibers perfectly.
Step 2: Shaping the River Stones
-
Form the core shapes:
Take a handful of the tinted clay and roll it between your palms firmly to compress the fibers. Shape them into organic ovals, circles, or flattened discs just like real river rocks. -
Create surface variety:
Vary the sizes significantly. Make one large terracotta sphere, a medium green oval, and smaller flat white stones. Don’t aim for perfect geometric spheres; slight irregularities make them look more natural. -
Smooth the surface:
Dip your finger in water and gently rub the surface of your wet clay stones to smooth out major bumps or large cracks, though a little texture is desirable for that stone effect. -
Initial drying phase:
Place the stones on a wire rack or non-stick paper. Let them air dry for at least 24 hours. Flip them halfway through so the bottoms dry evenly.
Cracking Up?
If cracks appear while drying, don’t panic! Mix a tiny amount of fresh paste and fill the crack, or leave it for an ancient, weathered stone look.
Step 3: Sculpting the Terracotta Bowl
-
Prepare the mold:
Find a small bowl or inflate a small balloon to use as a mold. Cover the outside of your mold with plastic wrap to ensure easy release later. -
Apply the clay:
Using the terracotta-tinted clay, press small flattened chunks onto the exterior of your mold. Aim for a wall thickness of about 1/4 inch. -
Shape the rim:
Instead of cutting a perfect edge, pat the rim with your fingers to create a soft, undulating organic lip. This rustic edge creates the handmade pottery aesthetic. -
Refine the texture:
Use a barely damp sponge to gently pat the exterior. You aren’t trying to make it glassy smooth; leave subtle finger marks or divots to resemble hand-thrown clay. -
Allow to cure:
Let the bowl dry completely on the mold for 24-48 hours. Once the outside renders hard and dry to the touch, carefully pop it off the mold and remove the plastic wrap. -
Dry the interior:
The inside will likely still be damp. Let it sit open-side up for another day until fully hardened and light in weight.
Step 4: Finishing Touches
-
Optional sanding:
Once fully bone-dry, you can use fine-grit sandpaper to knock down any sharp spikes or overly rough patches, but keep the overall matte texture intact. -
Dry brushing (optional):
To enhance realism, lightly dry brush a slightly lighter shade of paint over the high points of the stones. This mimics the dusty look of sedimentary rock. -
Arrange your display:
Place your finished bowl and scattered stones on a slate board or tray to complete the zen aesthetic.
Enjoy the calm atmosphere your new handmade stone collection brings to your space


Easy Pinch Bowls and Trinket Dishes

This charming, organically shaped bowl features a lovely textural contrast between its raw, creamy base and a warm terracotta rim. It’s the perfect size for holding your favorite rings and adds a touch of rustic elegance to any vanity.
Step-by-Step Guide
Materials
- Paper mache clay (homemade or store-bought)
- Small bowl or balloon (to use as a mold)
- Plastic wrap
- Rolling pin
- Sandpaper (fine and medium grit)
- Terracotta or peach acrylic paint
- White or cream acrylic paint
- Matte sealant or varnish
- Small paintbrush
- Water bowl
Step 1: Forming the Base
-
Prepare your workspace:
Cover your table with plastic or a mat. If you are using a bowl as a mold, turn it upside down and cover the outside tightly with plastic wrap to prevent sticking. -
Roll out the clay:
Take a handful of paper mache clay and roll it out into a flat circle, roughly 1/4 inch thick. Aim for an even thickness, but don’t worry about perfect edges. -
Drape over the mold:
Gently lift your clay circle and drape it over your prepared mold. Press the clay softly against the mold shape to form the bowl’s curve. -
Create the texture:
Instead of smoothing the clay perfectly, dab it lightly with your fingers or a crumpled piece of aluminum foil to enhance that lovely, stone-like texture visible in the photo.
Cracking Up?
If small cracks appear during drying, don’t panic. Mix a tiny bit of fresh clay with water to make a paste and fill the cracks, then smooth over.
Step 2: Shaping the Rim
-
Tear the edges:
To get that specific uneven look, gently tear away excess clay from the bottom edge (which will become the top rim) rather than cutting it. -
Pinch and wave:
Using your thumb and forefinger, pinch the rim at random intervals. Gently pull some sections up and push others down to create a natural, wavy border. -
Refine the thickness:
Check that the rim isn’t too thin, as paper mache can be brittle. I like to gently tap the edge back onto itself to thicken it slightly if it feels flimsy. -
First drying phase:
Let the bowl sit on the mold until it is firm enough to hold its shape but not fully dry. This usually takes overnight depending on humidity.
Add Some Sparkle
For a luxe touch, paint just the very top edge of the rim with liquid gold leaf. The metallic shine looks incredible against the matte texture.
Step 3: Finishing and Painting
-
Remove from mold:
Carefully pop the clay bowl off the mold. Peel away the plastic wrap. Let the inside dry completely, which might take another day. -
Sand for stability:
Once bone dry, check the bottom. If it wobbles, gently sand the exterior base flat so it sits securely on a table. -
Base coat interior:
Paint the entire interior and exterior with a creamy white acrylic paint. This unifies the color of the paper fibers. Let it dry. -
Apply the color accent:
Mix a warm terracotta or peach shade. Paint a thick, uneven band around the upper interior rim. Follow the wavy contours of your clay for a natural flow. -
Soften the transition:
While the peach paint is still wet, use a clean, slightly damp brush to gently feather the bottom edge of the color band so it blends softly into the cream base. -
Final seal:
Apply a coat of matte varnish to protect your dish. This keeps dirt out of the texture without making it look glossy and plastic.
Now you have a beautiful, custom dish ready to organize your treasures

The Complete Guide to Pottery Troubleshooting
Uncover the most common ceramic mistakes—from cracking clay to failed glazes—and learn how to fix them fast.
Textured Catchall Tray with a Raised Rim
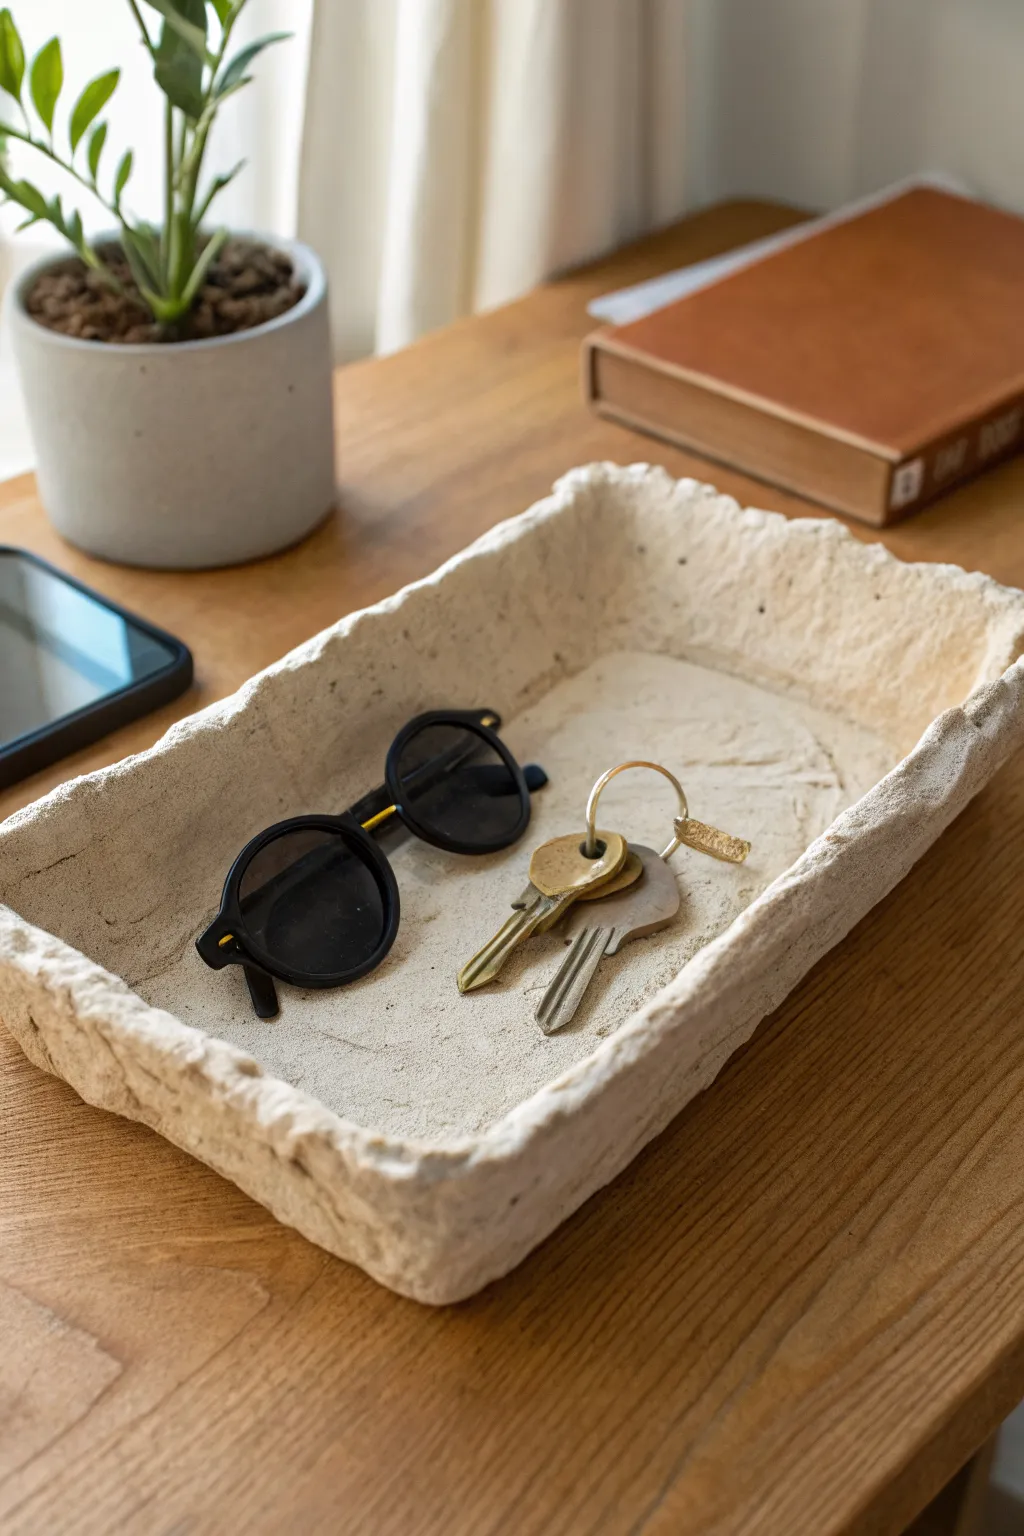
Transform humble paper mache clay into a sophisticated, stone-like catchall that brings organic warmth to any entryway. With its delightful wabi-sabi texture and sturdy raised rim, this tray is perfect for corralling keys and sunglasses.
Step-by-Step
Materials
- Paper mache clay (homemade or recipe of choice: toilet paper pulp, drywall joint compound, flour, glue)
- Rectangular plastic container or cardboard box (for use as a mold)
- Plastic wrap (cling film)
- Small bowl of water
- Medium-grit sandpaper
- Off-white or beige acrylic paint (matte finish)
- Sealant (polycrylic or similar)
- Spatula or butter knife
Step 1: Preparing the Base
-
Select your mold:
Find a rectangular container that matches the size you want for your tray. A standard Tupperware or a small shoebox works perfectly as a base form. -
Protect the mold:
Cover the entire inside of your chosen mold with plastic wrap. Ensure there is plenty of overhang on the edges so you can easily lift the project out later. -
Prepare the clay:
If your paper mache clay has been sitting, knead it briefly to ensure the texture is consistent. It should feel like a thick, spreadable frosting or heavy dough.
Step 2: Building the Form
-
Create the base layer:
Scoop a generous amount of clay into the bottom of the lined mold. Press it down firmly with your fingers or knuckles. -
Level the bottom:
Aim for a thickness of about 1/4 to 1/2 inch. Use the back of a spoon or your palms to smooth it out, though imperfections add to the stone look. -
Build the walls:
Take handfuls of clay and press them against the vertical sides of the mold, connecting them seamlessly to the bottom base. -
Reinforce the corners:
Pay special attention to the corners, pressing extra clay into them to ensure they are strong and won’t crack upon drying. -
Establish the height:
Build the walls up to approximately 1.5 to 2 inches high. It doesn’t need to be perfectly level; the organic wave is part of the charm.
Cracks while drying?
Don’t panic! Paper mache often shrinks. Mix a tiny batch of fresh clay or just use joint compound to fill the cracks, then smooth with a wet finger and let dry again.
Step 3: Texturing and Refining
-
Rough up the rim:
Instead of smoothing the top rim perfectly, use your fingers to pinch and pull small sections, creating that raw, broken-stone edge seen in the photo. -
Add surface interest:
I like to take a damp sponge or crumbled foil and dab the interior surfaces lightly. This enhances the pitted, travertine-like texture. -
Smooth the interior base:
While keeping the texture, ensure the very center where items will sit is relatively flat so your keys don’t wobble excessively. -
Initial drying phase:
Place the mold in a warm, dry spot with good airflow. Let it sit for at least 24-48 hours until the top feels firm to the touch. -
Demold the tray:
Gently lift the plastic wrap to pull the semi-dry tray out of the mold. The bottom will likely still be damp. -
Flip and finish drying:
Turn the tray upside down on a wire rack. Peel off the plastic wrap carefully to let the bottom dry completely. This may take another day or two.
Level Up: Faux Stone
Mix a teaspoon of dried used coffee grounds or fine sand into your clay before sculpting. This creates gorgeous speckles that mimic real limestone or granite.
Step 4: Finishing Touches
-
Sanding the sharp bits:
Once bone dry, take your medium-grit sandpaper and very lightly hit just the sharpest peaks on the rim so it’s pleasant to touch, but don’t smooth it out fully. -
Base coat painting:
Apply a coat of off-white or beige matte acrylic paint. Dab the brush into the crevices rather than using long strokes to maintain the visual depth. -
Dry styling:
If you want a more aged look, you can dry-brush a slightly lighter shade of white over the high points of the texture. -
Seal the piece:
Apply a matte sealant to protect the tray from moisture and scratches. This is crucial if you plan to toss metal keys into it daily.
Place your finished tray on an entryway table and enjoy the organic elegance it adds to your daily routine
Faux Pottery Vase with Carved Lines
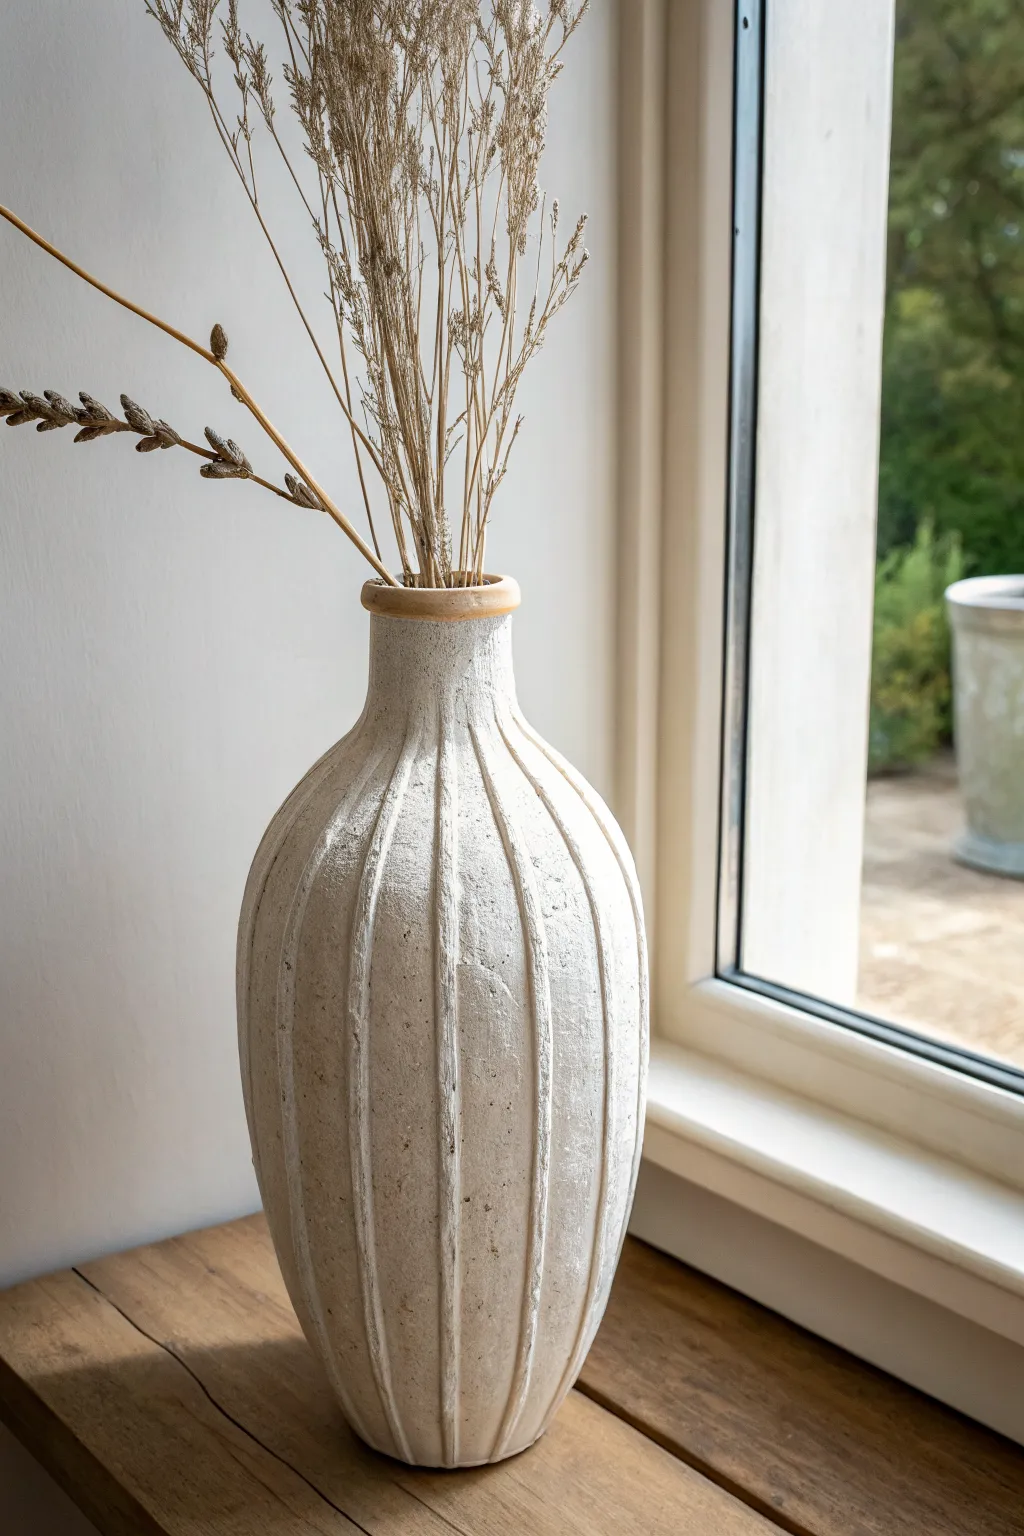
Achieve the high-end look of wheel-thrown ceramics without a kiln using paper mache clay and a simple glass recycling trick. This project features deep, organic vertical carving and a stony, matte finish that brings earthy elegance to any windowsill.
Detailed Instructions
Materials
- Tall glass jar or bottle (for the armature)
- Aluminum foil
- Masking tape
- Paper mache clay recipe (toilet paper, joint compound, PVA glue, flour)
- Rolling pin
- Plastic wrap
- Modeling tools or a dull butter knife
- Sandpaper (medium and fine grit)
- White acrylic paint (matte)
- Cream or beige acrylic paint (for antiquing)
- Clear matte sealer spray
- Sponge or rag
Step 1: Building the Armature
-
Prepare the base:
Clean and dry your glass jar or bottle thoroughly. This will serve as the permanent internal structure, making the vase waterproof and heavy enough to hold tall stems. -
Shape the neck:
Crumple aluminum foil and wrap it around the neck of the bottle to create a smooth, tapered transition from the body to the rim. You want to soften any hard angles of the original glass. -
Secure the form:
Cover the entire foil section completely with masking tape. This secures the shape and provides a better surface for the clay to adhere to than slick foil. -
Create the rim:
Roll a small snake of foil and tape it to the very top edge to create a slightly thickened, rounded rim, mimicking the look of hand-thrown pottery.
Cracks happen!
If hairline cracks appear while drying, don’t panic. Mix a tiny bit of fresh clay with extra PVA glue to make a paste, fill the cracks, smooth with a wet finger, and let re-dry.
Step 2: Applying the Clay
-
Mix your batch:
Prepare your paper mache clay. It should be the consistency of soft cookie dough—spreadable but firm enough to hold its shape. -
Wrap the base:
Apply a base layer of clay about 1/4 inch thick all over the vase. I find it easiest to work in sections, smoothing the clay upward from the bottom. -
Smooth the surface:
Dip your fingers in water and smooth out the clay surface. It doesn’t need to be perfect, but aim for an even thickness so the silhouette looks balanced. -
Refine the neck:
Pay special attention to the neck area, blending the clay seamlessly where the bottle meets the foil padding to create that elegant slope seen in the photo.
Step 3: Carving the Texture
-
Wait for the sweet spot:
Let the clay dry slightly until it is leather-hard. It shouldn’t remain mushy, but it needs to be soft enough to carve without cracking. -
Mark vertical guides:
Lightly mark vertical lines from the rim to the base with a pencil or needle tool to ensure your spacing is relatively even before committing to deep cuts. -
Carve the channels:
Using a modeling tool or the back of a butter knife, press firmly and drag downward to create vertical channels. Wiggle the tool slightly to create organic, imperfect edges. -
Detail the texture:
Don’t smooth the carved lines too much. The rough, pebbled texture inside the grooves adds to the aged stone effect. -
Dry completely:
Place the vase in a warm, airy spot to dry. This creates a solid shell. Depending on humidity, this can take 24 to 48 hours.
Add stone texture
Mix a teaspoon of baking soda or fine sand into your white base paint. This adds gritty texture that makes the paper mache look exactly like carved limestone.
Step 4: Finishing Touches
-
Sand the high points:
Once bone dry, use medium-grit sandpaper to gently sand the raised ridges. You want to smooth the outer surface while leaving the carved grooves rough. -
Base coat:
Paint the entire vase with a matte white or off-white acrylic paint. Dab the brush into the grooves to ensure full coverage. -
Antique the rim:
Mix a tiny amount of beige or light brown paint. Lightly brush this onto the rim and diffuse it downwards slightly to simulate wear/exposure. -
Dry brush highlights:
Dip a dry brush into pure white paint, wipe most of it off on a paper towel, and loosely brush over the raised vertical ribs to make the texture pop. -
Seal the work:
Finish with a clear matte spray sealer to protect the paint and give the vase a unified, non-shiny finish resembling bisque ware.
Fill your new vessel with dried pampas grass or wheat stems to complete the organic, serene aesthetic.


What Really Happens Inside the Kiln
Learn how time and temperature work together inside the kiln to transform clay into durable ceramic.
Pedestal Fruit Bowl Centerpiece
This elegant, footed centerpiece combines the classic silhouette of a compote bowl with a charmingly distressed, textured finish reminiscent of aged wood or stone. It’s the perfect vessel for displaying seasonal fruits while adding a hand-crafted, sculptural element to your kitchen counter or dining table.
How-To Guide
Materials
- Paper mache clay (store-bought or homemade)
- Plastic bowl (to use as a mold)
- Sturdy cardboard tube or small plastic cup (for the pedestal base)
- Masking tape
- Plastic wrap (cling film)
- Sandpaper (medium and fine grit)
- White acrylic paint or gesso
- Brown antique wax or thinned brown acrylic paint
- Matte sealant spray or varnish
- Sculpting tools or a butter knife
- Hot glue gun
Step 1: Building the Armature
-
Prep the mold:
Find a plastic bowl with the shape you want for the top section. Flip it upside down and cover the exterior completely with plastic wrap to ensure the clay serves as a release agent later. -
Prepare the base:
Cut your cardboard tube or plastic cup to your desired height for the pedestal stem. If it feels too light, you can pack it tightly with foil or paper to add stability. -
Create the foot:
Cut a circle of cardboard slightly wider than your tube for the bottom of the stand. Hot glue the tube to this circle to create a flared foot, which adds elegance and balance. -
Attach the stem:
Place your wrapped bowl upside down. Center the cardboard stem structure on the bottom of the bowl and secure it temporarily with masking tape, just to check the proportions.
Step 2: Sculpting with Clay
-
Initial clay application:
Take a handful of paper mache clay and flatten it onto the plastic-wrapped bowl. Work in sections, aiming for a thickness of about 1/4 inch. -
Form the rim:
As you reach the edge of the bowl, smooth the clay over the rim. You want an organic, slightly imperfect edge rather than a machine-perfect circle. -
Cover the stem:
Apply clay around your cardboard stem structure. Use extra clay to create a seamless, curved transition where the stem meets the bowl, flaring it out gently. -
Create the base detail:
Add a slightly thicker ring of clay at the very bottom of the foot, sculpting a tiered effect similar to the reference photo. -
Blend the seams:
Dip your fingers in a little water to smooth out any major lumps, but don’t over-smooth. The beauty of this piece lies in its texture. -
Add surface texture:
Before the clay dries, take a sculpting tool or a stiff brush and lightly scratch horizontal lines around the bowl’s exterior to mimic turned wood or brushed stone.
Weight it Down
Paper mache is naturally light. I like to glue a heavy metal washer or a smooth rock inside the hollow cardboard stem before sealing it up to prevent the bowl from tipping over.
Step 3: Finishing and Painting
-
Slow drying:
Let the sculpture dry completely. This can take 24-48 hours depending on humidity. Turning a fan on nearby helps circulate air. -
Remove the mold:
Once rigid, gently pop the plastic bowl out from the inside. Peel away the plastic wrap. Let the inside dry for a few hours if it feels damp. -
Refine the surface:
Sand any sharp or jagged spikes with medium-grit sandpaper, but leave the gouges and tool marks visible. -
Dry brush painting:
Apply a base coat of white acrylic paint or gesso. Don’t flood the texture; brush it on so it coats the surface but doesn’t fill in every crevice. -
Distressing the finish:
Once the white paint is dry, lightly sand high points to reveal a bit of the raw clay texture underneath. -
Antiquing:
Dip a rag into clear wax mixed with a drop of brown paint (or just watered-down brown paint). Rub it over the bowl and immediately wipe most of it off, leaving dark pigment only in the scratches and grooves. -
Seal the work:
Finish with a matte spray sealant to protect the surface from moisture, especially if you plan to hold real fruit.
Stone Effect
Mix a teaspoon of baking soda or fine sand into your white base paint. This adds a gritty, realistic stone texture that catches the antique wax beautifully.
Now you have a timeless, centerpiece-worthy bowl ready to be filled with your favorite seasonal harvest
Stoneware-Look Planter Cover (Decor Only)
Transform a basic planter into a trendy, high-end decor piece using paper mache clay to mimic the texture of speckled stoneware. This project creates a stunning contrast between raw terracotta and a smooth, modern concrete-like finish without the heavy weight.
Step-by-Step
Materials
- Inexpensive plastic or terracotta pot (clean and dry)
- Paper mache clay (homemade or store-bought)
- White acrylic paint
- Black acrylic paint
- Terracotta colored acrylic paint (or burnt sienna mixed with a touch of orange)
- Matte finish spray sealant
- Sandpaper (medium and fine grit)
- Paintbrushes (flat brush and a stiff-bristled brush)
- Palette or mixing plate
- Water bonding glue (PVA) or gesso (optional base coat)
- Painter’s tape
Step 1: Base Preparation
-
Clean surface:
Begin by thoroughly cleaning your base pot to remove any dust or oils. If the surface is very slick plastic, scuff it lightly with sandpaper to help the clay adhere. -
Apply bonding layer:
Brush a thin layer of PVA glue or gesso onto the exterior of the pot. Let this become tacky but not fully dry.
Step 2: Creating the Clay Form
-
Apply the clay:
Take small chunks of your paper mache clay and press them onto the pot. Spread the layer evenly, aiming for a thickness of about 1/8 to 1/4 inch. -
Smooth the surface:
Dip your fingers in a little water to smooth out the major bumps and fingerprints. While we want a handmade look, the goal here is a relatively uniform cylindrical shape. -
Sharpen the rim:
Pay special attention to the top rim. Flatten it out and square off the edges slightly to mimic the look of a wheel-thrown ceramic vessel. -
Dry thoroughly:
Let the pot dry completely. Depending on the thickness of your clay and humidity, this can take 24-48 hours. It should feel hard and room temperature to the touch when ready.
Smooth Operator
For a glassy ceramic look on the white section, use a high-gloss varnish instead of matte. Keep the terracotta section matte for contrast.
Step 3: Sanding and Refining
-
Initial sanding:
Once dry, use medium-grit sandpaper to knock down any high ridges or rough patches. The paper mache clay sands easily, so use a light hand. -
Fine tuning:
Switch to fine-grit sandpaper to buff the surface until it feels smooth, similar to unglazed bisque ware. Wipe away all dust with a slightly damp cloth.
Texture Trick
Mix a teaspoon of baking soda into the white paint before applying. This adds a subtle graininess that feels like real stoneware.
Step 4: Faux Glazing and Painting
-
Tape the line:
Decide where you want the transition line between the ‘raw clay’ bottom and the ‘glazed’ top. Apply painter’s tape firmly around the circumference of the pot, about one-fifth of the way up from the bottom. -
Paint the bottom:
Paint the area below the tape with your terracotta color. You might need two coats for full opacity. I consider this the ‘exposed clay’ section. -
Mix stoneware color:
On your palette, mix white acrylic paint with a tiny drop of grey or beige to warm it up. This will be the main body color. -
Paint the top section:
Paint the area above the tape with your white mixture. Extend this paint over the rim and slightly inside the pot for a finished look. -
Add the speckles:
Dilute a small amount of black paint with water until it is distinctively runny. Dip a stiff-bristled brush or an old toothbrush into the mixture. -
Splatter technique:
Run your thumb across the bristles to flick tiny speckles onto the white painted section. Practice on a piece of cardboard first to get the density right. -
Remove tape:
Carefully peel off the painter’s tape while the paint is still slightly tacky to ensure a crisp line. If any paint bled through, touch it up with a small detail brush.
Step 5: Finishing Touches
-
Seal the project:
Coat the entire exterior with a matte spray sealant. This protects the water-soluble paper mache from moisture. -
Final assembly:
Place your finished cover over a liner pot or set it on a matching terracotta saucer to complete the illusion.
Place your new planter on a windowsill and enjoy the modern, handcrafted vibe it brings to the room

TRACK YOUR CERAMIC JOURNEY
Capture glaze tests, firing details, and creative progress—all in one simple printable. Make your projects easier to repeat and improve.
Stamped Coasters Made from Paper Mache Clay
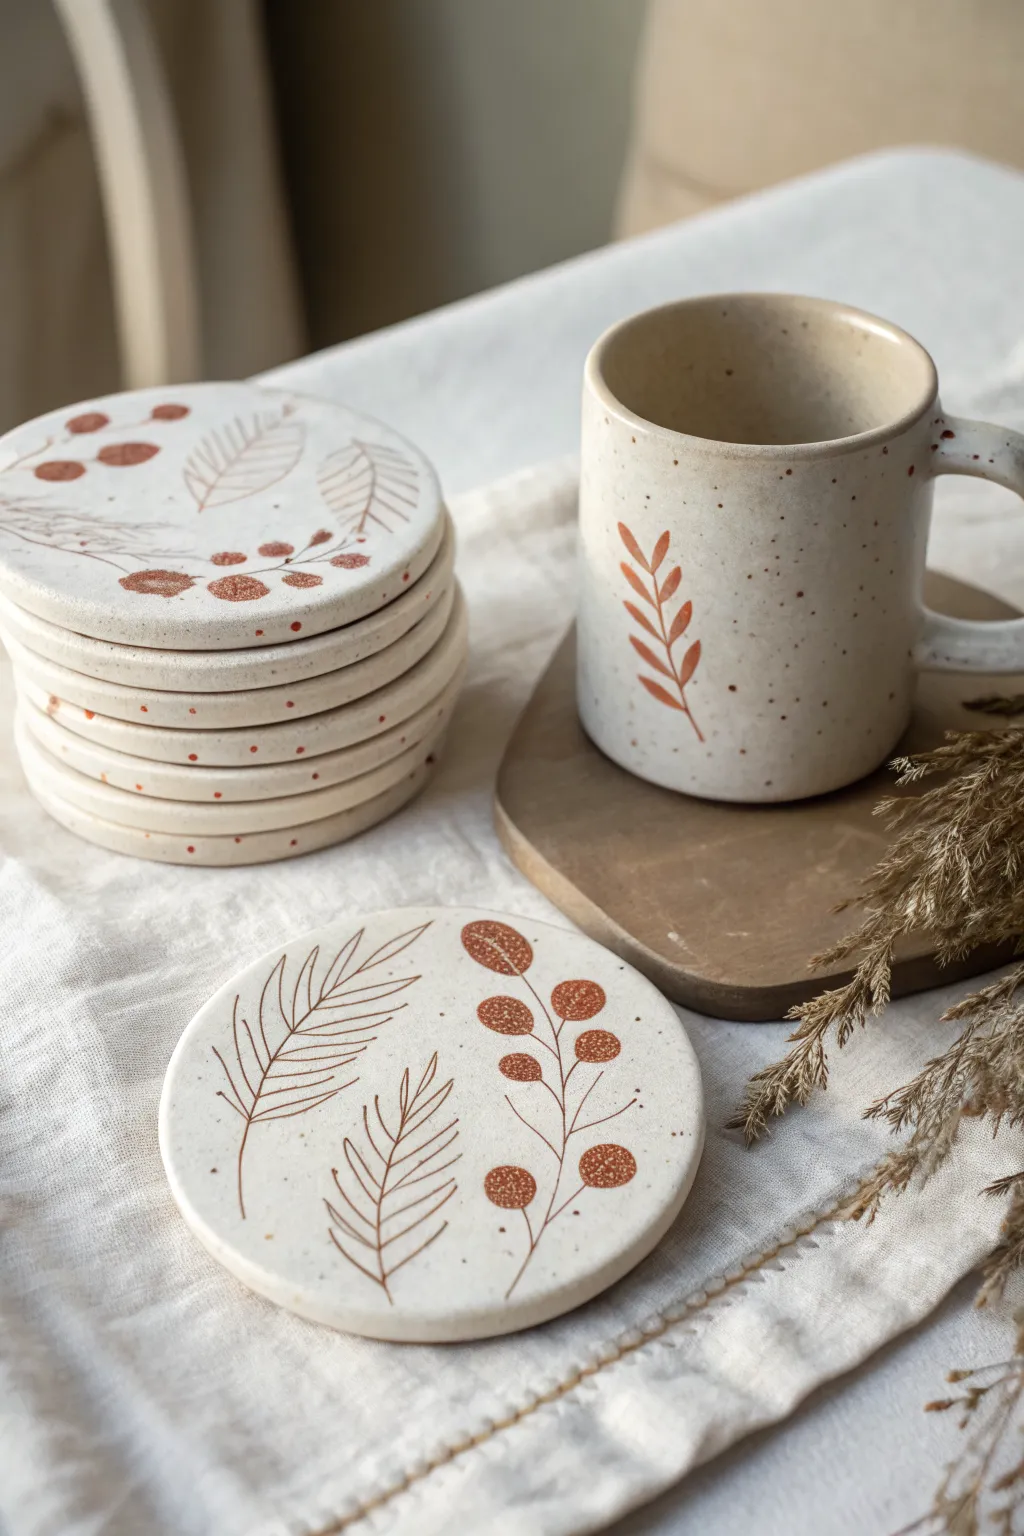
These rustic, nature-inspired coasters mimic the look of speckled ceramic pottery but are surprisingly crafted from paper mache clay. With their warm cream base and delicate rust-colored botanical motifs, they add a cozy, autumnal touch to any coffee table.
How-To Guide
Materials
- Paper mache clay (store-bought or homemade recipe)
- Round cookie cutter (approx. 4 inches / 10 cm)
- Rolling pin
- Parchment paper or non-stick mat
- Fine-grit sandpaper (220 grit)
- Acrylic paints: warm cream/off-white, burnt sienna/rust, brown
- Small flat brush and fine liner brush
- Old toothbrush (for splattering)
- Matte or satin waterproof varnish (essential for coasters)
- Felt pads (optional for bottom)
Step 1: Shaping the Base
-
Prepare the Clay:
Take a handful of paper mache clay and knead it briefly until it is smooth and pliable. If the clay feels too sticky, you can dust your hands with a little cornstarch. -
Roll Out the Slab:
Place the clay between two sheets of parchment paper to prevent sticking. Use a rolling pin to flatten the clay into an even slab, aiming for a thickness of about 1/4 inch (6mm) to ensure durability. -
Cut the Circles:
Press your round cookie cutter firmly into the clay slab. Wiggle it slightly to ensure a clean cut, then lift the cutter. Repeat to make as many coasters as you desire, re-rolling scraps as needed. -
Smooth the Edges:
Dip your finger in a little water and gently run it along the cut edges of each circle to smooth out any roughness or jagged bits left by the cutter. -
Dry Completely:
Lay the clay circles on a flat surface, like a wire rack, to dry. Let them air dry for 24-48 hours, flipping them occasionally to prevent warping. They should be rock hard and completely white/grey when finished.
Step 2: Refining and Painting
-
Sand the Surface:
Once fully dry, lightly sand the surface and edges with fine-grit sandpaper. This creates a professional, ceramic-like finish and prepares the surface for paint. -
Base Coat:
Mix a warm cream or off-white acrylic paint. Apply two even coats to the top, sides, and bottom of each coaster, allowing the first coat to dry before adding the second. -
Create the Speckle Effect:
Dilute a small amount of brown paint with water until it’s inky. Dip an old toothbrush into the mixture, hold it over the coasters, and run your thumb across the bristles to flick tiny speckles onto the surface. Let this dry completely.
Warp Warning
If your coasters start to curl up while drying, simply place a heavy book on top of them once they are partially dry (firm but still cool to the touch) to flatten them back out.
Step 3: Adding the Design
-
mix the Botanical Color:
On your palette, mix burnt sienna with a touch of brown to create a warm, earthy rust tone. This will be used for all the line work. -
Paint the Stems:
Using your finest liner brush, paint thin, curving lines to act as the central stems for your leaves. I like to vary the curvature slightly on each coaster so they look like a unique set rather than identical copies. -
Add Leaf Outlines:
Switching to the leaf motifs, paint simple almond shapes attached to the stems. Keep the lines delicate and thin to mimic the look of fine ink illustration. -
Detail the Leaves:
Inside the leaf outlines, paint fine diagonal lines to represent veins. Depending on the design, you might leave some leaves open and fill others with a solid wash of diluted rust paint. -
Add Berry Accents:
For the berry sprigs, paint small solid circles at the ends of the stems. To give them texture like the photo, dab the brush gently to create a slightly stippled look within the circle.
Make It a Set
Don’t stop at coasters! Before the clay dries, roll a rectangular slab and mold it around a plain cylinder glass to create a matching pen holder or utensil jar for your desk.
Step 4: Sealing and Finishing
-
Dry the Artwork:
Allow your painted botanical designs to cure for at least an hour to ensure the paint creates a strong bond with the base layer. -
First Varnish Coat:
Apply a coat of waterproof varnish over the entire coaster. This is crucial as coasters must resist moisture from cups. -
Second Sealing Coat:
Once the first coat is dry, apply a second layer of varnish, paying special attention to the edges to ensure a watertight seal. -
Add Bottom Protection:
Stick small felt pads or a circle of cork to the bottom of each coaster to protect your furniture and provide a finished feel.
Now you have a stunning set of faux-ceramic coasters ready to hold your favorite tea or coffee
Texture Tiles for Wall Art Grids
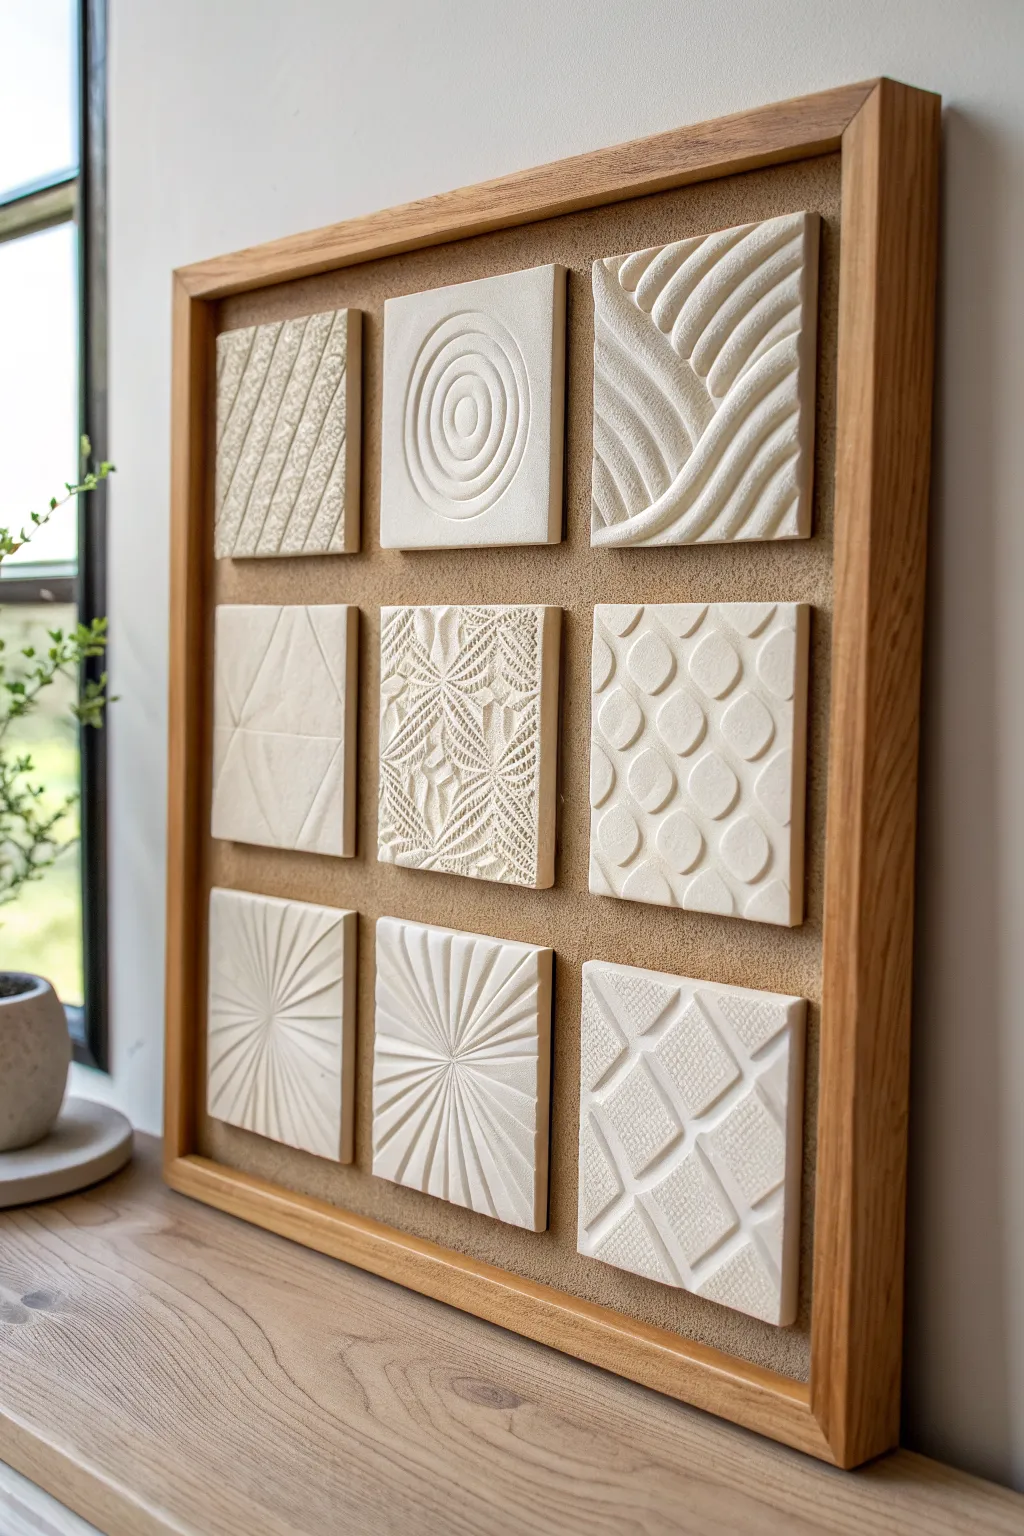
Elevate your space with this sophisticated wall art grid featuring nine distinct textured tiles made from paper mache clay. The monochromatic cream palette lets the mesmerizing relief patterns take center stage, creating a modern, tactile masterpiece.
Step-by-Step Guide
Materials
- Paper mache clay (store-bought or homemade)
- Rolling pin
- Two 1/4 inch thick wood slats (for depth guides)
- Square cookie cutter (approx. 4×4 inches) or ruler and knife
- Modeling tools (circular tubing, knife, stylus, comb)
- Lace or textured fabrics (for pressing)
- Sandpaper (fine grit)
- Square wood frame (deep shadow box style)
- Cork sheet or heavy biege textured cardstock (for backing)
- Strong craft glue (e.g., E6000 or heavy-duty PVA)
- Cream or off-white acrylic paint (matte finish)
- Flat paintbrush
Step 1: Preparation & Base Creation
-
Prepare your clay:
Begin by kneading your paper mache clay until it is smooth, pliable, and free of lumps. If using homemade clay, ensure the binder and paper pulp are fully integrated. -
Roll out the slab:
Place your clay between two 1/4-inch wood slats on a non-stick surface. Roll the rolling pin over the slats to ensure a perfectly even thickness across the entire slab. -
Cut the squares:
Using a square cookie cutter or a ruler and sharp knife, cut out nine identical squares. I find it helpful to cut one or two extra squares as backups in case a pattern doesn’t turn out right. -
Smooth the edges:
Dip your finger in a little water and gently run it along the cut edges of each square to remove any sharpness or burrs, creating a clean, professional look.
Warp Prevention
Paper mache clay shrinks as it dries. To keep tiles flat, place a light book over them once they are partially dry (leather-hard) but not fully hardened.
Step 2: Texturing the Tiles
-
Create the diagonal lines:
For the first tile, use a modeling knife or the edge of a ruler to press diagonal indentations into the clay. Vary the spacing slightly to mimic the first tile in the top left. -
Sculpt the concentric circles:
On the second tile, use the back of a paintbrush or a rounded stylus tool. Start from the center and drag the tool in a spiral or concentric circles outward to create the ripple effect. -
Form the organic waves:
For the third tile, use a thicker rounded tool or your finger to press deep, curved channels that flow diagonally across the square, resembling sand dunes or flowing water. -
Imprint geometric angles:
On a new square, use a flat blade to gently score lines creating large triangles and geometric facets, pressing harder on one side of the line to simulate an angled plane. -
Press the botanical weave:
To recreate the center tile, take a piece of coarse lace, burlap, or a textured doily. Press it firmly into the damp clay with your rolling pin, then carefully peel it back to reveal the intricate impression. -
Stamp the honeycomb pattern:
Use a small oval cutter or the cap of a marker. Press it repeatedly into the clay in staggered rows to create the scale-like, honeycomb texture seen on the middle-right tile. -
Carve the starbursts:
For the bottom-left and bottom-center tiles, use a fine knife tool. Locate a center point (offset or true center) and carve radiation lines outward. Make the grooves deeper near the center and shallower at the edges. -
Sculpt the cross-hatch grid:
For the final tile, use a flat modeling tool to press deep, intersecting diagonal lines, creating a quilted or diamond-grid appearance.
Level Up: Luxe Metallic
After the cream paint dries, use a dry brush technique with a tiny amount of gold wax or paint just on the highest raised ridges for a glamorous touch.
Step 3: Finishing & Assembly
-
Dry the tiles:
Place all textured tiles on a wire rack to air dry. This might take 24-48 hours depending on humidity. Flip them occasionally to prevent warping. -
Sand imperfections:
Once bone dry, take fine-grit sandpaper and very lightly sand the edges and surface high points to refine the finish without erasing your textures. -
Prime and paint:
Apply a coat of white primer if your clay is dark. Then, paint each tile with a matte cream acrylic paint. The matte finish helps the shadows defined by your textures pop. -
Prepare the backing board:
Cut your cork sheet or textured cardstock to fit exactly inside your wooden frame. Glue this securely to the frame’s backing board. -
Arrange the layout:
Before gluing, lay your tiles onto the backing board to check the spacing. Ensure the margins between tiles and the frame edge are equal. -
Mount the tiles:
Apply a generous dab of strong craft glue to the back of each tile. Press them firmly into place on the cork backing, holding for a moment to ensure initial adhesion. -
Final frame assembly:
Once the glue is fully cured, place the mounted artwork into the wood frame and secure the back.
Hang your new textured art grid in a well-lit spot to watch the shadows play across the reliefs throughout the day
Lightweight Hanging Ornaments and Gift Tags
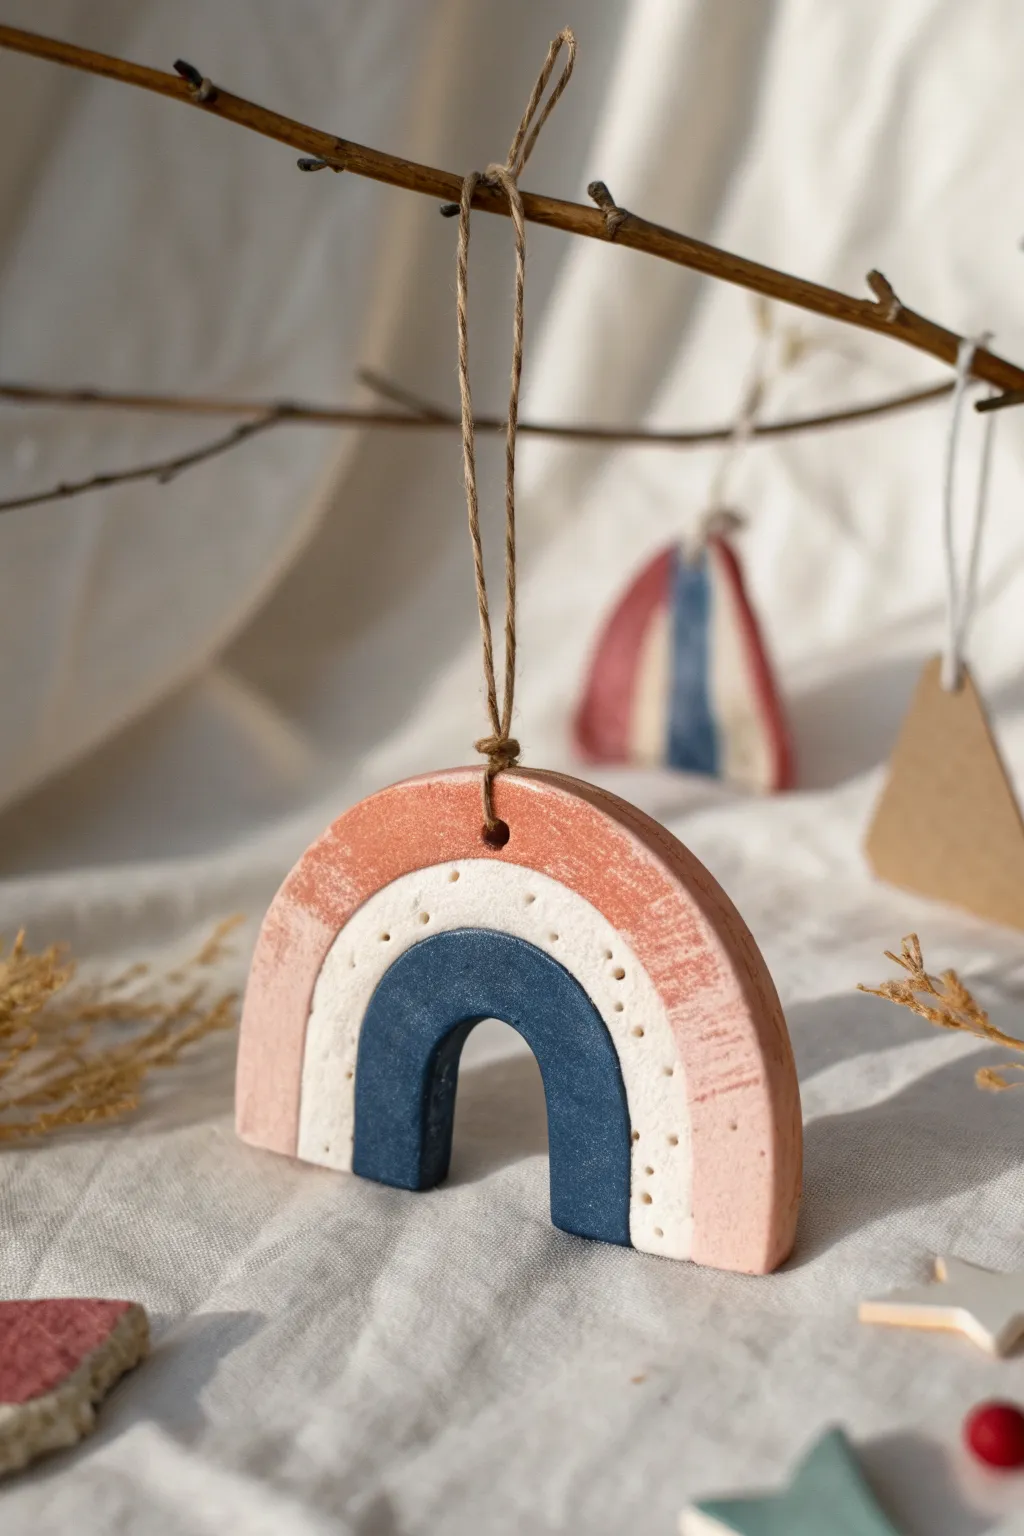
These charming rainbow arches serve as perfect lightweight ornaments or unique gift toppers, featuring a delightful handmade texture. Their muted, earthy palette of dusty pink, speckled white, and deep indigo gives them a modern bohemian feel that stands out from traditional shiny baubles.
Step-by-Step Tutorial
Materials
- Paper mache clay (homemade or store-bought)
- Rolling pin
- Parchment paper or silicone mat
- Knife or clay cutting tool
- Round cookie cutters (various sizes) or a drinking glass
- Toothpick or skewer
- Acrylic paints (Dusty Pink, Indigo Blue, White)
- Small flat paintbrush
- Jute twine
- Fine-grit sandpaper (optional)
Step 1: Shaping the Clay
-
Prepare the workspace:
Lay down your parchment paper or silicone mat to prevent sticking. Take a handful of paper mache clay and knead it briefly until it is pliable and smooth. -
Roll out the slab:
Using a rolling pin, flatten the clay to an even thickness of about 1/4 inch (6-7mm). Try to keep the thickness consistent so the ornament dries evenly. -
Cut the outer arch:
Use a large round cutter or trace around a wide glass to cut a perfect semi-circle shape. If using a full circle cutter, cut the resulting circle in half to create two rainbow bases. -
Create the inner arch:
Take a much smaller cutter or bottle cap and remove a semi-circle from the bottom center of your rainbow shape. This creates the legs of the rainbow. -
Smooth the edges:
Dip your finger in a little water and gently run it along the cut edges of the clay to smooth out any roughness or loose paper fibers. -
Add the hanging hole:
Use a skewer or toothpick to poke a hole at the very top center of the rainbow. Wiggle it slightly to ensure the hole is large enough for your twine to pass through later. -
Texture the middle band:
To mimic the dotted detail in the photo, take your toothpick and gently press a row of indentations into the clay where the white stripe will eventually be painted. Follow the curve of the arch. -
Dry the ornament:
Place the piece in a warm, dry spot. Depending on humidity and thickness, paper mache clay can take 24-48 hours to dry completely. Flip it over halfway through the process to prevent warping.
Warping Woes?
If the clay edges curl up while drying, gently weigh the nearly-dry pieces down with a heavy book (use parchment paper in between!) for the final few hours.
Step 2: Painting and Finishing
-
Base coat (optional):
If your clay is grey or uneven in color, paint the entire front face white first to make the subsequent colors pop. Let this dry completely. -
Paint the outer arch:
Mix a dusty pink or terra cotta shade. Using a flat brush, paint the outermost curve of the rainbow. I like to keep the brush fairly dry to achieve that slightly rustic, textured look seen in the image. -
Paint the inner arch:
Paint the smallest, innermost arch with a deep indigo or navy blue. Use the edge of your flat brush to create a clean line against the middle section. -
Paint the middle section:
Fill in the middle stripe with creamy white paint. Be careful not to fill in the little pierced dots completely; let the shadow inside them remain visible for texture. -
Refine the edges:
Check the sides of the ornament. You can either paint them to match the adjacent stripes or paint the entire edge a solid color for a cleaner finish. -
Seal the piece (optional):
Once the paint is fully dry, you can apply a matte varnish if you want extra durability, though leaving it unsealed preserves the matte, papery texture. -
Attach the twine:
Cut a length of jute twine about 8 inches long. Thread it through the hole at the top. -
Secure the loop:
Tie a simple knot at the base of the twine, close to the ornament, and then tie the loose ends together at the top to create a hanging loop.
Texture Pro Tip
For a rougher, stonelike surface, don’t sand the dried clay perfectly smooth. Dab your paint on with a sponge rather than stroking it to enhance the grain.
Hang your new handcrafted rainbow on a branch or gift it to a friend to brighten their day
Simple Face Masks with Raised Features
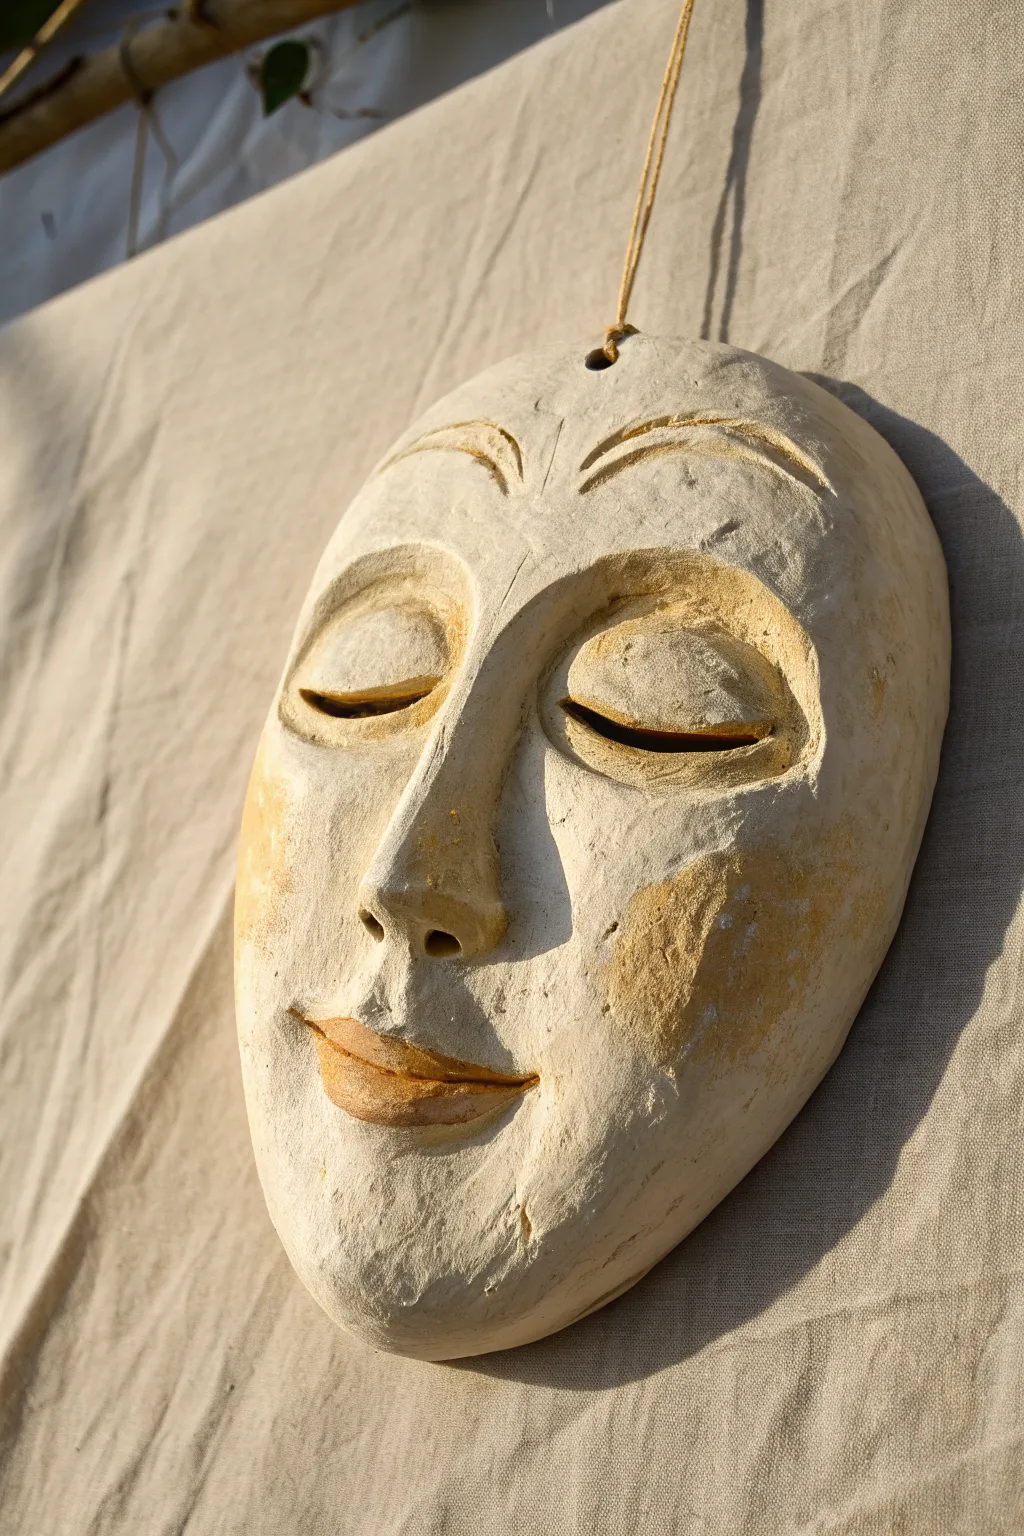
Capture a moment of peaceful resolve with this elegant, sleeping face mask project. Using paper mache clay, you will sculpt raised features like heavy eyelids and a carved mouth to create a piece that feels both ancient and artistic.
Step-by-Step
Materials
- Plastic face form or DIY cardboard base
- Paper mache clay (homemade or store-bought)
- Petroleum jelly (vaseline)
- Bowl of water
- Sculpting tools (or a butter knife and spoon)
- Fine grit sandpaper
- Gesso or white acrylic primer
- Acrylic paints (Cream, Raw Sienna, Gold)
- Matte sealant spray
- Twine or heavy cord for hanging
Step 1: Base Preparation
-
Prepare your mold:
Start by selecting a plastic face mask form to use as a mold. If you don’t have one, you can build a simple armature using cardboard and foil to create the general convex curve of a face. -
Apply release agent:
Generously coat the entire surface of your form with petroleum jelly. This crucial step ensures your paper mache clay won’t permanently bond to the plastic mold. -
Create the foundation layer:
Take a handful of paper mache clay and flatten it into a pancake about 1/4 inch thick. Press this firmly over the mask form, smoothing it out to cover the entire face area evenly.
Cracking Up?
If small cracks appear as the clay dries, don’t panic. Mix a small amount of fresh clay with water to make a paste and fill the cracks. Smooth over with a wet finger.
Step 2: Sculpting Features
-
Build the nose bridge:
Roll a snake of clay and place it vertically down the center to build up the nose. Use wet fingers to smooth the edges into the base layer, shaping a straight, prominent nose bridge. -
Shape the brow ridge:
Add two small arcs of clay above the eye area to create raised eyebrows. Use a sculpting tool to carve a clean line underneath them, giving the impression of a carved statue. -
Form the sleeping eyes:
Roll two balls of clay, flatten them slightly, and press them into the eye sockets. These should be bulky to represent closed eyelids. -
Detail the eyelids:
Take a sculpting tool or a dull knife to carve a deep, horizontal slit across the middle of each eye mound. This defines the meeting point of the upper and lower lids. -
Refine the mouth:
Add a small oval of clay for the mouth area. Smooth it onto the face, then use your tool to press a gentle smile line into the center, slightly upturning the corners. -
Create the lip volume:
Use your fingers to pinch and shape the clay above and below the smile line, creating fullness in the lips. The goal is a simplified, stylized look rather than hyper-realism.
Step 3: Drying and Refining
-
Initial drying:
Allow the mask to dry on the form for at least 24-48 hours. Place it in a warm, dry spot with good airflow to speed up the process. -
Remove from mold:
Once the outer surface feels hard, carefully pop the mask off the plastic form. The inside might still be damp, so let it sit upside down for another day to dry completely. -
Sand the surface:
Use fine-grit sandpaper to knock down any sharp ridges or overly rough bumps. I like to leave some texture rather than making it perfectly smooth, as it adds to the stone-like effect. -
Drill hanging hole:
Carefully drill or twist a hole at the very top center of the forehead using a small craft drill or awl. This is where your hanging cord will go.
Add Ancient Charm
For a more weathered relic look, mix fine sand into your gesso primer before painting. This creates a gritty, stone-like texture that catches the antiquing wash beautifully.
Step 4: Painting and Finishing
-
Prime the surface:
Coat the entire mask, front and back, with a layer of gesso or white acrylic primer. This seals the paper clay and provides a uniform base for painting. -
Base coat application:
Mix a Cream or Off-White acrylic paint and apply a solid coat over the whole face. Let this dry completely. -
Apply the antiquing wash:
Dilute Raw Sienna paint with water until it’s very thin. Brush this wash over the textured areas—around the eyes, nose, and hairline—and immediately wipe most of it off with a rag. This leaves color in the crevices. -
Highlighting with dry brushing:
Dip a dry brush into a tiny amount of metallic Gold or a lighter Cream paint. Lightly whisk it over the raised areas like the nose tip, lips, and brows to make them pop. -
Seal the artwork:
Once you are happy with the paint job, spray the mask with a matte sealant to protect the finish from moisture and dust. -
Add the hanger:
Thread a piece of rustic twine or cord through the hole in the forehead and tie a secure knot to finish your wall hanging.
Hang your serene mask in a quiet corner to bring a sense of calm to the space
Animal Figurines Over Cardboard Armatures
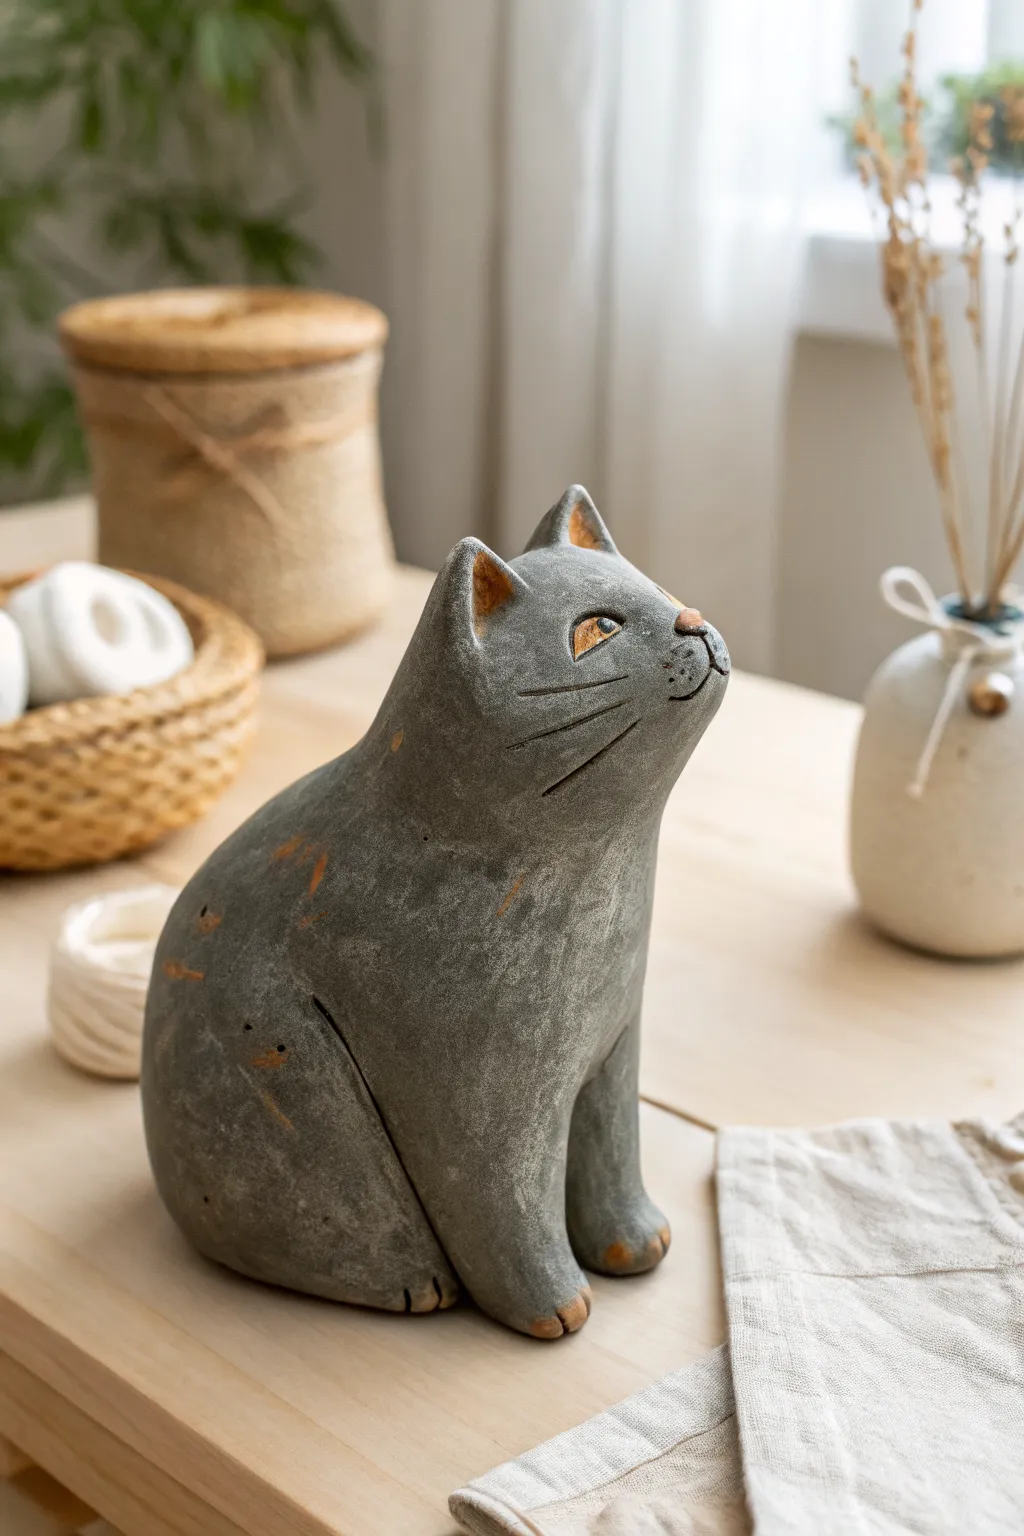
This charming, rustic cat figurine captures a serene moment with its upward gaze and gentle smile. By using a paper mache clay over a simple cardboard armature, you’ll create a durable, stone-like texture that brings this feline friend to life.
Step-by-Step Tutorial
Materials
- Sturdy cardboard (e.g., corrugated box)
- Masking tape
- Aluminum foil
- Paper mache clay (homemade or store-bought)
- Fine-grit sandpaper
- Acrylic paints: Dark grey, warm brown/ochre, black, white, and translucent orange ink/glaze
- Paintbrushes: Flat brushes for base coats, fine liner brush for details
- Utility knife or scissors
- Hot glue gun
Step 1: Building the Armature
-
Cut the silhouette:
Begin by drawing a simple side-profile silhouette of a sitting cat onto your cardboard. It should include the curve of the back and the head, but leave off the ears for now. Cut this shape out. -
Bulk up the body:
Crumple sheets of aluminum foil into tight balls and logs. Hot glue these onto both sides of your cardboard cutout to build up the rounded belly, chest, and haunches. Aim for a pear-like shape that is heavier at the bottom. -
Form the head:
Add more foil to the head area, shaping it into a rounded, slightly flattened sphere. Make sure the transition from the neck to the head is smooth but distinct. -
Secure with tape:
Wrap the entire foil form completely in masking tape. This secures the aluminum and provides a surface that the clay will adhere to easily. ensure there are no loose bits of foil poking out. -
Shape the ears:
Cut two small triangles from cardstock or cereal box cardboard. Fold them slightly to create a curve and hot glue them to the top of the head. Reinforce the attachment point with a little more tape.
Cracking Clay?
If hairline cracks appear while drying, don’t panic. Mix a small slurry of fresh clay and water, press it into the cracks, and smooth over. It adds character.
Step 2: Sculpting with Clay
-
Apply the base layer:
Take a handful of paper mache clay and roll it into a thin sheet or press it flat. Cover the entire armature with a layer about 1/4 inch thick. Use a little water on your fingers to smooth out joins. -
Refine the shape:
While the clay is wet, refine the curves of the back and chest. I like to gently stroke the clay upwards from the base to the neck to ensure a seamless, flowing line. -
Add the legs:
Add small, elongated rolls of clay to the front to suggest the front legs. Blend the top of these rolls into the chest so they don’t look stuck on, but rather part of the body. -
Sculpt the face:
Add tiny bits of clay to build up the muzzle area. Use a modeling tool or a toothpick to indent the mouth line and create the separation for the nose. -
Create texture:
Before the clay dries, use a stiff bristle brush to gently tap the surface. This creates a subtle stone-like texture rather than perfectly smooth plastic. Let the sculpture dry completely (this may take 24-48 hours).
Weight It Down
Before sealing the armature with tape, glue a heavy washer or stone into the base of the foil. This prevents your cat from tipping over easily.
Step 3: Sanding and Painting
-
Sand for finish:
Once bone dry, use fine-grit sandpaper to knock down any sharp ridges or bumps. You don’t want it perfectly smooth, just pleasant to hold. -
Base coat:
Paint the entire cat with a warm brown or ochre acrylic paint. This will be the ‘under color’ that shows through later to give it that rustic, vintage feel. Let this dry fully. -
Apply the grey layer:
Mix a charcoal grey paint. Apply it over the brown layer, but keep the brush relatively dry (dry-brushing technique) so the brown peeks through in the textured areas and crevices. -
Distress the surface:
If the grey is too solid, take a damp rag or piece of fine steel wool and gently rub areas like the knees, ears, and back to reveal more of the brown base coat. -
Paint the details:
Use a fine liner brush and black paint to carefully paint the whiskers, the mouth line, and the nose. Add small dots for whisker pores on the muzzle. -
Define the ears:
Paint the inside of the ears with the warm brown/ochre mix, blending it slightly into the grey at the edges for a natural transition. -
Bring eyes to life:
Paint the eye shapes with a yellow-orange tone. Once dry, add a black pupil and a tiny white highlight dot to give the cat a focused, lively gaze. -
Seal the work:
Finish with a clear matte varnish to protect the paint and unify the finish without making it shiny.
Place your finished feline on a windowsill or shelf where it can gaze contentedly at the room
Whimsical Mushrooms with Speckled Caps

Bring a touch of the forest floor indoors with this charming trio of paper mache mushrooms. Their textured stems and warm, earthy caps look surprisingly realistic, making them perfect for a nature-inspired mantle or shelf display.
How-To Guide
Materials
- Aluminum foil (heavy duty is best)
- Masking tape
- Paper mache clay (pre-made or homemade recipe)
- Thick gauge armature wire (for the tall mushroom)
- Cardboard (cereal box thickness)
- Acrylic paints: Titanium White, Burnt Umber, Raw Sienna, Yellow Ochre, Burnt Sienna
- Stiff bristle brushes (for texture)
- Soft synthetic brushes (for blending)
- Sculpting tools or a toothpick
- Fine grit sandpaper
- Matte spray varnish
Step 1: Building the Armature
-
Forming the stems:
Begin by crumpling aluminum foil into sturdy log shapes. For the tallest mushroom, create a core using a piece of heavy armature wire first, bending the bottom into a loop for stability, then wrap foil tightly around it to build bulk. -
Creating the cap bases:
Cut three circles out of cardboard corresponding to your desired cap sizes. Cut a slit to the center of each circle and overlap the edges slightly to create shallow cones, securing them with masking tape. -
Bulking up the caps:
Place a ball of crumpled foil on top of each cone to create the domed shape. Tape extensively to smooth out the transition from foil to cardboard, ensuring a nice rounded profile. -
Assembly:
Attach the stems to the underside of the caps using generous amounts of masking tape. The connection needs to be rigid so the head doesn’t wobble during clay application.
Step 2: Sculpting with Clay
-
Applying the base layer:
Spread a thin, even layer of paper mache clay over the entire mushroom armature. Working in sections prevents the clay from drying out too quickly. -
Texturing the stems:
Add a second, slightly thicker layer of clay to the stems. While wet, drag a stiff sculpting tool or fork vertically down the stem to mimic the fibrous, rough texture of a real mushroom stalk. -
Refining the caps:
Smooth a layer of clay over the caps. Unlike the stems, these should be relatively smooth but imperfect. Use a damp finger to soften any harsh ridges. -
Detailing the gills:
For the largest mushroom, add a rim of clay under the cap edge. Use a toothpick to impress fine lines radiating from the stem to the edge, simulating gills. -
Drying time:
Allow the mushrooms to dry completely. This can take 24-48 hours depending on humidity. Flip them occasionally so the bottom of the base dries evenly.
Clay Cracking?
Minimal cracking fits the rustic look, but large cracks can be filled with a wet mixture of drywall joint compound and glue, then sanded smooth.
Step 3: Painting and Finishing
-
Base coating:
Apply a solid coat of Titanium White mixed with a tiny drop of Yellow Ochre to the stems. This off-white base creates a natural, organic starting point. -
Washing the stems:
Mix a watery wash of watered-down Burnt Umber. Brush this over the textured stems and immediately wipe most of it away with a rag. The dark paint will remain in the crevices, highlighting the texture you sculpted. -
Painting the caps:
For the largest cap, start with a base of Yellow Ochre. While wet, blend in Burnt Sienna around the rim and center to create a baked bread look. For the smaller ones, use more Burnt Sienna for a reddish tone. -
Adding the cap texture:
I like to use a nearly dry stiff brush to stipple darker brown specks onto the larger cap to give it that porous, organic feel. -
Creating the speckles:
For the smallest mushroom (the fly agaric style), use a small round brush to dab distinct white spots onto the reddish-brown cap. -
Painting the soil line:
Dab a mix of grey and brown paint at the very bottom of the stems to make them look like they were just plucked from the ground. -
Sealing the work:
Once fully dry, spray all three mushrooms with a matte varnish. This protects the paint and eliminates any unnatural shine from the acrylics.
Glow Up
Hide a small battery-powered LED tea light inside the hollow underside of the largest mushroom cap for a magical, glowing forest nightlight.
Arrange your trio on a rustic wooden board or near a window to enjoy their quiet, woodland charm every day.
Chunky Bead Garland in Soft Matte Colors
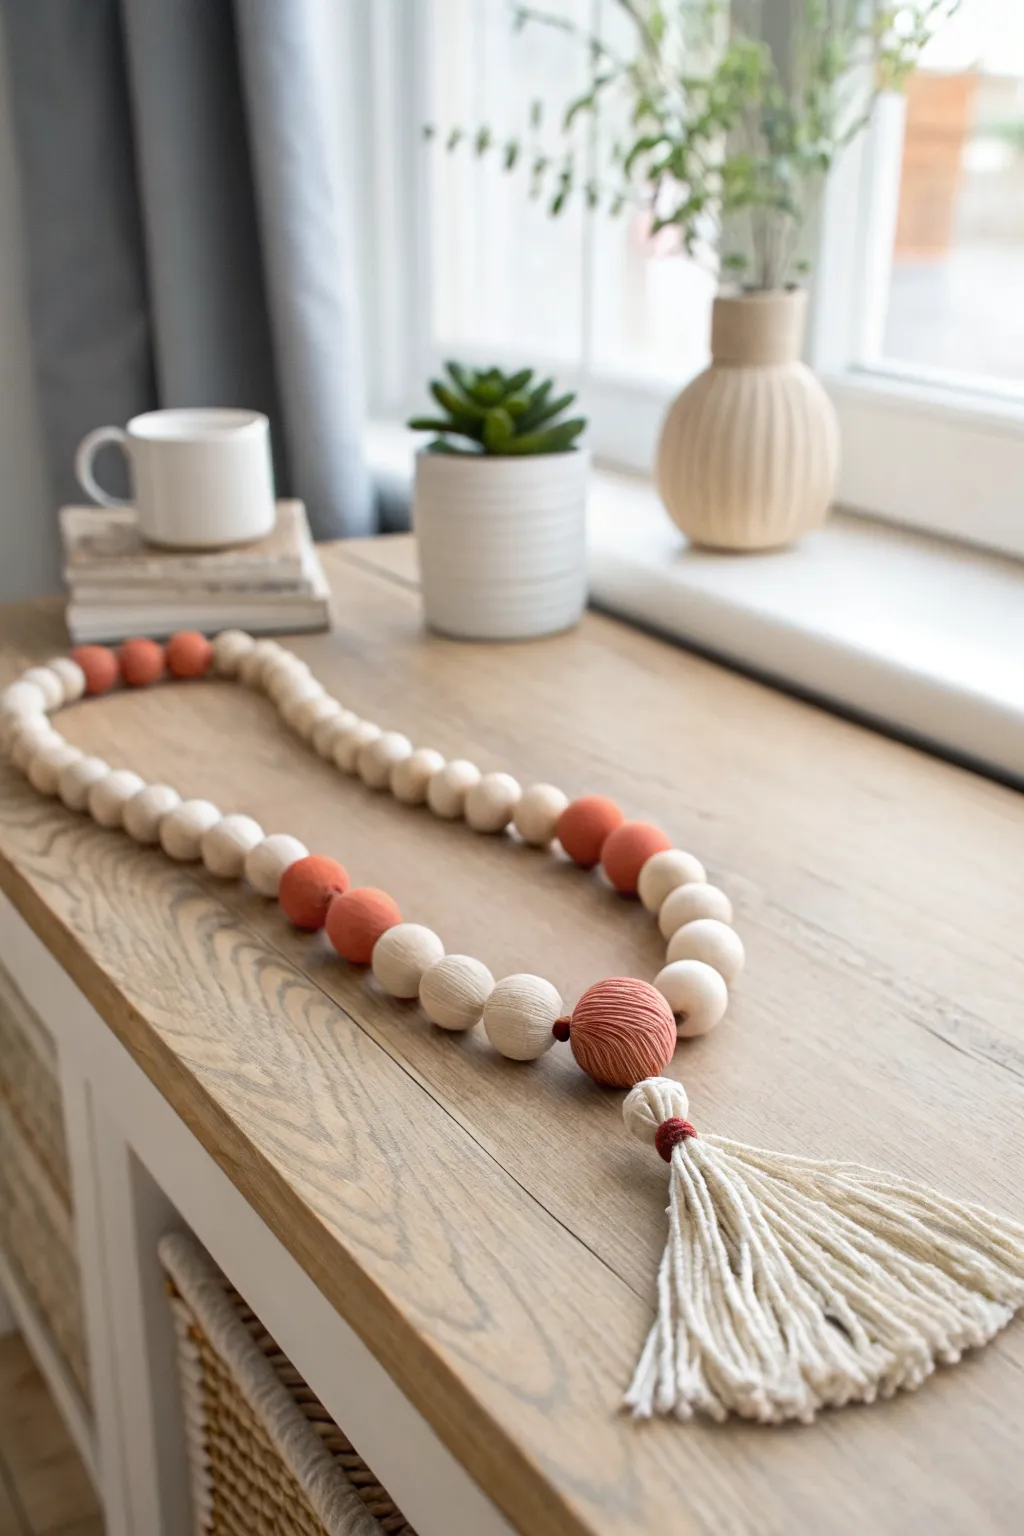
Embrace the soft, earthy textures of this chunky bead garland, featuring soothing tones of cream and muted terracotta. Created with homemade paper mache clay, these beads offer a uniquely organic feel that store-bought wooden beads simply can’t replicate.
Step-by-Step Guide
Materials
- Paper mache clay (homemade or premade)
- Small wooden skewers or knitting needle
- Fine-grit sandpaper (220 grit)
- Acrylic craft paints (creamy white, soft terracotta/coral)
- Matte sealant spray or matte varnish
- Cotton twine or thin macramé cord
- Large embroidery needle
- Painter’s tape or Styrofoam block (for drying)
- Scissors
Step 1: Shaping the Beads
-
Prepare your clay:
Begin with a batch of smooth paper mache clay. Knead it briefly in your hands to ensure it is pliable and free of large air bubbles. If it feels too sticky, dust your hands lightly with cornstarch. -
Roll spheres:
Pinch off portions of clay roughly the size of a walnut. Roll them between your palms to create smooth spheres. Aim for a mix of sizes: larger beads for the center focal points and slightly smaller ones for the ends. -
Create the piercing:
While the clay is still wet, gently push a wooden skewer or knitting needle through the center of each sphere. Ensure the hole is wide enough to accommodate your specific twine or cord. -
Smooth the edges:
Before removing the skewer, gently tap the bead ends to flatten the opening slightly, which helps them sit flush against each other later. -
Dry completely:
Leave the beads on the skewers and prop them up across a bowl, or stick the skewers into a Styrofoam block. Let them dry for at least 24-48 hours. I find turning them halfway through helps them dry evenly.
Cracking Clay?
If minor cracks appear while drying, don’t panic. Fill them with a tiny smudge of fresh wet clay or spackle, let dry, and sand smooth before painting.
Step 2: Refining and Painting
-
Sand for smoothness:
Once fully cured and hard, slide the beads off the skewers. Use 220-grit sandpaper to buff away any ridges or rough spots, focusing on the area around the holes. -
Wipe clean:
Use a dry cloth or a soft brush to remove all sanding dust. A clean surface is crucial for that smooth, matte finish we want. -
Mix your palette:
Prepare your acrylic paints. You’ll need a creamy off-white and a soft, muted terracotta or coral. For the textured yarn-wrapped look on the larger bead, choose a paint color that matches your yarn. -
Apply base coats:
Paint the majority of your beads in the creamy white shade. Use a skewer to hold the bead while painting to avoid messy fingerprints. It usually takes two thin coats for full opacity. -
Add accent colors:
Paint a selected number of beads—about 8 to 10 depending on length—in the terracotta shade. Let all paint dry completely between coats. -
Seal the finish:
Spray or brush on a clear matte sealant. This protects the clay and locks in that chalky, modern aesthetic without adding unwanted shine.
Step 3: Creating the Tassel and Assembly
-
Wrap the focal bead:
Take your largest bead (or a specifically reserved large one) and apply a dab of strong glue near the hole. Tightly wrap cotton embroidery thread or thin yarn around the bead until the surface is completely covered, creating a textured feature bead. -
Construct the tassel:
Wrap your cotton twine around a piece of cardboard (about 5-6 inches long) roughly 30 times. Slide the loops off carefully. -
Tie the tassel neck:
Cut a separate piece of twine and tie it tightly around the top quarter of the loops to create the tassel ‘head.’ Use a contrasting terracotta string for a decorative touch if desired. -
String the garland:
Thread a long length of twine onto a large needle. Begin stringing your painted beads, alternating patterns between the cream and terracotta beads. -
Attach the focal point:
Once the main garland is strung, thread the wrapped texture bead last, followed immediately by tying the twine securely to the top of your tassel. -
Trim and finalize:
Cut the bottom loops of the tassel and trim the fringe so it is straight and even. Ensure the knot connecting the garland to the tassel is hidden inside the large wrapped bead if possible.
Scented Beads
Mix a few drops of essential oil into the clay dough before rolling. The porous nature of the paper clay holds scent beautifully for a subtle room fragrance.
Drape your finished garland over a bowl or coffee table books to add an instant touch of serene, handmade charm to your space
Faux Marble Chain Links That Look Heavy
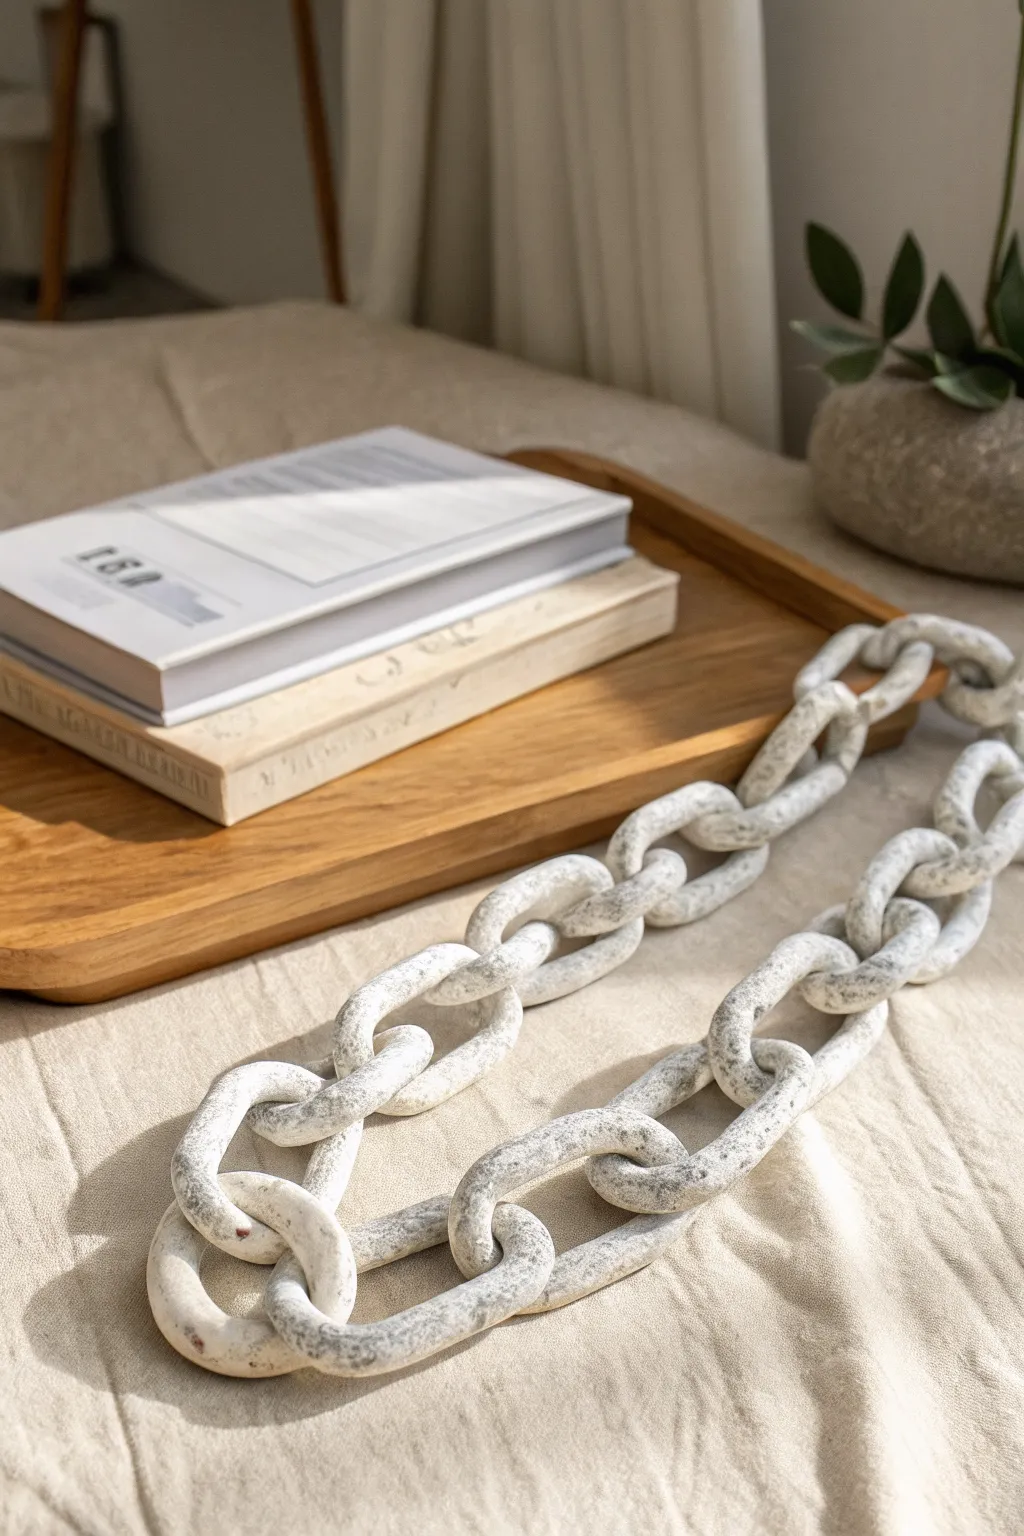
These substantial chain links add an immediate sculptural element to your coffee table or bookshelf, channeling the high-end look of heavy stone without the weight. By manipulating paper mache clay and using a specific speckled painting technique, you can create a realistic faux marble finish that feels surprisingly sturdy.
Detailed Instructions
Materials
- Paper mache clay (store-bought or homemade recipe)
- Aluminum foil
- Cardboard tubes (empty toilet paper or paper towel rolls)
- Masking tape
- Sandpaper (medium and fine grit)
- White acrylic paint or gesso
- Light gray acrylic paint
- Charcoal gray acrylic paint
- Old toothbrush
- Matte finish sealant spray
- Rolling pin
- Clear plastic sheet or wax paper
Step 1: Building the Armature
-
Prepare the core:
Cut your cardboard tubes into 1-inch wide rings. You will need one ring for every link you plan to make. Feel free to squish them slightly into ovals if you prefer an elongated chain look. -
Bulking up:
Crumple aluminum foil into long snakes. Wrap these foil snakes tightly around the cardboard rings to build volume. Aim for a thickness of about 3/4 of an inch all the way around. -
Securing the shape:
Wrap the foil-covered rings completely with masking tape. This prevents the foil from springing back and gives the paper mache clay a better surface to adhere to than slick metal. -
Plan the connection:
Remember that you need to link them as you build. When wrapping your subsequent rings, you must cut the cardboard and foil to slip them through the previous finished link before taping them shut.
Cracking Clay?
Make a slurry by mixing a small chunk of fresh clay with water. Paint this paste into any cracks, smooth it out with a wet finger, and let it dry again before sanding.
Step 2: Sculpting with Clay
-
Roll the clay:
Sandwich a large ball of paper mache clay between two sheets of plastic or wax paper. Use a rolling pin to flatten it into a long strip, roughly 1/4 inch thick. -
Wrap the first link:
Take your clay strip and wrap it around the outside of your first taped ring. Smooth the seam where the clay edges meet with a little water on your finger. -
Smooth the interior:
Push the clay into the center of the ring. You might need to add small snakes of clay to the inner curve if the outer wrap didn’t reach all the way around. Blend all seams thoroughly so it looks like one solid piece. -
Connect and repeat:
For the next links, you have to work carefully. Thread the foil armature through the finished clay link *before* applying the clay layer. I find it easiest to work on a non-stick surface so the wet clay doesn’t grab onto the table. -
Drying time:
Let the chain dry completely. Paper mache clay is dense, so this can take 24 to 48 hours depending on humidity. Flip the chain occasionally so air reaches all sides.
Step 3: Refining and Painting
-
Sanding:
Once bone dry, use medium grit sandpaper to knock down any large bumps or ridges. Follow up with fine grit sandpaper to create a surface smooth enough to mimic stone. -
Base coat:
Paint the entire chain with two coats of white acrylic paint or gesso. Let the first coat dry fully before applying the second to ensure solid coverage. -
Creating dimension:
Mix a tiny amount of light gray paint with water to make a very sheer wash. Dab this randomly over the white links with a rag, then immediately wipe most of it off. This creates faint shadowing. -
The splatter technique:
Dilute your charcoal gray paint slightly. Dip an old toothbrush into the paint, point the bristles toward the chain, and run your thumb along the bristles to spray fine speckles across the surface. -
Varying the stone effect:
Repeat the splatter process with the light gray paint, and perhaps a tiny bit of plain white, to create depth in the texture. Don’t overdo it; you want to see the white base clearly. -
Seal the deal:
Finish the project by spraying the entire chain with a matte sealant. A glossy finish tends to look plastic, whereas matte preserves the heavy, raw stone aesthetic.
Pro Tip: Weighty Feel
To make the chain feel as heavy as it looks, wrap a few lengths of heavy metal wire around the cardboard core before adding the aluminum foil layer.
Drape your finished faux stone chain over a stack of books or coil it in a wooden tray to add instant texture to your room
Cutout Lanterns for Cozy Light Play
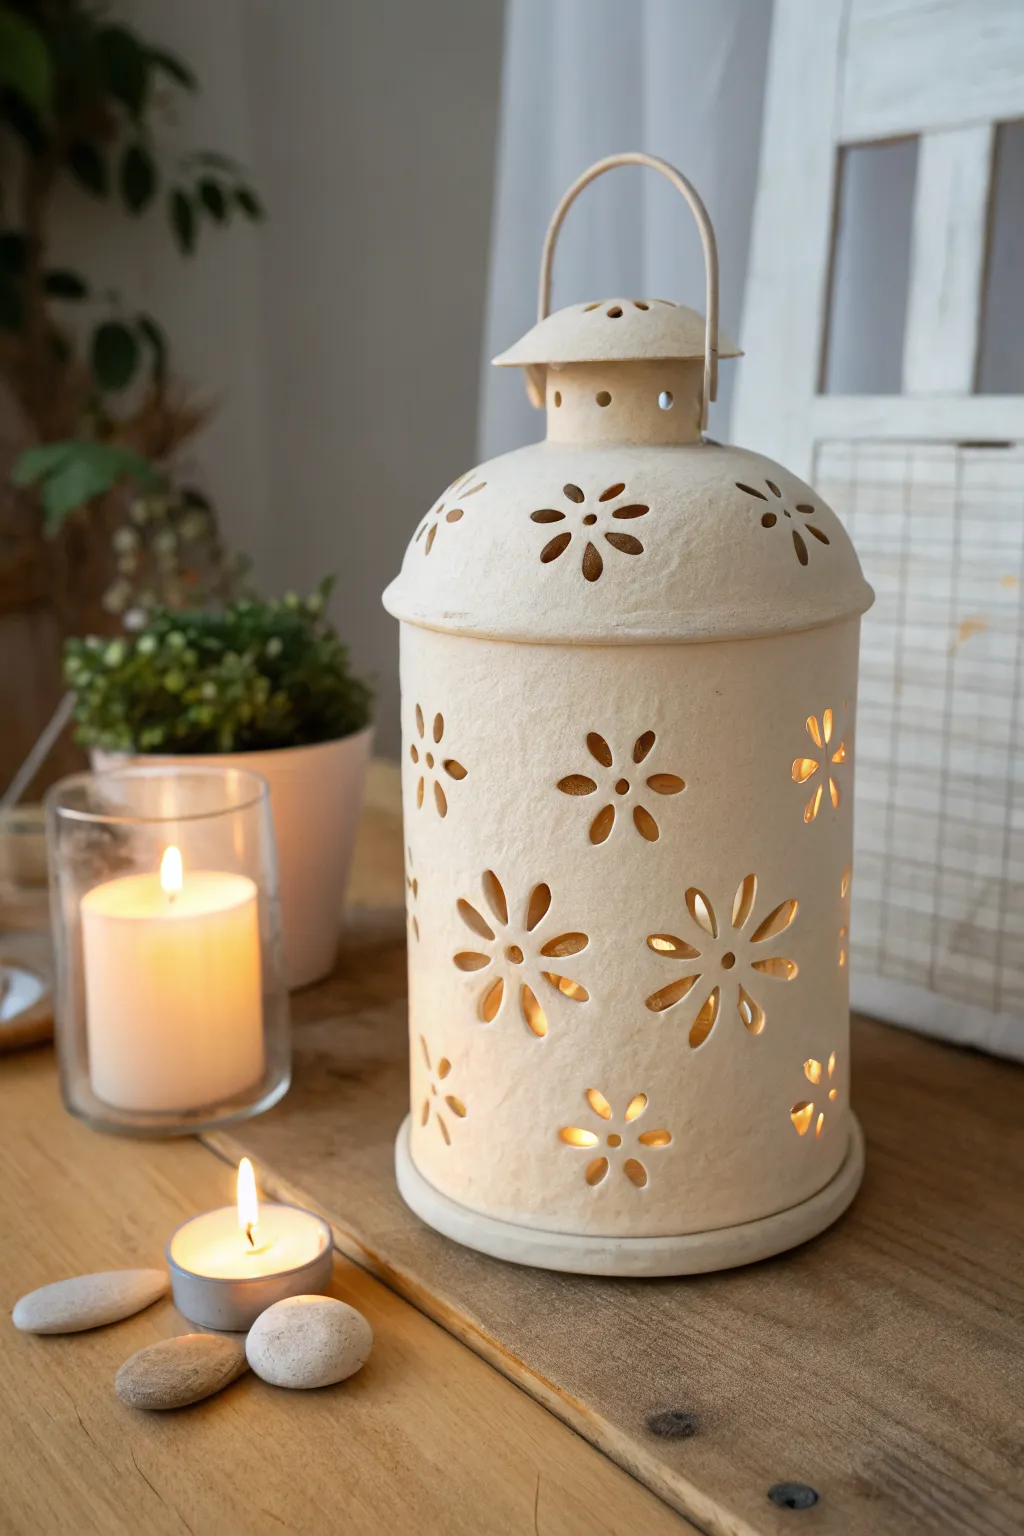
This charming lantern combines the rustic texture of paper mache clay with delicate light play, creating a cozy atmosphere in any room. Its cream finish and intricate floral cutouts cast beautiful shadows when illuminated by a flickering candle.
Step-by-Step Guide
Materials
- DIY paper mache clay (toilet paper, PVA glue, joint compound, flour/cornstarch)
- Clean, smooth cylindrical container (like a large oatmeal tin or plastic tub) as a mold
- Cling film or plastic wrap
- Cooking oil spray or petroleum jelly
- Craft knife or X-Acto knife (fresh blades are essential)
- Small cookie cutters (flower shapes)
- Sanding sponge (fine grit)
- Wire for the handle
- Acrylic paint (warm white or cream)
- Matte spray varnish
- Battery-operated pillar candle
Step 1: Preparing the Base
-
Prep the Mold:
Select a cylindrical container to serve as your form. Wrap it tightly with cling film to prevent sticking. I like to add a very light coat of cooking spray over the plastic just to be safe. -
Roll the Clay:
Take a large handful of your prepared paper mache clay. Roll it out on a non-stick surface to a uniform thickness of about 1/4 inch. If it’s too sticky, dust your surface lightly with cornstarch. -
Create the Cylinder:
Cut a rectangular strip of clay wide enough to wrap around your mold and tall enough for the main body. Lift it carefully and wrap it around the mold, smoothing the seam where the edges meet with a bit of water. -
Form the Top:
Fashion a separate, slightly domed piece for the lid. You can mold this over a smaller bowl or the bottom of a rounded bottle. Add a small clay loop on top for the handle attachment later. -
Initial Drying:
Let the clay sit on the mold until it is leather-hard—firm to the touch but still holds enough moisture to cut easily without cracking. This usually takes 12–24 hours depending on humidity.
Clean Cuts Pro-Tip
If the clay drags while cutting, it’s too wet. Wait an hour. If it crumbles, it’s too dry—mist it lightly with water and cover with plastic for 30 mins to rehydrate.
Step 2: Carving the Design
-
Map the Pattern:
Once the clay is leather-hard, lightly sketch your floral pattern onto the surface with a pencil. Plan for varied flower sizes to create visual interest. -
Cut the Petals:
Using your craft knife or small petal-shaped cutters, gently press into the clay to remove material. If using a knife, stabilize the clay with your other hand and make slow, deliberate cuts. -
Detail the Lid:
Repeat the cutout process on the domed lid section. Add small circular vent holes near the rim, which adds to the lantern aesthetic even if using LED candles. -
Smooth the Edges:
Dip your finger in water and gently run it over the cut edges of your designs to soften any sharp burrs or jagged bits before the clay dries completely.
Step 3: Finishing Touches
-
Full Cure:
Allow the lantern body and lid to dry completely. This can take 2–3 days. The clay will turn white and feel lightweight when fully cured. -
Remove Key Mold:
Carefully slide the cylinder off the mold. Peel away the plastic wrap from the inside. -
Sanding:
Use a fine-grit sanding sponge to smooth the exterior surface. Pay special attention to the rim and the bottom edge so the lantern sits flat. -
Attach the Base:
If your cylinder doesn’t have a bottom, cut a clay disc, moisten the edges, and attach it to the bottom of the cylinder now. Let this bond dry. -
Painting:
Apply two coats of warm white or cream acrylic paint. Dab the brush inside the cutout holes to ensure no raw clay color shows through. -
Add the Handle:
Once the paint is dry, bend a piece of wire into a U-shape. Insert the ends into pre-made holes on the lid or attach them using strong epoxy if you forgot to make holes. -
Seal:
Spray the entire piece with a matte varnish to protect the finish and make it easier to dust later.
Level Up: Gilded Glow
Paint the *interior* of the lantern with metallic gold paint. When the candle is lit, the inner gold surface will reflect a warmer, more intense light through the cutouts.
Place a battery-operated candle inside and enjoy the serene patterns of light casting across your table
Raised-Letter Wall Art with Bold Texture
Achieve the high-end look of carved limestone without the heavy weight using paper mache clay. This wall art features a deeply recessed border and a bold, raised letter that mimics classic architectural details.
How-To Guide
Materials
- Paper mache clay (homemade or store-bought)
- Rigid backing board (wood or thick MDF, approx. 12×12 inches)
- Cardboard or foam core (for the raised letter)
- Masking tape
- PVA glue or wood glue
- Palette knife or putty knife
- Sandpaper (medium and fine grit)
- Acrylic paint (warm beige, cream, dark grey)
- Matte spray sealer
- Heavy-duty string or rope for hanging
- Drill with small bit (optional)
Step 1: Base Structure Assembly
-
Prepare the backing:
Cut your rigid backing board to your desired size; a square format like 12×12 inches works beautifully for a single letter. -
Create the border:
To create the framed effect seen in the photo, cut strips of cardboard or foam core about 1 inch wide. Glue these strips flat along the very edge of your backing board to create a raised rim. -
Cut the letter:
Sketch a large, block-style letter onto a piece of thick cardboard or foam core. It should be sized to fit comfortably inside your border with distinct negative space around it. -
Thicken the letter:
For that substantial stone look, you want depth. Cut a second or even third identical letter and glue them stacked on top of each other until the letter is roughly the same height as your border rim. -
Mount the letter:
Center your cardboard letter stack on the backing board and glue it down securely. Let the glue dry completely so nothing shifts during the clay application. -
Tape the edges:
Cover the exposed raw edges of the cardboard letter and the outer border with masking tape. This smooths out the corrugation and gives the clay something better to grip. -
Install hanging hardware:
Drill two small holes through the top edge of the board for your hanging string, or attach D-rings to the back now, as it’s harder to do once the clay is added.
Warping Woes
If the backing board starts to curve as the wet clay dries, place heavy weights on the corners or flip it over periodically to ensure even airflow.
Step 2: Applying Paper Mache Clay
-
Prime the surface:
Brush a thin layer of PVA glue over the entire cardboard structure. This acts as a bonding agent for the clay. -
Apply the base layer:
Using a palette knife, spread a consistent layer of paper mache clay over the entire flat background area first. Aim for about 1/4 inch thickness. -
Sculpt the letter:
Apply clay to the top and sides of the raised letter. Use your fingers to press the clay firmly against the taped edges, ensuring square corners. -
Refine the border:
Cover the raised outer border rim with clay. I find using the flat side of a knife helps keep the long straight edges crisp rather than rounded. -
Add surface texture:
While the clay is wet, pat it gently with the flat of your knife or a slightly crumpled ball of foil. You want a rough, sandstone-like finish, not a perfectly smooth plastic look. -
Clean up edges:
Run a wet finger or tool along the inside corners where the letter meets the background to make the seam sharp and distinct. -
Dry thoroughly:
Place the piece in a warm, dry spot. Depending on humidity and thickness, this can take 24-48 hours. Don’t rush this; the core must be dry.
Ancient Artifact Look
Mix fine sand or coffee grounds directly into your paper mache clay recipe before applying. This adds authentic grit that paint alone can’t replicate.
Step 3: Finishing and Painting
-
Sand lightly:
Once bone dry, use sandpaper to knock off any unintentional sharp peaks or rough blobs, but leave the overall stone texture intact. -
Base coat painting:
Mix a warm beige acrylic paint. Apply this liberally over the entire piece, getting into every nook and cranny of the texture. -
Create dimension:
Mix a watery wash (glaze) using a tiny bit of dark grey or brown paint diluted with water. Brush it over the surface and immediately wipe most of it off with a rag. The dark pigment will stick in the low spots. -
Dry brush highlights:
Load a dry brush with a tiny amount of cream or off-white paint. Lightly drag it over the raised surfaces of the texture to mimic sun-bleached stone. -
Attach the string:
Thread a simple white cotton rope or cord through your pre-drilled holes and knot it securely. -
Seal the work:
Finish with a matte spray sealer to protect the paint and eliminate any unnatural glossy shine.
Hang your new relief sculpture in a spot where natural light can rake across the surface to emphasize the texture
Outdoor-Style Garden Stones Using Paper-Cement Clay
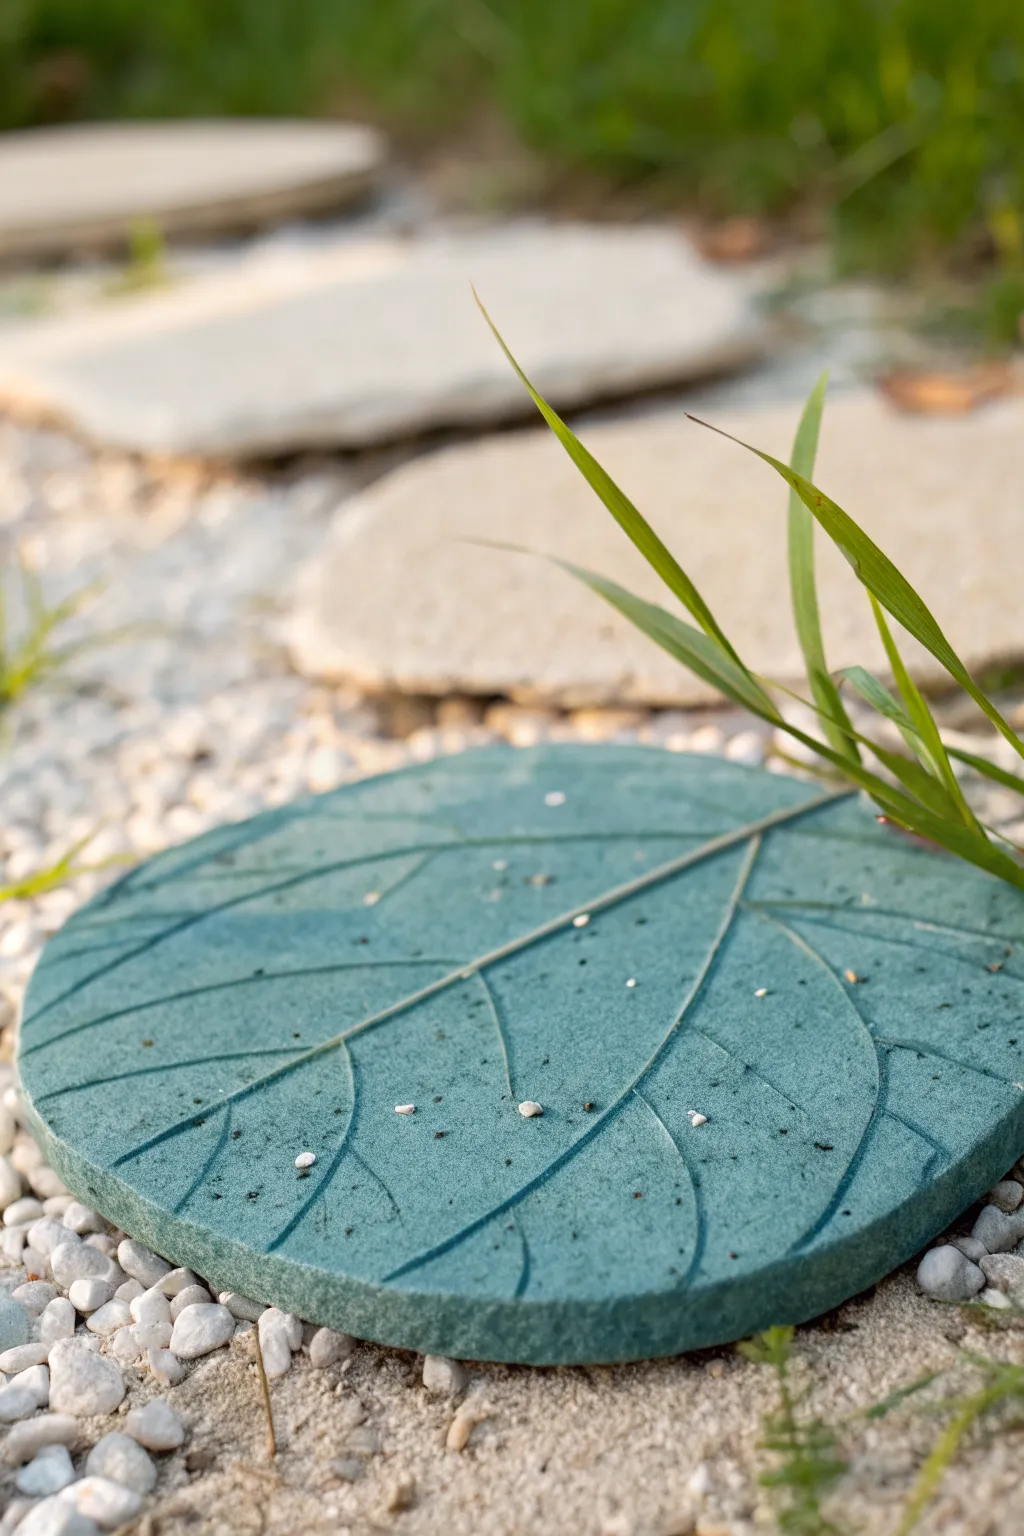
Bring a touch of organic texture to your garden path with these durable, leaf-imprinted stepping stones made from a robust paper-cement clay blend. This project mimics the look of heavy cast concrete but allows for finer detail and a unique, deep teal coloration that stands out against white gravel.
Detailed Instructions
Materials
- Cellulose insulation or shredded paper pulp (soaked and squeezed dry)
- Portland cement
- Joint compound or pre-mixed drywall mud
- Exterior grade PVA glue (white wood glue)
- Water
- Teal or dark green acrylic paint (or concrete pigment)
- Large plastic mixing bowl and heavy spoon or drill mixer
- Round plastic mold (like a planter saucer or a cut bucket bottom)
- Cooking oil or release spray
- Sculpting tools or a dull knife
- Fine-grit sandpaper (optional)
- Exterior matte varnish or concrete sealer
Step 1: Mixing the Clay Body
-
Prepare the pulp base:
Begin by soaking your paper pulp or cellulose insulation in warm water until fully saturated. Squeeze out as much water as possible until you have a damp, crumbly mass. -
Combine wet ingredients:
In your mixing bucket, combine the damp pulp with the joint compound and a generous squeeze of exterior PVA glue. Mix these thoroughly until the fibers are well-coated. -
Add the strengthener:
Gradually add Portland cement to the mixture while stirring continuously. This is the key ingredient that turns standard paper mache into weather-resistant outdoor art. -
Color the batch:
Add your teal acrylic paint or powdered pigment directly into the wet clay. I prefer mixing the color in now rather than painting later, as it ensures the stone remains green even if chipped. -
Check consistency:
Adjust the texture with small amounts of water or more cement powder. You are looking for a consistency similar to stiff cookie dough or modeling clay that holds its shape without slumping.
Cracking Up?
If you see hairline cracks forming while drying, your mix was likely too wet or it dried too fast. Rub a little wet clay slurry into cracks immediately to patch them.
Step 2: Sculpting the Form
-
Prep the mold:
Lightly coat the inside of your round plastic mold with cooking oil or release spray. This step is crucial for getting the stone out cleanly later. -
Pack the mold:
Press the colored clay mixture firmly into the mold, ensuring you push it into the corners to eliminate air pockets. Smooth the top surface flat with a spatula. -
Release the shape:
Carefully invert the mold onto a flat, plastic-covered work surface to release the clay disc. If the consistency is right, it should hold its round shape immediately. -
Refine the edges:
Use your fingers or a smoothing tool to gently round over the sharp top edge of the disc, giving it a softer, more natural stone appearance.
Step 3: Detailing and Finishing
-
Mark the center vein:
Using a sculpting tool or the back of a dull knife, score a long, slightly curved line across the diameter of the disc to represent the main leaf vein. -
Add branching veins:
Carve smaller veins branching off the center line. Keep them asymmetrical and slightly curved to maintain an organic, natural look. -
Deepen the impressions:
Go back over your lines to widen and deepen them slightly. The clay will shrink a tiny bit as it dries, so making the cuts bolder now prevents them from disappearing. -
Add texture:
Gently tap the surface with a stiff bristle brush or a crumpled ball of foil to remove any tool distinct marks and give the ‘stone’ a realistic, porous texture. -
Slow cure:
Cover the stone loosely with plastic wrap and let it cure slowly in a shaded area for at least 3-4 days. Slow drying prevents cracking. -
Uncover and final dry:
Remove the plastic and let the stone air dry for another 2-3 days until it feels light and sounds hollow when tapped. -
Seal for outdoors:
Apply two or three coats of exterior-grade matte varnish or concrete sealer, paying special attention to the bottom and the carved grooves to prevent moisture absorption.
Natural Impressions
Instead of carving veins by hand, press a large, deeply veined leaf (like Hosta or Rhubarb) into the wet clay surface, then peel it away for an authentic texture.
Place your finished stones among the gravel and enjoy your custom garden path all season long