
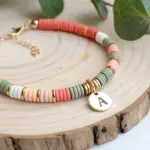
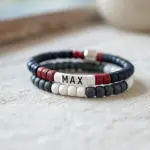
If you want a birthday present that feels genuinely thoughtful, polymer clay is my go-to because you can personalize almost anything without needing fancy equipment. Here are my favorite polymer clay birthday gift ideas—starting with the classics and ending with a few studio-style surprises.
Personalized Polymer Clay Earrings
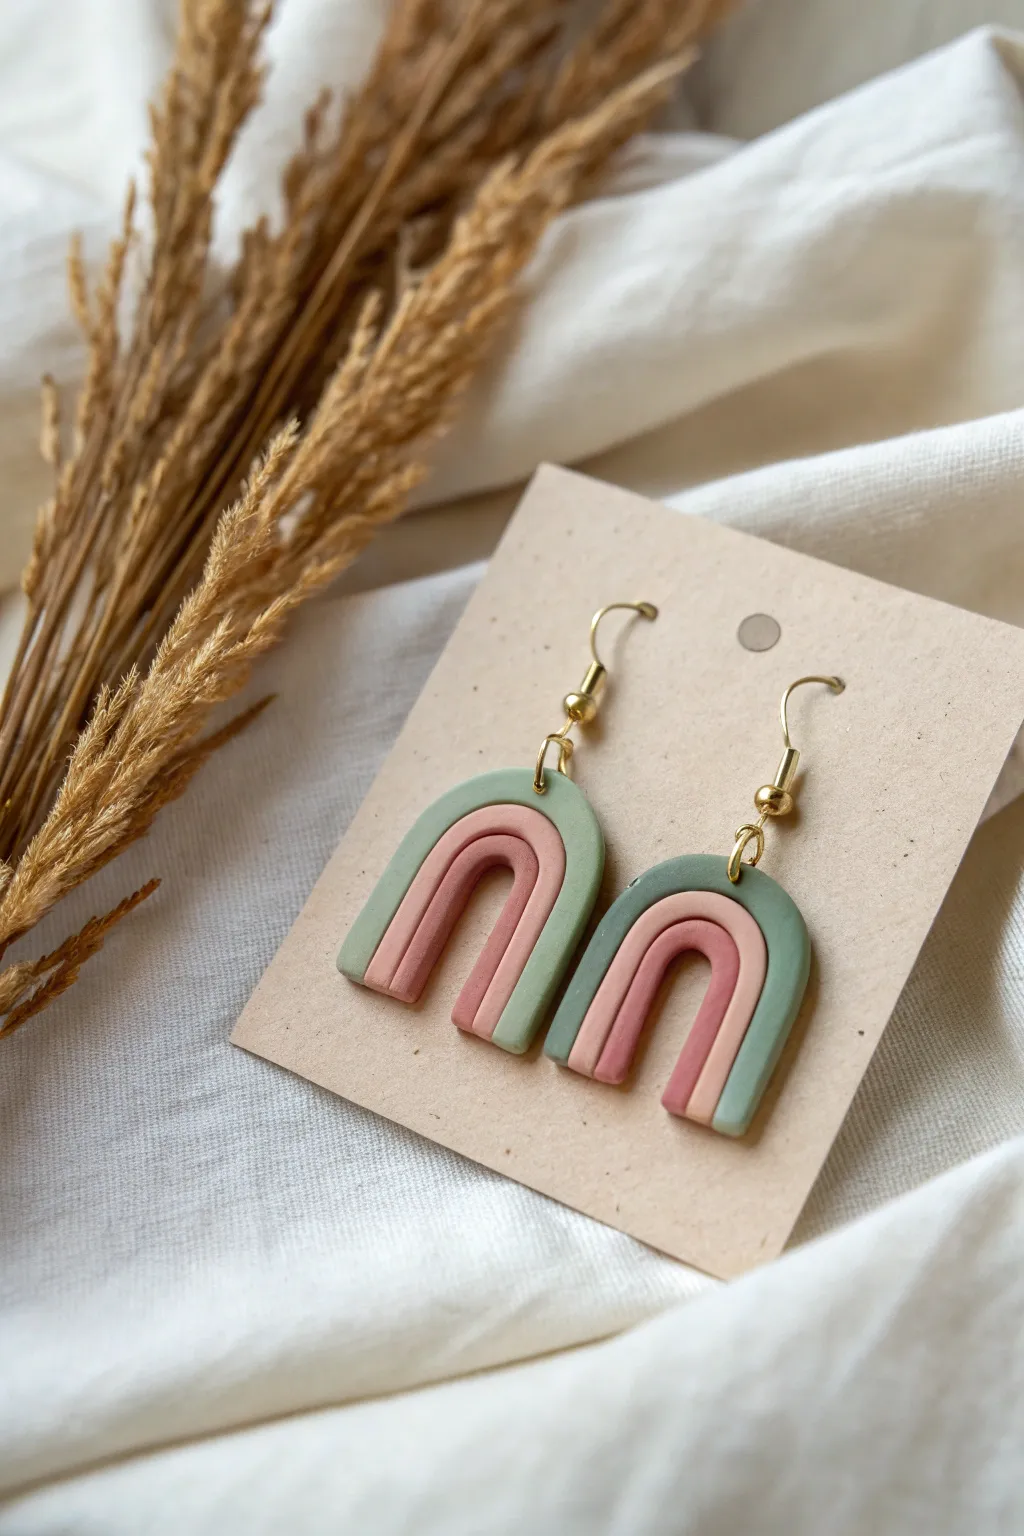
These trendy, muted rainbow earrings feature soft pastel arches in sage green, dusty rose, and blush pink. Their matte finish and modern U-shape make them a thoughtful, handmade birthday gift for anyone who loves an earthy, minimalist aesthetic.
Step-by-Step
Materials
- Polymer clay in sage green, dusty rose/terracotta, and blush pink/beige
- Rolling pin or pasta roller attachment
- Clay extruder (optional but helpful)
- Small round cookie cutter or circle template (approx. 1 inch)
- Rigid tissue blade or craft knife
- Hand drill or pin vibe
- Gold tone jump rings (4-6mm)
- Gold tone earring hooks (fishhook style)
- Needle nose jewelry pliers
- Ceramic tile or baking sheet with parchment paper
- Sandpaper (fine grit)
Step 1: Prepping and Extruding the Clay
-
Condition the clay:
Begin by kneading each of your three clay colors separately until they are soft, pliable, and free of air bubbles. This conditioning step prevents cracking later on. -
Roll out strands:
Roll each color into a long, thin rod or ‘snake’ of even thickness. Aim for a thickness of about 3-4mm. If you have a clay extruder with a medium circle die, this is the perfect time to use it for perfectly consistent strands. -
Cut to length:
Cut two pieces of each color, approximately 3 inches long. You will need a total of six strands: two green, two dusty rose/terracotta, and two blush pink.
Fixing Gaps
If the clay arches separate after baking, don’t panic. Put a tiny drop of superglue or liquid clay between the loose strands and re-bake briefly to bond them together permanently.
Step 2: Forming the Rainbow Arches
-
Start with the center arch:
Take your lightest color (the blush pink strand) and gently bend it into a U-shape. I find it helpful to bend it around a small circular object like a pen cap or small cutter to get a smooth curve, but freehand works too. -
Add the middle layer:
Take the medium color (dusty rose) strand and curve it snugly over the top of the first U-shape. -
Press together gently:
Lightly press the two strands together along the seam so they adhere without smashing the rounded profile. -
Add the outer layer:
Curve the final color (sage green) over the top of the existing stack to complete the rainbow shape. -
Repeat for the second earring:
Repeat the previous steps to build the second rainbow, ensuring the size matches the first one closely.
Add Texture
Before baking, gently roll the handle of a paintbrush or a texture roller over just the green outer band to create a unique contrast against the smooth inner arches.
Step 3: Trimming and Finishing
-
Trim the bottoms:
Use your rigid tissue blade to make a clean, straight cut across the bottom of the rainbow legs. Ensure both legs are even and cut both earrings to the same length. -
Create holes:
Using a needle tool or toothpick, pierce a small hole through the top center of the green arch. Ensure the hole is large enough for your jump rings. -
Smooth fingerprints:
Gently rub a tiny bit of cornstarch or baby oil over the surface if you see any fingerprints, smoothing them out before baking. -
Bake the pieces:
Place the rainbows on a ceramic tile or parchment-lined baking sheet. Bake according to your specific clay brand’s instructions (usually around 275°F/135°C for 15-30 minutes). -
Cool and sand:
Allow the pieces to cool completely. If there are rough edges on the bottom cut, gently sand them with fine-grit sandpaper for a professional finish.
Step 4: Assembly
-
Open the jump rings:
Use two pairs of pliers to twist your jump rings open sideways (never pull them apart outward). -
Attach the hardware:
Slide the open jump ring through the hole in the clay arch, then hook your earring wire onto the ring. -
Close the ring:
Twist the jump ring back into a closed position, ensuring the ends meet perfectly so the hook doesn’t slip out. -
Final check:
Hold the earrings up to check that they hang evenly and face the correct direction.
Gift these charming arches in a small box filled with tissue paper for a presentation they will love

Terrazzo Coaster Set for Birthday Hosting
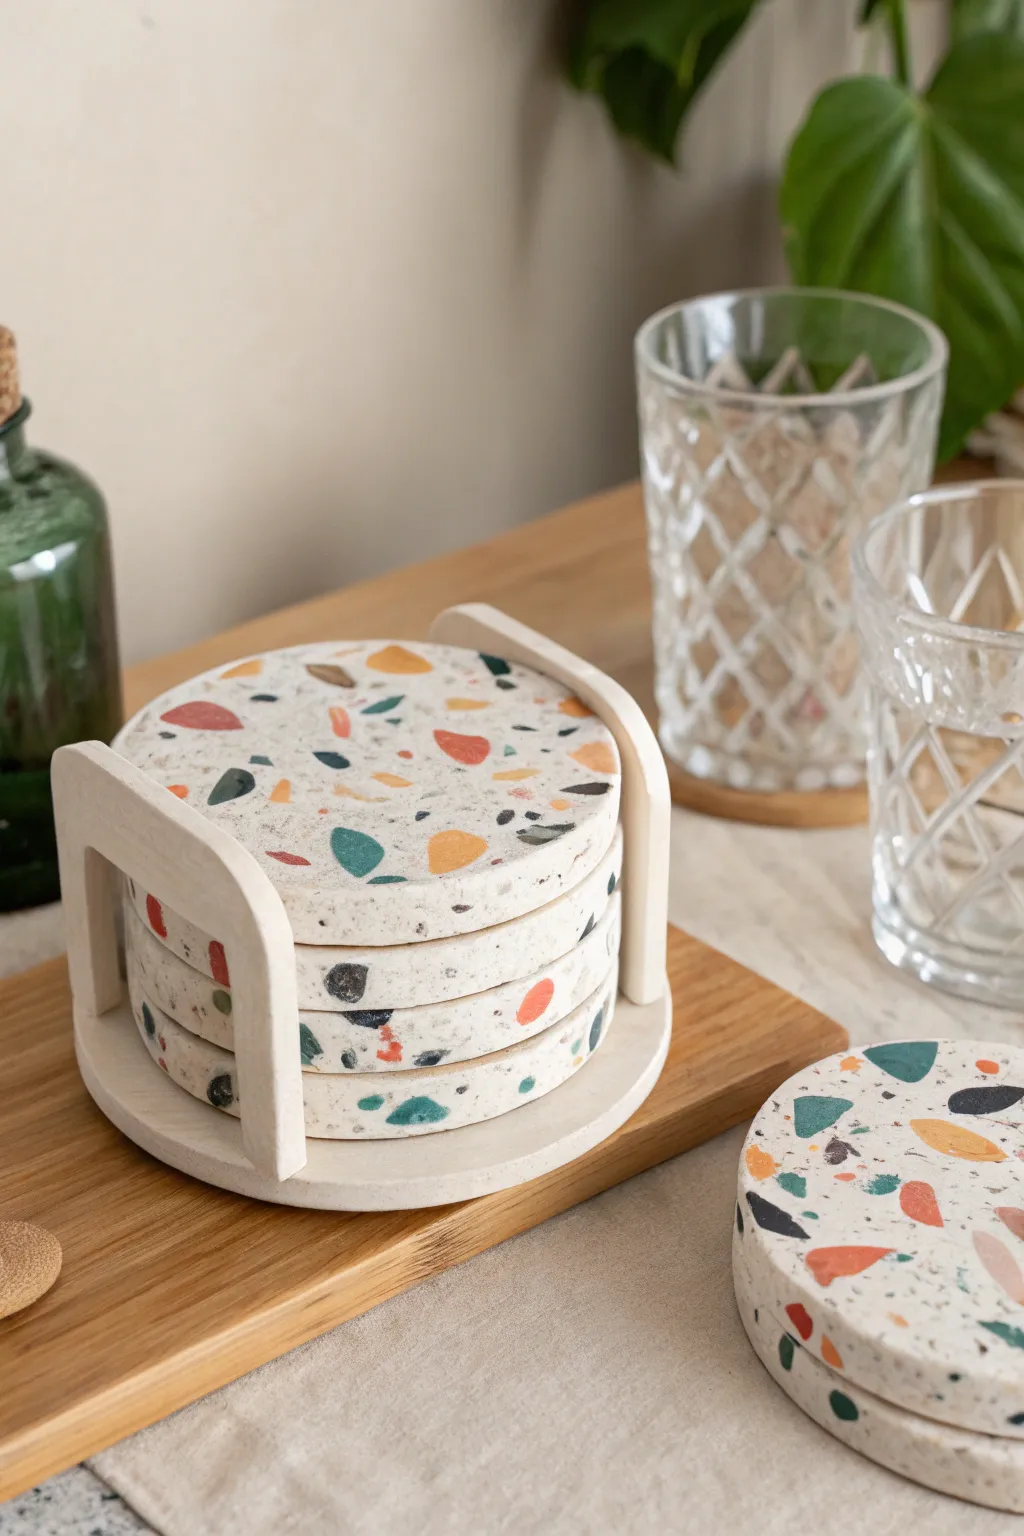
Elevate your coffee table game with these trendy faux-terrazzo coasters, featuring a speckled pattern of colorful chips embedded in a creamy white base. This set includes a sleek, matching holder, making it a perfectly polished handmade gift for any host.
Step-by-Step Guide
Materials
- White polymer clay (approx. 4 blocks, 2oz each)
- Assorted colored polymer clay scraps (terracotta, teal, mustard, black, slate blue)
- Acrylic roller or pasta machine
- Round cookie cutter (approx. 3.5 – 4 inch diameter)
- Parchment paper
- Sharp craft blade or tissue blade
- Ceramic tile or glass baking sheet
- Oven
- Wet/dry sandpaper (grits 400, 600, 1000)
- UV resin or clear polyurethane varnish (optional, for sealing)
- Heavy book or flat object (for weighting)
- Ruler
Step 1: Preparing the Terrazzo Chips
-
Condition the colors:
Start by conditioning your colored clay scraps until they are soft and pliable. You want a nice mix of warm earthy tones like terracotta and mustard, balanced with cool teals and blacks. -
Create thin sheets:
Roll each colored piece into a very thin sheet, roughly 1mm thick or the thinnest setting on your pasta machine. -
Bake the sheets:
Place these thin colored sheets on a piece of parchment paper and bake them for roughly 10-15 minutes at the temperature recommended on your clay package. They should be firm but not burnt. -
Chop into fragments:
Once cool, use your sharp blade or even your fingers to crumble and chop the baked sheets into irregular, jagged chips of varying sizes. This creates the authentic stone-chip look.
Uneven Chips?
If chips pop out during sanding, your clay wasn’t fully conditioned or bonded. Fill voids with a mix of white clay and liquid clay, re-bake briefly, and sand again.
Step 2: Forming the Coaster Base
-
Prepare the white clay:
Condition the white polymer clay thoroughly. It needs to be very soft to accept the hard chips. -
Mix in the chips:
Take a handful of your pre-baked colored chips and mix them directly into the block of soft white clay. Knead the clay to distribute the chips throughout the ‘dough’ evenly. -
Roll the slab:
Roll the chip-filled clay out into a thick slab, approximately 1/4 inch thick. You might notice the surface looks bumpy—that’s normal at this stage. -
Add surface chips:
Sprinkle more baked chips onto the top surface of the slab to ensure plenty of color is visible on the face of the coasters. Gently roll over the slab again to press these new chips flush into the clay. -
Cut the shapes:
Use your large round cutter to punch out four circles. Save the excess clay for the holder.
Step 3: Building the Holder
-
Construct the holder base:
Re-roll your remaining terrazzo clay mixture to cut a slightly larger circle or oval for the holder’s base. -
Create the walls:
Cut two rectangular strips from the rolled slab, roughly 0.5 inches wide and long enough to curve around the sides of your stacked coasters. Fashion them into ‘U’ shaped brackets. -
Assemble the holder:
Attach the U-shaped walls to opposite sides of the holder base. Use a little liquid clay or ‘bake and bond’ to secure the seams, blending the clay with a sculpting tool for a smooth transition.
Crisp Contrasts
Rinse your sandpaper frequently in a bowl of water. Clay dust can clog the grit and muddy the white background, obscuring your colorful terrazzo chips.
Step 4: Finishing Touches
-
Final Bake:
Place the coasters and the holder on your baking tile. Cover loosely with foil to prevent yellowing and bake for 30–45 minutes according to package directions. -
Flatten while cooling:
Immediately after removing the coasters from the oven but while they are still hot, place a piece of parchment paper over them and weigh them down with a heavy book. I always do this to ensure they cool perfectly flat. -
Sanding for exposure:
Once fully cooled, wet-sand the surfaces of the coasters using 400 grit sandpaper. This is the magic step that reveals the sharp edges of the colored chips contrasting against the white background. -
Refining the finish:
Progress to 600 and then 1000 grit sandpaper to polish the surface until it feels smooth as stone. -
Seal (Optional):
For extra protection against coffee stains, apply a thin coat of matte varnish or UV resin.
Stack your new coasters in their custom holder and wrap them up for a unique, modern gift that looks store-bought


Birthstone-Inspired Bead Necklace
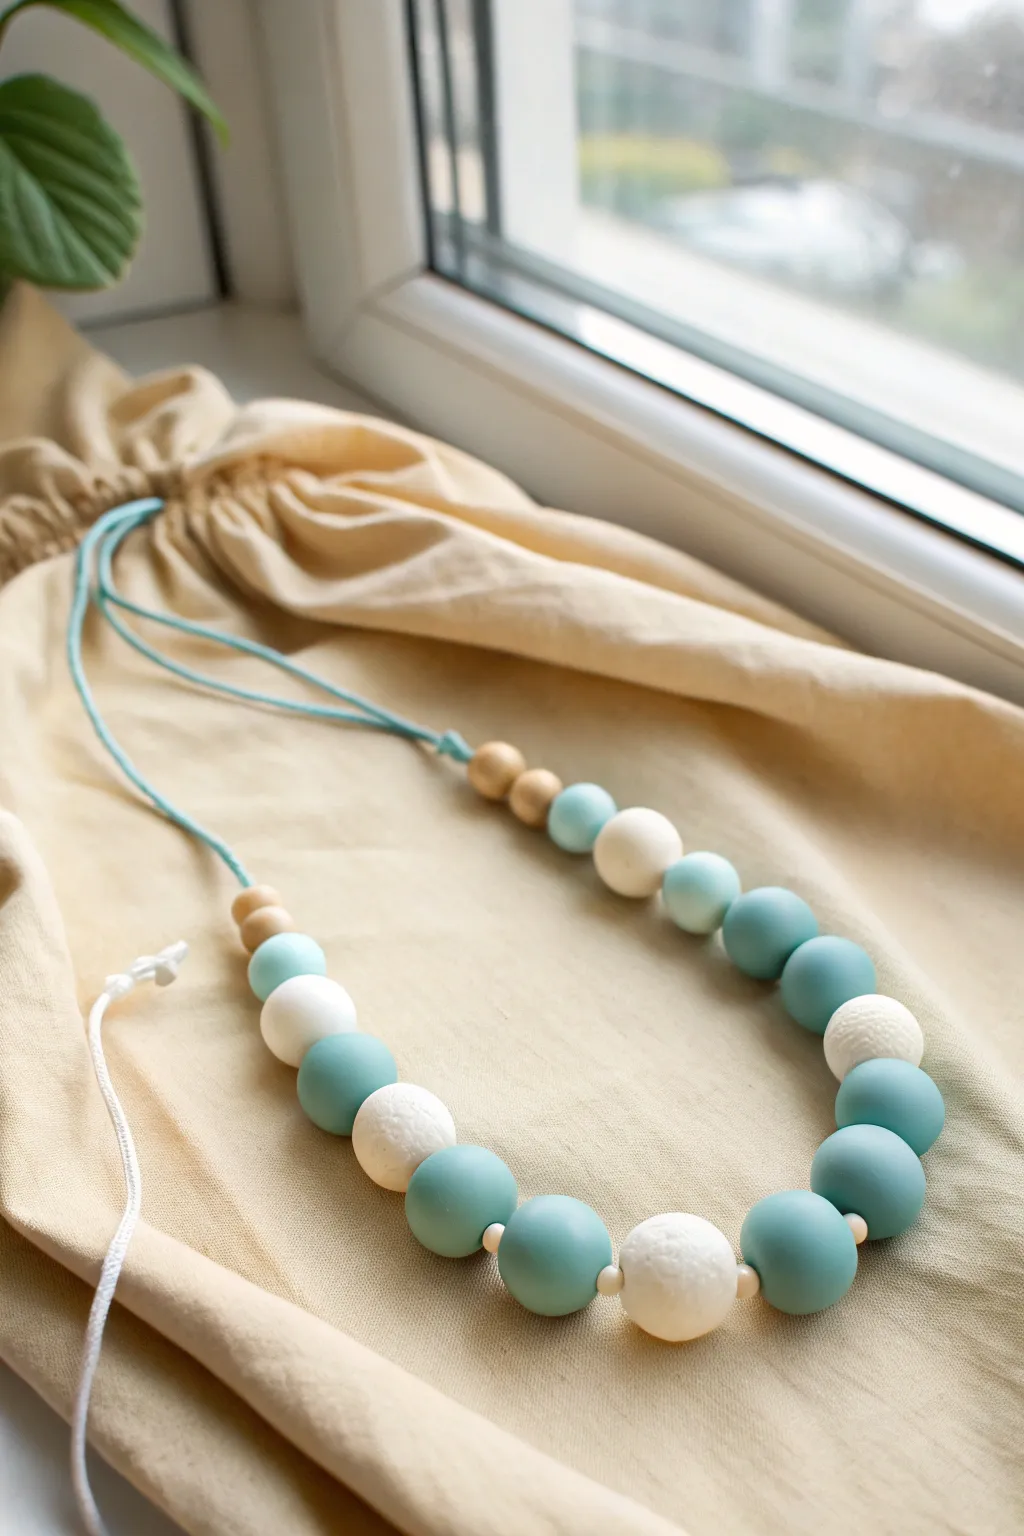
This elegant necklace balances smooth, matte polymer clay beads in calming teal tones with textured white accents and natural wood spacers. It makes a perfect, sophisticated gift that feels both modern and handcrafted.
Detailed Instructions
Materials
- Polymer clay (Teal/Turquoise, White)
- Small natural wood beads (approx. 4-6mm)
- Blue waxed cotton cord (approx. 1.5mm thickness)
- Bead piercing pin or needle tool
- Sandpaper or texturing tool (for the white beads)
- Oven for baking
- Optional: Cornstarch (for smoothing)
- Wet/dry sandpaper (fine grit)
Step 1: Preparing the Clay Beads
-
Condition the Clay:
Begin by conditioning your teal and white polymer clay separately until they are soft and pliable. This prevents cracks during baking. -
Mix Custom Shades:
To achieve the subtle gradient seen in the image, mix a small amount of white clay into your teal block to create a slightly lighter, milky turquoise shade for the outer beads. -
Form the Base Sizes:
Roll the clay into balls. You will need roughly 11 teal/turquoise beads of varying sizes (largest in the center) and 4-5 white beads. -
Texture the White Beads:
Take your white clay balls and gently roll them over a coarse sponge, sandpaper, or a texturing block to give them that distinct ‘sugar-coated’ or stone-like surface. -
Smooth the Teal Beads:
For the teal beads, ensure they are perfectly smooth. I find rolling them lightly in a dusting of cornstarch helps remove fingerprints before baking. -
Pierce:
Carefully pierce a hole through the center of each bead using your needle tool. Twist gently as you push through to avoid deforming the sphere.
Fingerprint Fighter
Keep a pack of baby wipes nearby. Wipe your hands when switching colors to keep the white clay pristine and free of teal smudges.
Step 2: Baking and Finishing
-
Bake:
Arrange your beads on a baking sheet or tile. Bake according to your customized clay brand’s instructions (usually around 275°F/130°C for 15-30 minutes). -
Cool Down:
Allow the beads to cool completely in the oven before handling them to ensure maximum durability. -
Sand for Matte Finish:
If your teal beads have any shiny spots or imperfections, gently buff them with wet/dry sandpaper under running water to achieve that premium matte look. -
Clean Up:
Wash the beads with soapy water to remove any sanding dust or residue and dry them thoroughly.
Add Salt Texture
For a unique look, roll raw white beads in coarse sea salt before baking. After baking, soak the beads in water to dissolve the salt, leaving pits.
Step 3: Assembly
-
Cut the Cord:
Cut a length of blue waxed cotton cord. Make it quite, perhaps 30-36 inches, to allow for an adjustable knot or a long pendant style. -
Layout Design:
Lay out your beads on a mat. Follow the pattern: Small wood beads at the ends, graduating to larger teal beads, with textured white beads interspersed among the central large teal ones. -
Stringing:
Thread the cord through your arranged beads. Place a tiny wooden spacer bead between most of the larger clay beads, especially near the center focal point. -
Knotting:
Tie a simple overhand knot on either side of the beaded section to keep the beads centered and secure on the cord. -
Finishing the Ends:
The necklace in the image uses a continuous loop or sliding knot. Tie the two loose ends of the cord together using an adjustable sliding knot so the wearer can change the length.
You now have a chic, custom piece of jewelry ready for gifting or wearing


Cute Ring Cone With Birthday Colors
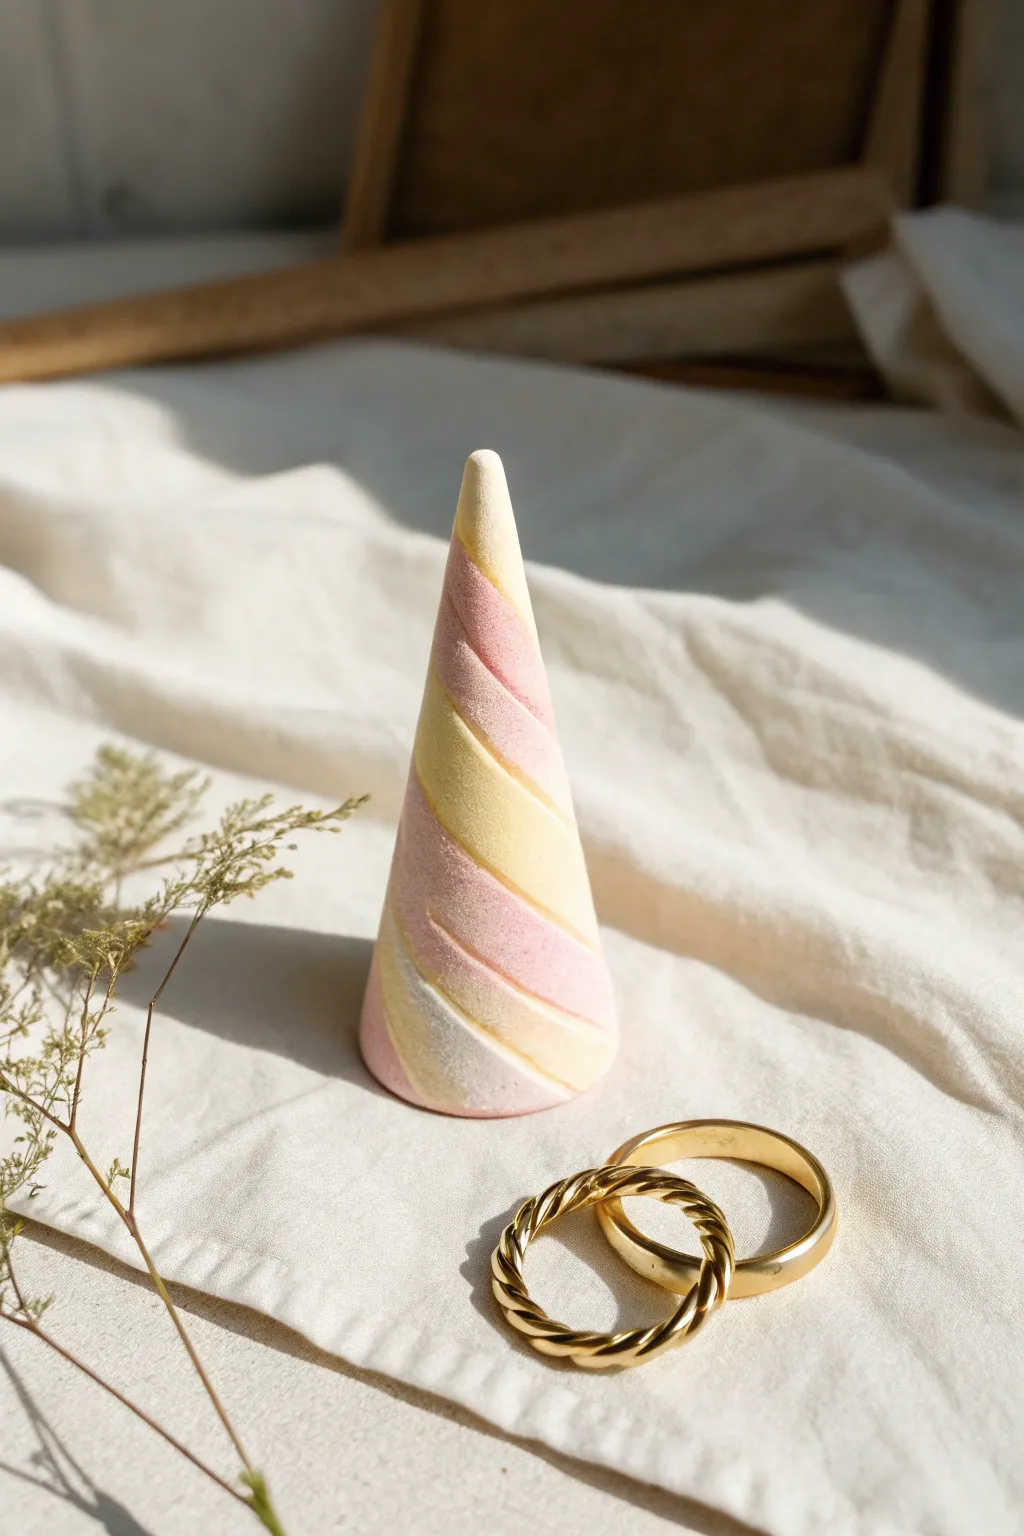
This charming ring cone features soft, spiraling bands of pastel yellow, pink, and cream, mimicking the festive look of birthday candles or party streamers. It serves as both a functional jewelry organizer and a delightful piece of handmade decor.
Step-by-Step Tutorial
Materials
- Polymer clay in pastel pink
- Polymer clay in pastel yellow
- Polymer clay in white or cream
- Acrylic rolling pin or clay machine
- Clay cutting blade
- Smooth work surface (ceramic tile or glass)
- Oven and baking sheet
- Fine-grit sandpaper (optional)
Step 1: Preparing the Clay
-
Condition the white clay:
Begin by taking a generous amount of white or cream polymer clay. Knead it in your hands until it is soft, pliable, and free of cracks. This will form the core of your cone. -
Form the base cone:
Roll the conditioned white clay into a ball, then shape it into a cone. Roll it gently on your work surface, applying more pressure to one end to taper it into a smooth point. The base should be flat enough to stand on its own. -
Condition colored clays:
Repeat the conditioning process for your pastel pink and yellow clays. You will also want a smaller portion of the white clay conditioned separately for the stripes. -
Roll out snakes:
Take small portions of the pink, yellow, and the remaining white clay. Roll each color into a long, thin rope or ‘snake’ of even thickness.
Uneven Stripes?
If your stripes look wonky or uneven thickness, try chilling the clay ropes in the fridge for 10 minutes before twisting them. Firm clay holds its shape better during rolling.
Step 2: Creating the Spiral Pattern
-
Twist the ropes:
Take your three clay ropes (pink, yellow, white) and gently twist them together into a single, thicker rope. Don’t over-twist; you want distinct bands of color, not a blended mess. -
Flatten the twist:
Using your acrylic roller, gently flatten this twisted rope into a long, striped ribbon. I prefer to roll lightly multiple times to keep the lines crisp rather than pressing hard all at once. -
Apply to the cone:
Take your flattened striped ribbon and wrap it spirally around your pre-made white cone base. Start at the bottom edge and work your way up to the tip. -
Smooth the seams:
Once the cone is covered, gently roll the entire cone on your work surface. This will press the spiral layer firmly into the core and smooth out the texture. -
Refine the shape:
Continue rolling until the surface feels seamless and the cone shape is perfectly symmetrical. The distinctive spiral grooves seen in the image are created by the natural indentation where the twisted strips meet; preserve these by not pressing too hard. -
Trim the bottom:
Turn the cone upside down. Use your clay blade to slice off any excess clay hanging over the bottom edge to ensure a perfectly flat, stable base.
Textured Finish
For a stone-like look, mix a pinch of translucent clay or coarse black pepper into your white clay before rolling. It adds instant speckled character.
Step 3: Baking and Finishing
-
Preheat the oven:
Set your oven to the temperature recommended on your specific brand of polymer clay packaging (usually around 275°F or 135°C). -
Bake carefully:
Place your cone upright on a baking sheet lined with parchment paper. Bake for approximately 15-20 minutes, depending on the thickness of your cone. -
Cool down:
Turn off the oven and let the cone cool inside with the door slightly ajar. This gradual cooling helps prevent cracks. -
Sand for texture:
To achieve the matte, slightly sandy texture seen in the photo, gently buff the surface with fine-grit sandpaper after it has completely cooled. -
Final clean:
Wipe away any sanding dust with a damp cloth or a baby wipe to reveal the soft pastel colors.
Now you have a sweet, celebratory spot to keep your favorite rings safe

The Complete Guide to Pottery Troubleshooting
Uncover the most common ceramic mistakes—from cracking clay to failed glazes—and learn how to fix them fast.
Birthday Treat Charm Set

These miniature dessert charms look good enough to eat and make adorable birthday gifts for friends with a sweet tooth. This set features four distinct treats—a layer cake slice, two styles of donut, and an ice cream cone—all detailed with realistic textures and soft pastel colors.
Step-by-Step Guide
Materials
- Polymer clay (white, beige/tan, pink, mint green/teal, chocolate brown, red)
- Liquid polymer clay (translucent or white mixed with clay)
- Pastel chalks or acrylic paints (for shading)
- Dotting tools and needle tools
- Small round cutter (approx. 1 inch)
- Tiny straw or small round cutter (for donut holes)
- Texture tool (toothbrush or sandpaper)
- X-acto knife or tissue blade
- Eye pins
- Lobster clasp keychains and jump rings
- Gloss glaze (optional)
Step 1: The Strawberry Layer Cake
-
Create the layers:
Review the image to note the alternating layers. Roll out yellow-beige clay for the sponge and thin pink clay for the filling. Cut three squares of sponge and two thin squares of filling. Stack them: sponge, filling, sponge, filling, sponge. -
Texture the sponge:
Cut the stack diagonally to create a triangular slice. Using a needle tool, gently poke and drag horizontally across the yellow sponge layers to simulate a fluffy cake crumb texture. -
Add the frosting:
Mix liquid clay with pink clay (or use pink liquid clay) to a thick icing consistency. Spread it over the top of the slice, letting it drip slightly down the sides. Add thin stripes of lighter pink clay on top for decoration. -
Top with fruit:
Mold a tiny sphere of red clay into a strawberry shape. Prick it all over with a needle tool for seeds and place it on the wet icing. Insert an eye pin into the top center.
Sticky Situation
If your liquid clay icing is too runny and dripping off the charm, let it sit on a piece of paper for 10 minutes to leach out some plasticizer before applying.
Step 2: The Pink Macaron Donut
-
Form the shells:
Roll two equal balls of pink clay and flatten them into thick discs. Use a small round tool to punch a hole in the center of each, creating a donut shape but with macaron ‘feet’. -
Create the feet:
Use a needle tool to rough up the bottom edges of both pink discs, pulling the clay slightly to create that classic crinkled macaron foot texture. -
Add the filling:
Roll a thin snake of dark brown clay for the chocolate filling. Place it between the two pink shells and press gently to sandwich them together. -
Decorate:
Mix a tiny amount of pastel chalk shavings with liquid clay to create a glaze, or use translucent liquid clay. Drizzle over the top and add tiny multicolored clay snakes for sprinkles. Insert an eye pin.
Glaze it Up
For an ultra-realistic wet look, apply a high-gloss water-based varnish ONLY to the fruit, icing, and sprinkles, leaving the cake sponge and cone matte for contrast.
Step 3: The Teal Sprinkled Donut
-
Shape the base:
Roll a ball of mint/teal clay and flatten it slightly. Press your thumb in the center or use a tool to create the donut hole, smoothing the edges so they are rounded and organic. -
Texture the dough:
Since this donut is fully glazed, just ensure the shape is smooth. If you want a bite mark, you can use a small scalloped cutter, but the image shows a whole donut. -
Add sprinkles:
Roll incredibly thin snakes of yellow, pink, and white clay. Pre-bake them for 5 minutes if they are too soft to handle, then cut them into tiny segments. Press these ‘sprinkles’ firmly into the raw teal clay so they adhere. -
Attach hardware:
Insert an eye pin deep into the donut body, ensuring the loop sits flush against the top edge.
Step 4: The Mint Ice Cream Cone
-
Form the cone:
Shape tan clay into a cone. Use a craft knife to gently score a diagonal crisscross pattern (waffle texture) onto the surface. Use a soft brush with light brown chalk dust to shade the waffle lines for a baked look. -
Create the scoop:
Roll a snake of mint green clay. Coil it starting from the top of the cone, winding upward and getting smaller to form a soft-serve swirl. -
Refine the swirl:
Blend the coils slightly with a silicone tool so it looks like continuous ice cream. I prefer to leave the ridges distinct for that distinct soft-serve aesthetic. -
Final garnishes:
Add large, triangle-shaped decorations cut from pink and yellow clay (like sprinkles or candy chunks). Insert the eye pin into the peak of the swirl.
Step 5: Finishing Touches
-
Bake:
Bake all charms according to your clay manufacturer’s instructions (usually 275°F/135°C for 15-30 minutes). Support the eye pins if needed so they don’t slide out. -
Secure pins:
Once cool, gently tug the eye pins. If they are loose, remove them, add a dab of superglue, and reinsert them. -
Add hardware:
Use pliers to open the jump rings. Attach a lobster clasp to each jump ring, then loop it through the eye pin on the charm and close securely.
Now you have a delectable set of charms ready to be gifted or clipped onto a bag
Mini Bud Vase With Color Wrap
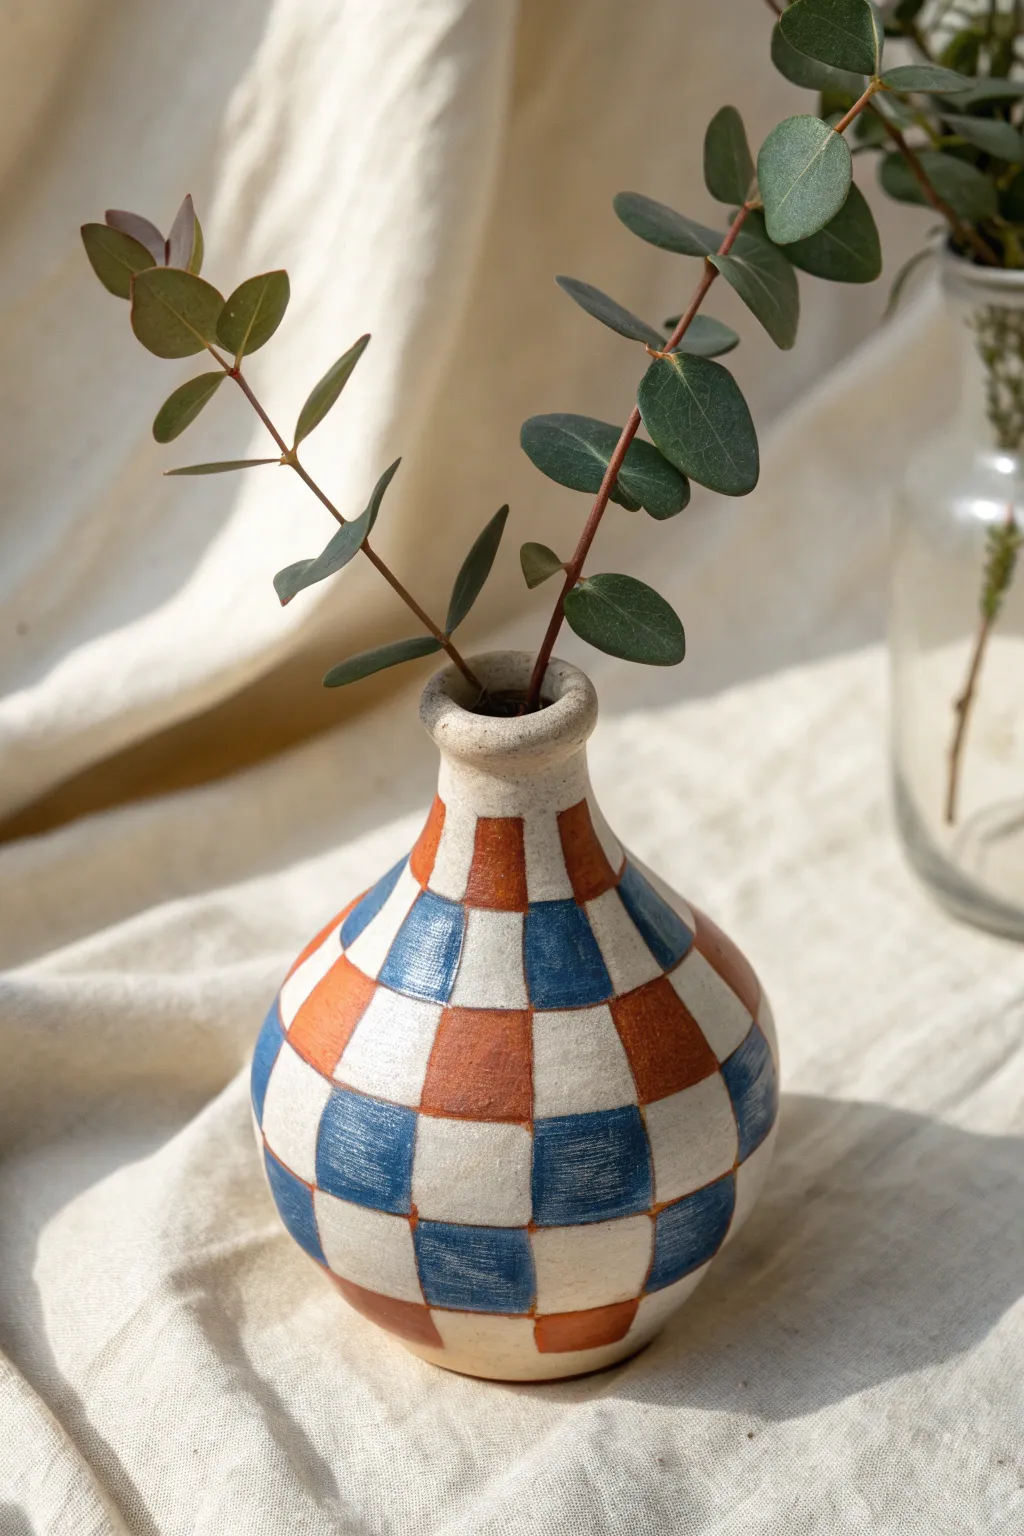
Transform a plain glass vessel into a trendy home accessory with this polymer clay wrap technique. The organic, hand-painted look of the checkerboard pattern gives this piece a cozy, artisanal feel that looks much more expensive than it is.
Step-by-Step
Materials
- Small glass bud vase (cleaned and dried)
- White or beige polymer clay (enough to cover the vase)
- Acrylic rolling pin
- sharp craft knife or scalpel blade
- Liquid polymer clay (e.g., Bake and Bond)
- Blue acrylic paint
- Terracotta or rust orange acrylic paint
- Small flat paintbrush
- Detail brush
- Matte residue-free varnish
- Clay sculpting tools (specifically a smoothing tool)
- Oven
Step 1: Prepping the Base
-
Condition the Clay:
Begin by conditioning your block of white or beige polymer clay. Knead it in your hands until it is warm, pliable, and free of any cracks. -
Roll out a Sheet:
Using your acrylic rolling pin, roll the clay out into a uniform sheet. Aim for a thickness of about 3-4mm—thick enough to be opaque but not so heavy that it slides off the glass. -
Prepare the Glass:
Wipe down your glass bud vase with a little alcohol to remove oils. Apply a thin layer of liquid polymer clay all over the exterior surface of the glass; this acts as the glue to hold the solid clay in place.
Step 2: Wrapping and Shaping
-
Wrap the Body:
Gently drape your clay sheet around the vase. Start from the center and smooth it outwards to release trapped air bubbles. Careful smoothing is key here to avoid lumpy textures. -
Seaming the Back:
Where the clay edges meet, cut away the excess with your craft knife to create a butt joint. Use a sculpting tool or your finger to blend the seam together until it disappears. -
Contour the Neck:
Gently press the clay into the curve of the vase neck. Because the neck is narrower, you may need to slice away small darts of excess clay to get it to lay flat. -
Create the Rim:
Ensure the clay extends slightly above the glass rim. Fold it over the top edge and inside, creating a chunky, rounded ceramic-style lip. Smooth this area thoroughly with a damp finger. -
Bake the Vase:
Place the clay-covered vase on a baking tray. Bake according to your specific clay brand’s manufacturer instructions (usually around 275°F/130°C for 15-30 minutes). Let it cool completely before painting.
Textural Trick
Before baking, lightly pat the raw clay surface with a piece of coarse sandpaper or a toothbrush. This subtle texture mimics stoneware pottery and gives the paint more ‘tooth’ to grab onto.
Step 3: Painting the Design
-
Map the Grid:
Once cool, lightly sketch a vertical and horizontal grid onto the vase using a pencil. Don’t worry about mathematical perfection; the wavy, hand-drawn look is part of the charm. -
Mix Your Palette:
Prepare your acrylic paints. I like to mix a drop of water into the paint to improve flow, which helps create crisper edges on the uneven clay surface. -
Paint the Blue Checks:
Start with the blue squares. Using a small flat brush, fill in alternating squares in your grid. The brush strokes should remain somewhat visible to mimic a glazed ceramic texture. -
Add the Rust Checks:
Next, fill in the alternating squares with the rust-orange color. Leave the remaining squares unpainted to show the natural clay color, creating a tri-color effect. -
Outline the Grid:
Using your finest detail brush and the blue paint, carefully trace over the pencil grid lines between the squares. This defines the pattern and hides any uneven paint edges. -
Refine the Neck Pattern:
As the pattern reaches the neck, allow the squares to naturally elongate and warp. This distortion helps the pattern flow up the vertical shape gracefully. -
Dry and Seal:
Allow the paint to dry completely. Finish by applying a coat of matte varnish over the entire piece to seal the paint and give it a finished, soft-touch texture.
Color Concept
Swap the rustic palette for pastels like sage green and lavender for a spring vibe, or try black and cream for a modern, graphic look.
Now you have a stunning, faux-ceramic vessel ready to hold your favorite dried sprigs or fresh blooms


What Really Happens Inside the Kiln
Learn how time and temperature work together inside the kiln to transform clay into durable ceramic.
Starry Incense Holder for a Birthday Reset
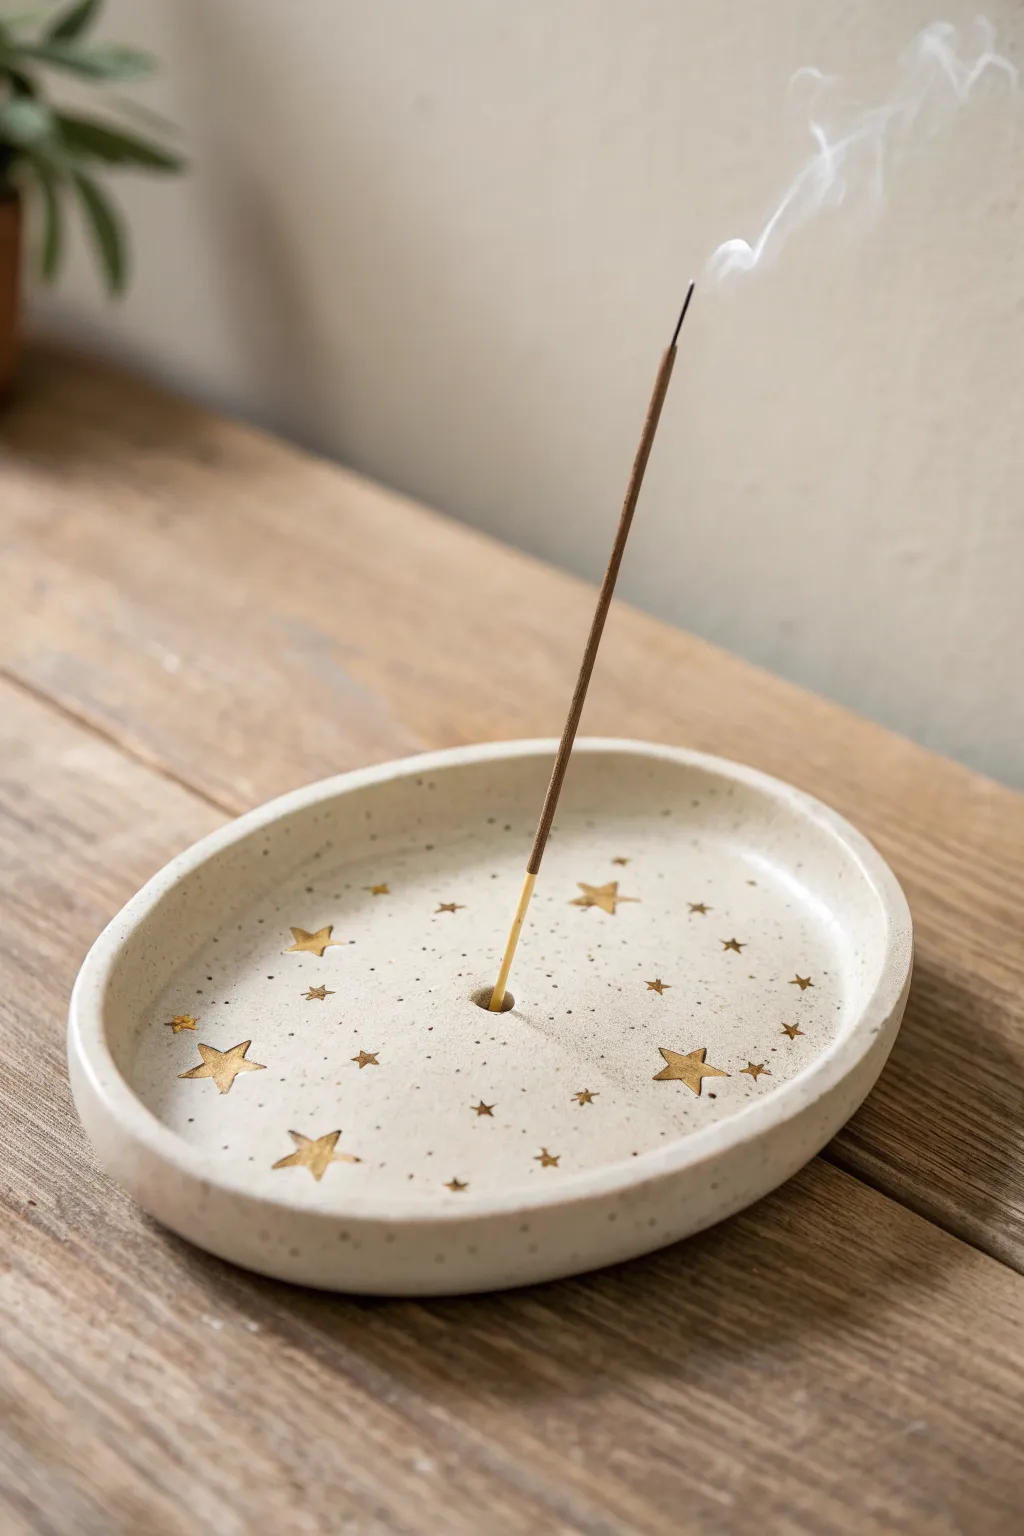
This serene incense holder combines a trendy speckled stoneware look with whimsical gold accents for the perfect relaxation gift. It is an easy yet sophisticated project that uses faux pottery techniques to create a high-end finish without a kiln.
How-To Guide
Materials
- White or translucent polymer clay
- Speckled clay (like granite or vanilla bean) or black pepper
- Rolling pin or pasta machine
- Oval cutter or paper template and craft knife
- Gold acrylic paint or liquid gold leaf
- Fine detail paintbrush
- Small star stamps (optional)
- Incense stick (for sizing)
- Downturned bowl or curved form
- Sandpaper (400-800 grit)
- Gloss or matte varnish (optional)
Step 1: Shaping the Base
-
Prepare the Clay:
Begin by conditioning your white or beige polymer clay until it is soft and pliable. If you aren’t using pre-speckled clay, mix in a tiny pinch of cracked black pepper or black embossing powder to achieve that stoneware pottery effect. -
Roll the Slab:
Roll the clay out onto a clean work surface to a thickness of about 1/4 inch (6mm). You want it substantial enough to feel like ceramic but thin enough to look elegant. -
Cut the Shape:
Place your oval cutter on the clay and press down firmly. If you don’t have a cutter, sketch an oval onto cardstock, cut it out, place it on the clay, and trace around it with a craft knife. -
Smooth the Edges:
Dip your finger in a little baby oil or water and gently run it along the cut edge of the oval to smooth out any harsh lines or jagged bits left by the cutter. -
Create the Lip:
Gently pinch and lift the edges of the oval upwards slightly to create a shallow rim. This prevents ash from falling off the side. -
Adding the Curve:
Carefully place your clay oval onto a large, smooth, downturned bowl or a curved baking form. This will ensure the dish dries with a slight, natural curve rather than sitting perfectly flat. -
Make the Hole:
Take a spare incense stick (the wooden end) or a tool of similar diameter. Press it into the center of the dish at a slight angle—not straight up and down—so the incense will lean gracefully over the tray. -
Check the Fit:
Wiggle the stick slightly to make the hole just a hair larger than the wood, as the clay can shrink infinitesimally during baking.
Clean Cuts Pro Tip
Before cutting your oval shape, place a sheet of plastic wrap over the clay. Press the cutter down through the plastic. This creates a pillowed, rounded edge that looks like fired ceramic instantly.
Step 2: Baking and Decorating
-
Bake:
Bake the piece according to your specific clay manufacturer’s instructions (usually 275°F/135°C for 15-30 minutes). I recommend tenting foil over the piece to prevent the white clay from scorching or yellowing. -
Cool and Sand:
Let the piece cool completely before removing it from the form. Once cool, wet-sand the edges under running water with fine-grit sandpaper for a professional, polished feel. -
Plan the Stars:
Visualize where your stars will go. Aim for a random scattering, mixing larger stars with tiny dots to simulate a night sky. -
Paint the Stars:
Using a very fine detail brush and gold acrylic paint or liquid leaf, hand-paint small five-pointed stars. If you have tiny rubber stamps, you can lightly dip them in paint and press them on instead. -
Add Stardust:
Between the main stars, use the tip of your paintbrush or a toothpick to add tiny gold dots. This fills the negative space and adds magical depth. -
Seal (Optional):
If you used acrylic paint, you may want to seal the dish with a thin coat of matte or satin varnish to protect the design, though liquid gold leaf is usually durable enough on its own.
Design Level Up
Instead of painting stars, press tiny star-shaped confetti or sequins into the raw clay before baking. Carefully remove them after baking and fill the indented star shapes with gold paint.
Wrap this celestial holder with a bundle of lavender incense for a gift that encourages immediate relaxation
Milestone Number Pin or Brooch
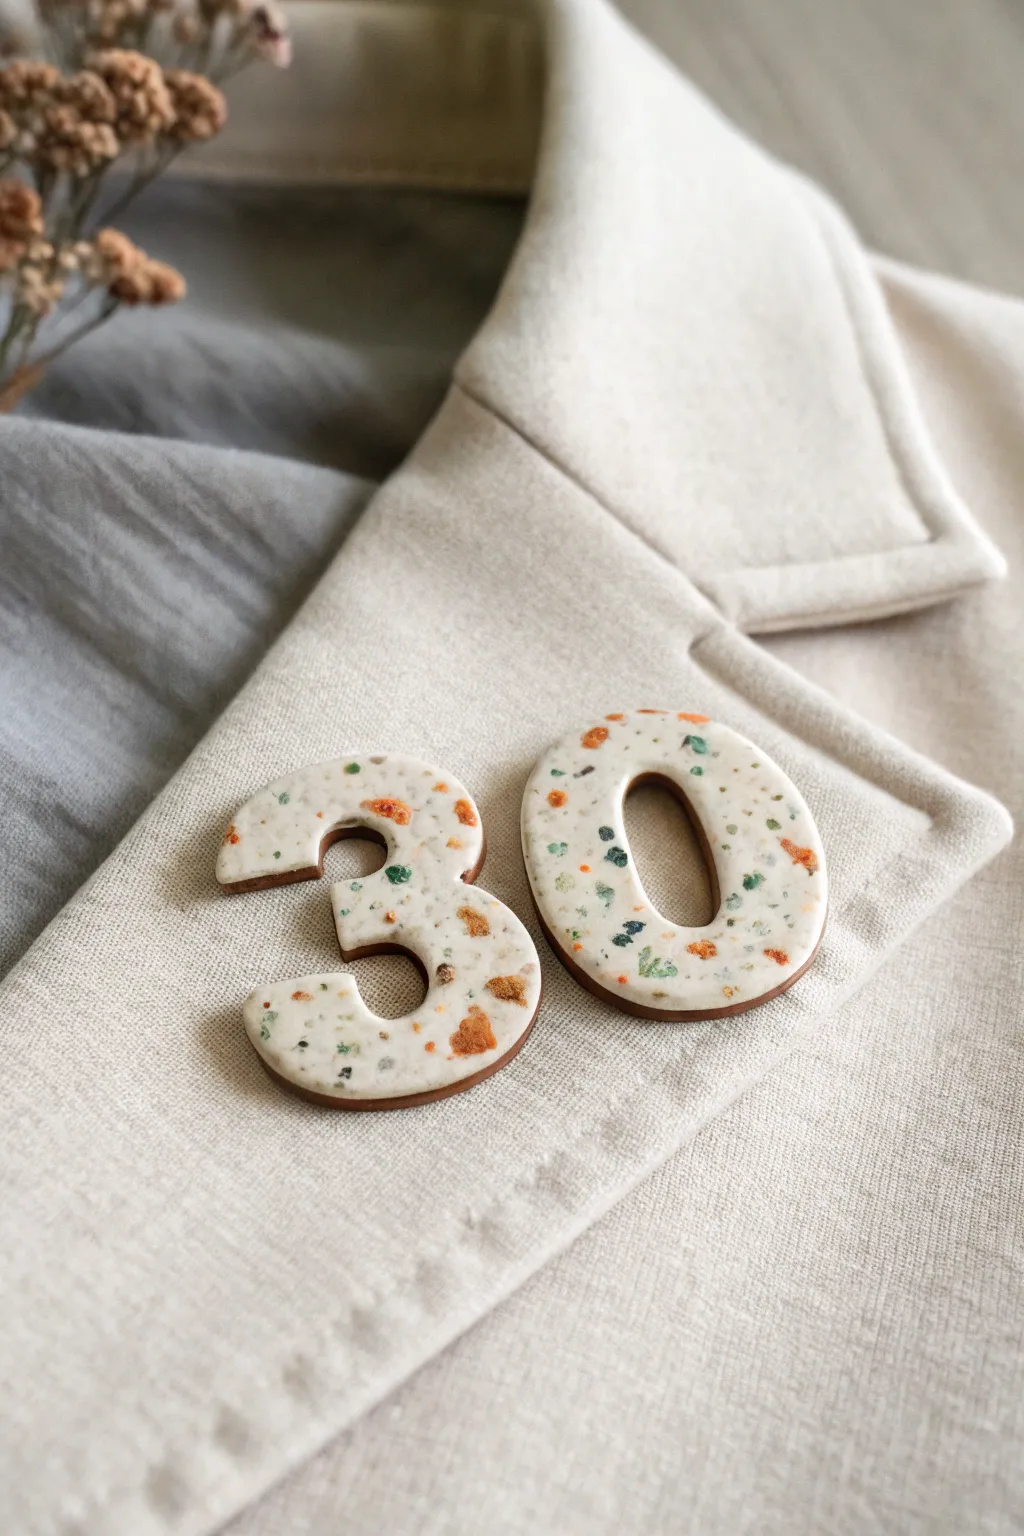
Celebrate a big birthday in style with these chic, minimalist number pins featuring a trendy faux-terrazzo finish. The speckled clay design mimics polished stone, adding a sophisticated yet playful touch to any lapel or jacket.
Detailed Instructions
Materials
- White polymer clay (base)
- Small amounts of colored polymer clay (terrazzo speckles): terracotta, dark moss green, sage green, and sand
- Brown polymer clay (backing)
- Acrylic rolling pin
- Number cookie cutters (approx. 1.5 – 2 inches tall)
- Sharp tissue blade
- Sandpaper (various grits from 400 to 1200)
- UV resin or gloss glaze (optional but recommended for shine)
- Pin backs or brooch findings
- Strong craft glue (E6000 or similar)
- Oven and baking tray
Step 1: Creating the Terrazzo Slab
-
Condition the base:
Start by conditioning your white polymer clay until it is soft and malleable. Roll it out into a sheet about 3mm thick. -
Prepare the colored chips:
Condition your colored clays (terracotta, greens, sand) separately. Roll them into very thin snakes or flat sheets. -
Chop the colors:
Use your tissue blade to chop the colored clay into irregular, tiny confetti-like pieces. Aim for a mix of sizes, but keep most quite small for a realistic stone look. -
Apply the speckles:
Scatter the chopped clay pieces randomly over your white clay sheet. Don’t overthink the placement; randomness is key to the terrazzo effect. -
Embed the inclusions:
Gently roll over the sheet with your acrylic roller to press the colored pieces into the white base. Roll in different directions to ensure the surface is flat and the speckles are fully embedded.
Step 2: Shaping and Backing
-
Create the backing sheet:
Condition the brown polymer clay and roll it out into a sheet approximately 1.5mm to 2mm thick. This adds a nice contrast edge. -
Layer the sheets:
Place your terrazzo sheet directly on top of the brown backing sheet. Gently roll over them once to bond the layers without distorting the pattern too much. -
Cut the numbers:
Place your number cutters (3 and 0) onto the layered slab. Press down firmly to cut through both layers. -
Refine the edges:
Gently push the clay out of the cutters. Use your finger or a smoothing tool to soften any sharp cutting ridges, ensuring the brown backing layer is distinct and neat. -
Bake the pieces:
Place the numbers on a parchment-lined baking tray. Bake according to the manufacturer’s instructions for your specific brand of clay (usually around 275°F/130°C for 30 minutes).
Clean Cuts Pro-Tip
Before cutting your numbers, cover the clay slab with a piece of plastic wrap. Press the cutter through the plastic. This creates lovely, rounded pillow-edges and saves sanding time.
Step 3: Finishing Touches
-
Cool and sand:
Once baked and fully cooled, wet sand the surface starting with 400 grit and working up to 1200 grit. This reveals the crisp edges of the colored speckles and smooths the surface. -
Buffing:
Rub the sanded pieces briskly with a denim scrap or soft cloth to create a natural sheen. -
Sealing (Optional):
If you want a glass-like finish similar to the image, apply a thin layer of UV resin and cure it under a UV lamp, or brush on a gloss glaze. -
Attach the hardware:
Flip the numbers over. Apply a dab of strong craft glue to the flat side of your pin backs and press them firmly onto the center of the brown backing. -
Final cure:
Allow the glue to dry completely (usually 24 hours for maximum strength) before pinning them to fabric.
Level Up: Gold Leaf
Add a touch of luxury by mixing tiny flakes of gold leaf into your terrazzo confetti before rolling it into the white base. The metallic flecks catch the light beautifully.
Enjoy wearing your custom accessories or gifting them to mark a special occasion