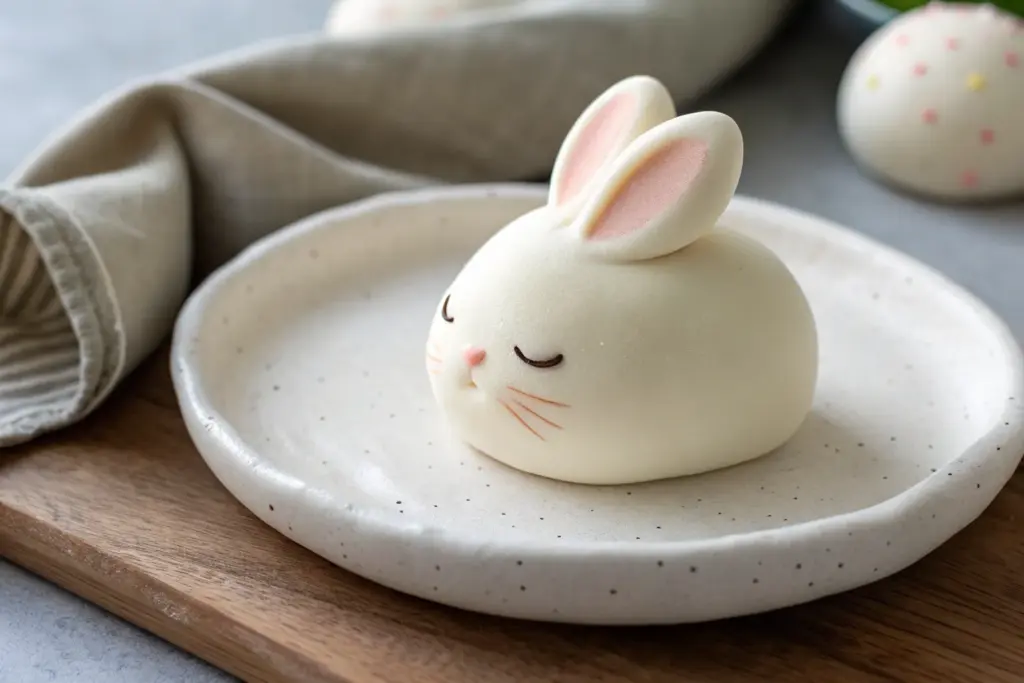
If you love that marshmallowy, bouncy look of puffy clay (aka foam clay), you’re in for the fun kind of messy. These puffy clay ideas are all about cute, rounded minis you can finish in a sitting and show off right away.
Puffy Cupcake Charms
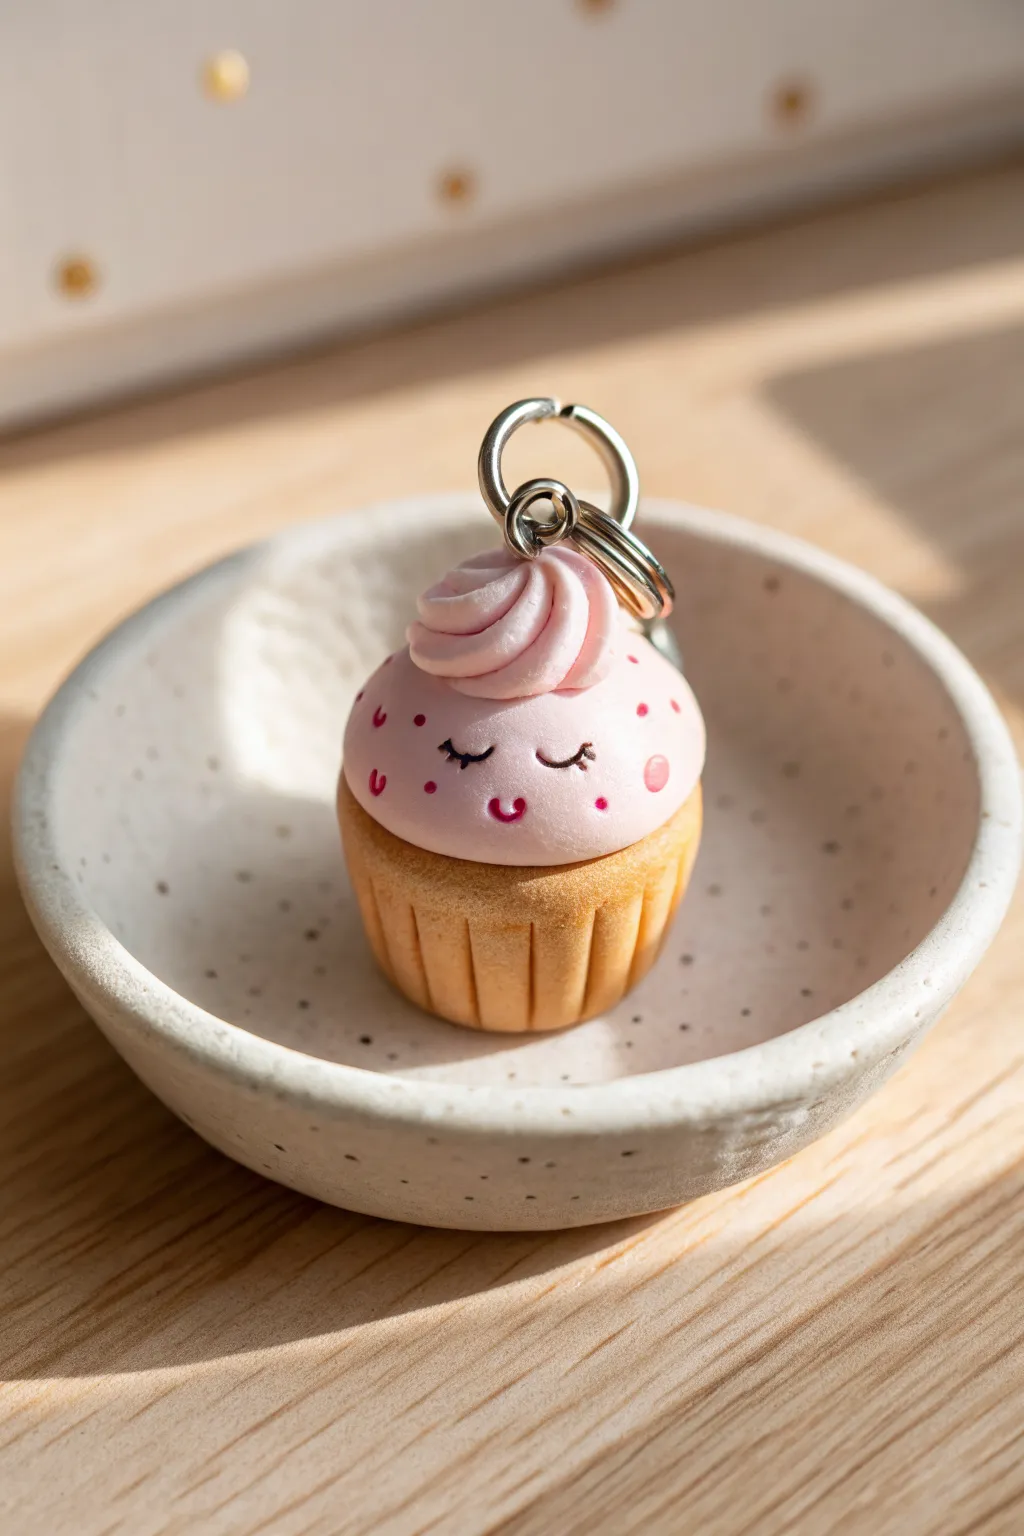
Create an adorable miniature treat that looks sweet enough to eat, featuring a fluffy frosting texture and a charming sleepy face. This project captures the soft, inviting look of puffy clay in a sturdy, wearable charm perfect for keychains or bags.
Step-by-Step Guide
Materials
- Polymer clay or air-dry puffy clay (Light Tan/Biscuit color)
- Polymer clay or air-dry puffy clay (Soft Pink)
- Needle tool or toothpick
- Small ball stylus tool
- Eye pin
- Jump rings and keychain hardware
- Black acrylic paint or fine-tip permanent marker
- Thin paintbrush (000 size)
- Dark pink acrylic paint
- Gloss glaze (optional)
Step 1: Baking the Base
-
Form the cupcake base:
Start by conditioning your tan clay until soft. Roll it into a smooth ball about the size of a large marble, then slightly flatten the top and bottom to create a cylinder shape that tapers slightly downward. -
Add texture:
Using a needle tool or the side of a toothpick, press vertical indentations all around the sides of the tan cylinder to mimic the ridges of a cupcake liner. Space them evenly for a realistic look. -
Refine the shape:
Gently press down on the center of the top to create a slight well, which will help the frosting sit securely later.
Pastel Perfection
To get that soft, puffy look without harsh lines, lightly dust your fingertips with cornstarch before smoothing the pink dome shapes.
Step 2: Frosting & Details
-
Create the main frosting dome:
Take a larger ball of pink clay and flatten the bottom. Place this directly onto your tan base, molding the edges so it looks like a soft, puffy mound of icing sitting on the cake. -
Smooth the seam:
Ensure there is a good connection between the pink and tan layers so they don’t separate after drying. -
Make the top swirl:
Roll a smaller snake of pink clay. Coil it into a small, tapered swirl shape, resembling a dollop of whipped cream. -
Attach the swirl:
Place this swirl on the very center of the pink dome. I like to blend the bottom edge of the swirl slightly into the dome with a styling tool to make it look like one continuous piping. -
Insert the hardware:
Take your eye pin and trim it if it’s too long. Push the straight end down through the center of the swirl and into the base until only the loop is visible.
Step 3: The Kawaii Face
-
Pre-mark the face:
Before adding color, very lightly mark where you want the eyes and mouth to go using a needle tool to ensure symmetry. -
Cure the clay:
If using polymer clay, bake according to package directions (usually 275°F/135°C for 15-30 mins). If using air-dry clay, let it sit for 24 hours until fully hardened. -
Paint the eyes:
Using a 000 brush and black paint, carefully paint two small semi-circles for closed, sleeping eyes with tiny eyelashes extending outward. -
Paint the mouth:
Add a tiny, smiling ‘U’ shape between the eyes in a dark pink or red color. -
Add cheeks:
Dip a ball stylus or the wooden end of a brush into light pink paint and dot rosy cheeks on either side of the mouth. -
Sprinkle details:
Using the tip of a toothpick and darker pink paint, dab tiny dots randomly over the main frosting dome to create sprinkles.
Hardware Help
If the eye pin pulls out after baking, remove it, add a tiny drop of super glue to the stem, and reinsert it for a permanent hold.
Step 4: Assembly
-
Seal the piece:
Once the paint is completely dry, apply a thin coat of gloss glaze to the frosting area if you want a shiny, tasty look. -
Attach keychain:
Open a jump ring using two pairs of pliers (twist sideways, don’t pull apart). Slide on the eye pin loop and your keychain hardware, then close the ring securely.
Now you have a sweet little companion to brighten up your keychain collection


Kawaii Pizza Slice Magnets
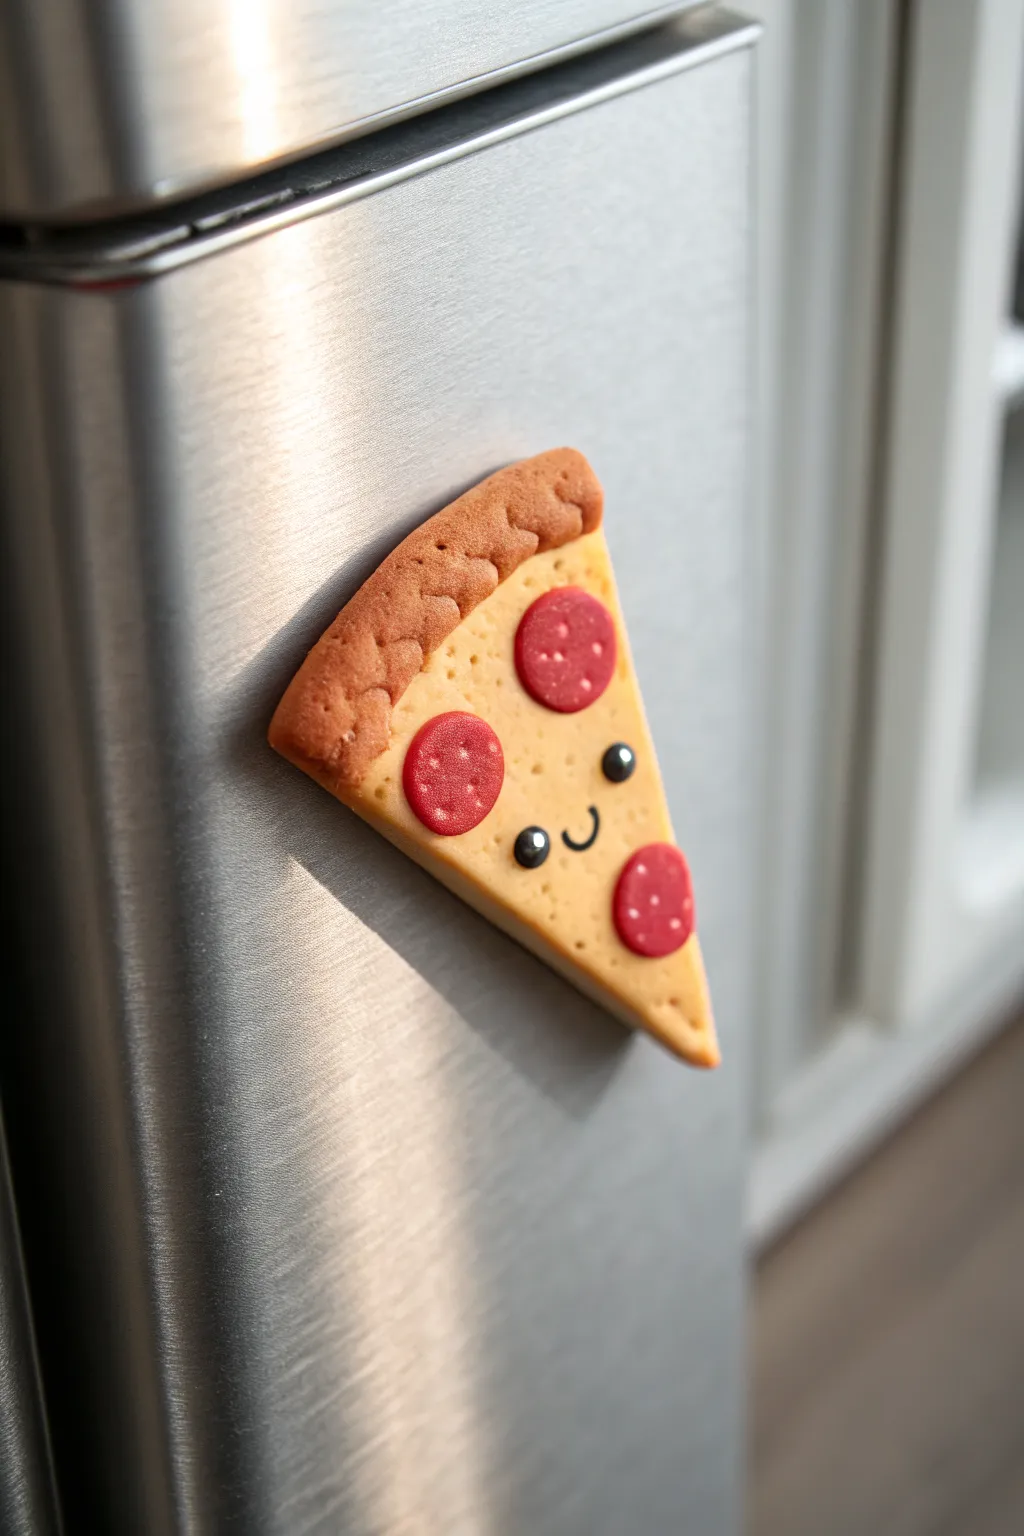
Add a slice of fun to your fridge with this adorable Kawaii pizza magnet. Made from puffy clay, this project features a golden crust, perfectly round pepperoni, and a sweet little smiling face that greets you every time you reach for a snack.
Step-by-Step Tutorial
Materials
- Lightweight puffy air-dry clay or polymer clay (beige, golden brown, red, black)
- Clay roller or smooth jar
- Rolling tool or toothpick for texturing
- Small round cutter or a straw
- Small ball tool or dotting tool
- Craft knife
- Strong craft glue (E6000 or similar)
- Round ceramic or ferrite magnet
- Soft pastel chalk (brown/orange) and a soft brush for shading
Step 1: Forming the Base
-
Mix the dough color:
Start by mixing a light beige clay for the cheese layer. If you only have white, add a tiny dot of yellow and orange to get that warm, melted-cheese hue. -
Roll and shape the triangle:
Flatten the beige clay into a thick triangle shape. Aim for about 1/4 inch thickness so it’s sturdy enough to hold a magnet. Smooth out the edges with your finger to remove any harsh angles. -
Create the crust:
Take a piece of golden brown clay and roll it into a thick snake. If you don’t have golden brown, mix brown with a little yellow and white. This log needs to be as long as the wide top edge of your pizza triangle. -
Attach and texture:
Press the brown log onto the top edge of the beige triangle. Use your fingers to smudge the seam on the back so it sticks well. On the front, use a toothpick or clay tool to press vertical indentations along the crust to give it that baked, doughy texture. -
Shade the crust:
For a realistic baked look, brush a little brown soft pastel powder onto the raised areas of the crust. This adds depth that single-colored clay can’t achieve on its own.
Sticky Situation?
If your clay is sticking to your table, work on a silicone mat or a piece of parchment paper. You can also lightly dust your fingers with cornstarch.
Step 2: Adding Toppings & Face
-
Make the pepperoni:
Roll out a thin sheet of red clay. Use a small round cutter, or even the end of a wide straw, to punch out three distinct circles. -
Position the toppings:
Press the three pepperoni slices onto the cheese layer. Place two near the top edges and one near the bottom point, leaving the center clear for the face. Don’t press too hard—you want them slightly raised. -
Refine the pepperoni texture:
If you want extra realism, gently tap the surface of the red clay with a toothbrush or stiff brush to mimic the meaty texture of salami. -
Add cheese pores:
Use a needle tool or toothpick to poke tiny, shallow holes randomly across the beige cheese area. Keep them sparse; this mimics the bubbles in melted cheese. -
Create eye sockets:
Use a small ball tool to make two indentations right primarily in the center of the slice, between the pepperoni arrangement. -
Insert the eyes:
Roll two tiny balls of black clay and press them into the sockets. Add microscopic dots of white clay (or white paint after drying) to the top right of each eye for a reflective glint. -
Form the smile:
Roll an extremely thin thread of black clay. Cut a tiny U-shape and carefully press it between the eyes to create a happy smile.
Step 3: Finishing Up
-
Dry the piece:
Let your pizza slice dry completely. If using puffy air-dry clay, this usually takes 24-48 hours. If using polymer clay, bake according to the package instructions. -
Seal (optional):
Once dry, you can apply a matte varnish to the crust and a satin glaze to the pepperoni and eyes to make them look juicy and bright. -
Attach magnet:
Apply a dab of strong craft glue to the back of the slice. Press the magnet firmly into the glue. -
Final cure:
Allow the glue to cure fully before sticking it to your fridge, ensuring the weight of the clay won’t cause it to slide down.
Pro Tip: Realistic texture
Use an old toothbrush to gently tap the ‘baked’ crust before shading. This creates a realistic bread texture that catches the pastel chalk beautifully.
Now your fridge has a delicious new guardian that looks good enough to eat


Strawberries With Tiny Faces
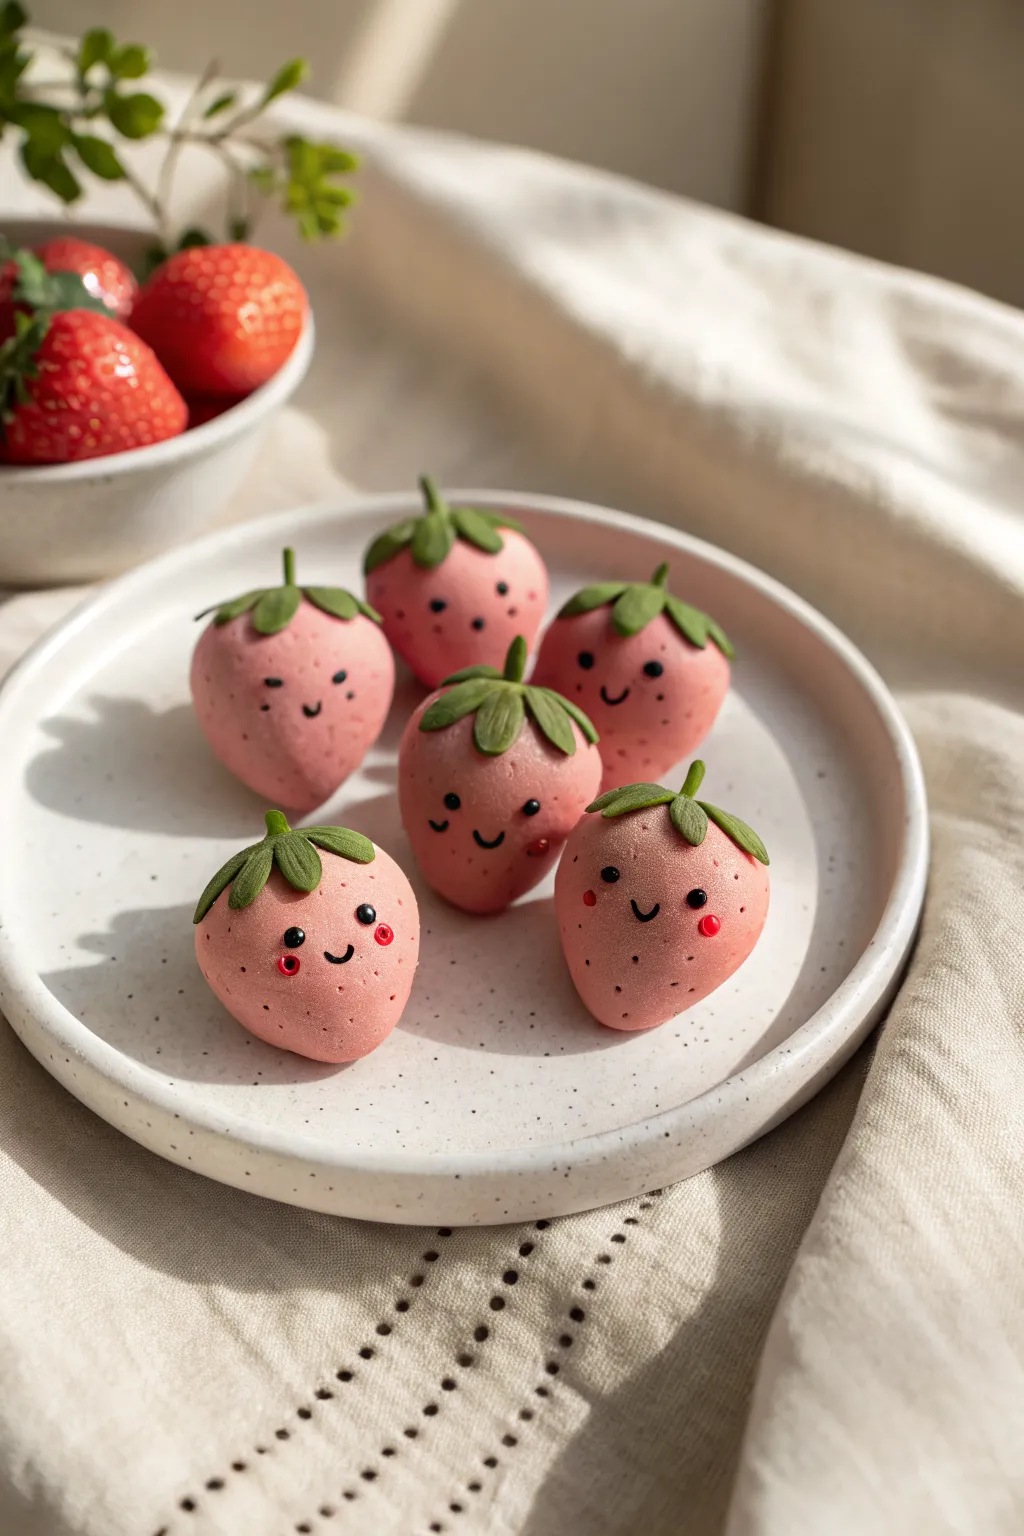
These adorable little berries bring a soft, whimsical touch to your desk or shelf, complete with blushing cheeks and tiny smiles. Perfect for beginners, this project turns simple puffy clay shapes into friendly fruit companions with personality.
How-To Guide
Materials
- Light pink puffy clay (air-dry or polymer depending on preference)
- Green puffy clay (for the leaves and stems)
- Black acrylic paint or fine-tip black marker
- Red or dark pink acrylic paint (for blushing cheeks)
- Dotting tool or a toothpick
- Creating smooth work surface (silicone mat or parchment paper)
- Plastic modeling tool or butter knife
Step 1: Shaping the Berry Bodies
-
Portion the clay:
Start by taking your light pink clay and dividing it into even chunks. You’ll want pieces about the size of a walnut to match the scale in the photo. -
Roll into spheres:
Roll each piece of pink clay between your palms until you have perfectly smooth balls. Get out as many creases as you can now. -
Form the strawberry shape:
Gently taper the bottom half of each sphere by rolling it slightly harder on one side. You want a soft, rounded cone shape—fat at the top and narrower at the bottom, but not too pointy. -
Flatten the top:
Press the wide top of the strawberry very gently against your work surface just to flatten it slightly, which will help the stem sit better later. -
Add texture:
Use a toothpick or a very small dotting tool to press random, shallow little divots all over the pink body. These mimic the seeds without needing to paint hundreds of tiny specks.
Cracking Clay?
If your puffy clay starts cracking while shaping, dip your finger in a tiny bit of water and smooth it over the fissures. Keep the clay sealed when not in use.
Step 2: Crafting the Greenery
-
Prepare the green clay:
Take a small pinch of green clay for each berry. You won’t need much, just enough to make the leafy cap. -
Create the leaves:
Flatten the green pinch into a small disk, then use your modeling tool or fingers to pull out 5 or 6 little star-points. -
Add texture to leaves:
I like to use a knife tool or toothpick to press a central vein line down the middle of each little leaf point for added realism. -
Make the stem:
Roll a tiny, thin sausage of green clay. Cut a short segment—about a quarter-inch long—to serve as the main stem. -
Attach the cap:
Press the star-shaped leaf piece onto the flat top of your strawberry. Gently curve the leaf tips down so they hug the rounded sides of the berry. -
Secure the stem:
Place the little stem stalk right in the center of the leaves. Press down gently to fuse the clay pieces together.
Step 3: Adding the Personality
-
Let the surface set:
If you are using air-dry clay, wait about 30 minutes for the surface to harden slightly before painting. If using polymer, bake according to package directions and let cool completely. -
Map out the face:
Visualize where the face will go. It should be relatively low on the strawberry body to achieve that cute ‘kawaii’ proportion. -
Paint the eyes:
Dip your smallest dotting tool (or a toothpick end) into black paint. Dab two small dots for eyes, spacing them wider apart than you think for extra cuteness. -
Draw the smile:
Using a very fine liner brush or a fine-tip marker, draw a tiny ‘U’ shape between the eyes for the smile. -
Add the blush:
Dip a clean dotting tool into your red or dark pink paint. Place two small dots just outside and slightly below the eyes for rosy cheeks. -
Optional highlights:
Once the black eye paint is dry, you can add an incredibly tiny speck of white paint to each eye for a sparkle effect.
Softer Blush Look
Instead of acrylic paint dots for cheeks, try using real cosmetic blush or pink pastel chalk dust applied with a Q-tip for a soft, airbrushed effect.
Arranged together on a small plate, these little berries make a sweet display that looks good enough to eat


Chubby Frog Figurines
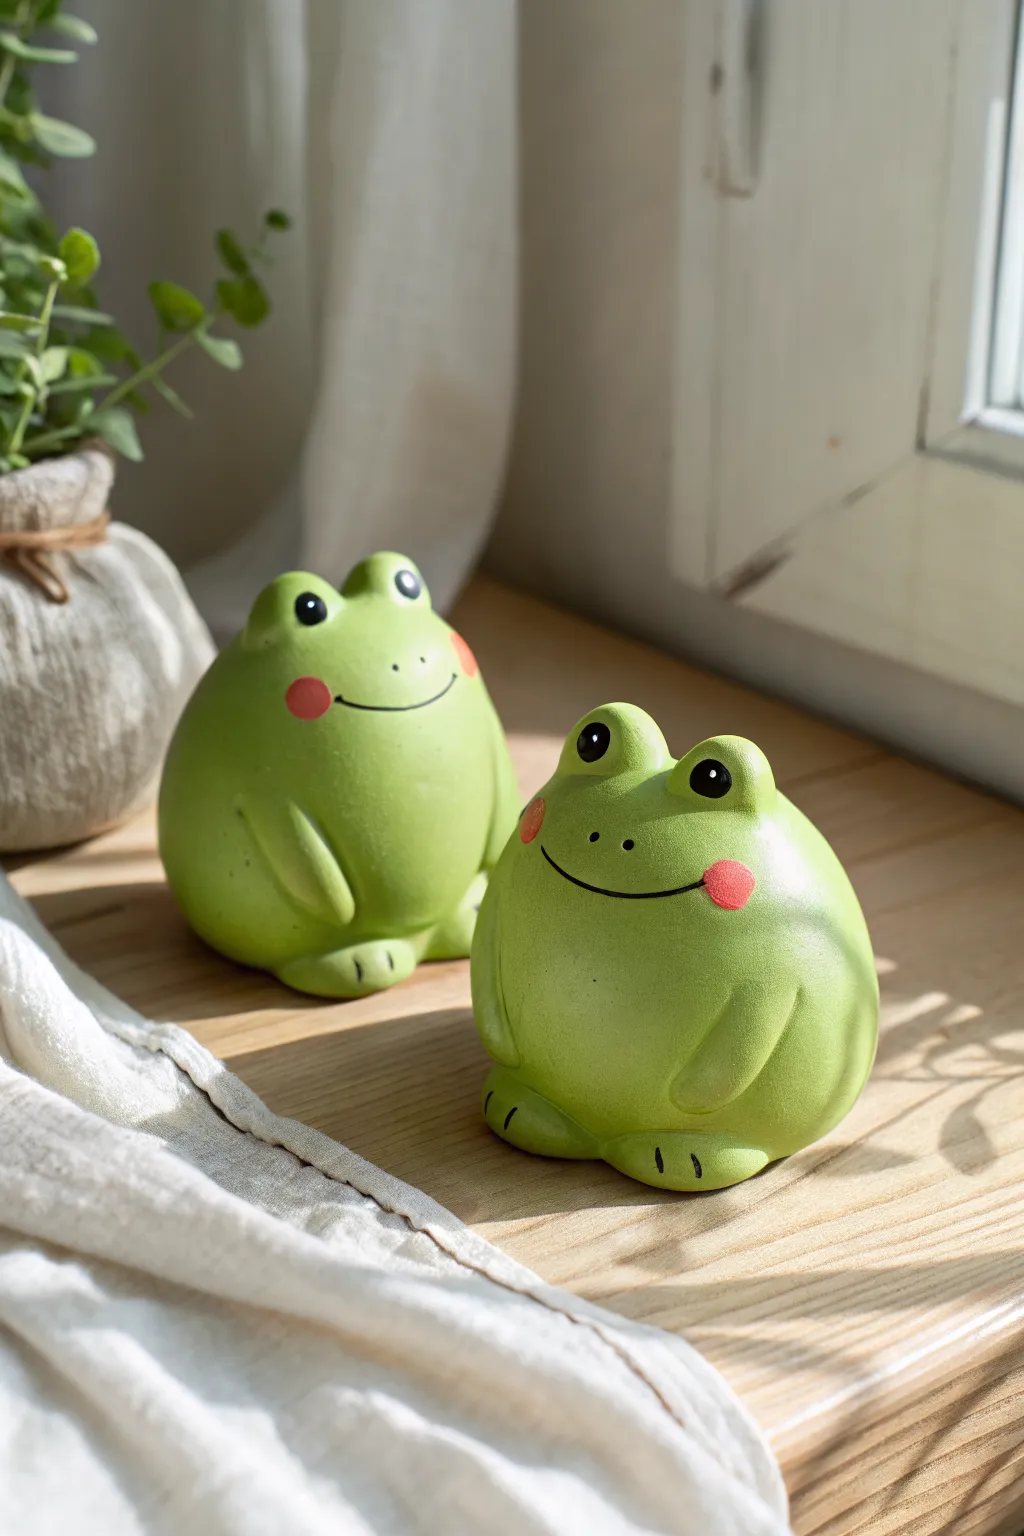
These delightfully round frog figurines bring a touch of whimsy to any shelf with their soft green hue and adorable rosy cheeks. Their simplified, egg-like shape makes them a perfect beginner project for mastering smooth curves and minimalist facial features.
Step-by-Step Guide
Materials
- Air-dry clay or polymer clay (white or pre-colored green)
- Acrylic paints (leaf green, white, pale pink, black)
- Glossy varnish or sealant
- Rolling pin
- Small cup of water (for smoothing)
- Fine-grit sandpaper
- Sculpting tool with a curved edge
- Fine detail paintbrush
Step 1: Faping the Base
-
Prepare the clay:
Start by conditioning your clay until it is soft and pliable. If you are using white clay, you can either knead green paint into it now for a solid color or plan to paint it later. I prefer kneading the color in first for a uniform look. -
Form the body:
Roll a large handful of clay into a smooth ball about the size of a tennis ball. Gently tap the bottom against your work surface to create a flat base so it sits stably. -
Refine the shape:
Using your palms, gently smooth the sides upwards to create a slightly tapered, egg-like dome shape. The frog should look very bottom-heavy and chubby.
Smooth Operator
Keep a wet sponge nearby while sculpting. Frequently wiping your clay tools prevents drag marks and keeps the surface buttery smooth.
Step 2: Adding Features
-
Make the eye sockets:
Roll two small marble-sized balls of clay for the eyes. Place them on top of the head, spaced slightly apart. -
Blend the eyes:
Use a sculpting tool to smooth the seam where the eye balls meet the main body. Blend the clay downward so the eyes look like raised bumps integrated into the head, not just stuck on. -
Create the arms:
Roll two thick, short logs of clay, slightly tapered at one end. Each should be about 1.5 inches long. -
Attach the arms:
Press the arms onto the sides of the body, curving them forward so the ‘hands’ rest on the frog’s belly. Blend the top flush with the shoulder area. -
Add definition to arms:
Use your sculpting tool to press a gentle indention along the back of the arm to separate it visually from the body, ensuring it still looks sleek and aerodynamic. -
Form the feet:
Roll two flattened ovals for the feet. Place them at the very bottom front of the frog, sticking out slightly. -
Detail the toes:
Use a knife tool or toothpick to press two small lines into each foot, creating the suggestion of three webbed toes. -
Final smoothing:
Dip your finger in a little water and run it over the entire sculpture to remove fingerprints and ensure all seams are invisible.
Cracking Up?
If small cracks appear as the clay dries, mix a tiny bit of fresh clay with water to make a paste and fill them in like spackle.
Step 3: Finishing Touches
-
Dry the sculpture:
Allow the clay to dry completely according to package instructions. For air-dry clay, this usually takes 24-48 hours. -
Sand imperfections:
Once fully hard, use fine-grit sandpaper to gently buff away any rough spots or remaining bumps for a ceramic-smooth finish. -
Paint the base coat:
If you didn’t color your clay beforehand, paint the entire frog a bright, leafy green. You may need two coats for full coverage. -
Paint the tummy (optional):
For added dimension, you can mix a little white into your green and dry-brush a lighter highlight on the center of the belly. -
Paint the cheeks:
Mix a soft coral or pale pink paint. Use the tip of a round brush or a cotton swab to dab two perfect circles on the cheeks. -
Draw the face:
Using a very fine liner brush and black paint, draw a wide, shallow U-shape for the smile connecting the cheeks. Add two small vertical ovals for the nose nostrils. -
Detail the eyes:
Paint solid black circles onto the raised eye bumps. Once dry, add a tiny white dot in the upper corner of each pupil for a life-like sparkle. -
Seal the piece:
Finish with a coat of glossy varnish. This mimics the glazed look of the ceramic frogs in the reference image and protects your paint.
Set your finished frogs on a sunny windowsill where their glossy coats can catch the light

The Complete Guide to Pottery Troubleshooting
Uncover the most common ceramic mistakes—from cracking clay to failed glazes—and learn how to fix them fast.
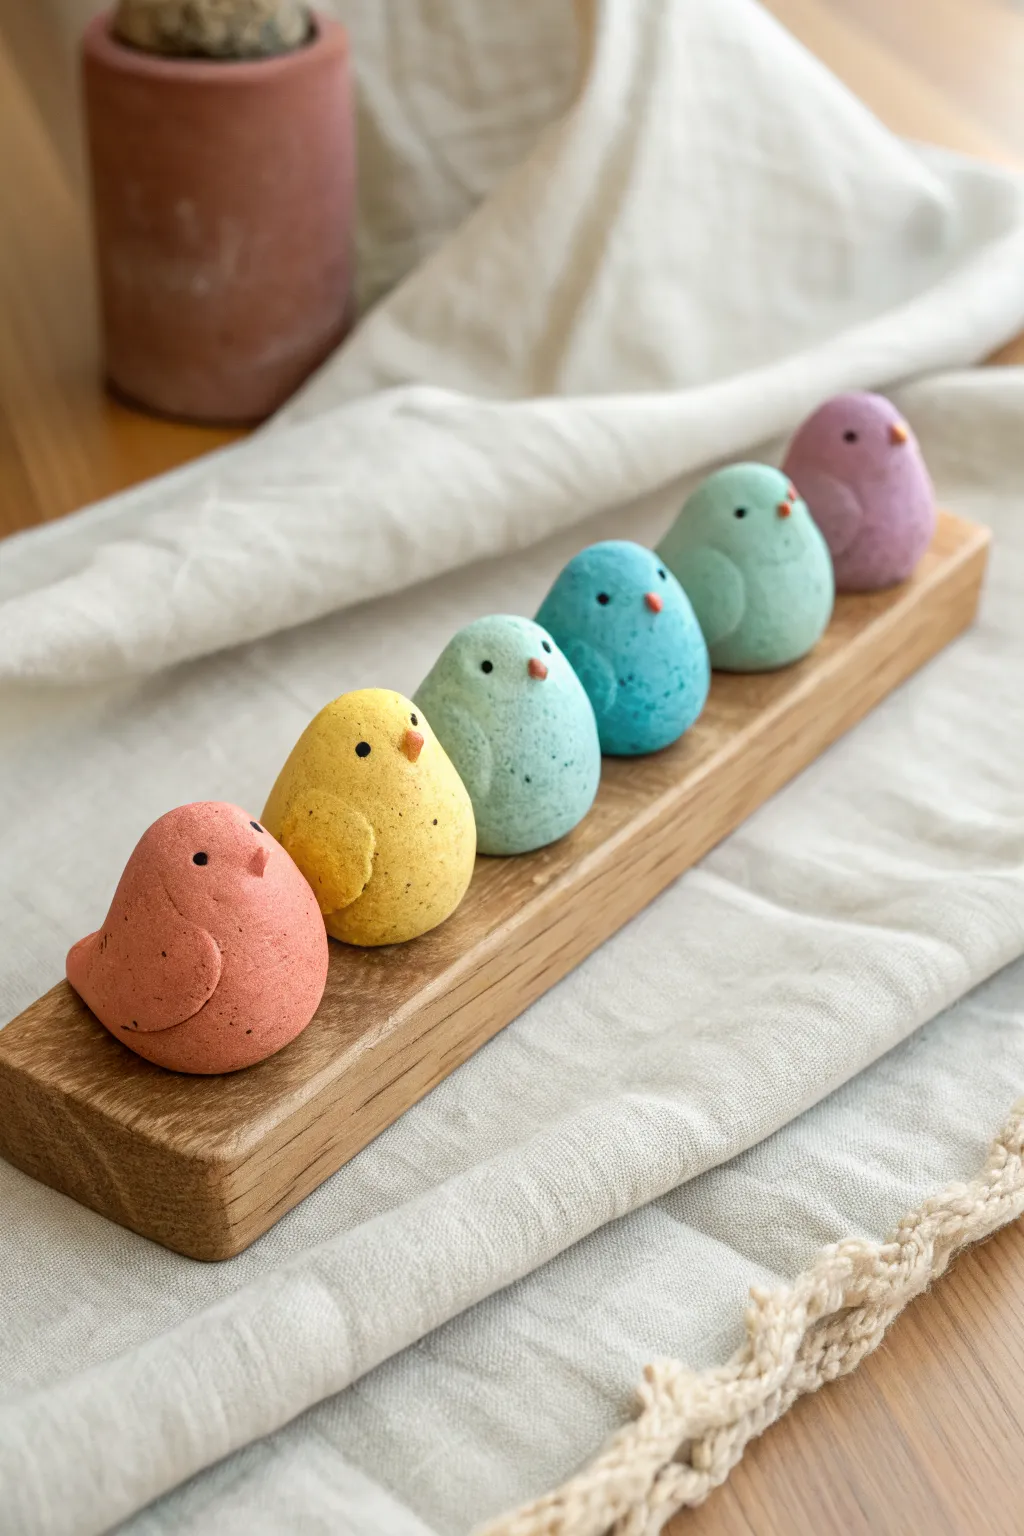
Round Little Chick Friends
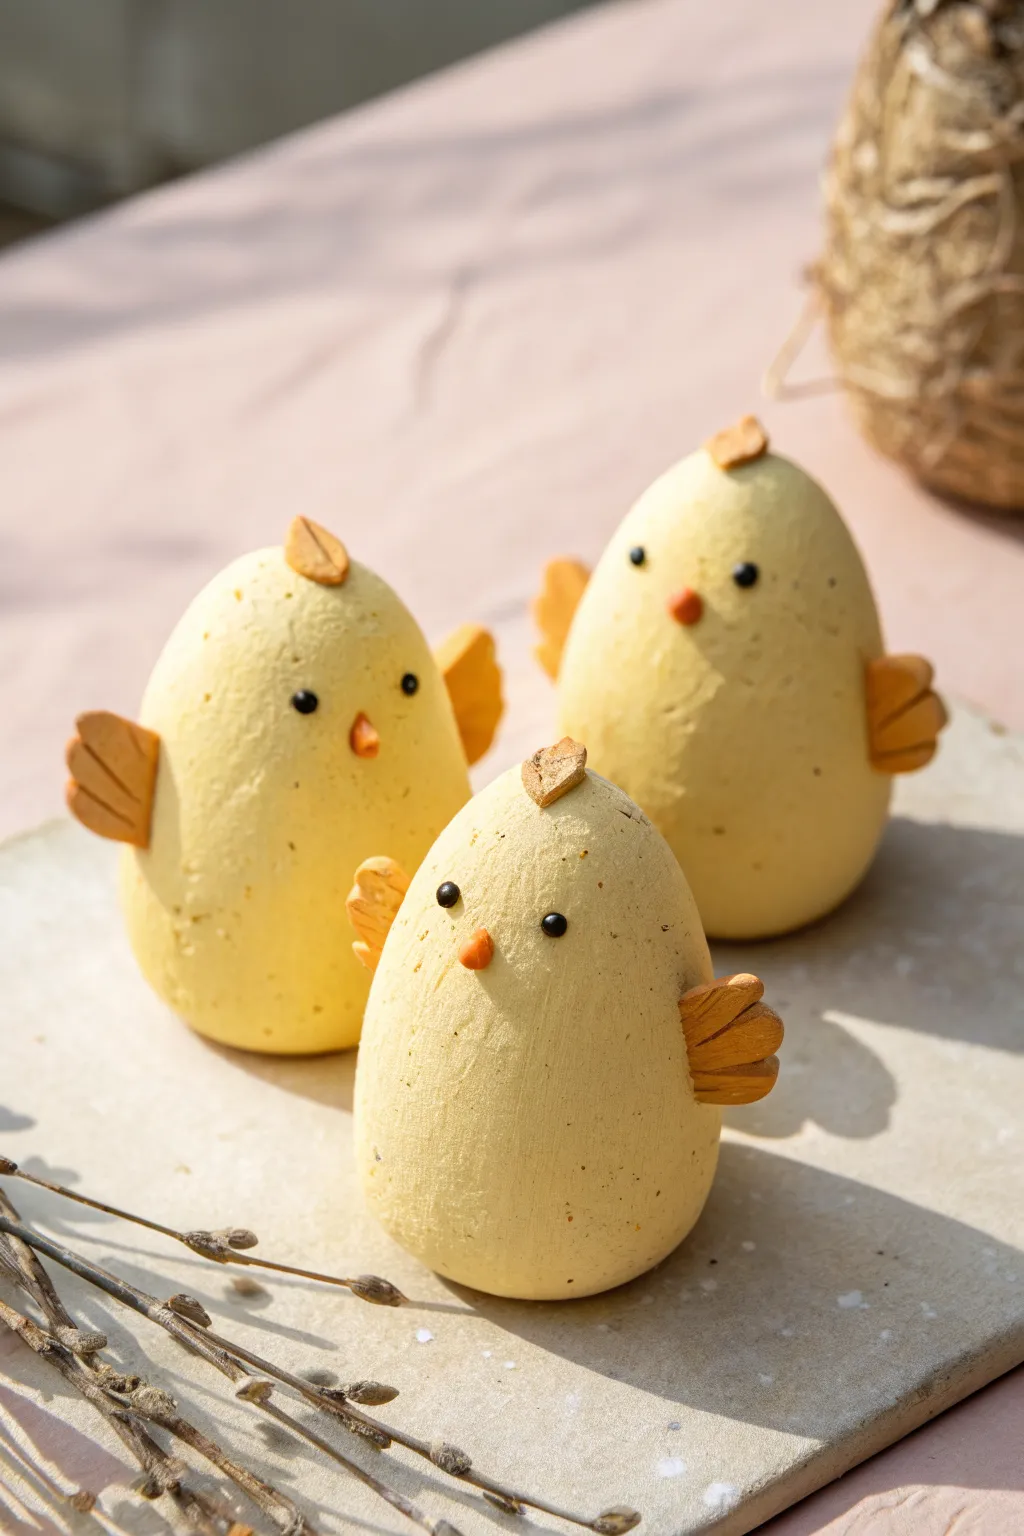
These adorable, round chicks are a perfect spring crafting project, combining simple shapes with charming details. Their textured, matte finish gives them a rustic, handmade feel that looks great nestled among seasonal decor.
Detailed Instructions
Materials
- Puffy clay or air-dry clay (white or light yellow)
- Acrylic paint (sunny yellow, bright orange, black, warm brown)
- Small paintbrush
- Pointed sculpting tool or toothpick
- Water in a small cup
- Aluminum foil (optional for core)
- Fine-grit sandpaper (optional)
- Matte sealant spray
Step 1: Shaping the Bodies
-
Prepare the clay:
Start by kneading your clay until it is soft and pliable. If you want colored clay from the start, mix a drop of yellow acrylic paint into the white clay now, kneading until the color is uniform. -
Form the base shape:
Roll a handful of clay into a smooth ball. Slowly taper the top portion to create a classic egg shape, slightly wider at the bottom for stability. -
Refine the surface:
Dip your finger in a tiny bit of water and smooth out any visible cracks or fingerprints on the egg form. Gently tap the bottom on your work surface so the chick stands upright on its own. -
Add texture:
To mimic the slightly rough, stone-like texture seen in the photo, gently dab the surface with a crumpled piece of aluminum foil or a stiff paintbrush bristles. Don’t overdo it; just enough to break the perfect smoothness.
Cracks Appearing?
If small cracks form while drying, mix a tiny bit of fresh clay with water to make a paste (slip) and fill them in. Smooth with a damp finger.
Step 2: Creating Features
-
Make the wings:
Pinch off two small distinct pieces of clay for the wings. Flatten them into teardrop shapes. -
Detail the feathers:
Use your sculpting tool or a toothpick to press two or three indentations into the wider end of the teardrop, creating a scalloped feather look. -
Attach the wings:
Score the sides of the body where the wings will go. Press the wings firmly onto the body, blending the clay slightly at the shoulder connection point so they don’t fall off. -
Form the crest:
Creating the little tuft on top adds personality. Take a tiny bit of clay, shape it like a small leaf or triangle, and attach it to the very top of the head. -
Add the beak:
Roll a tiny cone of clay for the beak. Press it into the center of the face area. I find using a dab of water here acts like glue to keep this small piece secure. -
Let it dry:
Allow your chicks to dry completely according to your clay’s package instructions. This usually takes 24 hours depending on thickness.
Step 3: Painting and Finishing
-
Base coat:
If you didn’t pre-dye the clay, paint the entire body yellow. Use a matte yellow paint for a soft look. You might need two coats for full coverage. -
Paint the wings:
Mix a little brown with your orange paint to get an earthy amber tone. Paint the wings and the crest on top of the head with this color. -
Highlight the beak:
Using a bright orange paint, carefully color the beak. A very small brush is essential here to keep the edges clean. -
Add the eyes:
Dip the handle end of a paintbrush or a dotting tool into black paint. Dot two eyes symmetrically above the beak. Keep them small for a gentle expression. -
Optional speckling:
To achieve that rustic speckled egg look, dilute a tiny bit of brown paint with water. Dip an old toothbrush in it and flick the bristles to spray fine mist specks over the dried chicks. -
Seat the eyes:
If you want the eyes to look embedded rather than painted on, you can gently press small black beads into the clay while it is still wet in the earlier phase. -
Seal the work:
Once all paint is dry, spray with a matte sealant to protect the finish without making them shiny.
Make Them Wobble
Embed a rounded weight or a heavy marble in the very bottom of the egg shape. This creates a roly-poly effect so they wobble when tapped.
Set your trio of chicks on a shelf or windowsill to bring a touch of sunshine indoors
Tiny Dino Nuggie Dinos
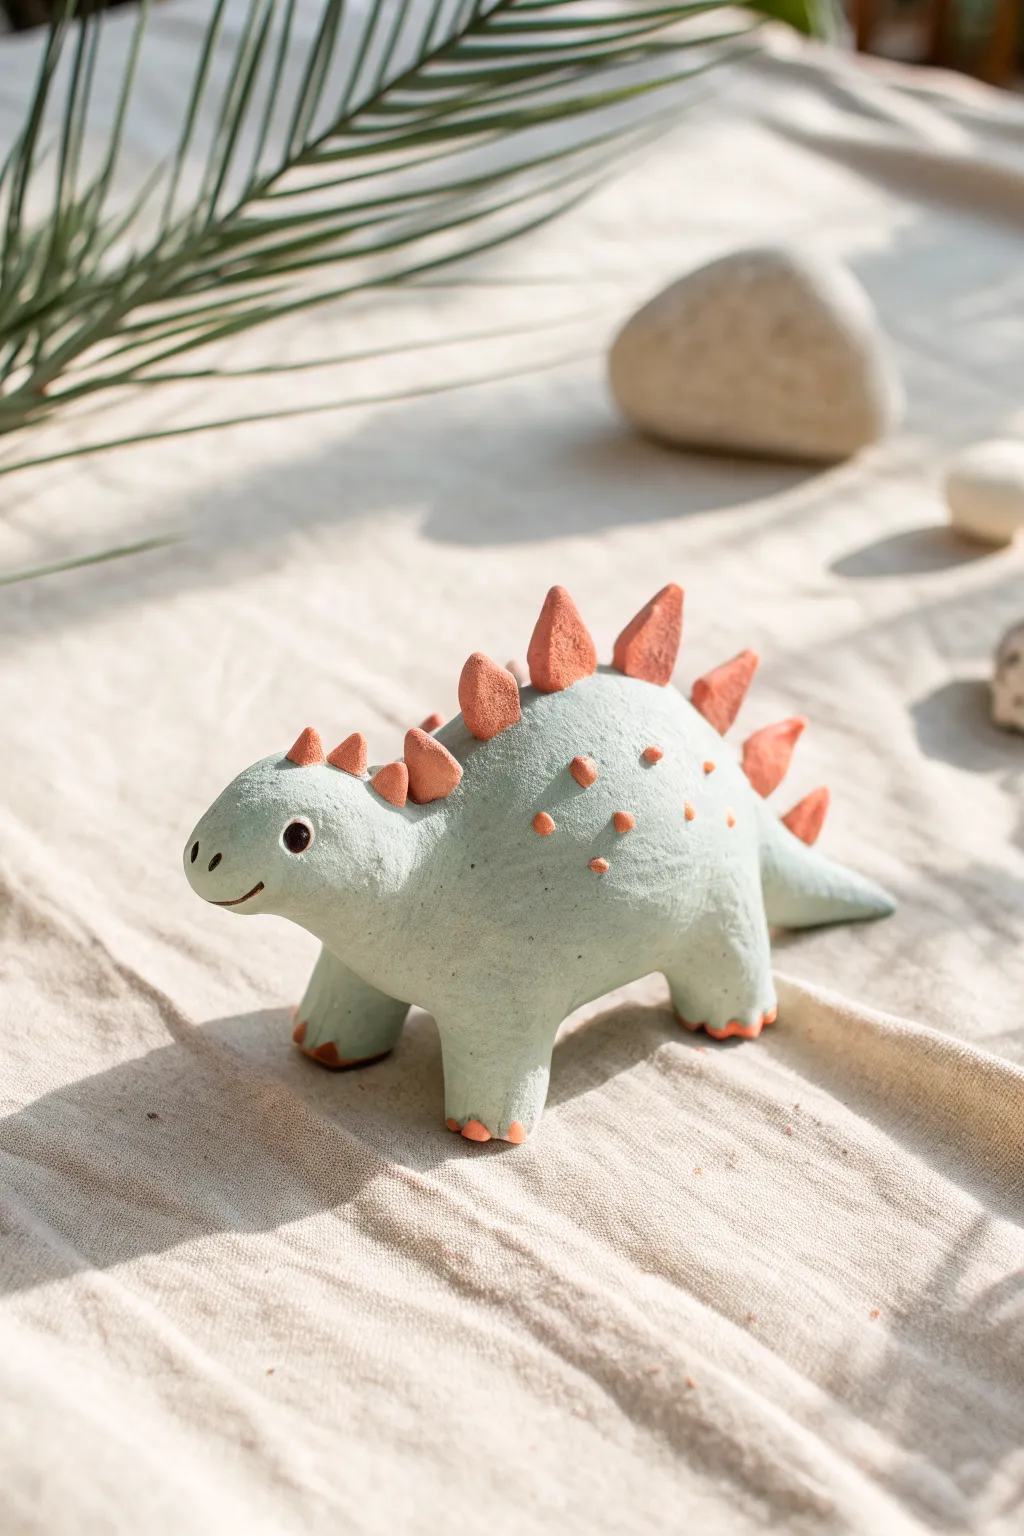
Create your own prehistoric buddy with this adorable mint-green stegosaurus project, featuring a unique textured finish that feels just like stone. This chunky little dino sports coral-colored spikes and tiny spots, making it the perfect desk companion or distinctive gift.
Step-by-Step Guide
Materials
- Air-dry puffy clay or lightweight stone clay (white base)
- Mint green acrylic paint (or food coloring if mixing into clay)
- Coral/terracotta acrylic paint
- Basic sculpting tools (needle tool, small ball tool)
- Black beads or black clay for eyes
- Water cup and small sponge
- Fine grit sandpaper (optional)
Step 1: Forming the Body
-
Mix the base color:
Start by taking a large handful of your puffy clay. If you are tinting the clay directly, knead in a small drop of mint green paint until the color is uniform and pastel. If you plan to paint later, leave it white. -
Shape the torso:
Roll the clay into a smooth, thick oval shape. This will be the main body of your dinosaur, so keep it plump and nuggets-shaped. -
Create the legs:
Pull four small, equal-sized pieces of clay from your main batch. Roll them into short, stout cylinders. -
Attach the limbs:
Press the four cylinders onto the bottom of the body oval. Blend the seams thoroughly with your finger or a sculpting tool so the legs look like they grow naturally out of the body. -
Form the tail:
Pinch the back end of the oval and gently pull it outwards to create a tapered tail. Smooth it so it curves slightly downwards. -
Sculpt the head:
On the front end, gently mould a rounded snout area. It shouldn’t be too distinct from the body—just a gentle rise to define the face.
Step 2: Adding Details
-
Prepare the spikes:
Take a separate portion of clay and tint it a coral or terracotta color. Roll tiny balls of varying sizes. -
Shape the plates:
Flatten each coral ball slightly and pinch the top to create a triangular, plate-like shape. Make sure the base of each spike is flat. -
Attach the spine plates:
Starting from the neck and working down to the tail, press these plates onto the center of the dinosaur’s back. I like to put the largest ones in the middle and get smaller towards the tail. -
Add texture spots:
Using tiny bits of the coral clay, press small, flat dots onto the side of the body for extra texture and color variation. -
Create the face:
Use a needle tool to press two small nostrils into the snout. Use a curved tool to carve a simple, happy smile. -
Insert the eyes:
Press two small black beads firmly into the sides of the head. If you don’t have beads, roll tiny balls of black clay and press them in flat.
Cracks Appearing?
If you see small cracks forming while the clay dries, mix a tiny bit of fresh clay with water to make a paste (slip) and smooth it into the fissures with your finger.
Step 3: Finishing Touches
-
Apply texture:
To get that stone-like look seen in the photo, gently tap the entire surface of the green skin with a stiff bristle brush or a crumpled ball of aluminum foil before the clay dries. -
Dry completely:
Let your dinosaur sit in a well-ventilated area for 24-48 hours. Puffy clay needs time to harden fully. -
Paint the toes:
Once dry, use a fine brush to paint tiny coral triangles on the bottom of the feet to represent claws. -
Matte finish:
If your paint is glossy, apply a coat of matte varnish. This seals the clay and removes any shine, giving it that soft, velvety stone appearance.
Primitive Style
For an even more rugged, fossil-like look, skip the separate clay colors. Sculpt the whole dino in one color, then use a ‘dry brush’ painting technique to highlight textures.
Enjoy your new prehistoric friend on your desk or shelf as a daily dose of cuteness


What Really Happens Inside the Kiln
Learn how time and temperature work together inside the kiln to transform clay into durable ceramic.
Puffy Cloud Charms
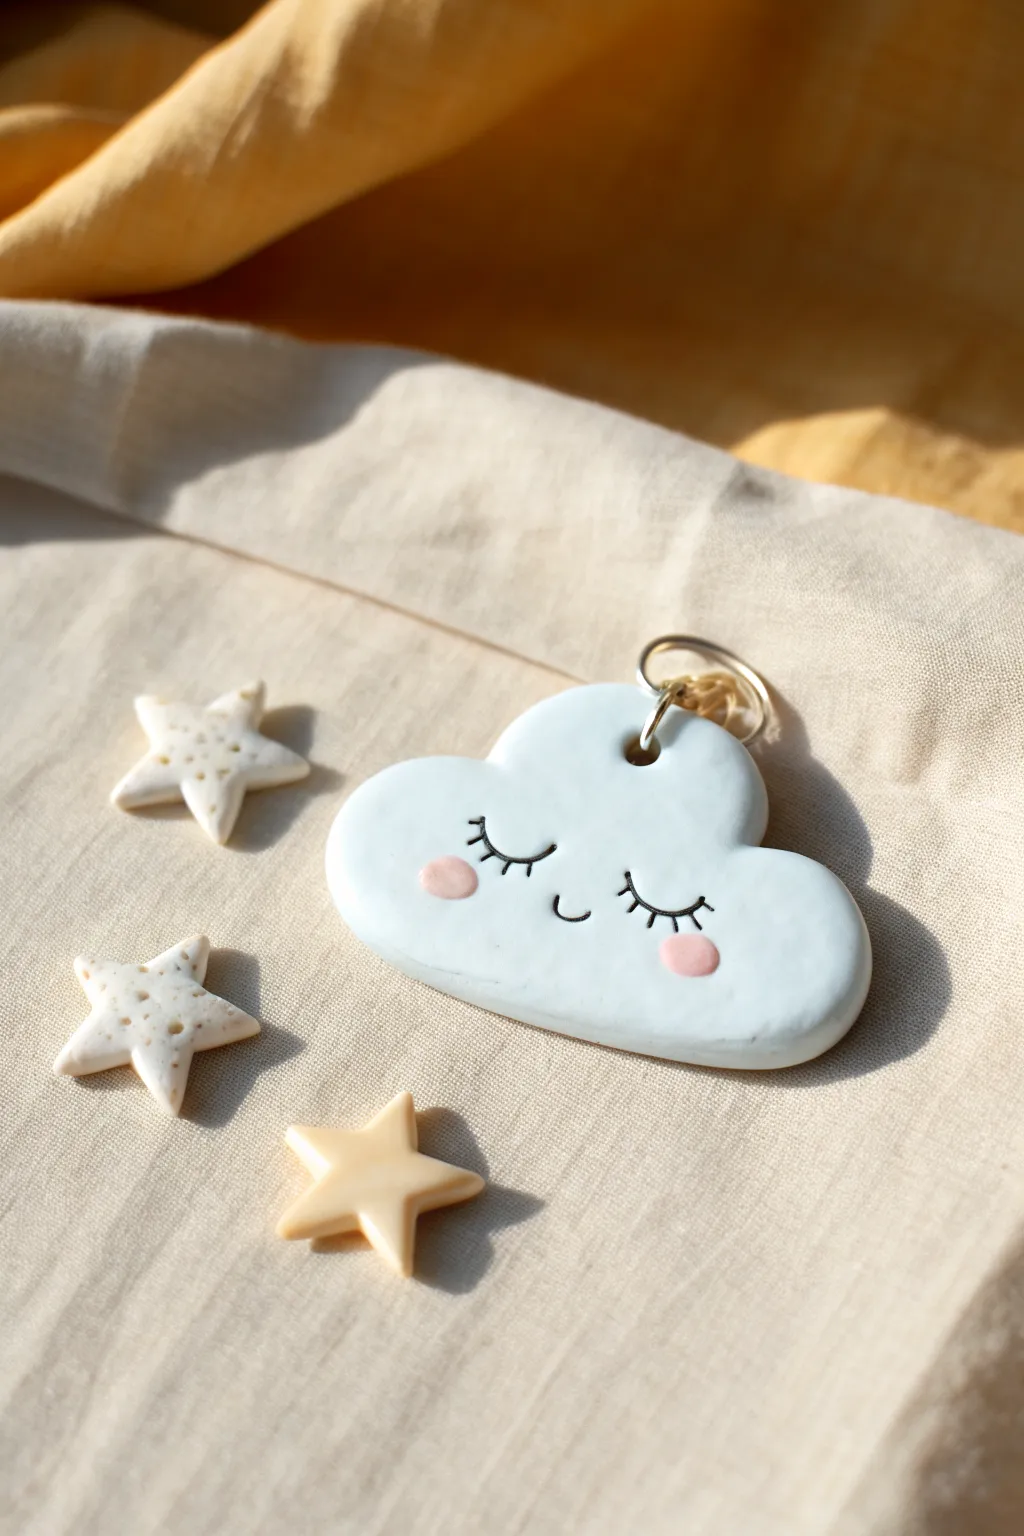
Capture the sweetness of a daydream with this adorable puffy cloud charm made from air-dry or polymer clay. Its soft edges, sleepy expression, and pastel finish make it a perfect addition to a keychain, mobile, or gift tag.
Detailed Instructions
Materials
- White polymer clay or air-dry clay
- Light blue acrylic paint (if using white clay)
- Black fine-point permanent marker or detail paint pen
- Pink acrylic paint
- Rolling pin
- Cloud-shaped cookie cutter (or X-Acto knife)
- Ball stylus tool or a straw
- Small paintbrush
- Jump ring and jewelry pliers
- Sandpaper (fine grit)
- Glaze or sealant (matte or satin finish)
Step 1: Shaping the Cloud
-
Condition the clay:
Begin by warming the clay in your hands. Knead it thoroughly until it is soft, pliable, and free of any cracks or air bubbles. -
Create a smooth slab:
Roll the clay out onto a smooth work surface. Aim for a thickness of about 1/4 inch (6mm)—you want it thick enough to look ‘puffy’ and rounded, not flat like a cracker. -
Cut the shape:
Press your cloud-shaped cutter firmly into the clay. If you don’t have a cutter, lightly sketch a cloud shape onto the clay with a needle tool and carefully cut it out with a craft knife. -
Soften the edges:
This step is crucial for the ‘puffy’ look. Gently run your fingertip dipped in a little water (for air-dry) or baby oil (for polymer) along the cut edges to round them off fully. The goal is to remove the sharp angle from the cutter. -
Making the stars (optional):
Use the leftover scraps to cut out small star shapes. Poke texture into them with a needle tool or toothbrush to give them a stony appearance like the ones in the photo. -
Add the hardware hole:
Using a straw or a large ball stylus, punch a clean hole near the top center of the cloud. Ensure it’s not too close to the edge to prevent tearing later. -
Cure or dry:
Bake the clay according to the manufacturer’s package instructions if using polymer, or let it air dry for 24-48 hours until rock hard.
Uneven Cheeks?
If your painted cheeks end up different sizes, wait for the paint to dry completely. Gently scrape the excess paint off with a craft knife or paint over it with the blue base color and try again.
Step 2: Painting and Finishing
-
Sand for smoothness:
Once fully cured and cooled, lightly sand any remaining rough spots on the edges with fine-grit sandpaper. -
Base coat:
If your clay wasn’t pre-colored, paint the entire cloud with a soft, pale blue acrylic paint. I find two thin coats cover better than one thick one. Let this dry completely. -
Drafting the face:
Lightly mark the position of the eyes and mouth with a pencil to ensure the symmetry is correct before committing to ink. -
Drawing the details:
Using a fine-point black marker or a very thin liner brush, draw two downward arches for the closed sleeping eyes. Add three small lashes to each eye. -
Adding the smile:
Draw a tiny ‘U’ shape right between the eyes for the nose or mouth. -
Rosy cheeks:
Dip the back end of a paintbrush or a large dotting tool into pink acrylic paint. Dab two generous circles onto the cheeks, just below the lash line. -
Sealing the charm:
Apply a coat of satin or matte glaze over the entire piece. This protects the paint from scratching and gives it a professional ceramic look. -
Final assembly:
Once the glaze is dry, use jewelry pliers to twist open a jump ring. Thread it through the hole at the top and close it securely.
Level Up: Texture
Before baking, use a crumpled piece of aluminum foil to gently press texture into the cloud’s surface. This gives it a soft, organic feel rather than perfectly smooth plastic.
Now your peaceful little cloud is ready to hang up and bring a sense of calm to your space
Star And Moon Puffy Pins
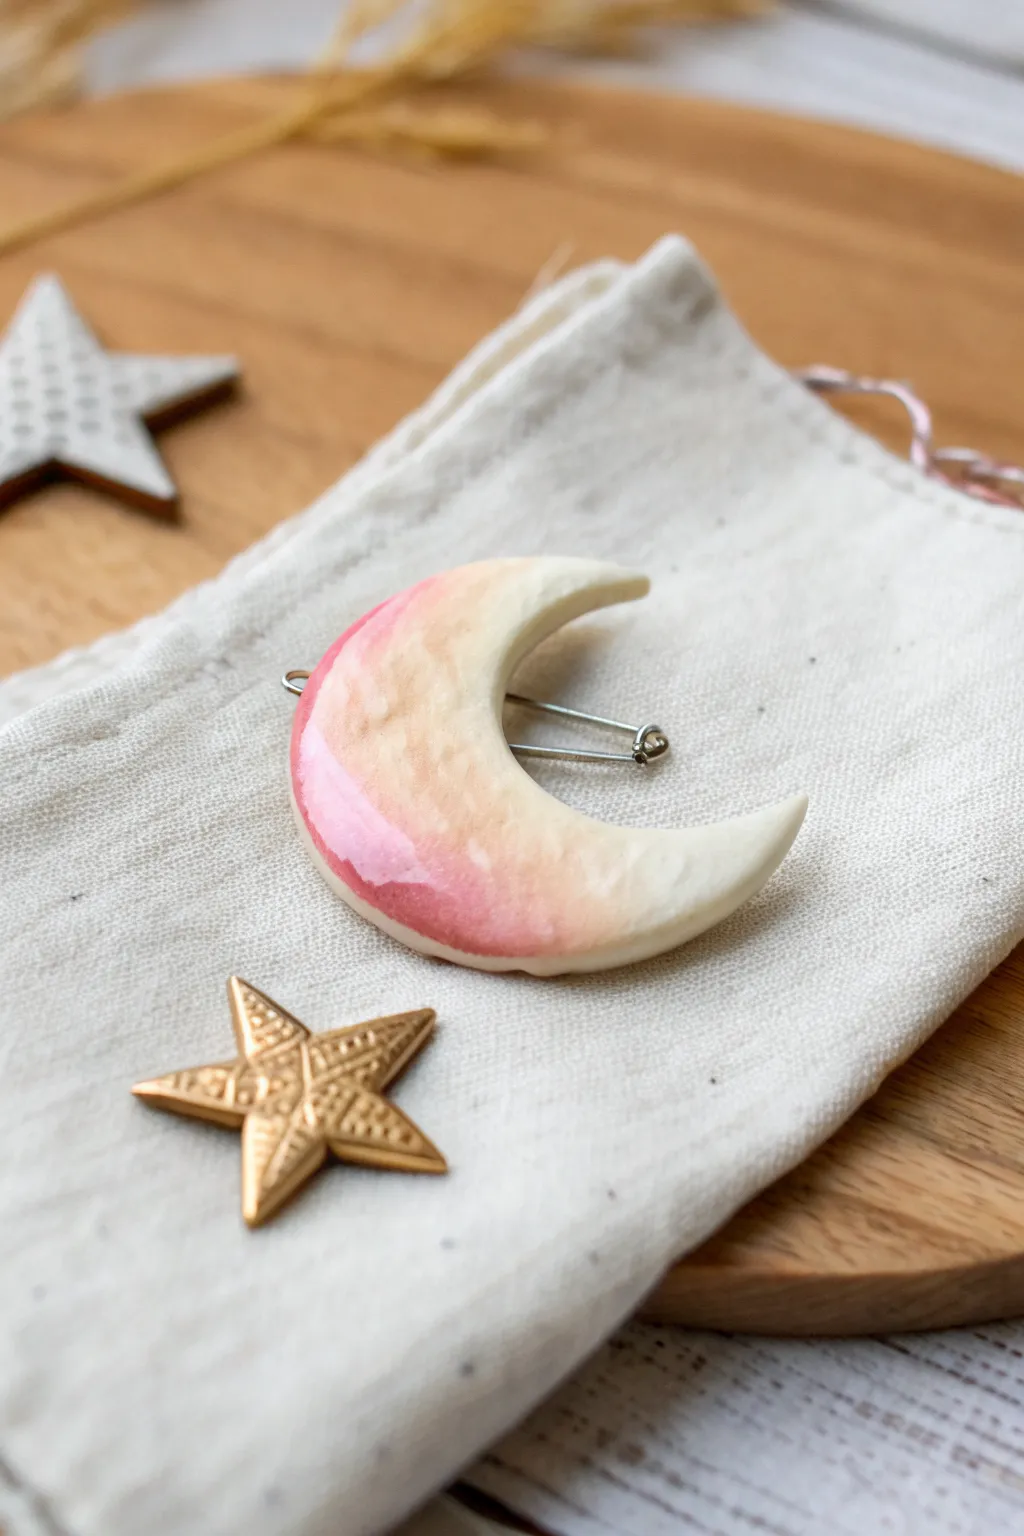
Capture the dreamy transitions of a twilight sky with this soft, puffy moon pin. Featuring a gentle gradient of peach and pink watercolors over sculpted clay, this accessory is finished with a high-gloss glaze for a ceramic-like shine.
How-To Guide
Materials
- White air-dry clay or polymer clay
- Rolling pin
- Moon-shaped cookie cutter (or craft knife)
- Sandpaper (fine grit)
- Watercolor paints (Pink, Peach, and Orange)
- Small soft paintbrush
- High-gloss varnish or UV resin
- Brooch pin back
- Strong craft glue (e.g., E6000)
- Water cup and paper towels
Step 1: Sculpting the Form
-
Condition the clay:
Start by taking a lump of white clay and kneading it in your hands until it becomes warm, soft, and pliable. This prevents cracks later on. -
Roll the slab:
Roll out the clay to a thickness of about 1/4 inch (6mm). You want it substantial enough to look ‘puffy’ and dimensional, not flat like paper. -
Cut the shape:
Press your moon-shaped cutter firmly into the clay. If you don’t have a cutter, lightly sketch a crescent shape with a needle tool and carefully cut it out using a craft knife. -
Soften the edges:
Dip your finger in a little water and gently run it along the cut edges of the fresh clay. This rounds them off and creates that signature ‘puffy’ pillow look. -
Dry or bake:
If using air-dry clay, let it sit for 24-48 hours until rock hard. If using polymer clay, bake according to the manufacturer’s package instructions and let it cool completely.
Fixing Patch Notches
Did the watercolor pool and create a hard line? Rewet the line with a clean damp brush and gently scrub to feather the edge back into a soft fade.
Step 2: Painting the Gradient
-
Smooth the surface:
Once fully cured, inspect your moon. Use fine-grit sandpaper to gently buff away any fingerprints or rough spots on the edges. -
Prepare the wash:
Dilute your pink and peach watercolor paints significantly. I prefer to work with very watery washes to build color slowly rather than applying thick opaque paint. -
Apply the first layer:
Brush clear water over the bottom half of the moon. Touch your brush, loaded with light pink paint, to the wet area and let it bleed upward naturally. -
Build the gradient:
While the surface is still slightly damp, add a touch of peach or orange near the very bottom tip and blend it upwards into the pink. -
Fade to white:
Use a clean, damp brush to feather the top edge of the paint so it fades seamlessly into the white clay near the top tip of the crescent. -
Dry completely:
Let the watercolor layers dry fully. If the color looks too pale once dry (watercolors often dry lighter), add a second sheer layer using the same technique.
Step 3: Finishing Touches
-
Seal the paint:
Apply a coat of high-gloss varnish or UV resin over the entire front and sides of the moon. This seals the watercolor and gives it that beautiful ceramic shine. -
Check surface tension:
Watch for air bubbles in the glaze. Pop them with a pin or quickly pass a lighter over them (if using resin) before the finish sets. -
Cure the finish:
Allow the varnish to dry according to the bottle, or cure the UV resin under a UV lamp for a few minutes until it is tack-free and glass-like. -
Attach the hardware:
Flip the moon over. Apply a strong dab of E6000 glue to the flat side of the pin back. -
Secure the pin:
Press the pin back firmly onto the center of the moon’s rear side. Let the glue set for at least 24 hours to ensure a secure bond.
Starry Night Detail
Before glazing, splatter faint white acrylic speckles using a toothbrush, or paint tiny gold stars on the pink section for a magical galaxy effect.
Now you have a serene piece of wearable art to pin onto your favorite jacket or tote bag

TRACK YOUR CERAMIC JOURNEY
Capture glaze tests, firing details, and creative progress—all in one simple printable. Make your projects easier to repeat and improve.
Puffy Heart Pocket Tokens
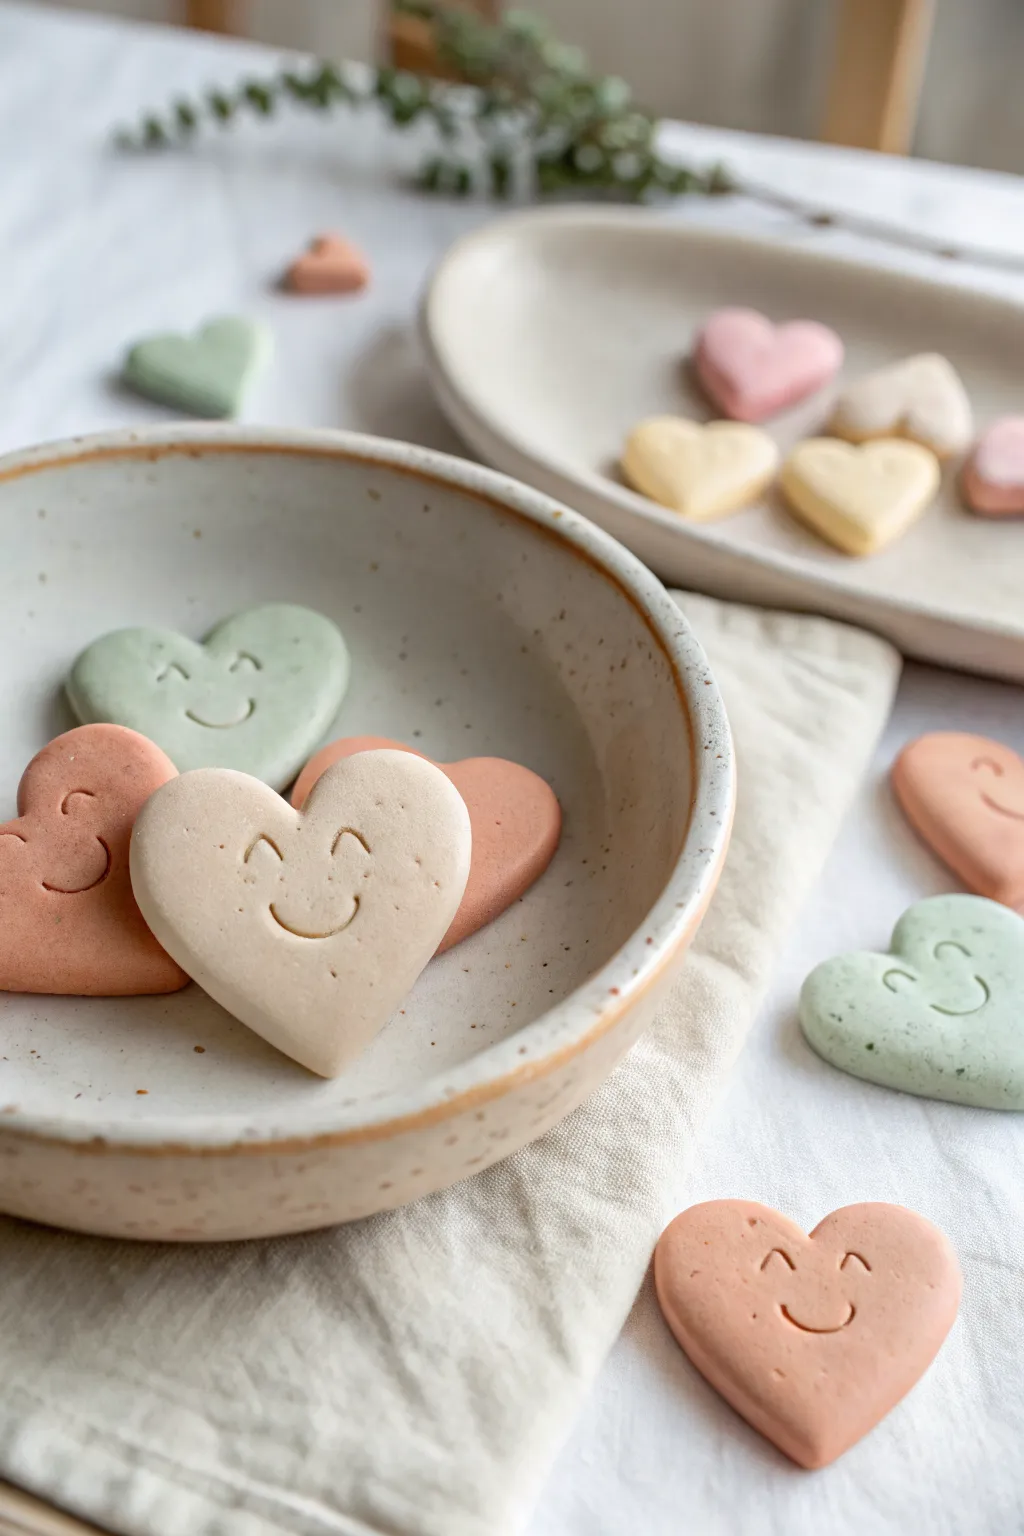
Create these adorable, smooth-finished heart tokens that fit perfectly in the palm of your hand or a loved one’s pocket. Their soft pastel hues and stamped smiley faces make them a cheerful, tactile reminder of affection.
Step-by-Step Tutorial
Materials
- White air-dry clay or polymer clay (white base)
- Acrylic paints (pastel pink, peach, sage green, cream)
- Small heart-shaped cookie cutter (approx. 1.5 – 2 inches)
- Rolling pin
- Small blending sponge or nitrile gloves
- Smile maker tool (or a straw cut in half length-wise)
- Small dotting tool or toothpick (for eyes)
- Fine-grit sandpaper (400 or 600 grit)
- Matte spray varnish (optional)
Step 1: Mixing and Shaping
-
Portion the clay:
Begin by dividing your white clay into four distinct balls, roughly the size of a golf ball each. -
Tint the clay:
Add a tiny drop of acrylic paint to each ball—one peach, one sage green, one cream, and one pink. Knead the color thoroughly into the white clay until you achieve a consistent, soft pastel shade. -
Roll it out:
Take one colored ball and flatten it slightly with your palm. Use a rolling pin to roll it to a thickness of about 1/4 inch; you want them thick enough to feel ‘puffy.’ -
Cut the shapes:
Press your heart-shaped cutter into the clay. If the clay sticks, you can dip the cutter in cornstarch or baby powder first. -
Soften the edges:
After cutting, gently tap the edges of the heart with your finger to round them off. This removes the sharp ‘cookie cutter’ look and enhances the puffy aesthetic.
Smooth Operator
To get that ultra-smooth ‘puffy’ look, use a tiny amount of baby oil on your fingertips while smoothing the edges before drying.
Step 2: Adding Personality
-
Create the smile:
Using a purpose-made smile tool or a straw cut in half lengthwise, press a gentle curve into the lower center of the heart. Rock it slightly to get a clean impression. -
Dot the eyes:
Take your small dotting tool or a toothpick and press two small indentations above the smile for the eyes. -
Add gentle corners:
For that cute ‘cheeky’ look, press the very tips of the smile tool slightly deeper at the corners of the mouth. -
Smooth imperfections:
Dip your finger in a tiny bit of water and lightly brush over the surface to erase any fingerprints without distorting the face.
Scented Tokens
Mix a drop of essential oil (like lavender or vanilla) into the clay during the kneading phase for hearts that smell as sweet as they look.
Step 3: Finishing Touches
-
Allow to dry:
Place the hearts on a parchment-lined tray. If using air-dry clay, let them sit for 24-48 hours, flipping them halfway through to ensure even drying. -
Check for rough spots:
Once fully cured, inspect the edges. If there are any sharp bits, I like to use a fine-grit sandpaper to give them a focused polish until they feel like smooth stones. -
Clean dust:
Wipe away any sanding dust with a slightly damp cloth or a soft brush. -
Speckle effect (optional):
To mimic the ceramic look in the photo, dilute some brown paint with water. Dip a toothbrush in it and run your thumb across the bristles to flick tiny specks onto the hearts. -
Seal:
Finish with a light coat of matte spray varnish to protect the surface while keeping the natural, clay-like appearance.
Scatter these little tokens of joy in gift bags or keep a bowl of them on your desk for a daily smile
Thumbprint Puffy Birds
Create a flock of adorable, minimalist birds using puffy air-dry clay in soft pastel shades. These sweet, textured figurines sit perfectly on a wooden display block and make for charming nursery or mantel decor.
Detailed Instructions
Materials
- White puffy air-dry clay (or lightweight polymer clay)
- Acrylic paints (coral, yellow, light blue, teal, mint, lavender)
- Small wooden craft block or plank (approx. 10 inches long)
- Black glass seed beads (for eyes)
- Needle tool or toothpick
- Small round sculpting tool
- Fine-grit sandpaper
- Matte sealant spray (optional)
- Clean work surface
Step 1: Preparing the Clay Body
-
Portion the clay:
Start by dividing your white puffy clay into six equal portions, roughly the size of a golf ball. Keeping the sizes consistent ensures your flock looks uniform. -
Color the clay:
Take one portion and knead in a small drop of coral acrylic paint. Fold and press the clay repeatedly until the color is completely uniform and pastel. Repeat this process with the remaining five portions using yellow, light blue, teal, mint green, and lavender paints. -
Form the base shape:
Roll one colored ball between your palms to create a smooth sphere. Ensure there are no major cracks on the surface. -
Shape the body:
Gently gently press the sphere onto your work surface to flatten the bottom so it sits securely. Using your fingers, pinch and pull one side slightly upward to form a rounded tail shape.
Cracking Clay?
If the clay starts cracking while you shape it, dip your finger in water and smooth over the fissure immediately. Keep unused clay covered with plastic wrap.
Step 2: Sculpting Details
-
Create the wings:
Use your thumb or a small round sculpting tool to press an indentation on both sides of the body. This creates the impression of wings tucked against the bird’s side. -
Refine the wing shape:
Using a needle tool, lightly etch a subtle curve along the bottom of the wing indentation to define it further. Keep the lines soft rather than sharp. -
Add the beak:
Pinch a tiny amount of leftover clay (you can mix a neutral orange tone) into a microscopic cone shape. Gently press this onto the front of the face area. You can also pinch the face clay itself outward if you prefer a seamless look. -
Insert the eyes:
While the clay is still pliable, press two black seed beads into the face area. Push them in just deep enough that they won’t pop out when the clay shrinks slightly during drying. -
Texture the surface:
For that matte, stone-like texture seen in the photo, gently tap the entire surface of the bird with a stiff stipple brush or a crumpled ball of aluminum foil. This removes finger prints and adds character. -
Repeat for the flock:
Repeat the sculpting process for the remaining five colored balls of clay.
Pro Tip: Weighted Bottoms
Press a small metal washer into the bottom of each bird before flattening it. This adds weight and keeps them from tipping over easily.
Step 3: Finishing Touches
-
Let them dry:
Allow the birds to air dry completely for 24-48 hours. I like to rotate them occasionally to ensure the bottom dries evenly. -
Prepare the wooden base:
While the birds dry, sand your small wooden plank to ensure it is smooth and splinter-free. -
Optional speckling:
To mimic the speckled egg look, verify your clay is dry, then load a toothbrush with diluted brown paint. Run your thumb over the bristles to flick tiny specks onto the birds. -
Seal the work:
Once any paint is dry, apply a light coat of matte sealant spray to protect the clay without making it shiny. -
Arrange the flock:
Place your finished birds in a color gradient line on the wooden block to complete the display.
Now you have a sweet little rainbow of birds ready to brighten up any corner of your home
Mushrooms With Puffy Caps
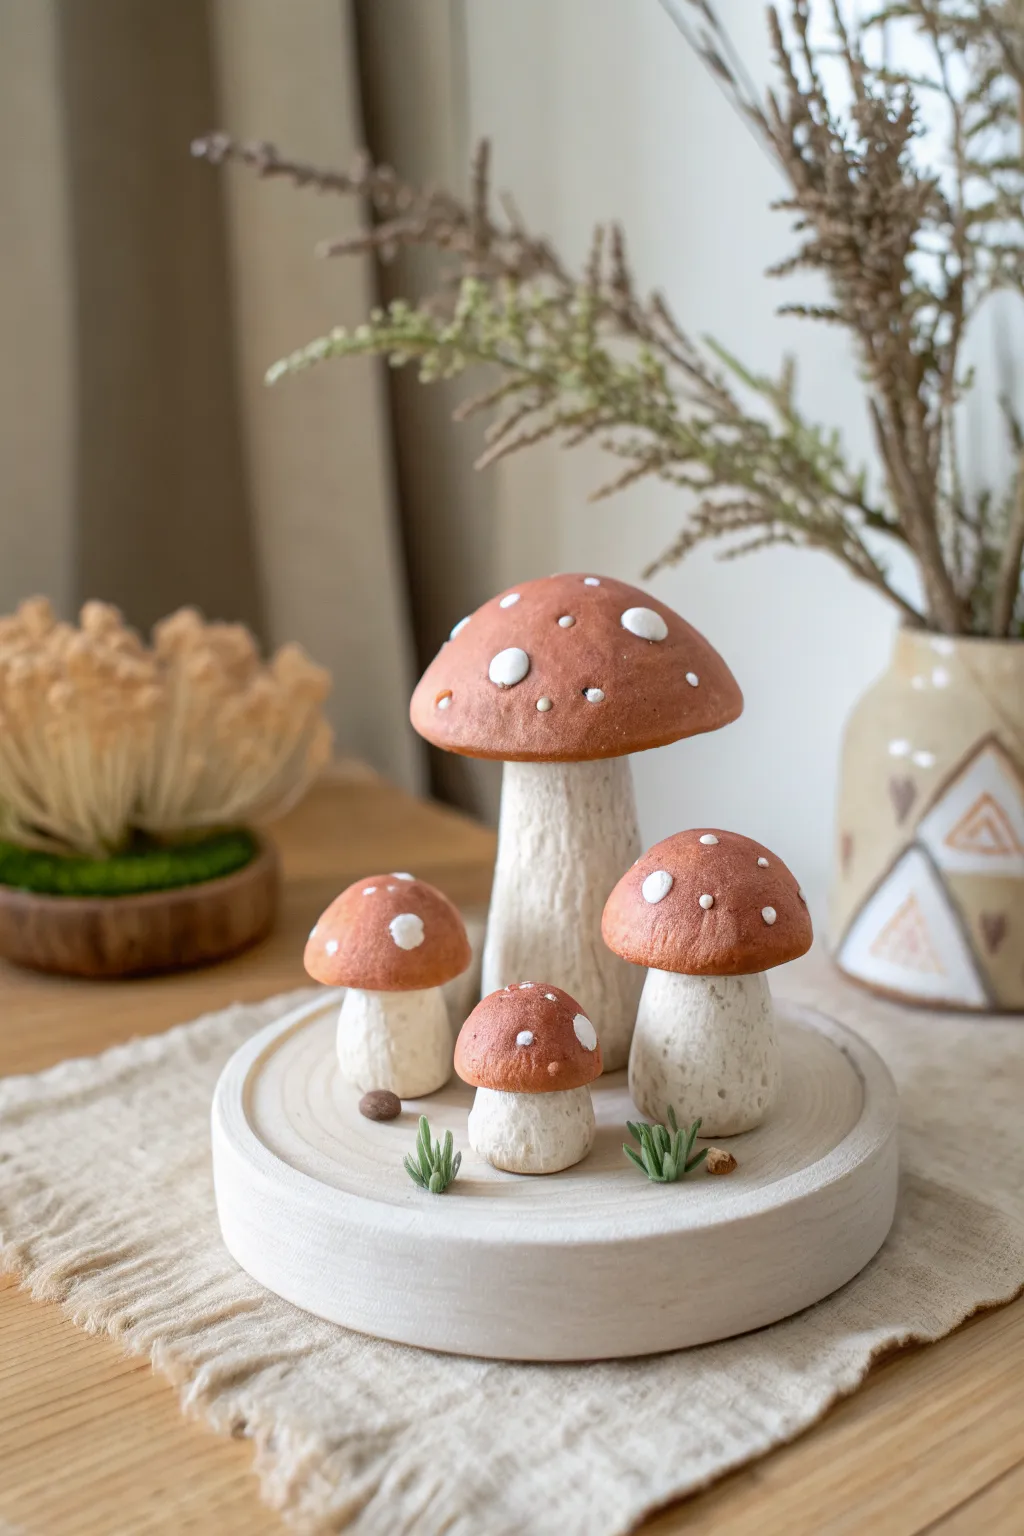
Create a charming little forest scene with these delightful mushrooms featuring unmistakably puffy, rounded caps. The texture of the clay gives the stems a realistic, organic feel while the white spots add a touch of storybook magic.
How-To Guide
Materials
- White puffed air-dry clay (or polymer clay with a matte finish)
- Acrylic paints (terracotta/rust red, antique white, dark brown)
- Round wooden display base (approx. 4-5 inches)
- Texturing tool (stiff bristle brush or a ball of tin foil)
- Small detail paintbrush
- Medium flat paintbrush
- PVA glue or tacky glue
- Small dried moss bits or faux greenery tufts
Step 1: Sculpting the Stems
-
Prepare the base clay:
Start by conditioning a chunk of your puffy white clay until it is soft and pliable. Divide it into four unequal portions—one large, two medium, and one small—to create variety in your mushroom family. -
Form the cylinders:
Roll each portion into a thick cylinder. Taper the top slightly so it’s narrower than the base, giving it that classic sturdy mushroom stalk shape. -
Add stem texture:
Before the clay dries, take a stiff bristle brush or a crumpled ball of aluminum foil and press it gently all over the stems. This creates a pitted, organic texture rather than a smooth, plastic look. -
Flatten the connection points:
Press the bottom of each stem firmly against a flat surface to ensure they will stand upright. Slightly flatten the very top of each stem so the cap will sit securely later.
Texture Secret
Use a real rock to imprint texture onto the stems. Rolling the clay directly over a clean, rough stone gives the most realistic organic surface pattern.
Step 2: Creating the Caps
-
Shape the domes:
Roll four balls of clay corresponding to your stem sizes. Gently flatten the bottom of each ball with your thumb while keeping the top rounded and domed to create the puffy cap shape. -
Refine the edges:
Smooth the bottom edge of the caps with your finger so they aren’t sharp; you want a soft, rounded lip that overhangs the stem slightly. -
Dry the components:
Let all stems and caps dry completely according to your clay package instructions. I find letting them sit overnight ensures the best surface for painting.
Glow Up
Drill a hole up through the base and large stem before assembly to insert a small battery-operated fairy light for a magical glowing mushroom lamp.
Step 3: Painting and Assembly
-
Paint the stems:
Mix a tiny drop of brown paint into white acrylic to create an off-white, sandy color. Paint the stems entirely, dabbing the brush into the texture crevices. -
Enhance stem texture:
For depth, mix a watery wash of darker brown paint. Brush it over the dry stems and immediately wipe most of it off with a paper towel, leaving shadow in the textured pits. -
Paint the caps:
Coat the tops of the caps with a rich terracotta or rust-red acrylic paint. You may need two thin coats for opaque, velvety coverage. -
Add the signature spots:
Using a very fine detail brush or a dotting tool, apply crisp white dots to the red caps. Vary the sizes of the dots and group some closer together for a natural look. -
Attach caps to stems:
Once the paint is dry, apply a strong dab of tacky glue or PVA to the top of each stem and press the corresponding cap firmly in place.
Step 4: The Final Scene
-
Prepare the wooden base:
If your wooden base is unfinished, you might want to give it a light sanding or a coat of matte varnish to protect it. -
Arrange the cluster:
Test the arrangement of your mushrooms on the base before gluing. Grouping them off-center or in a tight cluster usually looks more natural than spacing them evenly. -
Secure the mushrooms:
Glue the bottom of each stem to the wooden base. Hold them in place for a few seconds to let the glue tack up. -
Plant the greenery:
Dip the bottom of your tiny faux greenery tufts or dried moss into glue and nestle them around the base of the stems to ground the mushrooms in their ‘soil’. -
Add tiny details:
For a final touch, you can glue a tiny pebble or two near the greenery to complete the woodland floor effect.
Place your finished mushroom patch on a bookshelf or windowsill to bring a quiet moment of nature indoors
Mini Puffy Succulents In Pots
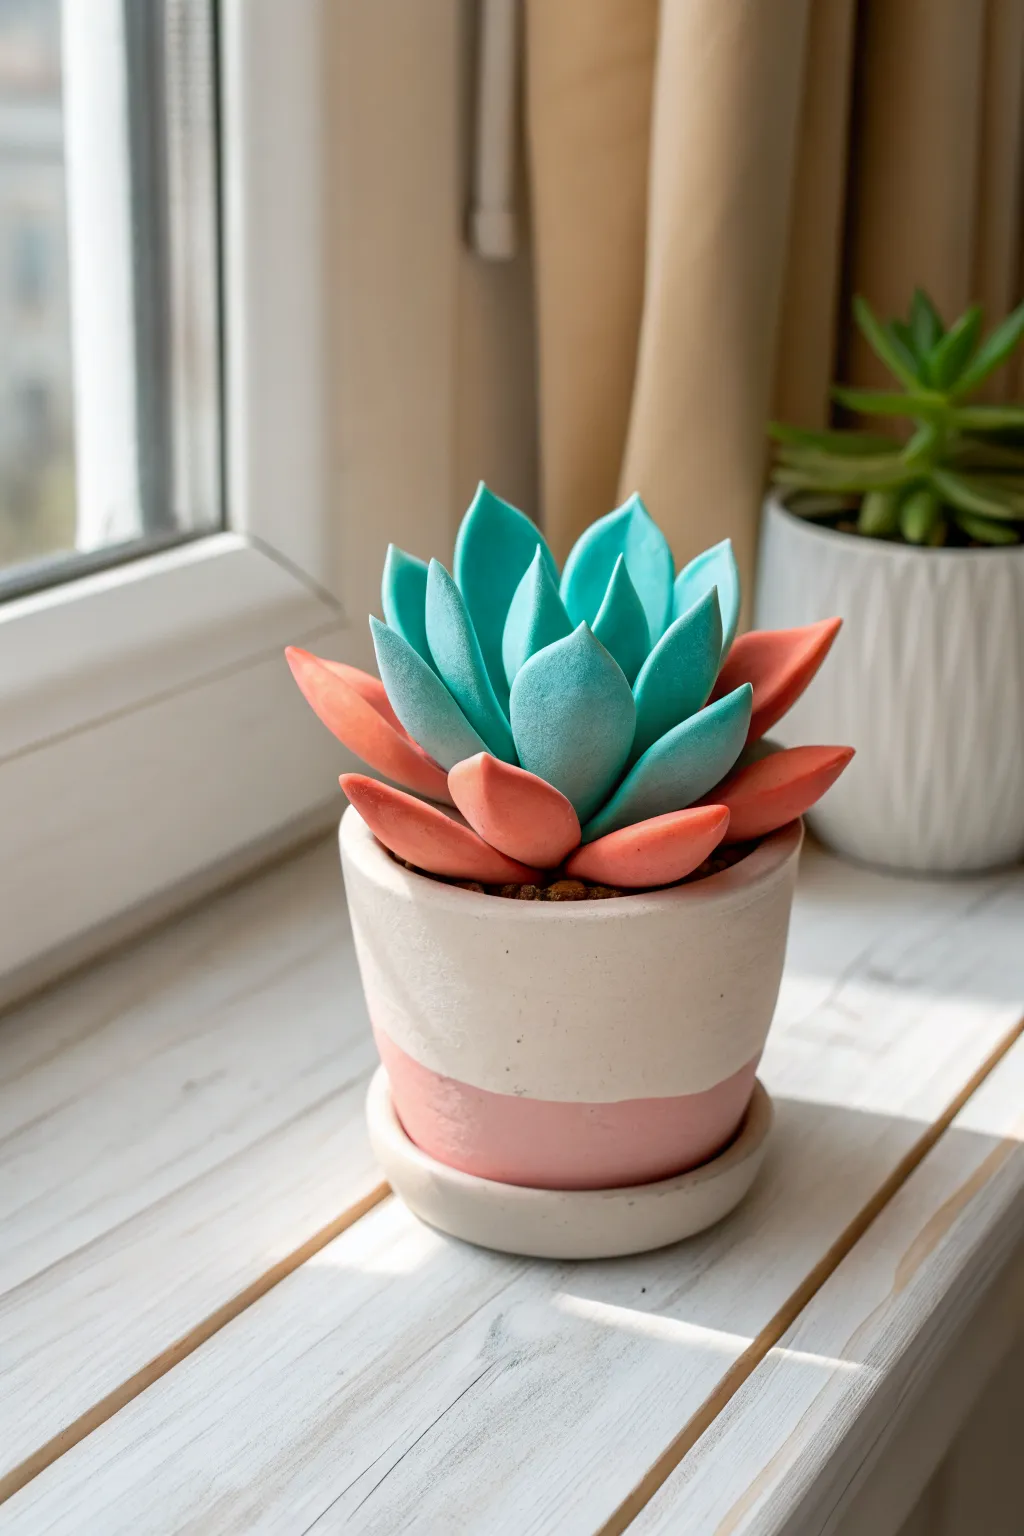
Brighten up your windowsill with this adorable, maintenance-free succulent crafted from puffy clay. Featuring striking layers of teal and coral, this soft-sculpture plant sits perfectly in its own custom-painted two-tone pot.
Step-by-Step
Materials
- White puffy clay (air-dry or polymer, depending on preference)
- Acrylic paints (teal, coral/salmon, white, soft pink)
- Small terracotta pot (approx. 2-3 inches) with saucer
- Sculpting tools or a craft knife
- Non-stick rolling pin
- Dried coffee grounds or brown textured clay (for soil)
- Paintbrushes (flat and detail)
- Matte sealant spray
Step 1: Preparing the Pot
-
Base Coat:
Begin by painting the entire terracotta pot and its saucer with a solid coat of white acrylic paint. You may need two layers to fully cover the orange clay color. -
Adding Color:
Once the white base is dry, mix a soft pink shade. Paint the bottom third of the pot and the entire outer rim of the saucer in this pink hue to create a dipped look. -
Creating the Soil Base:
Fill the bottom of the pot with a ball of scrap clay or aluminum foil to save material. Top it with a layer of brown clay, pressing it down so it sits just below the rim. -
Texturing the Soil:
Use a stiff brush or an old toothbrush to stipple the brown clay surface, or press dried coffee grounds into the wet clay for a realistic dirt texture.
Smooth Operator
To eliminate fingerprints on puffy clay, lightly dust your fingertips with cornstarch or baby powder before handling the final leaf shapes.
Step 2: Sculpting the Succulent Leaves
-
Color Mixing:
Divide your white puffy clay into two portions. Knead teal paint into the larger portion and coral/salmon paint into the smaller portion until the color is uniform. -
Forming the Base Leaves:
Starting with the coral clay, pinch off 5-6 small pieces. Roll each piece into a teardrop shape. -
Flattening:
Gently press each coral teardrop between your thumb and forefinger to flatten them slightly. They should remain thick and puffy in the center but taper at the edges. -
Curving the Shape:
Use your thumb to create a slight concave curve on the upper surface of each leaf, giving it that natural succulent scoop. -
Forming the Teal Leaves:
Repeat the rolling and flattening process with the teal clay. You will need about 8-10 leaves in varying sizes—some larger for the middle layer, and smaller ones for the center. -
Creating Sharp Tips:
Pinch the very tip of each teal and coral leaf to create a defined point, characteristic of an Echeveria.
Loose Leaves?
If the clay leaves aren’t sticking together securely, apply a tiny dab of PVA glue or craft adhesive between the layers for a stronger permanent bond.
Step 3: Assembly & Finishing
-
Positioning the Bottom Layer:
Arrange the coral leaves in a circle directly onto the brown soil base, pressing the rounded ends into the center. They should fan out slightly over the pot’s edge. -
Adding the Middle Layer:
Place the larger teal leaves on top of the coral layer. Position them in the gaps between the coral leaves below to create an alternating pattern. -
Building the Core:
Take the smallest teal leaves and arrange them in the very center, standing them more upright to mimic new growth unfurling. -
Smoothing the Connections:
Use a small sculpting tool to gently press inside the center of the rosette, ensuring all huge layers adhere to each other without squashing the puffy texture. -
Drying:
Allow the clay to dry completely according to the package instructions. Puffy clay often shrinks slightly as it dries. -
Optional Shading:
I like to dry-brush a tiny amount of lighter teal paint on the tips of the upper leaves to accentuate their shape. -
Sealing:
Finish with a light coat of matte sealant spray to protect the color and keep the texture looking velvety soft.
Place your finished pot on a sunny ledge and enjoy the permanent pop of pastel color.
Shell Diorama With Puffy Critters
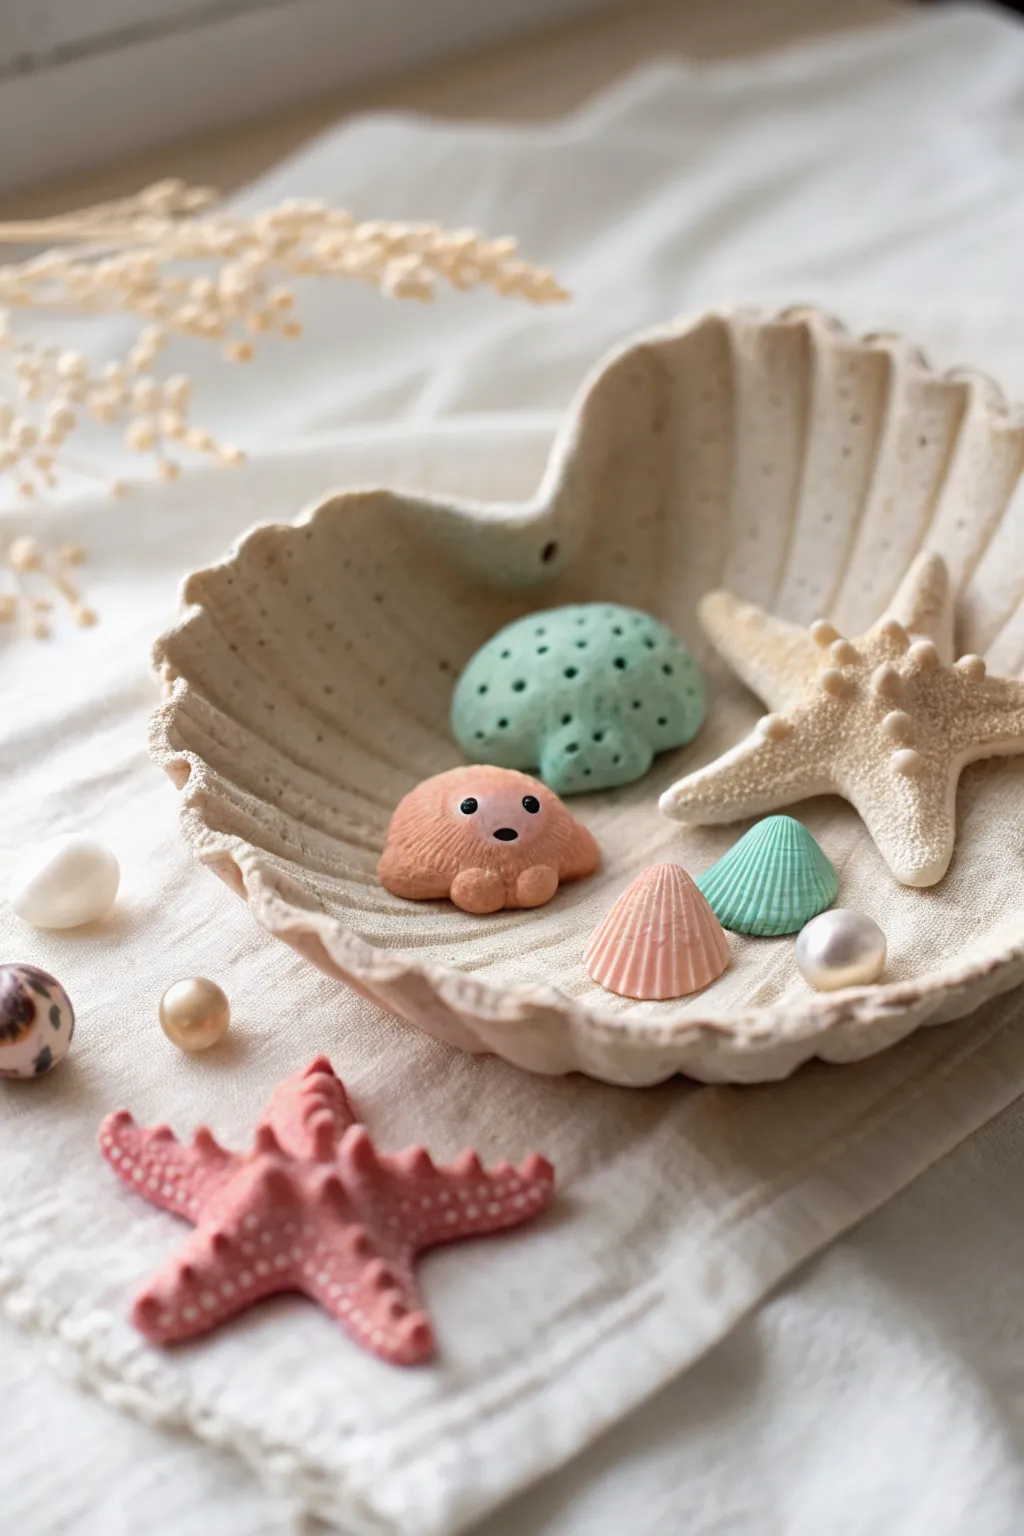
Capture the magic of a tide pool with this charming arrangement of soft, matte-finish clay critters nestled in a handcrafted shell dish. The gentle pastel tones and speckled textures create a calming, beach-combed aesthetic that’s perfect for summer decor.
Detailed Instructions
Materials
- White polymer or air-dry clay (puffy/lightweight formula preferred)
- Acrylic paints (peach, mint green, coral pink, cream)
- Black acrylic paint or fine-tip black marker
- Speckled clay or dried tea leaves/coffee grounds for texture
- Sculpting tools (needle tool, ball stylus)
- Real scallop shell (large) to use as a mold
- Sandpaper (fine grit)
- Matte sealant
- Small pearls or beads (optional)
Step 1: Sculpting the Shell Dish
-
Prepare the speckled clay:
Start by conditioning your white clay. To achieve that beachy, sandy look, knead in a tiny pinch of dried tea leaves, coarse pepper, or use pre-mixed speckled granite clay. The speckles should be subtle and evenly distributed. -
Shape the base slab:
Roll the clay out into a thick, even slab, about 1/4 inch thick. You want it substantial enough to hold its shape once curved. -
Form the scallop shape:
Cut the slab into a large fan or scallop shape. You can freehand this or trace a real large scallop shell lightly onto the clay before cutting. -
Add texture and curve:
Gently drape the clay slab inside a real large shell (lined with plastic wrap to prevent sticking) or over a bowl to create a cupped shape. Use a modeling tool to press deep vertical grooves radiating from the base to the outer edge, mimicking natural shell ridges. -
Rough up the rim:
Don’t make the edges too perfect. Pinch and tear the rim slightly to give it a weathered, organic feel, then bake or dry according to your clay package instructions.
Pro Tip: Seamless Texture
To remove fingerprints from your clay before baking, lightly brush the surface with a little baby oil or cornstarch. This leaves a velvety smooth finish perfect for soft critters.
Step 2: Creating the Sea Life
-
Mix pastel colors:
While the shell dries, prepare your colored clays. Mix white clay with very small amounts of peach, mint green, and coral paint. Alternatively, use colored clay, but keep the tones soft and muted. -
Sculpt the puffy octopus:
Roll a ball of peach clay and flatten the bottom slightly. Use a knife tool to mark little separations around the base for tentacles, rounding them off so they look chubby and soft. -
Give it a face:
Using a very small dotting tool and black paint, add two tiny, wide-set eyes to the octopus. I find placing them slightly lower on the ‘face’ makes it look cuter. -
Form the mint sponge:
Create an irregular, rounded lump from mint green clay. Use a medium-sized ball stylus to press random indentations all over the surface to resemble a porous sea sponge or coral. -
Make mini shells:
Shape small cones from pink and teal clay. Flatten them slightly and use a needle tool to press ridges from the pointy end down to the wide end to mimic tiny fan shells. -
Create the starfish critter:
Take cream-colored clay and form a five-pointed star. Texture the surface by stippling it with a stiff decoration brush or toothbrush to make it look rough and sandy. -
Add bumps and details:
Roll tiny little balls of the same cream clay and press them onto the center of the starfish and down the center of each arm for extra dimension.
Step 3: Creation of the Pink Starfish
-
Shape the pink star:
Use a darker coral-pink clay to form a second, slightly more slender starfish. Pull the five arms gently so they look like they are in motion. -
Apply white details:
Using white paint and a fine dotting tool, apply intricate rows of dots along the arms and center body of the pink starfish to mimic natural patterns.
Level Up: Hidden Treasure
Sculpt the mint green sponge piece to be hollow underneath. You can then hide a tiny pearl or secret note inside, turning this decoration into a functional trinket keeper.
Step 4: Assembly and Finishing
-
Final cure:
Bake or dry all your small critters according to the manufacturer’s instructions. -
Seal the pieces:
Apply a matte varnish to all pieces. Avoid glossy finishes, as the matte look contributes to the soft, ‘puffy’ aesthetic of this project. -
Arrange the diorama:
Place your finished shell bowl on a soft cloth. Arrange the critters inside the bowl playfully. You can use a dab of glue to secure them if you want a permanent display, or leave them loose to rearrange later. -
Add pearl accents:
Tuck a few loose craft pearls or iridescent beads among the clay figures to add a touch of contrasting shine to the matte scene.
Enjoy your little slice of the ocean shore right on your desk.
Puffy Alphabet Keychain Letters
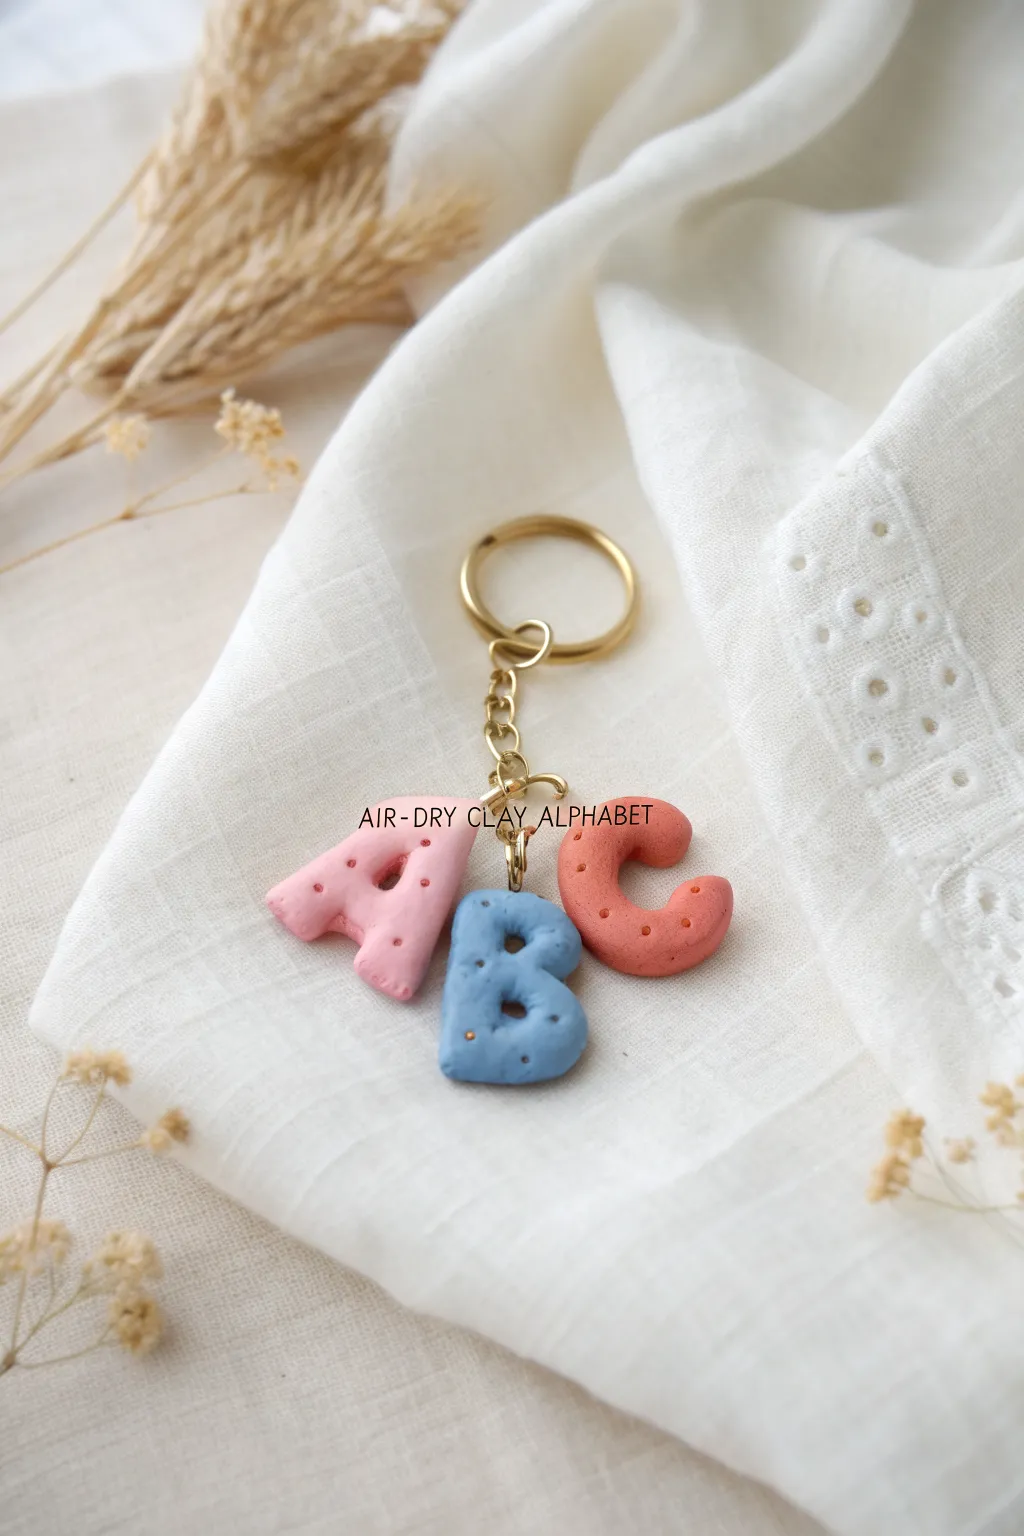
Create a personalized accessory with these adorable, marshmallow-like alphabet letters made from air-dry clay. Each letter features a soft pastel hue and a whimsical stippled texture, dangling cheerfully from a golden keychain ring.
Step-by-Step Guide
Materials
- White puffed air-dry clay (or polymer clay)
- Acrylic paints (pastel pink, baby blue, coral orange)
- Rolling pin
- Small alphabet cookie cutters (approx. 1 inch)
- Needle tool or toothpick
- Gold screw eye pins (small)
- Gold jump rings
- Gold keychain ring with chain attached
- Jewelry pliers (round nose and flat nose)
- Parchment paper or non-stick craft mat
- Gloss varnish (optional)
Step 1: Shaping the Letters
-
Tint the clay:
Start by dividing your white clay into three equal balls. To get those sweet pastel shades, mix a tiny drop of acrylic paint into each ball—pink for one, blue for the second, and coral for the third. Knead until the color is completely uniform. -
Roll out the slab:
Working on a non-stick surface, roll out each colored ball of clay. You want them fairly thick to achieve that ‘puffy’ look shown in the photo, aiming for about 1/4 inch thickness. -
Cut the shapes:
Using your small alphabet cutters, press firmly into the clay to create an ‘A’, ‘B’, and ‘C’. Gently wiggle the cutter to release the shape without distorting it. -
Smooth the edges:
Once cut, the edges might be a little sharp. Dampen your finger slightly with water and run it along the sides of each letter to round them off, enhancing the pillowy effect. -
Add texture:
Take a needle tool or a clean toothpick to add the stippled texture. Gently poke shallow holes into the surface of the letters in a random pattern. Don’t press too deep; you just want surface indentation. -
Back texture:
Don’t forget the other side! Carefully flip the letters over and repeat the stippling process on the back so the keychain looks good from every angle.
Loose Eye Pins?
If an eye pin feels loose after drying, pull it out, add a dab of super glue to the stem, and screw it back into the existing hole for a permanent hold.
Step 2: Assembly and Hardware
-
Insert eye pins:
While the clay is still wet and pliable, carefully insert a gold screw eye pin into the top center of each letter. I find twisting it slowly helps it grip the clay better than just pushing it in. -
Secure the pins:
After inserting the pin, gently pinch the clay around the base of the metal to ensure it makes a tight seal as it dries. -
Let it dry:
Place your letters on a piece of parchment paper to air dry. This typically takes 24 to 48 hours depending on humidity. Flip them halfway through the drying time to ensure even curing. -
Optional sealing:
If you want extra durability, brush a thin coat of matte or gloss varnish over the dried clay. This will protect the paint and texture from daily wear and tear. -
Open jump rings:
Using two pairs of pliers, twist the gold jump rings open sideways (never pull them apart). This keeps the ring strong. -
Attach the ‘A’:
Loop a jump ring through the eye pin of the pink ‘A’ and attach it to the lowest link of your keychain chain. Close the ring securely. -
Attach the rest:
Repeat the process for the blue ‘B’ and coral ‘C’. To create a clustered look like the example, you might want to attach them to the same chain link or adjacent links so they bunch together nicely. -
Final check:
Give each letter a gentle tug to ensure all jump rings are fully closed and the eye pins are secure within the clay.
Sparkle Upgrade
Mix a pinch of fine iridescent glitter into the clay while kneading the color. This gives the letters a subtle shimmer that catches the light beautifully.
Enjoy clipping your bubbly, custom monogram letters onto your keys or backpack for a pop of handmade charm
Bubble-Texture Puffy Coasters
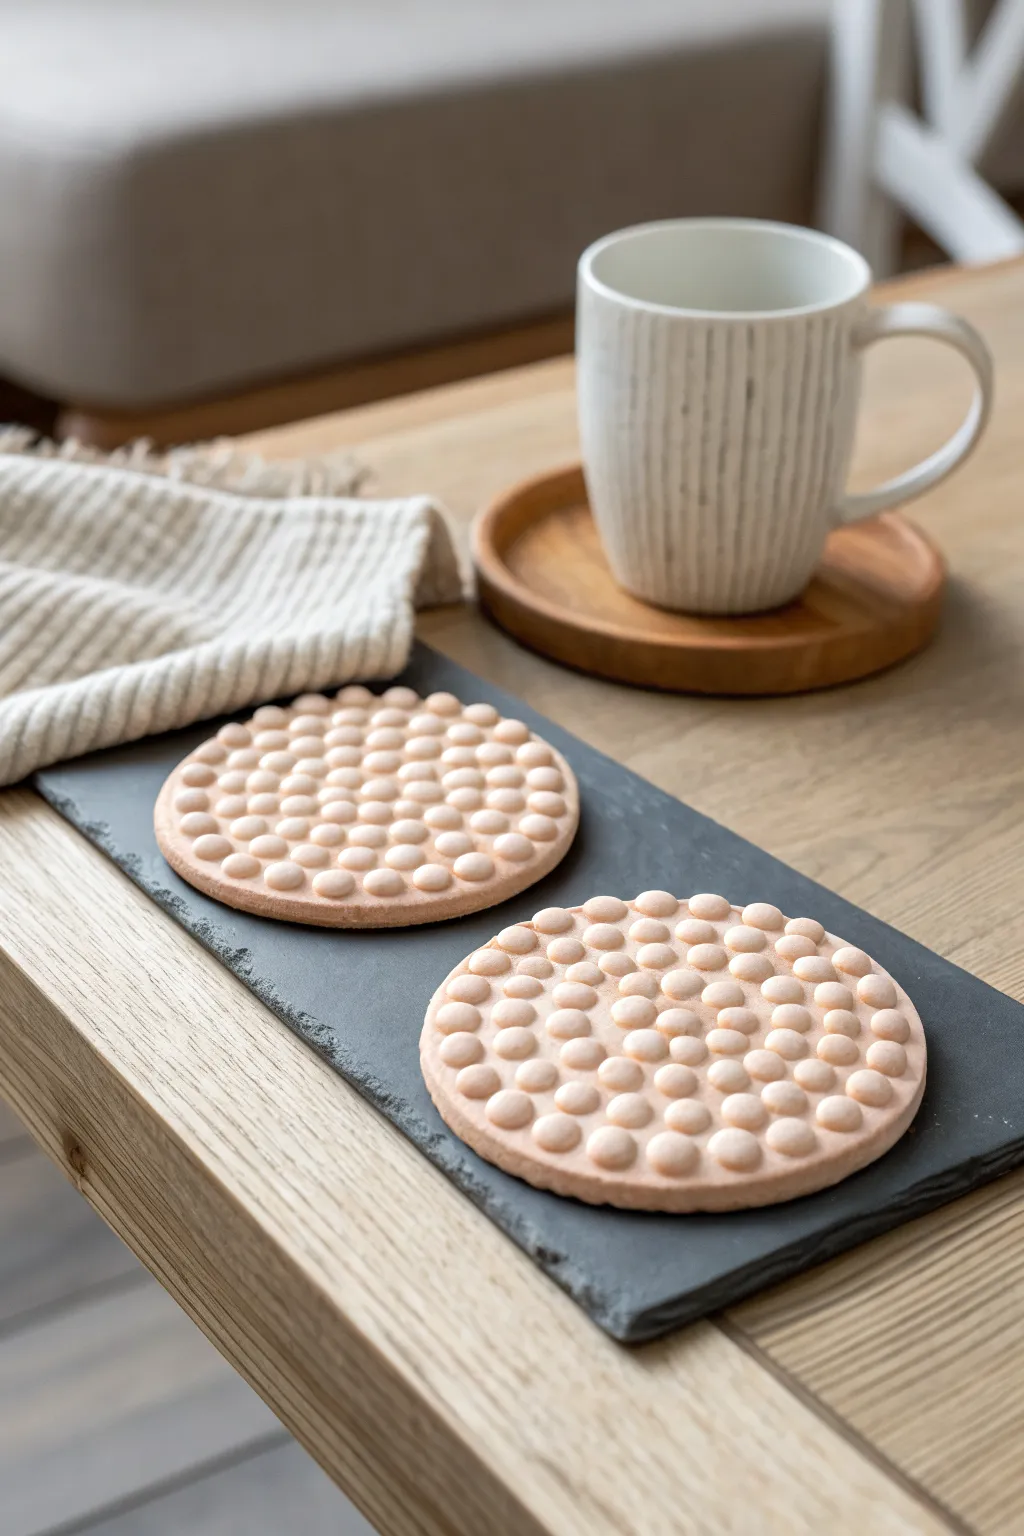
These coasters combine a satisfying tactile surface with modern aesthetics, featuring a grid of perfectly raised dots that add grip and style to your coffee table. The soft peach tone and repeating bubble pattern create a calming, minimalist look that is surprisingly simple to achieve.
Step-by-Step Tutorial
Materials
- Lightweight air-dry clay (peach or terra cotta color)
- Round cookie cutter (approx. 4 inches)
- Small round piping tip or small circular cutter (approx. 0.5 cm)
- Rolling pin
- Parchment paper or non-stick silicone mat
- Ruler
- Smoothing tool or water
- Matte spray varnish or clay sealant
- Fine-grit sandpaper (optional)
Step 1: Base Preparation
-
Condition the clay:
Begin by taking a generous amount of your lightweight air-dry clay. Knead it thoroughly in your hands until it becomes warm, pliable, and free of any air pockets. -
Roll out the slab:
Place the clay onto your parchment paper or silicone mat. Using the rolling pin, roll it out to an even thickness of about 1/4 inch (6mm). Ensure the surface is perfectly smooth. -
Cut the circles:
Press your 4-inch round cookie cutter firmly into the clay slab to create the coaster base. Carefully remove the excess clay from around the circle. -
Smooth the edges:
Dip your finger in a tiny bit of water and run it along the cut edge of the circle to soften any sharp ridges left by the cutter. The edge should look rounded and finished.
Uneven Bubbles?
If your dots vary wildly in size, roll a long snake of clay first, slice it into equal segments, then roll those segments into balls. This ensures standardized volume.
Step 2: Creating the Bubbles
-
Roll a thin sheet:
Take the excess clay you set aside earlier and knead it again. This time, roll it out slightly thinner than the base, perhaps around 1/8 inch (3mm) thick. -
Punch out the dots:
Using the small round piping tip (using the wide end often works well for uniform circles) or a tiny cutter, punch out roughly 60-80 small circles per coaster. It’s better to have too many than too few. -
Shape into spheres:
Take each tiny cut-out circle and gently roll it between your palms or fingertips to form a smooth, slightly flattened sphere. This gives them that organic ‘puffy’ look rather than a flat cylinder. -
Score the surface:
Back on your main coaster base, use a ruler to lightly impress a grid pattern or concentric circles as a guide, or simply trust your eye for the placement. -
Attach the center dot:
Dab a tiny amount of water or liquid clay (slip) onto the center of the coaster. Place your first clay sphere right in the middle and press it down gently so it adheres but keeps its dome shape. -
Build the first ring:
Working outward from the center, attach a ring of clay spheres around the central dot. Keep the spacing tight; they should almost be touching. -
Continue the pattern:
Continue adding concentric rings of bubbles moving toward the edge. I find it helpful to rotate the coaster frequently to ensure the pattern stays symmetrical. -
Adjust the edge:
As you reach the perimeter, you cut off the pattern cleanly so the dots don’t overhang. If a dot is too large for the remaining space at the edge, gently reshaping it or leaving a small border is fine. -
Final press:
Once all dots are placed, lay a piece of parchment paper gently over the top. Use a flat object like a book to apply very light, even pressure. This ensures all dots are level with each other so a mug can sit flat.
Step 3: Finishing Touches
-
Dry partially:
Let the coasters sit for about an hour to firm up slightly, then flip them over gently to help the underside dry evenly. This prevents curling. -
Full cure:
Allow the project to dry completely for 24-48 hours. The color will lighten slightly as the moisture evaporates. -
Sand edges:
If the rim of the coaster feels rough after drying, use fine-grit sandpaper to give the edge a quick polish. -
Seal for protection:
Since these are coasters, moisture protection is key. Spray with a matte varnish or apply a brush-on sealant to create a waterproof barrier.
Pro Tip: Flatness
Drying between two pieces of drywall or wood boards (weighted down) guarantees a perfectly flat coaster that won’t wobble on the table.
Now you have a stylish spot to rest your morning coffee