If you’re in the mood for a little wicked magic at your wrist, clay beads are honestly the sweetest way to play with that iconic green and pink contrast. These bracelet ideas lean into witchy vibes, friendship energy, and just enough sparkle to feel stage-ready without being fussy.
Classic Split Pink-and-Green Bracelet
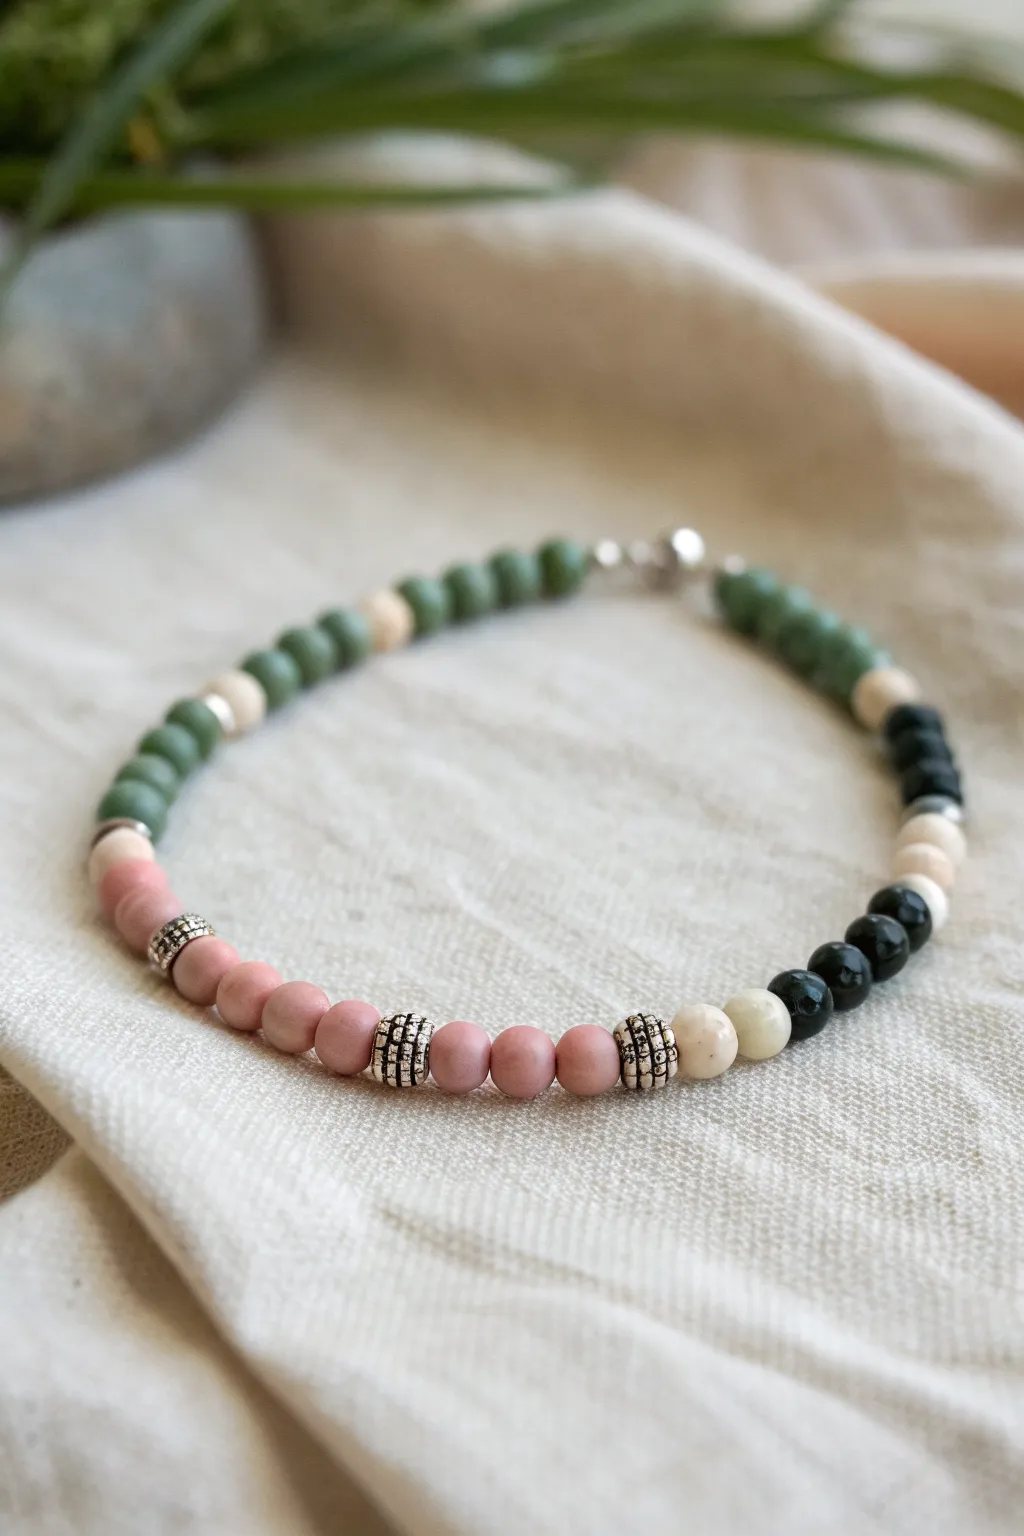
This project combines soft matte pinks and muted greens with striking black accents for a sophisticated, nature-inspired look. The silver spacer beads add just the right amount of shine to break up the color blocks, making it perfect for everyday wear.
Step-by-Step Tutorial
Materials
- Matte round beads (6mm or 8mm) in dusty pink and sage green
- Glossy black round beads (same size)
- Cream or off-white round spacer beads (slightly smaller)
- Silver-tone cylindrical spacer beads with textured design
- Silver crimp beads
- Strong beading wire or elastic cord (0.8mm)
- Silver lobster clasp and jump ring
- Flat nose pliers
- Scissors or wire cutters
Step 1: Planning and Preparation
-
Measure your wrist:
Wrap a flexible measuring tape around your wrist to find your size, then add about half an inch to ensure the bracelet fits comfortably without pinching. -
Cut the cord:
Cut a length of beading wire or elastic cord that is at least 3-4 inches longer than your final measurement to give yourself plenty of room for tying knots or crimping. -
Secure the end:
If you are using beading wire, thread on a crimp bead and your lobster clasp, loop the wire back through the crimp bead, and use your flat nose pliers to squash it flat. If using elastic, you can simply use a bead stopper or tape to hold the end.
Stiff Bracelet Syndrome
If the bracelet feels rigid and won’t curve nicely, you likely crimped it too tight. Leave a tiny 1-2mm gap of bare wire before crimping to allow movement.
Step 2: Creating the Green Section
-
Start the green run:
Begin threading your sage green matte beads onto the wire. You will want to thread about 14-16 beads consecutively to create the first major color block. -
Add a spacer accent:
Slide on one cream-colored spacer bead, followed closely by a single silver cylindrical bead. -
Continue the pattern:
Thread on two more sage green beads to finish this section before transitioning to the next color. -
Transition to neutral:
Add one cream bead to act as a buffer between the green and the next color block.
Texture Play
Mix bead finishes like matte, glossy, and frosted within the same color family. This subtle texture variance makes the simple design look much more expensive.
Step 3: The Pink Focal Point
-
Begin the pink section:
Thread on two dusty pink matte beads following the cream spacer. -
Insert silver texture:
Here I like to add a silver textured spacer bead to frame the pink section beautifully. -
Build the pink center:
Add three more pink beads. This odd number creates a nice central cluster. -
Add the second silver spacer:
Place another silver textured spacer bead on the wire. -
Finish the pink block:
Thread three final pink beads, followed by one silver textured spacer and a cream bead.
Step 4: The Black Contrast Section
-
Start the dark contrast:
Thread on four glossy black beads. These provide a sharp, modern contrast to the softer matte colors used previously. -
Add a light break:
Slide on two cream or off-white beads to interrupt the dark flow slightly. -
Finish the black run:
Add three to four more black beads to complete the dark section. -
Check the length:
Wrap the unfinished strand around your wrist to verify the sizing. If it’s too short, add a few extra green or black beads to the ends of the respective sections.
Step 5: Finishing the Bracelet
-
Attach the jump ring:
Thread a crimp bead onto the end of the wire, followed by a jump ring. -
Secure the crimp:
Loop the wire back through the crimp bead and pull it taut (but not too tight, or the bracelet will be stiff). Use your pliers to flatten the crimp bead securely. -
Trim excess wire:
Snip off the excess wire tail close to the crimp bead using your wire cutters. -
Hide the tail:
If possible, tuck the remaining tiny tail of wire back into the first few beads for a clean, professional finish.
Enjoy wearing your new accessory, stacking it with silver bangles or letting it stand out on its own


Besties Duo: One Pink, One Green
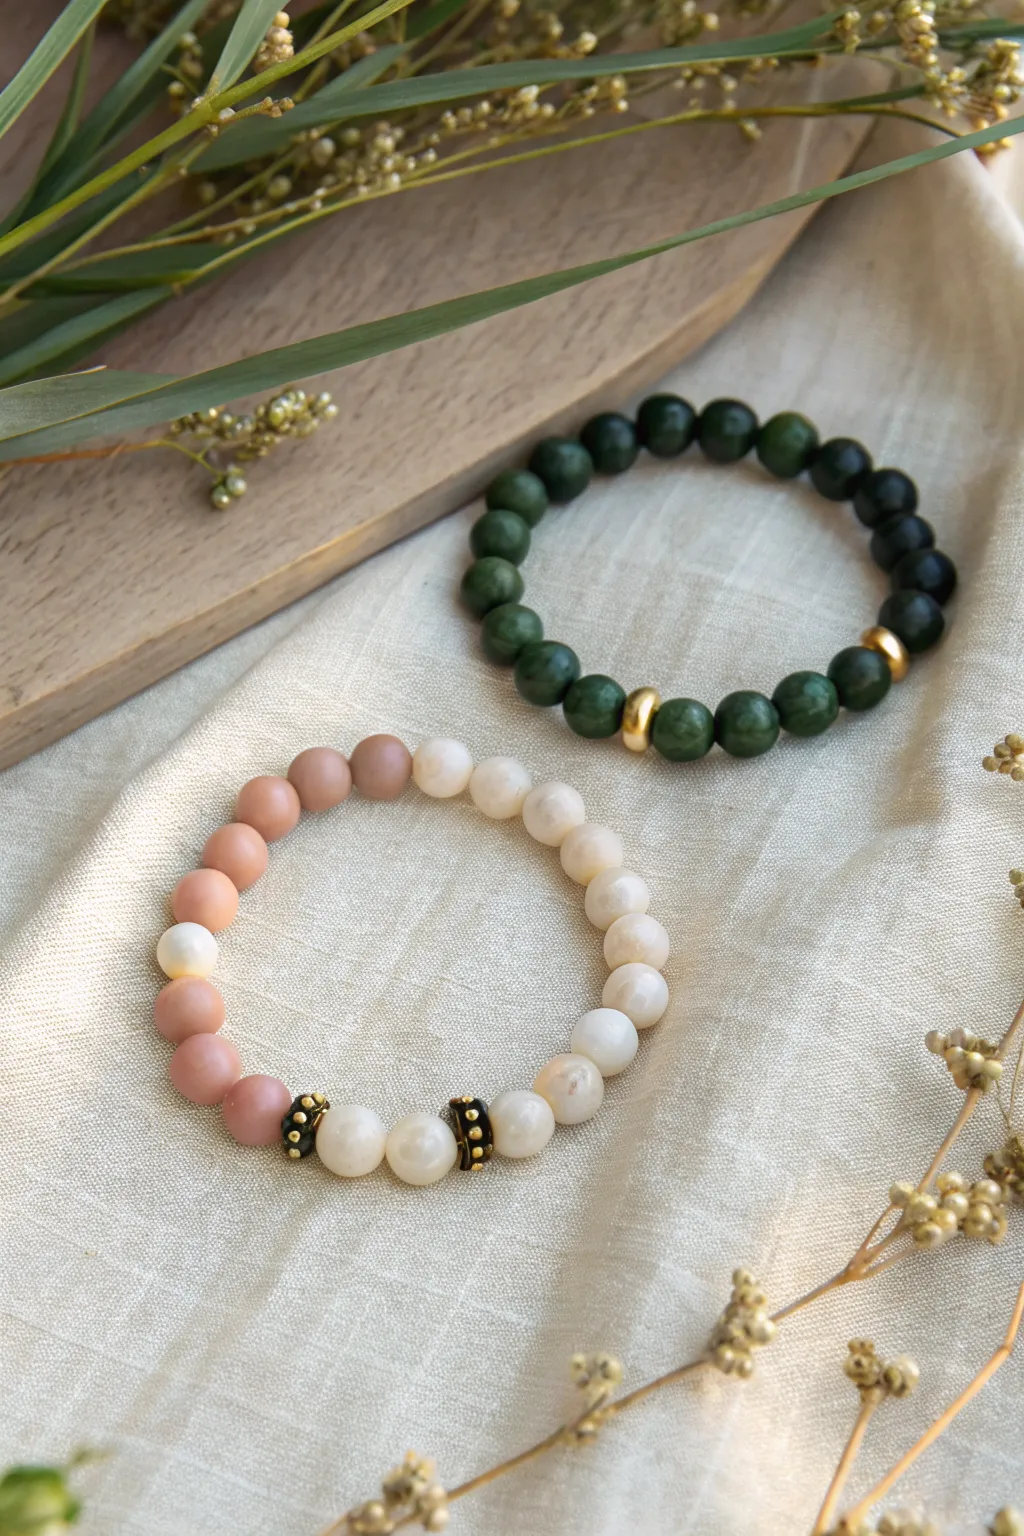
Celebrate friendship with this contrasting duo of stretch bracelets, featuring one design in deep, earthy forest greens and another in soft, romantic creams and dusty pinks. Perfect for trading or wearing together, these accessories balance bold sophistication with delicate charm.
Detailed Instructions
Materials
- Dark forest green round beads (approx. 8mm-10mm)
- Dusty pink/peach round beads (approx. 8mm-10mm)
- Creamy white round beads (approx. 8mm-10mm)
- 2 Flat gold rondelle spacer beads (for the green bracelet)
- 2 Decorative black cylinder beads with gold studded accents (for the pink bracelet)
- Strong elastic bead cord (0.8mm or 1mm thickness recommended)
- Jewelry glue or clear nail polish
- Scissors
- Bead stopper or tape
- Ruler or measuring tape
Step 1: Planning and Prep
-
Measure your wrist:
Wrap a measuring tape loosely around your wrist to determine the desired length. Add about half an inch to this measurement to ensure the bracelet rolls on comfortably without pinching. -
Cut the elastic:
Cut two lengths of elastic cord, each about 10-12 inches long. Having this extra length makes the final knotting process much less frustrating than working with short tails. -
Secure the end:
Attach a bead stopper or simply place a piece of tape folded over one end of each elastic strand to prevent your beads from sliding off while you design.
Knot Hiding Trick
Make your finish invisible by gently tugging the elastic until the glued knot pops inside the hole of a neighboring bead before it fully dries.
Step 2: The Forest Green Bracelet
-
String the base beads:
Begin stringing your dark green beads onto one of the elastic cords. You will want to string about half of the total beads required for your wrist size first. -
Add first gold accent:
Slide on one of the smooth gold rondelle spacer beads. This bright metallic pop breaks up the solid color and adds a touch of elegance. -
Create the focal section:
Add three more dark green beads after the spacer. These three beads will sit between the two gold accents. -
Add second gold accent:
Slide on the second gold rondelle spacer bead to complete the decorative focal point. -
Finish the strand:
Continue stringing the remaining green beads until the bracelet reaches your determined length, checking it against your wrist occasionally for fit. -
Prepare for knotting:
Pre-stretch the cord by gently pulling on both ends of the elastic. This is a crucial step I always do to prevent the bracelet from sagging later. -
Tie the knot:
Remove the bead stopper and tie a secure surgeon’s knot (right over left, left over right twice). Pull it tight. -
Secure and trim:
Add a tiny dab of jewelry glue to the knot, let it dry, and then trim the excess tail ends close to the knot. Hide the knot inside a bead hole if possible.
Step 3: The Flora Pink Bracelet
-
Design the gradient:
Lay out your beads on a table first. Arrange them so one half is primarily creamy white and the other transitions into the dusty pinks, creating a soft ombre or color-blocked effect. -
Start stringing:
Begin threading the creamy white beads first. String them until you have covered slightly less than half of the bracelet length. -
Add the first decorative spacer:
Slide on one of the black and gold studded cylinder beads. This darker element provides a grounding contrast to the light pastel beads. -
Insert the bridge beads:
Add two creamy white beads. These will sit directly between your two decorative spacers. -
Add the second spacer:
Slide on the second black and gold cylinder bead. You should now have a small white section framed by the two dark accents. -
Complete with pink:
Finish the strand using the dusty pink/peach beads for the remaining half of the bracelet. -
Check the symmetry:
Hold the ends together to see how the colors meet. You want the decorative spacers to sit somewhat opposite the color transition for visual balance. -
Knot and finish:
Repeat the pre-stretching, knotting, gluing, and trimming process you used for the green bracelet to complete the set.
Sticky Elastic?
If you’re having trouble threading beads onto fraying elastic, dab the tip of the cord with superglue or clear polish to create a stiff ‘needle’ end.
Give one to your best friend or wear them stacked together for a perfect mix of earthy style


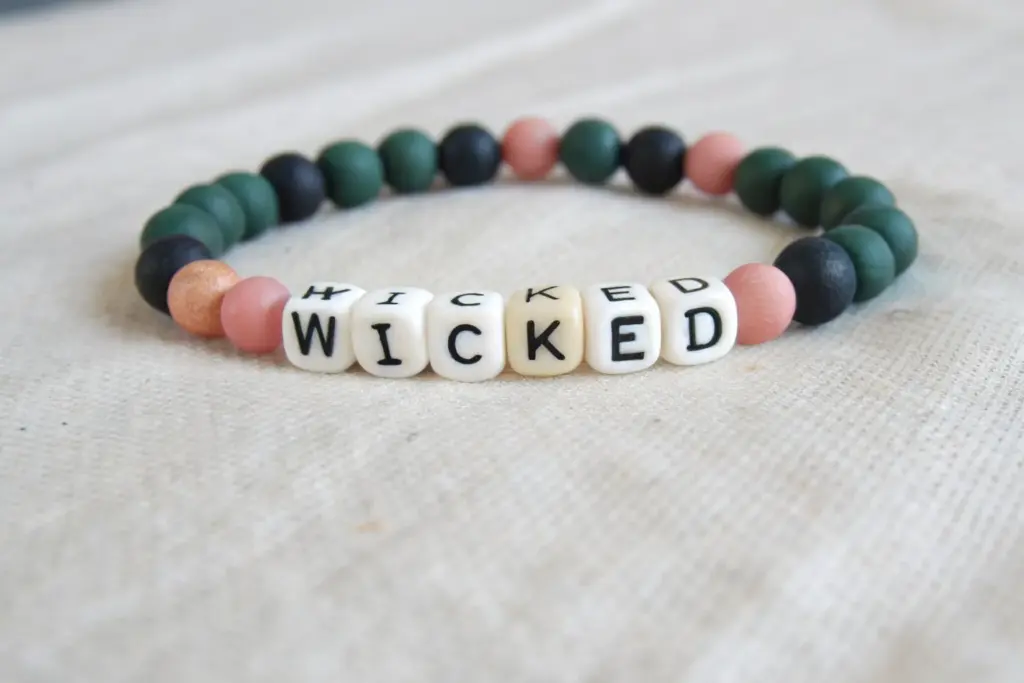
Bold WICKED Letter-Bead Centerpiece
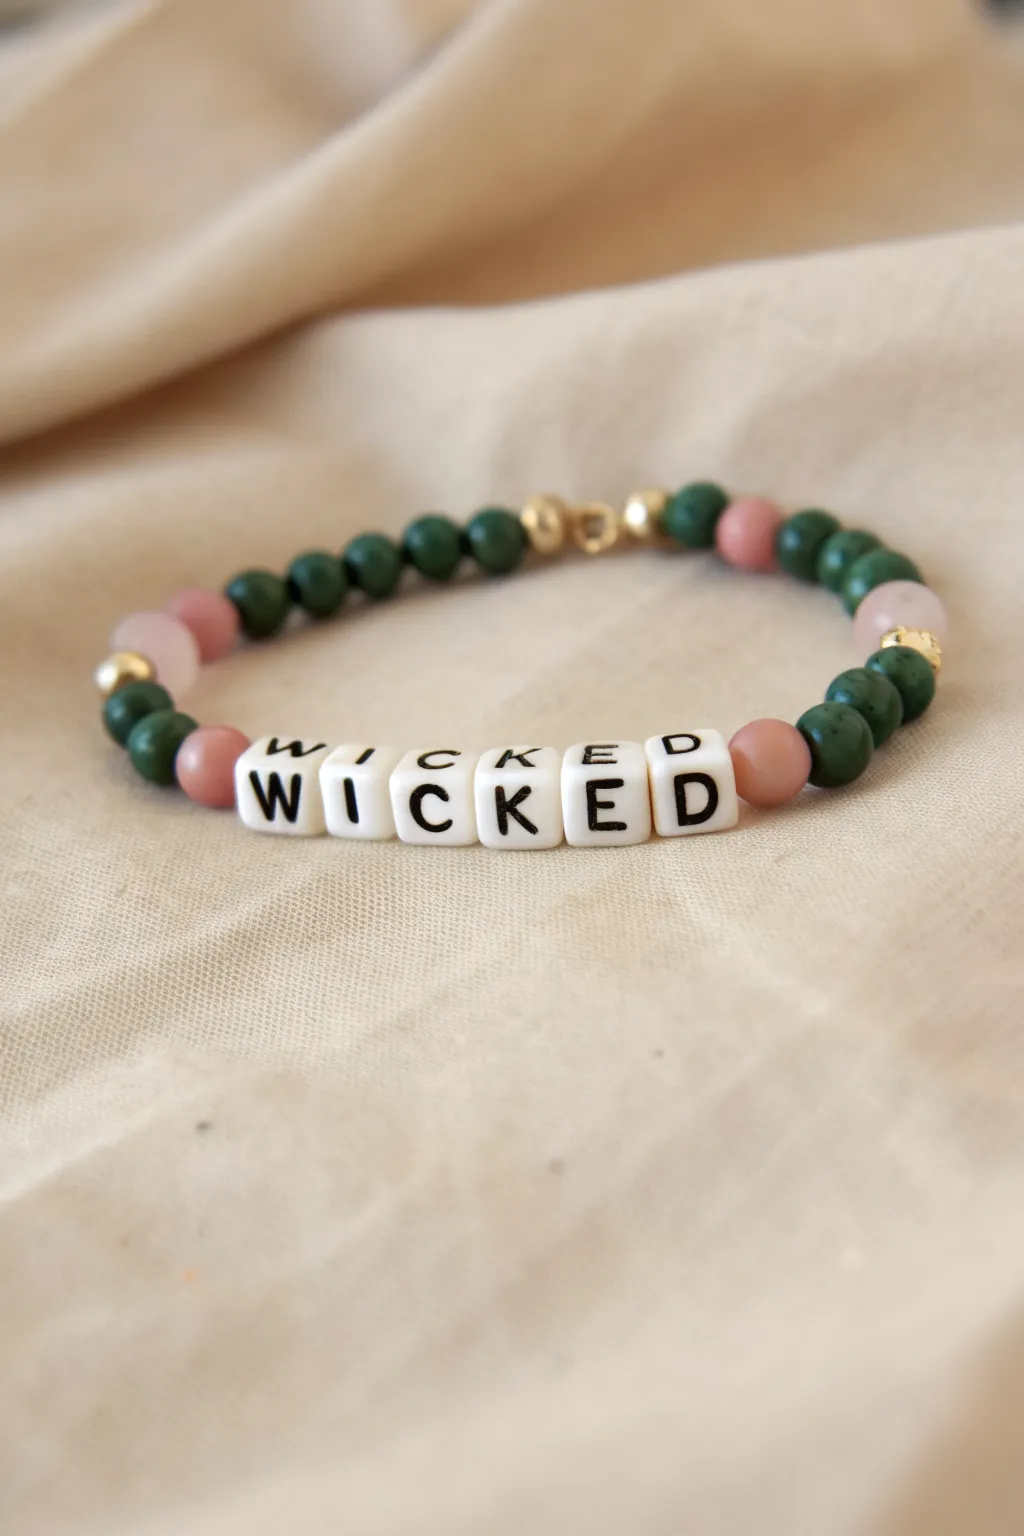
Channel a bit of dramatic flair with this sophisticated take on a friendship bracelet, combining deep forest greens and soft dusty pinks. The bold “WICKED” lettering stands out sharply against the elegant stone beads, creating a piece that feels both playful and polished.
Step-by-Step Tutorial
Materials
- Dark green round gemstone beads (6mm or 8mm, look for jade or moss agate)
- Dusty pink round gemstone beads (8mm, rose quartz or rhodonite)
- Lighter pink/translucent round beads (8mm, rose quartz)
- White square alphabet beads with black lettering
- Small gold round spacer beads (3mm or 4mm)
- Small gold crimp beads
- Gold lobster clasp and jump ring set
- Strong beading wire (Tiger Tail or similar flexible wire)
- Jewelry pliers (crimping pliers and flat nose pliers)
- Wire cutters
- Bead stopper or tape
Step 1: Preparation & Central Design
-
Measure and cut:
Begin by measuring your wrist and adding about 3-4 inches of extra length to allow for finishing the ends comfortably. Cut a piece of beading wire to this length. -
Secure the end:
Place a bead stopper or a piece of masking tape on one end of the wire. This prevents your beads from sliding off while you design the pattern. -
Select the letters:
Pick out the white square letter beads to spell the word “WICKED”. Lay them out in order on your workspace to ensure you have the correct orientation before stringing. -
Start the center sequence:
Slide the letter ‘W’ onto the wire first, followed by ‘I’, ‘C’, ‘K’, ‘E’, and ‘D’. Push them to the middle of your wire length. -
Frame the word:
On the left side of the ‘W’, add one dusty pink round bead. Repeat this on the right side of the ‘D’, so the word is bookended by the soft pink color.
Pro Tip: Layout First
Use a bead design board or a piece of felt to lay out your pattern before stringing. This stops round beads from rolling away and helps visualize the final symmetry.
Step 2: Building the Pattern
-
Right side pattern:
Working from the pink bead on the right side, add two dark green gemstone beads. -
Add a gold accent:
Slide on one small gold spacer bead to break up the color block. -
Lighter pink variation:
Add a lighter, slightly translucent pink bead (like rose quartz) next. -
Green continuation:
String on three more dark green beads to continue the forest theme. -
Repeat for left side:
Now move to the left side of the bracelet. Repeat the exact same pattern: two green beads, one gold spacer, one light pink bead, and three green beads. -
Check the fit:
Wrap the beaded wire around your wrist. If you need more length, add more green beads symmetrically to both ends until it almost meets around your wrist, leaving about half an inch for the clasp.
Troubleshooting: Stiff Bracelet
If the bracelet feels rigid or kinks, you strung the beads too tightly. Leave a tiny gap (about 1mm) of bare wire before crimping the second end to allow movement.
Step 3: Finishing the Clasp
-
Attached the crimp bead:
Remove the bead stopper from one end. Slide on a small gold crimp bead, followed by one half of your clasp (either the jump ring or the lobster claw). -
Loop and secure:
Thread the wire back through the crimp bead, creating a small loop that holds the clasp component. -
Crimp firmly:
Use your crimping pliers to flatten the crimp bead securely. I like to give it a gentle tug to make sure it won’t slip. -
Trim excess wire:
Feed the short tail of excess wire back through the first couple of green beads to hide it, then trim specifically close with your wire cutters. -
Finish the second side:
Repeat the crimping process on the other end with the matching clasp component. Ensure the beads are snug but not so tight the bracelet becomes stiff, then crimp, hide the tail, and trim.
Now you have a stylish, custom-made accessory ready to wear or gift to a friend


Emerald-City Spacer Pattern
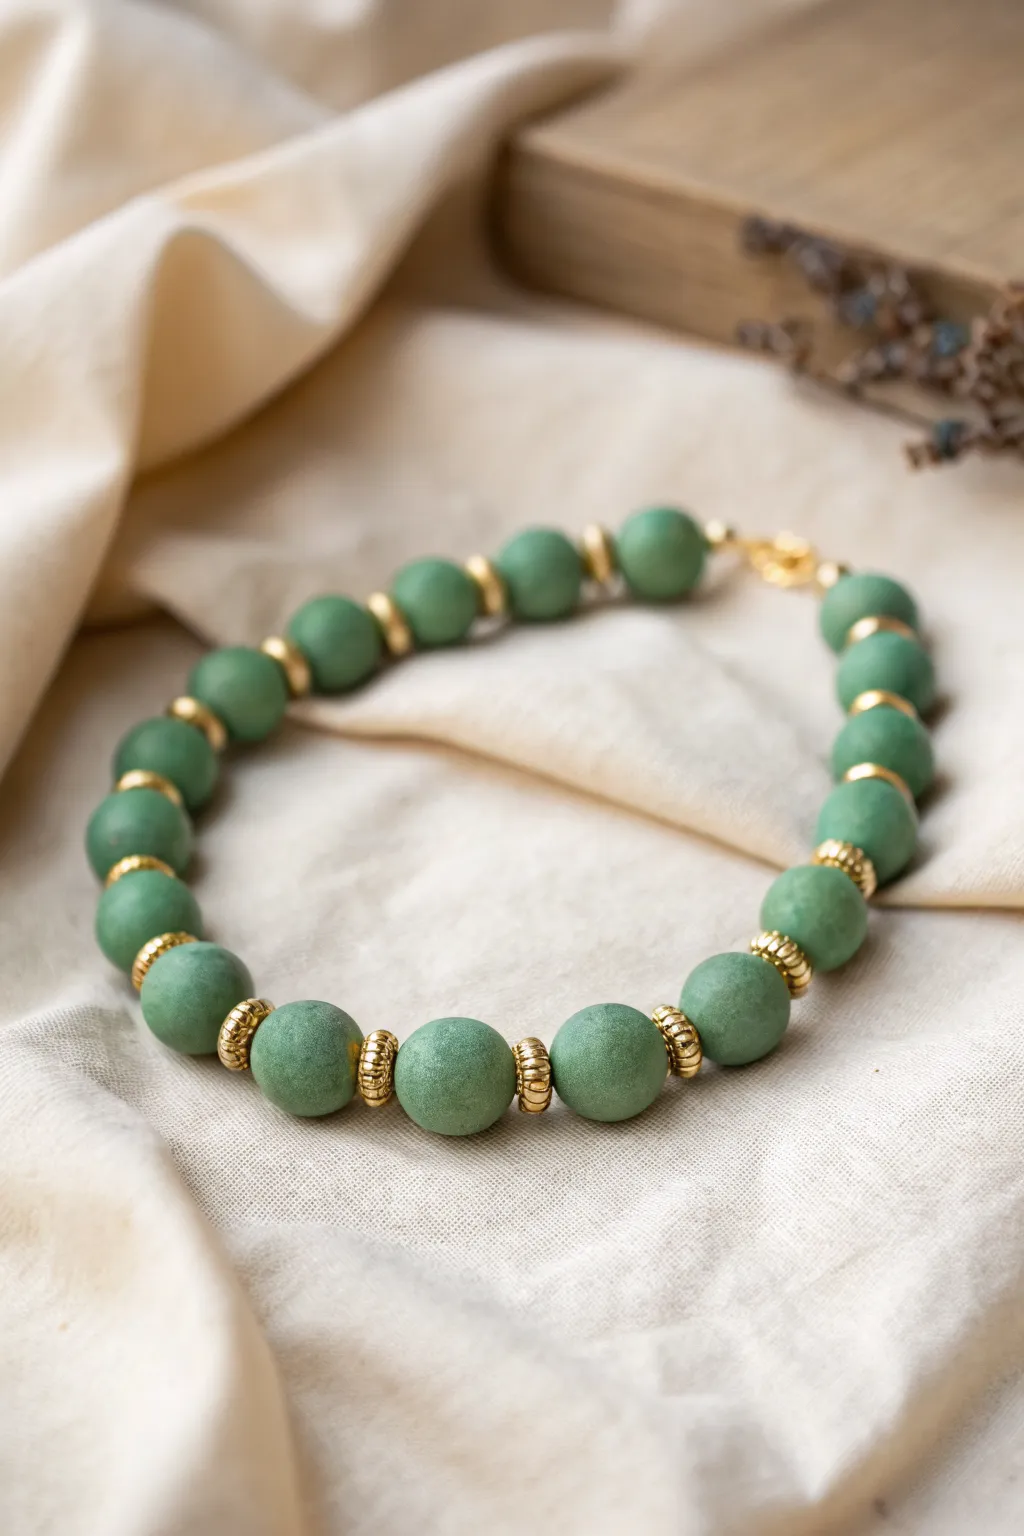
Elevate simple polymer clay beads with a sophisticated pattern of textured gold spacers that catch the light beautifully. This design balances the matte, earthly finish of sage green clay with the luxurious pop of metallic hardware for a piece that looks boutique-bought.
Step-by-Step Tutorial
Materials
- Sage green polymer clay (specifically a matte or suede-effect finish)
- Gold textured spacer beads ( rondelle or disc shape with ridges)
- Strong elastic beading cord (0.7mm or 0.8mm)
- Superglue or jewelry cement
- Scissors
Step 1: Prepping the Clay Beads
-
Condition the clay:
Start by thoroughly conditioning your sage green polymer clay until it is soft and pliable, which prevents cracking later. -
Portion the clay:
Pinch off equal amounts of clay for your beads. A small circular cutter can help ensure every portion is exactly the same volume. -
Roll the spheres:
Roll each portion between your palms to create smooth, perfectly round spheres approximately 10-12mm in diameter. -
Piercing holes:
I like to use a toothpick or a bead pin to gently pierce a hole through the center of each sphere while it is still raw, rotating slightly to keep the shape round. -
Adding texture (optional):
To achieve the matte, almost sugary look in the photo, you can gently roll the raw beads on a piece of coarse sandpaper or use a stiff brush to stipple the surface before baking. -
Bake the beads:
Arrange your beads on a baking tray lined with cardstock to prevent flat spots. Bake according to the manufacturer’s package instructions—usually around 275°F (135°C) for 30 minutes. -
Cooling down:
Allow the beads to cool completely in the oven before handling them to ensure they harden fully.
Clean Bead Holes
Before stringing, re-check bead holes. If baking shrank the hole, gently twist a small drill bit by hand to clear it out.
Step 2: Assembling the Pattern
-
Measure your cord:
Cut a length of elastic cord about 10-12 inches long. This gives you plenty of extra room for tying the knots comfortably. -
Pre-stretch the elastic:
Give the elastic cord a few firm tugs. This crucial step prevents the bracelet from stretching out and becoming loose after you wear it a few times. -
Secure the end:
Place a piece of tape or a bead stopper on one end of the cord so your work doesn’t slide off while styling. -
Begin the sequence:
Thread one gold textured spacer bead onto the cord first to start your pattern. -
Add a clay bead:
Slide on one of your cooled sage green clay beads right after the spacer. -
Repeat the rhythm:
Continue this alternating pattern—one gold spacer, one green bead—until you reach your desired wrist length. The spacers should act as shiny ‘bookends’ for every clay sphere. -
Check fit:
Wrap the strand around your wrist to check the sizing. Add or remove a bead-spacer pair if necessary, ensuring the pattern stays consistent.
Step 3: Finishing Touches
-
Prepare to tie:
Remove the tape or stopper, bringing the two ends of the cord together carefully. -
Knotting securely:
Tie a surgeon’s knot (like a regular square knot but looped through twice) and pull it tight. I find pulling gently on the cord ends while pushing the knot down helps secure it. -
Reinforce with glue:
Apply a tiny dot of jewelry cement or superglue directly onto the knot. Let it dry for a minute or two. -
Hide the knot:
Trim the excess cord close to the knot, then gently tug the bracelet so the knot slides inside the hole of one of the clay beads or spacers to hide it.
Mix Up Metals
Swap the gold spacers for brushed copper or rose gold rings to give the sage green clay a warmer, autumnal vibe.
Now slip on your new accessory and enjoy the custom elegance you created by hand

The Complete Guide to Pottery Troubleshooting
Uncover the most common ceramic mistakes—from cracking clay to failed glazes—and learn how to fix them fast.
Sparkle vs Matte Pink-and-Green Mix
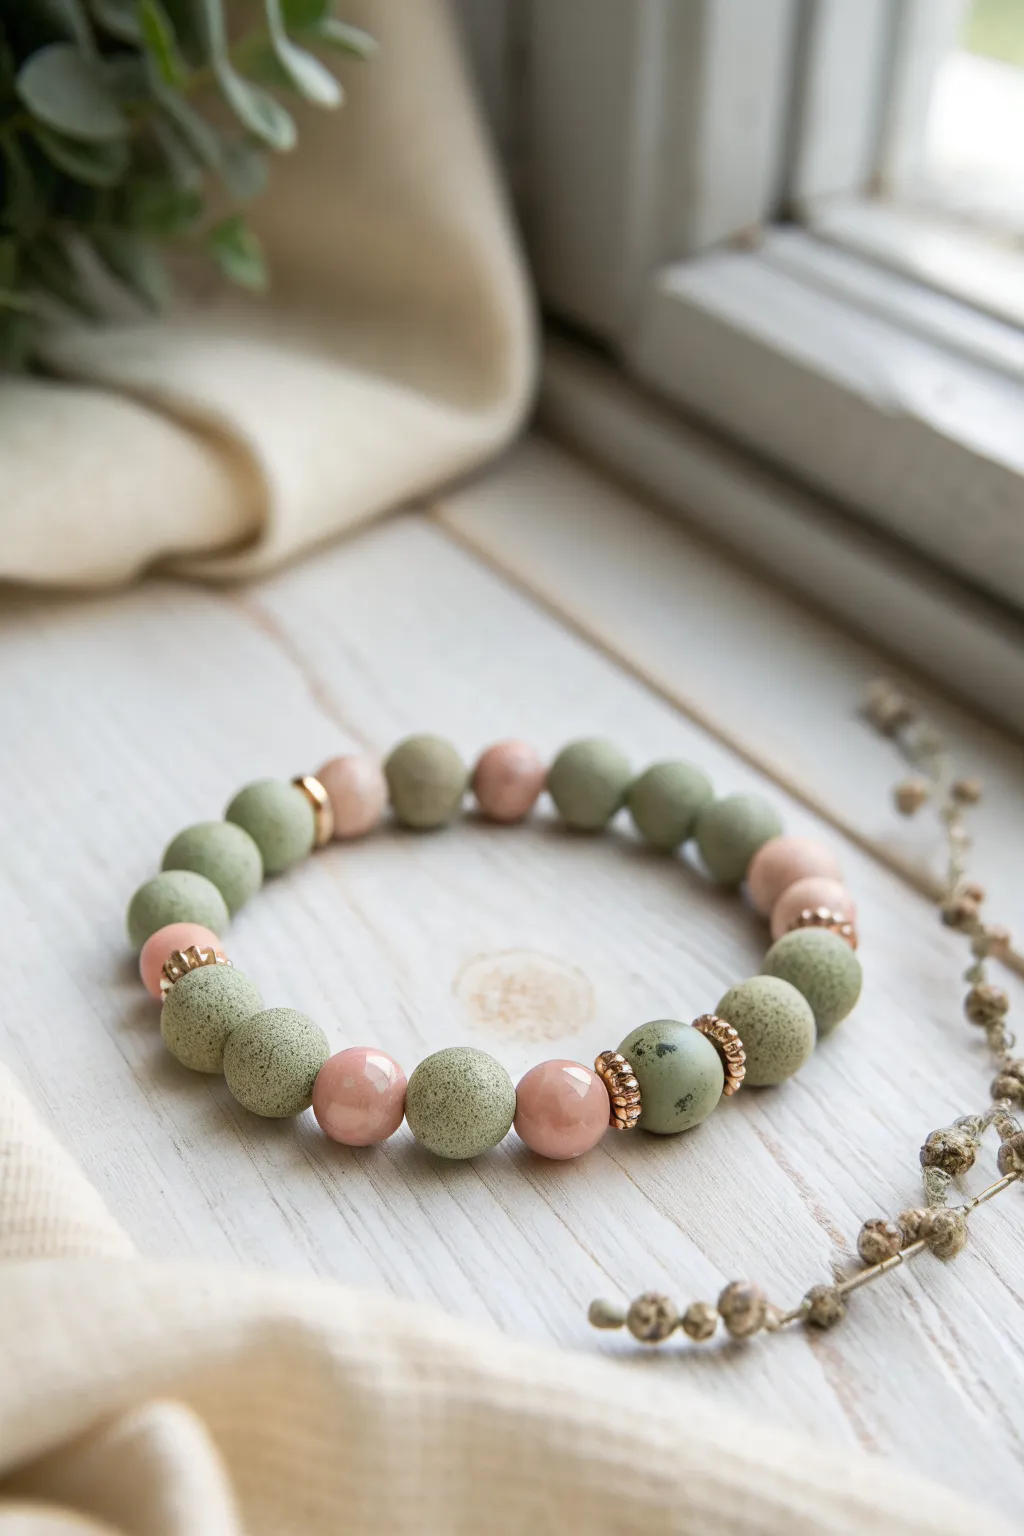
Balanced perfectly between earthy and elegant, this bracelet design pairs rough, moss-like green textures with the smooth, high-gloss finish of pale pink accents. The addition of rose-gold spacer beads adds just the right amount of warm metallic shine to tie the natural palette together.
Step-by-Step Guide
Materials
- Polymer clay (Sage Green, Forest Green, Translucent, and Pale Pink)
- Coarse sea salt or sandpaper (for texturing)
- Glossy polymer clay glaze or UV resin
- Rose gold metallic spacer beads (daisy spacer style and simple rings)
- Strong elastic stretch cord (0.8mm or 1mm)
- Clay roller or pasta machine
- Small round bead cutter (approx 8-10mm)
- Bead piercing pin or needle
- Super glue or jewelry cement
- Baking tile or parchment paper
- Oven
Step 1: Prepping the Clay
-
Condition the Greens:
Begin by conditioning your sage green clay until it is soft and pliable. To achieve that organic, mossy look, mix a small amount of forest green and translucent clay into the sage, but don’t blend it completely—leave slight streaks. -
Create Texture:
Before rolling your beads, press the green clay sheet onto coarse sandpaper or roll it over scattered sea salt crystals. This imitates the pitted, stone-like surface seen in the reference. -
Condition the Pink:
Separately condition your pale pink clay. This color needs to remain perfectly smooth and uniform, so wash your hands to avoid transferring any green pigments.
Step 2: Forming the Beads
-
Cut Uniform Pieces:
Use your small round cutter to punch out equal circles from your clay sheets. This ensures every bead starts with the same volume of material for a consistent size. -
Roll the Green Beads:
Takes the textured green circles and roll them gently into spheres. Try not to over-smooth them; you want to preserve those indentations and the matte finish. -
Roll the Pink Beads:
Roll the pink clay circles into perfect, smooth spheres. Inspect them closely to ensure there are no fingerprints or lint, as these will show under the gloss. -
Pierce the Holes:
Using a bead piercing pin, carefully poke a hole through the center of each bead. I find twisting the pin gently while pushing helps prevent the bead from squashing out of shape. -
Bake:
Arrange the beads on a baking tile. Bake according to your specific clay brand’s package instructions (usually around 275°F/135°C for 15-30 minutes). Let them cool completely.
Uneven Textures?
If your green beads look too smooth after rolling, gently tap them with a toothbrush or stiff paintbrush before baking to re-introduce that stone-like surface.
Step 3: Finishing and Assembly
-
Glaze the Pinks:
Once cool, apply a thick coat of high-gloss glaze or UV resin only to the pink beads. This creates the ‘Sparkle vs Matte’ contrast that defines this style. Cure or let dry. -
Plan the Pattern:
Lay out your design on a bead board. The pattern in the image is generally 2-3 matte green beads followed by a glossy pink bead, but note the asymmetry; sometimes spacers frame the pink, sometimes they sit between green beads. -
Incorporate Spacers:
Place the rose gold daisy spacers. Notice how one section uses two large spacers to frame a unique, speckled green focal bead. Experiment with placement until it looks balanced. -
Measure Cord:
Cut a length of elastic cord about 10-12 inches long. Pre-stretch the cord by pulling it firmly a few times; this prevents the bracelet from sagging later. -
String the Beads:
Thread your beads onto the elastic according to your layout. Check the fit around your wrist before you tie it off. -
Tie the Knot:
Tie a surgeon’s knot (right over left twice, then left over right). Pull tight to secure. -
Hide the Knot:
Apply a tiny drop of super glue to the knot. Once dry, trim the excess cord and gently tuck the knot inside one of the larger-holed beads if possible.
Pro Tip: Spot Cleaning
Keep baby wipes handy while rolling the pink beads. Even tiny dust specks show up under gloss, so clean hands and surfaces are crucial for that glass-like finish.
Enjoy the satisfying contrast of textures on your wrist as you wear your new custom piece
Moody Green Smoke Marble Beads
Capture the essence of a foggy forest with this moody bracelet project, featuring hand-rolled polymer clay beads that swirl deep greens with smoky blacks. The finish is polished and sophisticated, perfect for adding an edge to your everyday accessory stack.
Step-by-Step
Materials
- Polymer clay (Deep Green, Black, Translucent, and Forest Green)
- Small metal spacer beads (silver or gunmetal tons)
- Elastic cord (0.8mm or 1mm)
- Clay roller or pasta machine
- Bead piercing pin or needle tool
- Bead baking rack (optional but recommended)
- Wet/dry sandpaper (400, 600, 1000 grit)
- Buffing wheel or denim cloth
- Gloss glaze (optional)
- Super glue or jewelry cement
Step 1: Creating the Moody Marble Blend
-
Conditioning the Clay:
Begin by thoroughly conditioning your Deep Green, Forest Green, Black, and Translucent clays separately. You want them pliable and warm to ensure they mix smoothly without cracking. -
Forming Snakes:
Roll each color into a long, thin snake about 1/4 inch thick. For this specific look, use twice as much Deep Green as the other colors to keep it the dominant hue. -
Determine Ratio:
Take your green snakes and lay them side-by-side. Add a very thin strand of black—be sparing, as black can easily overpower the mix—and a strand of translucent to add depth. -
Twisting the Colors:
Twist the bundle of clay snakes together tightly until it looks like a candy cane. Fold it in half and twist again. Repeat this step 3-4 times to begin marbling the colors. -
Consolidating the Cane:
Roll the twisted clay into a smooth log. If you want a more subtle marble, fold and twist a few more times until the distinct lines start to blur into a smoky effect.
Fixing Flat Spots
If beads developed flat spots during baking, sand firmly with coarse grit (220) to reshape them before moving to finer sandpapers for smoothing.
Step 2: Shaping and Piercing
-
Measuring Portions:
Use a tissue blade to slice equal sized segments from your marbled log for the green beads. Slice separate, slightly smaller segments from a pure black block of clay for the accent beads. -
Rolling Spheres:
Roll each segment between your palms to create perfect spheres. I find using a small sheet of acrylic over the beads and moving in a circular motion on the work surface helps get them perfectly round. -
Piercing the Beads:
Gently pierce each bead with your needle tool. Rotate the bead as you push the needle through to avoid distorting the spherical shape. Smooth out the exit hole with your fingertip. -
Preparation for Baking:
Place your beads on a bead rack suspended over a tray. If you don’t have a rack, nestle them into a bed of cornstarch or baking soda to prevent flat spots forming on the bottom. -
Baking:
Bake the beads according to your polymer clay package instructions (usually 275°F/135°C for 30-45 minutes). Let them cool completely before handling.
Ice Water Shock
Plunge baked beads directly into ice water straight from the oven. This ‘shocks’ the clay, often resulting in increased hardness and clarity for translucent mixes.
Step 3: Finishing and Assembly
-
Sanding for Smoothness:
Place the cooled beads in a bowl of water with a drop of dish soap. Wet sand them starting with 400 grit, moving to 600, and finishing with 1000 grit to remove fingerprints and surface bumps. -
Buffing:
Vigorously rub the beads with a piece of denim or use a buffing wheel on a rotary tool to bring out a natural sheen. -
Glazing (Optional):
If you prefer the high-gloss look seen on the black beads in the photo, apply a thin coat of gloss glaze now and let dry. -
Stringing the Pattern:
Cut a piece of elastic cord about 10 inches long. Pre-stretch the cord by pulling it firmly a few times to prevent sagging later. -
Creating the Design:
String your beads. A nice pattern is 4-5 green marble beads, followed by a black bead, perhaps flanked by tiny metal spacers for a professional touch. Repeat until the length measures your wrist size plus 0.5 inches. -
Tying the Knot:
Tie a surgeon’s knot (right over left twice, then left over right twice). Pull tight. -
Securing the Ends:
Add a tiny drop of jewelry cement or super glue to the knot. Let it dry for a minute before trimming the excess cord and tucking the knot inside a neighboring bead.
Slip this evocative piece onto your wrist and enjoy the mysterious depth of your handmade marbled pattern


What Really Happens Inside the Kiln
Learn how time and temperature work together inside the kiln to transform clay into durable ceramic.
Soft Pink Cloud Marble Beads

This elegant bracelet captures the dreamy essence of soft pink clouds with its swirls of white and rose marble effects. The scattered gold spacer beads add just a touch of luxury, elevating the design from simple to sophisticated.
Step-by-Step Tutorial
Materials
- White polymer clay
- Translucent polymer clay
- Rose/Magenta polymer clay
- Gold polymer clay (or metallic gold pigment powder)
- Stretch cord (0.8mm or 1mm)
- Jewelry glue (GS Hypo Cement recommended)
- Small bead roller (optional but helpful)
- Needle tool or toothpick
- Small gold spacer beads (metal or clay)
- Oven for baking
Step 1: Creating the Marble Effect
-
Preparation:
Condition your white polymer clay until it is soft and pliable. Do the same with a small amount of the rose/magenta clay. -
Mixing base colors:
Mix a portion of the white clay with a tiny dot of rose to create a very pale, almost white-pink base. Keep some pure white aside as well. -
Setting up the heavy marble:
Roll the white clay and the pale pink clay into snakes (logs). Then, roll very thin snakes of the pure darker rose clay. -
Combining clays:
Twist the white and pale pink logs together gently. Lay the thin rose snakes over this combined log in random squiggly patterns. -
The twist method:
Fold the combined log in half and twist it. Roll it into a smooth log again. -
Repeat for complexity:
Repeat the fold-and-twist motion 2-3 times. Be careful not to overmix; you want distinct veins of pink, not a solid blended color. -
Adding texture (optional):
To mimic the specific ‘crackle’ texture seen on some beads in the photo, roll the log over a piece of sandpaper or texture sheet before slicing.
Step 2: Forming the Beads
-
Sizing:
Slice your marbled log into equal-sized segments. You are aiming for enough clay to make approximately 8mm to 10mm spheres. -
Rolling:
Roll each segment between your palms to create round balls. I find creating a cupping shape with my hand helps keep them perfectly spherical. -
Detailing:
If your marbling looks too uniform, gently pinch and distort the clay before re-rolling to make the veins look organic. -
Making the holes:
Using a needle tool or toothpick, carefully pierce the center of each bead. Twist the tool gently as you push through to avoid squashing the sphere. -
Baking:
Arrange the beads on a baking sheet or tile. Bake according to your brand of polymer clay’s instructions (usually 275°F/135°C for 15-30 minutes per 1/4 inch thickness). -
Cooling:
Let the beads cool completely before handling. They must be hard before stringing.
Clean Bead Holes
To prevent distorted holes, try baking your beads directly on the needle tool or a metal skewer, suspended over a baking dish so they don’t flatten.
Step 3: Assembly
-
Measuring cord:
Cut a piece of stretch cord about 10-12 inches long. Pre-stretch the cord by pulling on it firmly a few times to prevent sagging later. -
Stringing pattern:
String your cooled clay beads onto the cord. Insert a gold spacer bead randomly every 4 to 6 clay beads to match the image’s asymmetrical style. -
Checking size:
Wrap the strand around your wrist to check the fit. Add or remove beads as necessary for comfort. -
Tying off:
Tie a surgeon’s knot (right over left twice, then left over right). Pull the knot tight. -
Securing:
Dab a tiny drop of jewelry glue on the knot. Let it dry before trimming the excess cord ends.
Gold Dust Finish
Before baking, brush a tiny amount of gold mica powder into the darker pink ‘veins’ of the marble for a subtle shimmer that catches the light.
Now you have a stunning, handcrafted piece of jewelry that looks like polished stone
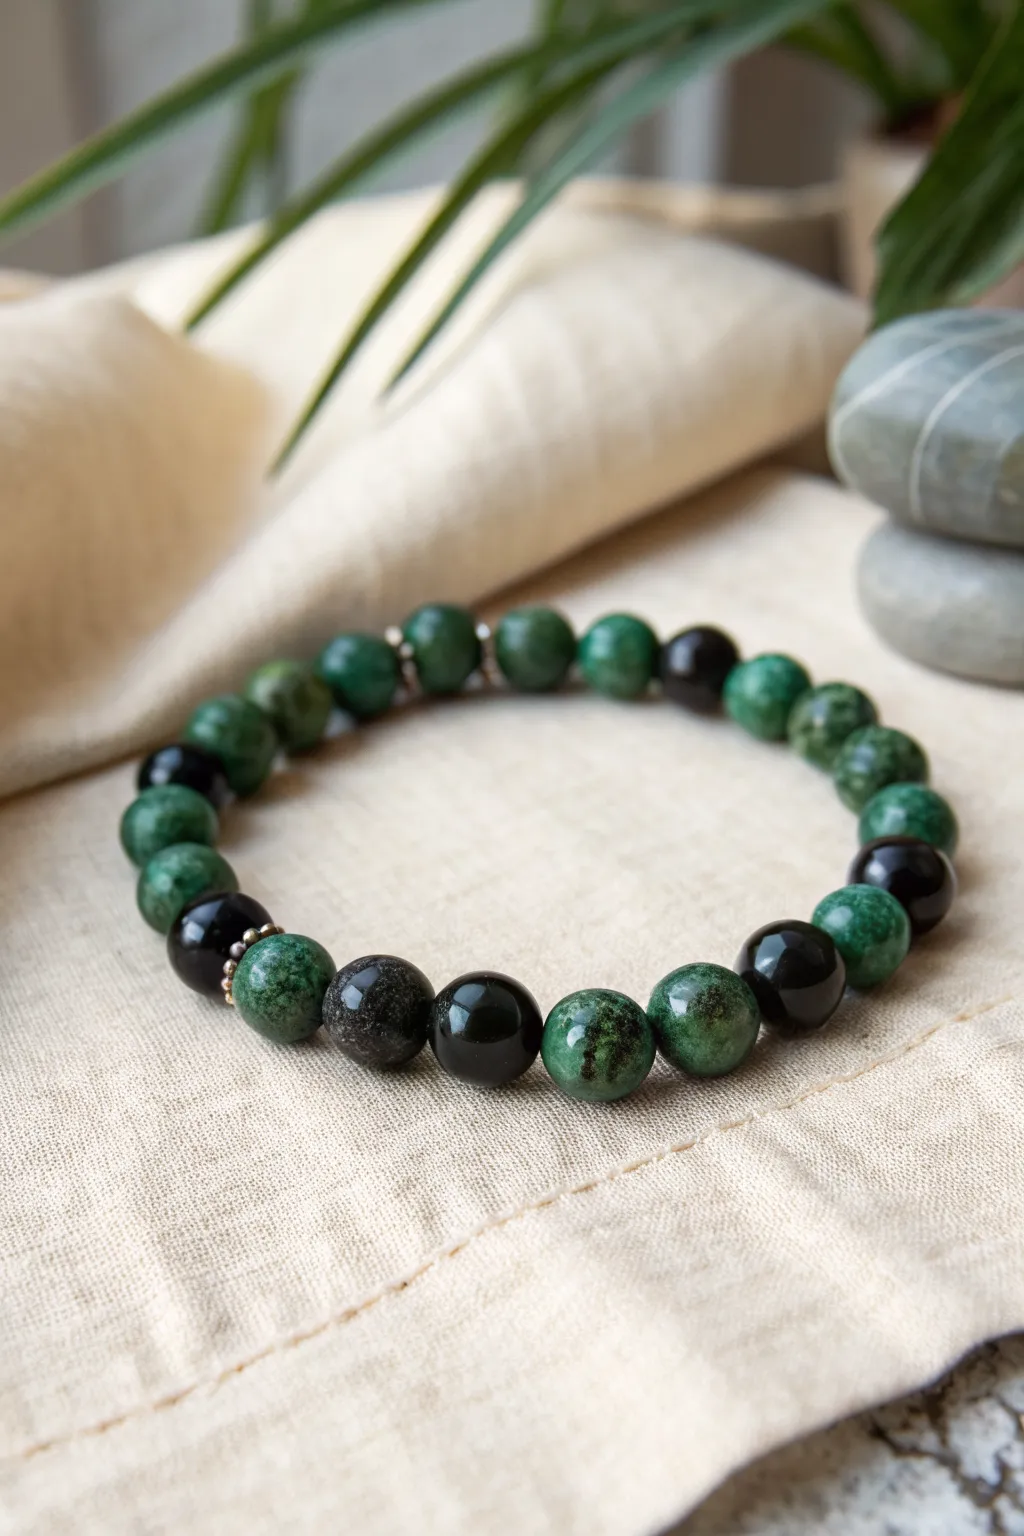
Witch Hat Charm Accent Bracelet
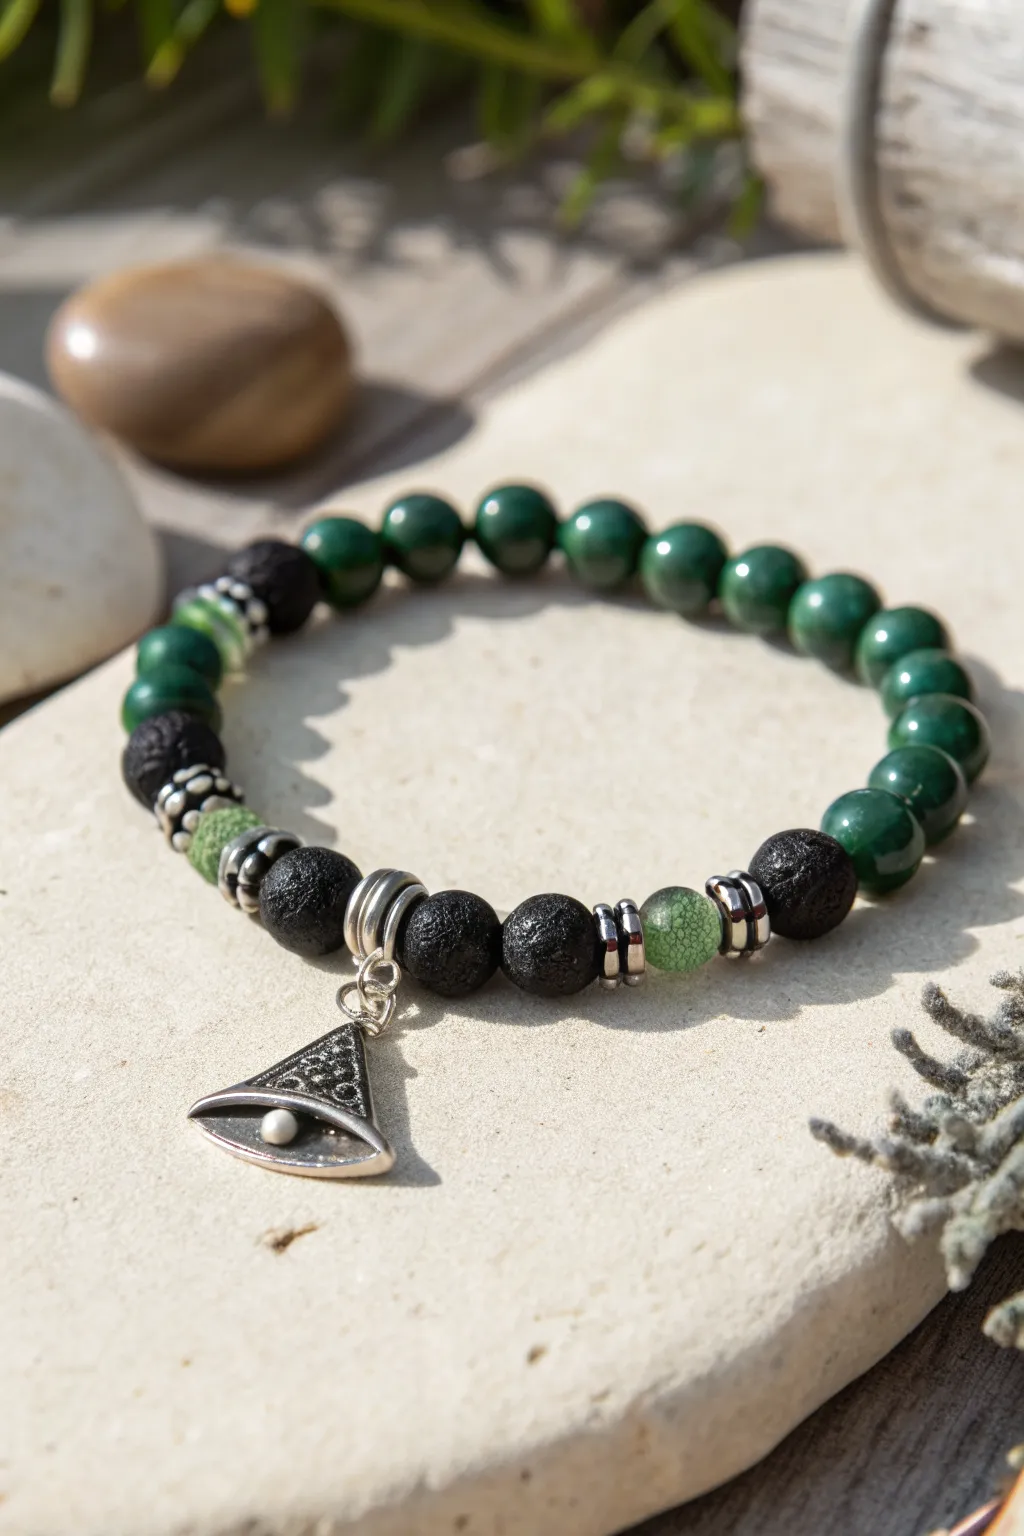
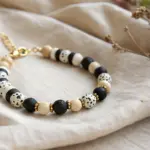
This striking beaded bracelet combines the organic texture of black lava rock with the smooth, mystical allure of green malachite-style agate. With a distinct silver witch’s hat charm as the focal point, it’s a perfect accessory for adding a touch of magic to your everyday style.
Step-by-Step
Materials
- 8mm dark green round stone beads (Malachite or dyed Agate)
- 8mm black lava stone beads
- 6mm crackle glass green accent beads
- Silver spacer beads (ridged or patterned)
- Silver witch hat charm (with bail)
- Elastic stretch cord (0.8mm or 1mm thickness)
- Jewelry adhesive or clear nail polish
- Scissors or bead nippers
- Optional: Bead board or design tray
- Large jump ring (6-7mm) for the charm
Step 1: Preparation & Layout
-
Measure your cord:
Cut a length of elastic cord about 10-12 inches long. It’s always better to have too much cord than too little, as it makes tying the knot much easier later. -
Pre-stretch the elastic:
Hold the cord firmly at both ends and give it a few gentle tugs. This pre-stretching prevents the bracelet from becoming loose immediately after you finish making it. -
Secure the end:
Place a bead stopper or simply a piece of strong tape on one end of your cord to stop beads from sliding off while you work. I usually just use a binder clip for this. -
Lay out the design:
Visualize your pattern on a bead board or flat surface. The pattern consists of a solid run of green beads for the back half, transitioning into a mixed pattern of lava, spacers, and green accents for the front focal area.
Knot Slipping Out?
If the knot keeps popping out of the bead hole, try widening the hole of that specific bead gently with a bead reamer, or tie the knot next to a metal spacer which often has larger holes.
Step 2: Creating the Focal Section
-
Start the center cluster:
Begin by threading the charm’s jump ring onto a decorative bail or slider bead if you have one, or simply prepare the charm to hang directly between beads. -
Add center lava beads:
Thread two black lava beads onto the cord. These will sit immediately to the right of your central charm placement. -
Position the charm carrier:
Slide on the silver bail or large jump ring holding your witch hat charm so it rests next to the lava beads. -
Complete the center block:
Thread one more black lava bead on the other side of the charm bail. You should now have the charm centered between lava beads. -
Add silver spacers:
Slide a ridged silver spacer bead onto the cord next to the lava bead. -
Insert green accent:
Add one of the smaller, lighter green crackle glass beads. This provides a nice color variation from the darker main stones. -
Mirror the spacers:
Add another silver spacer bead to flank the light green bead. -
Add outer lava bead:
Thread on one more black lava bead to finish this specific patterned segment on the right side. -
Mirror the pattern on the left:
If you are stringing from one end, continue building outward. If you are centering the layout, ensure the pattern of [Lava – Spacer – Light Green – Spacer – Lava] is repeated on the left side of the charm cluster as well.
Use Essential Oils
Make your bracelet functional! Add a drop of essential oil (like patchouli or cedarwood) to the porous lava beads. They act as natural diffusers that will hold the scent for hours.
Step 3: Finishing the Loop
-
Add transition beads:
Place a final silver spacer bead after the outer lava beads on both sides. This signifies the end of the ‘focal’ section and the start of the main strap. -
String the main green beads:
Fill the rest of the cord with your dark green 8mm round beads. Depending on your wrist size, this is typically about 12-15 beads. -
Check the fit:
Wrap the unfinished strand around your wrist. It should sit comfortably without gaps, but not squeeze your skin. Add or remove green beads as needed. -
Tie the surgeon’s knot:
Remove the tape or clip. Cross the left end over the right, wrap it around twice, and pull tight. Repeat by crossing right over left to secure the knot. -
Secure the knot:
Apply a tiny drop of jewelry adhesive or clear nail polish directly onto the knot. Let it tack up for a moment. -
Hide the knot:
While the glue is still slightly tacky but flexible, pull the cord firmly so the knot slides inside the hole of the nearest large bead. -
Trim excess cord:
Once the glue is fully dry (give it at least 15 minutes), use your scissors to snip the loose ends of the elastic as close to the bead hole as possible.
Now you have a wickedly stylish accessory ready to wear for spooky season or year-round magic

TRACK YOUR CERAMIC JOURNEY
Capture glaze tests, firing details, and creative progress—all in one simple printable. Make your projects easier to repeat and improve.
Wand-and-Star Charm Sweetheart Stack
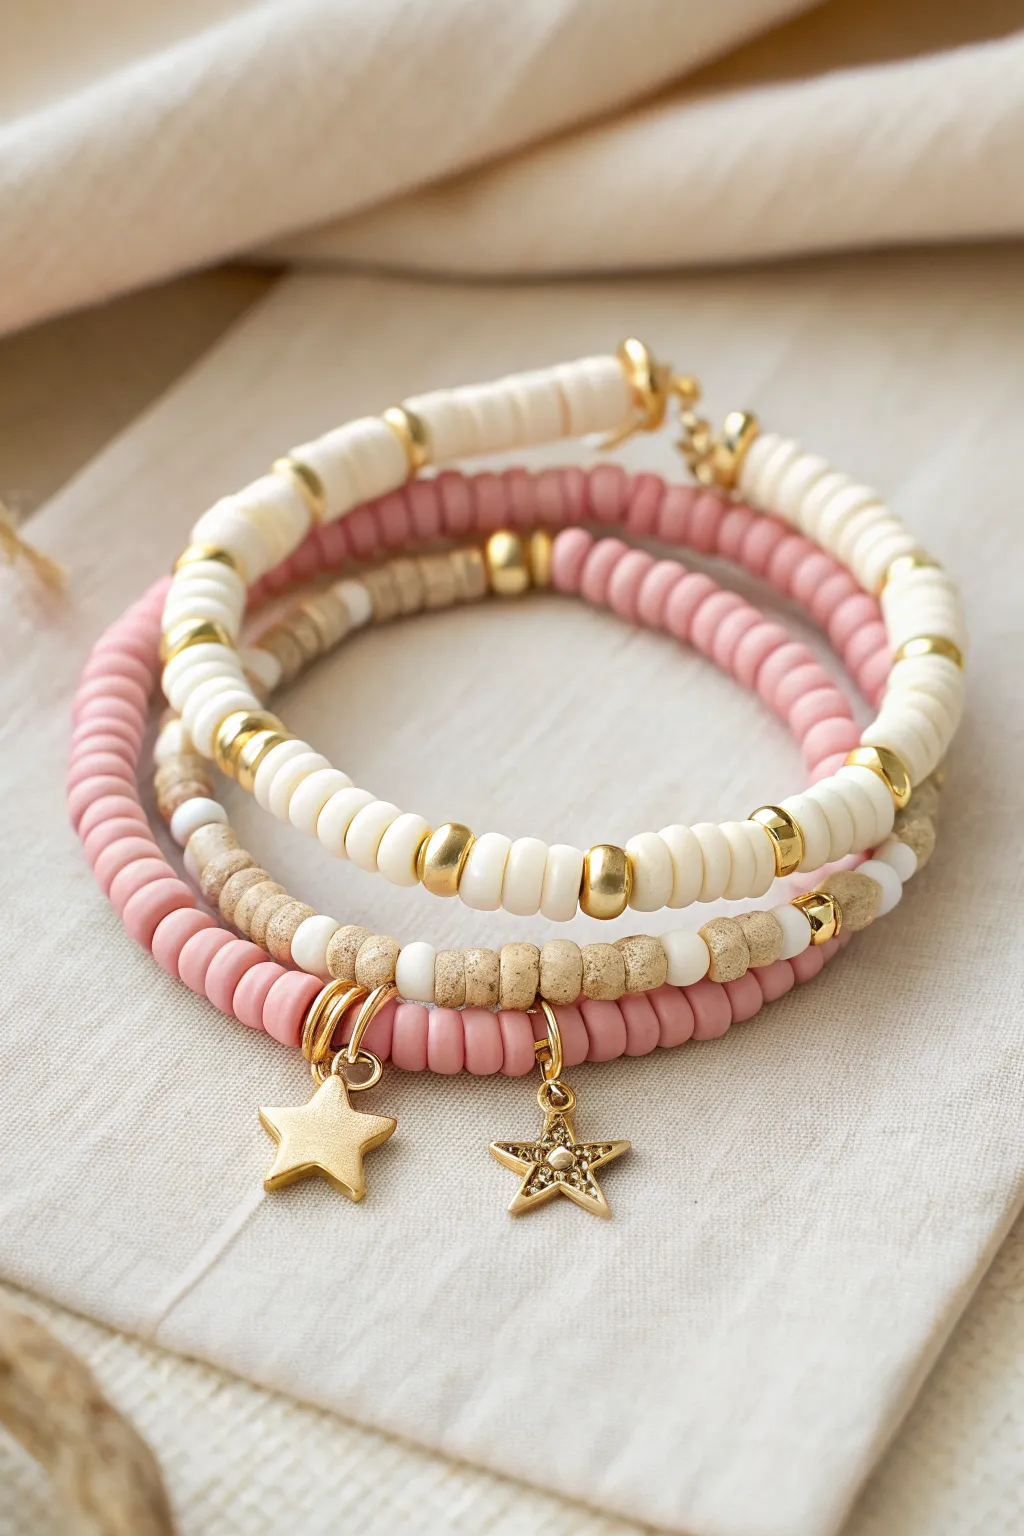
Capture a whimsical touch with this three-strand bracelet stack featuring soft pink and creamy white clay heishi beads accented by golden spacers. The set is crowned with dangling celestial charms, making it a perfect accessory for dreamers and romantics alike.
How-To Guide
Materials
- 6mm Polymer clay heishi beads (Cream White)
- 6mm Polymer clay heishi beads (Dusty Pink)
- 6mm Textured/Wood-look round beads (Beige/Tan)
- Small gold metal saucer spacers (approx. 4-5mm)
- Small gold round spacer beads (3mm)
- Gold star charm (solid silhouette)
- Gold open-star charm with rhinestone center
- Gold jump rings (open, 5-6mm)
- Elastic beading cord (0.7mm or 0.8mm clear)
- Jewelry glue or clear nail polish
- Scissors
Step 1: Strand One: The Golden Cream Classic
-
Measure your cord:
Cut a piece of elastic cord about 10-12 inches long. This generous length gives you plenty of room to tie knots later without struggling. -
Start the pattern:
String on five or six cream white heishi beads to begin the base of your pattern. -
Add gold accents:
Slide on one gold saucer spacer. These act as little dividers that catch the light beautifully against the matte clay. -
Continue the sequence:
Repeat the pattern: 5-6 white beads followed by 1 gold spacer. Continue until the beaded section measures about 6.5 to 7 inches, or fits comfortably around your wrist. -
Close the loop:
Bring the ends together and tie a surgeon’s knot (right over left twice, then left over right). Pull tight to secure the elastic, adding a dot of jewelers glue to the knot.
Knot Security
Pre-stretch your elastic cord firmly before stringing beads. This prevents the finished bracelet from sagging or loosening up after the first few times you wear it.
Step 2: Strand Two: The Textured Mix
-
Prepare the cord:
Cut another 10-12 inch length of elastic cord for the second bracelet. -
Begin the texture pattern:
This strand mixes textures. String about 8-10 of the beige textured round beads. -
Transition to white:
Add a small gold round spacer, then switch to a section of about 5 cream white heishi beads. -
Add pink accents:
Add another gold round spacer, then string a short section of 5-8 dusty pink heishi beads. -
Complete the circle:
Continue alternating these sections—textured beige, white heishi, and pink heishi—separated by gold round spacers until you reach your desired length. Tie and glue the knot as before.
Make it Sparkle
Swap the plain gold spacers for rhinestone rondelle spacers on the middle strand. It adds a subtle glitter that complements the rhinestone star charm perfectly.
Step 3: Strand Three: The Pink Charm Keeper
-
Set the base:
Cut your final piece of elastic cord. This strand will hold the focal charms. -
String solid pink:
String the dusty pink heishi beads continuously. I like to check the fit against the other two bracelets to ensure they stack evenly. -
Prepare the charms:
Using pliers (or your fingers if the metal is soft enough), open two gold jump rings. -
Attach the solid star:
Slide the solid gold star charm onto one jump ring and loop it onto the elastic cord roughly where the knot will be (to hide it) or centered if you prefer. -
Attach the open star:
Repeat with the rhinestone open-star charm, placing it right next to the first charm for that clustered ‘charm bracelet’ look. -
Knot and secure:
Tie your final surgeon’s knot, ensuring it’s tight but doesn’t over-stretch the elastic. Apply a dab of glue. -
Hide the knots:
Once the glue is fully dry, trim the excess cord tails close to the knot. If possible, gently tug the knot inside one of the adjacent heishi beads to hide it completely.
Stack them all together on your wrist for a coordinated, textured look that feels effortless and chic
Broomstick Charm Dark-Glam Bracelet
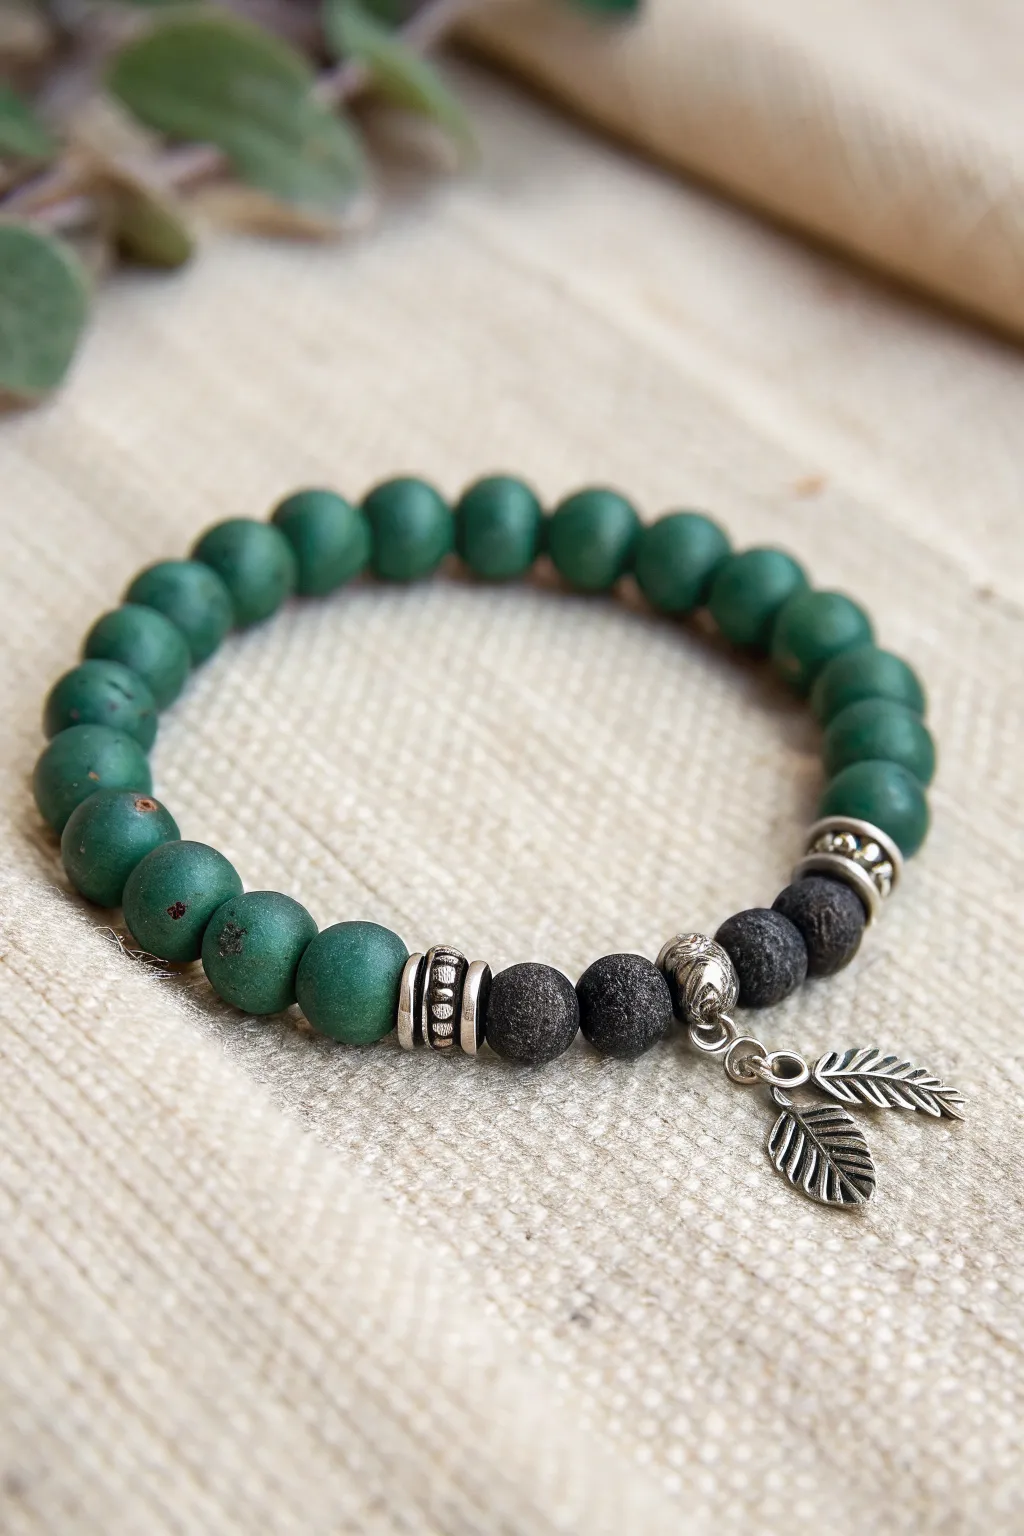
This earthy, grounded design combines the deep matte green of forest foliage with the rugged texture of black lava stone. Finished with delicate silver leaf charms, it captures a perfect balance between woodland serenity and raw, volcanic energy.
Step-by-Step Tutorial
Materials
- Matte green round beads (approx. 8mm, likely green jasper or clay)
- Black lava stone beads (8mm or 10mm)
- Silver spacer beads with textured patterns
- Silver bail or jump ring carrier bead
- Two silver leaf charms
- Elastic beading cord (0.7mm or 0.8mm)
- Jewelry glue (e.g., G-S Hypo Cement)
- Scissors or jewelry snips
- Chain nose pliers (optional, for jump rings)
- Bead stopper or tape
Step 1: Setting the Pattern
-
Prepare your workspace:
Lay out a bead design board or a soft towel to prevent your beads from rolling away. Cut a length of elastic cord about 10-12 inches long to give yourself plenty of room for tying knots later. -
Secure the end:
Place a bead stopper or a piece of tape on one end of your elastic cord. This is a simple step that saves you the frustration of beads sliding right off as you work. -
String the green beads:
Begin by threading the matte green round beads onto the cord. For a standard 7-inch wrist, you’ll want to use approximately 16 to 18 of these green beads, creating the main body of the bracelet. -
Check the length:
Wrap the strand around your wrist to check the sizing. Remember that you will be adding several more accent beads, so the green section should cover roughly three-quarters of your wrist circumference.
Aromatic Touch
Add a drop of essential oil like pine, cedar, or rosemary directly onto the black lava beads. The porous stone acts as a natural diffuser.
Step 2: Adding the Focal Section
-
Add the first spacer:
Slide on one of your silver cylinder spacers. I prefer spacers with intricate, oxidized patterns as they complement the rustic feel of the stone beads perfectly. -
Introduce the lava stone:
Thread on two black lava stone beads next. Notice how their porous texture contrasts beautifully with the smoother green beads. -
Place the charm carrier:
Add your silver bail bead or charm carrier. This central metal bead will hold your leaf charms and act as the visual anchor of the bracelet. -
Complete the lava symmetry:
Thread on two more black lava stone beads on the other side of the charm carrier, mirroring the first two. -
Finish with the second spacer:
Slide on the final silver cylinder spacer to close off this focal section, creating a symmetrical frame around the black beads.
Dual Texture
Mix up the green beads by sanding a few of them lightly with fine-grit sandpaper to give them an even more weathered, ancient look.
Step 3: Finishing Touches
-
Pre-stretch the cord:
Gently pull on both ends of the elastic cord to pre-stretch it. This crucial step prevents the bracelet from sagging or loosening shortly after you start wearing it. -
Tie the knot:
Bring the two ends of the cord together and tie a surgeon’s knot. This is just a standard square knot with an extra loop through the first pass for added security. -
Secure with glue:
Apply a tiny dab of jewelry glue directly onto the knot. Wait a few moments for it to become tacky before pulling the knot tight one last time. -
Hide the knot:
Trim the excess cord carefully, leaving about 2mm of tail. Gently tug the cord so the knot slides inside one of the adjacent beads (preferably one of the larger green ones or a spacer) to hide it from view. -
Prepare the charms:
If your leaf charms aren’t already attached to jump rings, use your pliers to carefully open two small jump rings and attach a leaf onto each one. -
Attach the charms:
Hook the jump rings onto the loop of your central bail bead. Ensure the jump rings are closed tightly so the charms don’t slip off.
Enjoy wearing this piece of woodland magic on your wrist
Defy Gravity Gradient Ombre
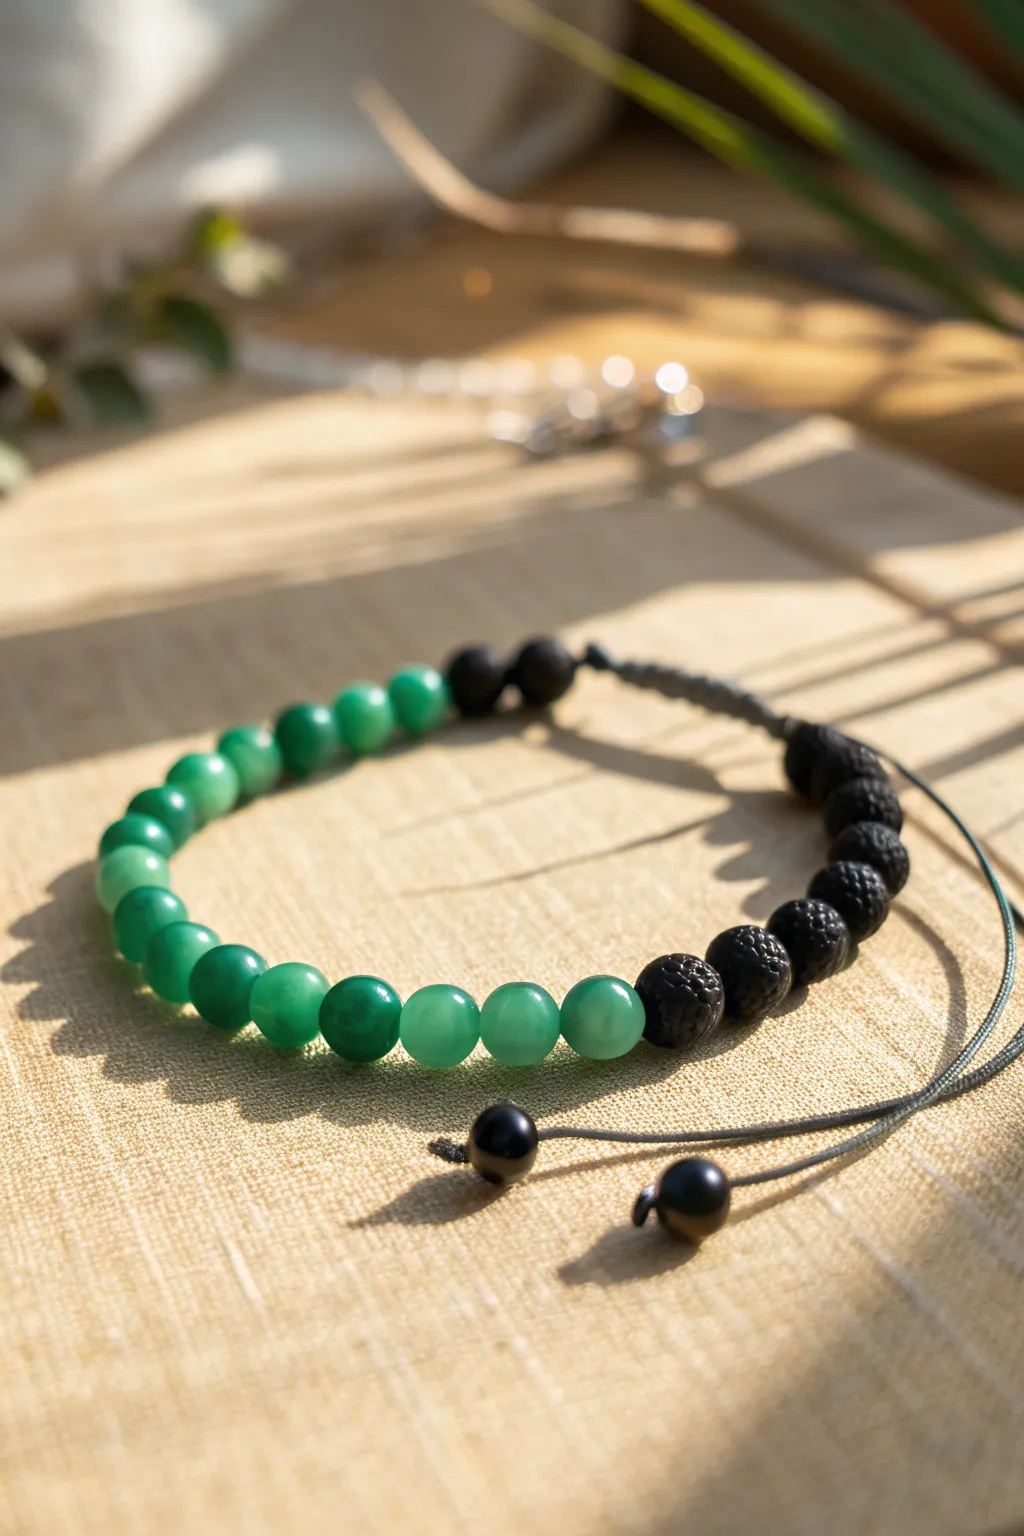
Embrace the natural transition of color with this stunning gradient ombre bracelet that pairs milky greens with stark black lava stone. The adjustable macramé closure adds both functionality and a touch of rustic charm to this sophisticated everyday accessory.
Step-by-Step Guide
Materials
- Green gemstone beads (6mm or 8mm) – varied shades like aventurine or jade
- Black lava stone beads (6mm or 8mm)
- Black nylon cord or waxed cotton cord (0.8mm or 1mm)
- Small black spacer beads (optional)
- Scissors
- Lighter (for sealing cord ends)
- Clipboard or tape (to hold work in place)
Step 1: Sorting the Gradient
-
Select your greens:
Begin by laying out all your green gemstone beads on a bead mat or soft towel. Look closely at the subtle variations in color. -
Build the fade:
Arrange the green beads in a line, creating a gradient that flows from the darkest, deepest forest green to the lightest, milky mint shade. You’ll need about 13-15 green beads total. -
Add the contrast:
Select roughly 8-10 black lava stone beads. These will form the opposing side of the bracelet, creating a striking textural contrast against the smooth green stones.
Twisted cords?
Work slowly on the sliding knot. If cords twist, the slide mechanism won’t work smoothly. Keep the central cords parallel and flat against your surface.
Step 2: Stringing the Design
-
Prepare the cord:
Cut a length of your black nylon cord, approximately 24 inches long. This generous length gives you plenty of room to work the adjustable knot later. -
Thread the green section:
Stiffen the end of your cord with a lighter if it’s fraying. Start threading your sorted green beads, maintaining the exact gradient order you laid out. -
Transition to black:
Once all greens are strung, begin adding the black lava stone beads immediately after the lightest green bead. -
Verify the length:
Wrap the strung beads around your wrist to check the fit. The beads should cover most of your wrist but leave a gap of about 1 inch for the macramé closure. -
Center the work:
Slide all the beads to the center of your cord length so you have equal tails on both ends.
Aroma Boost
Since this design uses porous lava stones, add a drop of essential oil like peppermint or eucalyptus to the black beads for a slow-release diffuser bracelet.
Step 3: Creating the Adjustable Closure
-
Form the circle:
Bring the two cord ends together, crossing them over each other to form a circle with the beaded strand. -
Secure for knotting:
I find it helpful to tape these crossed cords down to a table or clipboard to keep them parallel and taut while I work. -
Cut a knotting cord:
Cut a separate piece of cord, about 10-12 inches long. This will be used to create the sliding macramé knot. -
Start the square knot:
Slide this new short cord under the two main crossed cords. Tie a simple overhand knot to secure it. -
Tie the first half-knot:
Take the right end of the knotting cord, pass it over the main cords, and under the left knotting cord. Pull tight. -
Complete the square knot:
Take the left end, pass it over the main cords, and under the right end. Pull tight to finish one full square knot. -
Repeat the pattern:
Continue tying square knots for about 0.5 to 1 inch, creating a sturdy band that allows the main cords to slide back and forth. -
Seal the closure:
Trim the excess tails of the *knotting* cord (not the main bracelet cords) very close to the knot. Carefully melt the ends with a lighter and press them flat against the knot to seal.
Step 4: Finishing Touches
-
Add end beads:
Thread one small gleaming black bead (like obsidian or glass) onto each of the loose main cord tails. -
Knot the ends:
Tie a simple overhand knot at the very end of each cord tail to secure the finishing beads in place. -
Final trim:
Cut off any excess cord past the final knots and lightly singe the tips with your lighter to prevent fraying.
Enjoy wearing your handcrafted gradient piece that balances earthy textures with smooth color transitions
Pink-and-Green Checkerboard Pattern
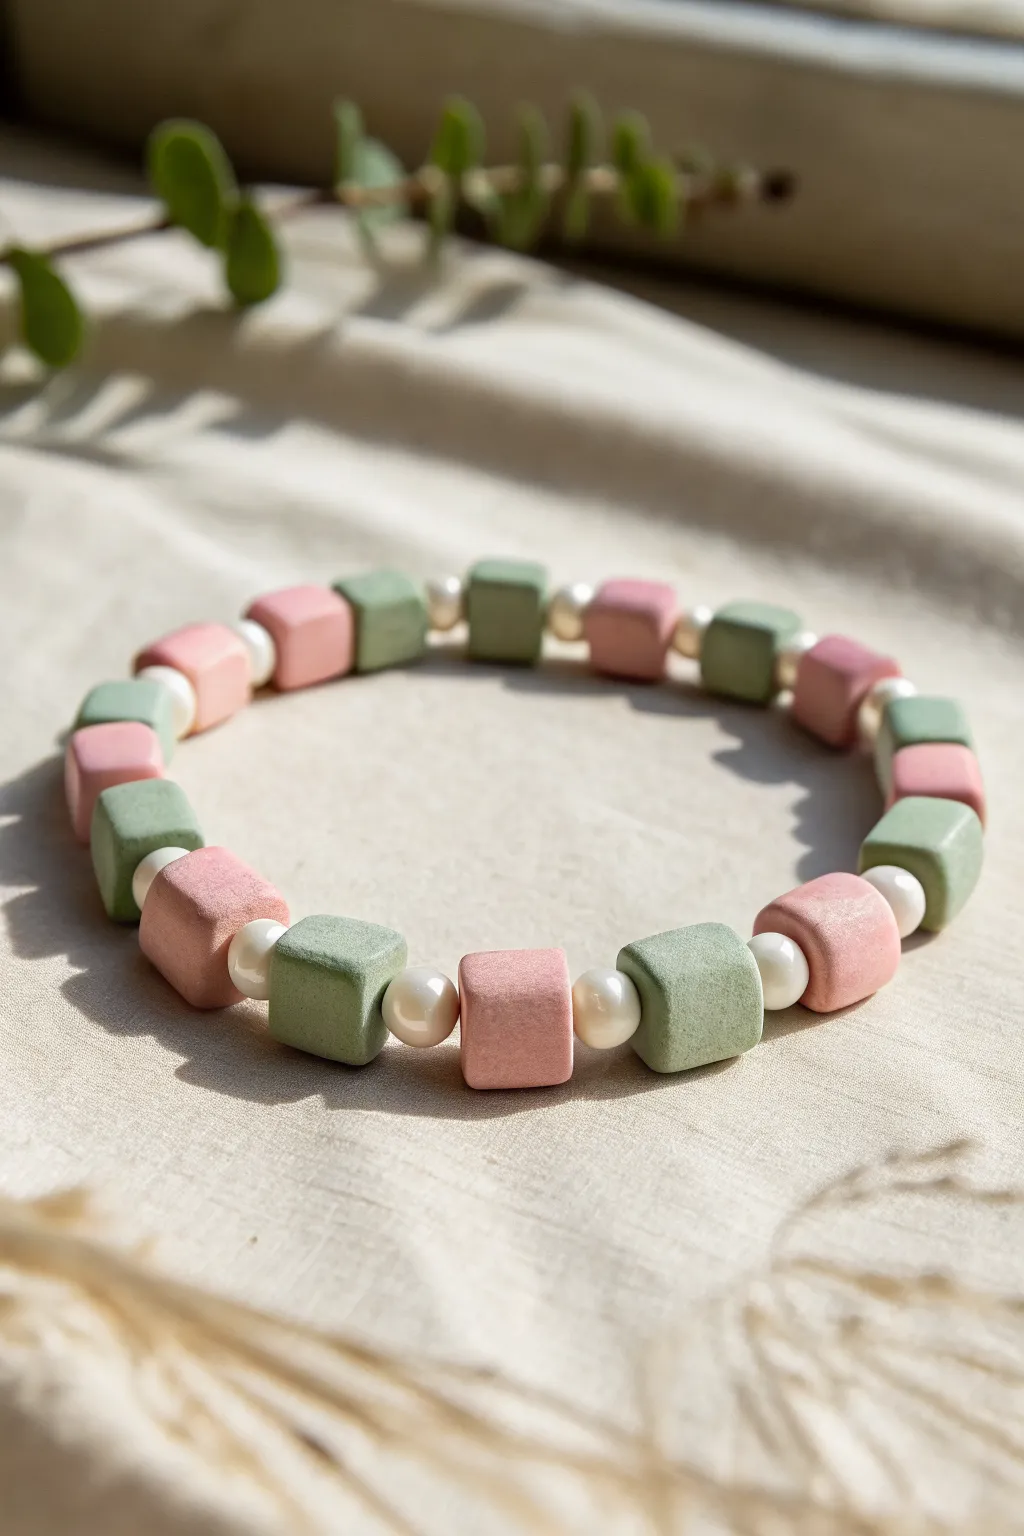
This charming bracelet combines soft matte textures with delicate shimmer, alternating sage green and dusty rose clay cubes with lustrous pearl accents. The result is a sophisticated take on the classic checkerboard trend that feels both modern and timeless.
Step-by-Step
Materials
- Polymer clay (Sage Green)
- Polymer clay (Dusty Rose/Pink)
- Small round pearl beads (approx. 4-6mm, white or cream)
- Strong elastic cord (0.8mm or 1mm)
- Clay blade or craft knife
- Rolling pin or pasta machine
- Small square cutter (optional, approx. 8-10mm)
- Bead piercing pin or needle
- Super glue or jewelry adhesive
- Baking tray and parchment paper
Step 1: Shaping the Clay Cubes
-
Condition the Clay:
Begin by thoroughly conditioning your sage green and dusty rose polymer clay separately until they are pliable and smooth. This prevents cracking later on. -
Form a Slab:
Roll out both colors of clay into thick slabs. You want the thickness to match the desired height of your cubes, roughly 8mm to 1cm thick. -
Cut Strips:
Use your clay blade to cut long, even strips from the thick slabs. The width of these strips should match the thickness of the slab to ensure a perfect square profile. -
Slice into Cubes:
Slice across the strips at the same interval to create uniform cubes. Aim for about 12-14 cubes of each color, depending on your wrist size. -
Refine the Shapes:
Using your fingertips, gently tap the sides of each cube to sharpen the edges and smooth out any fingerprints. I find lightly dusting my fingers with cornstarch helps prevent sticking. -
Pierce the Holes:
Carefully insert a bead piercing pin through the center of each cube. Twist the pin gently as you push through to avoid distorting the square shape. -
Check Hole Exit:
Once the pin starts to poke through the other side, stop and pierce from that opposite side to ensure a clean, smooth exit hole. -
Bake the Beads:
Arrange your clay cubes on a parchment-lined baking sheet. Follow the temperature and time instructions on your specific brand of polymer clay packaging. -
Cool Down:
Allow the beads to cool completely before handling them. They harden fully only after cooling.
Smooth Surface Trick
Before baking, lightly brush your unbaked clay cubes with a tiny amount of baby oil or acetone. This smooths out microscopic fingerprints for a flawless matte finish.
Step 2: Assembly and Stringing
-
Pre-stretch the Elastic:
Cut a length of elastic cord about 10-12 inches long. Give it a few firm tugs to pre-stretch it, which prevents the bracelet from sagging later. -
Secure One End:
Place a piece of tape or a bead stopper on one end of the cord so your beads don’t slide off while you work. -
Start the Pattern:
Begin stringing your beads. The pattern is: One Pink Cube, One Pearl, One Green Cube, One Pearl. -
Continue the Sequence:
Repeat this sequence continuously. Ensure the pearls sit snugly between the flat faces of the clay cubes. -
Check the Fit:
Wrap the strand around your wrist occasionally to check the length. Add or remove beads as needed, ensuring you end the pattern correctly to maintain the alternating sequence. -
Tie the Knot:
Once you have the correct length, remove the tape and tie the ends together using a strong surgeon’s knot (right over left, left over right). -
Secure and Hide:
Apply a tiny dot of super glue to the knot. While the glue is still wet, gently pull the knot inside one of the cube beads to hide it. -
Trim Excess:
After the glue has dried completely, carefully trim the excess elastic cord close to the bead.
Glossy Upgrade
For a different vibe, coat the baked clay cubes with a glossy resin or polymer varnish. This makes them shine and match the luster of the pearls perfectly.
Wear your new bracelet alone for a minimal look or stack it with gold chains for textured contrast
Twisted Candy-Stripe Wicked Spiral
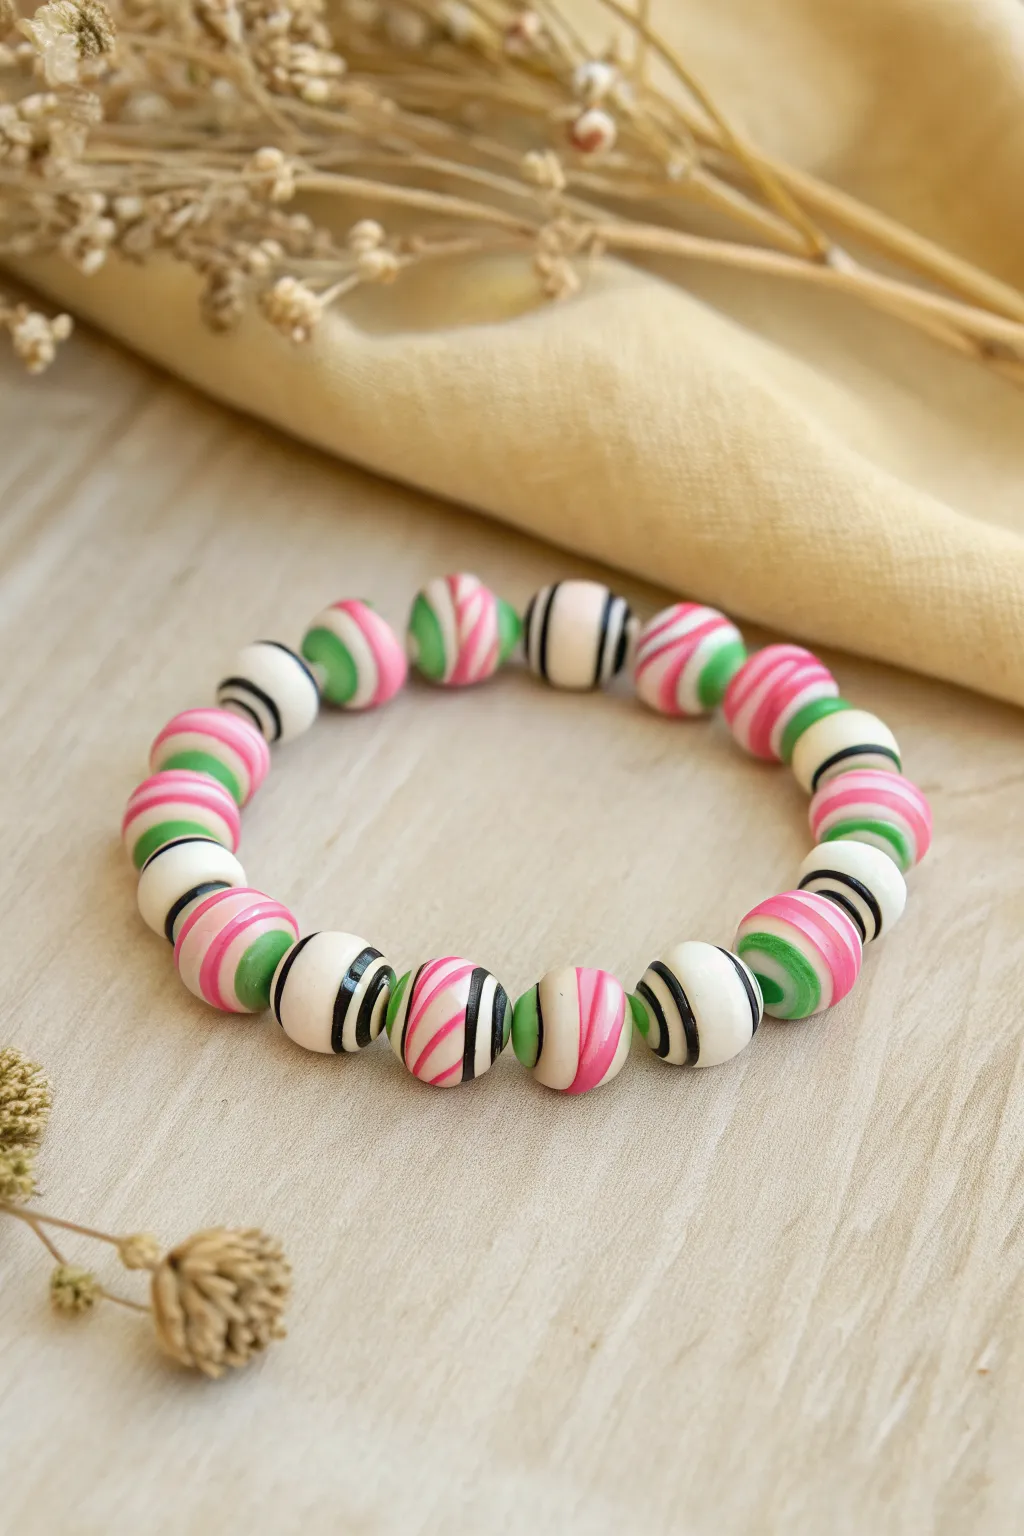
This playful bracelet combines classic candy-shop nostalgia with a modern, graphic edge using a mesmerizing twisting technique. The beads feature a striking mix of crisp white, bold black, hot pink, and lime green in intricate spirals that look complex but are surprisingly achievable.
How-To Guide
Materials
- Polymer clay in White, Black, Hot Pink, and Lime Green
- Acrylic rolling pin
- Clay cutting blade or tissue blade
- Needle tool or bead pins
- Bead rack (optional but recommended for baking)
- Wet/dry sandpaper (400, 600, and 1000 grit)
- Elastic stretch cord (0.8mm or 1mm)
- Super glue (gel formula works best)
- Oven thermometer
Step 1: Creating the Base Canes
-
Condition the Clay:
Begin by conditioning each color of polymer clay thoroughly until it is soft and pliable. This step is crucial to prevent cracking later. -
Roll Logs:
Roll out a thick log of the white clay, roughly 1/2 inch in diameter. Roll thinner logs of black, pink, and green clay. -
Form the Stack:
Flatten the white log slightly into a rectangular block. Arrange stripes of the colored clay on top of the white block. You can vary the pattern—try pink/green/white or black/white/black. -
Prepare the Wrap:
For the specific beads seen here, create a ‘jelly roll’ style cane. Lay a thin sheet of white clay down, place stripes of pink and green side-by-side on top to create a striped sheet. -
Roll the Cane:
Roll this striped sheet up tightly like a carpet. Compress the log gently to remove air bubbles.
Step 2: Twisting and Forming Beads
-
Elongate the Cane:
Gently squeeze and pull your striped log to make it longer and thinner. Aim for a diameter of about 1/4 to 1/2 inch. -
Create the Twist:
Here is the key step: hold one end of the log stationary while twisting the other end. Continue twisting until the stripes spiral tightly around the core like a candy cane. -
Section the Log:
Using your sharp blade, cut the twisted log into equal segments, roughly the size you want your finished beads to be. -
Shape the Spheres:
Take a segment and roll it gently between your palms to form a sphere. The twisting action on the surface will create that beautiful swirling ‘wicked’ effect. -
Vary the Patterns:
To match the image, don’t make every bead identical. Create a second cane using just black and white stripes, twist it, and roll beads from that to intersperse graphic contrast. -
Smooth the Surface:
Lightly roll the finished spheres on your work surface to ensure they are perfectly round and to smooth out any fingerprints.
Muddy Colors?
If your stripes look smeared, your clay might be too soft or warm. Put the cane in the fridge for 20 minutes before slicing to incite a cleaner pattern.
Step 3: Piercing and Baking
-
Pierce the Holes:
Gently insert a bead pin or needle tool through the center of each bead. I find twisting the needle as it enters helps prevent the clay from squishing out of shape. -
Double Check Shape:
Handling the beads to pierce them often distorts them slightly. Give them a final gentle roll while they are on the pin to restore sphericity. -
Bake:
Arrange the beads on a bead rack or a parchment-lined baking sheet. Bake according to your clay manufacturer’s instructions (usually 275°F/130°C for 30-60 minutes). Use an oven thermometer to ensure accuracy. -
Cool and Sand:
Allow beads to cool completely. Wet sand them under running water, starting with 400 grit and moving to 1000 grit for a silky smooth, matte finish. -
Buff (Optional):
For a slight sheen, buff the dry beads vigorously with a piece of denim or a soft cotton cloth.
Pro Tip: Consistent Sizing
Use a small circular cookie cutter or a dedicated clay cutter to portion out exactly the same amount of clay for each bead segment.
Step 4: Assembly
-
Design Layout:
Lay your beads out on a bead board or towel. Alternate the colorful pink/green swirls with the graphic black/white ones to create a dynamic rhythm. -
String the Beads:
Cut a length of elastic cord (about 10-12 inches). Pre-stretch it by pulling firmly a few times. String all your beads onto the cord. -
Secure the Knot:
Tie a surgeon’s knot (right over left twice, then left over right). Pull tight to secure. -
Final Glue:
Add a tiny drop of super glue to the knot. Let it dry, then trim the excess cord and tuck the knot inside a bead hole.
Enjoy the satisfying click of your new handmade beads as you slide this vibrant accessory onto your wrist
Glow-in-the-Dark Green Night Bracelet
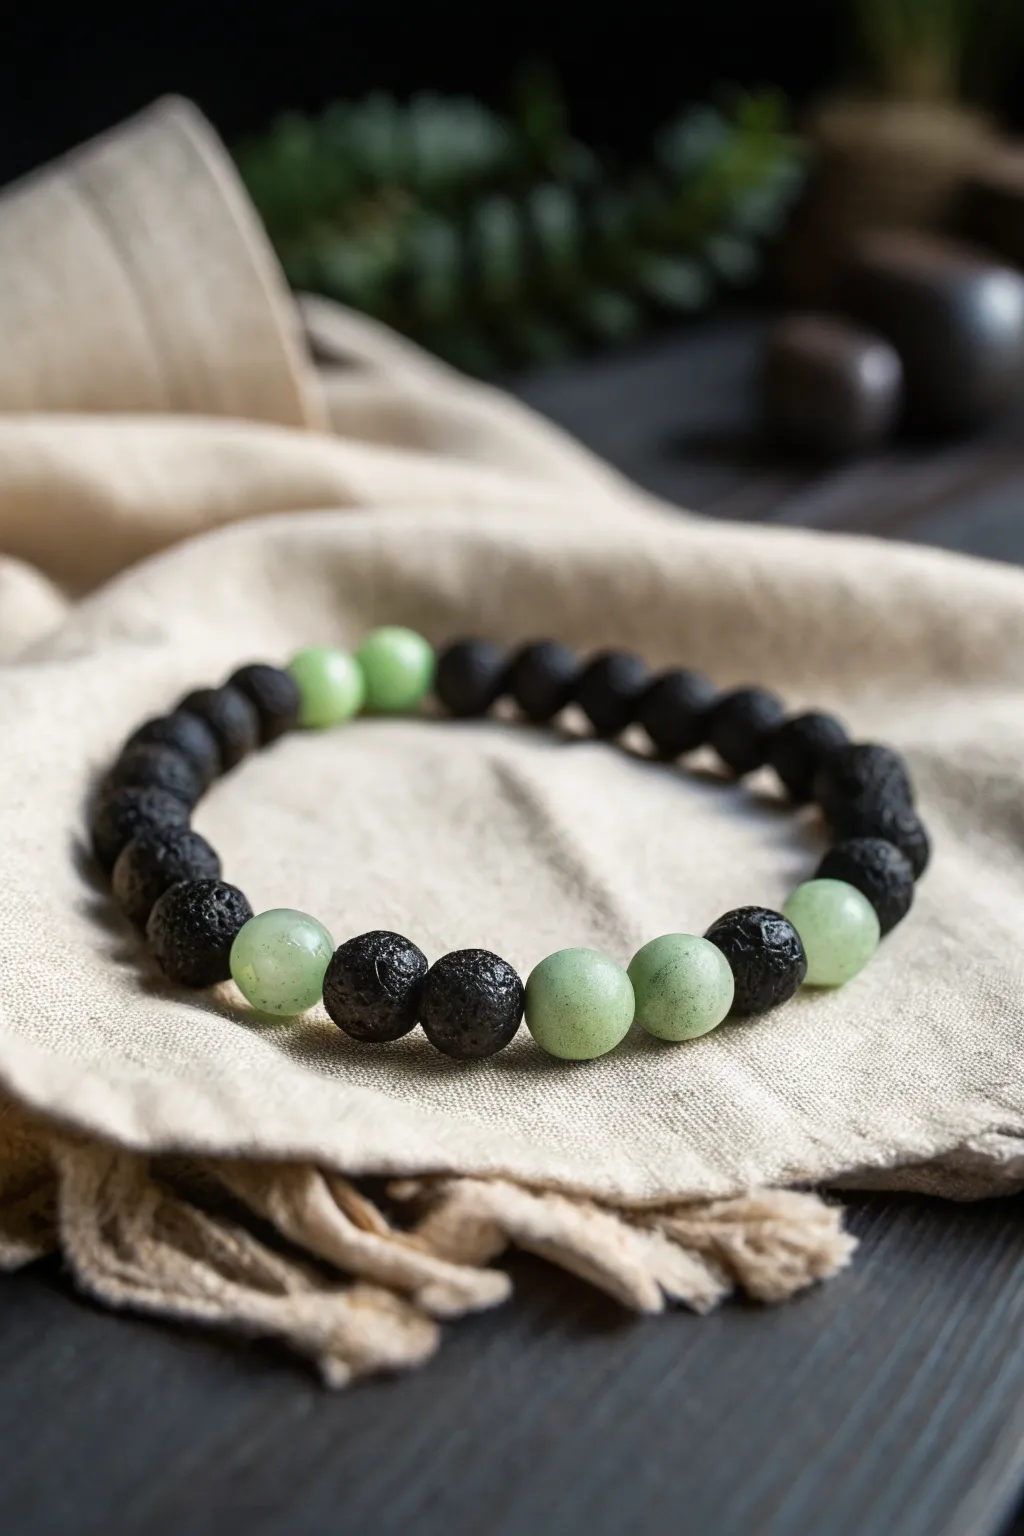
This moody, stylish bracelet combines the rugged texture of black lava beads with the ethereal mystery of pale green accents that shine when the lights go out. It’s a perfect blend of earthy grounding and playful luminescence, all strung together on a simple elastic cord.
Step-by-Step Guide
Materials
- Polymer clay (Glow-in-the-dark or Pale Green)
- Black lava stone beads (8mm or 10mm)
- Elastic beading cord (0.8mm or 1mm transparent)
- Beading needle (optional but helpful)
- Super glue or jewelry cement
- Scissors
- Oven for baking clay
- Needle tool or toothpick
- Wet/dry sandpaper (fine grit)
- Acrylic roller or pasta machine
Step 1: Crafting the Glow Beads
-
Condition the Clay:
Start by taking your glow-in-the-dark polymer clay and kneading it thoroughly in your hands until it becomes soft and pliable. If you want a specific tint like the pale jade green in the photo, mix in a tiny pinhead-sized amount of green clay, but be careful not to overpower the glow effect. -
Roll a Log:
Roll the conditioned clay into a smooth, even log on your work surface. Aim for the log to be roughly the same diameter as your lava beads to ensure a consistent look for the bracelet. -
Measure and Cut:
Slice the log into equal segments. For the pattern shown, you will need about 6 to 8 clay beads, depending on your wrist size. -
Form the Spheres:
Take each segment and roll it between your palms to form a perfect sphere. I like to use a light circular motion to ensure there are no flat spots or seams. -
Checking Size:
Compare one of your rolled clay balls against a lava bead. They should be nearly identical in size; adjust by adding or removing clay if necessary. -
Pierce the Holes:
Holding a clay bead gently to avoid squishing it, carefully twist a needle tool or toothpick through the center to create a hole. Rotate the bead as you pierce to keep the hole centered and the shape round. -
Bake the Clay:
Arrange your beads on a baking sheet or tile. Bake them according to the manufacturer’s instructions for your specific brand of polymer clay, usually around 275°F (135°C) for 15-30 minutes. -
Cool and Sand:
Allow the beads to cool completely. Once cool, gently wet-sand them with fine-grit sandpaper to remove any fingerprints or imperfections, giving them that smooth, stone-like finish.
Step 2: Designing and Stringing
-
Plan the Pattern:
Lay out your design on a bead board or soft cloth. The example uses a pattern of mostly black lava beads with strategic clusters of green beads: create two sections where two green beads are separated by a single black bead. -
Cut the Elastic:
Cut a piece of elastic cord about 10-12 inches long. This extra length makes tying the final knot much easier than fighting with short ends. -
Pre-stretch the Cord:
Give the elastic cord a few firm tugs. This pre-stretching step helps prevent the bracelet from sagging or loosening up immediately after you wear it. -
Start Stringing:
Thread your beads onto the cord following your laid-out pattern. If the bead holes are tricky, a collapsible eye needle works wonders here. -
Verify the Fit:
Wrap the strung beads around your wrist to check the sizing. Because the beads are chunky, you might need a slightly longer length than usual; ensure it sits comfortably without gaps. -
Tie the Knot:
Tie a secure surgeon’s knot (right over left, left over right, and loop through an extra time). Pull the elastic tight so the beads press firmly against each other. -
Secure the Knot:
Apply a tiny drop of super glue or jewelry cement directly onto the knot. Let it dry for a moment. -
Hide the Evidence:
Trim the excess elastic ends close to the knot, leaving just a millimeter or two. Gently tug the cord to pull the knot inside the hole of one of the adjacent lava beads to hide it completely.
Use Essential Oils
Lava beads are porous and act as natural diffusers. Add a drop of lavender or peppermint oil to the black beads for a bracelet that smells as good as it looks.
Texture Contrast
Before baking the green clay beads, gently roll them over a piece of rough sandpaper or a sponge to give them a subtle texture that matches the lava stone better.
Slip on your new creation and enjoy the distinct contrast of textures throughout the day and the soft glow at night