If you’ve ever wanted your bearded dragon enclosure to look like a real little desert world, excavator clay is where the magic happens. I love it because you can sculpt actual terrain—caves, tunnels, ledges, and backgrounds—so your beardie gets a home that’s fun to explore and sturdy enough to last.
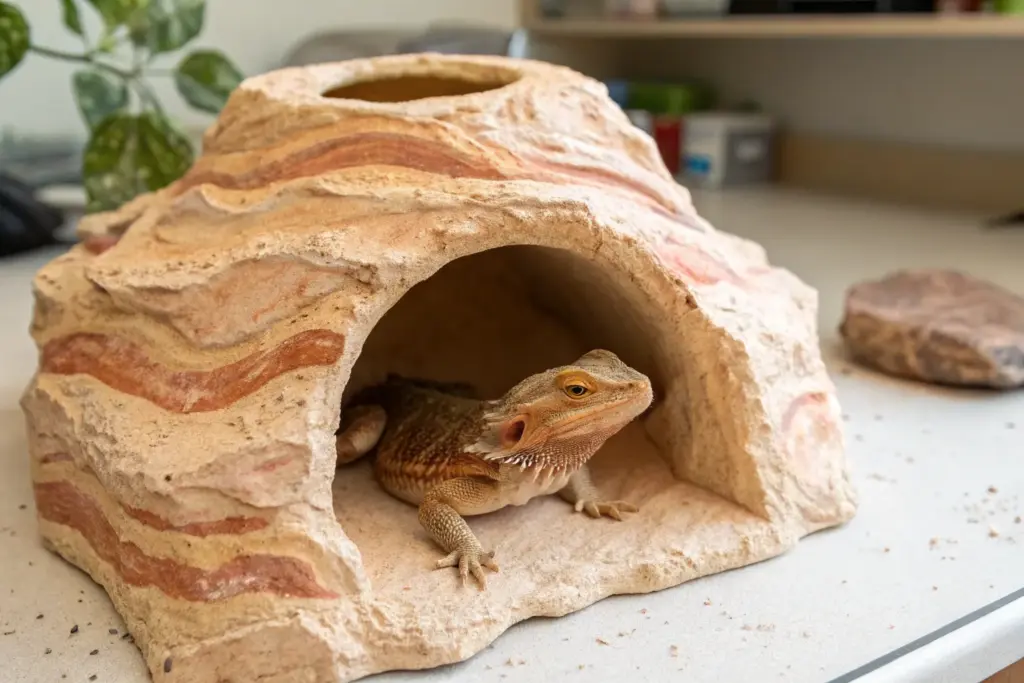
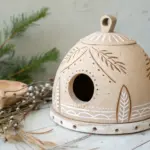
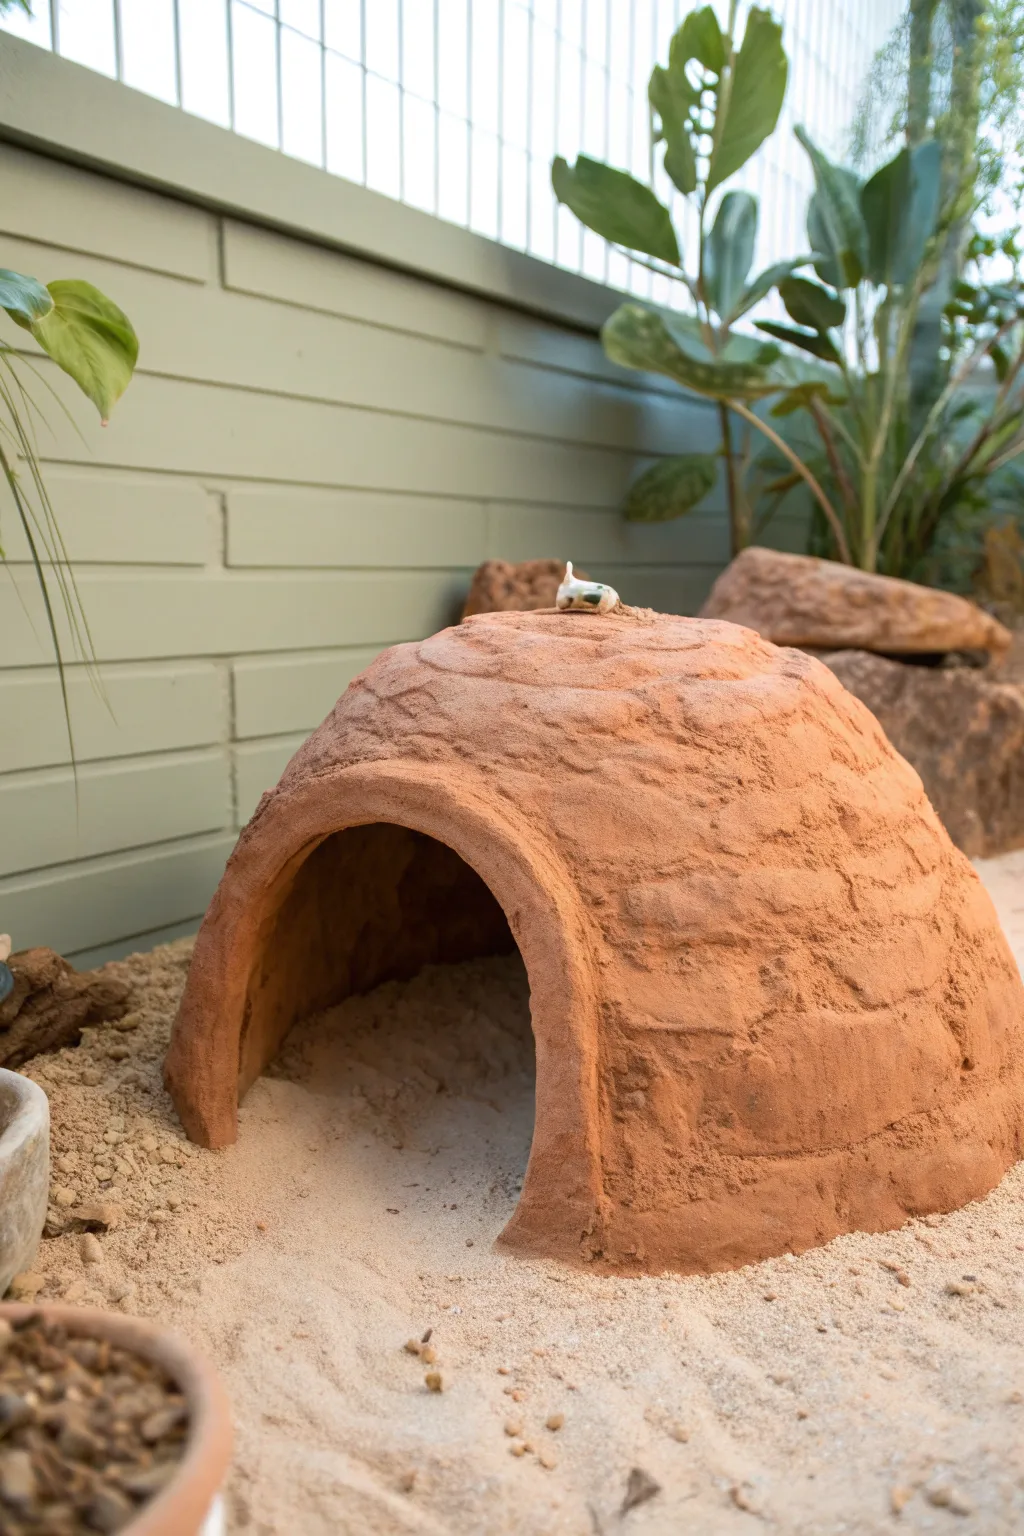
Sculpted Cave Hide With A Dark Entrance
This project features a robust, dome-shaped hide that mimics the look of a primitive earthen dwelling. Its textured surface and spacious, shadowy interior provide your bearded dragon with a sense of security while seamlessly blending into a naturalistic terrarium setup.
Detailed Instructions
Materials
- Excavator clay (approx. 5-10 lbs depending on size)
- Water
- Large round balloon or plastic mixing bowl (as a temporary mold)
- Plastic wrap
- Sculpting tools (or a butter knife and spoon)
- Spray bottle with water
- Sandpaper (optional, for finishing)
- Small flat wooden board or tray (as a working base)
Step 1: Preparing the Base Form
-
Select your mold:
Choose an object to serve as the internal structure for your dome. A large inflated balloon works well for a disposable option, while a plastic mixing bowl turned upside down offers a sturdier shape. -
Protect the mold:
If using a bowl, wrap the exterior tightly with plastic wrap. This ensures the clay won’t stick permanently and makes removal much easier later on. -
Set up the workspace:
Place your mold on a movable wooden board or tray. This allows you to rotate the project as you work without handling the wet clay directly.
Step 2: Mixing and Shaping
-
Hydrate the clay:
In a bucket, mix the excavator clay with water according to the package instructions. Aim for a consistency similar to stiff cookie dough—moldable but not sloppy. -
Create the foundation:
Pack a thick ring of clay around the base of your mold form. This ring should be about 1 inch thick to support the weight of the dome walls. -
Build the walls:
Begin packing clay up the sides of the mold. Don’t worry about being perfectly smooth yet; focus on achieving an even thickness of at least 3/4 inch for structural integrity. -
Define the entrance:
Leave a wide archway open at the front. I like to shape this opening slightly wider at the bottom than the top to give it a grounded, stable appearance. -
Close the dome:
Continue adding clay until you reach the top center of the mold. Press the clay firmly together to remove air pockets and merge the seams.
Crack Control
If deep cracks appear while drying, don’t panic. Mix a small slurry of clay and water (slip) and fill the cracks, then smooth over with a damp finger.
Step 3: Detailing and Texturing
-
Smooth the archway:
Use wet fingers to smooth the clay around the lip of the entrance. It should be rounded off so there are no sharp edges that could scratch your pet. -
Add surface texture:
Take a rough stone or a ball of aluminum foil and press it gently over the exterior surface. This creates a natural, weathered rock effect rather than a smooth pottery look. -
Carve the relief circles:
Using a spoon or loop tool, gently sketch large circles on the lower sides of the dome. Carve slightly deeper around the perimeter of these circles to make them stand out as a relief design. -
Refine the top cracks:
Using a knife tool, etch shallow, irregular lines radiating from the very top of the dome. These should look like natural stress fractures or tectonic plates on a boulder. -
Blend the edges:
Softens the edges of your carvings with a damp finger so they look weathered by time rather than freshly cut.
Pigment Infusion
Mix dry oxide powder pigments (like burnt sienna or ochre) into the clay before adding water to create a custom color that won’t chip off over time.
Step 4: Drying and Finishing
-
Initial drying:
Let the sculpture sit for 24 hours in a warm, dry area. If you see rapid cracking, mist it lightly with water to slow the drying process. -
Remove the mold:
Once the clay is firm to the touch (leather hard) but not fully cured, carefully deflate the balloon or wiggle the plastic bowl out from underneath. Do this slowly to avoid collapsing the roof. -
Smooth the interior:
Reach inside and smooth out any rough seams left by the mold. You want the interior floor and walls to be comfortable for your dragon. -
Final cure:
Allow the cave to dry completely for another 24-48 hours. The color will lighten significantly as the moisture leaves the clay. -
Safety check:
Run your hand over the entire surface. Use fine-grit sandpaper to knock down any accidental sharp spikes or jagged bits before placing it in the enclosure.
Once fully cured, your custom cave will be a durable centerpiece ready for exploration

Subterranean Tunnel Through A Clay Mound
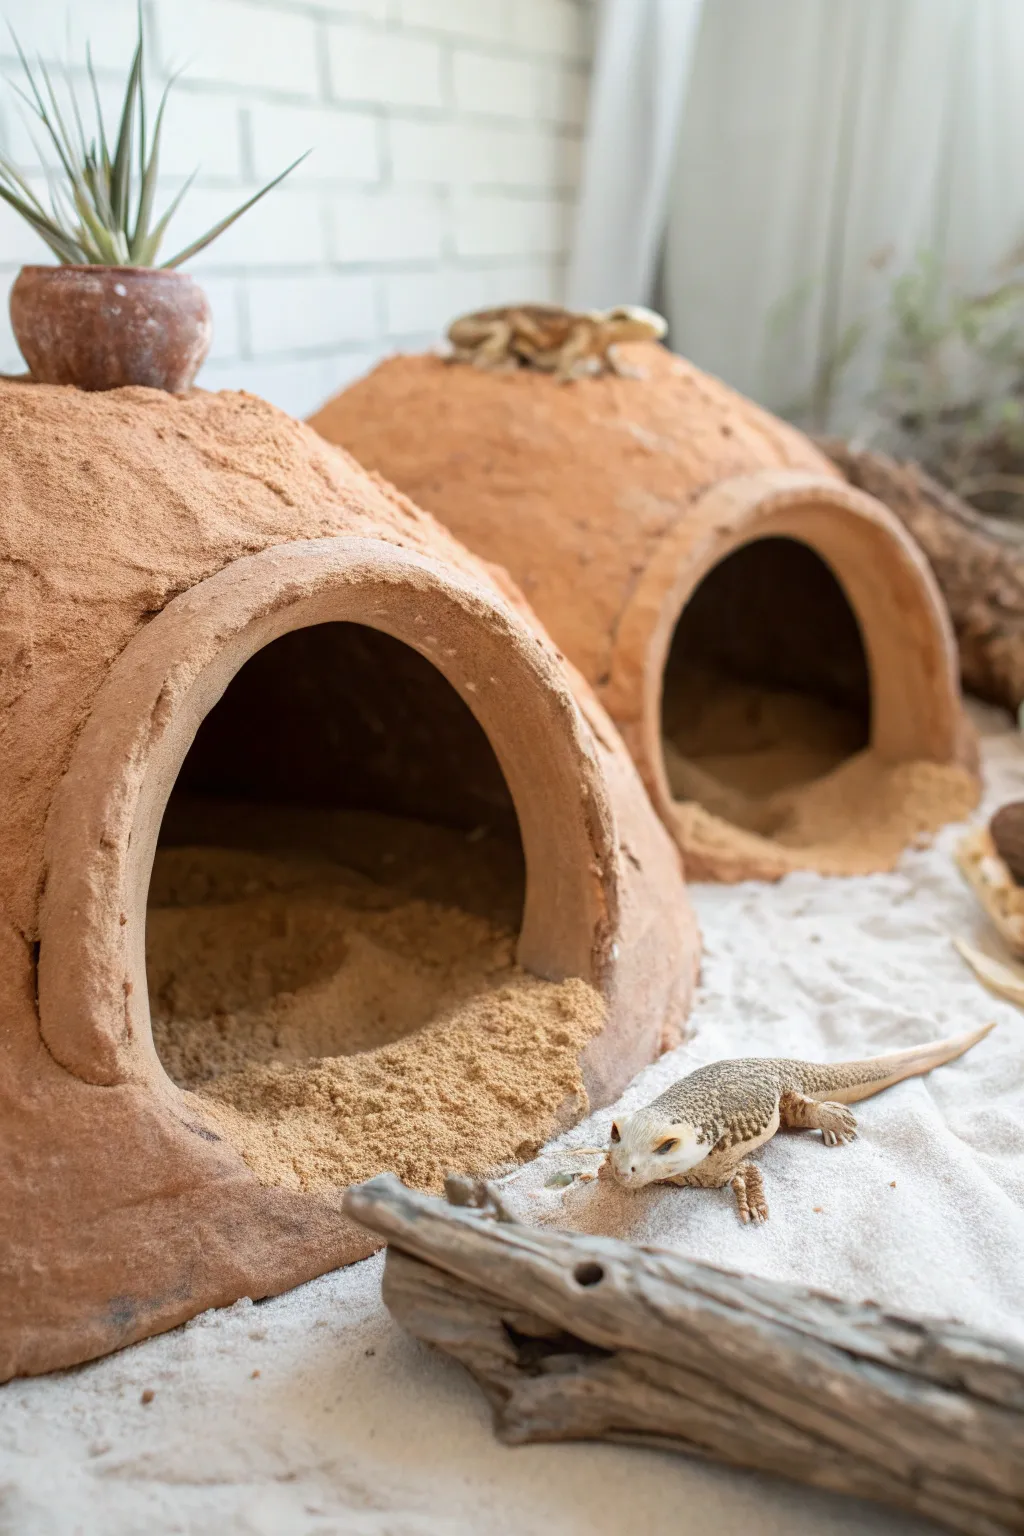
These dual domed structures provide an enriched environment with naturalistic texture, mimicking the dry, rocky outcrops of an arid landscape. The project combines functional shelter with aesthetic appeal, creating sturdy, excavatable mounds perfect for a desert terrarium setup.
Step-by-Step
Materials
- Excavator clay (approx. 10-15 lbs)
- Water
- Large mixing bowl or bucket
- Two balloons (round)
- Duct tape or sturdy packing tape
- Sand (reptile-safe, for texturing)
- Spray bottle with water
- Sculpting tools or a butter knife
- Small plastic cup (for plant pot mold)
- Cardboard or plastic sheet (work surface)
Step 1: Preparation and Mixing
-
Prepare the Molds:
Inflate two round balloons to different sizes—one slightly larger for the main foreground hide and a smaller one for the background. Secure the knots tight. -
Stabilize the Base:
Tape the tied end of each balloon down to your cardboard or plastic work surface. This keeps them upright and stable while you work. I prefer using a ring of tape to create a little ‘nest’ for the balloon to sit in so it doesn’t wobble. -
Mix the Clay:
Pour the excavator clay powder into your mixing bucket. Add water gradually according to the package instructions. -
Achieve Consistency:
Mix thoroughly until the clay reaches a stiff, moldable consistency similar to pie dough or slightly dry mud. It should hold its shape without slumping but not be crumbly.
Collapsing Domes?
If the clay slumps while building, your mix is too wet. Add more dry powder immediately. If walls sag, let the bottom layer dry for an hour before building the top half.
Step 2: Sculpting the Base Structure
-
Apply the Initial Layer:
Take handfuls of the mixed clay and begin packing it around the base of the first balloon. Press it firmly against the balloon surface to remove air pockets. -
Build Up the Walls:
Work your way up the sides of the balloon, maintaining a thickness of about 3/4 to 1 inch. This thickness is crucial for structural integrity once the balloon is removed. -
Create the Entrance:
Leave a large, arched section open on one side. Don’t worry about perfecting the rim yet; just ensure the main negative space for the doorway is clear. -
Repeat for Second Hide:
Repeat the clay application process on the second balloon. You can make this one slightly lower or wider to create visual variety in the final distinct landscape. -
Rough Texture:
As you smooth the clay, don’t make it too perfect. Pat the surface with your fingertips to leave small indentations and a natural earthen look.
Natural Polish
Before the clay fully hardens, lightly mist it with water and dust with red desert sand. This embeds the color for a permanent, non-painted natural finish.
Step 3: Detailing and Refining
-
Reinforce the Doorway:
Roll a snake of clay roughly 1/2 inch thick and press it around the arched opening you created. This creates the reinforced ‘lip’ seen in the image. -
Blend the Arch:
Smooth the edges of this added roll into the main dome body so it looks like a single cohesive piece, but keep the front edge slightly distinct for that architectural look. -
Add the Planter Mount:
On the top of the foreground dome, add a small mound of clay. Press a small plastic cup into it to create a depression that can hold a faux air plant or succulent later. -
Surface Texturing:
While the clay is still damp, take a handful of dry sand and press it gently into the surface of both domes. This adds that gritty, realistic desert finish. -
Topography Details:
Use a sculpting tool or a dull knife to create subtle horizontal scratch marks or grooves, simulating wind erosion.
Step 4: Drying and Finalizing
-
Initial Drying Time:
Allow the structures to dry undisturbed for at least 24 hours. The surface should feel hard to the touch. -
Pop the Molds:
Once the outer shell feels firm, carefully pop the balloons with a pin and peel the latex remnants away from the interior. -
Interior Reinforcement:
Check the inside. If the walls feel thin in spots, mix a small batch of fresh clay and reinforce those areas from the inside. -
Full Cure:
Let the hides dry completely for another 24-48 hours. Using a fan can speed this up. The color will lighten significantly as it dries. -
Final Sanding:
Gently rub any sharp or unnatural spikes off with a piece of sandpaper or a dry scouring pad to ensure it’s safe for your pet.
Place your new custom caves into the habitat and watch your pet explore their new multi-level home


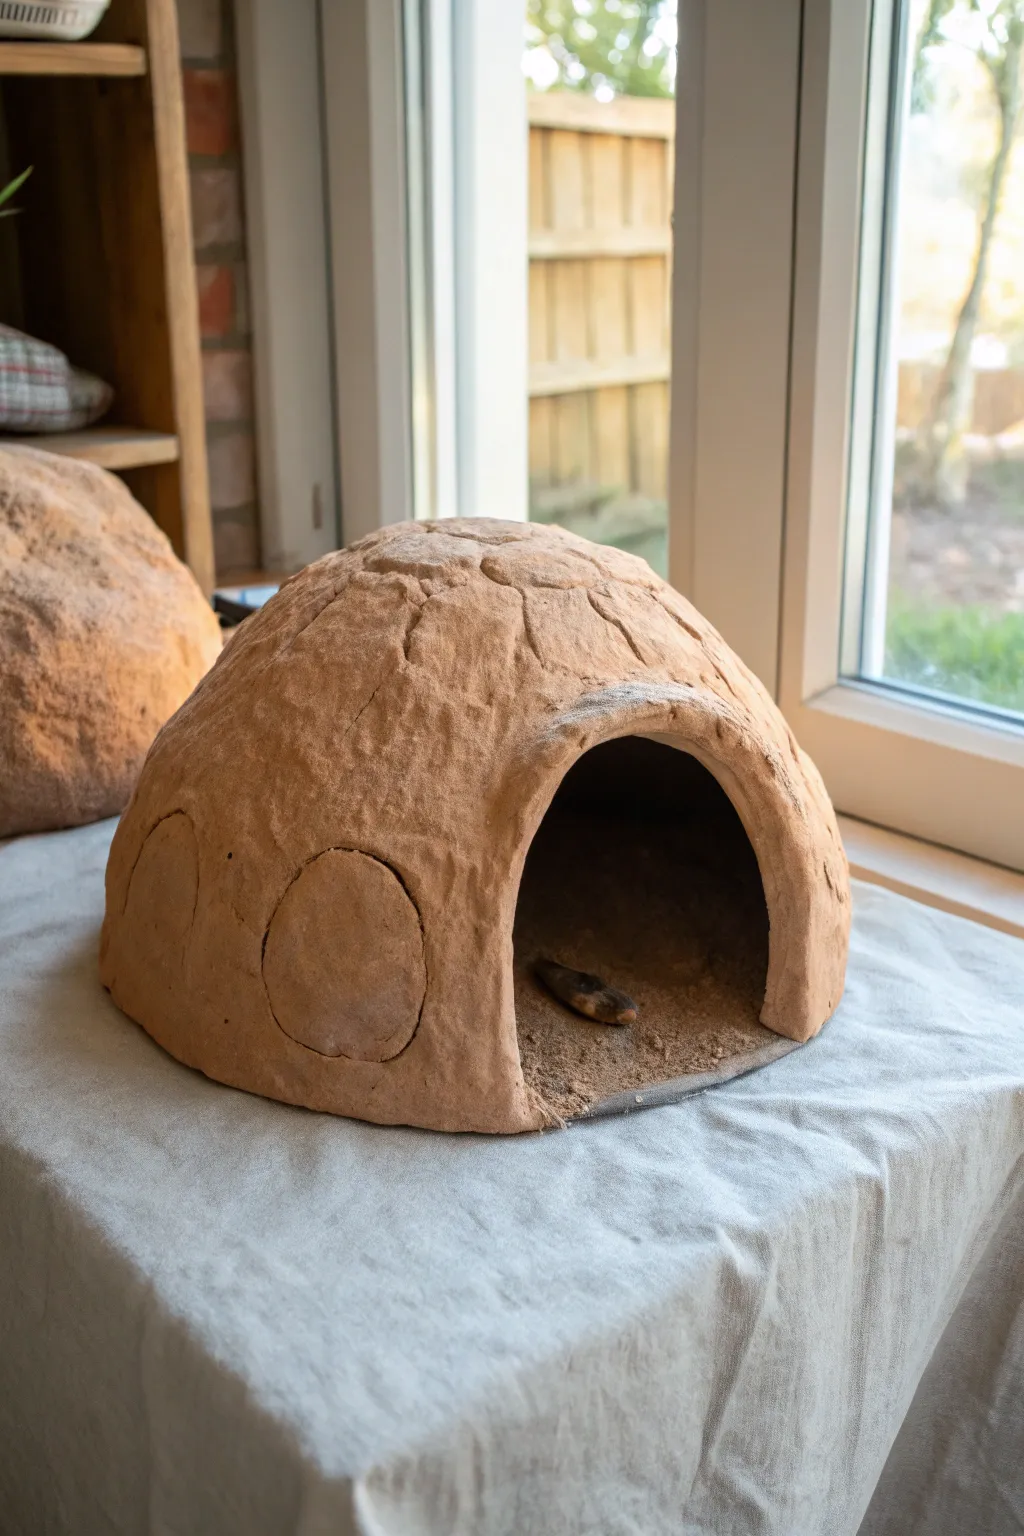
Cool-Side Hide Chamber Tucked Into The Wall
Create a naturalistic, secure retreat for your bearded dragon that mimics the look of a desert burrow or adobe dwelling. using excavator clay, this dome-shaped hide features a textured, earthy finish that blends seamlessly into sandy terrarium environments.
Step-by-Step Tutorial
Materials
- Excavator clay (powdered burrowing clay)
- Water
- Large plastic mixing bowl
- Heavy-duty balloon or a round plastic bowl (to use as a mold)
- Plastic wrap (cling film)
- Sand (for texture)
- Sculpting tools or a spoon
- Spray bottle with water
Step 1: Preparation and Mixing
-
Prepare the workspace:
Lay down newspaper or a plastic sheet on your work surface, as this process can get a bit messy. Have your mold ready to go. -
Prepare the mold:
If you are using a plastic bowl or a balloon as your internal support form, wrap it thoroughly in plastic wrap. This ensures the clay won’t stick permanently to the mold once it starts to dry. -
Prop the mold:
Place your wrapped mold on the work surface. If using a bowl, turn it upside down. Ensure it is stable and won’t slide around. -
Measure the clay:
Pour the dry excavator clay powder into your mixing bowl. Start with enough to cover your mold with about 1 inch of thickness. -
Add water gradually:
Slowly add water while mixing with your hands. You want a consistency similar to stiff cookie dough or firm play sand—moldable and clumping, but not dripping wet or soupy.
Pro Tip: Reinforcement
For larger domes, mix short strands of dried sphagnum moss or burlap fibers into the wet clay. This acts like rebar in concrete, preventing cracks as it dries.
Step 2: Building the Dome
-
Form the base layer:
Take handfuls of the mixed clay and start packing them around the base of your mold. Press firmly to ensure a solid foundation. -
Build upward:
Continue adding clay, working your way up the sides of the mold. Maintain a consistent thickness of about 3/4 to 1 inch to ensure structural integrity. -
Create the entryway:
Leave a section open for the door. I like to shape an exaggerated arch here, making it wide enough for a bearded dragon to comfortably turn around in. -
Close the top:
Pack clay over the very top of the mold to close the dome. Smooth the connection points where different handfuls of clay meet. -
Define the arch:
Use your fingers or a sculpting tool to smooth and round the edges of the doorway arch. A rough edge here could irritate your pet’s skin, so take time to bevel it nicely.
Step 3: Texturing and Drying
-
Add surface texture:
Instead of smoothing the outside perfectly, use your fingers to press distinct ‘pats’ or small divots all over the dome. This mimics the stacked adobe look seen in the photo. -
Enhance with sand:
Lightly dust the wet surface with dry sand and pat it in gently. This adds extra grit and helps color-match the hide to your substrate later. -
Initial setting:
Let the structure sit for about 24 hours until the outside feels firm to the touch but the clay isn’t 100% dry all the way through. -
Remove the mold:
Carefully slide the bowl or pop the balloon from the inside. Do this gently to avoid cracking the semi-dry clay. -
Texture the interior:
Reach inside and smooth out any weird wrinkles left by the plastic wrap. You can scratch the inner walls slightly to give your dragon some grip. -
Final drying phase:
Allow the hide to dry completely for another 24-48 hours. If it dries too fast and cracks, mist it lightly with water and smooth the crack over with your finger. -
Placement:
Once rock-hard, place the hide in your enclosure. You can pile loose substrate around the base to make it look like it’s emerging naturally from the ground.
Level Up: Heated basking spot
Embed a flat piece of slate or dark tile into the very top of the wet clay dome. This absorbs heat lamp energy better, creating a prime basking surface on the roof.
Your reptile now has a custom, durable shelter that looks right at home in a desert terrarium


Canyon Ridge With A Lookout Point
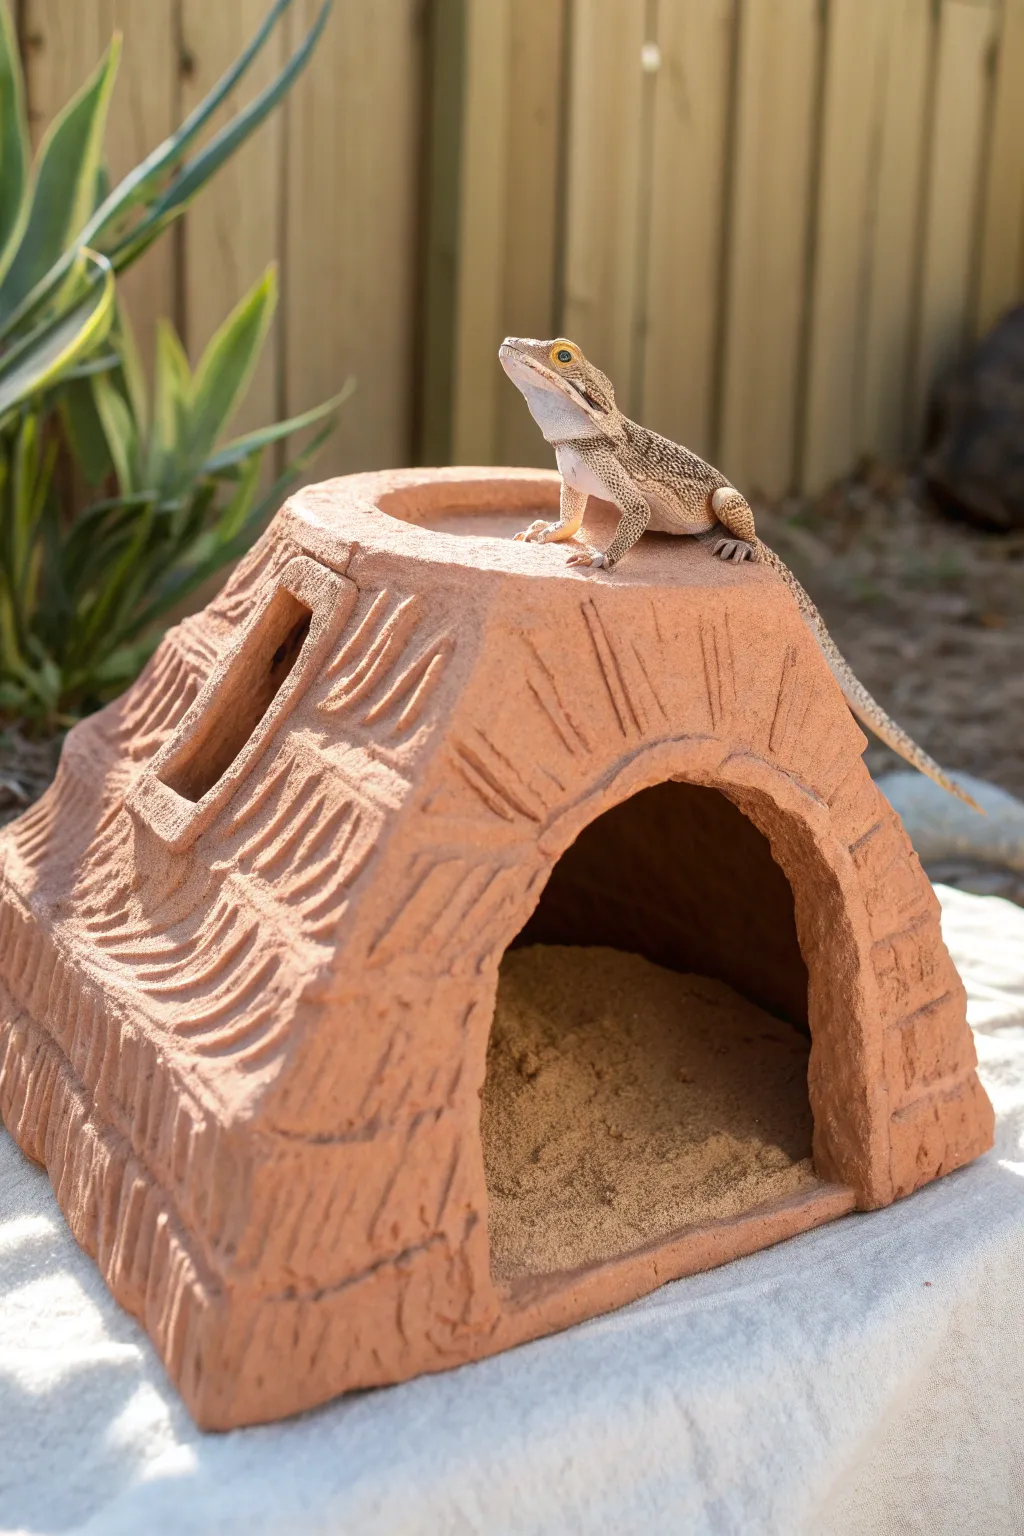
This rustic hide features a flat basking platform on top and a cozy, sandy cave below, mimicking the natural rocky ledges of the Australian outback. The textured, reddish clay finish provides excellent grip for climbing while offering a secure retreat for your reptile.
How-To Guide
Materials
- Excavator clay (approx. 5-10 lbs depending on size)
- Water spray bottle
- Cardboard or foam board (for the mold/armature)
- Tape (masking or packing)
- Plastic wrap (Cling film)
- Sand (reptile-safe, for the interior floor)
- Sculpting tools (or a chopstick/skewer)
- Balloon (optional, for dome support)
Step 1: Building the Armature
-
Create the base form:
Cut four trapezoidal pieces of cardboard or foam board to form the walls of your hide. The shape should be wider at the bottom and narrower at the top, like a pyramid with the tip cut off. -
Cut the entrance:
On the piece that will be the front facade, cut out a large arch. This will be the main cave entrance. Ensure it is wide and tall enough for your dragon to walk through comfortably. -
Assemble the box:
Tape the four walls together securely. Add a flat piece of cardboard on top to create the roof, which will serve as the basking platform. -
Waterproof the mold:
Wrap the entire cardboard structure tightly in plastic wrap. This step is crucial because it prevents the wet clay from sticking to your mold, allowing you to remove the cardboard later if desired. -
Add the window detail:
If you want the side ‘window’ feature seen in the photo, tape a small, rectangular block of foam or cardboard onto the side slope of your armature. Wrap this in plastic as well.
Crack Control
If you see hairline cracks while drying, mist the area with water and smooth fresh clay over the gap. Slow down drying by loosely draping a plastic bag over the structure.
Step 2: Applying the Clay
-
Mix the clay:
In a bucket or mixing tub, mix your excavator clay with water according to the package instructions. You want a consistency similar to firm playdough—moldable but not sloppy. -
Create the base layer:
Begin packing the clay around the base of your plastic-wrapped form. Press it down firmly to eliminate air pockets and create a solid foundation. -
Build up the walls:
Work your way up the sides of the form, applying the clay in a layer about 0.5 to 1 inch thick. I find squeezing the clay tightly against the form helps it bond better. -
Form the entrance arch:
Carefully shape the clay around the cardboard archway. Smooth the edges so there are no sharp points that could scratch your pet as they enter. -
Sculpt the window ledge:
Pack clay around the protruding window block you added earlier. Shape it into a rectangular rim that sticks out slightly from the main slope. -
Form the basking platform:
Cover the flat top of the structure with a slightly thicker layer of clay. You can create a slight rim around the edge to define the platform area, making it feel like a distinct lookout spot.
Step 3: Texturing and Finishing
-
Add directional texture:
While the clay is still wet, use a sculpting tool or a dull skewer to carve grooves into the surface. Create diagonal lines radiating outward to mimic sedimentary rock layers or erosion patterns. -
Rough up the surface:
Gently stipple the rest of the surface with a stiff brush or a ball of crumbled foil. This rough texture helps lizards grip the surface when climbing. -
Detail the entrance:
Use your tool to carve faint brick-like or stone-block patterns around the archway for an architectural touch. -
Initial drying phase:
Let the structure sit in a warm, dry area for about 24 hours until the outside feels firm to the touch but not fully cured. -
Remove the core (Optional):
If you want a hollow interior without the cardboard, carefully reach underneath and pull out the cardboard armature and plastic wrap. If the clay is still too soft preventing this, wait longer. -
Final cure:
Allow the project to dry completely for another 24-48 hours. The clay will lighten in color as it dries. -
Sand the interior:
Once fully dry, place the hide in the enclosure. Fill the interior floor with loose sand to complete the cozy cave environment shown in the reference.
Level Up: Heated Hub
Embed a piece of slate tile into the wet clay on the top platform. Slate absorbs heat perfectly, creating a highly efficient basking spot.
Your bearded dragon now has a custom-made fortress to survey their kingdom from

The Complete Guide to Pottery Troubleshooting
Uncover the most common ceramic mistakes—from cracking clay to failed glazes—and learn how to fix them fast.
Double-Entrance Hide For “No Dead Ends” Security
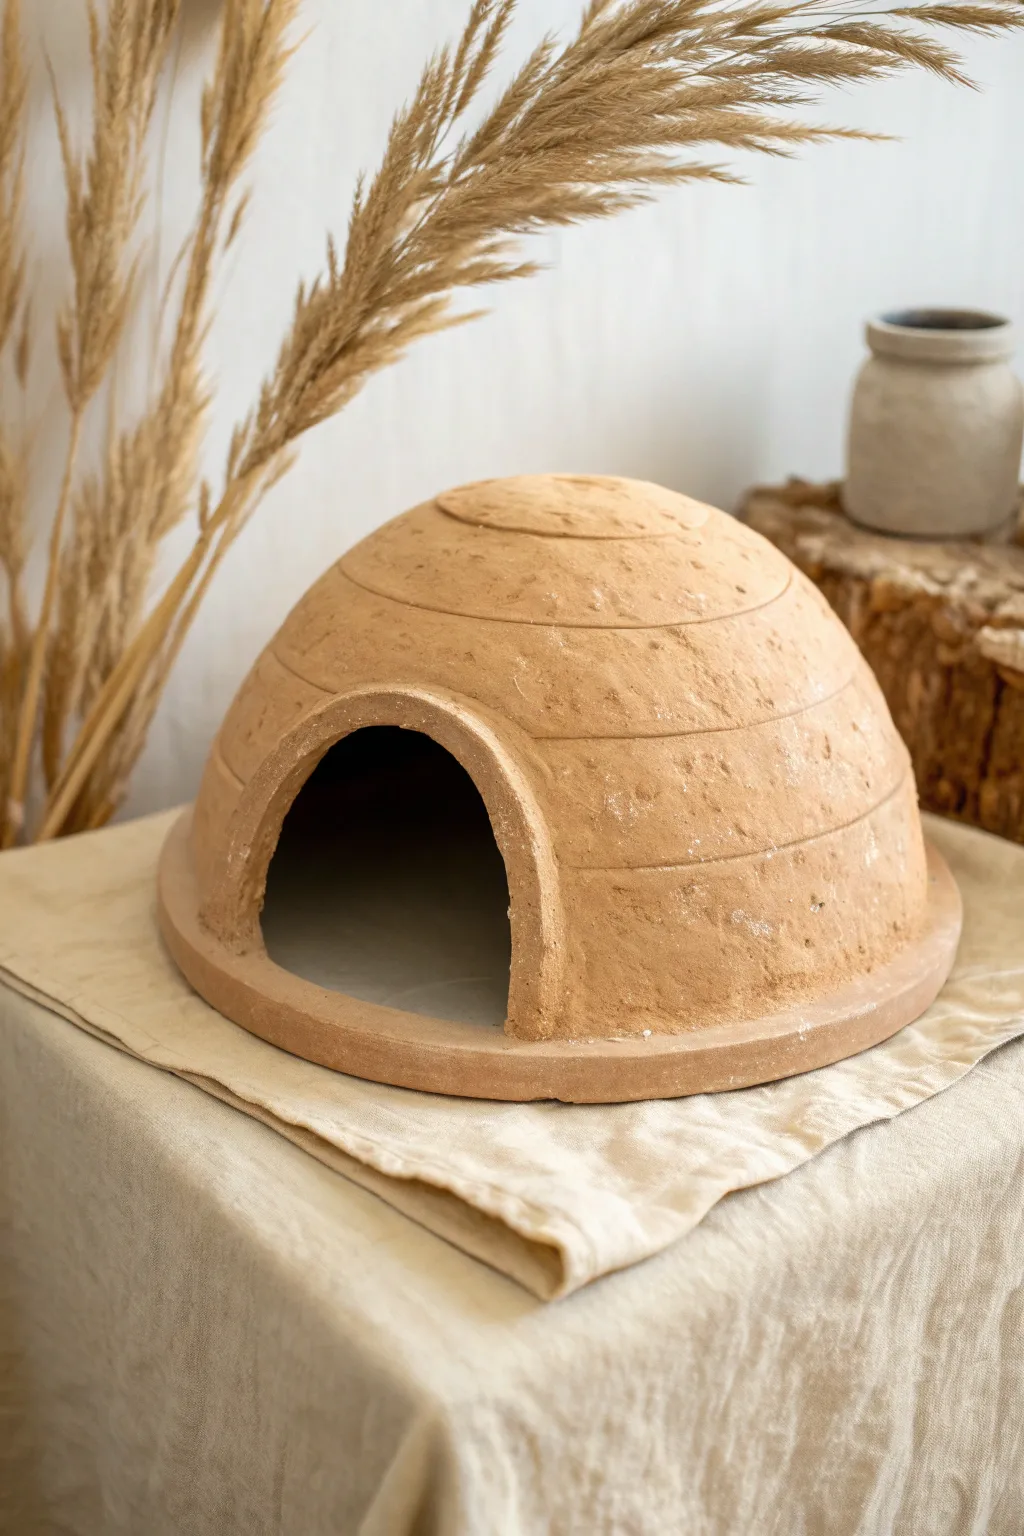
This rustic, igloo-style burrow offers a cozy retreat for your bearded dragon while mimicking the look of natural earthern dens. Its smooth, domed shape and textured rings create a stunning, functional centerpiece for any desert terrarium.
Step-by-Step
Materials
- Excavator clay (or reptile-safe sculpting clay)
- Balloon (large, round) or mixing bowl for a mold
- Plastic wrap
- Water spray bottle
- Sculpting tool or plastic knife
- Sponge
- Flat working surface (piece of wood or plastic)
- Sandpaper (optional)
Step 1: Preparation and Base
-
Prepare your mold:
Select a large round bowl or inflate a sturdy balloon to the desired size of your hide’s interior. Cover the bowl or balloon completely with plastic wrap to prevent sticking, ensuring the plastic is smooth to minimize wrinkles inside. -
Mix the clay:
Follow the manufacturer’s instructions to hydrate your excavator clay. You want a consistency that is pliable but holds its shape firmly, similar to stiff cookie dough. -
Form the base ring:
Roll a thick sausage of clay and flatten it onto your work surface to create a circular base. This will be the foundation lip that rests on the tank floor. -
Position the mold:
Place your wrapped bowl or balloon onto the center of the base ring. Ensure there is a small border of the base extending outward.
Cracks Appearing?
If hairline cracks appear during drying, wet your finger and rub a small amount of fresh clay sludge (slip) into the crack, then smooth it over.
Step 2: Building the Dome
-
Apply the first layer:
Pack handfuls of clay against the mold, starting from the bottom and working your way up. Blend the fresh clay into the base ring seamlessly so they become one solid unit. -
Build upwards:
Continue adding clay up the sides of the mold. Maintain a consistent thickness of about half an inch to ensure structural integrity. -
Close the top:
Finish covering the mold by closing the very top of the dome. Pat it down gently to remove air pockets and ensure a smooth, rounded silhouette. -
Smooth the surface:
Dip your hands in water and smooth over the entire exterior. This helps bind the clay particles and creates a cleaner canvas for the texturing steps.
Step 3: Detailing and Openings
-
Carve the entrance:
Using a plastic knife or sculpting tool, carefully cut out a wide archway for the main entrance. Remove the excess clay. -
Create the second entrance:
On the opposite side or slightly offset, cut a second, perhaps smaller, opening. This provides the ‘no dead ends’ security bearded dragons prefer. -
Reinforce the doorways:
I like to take a little water on my finger and run it along the cut edges of the doors to round them off. Sharp edges can be uncomfortable for shedding reptiles. -
Mark the rings:
To achieve the beehive look, use a sculpting tool to gently score horizontal lines around the circumference of the dome. -
Define the layers:
Go back over your scored lines and press just below them to create a stepped, layered effect. The goal is to make it look like stacked coils of clay. -
Add surface texture:
Dab a dry sponge or crumbly rock against the wet clay. This imparts a natural, weathered stone texture rather than a perfectly smooth pottery look.
Level Up: basking Spot
Flatten the very top of the dome slightly while the clay is wet. This creates a stable platform for your dragon to bask on top of the hide.
Step 4: Drying and Finishing
-
Initial dry time:
Let the structure sit for a few hours until it is leather-hard—firm to the touch but still holds moisture. -
Remove the mold:
Carefully deflate the balloon or gently wiggle the bowl out from underneath. Do this slowly to avoid collapsing the dome. -
Refine the interior:
Reach inside and smooth out any rough seams or plastic wrap marks. A smooth interior is crucial for easy cleaning later. -
Final cure:
Allow the hide to dry completely in a warm, dry area. This can take 24 to 48 hours depending on humidity; it will lighten in color as it dries. -
Final safety check:
Once rock-hard, run your hand over the entire piece. Use sandpaper to gently buff away any remaining sharp burrs or rough spots.
Place your custom hide in the terrarium and watch your dragon explore their new secure fortress