When I’m teaching beginners, air-dry clay animals are always the fastest way to get that “I made this!” feeling. Here are my favorite air clay animal ideas, all based on simple shapes so you can keep it cute, not complicated.
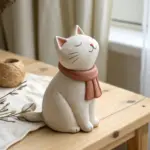
Chubby Cat Figurine
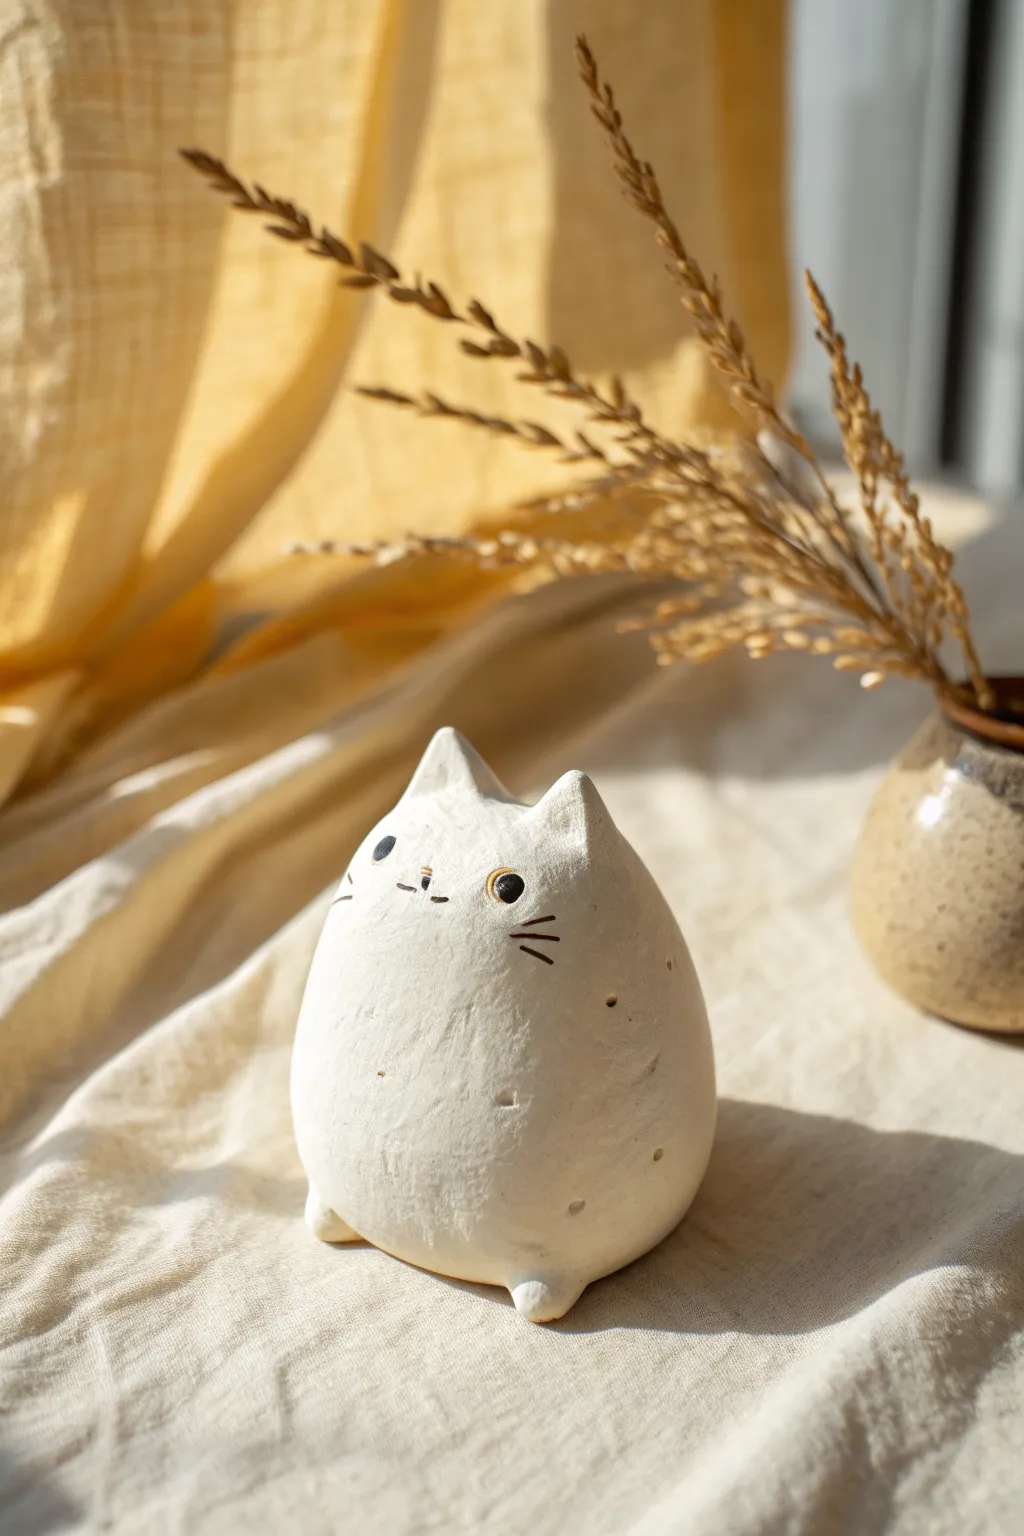
This endearing little sculpture captures the essence of a cat in its most relaxed, potato-shaped form. Crafted from air-dry clay with a minimal, textured finish, it makes for a perfect desk companion or a sweet handmade gift.
Step-by-Step
Materials
- White creative paperclay or premium air-dry clay
- Water in a small dish
- Pointed modeling tool or toothpick
- Small round sculpting tool or ball stylus
- Fine-grit sandpaper (220-400 grit)
- Black acrylic paint
- Fine detail paintbrush (size 0 or 00)
- Small piece of aluminum foil
- Matte sealant or varnish (optional)
Step 1: Sculpting the Base Form
-
Create the core:
Start by crumpling a small piece of aluminum foil into a tight egg shape. This acts as an armature, saving clay and reducing drying time. -
Prepare the clay:
Condition a handful of air-dry clay by kneading it until it is warm and pliable. Flatten it into a pancake shape about 1/4 inch thick. -
Cover the armature:
Wrap the clay pancake around your foil core. Gently massage the seams together until they disappear completely and the surface is smooth. -
Shape the body:
Roll the clay form between your palms to create a smooth, tapering egg shape. The bottom should be slightly wider than the top to give it that ‘chubby’ look. -
Flatten the base:
Tap the bottom of the egg shape gently on your work surface. You want it to sit flat and stable without wobbling.
Step 2: Adding Details
-
Pinch the ears:
At the narrower top of the egg, gently pinch two small triangles of clay upwards to form the ears. I like to keep them somewhat short and rounded for a softer appearance. -
Refine the ears:
Smooth the transition between the ears and the head using a little water on your finger. Use a modeling tool to create small indentations inside the ears for depth. -
Add the feet:
Roll two huge pea-sized balls of clay. Attach them to the bottom front of the body to form tiny, nubby feet. Blend the clay upwards into the body so they don’t fall off. -
Smooth the surface:
Dip your finger in water and run it over the entire sculpture to remove fingerprints. The goal is a matte, slightly organic texture, not plastic-perfect smoothness. -
Texture the body:
Using a toothpick or a small stylus, press random, tiny dots into the sides of the cat’s body. These decorative stipples add rustic character to the white surface. -
Dry the sculpture:
Set your cat aside to dry completely. This usually takes 24-48 hours depending on humidity. Rotate it occasionally so the bottom dries evenly.
Cracks happen
If small cracks appear as the clay dries, mix a tiny bit of fresh clay with water to make a paste (slip) and fill them in, then sand smooth once dry.
Step 3: Finishing Touches
-
Sand for softness:
Once fully dry, use fine-grit sandpaper to gently buff away any sharp ridges or rough bumps. Wipe away the dust with a slightly damp cloth/tissue. -
Paint the eyes:
Using your finest brush and black acrylic paint, paint two small, wide-set circles for eyes. Leave them solid black for a graphic look. -
Paint the nose and mouth:
Paint a tiny inverted triangle or oval for the nose between the eyes. Add a very faint, small ‘w’ shape beneath it for the mouth. -
Add whiskers:
With the very tip of your brush, paint three short, straight lines on each cheek. Keep your hand steady and light; thick whiskers can overwhelm the face. -
Seal the piece:
Apply a thin coat of matte varnish to protect the paint and clay. A glossy finish might look too plastic, so matte is best to keep that natural clay aesthetic.
Add a tail
Before drying, roll a thin snake of clay and wrap it around the curved back of the cat so it hugs the side of the body for extra cuteness.
Now you have a charming little clay friend ready to sit on your shelf


Floppy-Eared Puppy Pal
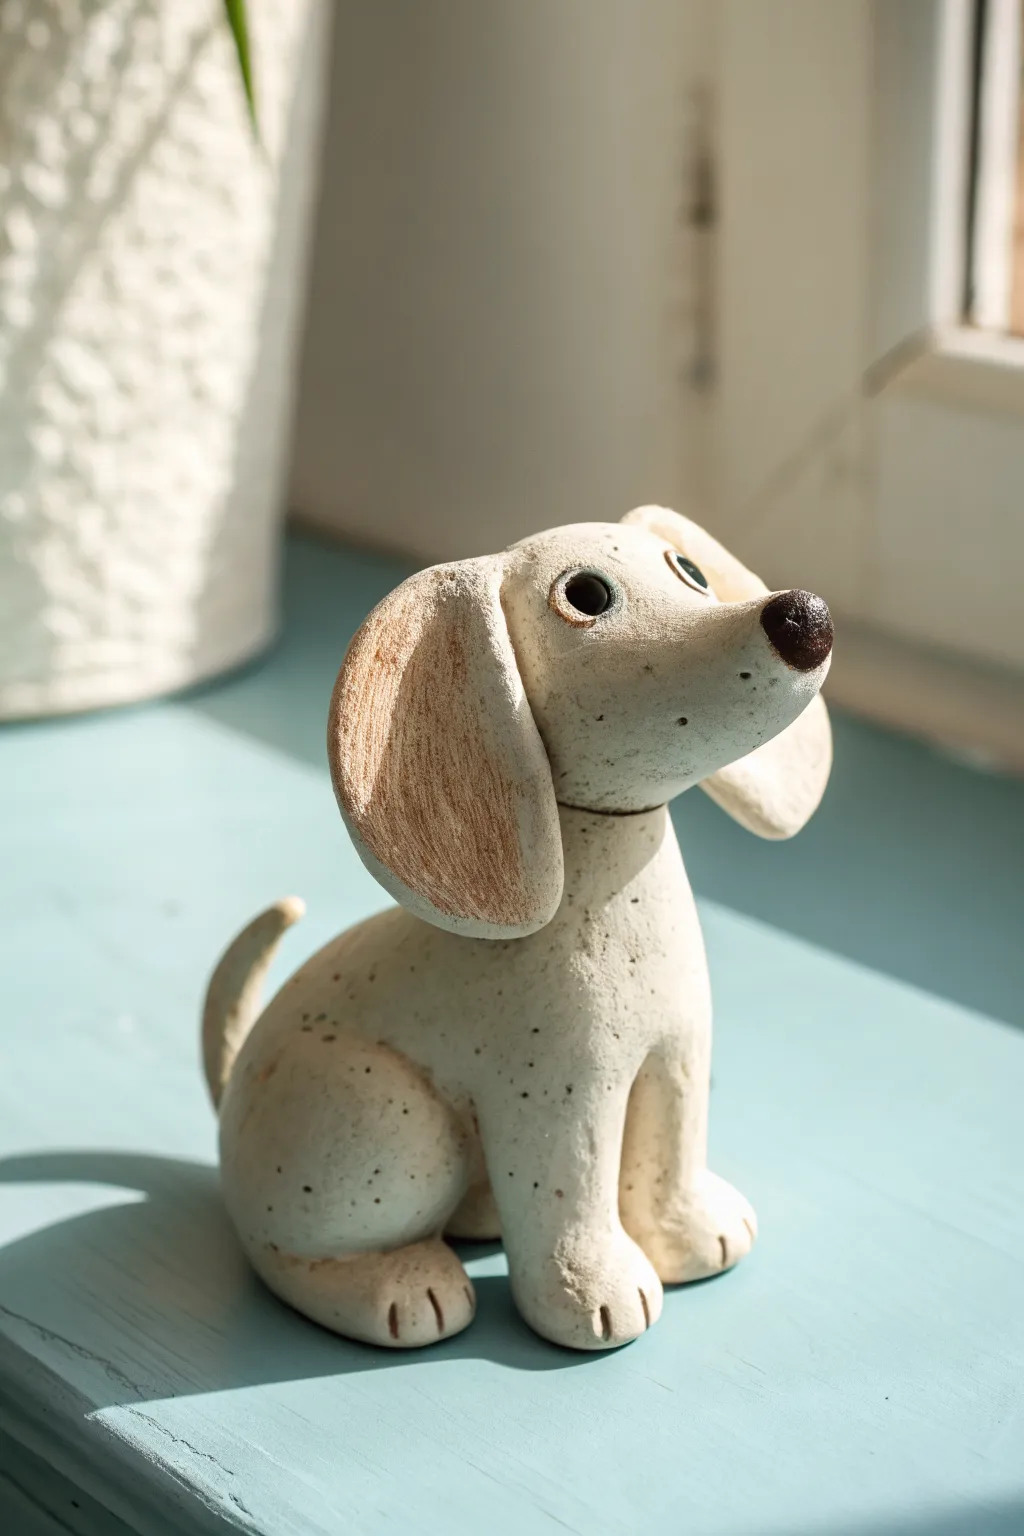
This charming, spotted puppy is full of personality with his oversized, floppy ears and inquisitive upward gaze. Using simple air-dry clay techniques, you’ll sculpt a stylized figure that captures the warmth and texture of hand-built pottery without needing a kiln.
Step-by-Step Guide
Materials
- White air-dry clay (stone clay or paper clay work best)
- Small cup of water
- Sculpting tools (needle tool and smoothing tool)
- Acrylic paints (brown, black, and a heavily diluted black/grey wash)
- Small paintbrush
- Sponge or stiff bristle brush for texture
- Toothpick or wire for neck reinforcement
- Matte varnish
Step 1: Forming the Body
-
Shape the torso:
Begin with a lump of clay about the size of a golf ball. Roll it into a smooth pear shape, slightly flattening the bottom so it sits securely on your work surface. -
Elongate the neck:
Gently pull and smooth the narrower top part of your pear shape upwards to define the neck area. It should transition smoothly into the chest rather than looking like a separate tube. -
Insert support:
Push a toothpick or a small piece of wire vertically down into the center of the neck. Leave about half an inch exposed at the top to anchor the head later. -
Add texture:
Before adding limbs, lightly tap the entire surface with a dry sponge or a stiff brush. This creates the subtle, pitted texture seen on the original piece, mimicking rustic ceramic.
Stay Smooth
Keep a damp sponge nearby while working. Wiping your fingers frequently prevents clay buildup, which causes unwanted crumbs and cracks on your smooth surfaces.
Step 2: Building the Head
-
Create the head shape:
Roll a smaller ball of clay and press it into a smooth, elongated oval. One end should be slightly bulbous for the cranium, tapering down to a blunt snout. -
Attach the head:
Push the head onto the exposed toothpick on the body. Position it at an upward angle, as if the puppy is looking up at you. -
Blend the connection:
Use a small amount of water on your finger or a smoothing tool to blend the clay from the neck to the underside of the head. Ensure the seam disappears completely for a solid join. -
Form the nose:
Roll a tiny, dark-colored teardrop of clay (or paint it later) and attach it to the very tip of the snout. -
Create eye sockets:
Use the rounded end of a paintbrush handle to press two deep indentations on either side of the head where the eyes will go. -
Add the eyes:
Roll two very small balls of clay. Place them into the sockets you just made, then use a needle tool to create a tiny pupil indentation in the center of each.
Step 3: Limbs and Details
-
Sculpt the front legs:
Roll two small sausages of clay. Flatten one end of each slightly to create paws. -
Attach front legs:
Press these cylinders onto the front of the chest, blending the clay at the shoulders so they look integrated. The paws should rest flat on the ground. -
Form the haunches:
I prefer to make the back legs simply by shaping two rounded discs of clay and pressing them onto the lower sides of the body. -
Add hind paws:
At the base of those haunch discs, add small oval shapes for the back feet, blending them securely. -
Detail the toes:
Use a needle tool or knife to press three small lines into the front of each paw to define the toes. -
Make the tail:
Roll a short, tapered cone of clay. Attach it low on the back, curving it upwards in a happy, wagging position.
Collar Detail
Before the clay dries, roll a super-thin snake of clay or use a leather cord to create a collar around the neck. Add a tiny gold bead for a tag.
Step 4: Ears and Finishing
-
Shape the ears:
Roll two larger, flat ovals for the ears. Make them thick enough to hold their shape but thin enough to look like fabric. -
Attach the ears:
Score the side of the head and the top of the ear pieces. Use a little water (slip) to attach them firmly. Position them so they flop downwards, framing the face. -
Dry completely:
Allow the sculpture to dry for at least 24-48 hours. It needs to be bone dry before painting. -
Apply base color:
Paint the nose dark chocolate brown. Paint the pupils black. Gently brush a light brown wash over the ears to give them a distinct color from the body. -
Speckle technique:
Dilute some black or dark grey paint with plenty of water. Dip an old toothbrush in it and flick the bristles with your thumb to spray tiny speckles all over the dog’s body for that spotted look. -
Seal:
Once the paint is dry, coat the entire figure with a matte varnish to protect it and unify the finish.
Place your new puppy pal on a sunny shelf where he can look up and admire the view


Bunny With a Carrot

This charming, texturized bunny sculpture brings a touch of farmhouse warmth to your windowsill. With its simple shapes and sweet expression, it captures the cozy feeling of spring using just air dry clay and a few acrylic accents.
How-To Guide
Materials
- White air dry clay (approx. 500g)
- Acrylic paints (orange, pale pink, black, brown)
- Faux greenery stems or floral wire wrapped in green tape
- Aluminum foil (for armature)
- Sculpting tools (needle tool, blending tool)
- Rough sponge or toothbrush (for texture)
- Fine grit sandpaper
- Matte varnish
- Water cup and brushes
- Strong craft glue
Step 1: Sculpting the Base Form
-
Create the core:
Begin by crumpling aluminum foil into a pear shape to serve as the core. This saves clay and helps the sculpture dry evenly. It should be slightly smaller than the final size you want for the bunny’s body. -
Cover the body:
Roll out a slab of white air dry clay to about 1/4 inch thickness. Wrap this completely around your foil pear, smoothing out the seams with a little water until you have a seamless, sturdy base. -
Add the head:
Roll a sphere of clay for the head. It should be slightly oval-shaped. Score (scratch) the top of the body and the bottom of the head, add a dab of water, and press them firmly together to join. -
Blend the neck:
Use a modeling tool or your thumb to drag clay from the head down to the body and vice versa, smoothing the transition so the head doesn’t look like it’s just balancing on top. I find adding a tiny coil of clay around the neck gap helps reinforce this joint. -
Form the feet:
Roll two small, flattened oval balls for the feet. Attach them to the bottom front of the body. Use a knife tool to press two indentations into each foot to create toes.
Step 2: Adding Character & Details
-
Shape the ears:
Roll two elongated teardrop shapes for the ears. Flatten them slightly and use your thumb to create an impression down the center of each. Attach them to the top of the head, blending the clay at the base thoroughly for a strong hold. -
Create the face:
Add a tiny triangle of clay for the nose. Use a needle tool to gently etch a muzzle line down from the nose and curve it into a smile. Press small indentations where the eyes will go. -
Sculpt the arms:
Roll two log shapes for arms. Attach them to the sides of the body, curving them forward as if the bunny is ready to hold something. Don’t press the hands together yet; leave space for the carrot. -
Make the carrot:
Form a cone shape from a separate piece of clay. Use a knife tool to score horizontal lines across it for texture. Poke a hole in the wide top end deep enough to hold your faux greenery later. -
Attach the carrot:
Place the carrot vertically between the bunny’s paws. Gently press the paws into the carrot to secure it, using a little water or slip (clay and water mix) as glue. Ensure the carrot rests against the belly for support. -
Add texture:
Before the clay dries, take a rough sponge or an old toothbrush and dab it gently all over the bunny’s white fur. This creates that lovely, rustic stone-like texture seen in the photo.
Pro Tip: Rustic Wash
To get that aged look, mix water with a tiny drop of brown paint. Brush it over the white body and immediately wipe it off with a rag. The pigment will stay in the textures.
Step 3: Painting and Finishing
-
Let it dry:
Allow the sculpture to dry completely. Depending on humidity and thickness, this usually takes 24-48 hours. The clay will turn chalky white and feel room temperature (not cold) when dry. -
Sand imperfections:
Once fully dry, essentially sand down any sharp fingerprints or unintended bumps, but try to preserve the intentional texture you added with the sponge. -
Paint the carrot:
Paint the carrot with a vibrant orange acrylic. You might want to wash a tiny bit of brown into the grooves to show depth. -
Add facial details:
Use a small detail brush to paint the eyes black with white highlight dots. Paint the nose a soft brown. dry-brush a very pale pink inside the ears and on the cheeks for a rosy glow. Use a thin brush to add whisker lines on the cheeks. -
Insert greenery:
Dip the ends of your faux greenery stems into strong craft glue and insert them into the hole you made at the top of the carrot. -
Seal the work:
Finish with a coat of matte varnish to protect the paint and seal the clay without making it look glossy or plastic.
Level Up: Seasonal Swap
Instead of gluing the carrot permanently, model the arms to just ‘cup’ the space. You can then swap the carrot for a clay flower in spring or a pumpkin in autumn.
Now you have a timeless little companion to brighten up any corner of your home

Tiny Panda Snack Time
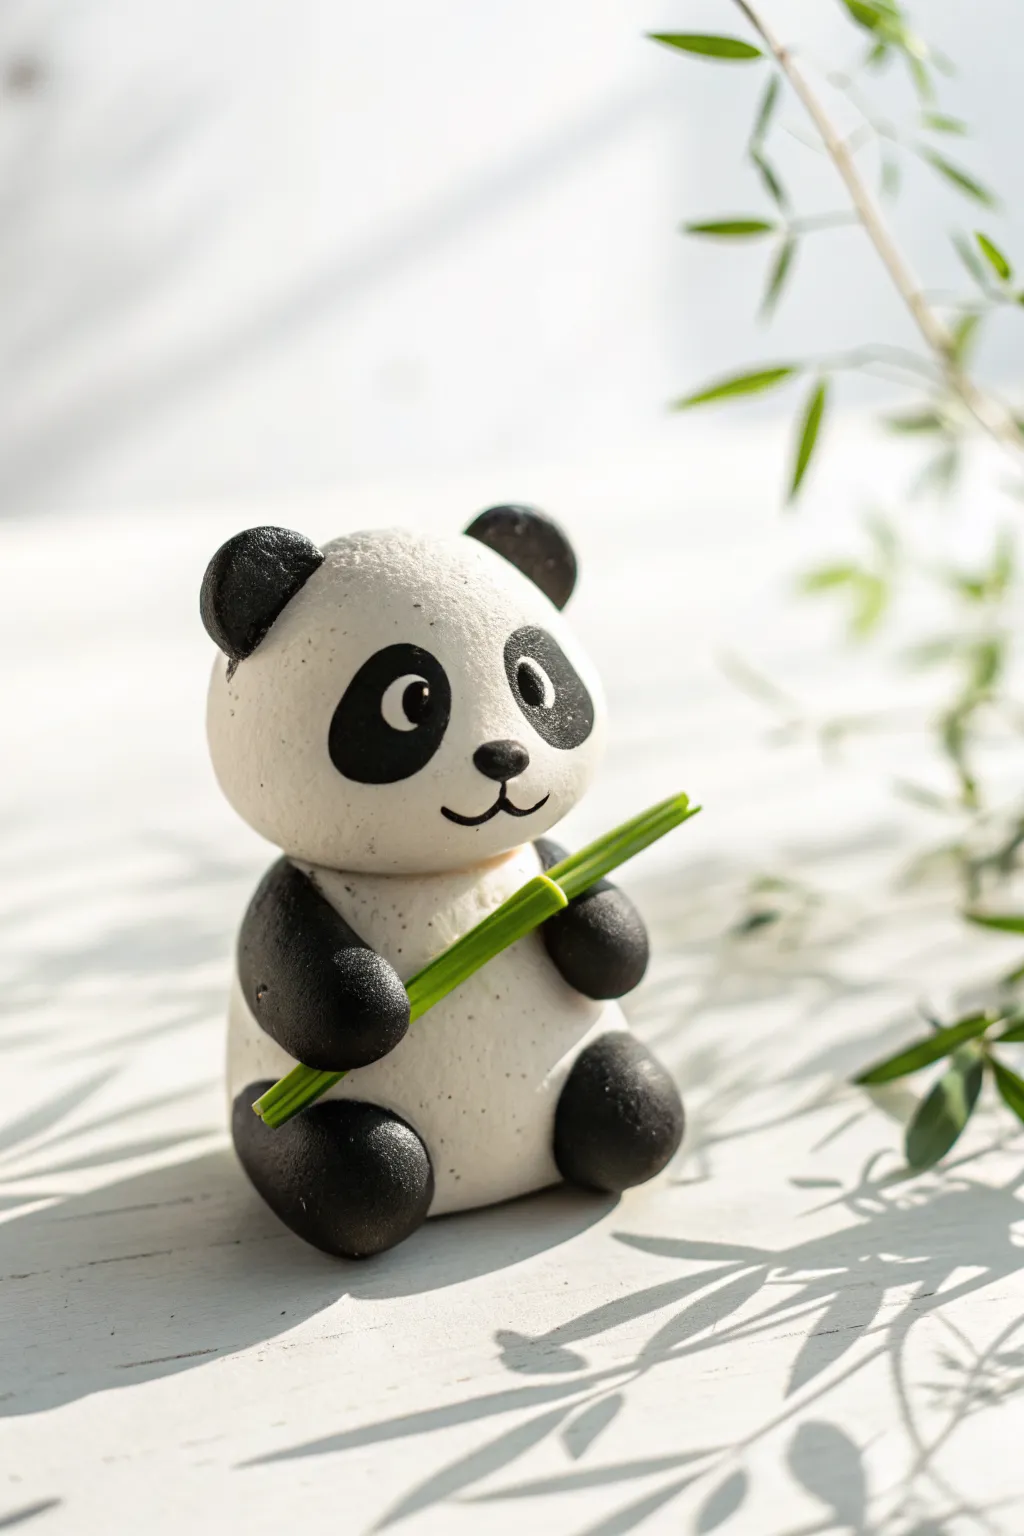
Bring a little Zen to your desk with this adorable air clay panda enjoying its favorite treat. This simple project uses basic round shapes to create a stylized, charming character holding a bright green bamboo shoot.
Step-by-Step Guide
Materials
- White air dry clay
- Black air dry clay
- Green air dry clay (or white clay painted green)
- Small ball tool or dotting tool
- Clay knife or craft blade
- Black acrylic paint (if not using black clay for details)
- Fine detail paintbrush
- Water (for smoothing)
- Clear matte varnish (optional)
Step 1: Shaping the Head
-
Roll the base:
Start with a piece of white clay roughly the size of a walnut. Roll it between your palms until you have a perfectly smooth sphere with no cracks. -
Form the shape:
Gently press the sphere onto your work surface to flatten the bottom slightly so the head doesn’t roll away. It should remain mostly round, just slightly stable. -
Add the ears:
Pinch off two very small, pea-sized pieces of black clay. Roll them into balls and then flatten them slightly into discs. -
Attach the ears:
Press the tiny black discs onto the top left and right sides of the white head. Use a tiny bit of water to blend the seam where the ear meets the head so they don’t pop off later.
Step 2: Building the Body
-
Create the torso:
Take another piece of white clay, slightly larger than the head piece. Roll it into a smooth ball, then gently shape it into a rounded teardrop or egg shape with a flattened bottom for stability. -
Connect head and body:
Place the head on top of the narrower end of the body. Press down gently to secure them. If the clay is feeling dry, scratch up the meeting points and add a drop of water to act as glue. -
Form the legs:
Create two small ovals from black clay for the legs. They should be chubby and rounded. -
Attach the legs:
Press these black ovals onto the bottom front of the white body, positioning them so they stick out slightly like feet. Smooth the clay at the attachment point. -
Make the Arms:
Roll two slightly smaller sausages of black clay for the arms. Curved them slightly to prepare for holding the bamboo. -
Position the arms:
Attach the arms higher up on the body, just below the neck area. Angle them forward so the ‘hands’ meet in the middle of the belly.
Cracks Appearing?
If you see tiny cracks while shaping, dip your finger in water and smooth them out immediately. Air clay shrinks as it dries, so cracks can widen later.
Step 3: Creating the Bamboo
-
Roll the stalk:
Take a small amount of green clay and roll it into a thin, even stick. I like to keep this quite slender to match the delicate scale of the panda. -
Add texture:
Use your craft knife to gently press shallow indentation rings around the green stick at intervals to mimic bamboo segments. -
Insert the snack:
Place the bamboo stick into the panda’s black paws. You might need to gently pry the arms open slightly and then press them back around the green stick to secure it.
Level Up: Environment
Make a few extra tall bamboo stalks to stand next to your panda, or create a simple flat green leaf base for him to sit on for a complete scene.
Step 4: Painting the Face
-
Outline the eyes:
Use black paint and a fine brush to paint two large, tilted oval patches for the eye areas. Make them slant slightly downwards towards the nose. -
Add the eyes:
Once the black patches are dry, paint a small white circle inside the upper part of each black patch. Then, add a tiny black dot inside the white for the pupil. -
Paint the nose:
Paint a small, rounded black triangle in the center of the face, right between the eye patches. -
Draw the mouth:
Using the very tip of your brush (or a fine marker), draw a small ‘w’ shape extending down from the nose to create a smiling mouth. -
Finish with texture:
Before the clay fully cures, you can gently tap the white surface with a stiff brush or a toothbrush to give it a slight furry texture, avoiding the painted face area.
Let your panda dry completely for 24 hours before moving it to its new home

The Complete Guide to Pottery Troubleshooting
Uncover the most common ceramic mistakes—from cracking clay to failed glazes—and learn how to fix them fast.
Mini Piggy With a Snout
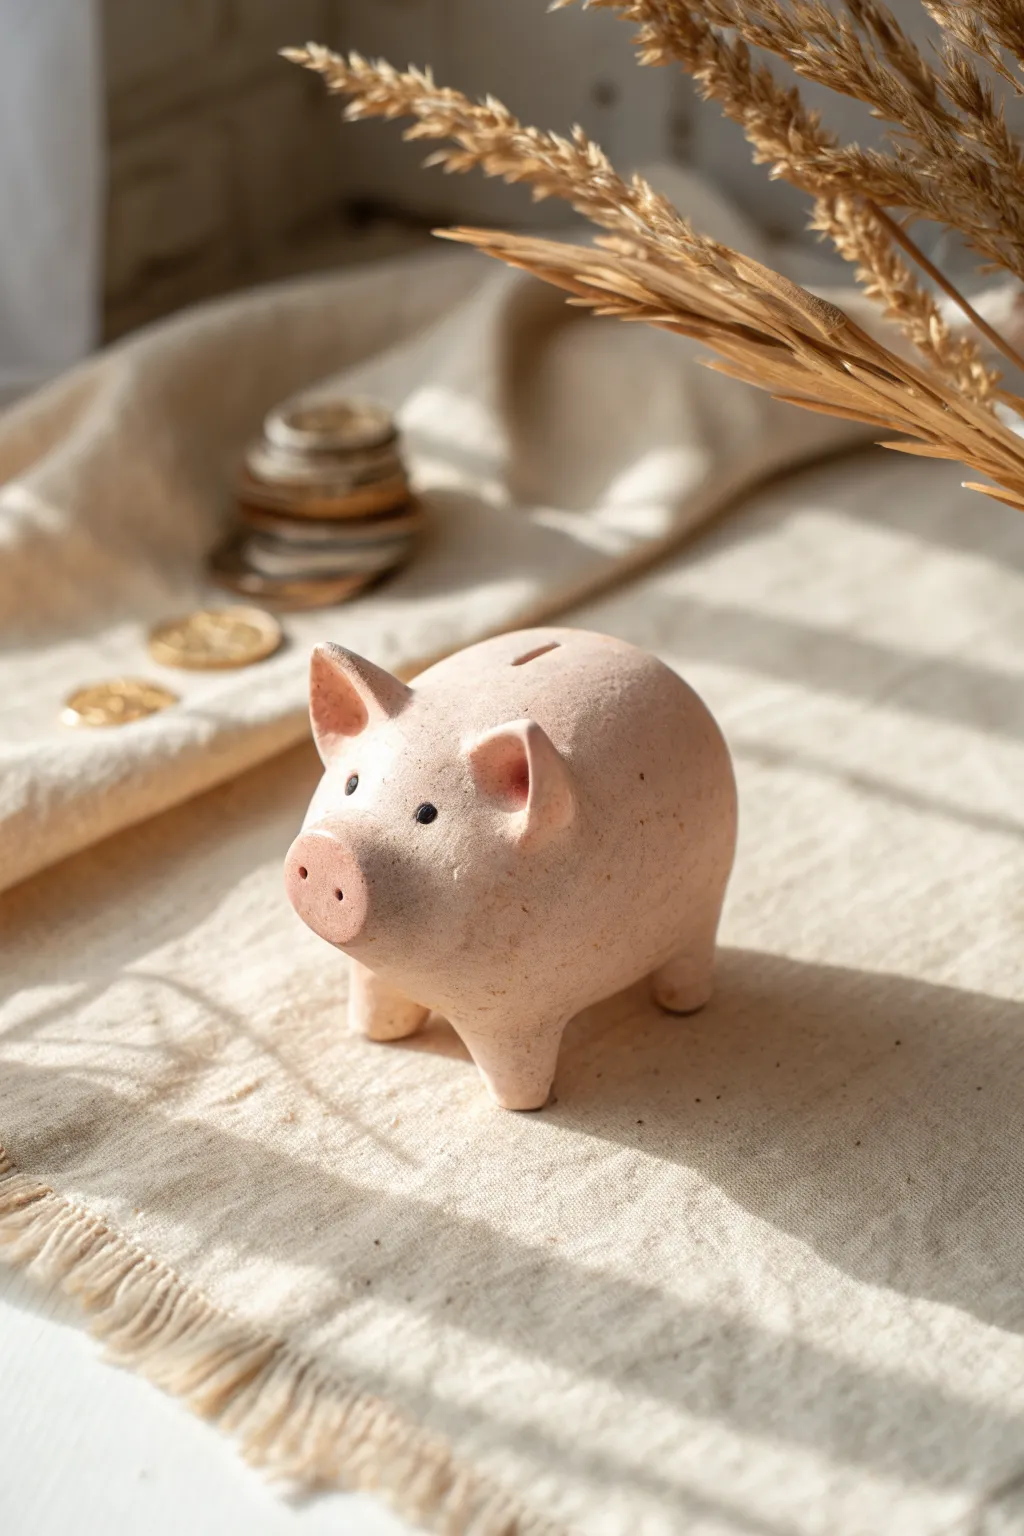
Sculpt this adorable, palm-sized piglet that captures a charming, rustic aesthetic with its textured finish and natural pinkish-beige tone. This project embraces imperfections, giving your little piggy a unique personality while keeping your spare change safe.
Step-by-Step Tutorial
Materials
- Air-dry clay (stone, terracotta, or white colored)
- Acrylic paint (pale pink, beige, brown)
- Small black beads or black clay for eyes
- Sculpting tools (needle tool, small slightly curved tool)
- Small sponge or toothbrush for texture
- Water in a small cup
- Clear matte varnish (optional)
Step 1: Forming the Body
-
Prepare the Clay:
Begin by conditioning a handful of air-dry clay. Knead it until it’s soft, pliable, and free of cracks. If you want a custom color, mix a tiny drop of pale pink and beige acrylic paint directly into the white clay before sculpting. -
Shape the Base:
Roll the clay into a smooth ball slightly larger than a tennis ball, then gently elongate it into a stout oval or egg shape. This will be the main body of your piggy. -
Flatten the Bottom:
Tap the bottom of the oval gently against your work surface. This creates a slightly flat belly area which will help the legs attach more securely later. -
Create the Coin Slot:
Using a flat sculpting tool or a popsicle stick, carefully press a slot into the top center of the pig’s back. Make it wide enough for a thick coin to pass through, smoothing the edges with a wet finger.
Hollow it Out
For a lighter piggy bank that dries faster, wrap a ball of aluminum foil in clay as the core. Just remember to dig out the foil through the coin slot before it fully hardens.
Step 2: Legs and Features
-
Looking for Legs:
Roll four equal-sized small balls of clay, roughly the size of large marbles. These will become the legs. -
Shape the Limbs:
Taper each ball slightly into a cone shape. The wider end will be the top of the leg, and the narrower, flat end will be the hoof. -
Attach the Legs:
Score (scratch) the attachment points on both the body and the legs, add a dab of water or slip, and press the legs firmly onto the bottom of the body. Blend the clay seams upward until they disappear. -
Check Stability:
Set the pig down on its feet. Gently press from the top to ensure it stands evenly. If it wobbles, adjust the leg angles or tap the pig on the table to level the feet. -
Form the Snout:
Roll a small ball of clay and flatten it into a button shape. Attach this to the front of the face, blending the back edges onto the head while keeping the front edge crisp. -
Detail the Snout:
Use a needle tool or the end of a paintbrush to poke two distinct nostrils into the flat button nose. This instantly gives the pig character. -
Make the Ears:
Create two small triangles of clay. Gently curve them to create a cupped shape, resembling a petal or a leaf. -
Attach the Ears:
Place the ears on top of the head, just behind the eyes’ location. Blend the base of the ears into the head, keeping the pointed tips perky and alert.
Tail Twist
Don’t forget the back! Roll a tiny, thin snake of clay and curl it into a tight spring spiral. Attach it to the pig’s rear for that classic curly tail silhouette.
Step 3: Texture and Finishing
-
Add Texture:
To get that rustic look shown in the photo, gently dab a textured sponge or an old toothbrush over the semi-smooth surface. Avoid the snout to keep it distinct. -
Insert the Eyes:
Press two small black beads into the clay for eyes. Alternatively, use a tool to make small indentations that you can paint black after drying. -
Dry Completely:
Allow your piggy to dry for 24-48 hours. Turn it over occasionally so the belly dries evenly. -
Color Wash:
If you used uncolored clay, mix a very watered-down beige-pink paint. Brush this ‘wash’ over the pig and wipe parts off with a rag to let the texture catch the pigment. -
Adding Speckles:
I like to finish by flicking a toothbrush with diluted brown paint over the pig to create tiny, natural-looking speckles. -
Seal:
Protect your work with a coat of clear matte varnish to preserve the earthy texture.
Place your new friend on a shelf to start collecting coins in style
Spotted Cow Cutie
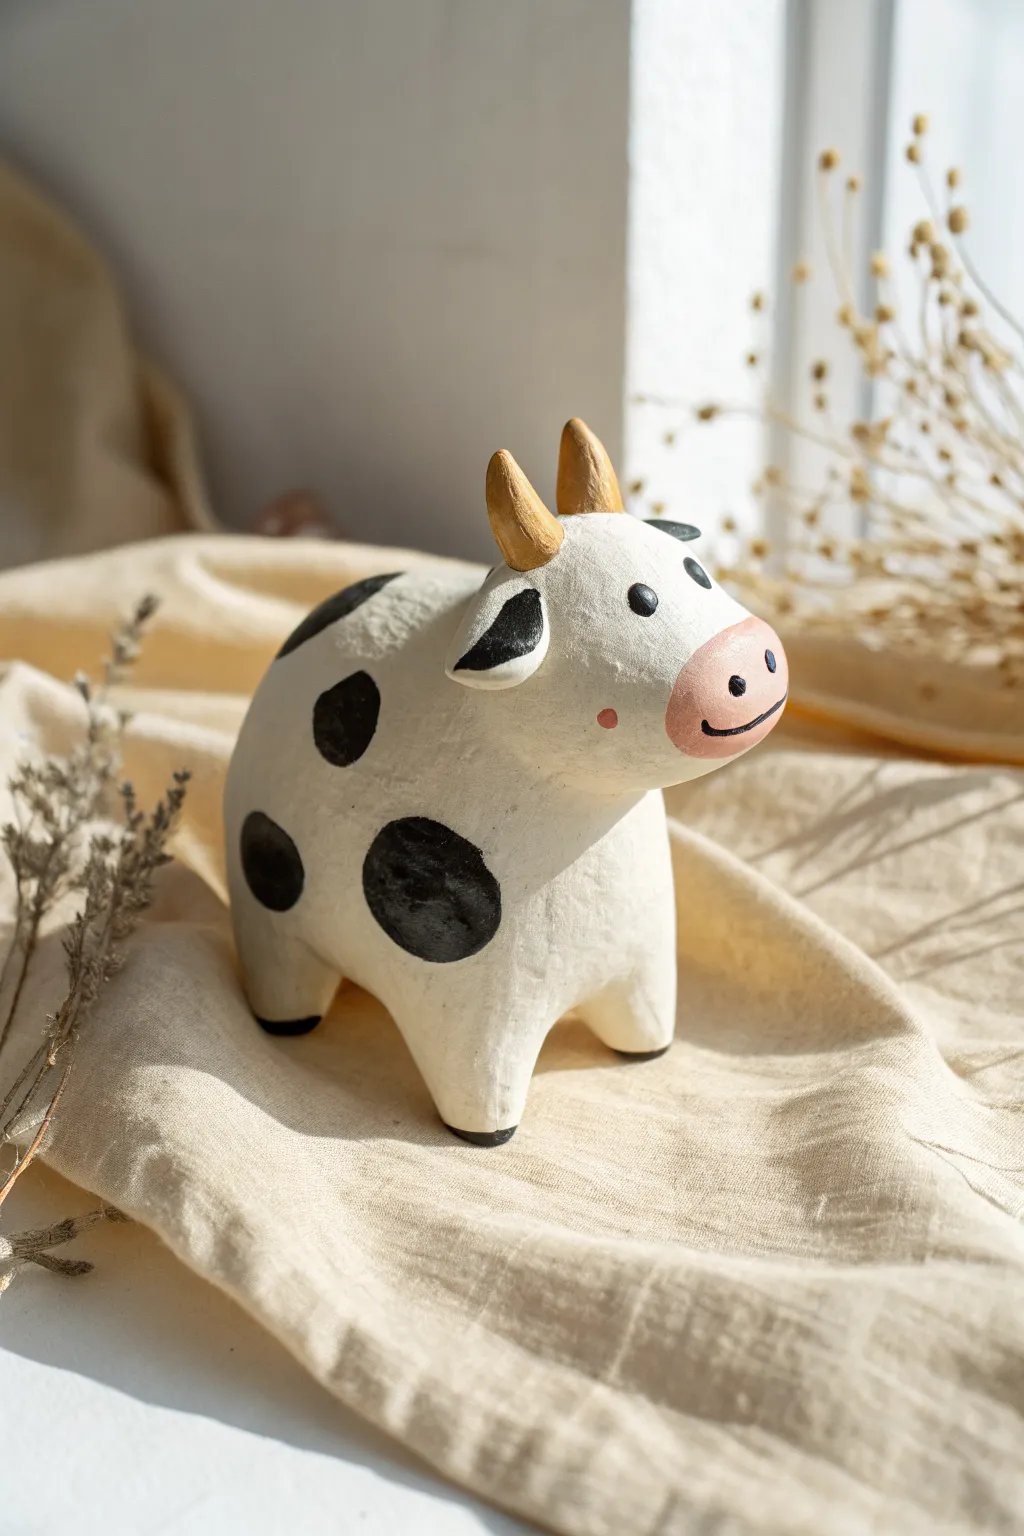
Moo-ve over ordinary crafts, this adorable little bovine is here to steal your heart with its golden horns and sweet expression. Using simple shapes and air-dry clay, you’ll sculpt a sturdy, charming figurine that looks perfect on any sunny windowsill.
How-To Guide
Materials
- White or light grey air-dry clay (approx. 200g)
- Acrylic paints: White, Black, Metallic Gold, Pale Pink
- Fine-grit sandpaper
- Paintbrushes (medium flat and fine detail)
- Cup of water
- Clay sculpting tools (or a toothpick)
- Gloss or matte varnish (optional)
Step 1: Shaping the Body
-
Prepare the base:
Start by taking a large handful of air-dry clay and kneading it until it is soft and conditioned. Roll it into a smooth, solid ball to remove any air bubbles. -
Form the torso:
Gently gently squeeze and roll the ball into a thick, rounded cylinder shape. One end should be slightly tapered and lifted—this will become the neck and head area. -
Define the head:
Use your thumb and forefinger to pinch out a head shape from the tapered end. Unlike a horse, a cow needs a blunt, boxy muzzle, so flatten the front face slightly. -
Pull the legs:
Instead of attaching separate legs, try pulling them from the main body mass for better stability. Pinch four short, stout stumps from the corners of the belly area and flatten the bottoms so it stands on its own.
Smoother Sailing
Keep a small bowl of water nearby while sculpting. Regularly dipping your finger and running it over the clay ‘erases’ cracks instantly before they dry.
Step 2: The Details
-
Shape the ears:
Roll two very small teardrops of clay. Flatten them slightly and press them onto the sides of the head, just behind where the eyes will go. Gently curve the tips downward for a relaxed look. -
Create the horns:
Roll two small cones of clay, smaller than the ears. Attach them to the top of the head, pointing slightly outward and upward. Use a dab of water or slip to ensure they bond securely. -
Smooth the surface:
Dip your finger in a little water and smooth out any fingerprints or cracks on the cow’s body. Pay close attention to the joints around the ears and horns. -
Drying time:
Set your cow aside in a cool, dry place. Depending on the thickness, it will need 24-48 hours to dry completely. Rotate it occasionally so the belly dries evenly.
Make a Herd
Change the horn color to silver or copper, or swap the black spots for brown to create a diverse herd of barnyard friends.
Step 3: Bringing it to Life
-
Sand imperfections:
Once fully dry and hard, take your fine-grit sandpaper and gently buff away any rough textures or bumps to create a smooth surface for painting. -
Base coat:
Paint the entire cow with a creamy white acrylic paint. It might need two coats to look opaque and solid. Let this dry completely before moving on. -
Paint the muzzle:
Mix a soft, pale pink and carefully paint the oval area of the nose and mouth. Add two tiny pink dots on the cheeks for a blushing effect. -
Add the spots:
Using black paint, create large, organic round shapes on the body. Don’t worry about making them perfect circles; irregular ‘cow spots’ look more natural. -
Gild the horns:
Using a small detail brush, paint the horns with metallic gold paint. This adds a whimsical, elevated touch to the rustic clay texture. -
Define the face:
With your finest brush or a black paint pen, draw two small dots for eyes, two tiny nostrils on the pink snout, and a curved line for the smile. -
Finish the details:
Paint the inside of the ears black and add black ‘hooves’ by painting the very bottom of each leg. -
Seal the deal:
Protect your paint job with a layer of varnish. I find a matte finish keeps the natural look, but gloss works if you want a ceramic feel.
Enjoy your charming new desk companion or gift it to a friend who loves farm animals


What Really Happens Inside the Kiln
Learn how time and temperature work together inside the kiln to transform clay into durable ceramic.
Fluffy Little Sheep
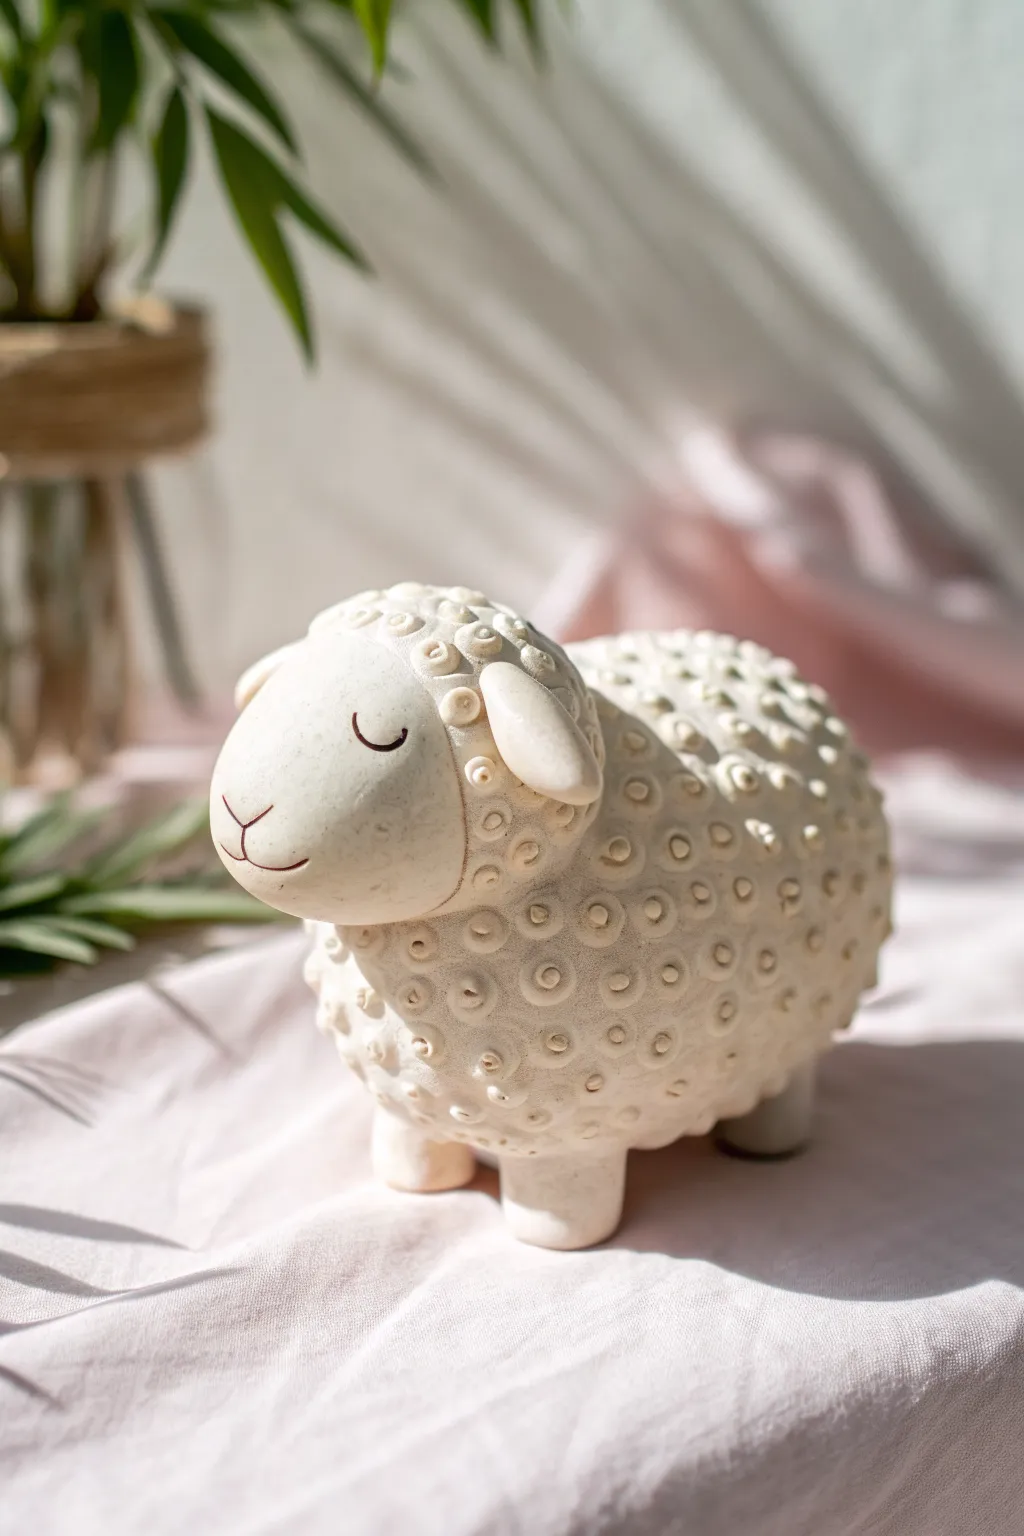
This adorable, chubby sheep figurine brings a touch of pastoral charm to any shelf with its unique circular-punched texture and serene expression. Crafted from air-dry clay, its sturdy, rounded form is emphasized by the repeated dimpled pattern that mimics fluffy wool in a modern, stylized way.
Step-by-Step
Materials
- White or cream air-dry clay
- Small rolling pin
- Small hollow straw or round piping tip (for texture)
- Clay sculpting tools (needle tool, curved smoothing tool)
- Water in a small cup
- Fine-grit sandpaper
- Brown acrylic paint
- Fine detail paintbrush
- Matte varnish (optional)
Step 1: Forming the Body Construction
-
Shape the main body:
Begin by conditioning a large ball of clay roughly the size of a grapefruit. Roll it between your palms until it is a smooth, elongated oval shapes, slightly fatter on one end for the chest area. -
Create the head:
Roll a smaller ball of clay, about one-third the size of the body. Shape this into a smooth, slightly flattened teardrop. The rounded end will be the face, while the tapered end will attach to the body. -
Attach the head:
Score the surface of the body where the head will go and the back of the head piece. Apply a dab of water or clay slip, then press the pieces firmly together. Use a sculpting tool to blend the seam at the neck until invisible. -
Add the legs:
Form four stout, cylindrical logs of clay for legs. Keep them short and thick to support the sheep’s weight. Attach them to the belly using the score-and-slip method, blending the seams upward into the body for a seamless transition. -
Verify balance:
Stand the sheep on a flat surface. Gently press down to flatten the bottoms of the feet and ensure the figurine stands stable and doesn’t rock. Adjust the leg positions if necessary.
Leg stability issues?
If the legs are squishing under the body’s weight, insert short lengths of toothpick inside each leg as an armature. This acts like a skeleton to support the heavy body while drying.
Step 2: Refining Details and Texture
-
Make the ears:
Shape two small, flattened teardrops for ears. Attach them to the sides of the head, just behind where the face starts to curve. Angle them slightly downward for a relaxed look. -
Smooth the face:
Before texturing, use a slightly damp finger or sponge to ensure the face area remains perfectly smooth. The contrast between the smooth face and textured body is key to this design. -
Add the tail:
Roll a tiny nub for the tail and attach it to the rear. It should be small and unobtrusive, blending into the body shape. -
Begin texturing:
Using a small hollow straw, a retracted mechanical pen tip, or a small piping nozzle, press gently into the soft clay on the body. This creates the ‘wool’ texture. Avoid the smooth face and the very bottom of the feet. -
Vary the pattern:
I prefer to stamp the circles in a random, dense pattern rather than neat rows. Make sure to cover the back, sides, chest, and even part of the top of the head around the ears. -
Detail the circles:
For added depth, you can take a smaller tool (like a toothpick tip) and make a tiny prick in the center of some of the larger stamped circles, creating a button-like effect. -
Inscribe the face:
Using a very fine needle tool, gently carve two U-shaped arches for closed, sleeping eyes. Draw a small ‘Y’ shape for the nose and mouth. Keep the lines clean and simple.
Texture variation
Don’t press every circle to the exact same depth. Varying the pressure creates a more organic, bubbly look that catches the light better than a uniform, flat surface.
Step 3: Finishing Touches
-
Dry thoroughly:
Let the sheep sit in a dry area for at least 24 to 48 hours. Turn it gently occasionally so the belly dries evenly. -
Sand imperfections:
Once fully dry, lightly sand any rough spots on the face or feet. Be careful not to sand down your beautiful stamped texture. -
Paint the features:
Dip a fine detail brush into brown acrylic paint. Carefully trace the carved lines of the eyes and mouth to define them. If you prefer a softer look, wipe away excess paint immediately so it only stays in the crevices. -
Final coat:
To protect your work, brush on a layer of matte varnish. This seals the clay and enhances the natural stone-like color without making it too shiny.
Place your finished sheep near a window where the light can catch all those wonderful textures you created
Penguin in a Cozy Pose
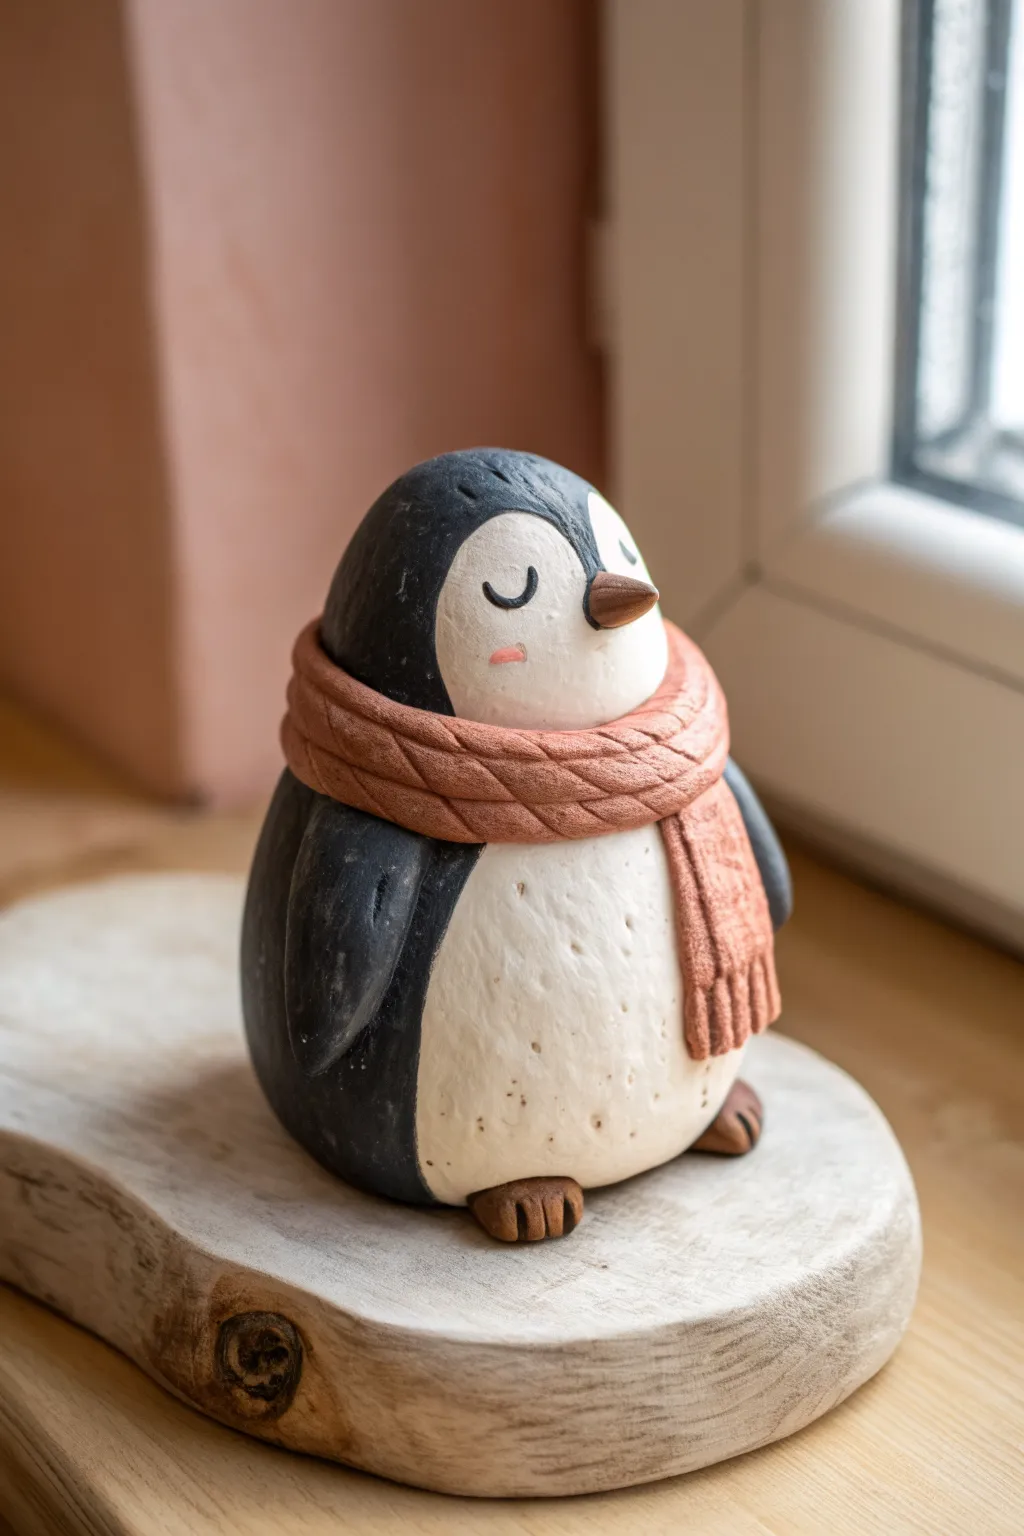
This adorable chilly friend brings winter charm to any shelf with its snuggly pink scarf and peaceful expression. Using simple shapes and careful texturing, you’ll create a stylized penguin with a hand-carved look that feels rustic and sweet.
Step-by-Step Guide
Materials
- Air-dry clay (white)
- Acrylic paints (black, white, dusty pink/salmon, brown)
- Matte varnish or sealant
- Sculpting tools (needle tool, small ball stylus)
- Soft synthetic brushes
- Small cup of water
- Fine-grit sandpaper (optional)
Step 1: Shaping the Base
-
Form the Body:
Start with a generous handful of white air-dry clay. Roll it into a smooth ball, then gently roll it on your work surface to elongate it slightly into a large egg shape. The bottom should be slightly wider than the top to give the penguin a stable, chubby look. -
Flatten the Base:
Tap the bottom of your egg shape firmly against your table to create a flat standing surface. Check that the figure stands straight without wobbling. -
Smooth the Surface:
Dip your finger in a tiny bit of water and rub it over the clay to remove any cracks or fingerprints. This is crucial for that smooth, stone-like finish later.
Crack Control
If small cracks appear while drying, don’t panic. Mix a tiny bit of fresh clay with water to make a paste and fill the cracks, then smooth with a damp finger.
Step 2: Adding Features
-
Create flippers:
Roll two smaller balls of clay about the size of large marbles. Flatten them into teardrop shapes. -
Attach the Flippers:
Score the sides of the body and the back of the flippers (scratch cross-hatching marks). Add a dab of water or clay slip, then press the flippers onto the sides of the body, blending the top seam smooth so they look integrated. -
Make the Beak:
Roll a very tiny cone of clay. Attach it to the center of the face area, pointing slightly downward. Blend the back edge of the cone onto the face carefully. -
Make the Feet:
Create two small, flattened ovals for feet. Use a knife tool to press three vertical indentations into each for toes. Slip and score these to attach them peeking out from under the belly.
Winter Display
Glue your finished penguin onto a small wood slice (often found at craft stores). Add a dusting of artificial snow or white glitter around the feet for extra frostiness.
Step 3: The Cozy Scarf
-
Roll the Scarf Coil:
Roll a long, even snake of clay. It needs to be long enough to wrap around the penguin’s neck with extra length for the hanging tail. -
Flatten the Clay:
Gently press down on the snake to flatten it into a thick ribbon shape, roughly uniform in width. -
Add Texture:
Before attaching, use a needle tool to press diagonal hatch marks all along the strip to mimic a knit pattern. I find doing this while the clay is flat on the table prevents distorting the shape later. -
Wrap it Up:
Drape the scarf around the penguin’s neck area (where the head meets the body). Cross one end over the other at the front-right side. -
Create the Tails:
Let one end hang down the front of the belly. Trim the ends cleanly. Use your needle tool to add vertical fringe lines at the very bottom of the scarf tails. -
Drying Time:
Let the sculpture dry completely. This usually takes 24-48 hours depending on thickness. It should feel room temperature, not cool to the touch.
Step 4: Painting & Finishing
-
Base Body Coating:
Paint the entire belly and face area with an off-white or cream acrylic paint. Don’t use stark white; a warmer creamy tone looks more natural. -
Applying the Black:
Paint the back, top of the head, and flippers with matte black paint. Carefully curve the line around the face to create that classic ‘heart-shaped’ hairline penguins have. -
Adding Speckles:
Mix a very watery tan or light brown paint. Load a toothbrush or stiff brush and flick tiny speckles onto the white belly area to give it a stone-like texture. -
Painting the Scarf:
Paint the scarf a dusty pink or salmon color. You might need two coats to get into the textured grooves. -
Highlighting the Knit:
Once the scarf is dry, dry-brush a slightly lighter shade of pink over the raised texture to make the ‘knitting’ pop. -
Facial Details:
Use a fine liner brush or a black paint pen to draw two small ‘U’ shapes for sleeping eyes. Paint the beak a warm brown and add a tiny pink blush oval on the cheek. -
Seal the Work:
Once all paint is fully dry, apply a coat of matte varnish. Avoid glossy finishes, as the matte look mimics the stone/ceramic aesthetic of the original image.
Place your cozy little penguin on a windowsill to enjoy the winter view

TRACK YOUR CERAMIC JOURNEY
Capture glaze tests, firing details, and creative progress—all in one simple printable. Make your projects easier to repeat and improve.
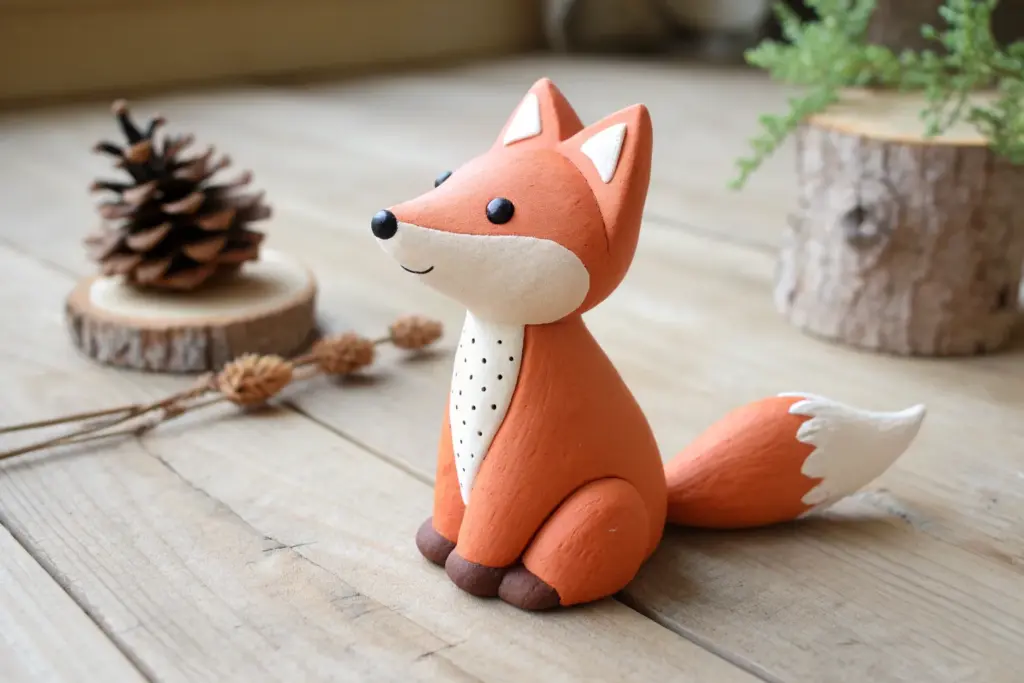
Curly-Tailed Fox
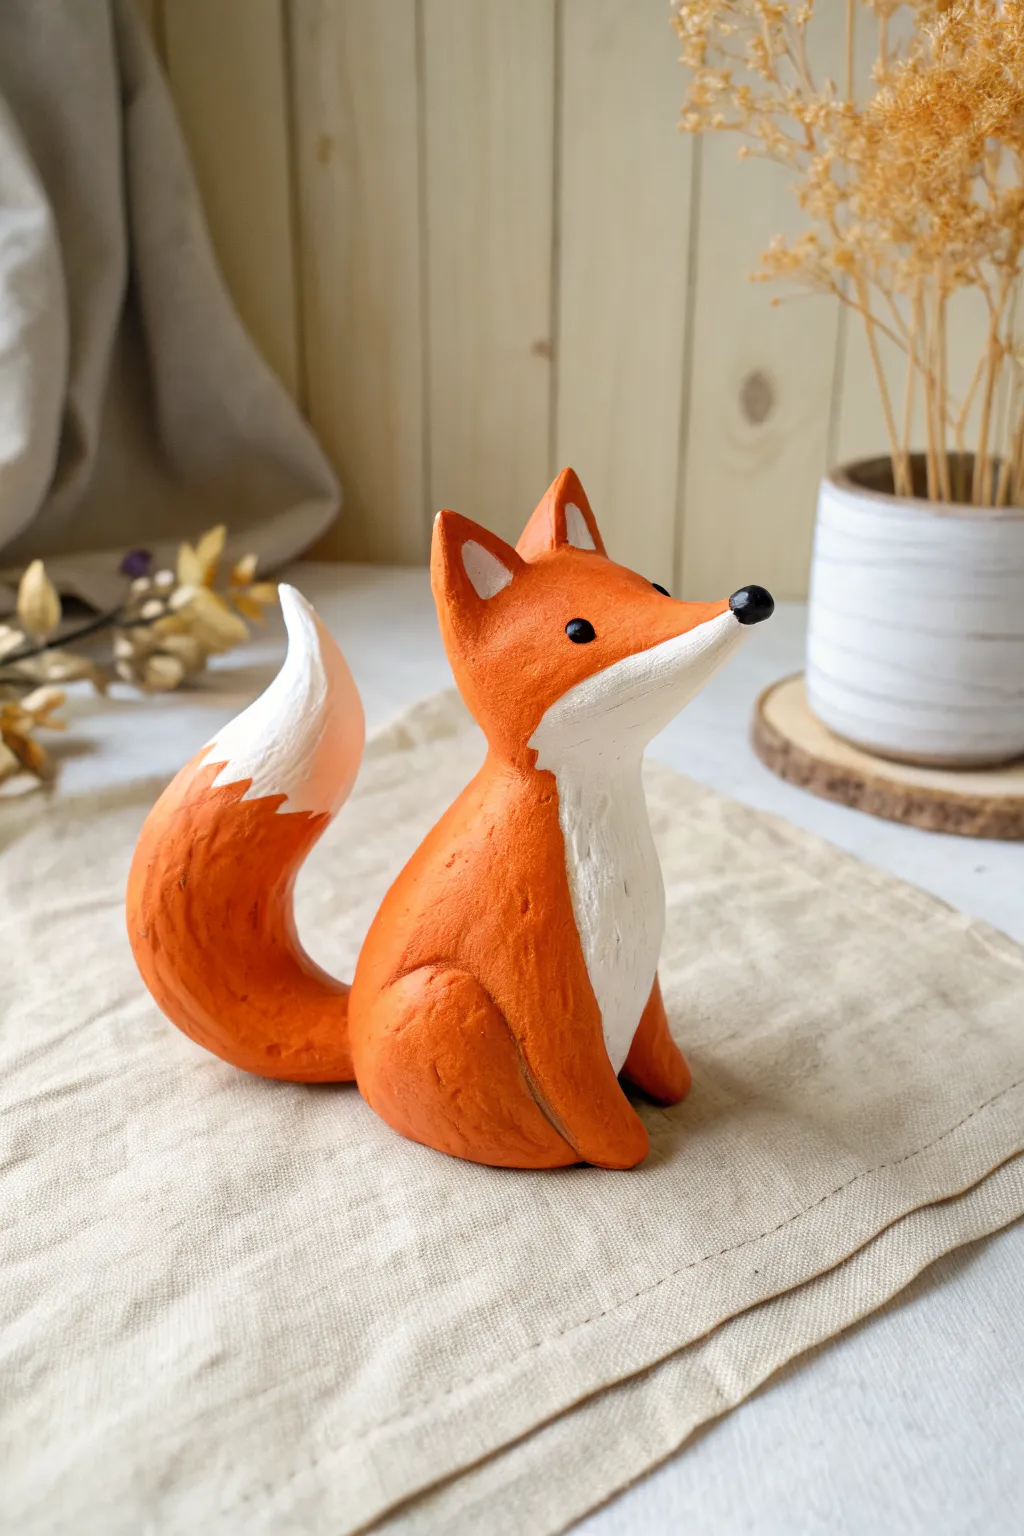
Capture the charm of the forest with this adorable, curly-tailed fox sculpture. Its simple, sleek lines and bright colors make it a delightful project that brings a touch of woodland magic to any shelf.
How-To Guide
Materials
- Air-dry clay (white or terracotta)
- Acrylic paints (bright orange, white, black)
- Fine grit sandpaper
- Small paintbrushes (round and detail)
- Water cup
- Sculpting tools or toothpicks
- Matte varnish (optional)
Step 1: Shaping the Body
-
Form the Base:
Start with a ball of clay roughly the size of a tangerine. Roll it into a smooth, slightly elongated teardrop shape to form the main body. The wider bottom will be the seated area, tapering up to where the neck begins. -
Create the Head:
Roll a smaller ball of clay for the head. Shape it into a softened triangle, pulling one side out gently to form the pointed snout. Smooth the clay so the transition from forehead to nose is gradual. -
Attach Head to Body:
Score the top of the body and the bottom of the head with a needle tool or toothpick. Apply a dab of water or clay slip, press the pieces together firmly, and blend the seam until invisible using your thumb or a smoothing tool. -
Add the Ears:
Form two small triangles for the ears. Attach them to the top of the head using the scoring and slipping method. Gently pinch the tips to make them sharp and alert. -
Shape the Hind Leg:
Create a flattened oval of clay for the fox’s haunch. Press this onto the side of the body near the base to suggest a seated leg. Blend the edges into the main body so it looks like a natural muscle bulge rather than a stuck-on piece. -
Construct the Tail:
Roll a thick snake of clay, tapering it at both ends. This needs to be substantial—about the same volume as the body—to get that plush look. -
Pose the Tail:
Curve the tail into a prominent ‘C’ or ‘S’ shape. Attach the thicker base to the back of the fox, blending the seams very well for stability. Curl the tip upward so it frames the fox’s back.
Step 2: Refining and Drying
-
Smooth the Surface:
Dip your finger in a little water and run it over the entire sculpture to remove fingerprints and minor cracks. I find using a very soft, slightly damp brush works wonders for tight spots around the ears. -
Check Balance:
Set the fox down on a flat surface to ensure it sits stable without tipping over. If it wobbles, gently tap the base against the table to flatten it. -
Dry Thoroughly:
Let the fox dry completely. This usually takes 24 to 48 hours depending on thickness and humidity. Rotate it occasionally so the bottom dries evenly. -
Sand Imperfections:
Once bone dry, use fine-grit sandpaper to buff away any remaining lumps or rough textures, focusing on the blended seams and the tip of the tail.
Crack Control
If tiny cracks appear while drying, don’t panic! Mix a tiny bit of fresh clay with water to make a paste and fill them in before painting.
Step 3: Painting
-
Base Coat:
Apply a solid coat of white acrylic paint over the entire figure. This acts as a primer and ensures your orange will look vibrant later. -
Apply the Orange:
Paint the body, head, ears, and most of the tail with a bright orange. Leave the chest, the bottom of the snout, and the very tip of the tail white. -
Paint the Chest Patch:
Using white paint, carefully define the chest area. Create a bib shape that starts under the chin and flows down the front of the body. You can use a purposefully scratchy stroke at the edges to mimic fur texture. -
Detail the Tail Tip:
Paint the tip of the tail white. Use a small brush to create a jagged, zig-zag transition between the orange and white paint to simulate fluffy fur layers. -
Face Details:
Use a fine detail brush to paint the inside of the ears white. Paint a small black nose on the very point of the snout. -
Add the Eyes:
Paint two small, solid black circles for the eyes. Positioning them slightly wide apart gives the fox a sweet, innocent expression. -
Seal:
Once the paint is completely dry, apply a coat of matte varnish to protect your work and give it a professional, finished look.
Textured Touch
Before the clay dries, use a stiff bristle brush to tap texture onto the orange parts of the clay for a realistic fur effect.
Place your woodland friend near a potted plant or on a windowsill to enjoy its cheerful presence every day
Wide-Eyed Owl Buddy
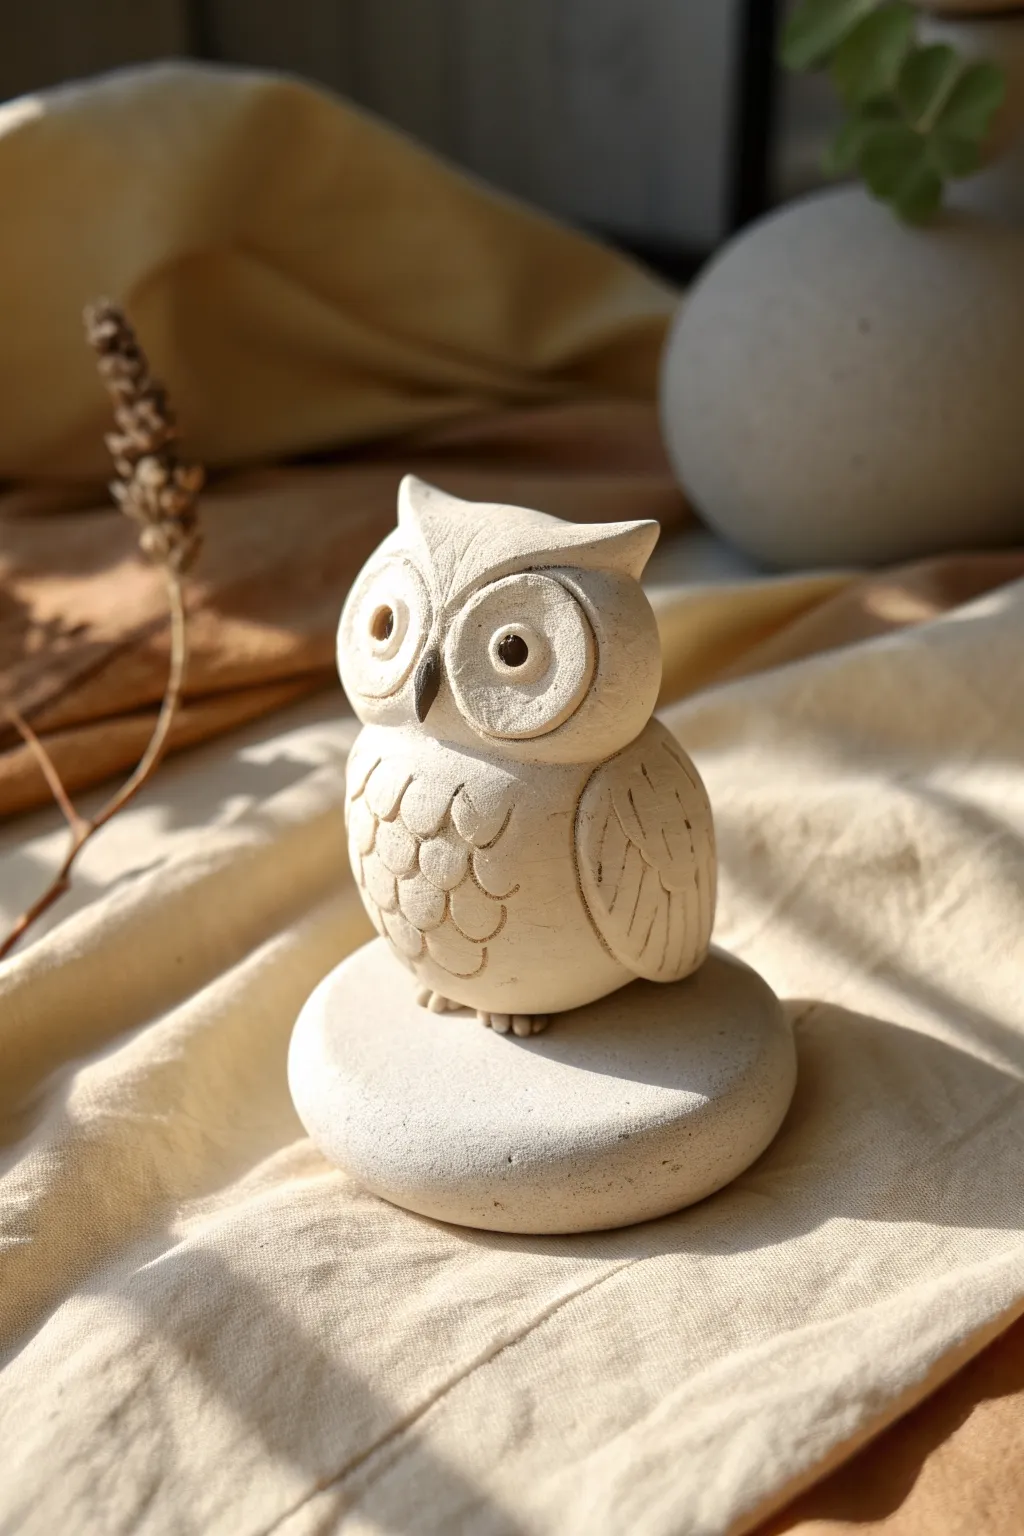
This charming, wide-eyed owl statue brings a touch of wisdom and whimsy to any shelf. Crafted from white air-dry clay, its stone-like texture and minimalist design make it a timeless piece of decor that’s surprisingly simple to sculpt.
Step-by-Step Guide
Materials
- White air-dry clay (stone or ceramic effect preferred)
- Small rolling pin
- Modeling tools (needle tool, small loop tool)
- Two small black beads (for pupils)
- Water in a small cup
- Fine grit sandpaper
- A small round cookie cutter (optional)
- Acrylic matte varnish (optional)
Step 1: Forming the Base Structure
-
Create the perch:
Start by rolling a ball of clay roughly the size of a tangerine. Flatten it gently into a thick, rounded disc to serve as the stone base. -
Shape the owl’s body:
Roll a second, slightly smaller ball for the owl itself. Gently shape it into an oval or egg shape, keeping the bottom flatter so it sits securely on your base. -
Define the head:
Pinch the top third of the egg shape slightly to distinguish the head from the body, but don’t separate them completely; you want a cohesive, solitary form. -
Sculpt the ears:
At the very top of the head, pinch two small tufts of clay upwards and outwards to create the classic horned owl ear shape. Smooth the connection points with a wet finger. -
Attach body to base:
Score the bottom of the owl and the top of the base with your needle tool. Apply a dab of water (slip) and press the owl firmly onto the perch.
Cracking Up?
If small cracks appear while drying, don’t panic. Mix a tiny bit of fresh clay with water to make a paste and fill the cracks, then smooth it over.
Step 2: Adding Facial Features
-
Make the eye discs:
Roll two small spheres of clay and flatten them into identical discs. Attach these to the face area using a little water, pressing them down so they merge slightly with the head. -
Indent the eyes:
Using a rounded tool or the back of a pen, press into the center of each eye disc to create a concave socket. -
Add the pupils:
Press a small black bead deeply into the center of each socket. If you prefer an all-clay look, you can use tiny balls of black clay instead. -
Form the beak:
Roll a tiny cone of clay for the beak. Attach it vertically right between the two eye discs, blending the top edge into the forehead area. -
Define the eyebrows:
Use a needle tool or small knife to lightly carve a brow line above the eyes, connecting it to the ear tufts for a continuous flow.
Wise Upgrade
Before drying, poke a small hole in the top of the head and insert a hook to turn this sculpture into a heavy-duty ornament or paperweight.
Step 3: Detailing and Texture
-
Create the wings:
Roll two flat teardrop shapes for wings. Attach them to the sides of the body, curving them slightly around the belly. -
Detail the feathers:
On the wings, use your needle tool to carve long, vertical lines to represent flight feathers. I like to vary the pressure here to make the feathers look more natural. -
Texture the chest:
Using a U-shaped loop tool or the end of a straw cut in half, press rows of ‘scales’ onto the owl’s chest to mimic fluffy down feathers. Start from the bottom and overlap them as you move up. -
Add tiny claws:
Roll tiny little ovals and attach them at the very bottom of the owl where it meets the stone base to suggest toes gripping the perch. -
Refine the surface:
Look over the entire sculpture. Smooth out any unwanted fingerprints with a slightly damp brush or your finger, but leave some texture to maintain the stone look. -
Dry completely:
Let the owl sit in a dry, room-temperature spot for 24-48 hours. Turn it occasionally if possible to ensure even drying. -
Final polish:
Once bone dry, you can lightly sand any rough edges. If you want a protective finish, apply a coat of matte varnish.
Your stoic little owl is now ready to keep watch on your desk
Elephant With an Upturned Trunk
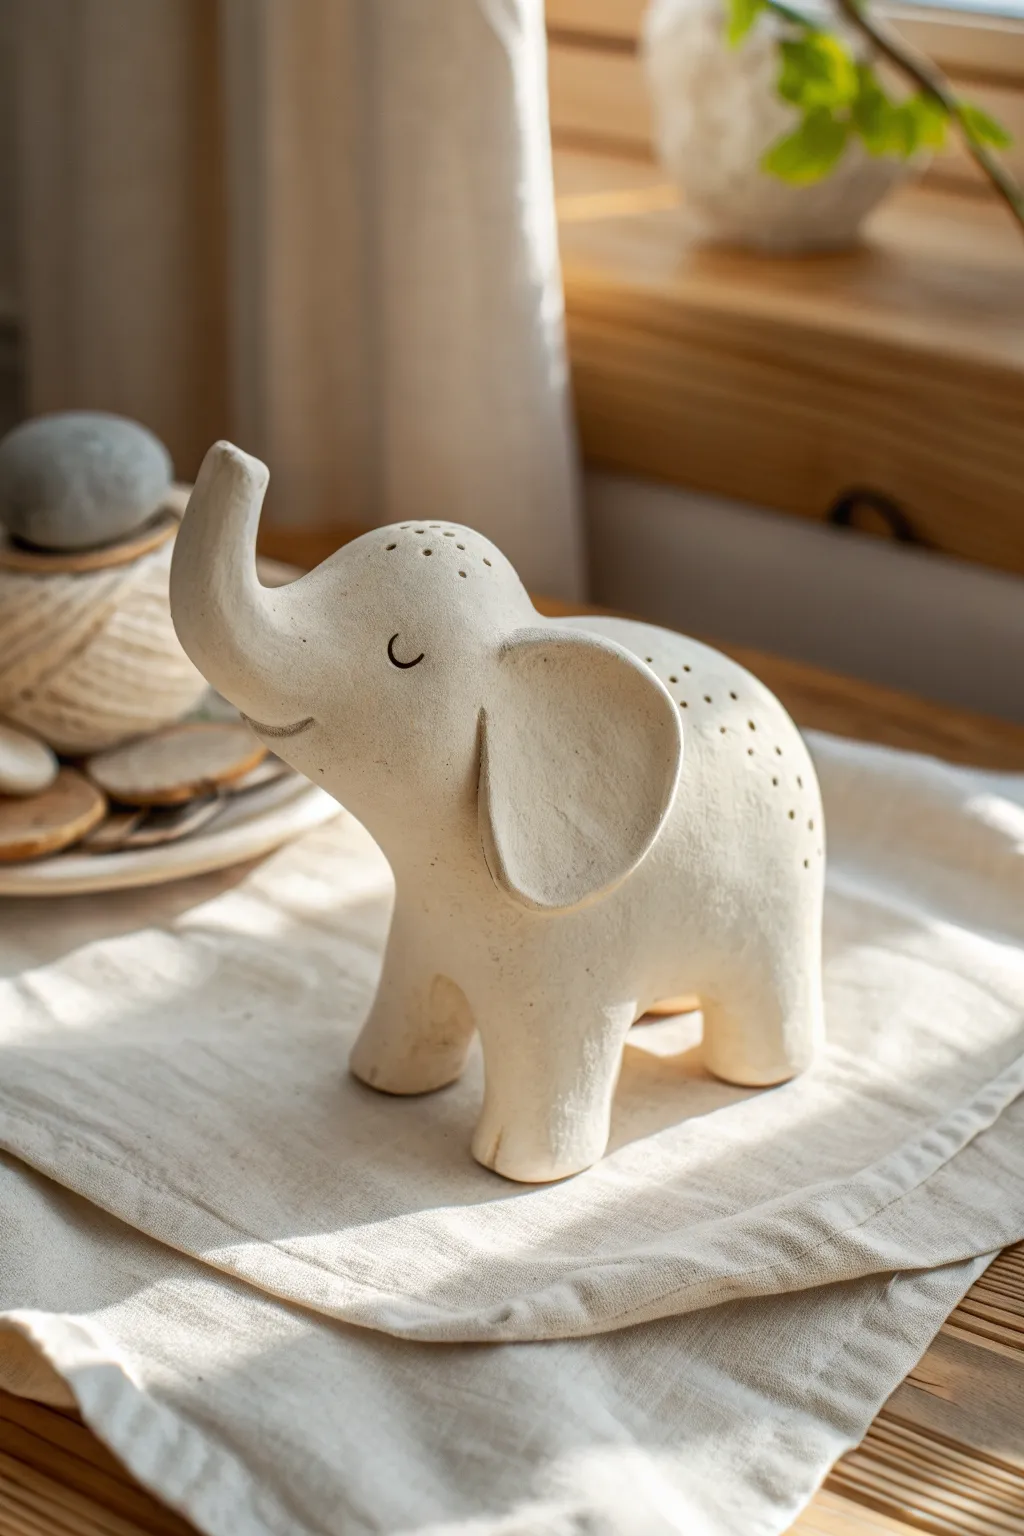
Sculpt a symbol of good luck with this charming, minimalist elephant featuring an upturned trunk and a sweet smile. Its smooth, stone-like texture and simple lines make it a calming addition to any shelf.
Step-by-Step Tutorial
Materials
- White or cream air-dry clay (smooth texture)
- Small rolling pin
- Modeling tools (needle tool, blending tool)
- Cup of water
- Sponge or fine sandpaper
- Slip (clay mixed with water)
- Black fine-tip marker or acrylic paint
- Optional: Clear matte varnish
Step 1: Forming the body
-
Create the main mass:
Begin with a fist-sized ball of well-conditioned clay. Roll it between your palms until it is smooth and free of major cracks. Gently elongate it into an oval or bean shape to form the main torso. -
Pull down the legs:
Instead of attaching separate legs, try gently pulling four sturdy stumps directly from the underside of your oval. Use your thumbs to coax the clay downwards, keeping the limbs thick and stable. -
Flatten the base:
Tap the bottom of the legs against your work surface to create flat feet. Ensure the elephant stands squarely on all four limbs without wobbling. -
Smooth the underbelly:
Use a damp finger to smooth out the area between the legs, creating a gentle curve for the belly. The transition from leg to body should be seamless.
Trunk Sagging?
If the trunk droops while drying, support it with a crumpled piece of paper towel or small foam wedge until the clay hardens enough to hold its own weight.
Step 2: Sculpting the Head and Trunk
-
Shape the head:
Roll a slightly smaller ball of clay for the head. Attach it to the front of the body using the score-and-slip method: scratch both joining surfaces, add a dab of clay water (slip), and press firmly together. -
Blend the neck:
Drag clay from the head down onto the body and from the body up onto the head to erase the seam. Smooth this area thoroughly with a wet finger so the neck looks integrated. -
Extend the trunk:
Pinch the front of the head and gently pull the clay outward and upward to form the trunk. I tend to make the base thick and taper it towards the tip for a more natural look. -
Curl the tip:
Curve the end of the trunk strictly upwards. This upturned gesture is key to the friendly expression. -
Refine the face:
Press lightly into the sides of the head to flatten the cheeks slightly, giving the head a defined structure rather than just a round ball.
Make it a Set
Create a whole herd by making two smaller versions to trail behind the parent. Vary the trunk positions slightly for each one to give them unique personalities.
Step 3: EARS AND DETAILS
-
Make the ears:
Flatten two identical balls of clay into large, thin teardrop or D-shapes. These should be generous in size relative to the head. -
Attach the ears:
Score and slip the flat side of the ears and press them onto the sides of the head. Blend the back edge of the ear into the head/neck, but leave the front flap slightly loose to look like a separate flap of skin. -
Add the smile:
Use a needle tool or a small curved sculpting tool to impress a simple, upturned arc for the mouth on one or both sides just below the trunk. -
Add decorative texture:
Using a needle tool, poke a pattern of tiny holes along the spine or top of the head for a stylized texture, mimicking the pores seen in the reference image. -
Final smoothing:
Dip a sponge in water and squeeze it out until almost dry. Wipe the entire surface of the elephant to remove fingerprints and create a unifying, matte texture.
Step 4: Finishing Touches
-
Dry thoroughly:
Let the sculpture dry completely for 24-48 hours. Turn it occasionally so the belly dries evenly. -
Sand imperfections:
Once fully dry, use fine-grit sandpaper to gently buff away any remaining rough spots or bumps. -
Paint the eye:
Using a fine-tip black marker or a thin brush with black paint, draw a small ‘U’ shape for a closed, sleeping eye. Add tiny eyelashes if you like. -
Seal (Optional):
Protect your work with a coat of matte varnish. This preserves the natural ‘stone’ look while sealing the clay against moisture.
Place your finished elephant near a window for a serene decorative touch
Patterned Shell Turtle
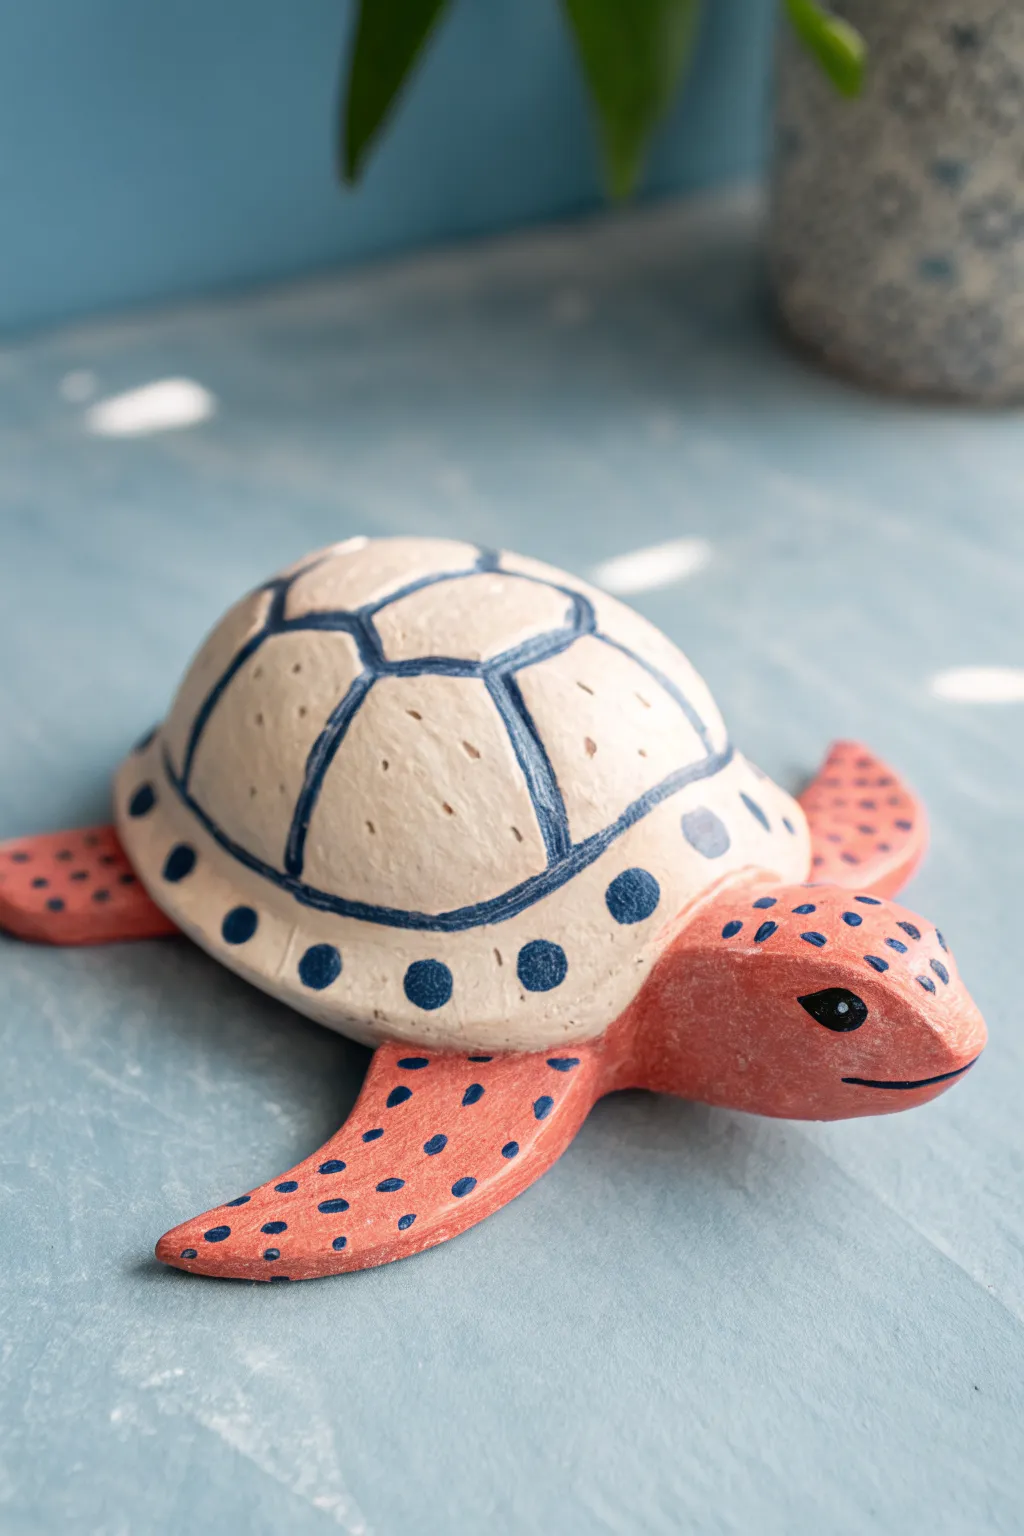
Bring a touch of the ocean to your desk with this charming clay turtle featuring a patterned shell and vibrant coral flippers. Its friendly expression and distinctive navy blue markings make it a delightful project for crafters of all skill levels.
Step-by-Step
Materials
- White baking clay or air-dry clay
- Acrylic paints: Coral/Salmon pink, Cream/Off-white, Navy Blue
- Mod Podge or satin varnish
- Sculpting tools (needle tool, smoothing tool)
- Fine detail paintbrush (size 0 or 1)
- Medium flat paintbrush
- Foil (for the shell armature)
- Rolling pin
- Water cup and paper towels
Step 1: Sculpting the Base Form
-
Create the shell armature:
To save clay and keep the turtle light, crunch up a ball of aluminum foil into a dome shape roughly the size of a tangerine. Press it firmly so it is dense and smooth. -
Cover the shell:
Roll out a sheet of white clay just under a quarter-inch thick. Drape this over your foil dome, smoothing it down the sides to create the main shell shape. Trim away the excess clay at the bottom edge. -
Form the underbelly:
Flip the dome over. Press a flat oval of clay onto the bottom to cover the exposed foil, blending the seams where it meets the top shell until completely smooth. -
Sculpt the head:
Roll a sphere of clay regarding the size of a walnut. Shape it slightly into a teardrop. -
Attach the head:
Press the wider end of the teardrop onto the front of the shell body. Blend the clay well at the neck joint so it doesn’t fall off later. Use a little water if you are using air-dry clay to help the bond. -
Create the flippers:
Form four boomerang-like shapes from clay. The front flippers should be slightly longer and more curved than the back ones. Flatten them gently so they look like paddles. -
Attach the flippers:
Position the flippers under the shell body. The front ones should angle backward slightly, and the rear ones should peek out from the back. Blend the connection points underneath firmly. -
Add detail:
Using a needle tool, lightly etch a smile onto the face. I find it helpful to start the smile low on the face for a cuter expression. Check the overall shape and smooth out any fingerprints with a damp finger. -
Dry or Bake:
Follow the instructions for your specific clay. If baking, let it cool completely before painting. If air-drying, allow at least 24-48 hours until fully hard.
Smooth Moves
Before painting, lightly sand the dried clay with fine-grit sandpaper. This removes bumps and makes the painted lines look much crisper.
Step 2: Painting and Patterning
-
Base coat the shell:
Paint the entire shell dome with the cream or off-white acrylic paint. You may need two thin coats to get solid coverage. -
Paint the body:
Paint the head and all four flippers with the coral or salmon pink color. Be careful where the flippers meet the shell to keep a clean line. -
Add shell segments:
Using your fine detail brush and navy blue paint, draw the pattern on the shell. Start with a central hexagon at the very top, then draw lines extending down to create the surrounding plates. -
Outline the rim:
Paint a line around the base of the shell dome, separating the main shell pattern from the rim area. -
Create the dot pattern:
Dip the handle end of a paintbrush into the navy blue paint to create consistent dots. Place one large dot in the center of each rim segment along the bottom of the shell. -
Add smaller spots:
Using the same blue, paint tiny, random speckles or small dashes on the coral-colored flippers and the top of the head for texture. -
Paint the eye:
Paint a sleek, almond-shaped eye in black or dark navy on the side of the head. Add a tiny white reflection dot once dry to bring it to life. -
Define the mouth:
Carefully trace the etched smile line with the darker blue or black paint using your finest brush. -
Seal the project:
Once all paint is perfectly dry, apply a coat of satin varnish or Mod Podge to protect the finish and give the shell a gentle sheen.
Wobbly Lines?
If your hand shakes while painting thin lines on the shell, try using a navy blue acrylic paint marker instead of a brush for better control.
Place your finished turtle on a shelf or use it as a cheerful paperweight to brighten your workspace
Frog on a Lily Pad
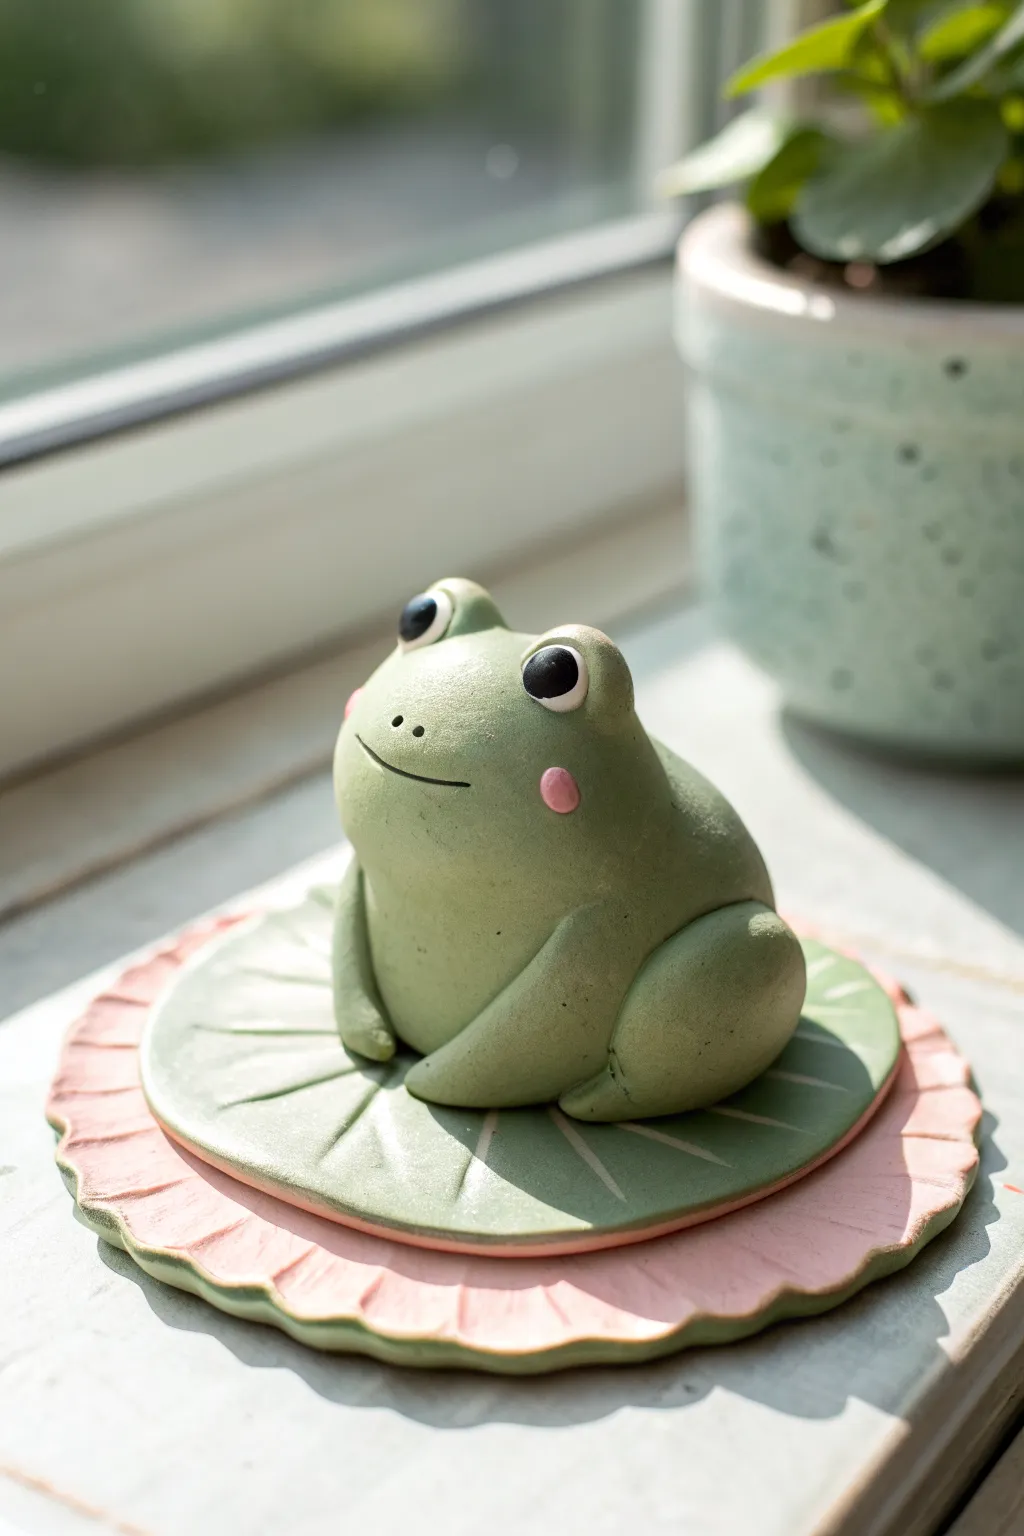
Hop into crafting with this adorable, minimalist frog perching happily on a layered lily pad base. The soft matte finish and simple geometric shapes make this a perfect beginner project that captures a charming, peaceful vibe.
Step-by-Step Tutorial
Materials
- Air-dry clay (white)
- Acrylic paints (sage green, pastel pink, black, white)
- Clay sculpting tools (needle tool, modeling ball tool)
- Rolling pin
- Circle cutters (two sizes)
- Water bonding slip (water mixed with a little clay)
- Fine grit sandpaper
- Matte sealant or varnish
Step 1: Sculpting the Base Layers
-
Mix your colors:
Before sculpting, it is best to tint your clay. Mix a portion of white clay with sage green paint until uniform. Mix a second, larger portion with a tiny drop of pastel pink for the bottom flower layer. -
Create the pink petal base:
Roll out the pink clay to about 1/4 inch thickness. Use your larger circle cutter to stamp out a round base. If you don’t have a cutter, trace a jar lid and cut with a knife. -
Add texture to the pink layer:
Using a blunt tool or the handle of a paintbrush, gently press vertical indentations around the rim to create a ruffled, petal-like edge. -
Form the green lily pad:
Roll out the green clay slightly thinner than the pink layer. Cut a circle using the smaller cutter so it nests perfectly inside the pink base. -
Detail the leaf veins:
Use a needle tool or knife to score a pattern of radiating lines from the center of the green circle out to the edges. Don’t cut all the way through; just create surface impressions. -
Assemble the base:
Apply a small dab of water or slip to the center of the pink pad and gently press the green pad on top. Let this base dry partially while you work on the frog so it holds its shape.
Smooth Operator
To get that porcelain-like finish, keep a small bowl of water nearby. Frequently wet your fingertips while smoothing the clay to buff out any micro-cracks before they dry.
Step 2: Forming the Frog Body
-
Shape the main body:
Take a generous ball of green clay and roll it into a very smooth sphere. Gently tap the bottom on your work surface to flatten it slightly so it sits stable. -
Refine the shape:
With your palms, gently narrow the top of the sphere just a tiny bit to distinguish the head area, though this frog style keeps the head and body mostly fused in a cute lump shape. -
Create the front legs:
Roll two small, thick logs of green clay. Attach them vertically to the front of the body, blending the top seam into the body with water so they look like one continuous piece. -
Add the hind legs:
Form two larger teardrop shapes for the powerful back legs. Attach these to the sides of the body, pressing the rounded part against the lower flank. Blend the seams smoothly. -
Make the eye sockets:
Roll two small balls of green clay and attach them to the top of the head for the eye mounds. Use a ball tool directly on the front of these mounds to create sockets for the eyes. -
Insert the eyes:
Roll tiny balls of black clay (or paint white clay black) and press them firmly into the sockets you just made. Add a minuscule dot of white paint to each pupil for a reflection.
Cracks? No Problem
If hairline cracks appear while drying, mix a tiny bit of fresh clay with water to make a paste. Fill the crack, smooth it over with a wet finger, and let it dry again.
Step 3: Finishing Details
-
Sculpt the face:
Use a needle tool to press two tiny nostrils into the snout area. For the mouth, use a thin blade to carefully press a wide, gentle smile into the clay. -
Add rosy cheeks:
Take two minuscule balls of pink clay, flatten them into discs, and press them onto the cheeks just below the eyes. Blend the edges very slightly for a soft look. -
Attach frog to base:
Score the bottom of the frog and the center of your lily pad. Apply slip and press the frog firmly into place. -
Smooth and dry:
Dip your finger in water and run it over the entire sculpture to remove any fingerprints. Set the piece aside in a cool, dry place for at least 24-48 hours. -
Seal:
Once fully dry, apply a coat of matte varnish. This brings out the colors and protects the clay from moisture.
Place your little amphibian friend on a windowsill or desk to bring a touch of nature indoors
Smiley Axolotl Mini
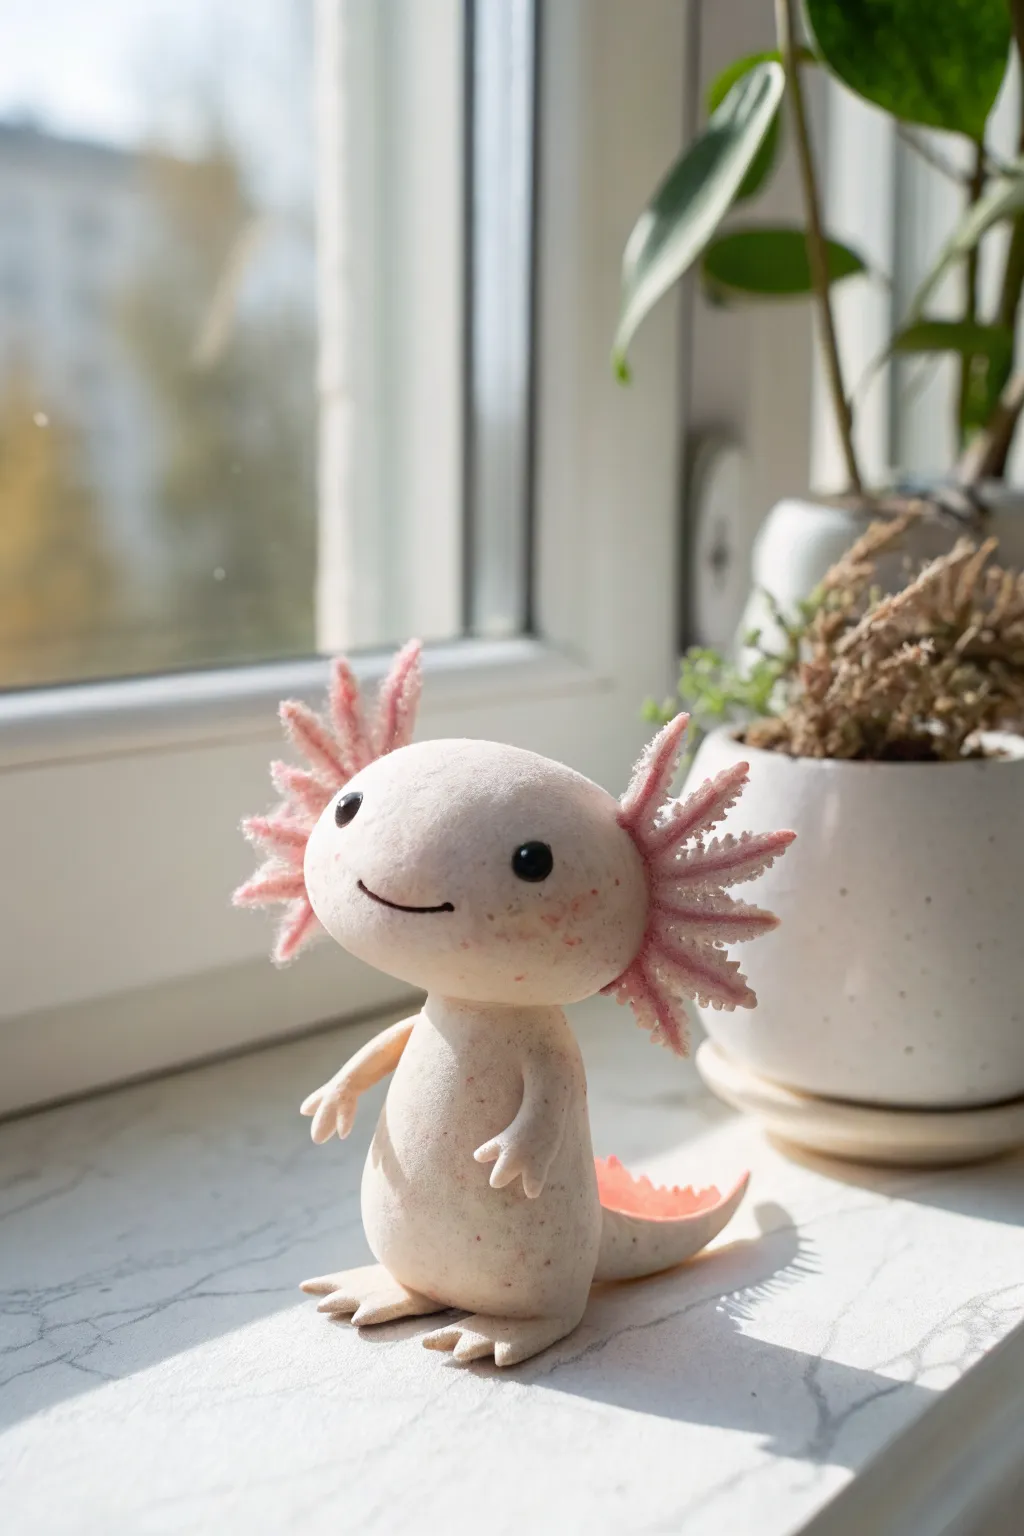
Capture the whimsy of a magical aquatic friend with this adorable standing axolotl figurine. Its gentle, speckled texture and feathery pink gills give it a soft, lifelike quality that looks perfect perched on a windowsill.
How-To Guide
Materials
- White air-dry clay (foam or velvet clay works best for this texture)
- Pink air-dry clay (soft pastel shade)
- Basic sculpting tools (needle tool, ball stylus)
- Acrylic paints: Black, dark pink/magenta
- Fine-tipped paintbrush or dotting tool
- Old toothbrush or stiff bristle brush (for texturing)
- Small piece of wire or toothpick (for armature support)
Step 1: Forming the Body Base
-
Create the core:
Start by rolling a ball of white clay roughly the size of a tangerine for the body. Gently shape it into a pear form, flattening the bottom slightly so your axolotl can stand upright. -
Add stability:
Insert a toothpick or small wire vertically into the neck area of the pear shape. This will keep the large head secure later on. -
Shape the head:
Roll a second, slightly smaller ball for the head. Press it gently into an oval shape, keeping it nice and chubby. Push this onto the exposed neck support found on the body. -
Blend the seams:
Use a little bit of water on your finger or a smoothing tool to seamlessly blend the neck connection so the head looks like a natural extension of the body.
Step 2: Limbs and Tail
-
Sculpt the tail:
Form a thick, tapered snake of white clay. Flatten the top ridge slightly to mimic a fin. Attach this to the lower back of the body, blending the clay smoothly into the torso. Curve the tail slightly to the side for a dynamic pose. -
Make the legs:
Roll two short, thick sausages for the hind legs. Attach them to the bottom sides of the body. Use a needle tool to press three small indentations into the ends to create little toes. -
Balance check:
Before the clay dries, stand your figure up. Adjust the tail and feet positions to ensure it stands firmly on its own without tipping over. -
Add the arms:
Create two smaller, thinner sausage shapes for the arms. Attach them high on the chest, curving them slightly forward. Gently flatten the tips and cut tiny notches for fingers.
Fixing Cracks
If you see hairline cracks as the air clay dries, mix a tiny bit of fresh clay with water to make a paste (slip) and smooth it into the cracks with your finger.
Step 3: Detailed Features
-
Prepare the gills:
Mix a small amount of pink clay with white to get a pale blush tone. Roll out six small, tapered spikes—three for each side of the head. -
Attach the gills:
Press the pink spikes onto the sides of the head behind where the eyes will go. Arrange them in a fanned-out pattern. -
Add gill texture:
Using a needle tool or small scissors, make many tiny snips or indentations all over the pink gills to create that feathery, coral-like appearance shown in the photo. -
Create the tail fin:
With the same pink clay, add a thin, wavy strip along the top ridge of the tail you made earlier. Texture this to match the gills for continuity. -
Texturizing the skin:
Take a stiff toothbrush and gently dab it all over the white body and head. This removes the plastic shine and gives the clay that soft, organic ‘velvet’ look.
Level Up: Glossy Eyes
Make your axolotl look truly alive by adding a drop of UV resin or high-gloss varnish specifically on the black eye dots. This creates a wet, shiny look.
Step 4: Face and Finishing Touches
-
Sculpt the smile:
Press a curved line into the face using a needle tool or a clay knife to create a wide, happy smile. I like to make the corners fairly deep to emphasize the expression. -
Paint the eyes:
Once the surface is dry to the touch, use black acrylic paint and a dotting tool (or the back of a paintbrush) to place two wide-set, solid black eyes. -
Speckle the skin:
Load a stiff brush with watered-down reddish-pink paint. Run your thumb across the bristles to flick tiny speckles of paint onto the cheeks, body, and tail. Go lightly—you can always add more. -
Refine the mouth:
carefully trace the indented smile line with a very thin brush and dark grey or black paint to make it pop.
Place your finished axolotl near some potted plants to give it a natural, cozy habitat to explore
Capybara With a Citrus Hat
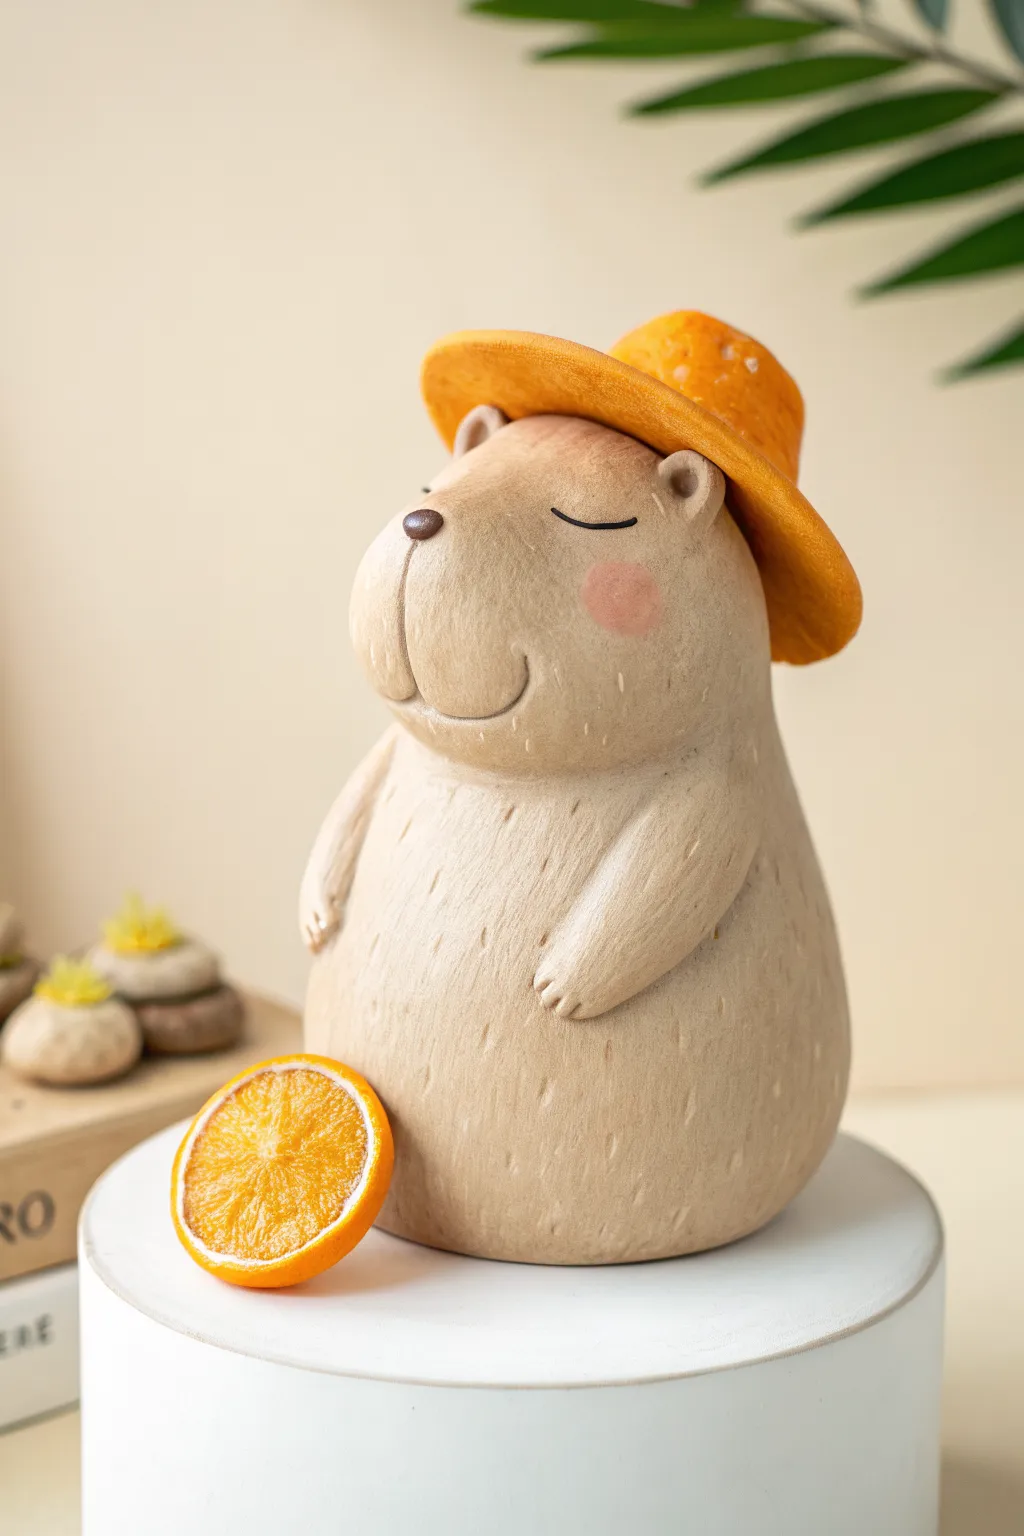
Embrace the chill vibes of the animal kingdom’s friendliest creature with this adorable air-dry clay project. This round, contented capybara sports a playful citrus-textured hat, making it a perfect desk companion to bring a smile to your face.
How-To Guide
Materials
- Air-dry clay (white or beige)
- Acrylic paints (tan/beige, orange, brown, pink, white)
- Clay sculpting tools (needle tool, ball tool)
- Water and a small sponge
- Fine-grit sandpaper
- Paintbrushes (fine detail and flat shader)
- Matte sealant or varnish
Step 1: Sculpting the Base Form
-
Form the main body:
Start with a large ball of clay roughly the size of a tennis ball. Roll it into a smooth pear shape, thicker at the bottom for stability and slightly tapered at the top for the head. -
Create the muzzle:
Take a smaller ball of clay and flatten it slightly into an oval. Press this firmly onto the front of the head area to create the capybara’s distinctive, boxy muzzle. -
Blend the seams:
Using a little water on your finger or a clay tool, smooth the edges where the muzzle meets the head so it looks like one cohesive piece. -
Shape the ears:
Roll two tiny balls of clay for the ears. Press your thumb or a ball tool into the center of each to create an indentation, then attach them to the top sides of the head. -
Add the arms:
Roll two small sausages of clay for the arms. Attach them to the sides of the body, curving them slightly forward so they rest gently on the belly. -
Refine the paws:
Use a needle tool or knife to press small lines into the ends of the arms to suggest toes. -
Texturize the fur:
Take a needle tool and gently press tiny, vertical dashes all over the body. Keep the pressure light; you just want subtle texture, not deep gouges.
Fur Texture Tip
Work in rows from bottom to top when texturing the fur. This ensures the pattern looks natural and layered like real animal hair.
Step 2: Crafting the Citrus Hat
-
Form the hat brim:
Roll out a flat circle of clay. Gently curve the edges upward to create a brim shape and place it on the capybara’s head to check the fit. -
Shape the crown:
Create a half-sphere of clay for the top of the hat. I like to texture this piece by pressing a piece of real orange peel or a coarse sponge against it to mimic citrus skin. -
Assemble the hat:
Score and slip (scratch up the surfaces and add water) the connection points, then press the crown onto the brim. Place the finished hat onto the capybara’s head, tilting it slightly for character. -
Dry the sculpture:
Let the entire piece dry completely. Depending on your clay brand and humidity, this usually takes 24-48 hours. Rotate it occasionally for even drying.
Step 3: Painting and Finishing
-
Sand for smoothness:
Once dry, use fine-grit sandpaper to gently smooth out any rough fingerprints or sharp edges, being careful not to sand away your fur texture. -
Base coat the body:
Paint the entire body with a warm tan or beige acrylic paint. You might need two thin coats for opaque coverage. -
Paint the hat:
Apply a bright fibrous orange color to the hat. Dab the paint on rather than brushing it to enhance the pitted texture. -
Add facial details:
With a fine detail brush and dark brown paint, carefully paint the nose on the tip of the muzzle and draw thin curved lines for the closed, sleepy eyes and mouth. -
Apply blush:
Mix a very watery pink paint or use a dry-brush technique to gently dab rosy cheeks just below the eyes. -
Seal the work:
Protect your capybara with a coat of matte varnish. This unifies the finish and prevents the paint from chipping over time. -
Create the orange slice (optional):
If you want the accessory shown in the image, paint a spare wooden or clay disk orange, adding white radiating lines and a white rim to resemble a fresh orange slice.
Make It a Set
Create a whole family of capybaras with different fruit hats—try a lemon, a strawberry beret, or even a tiny watermelon helmet.
Now you have a serene little friend to keep you company during your creative hours