Whenever I need a fun project that actually gets used, I reach for clay game ideas—they’re creative, practical, and ridiculously satisfying to play after they dry or bake. Here are my favorite tabletop games and playful little builds you can make with air-dry clay or polymer clay.
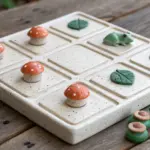
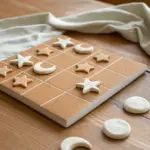
Tic-Tac-Toe Tile Set
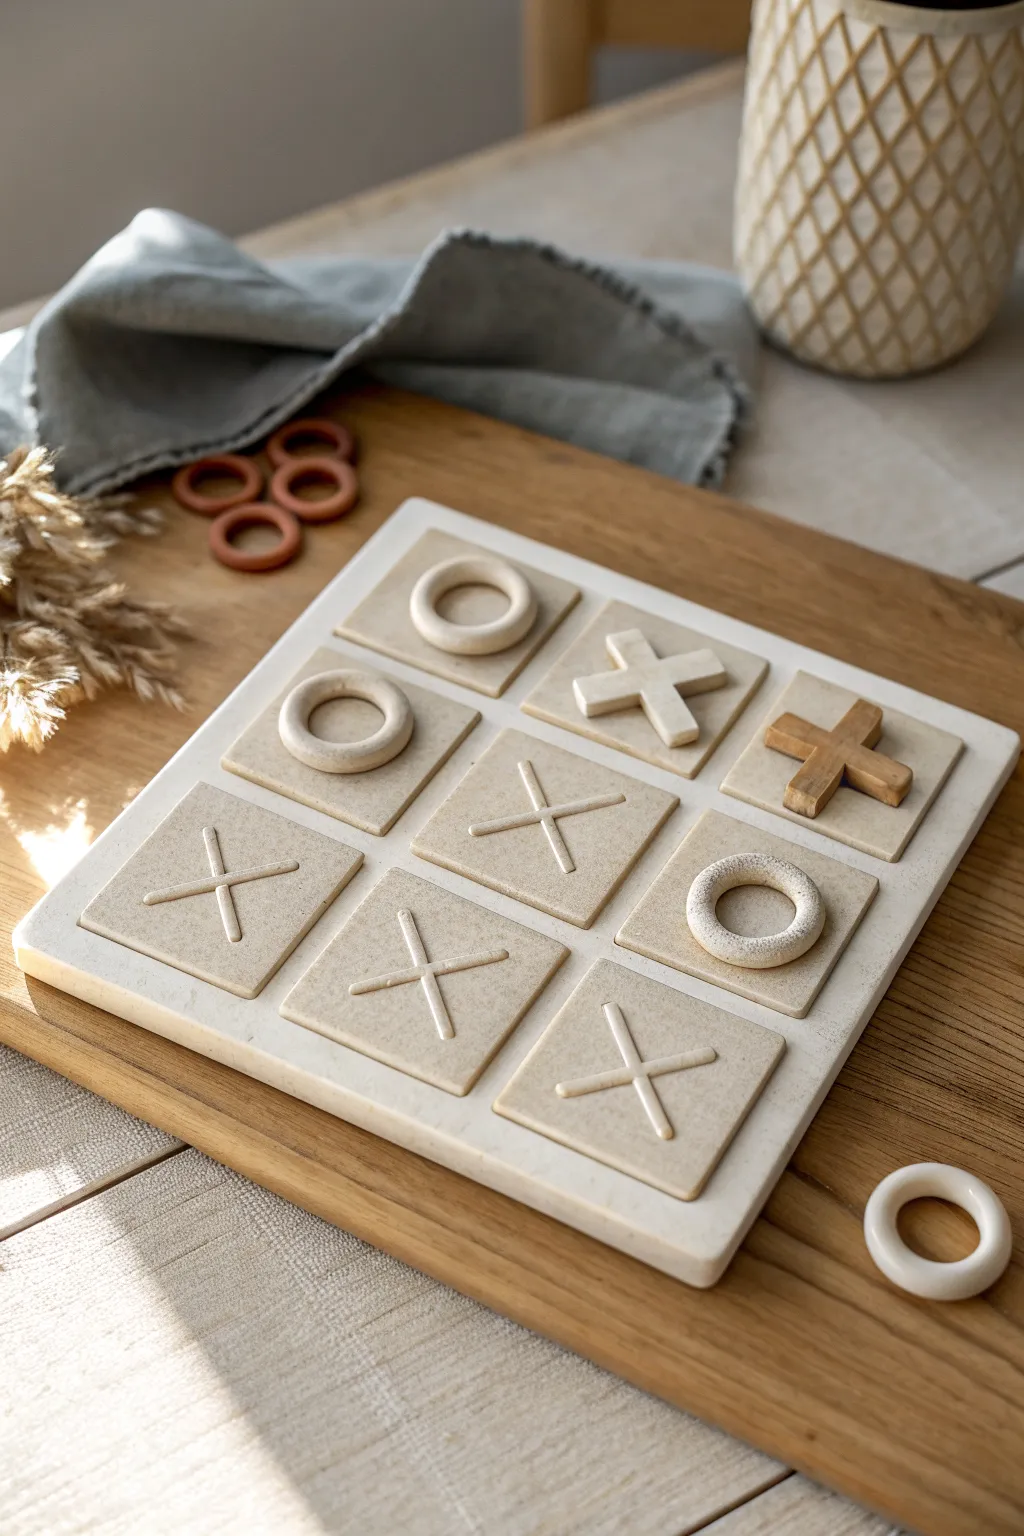
Elevate your coffee table décor with this minimalist Tic-Tac-Toe set that mimics the look of carved limestone. Using speckled clay and geometric precision, you’ll create a sophisticated game board that serves as both entertainment and a sculptural centerpiece.
How-To Guide
Materials
- Speckled polymer clay (stone or granite effect)
- White or beige polymer clay (to lighten the mix)
- Rolling pin with thickness guides
- Square cookie cutters (one large for the base, one smaller for tiles)
- X-acto knife or craft blade
- Small circular cutter (for O pieces)
- Fimo gloss or matte varnish (optional)
- Ruler
- Sandpaper (fine grit)
- Baking sheet and parchment paper
- Acrylic paint in warm wood tone (optional for accent piece)
Step 1: Preparing the Clay Base
-
Mix and condition:
Begin by conditioning your speckled clay until it’s pliable. If the granite effect is too dark, I like to marble in some plain white or beige heavy-body clay to achieve that soft, limestone look seen in the photo. -
Roll the main slab:
Roll out a large slab of clay for the main game board foundation. Aim for a thickness of about 1/4 inch (6mm) to ensure it’s sturdy enough to hold the tiles without warping. -
Cut the base square:
Use a ruler and craft knife to cut a precise large square. This will be the platform for your game. Smooth the edges with your finger or a little water to soften any sharp cuts.
Clean Cuts Pro Tip
Chill your clay sheet in the fridge for 10 minutes before cutting squares. Firm clay cuts much sharper and distorts less than warm, soft clay.
Step 2: Creating the Playing Tiles
-
Roll tile thickness:
Roll out a second portion of clay, slightly thinner than your base—around 1/8 inch (4mm) is ideal for the removable tiles. -
Cut the nine squares:
Using a square cutter or your ruler, cut out nine identical squares. These must be small enough to fit three-across on your base board with a small gap between them. -
Impress or carve the designs:
This set features raised and recessed designs. For the ‘recessed’ tiles, use a clay tool to gently carve an X or press a circle cutter lightly into the surface without cutting all the way through. -
Smooth the tile edges:
Take a moment to tap the edges of each square tile against your work surface. This squares them up and removes the ‘pinched’ look from the cutter.
Step 3: Sculpting the Game Pieces
-
Form the O pieces:
Roll thick snakes of clay and join the ends to form rings. Alternatively, use two circle cutters (one strictly smaller than the other) to punch rings out of a thick slab. -
Shape the X pieces:
Cut two short, thick logs of clay for each X. Make a notch in the center of both logs so they interlock cleanly, or simply press them together firmly and blend the seam on the back. -
Create a wooden accent:
To match the reference, create one X piece that looks like wood. You can sculpt this from brown clay, or shape it from the stone clay and paint it later with a warm ochre wash. -
Test the fit:
Place your X and O pieces onto the square tiles you made earlier to ensure scale. They should sit comfortably within the tile borders.
Troubleshooting Warping
If your large base board isn’t flat after baking, reheat it slightly with a hair dryer until just flexible, then press it under a heavy object until completely cool.
Step 4: Finishing and Assembly
-
Bake the components:
Arrangement is key for baking. Place the large base, the nine square tiles, and the X and O pieces on a parchment-lined baking sheet. Bake according to your clay package variations, usually at 275°F (135°C). -
Cool under weight:
As soon as the flat pieces (base and tiles) come out of the oven, place a heavy book on top of them while they cool. This is my secret to ensuring they stay perfectly flat and don’t curl. -
Paint the accent:
If you created a ‘faux wood’ X piece using white clay, dilute some brown acrylic paint and wash it over the piece, wiping away excess to highlight any texture. -
Sanding for stone texture:
Once fully cool, lightly sand the surfaces of the tiles and the base. This removes fingerprints and enhances the matte, stone-like texture. -
Optional assembly:
You can leave the nine square tiles loose for a modular game, or superglue them onto the large base board for a permanent grid structure. The reference image shows them attached.
Place your finished set on a linen cloth or wooden tray to complete the organic, modern aesthetic
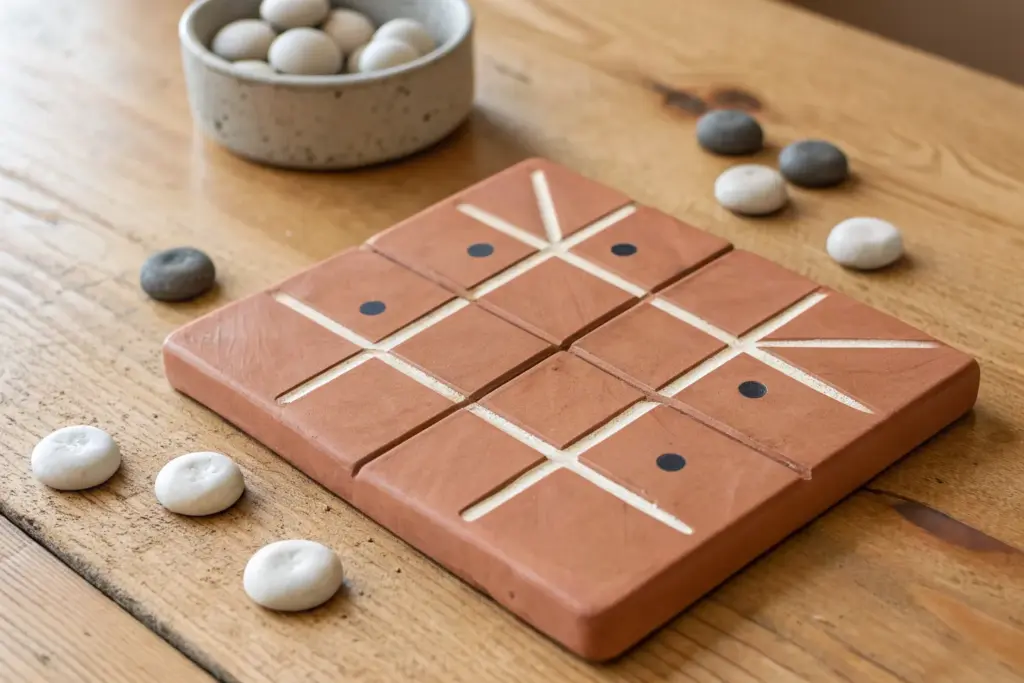
Clay Dominoes With Texture
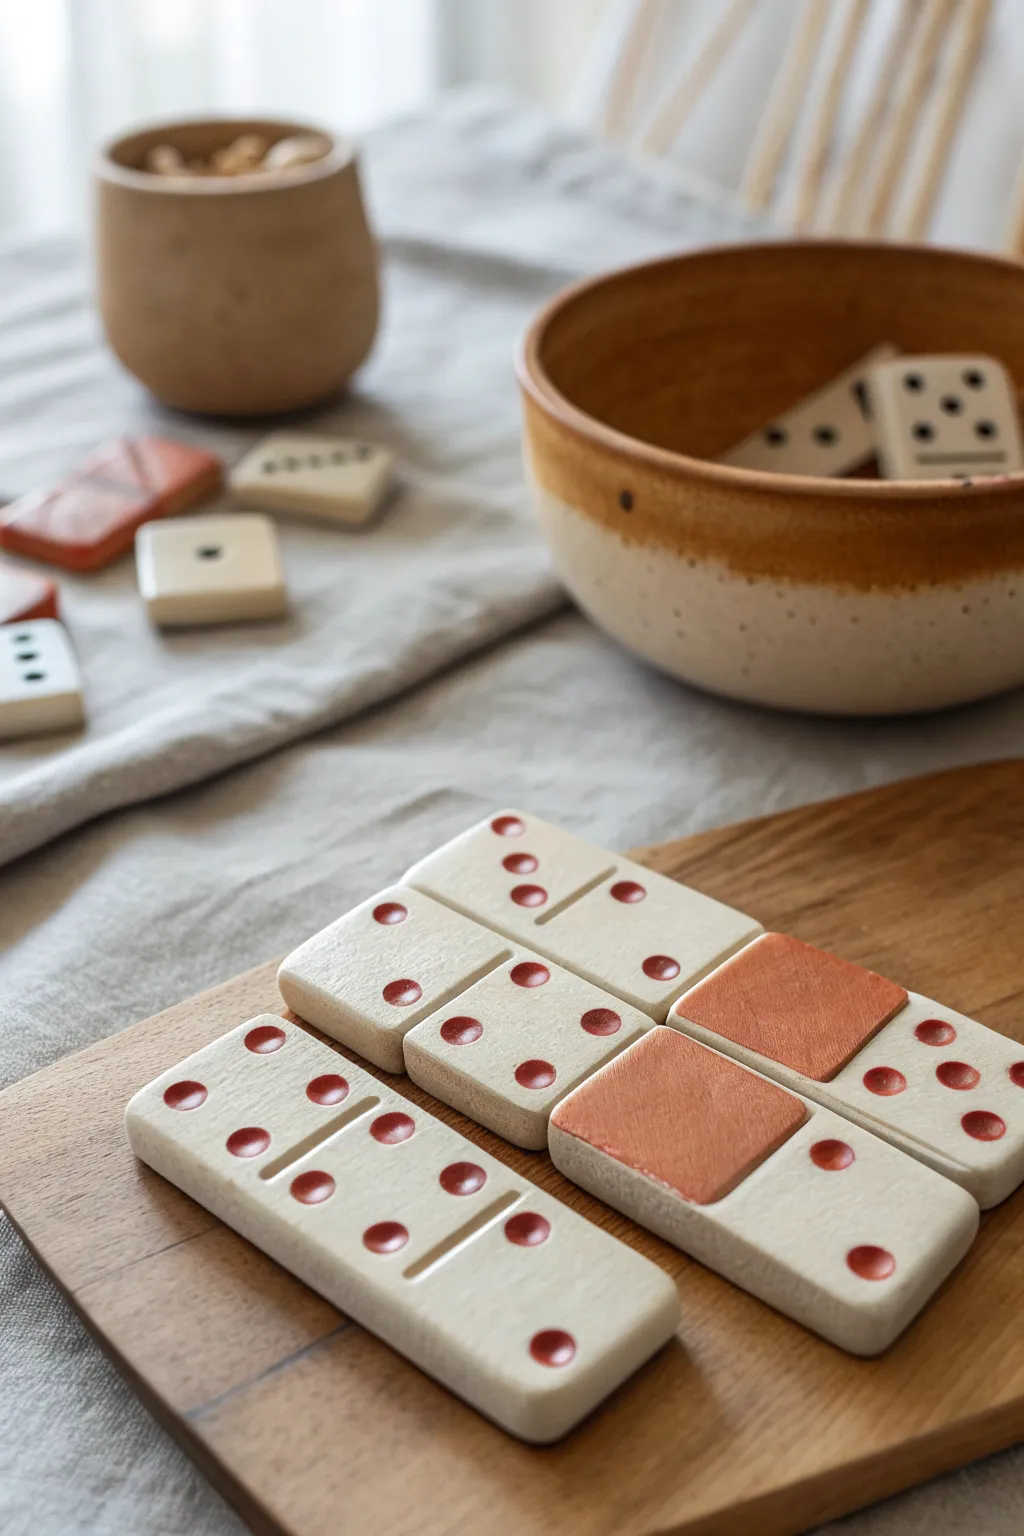
Elevate game night with this beautiful set of handmade dominoes, featuring a warm, earthy aesthetic and tactile dot detailing. The chunky, satisfying weight of the clay pieces combined with the custom burnt-sienna accents makes this both a playable game and a stunning coffee table display.
Step-by-Step Tutorial
Materials
- Polymer clay (white or cream)
- Acrylic paint (burnt sienna/terracotta)
- Acrylic rolling pin
- Sharp clay blade or craft knife
- Ruler
- Small round piping tip or stylus tool (for indenting dots)
- Fine-grit sandpaper
- Small flat paintbrush
- Matte or satin clay varnish (optional)
- Parchment paper
Step 1: Shaping the Tiles
-
Condition the clay:
Begin by warming the polymer clay in your hands, kneading it thoroughly until it is soft and pliable. This prevents cracking later on. -
Roll out the slab:
Using an acrylic rolling pin or a pasta machine on a wide setting, roll the clay into a slab. Aim for a substantial thickness, about 1/4 inch (6mm), to give the dominoes a nice, weighty feel. -
Measure the tiles:
Use a ruler to lightly mark out rectangular grid lines on your clay slab. A standard domino size is roughly 1 inch by 2 inches, but slight variations add to the handmade charm. -
Cut the shapes:
With a sharp clay blade, slice straight down through the clay along your grid lines. Try not to drag the blade, as this can warp the rectangular shape. -
Soften the edges:
Once cut, gently tap the edges of each tile with your finger to round them off slightly. This removes the sharp ‘machined’ look and makes them comfortable to hold. -
Create the dividing line:
Use the back of your craft knife or a thin modeling tool to gently press a horizontal indentation across the center of each tile, dividing the play area into two squares.
Consistent Depth
To ensure all your dots are the same depth, wrap a piece of masking tape around your stylus tool as a depth-guide stopper.
Step 2: Adding Details & Baking
-
Mark the pips:
Using a small round piping tip or a large ball stylus, press the dot patterns (pips) into the clay. Press deeply enough to create a distinct divot that will hold paint later. -
Texture square zones:
For the special blank tiles shown in the reference, leave one half of the domino completely smooth without pips. We will paint this section later to create that bold block of color. -
Final smoothing:
Give the surface a final check for stray fingerprints. I like to lightly brush them with a bit of cornstarch or baby oil to smooth them away before baking. -
Bake the tiles:
Arrange the tiles on a parchment-lined baking sheet. Bake according to your clay manufacturer’s instructions (usually around 275°F/135°C for 30 minutes, depending on brand and thickness). -
Cool and sand:
Allow the tiles to cool completely inside the oven to prevent thermal shock. Once cool, use fine-grit sandpaper to buff away any rough spots on the sides or back.
Warped Tiles?
If tiles curl during baking, place a heavy ceramic tile directly on top of them while they are still hot from the oven to flatten them as they cool.
Step 3: Painting & Finishing
-
Paint the pips:
Dip a fine paintbrush into burnt sienna acrylic paint. Carefully fill each indented dot. Don’t worry if you get paint on the surface; we’ll clean it up. -
Clean up excess paint:
While the paint is still wet, quickly wipe the surface of the clay with a damp paper towel or baby wipe. This leaves the paint trapped perfectly inside the indented dots. -
Paint the accent squares:
For the tiles with the large colored blocks, paint the square section you left blank earlier with the same burnt sienna shade. Apply two thin coats for opaque coverage. -
Initial drying:
Let the paint dry completely for at least an hour. The matte texture of the paint contrasts beautifully with the smooth clay. -
Seal (Optional):
If you plan on playing with these frequently, apply a thin coat of matte varnish to protect the paint from chipping during shuffling.
Gather your friends for a game night and enjoy the satisfying clack of your new handmade set

Checkers With Cute Tokens
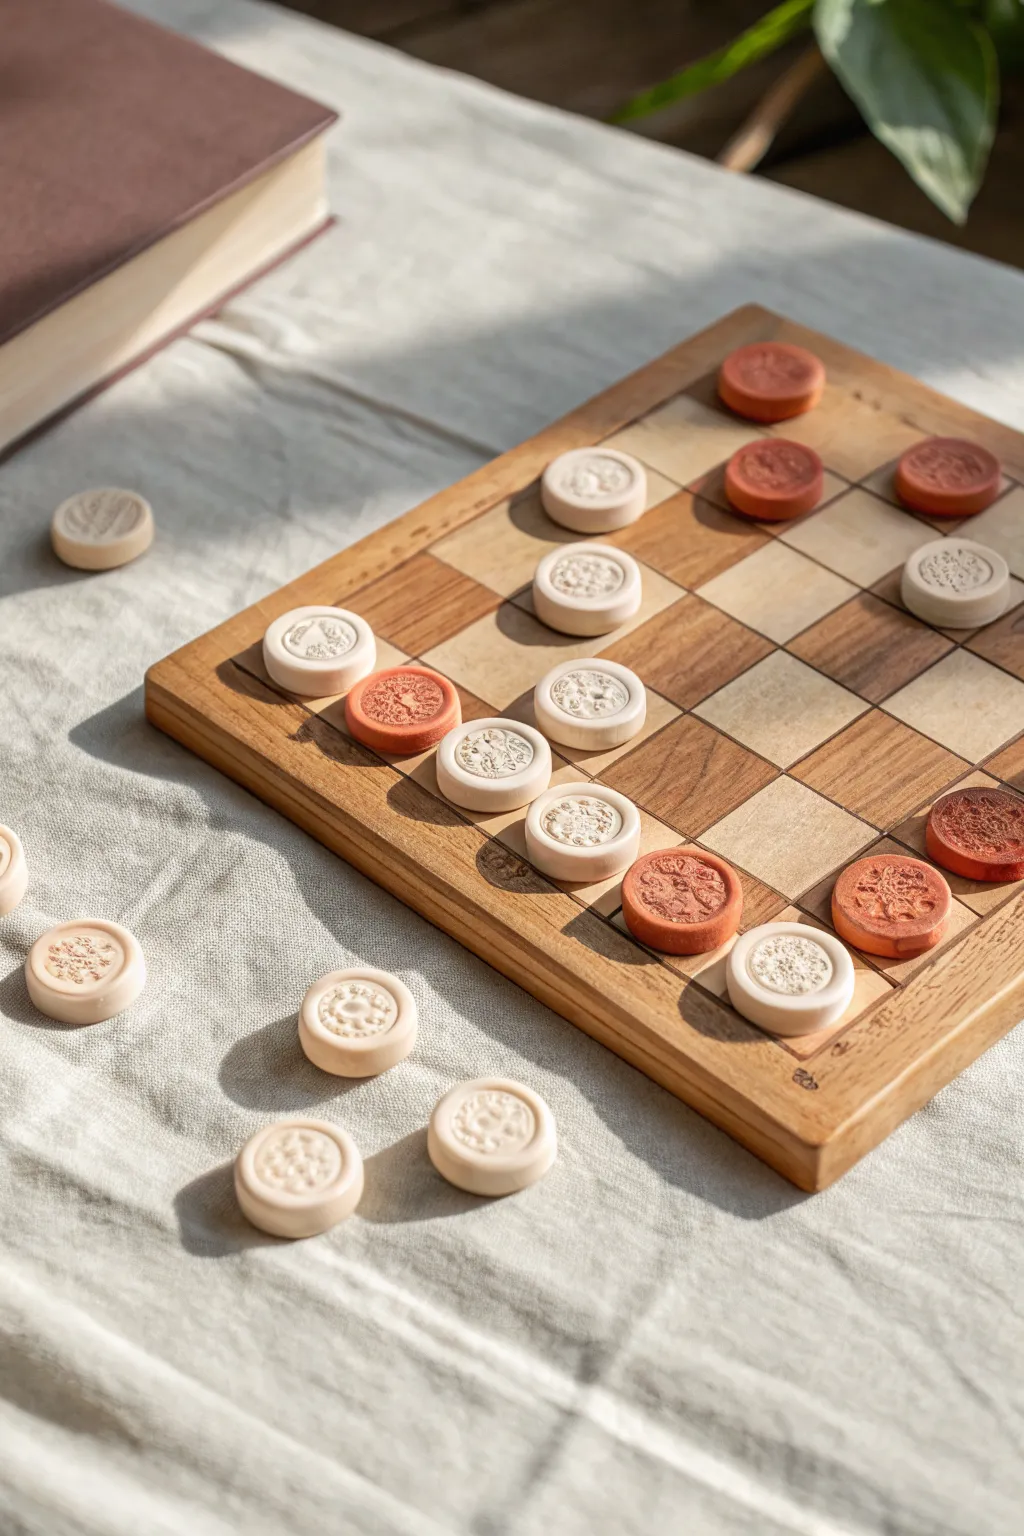
Elevate your game night with this beautiful set of handmade clay checkers, featuring intricate embossed patterns and a soft, matte finish. These tactile pieces bring an old-world charm to a classic game, making every move feel substantial and artistic.
Step-by-Step Guide
Materials
- White or cream polymer clay (approx. 2-3 blocks)
- Terracotta or reddish-brown polymer clay (approx. 2-3 blocks)
- Small round cutter (about 1 inch diameter)
- Patterned stamps, buttons, or textured lace for embossing
- Rolling pin or acrylic roller
- Parchment paper or clay work mat
- Detail sandpaper (fine grit)
- Baking sheet
- Oven (for curing)
- Matte spray varnish (optional)
Step 1: Preparing the Clay
-
Condition the Clay:
Begin by taking your white polymer clay and kneading it thoroughly in your hands until it becomes soft, pliable, and free of cracks. Repeat this process separately for the terracotta-colored clay, ensuring you wash your hands between colors to avoid staining the white clay. -
Roll Out the Sheets:
Using a rolling pin or acrylic roller, flatten the white clay on a piece of parchment paper. Aim for a thickness of about 1/4 inch (6mm) to give your checkers a nice, substantial weight. -
Check Thickness Consistency:
It’s important that all pieces are uniform so they stack well during the game. I find using two wooden craft sticks as guides on either side of the roller helps maintain an even thickness across the entire slab. -
Repeat for Color Two:
Roll out the terracotta clay slab to the exact same thickness as your white slab.
Stamp Release
If your stamp is sticking to the raw clay, lightly dust the surface of the clay with cornstarch or dip your stamp in water before pressing down for a clean release.
Step 2: Cutting and Stamping
-
Select Texture Tools:
Gather your patterned stamps. You can use formal rubber stamps, metal buttons with relief patterns, or even pieces of coarse lace. Test the impression on a scrap piece of clay first. -
Emboss the Clay Slab:
Before cutting the individual circles, lightly press your chosen stamp into the clay slab. Repeat the pattern across the surface, leaving enough space between impressions for your cutter. -
Cut the Rounds:
Position your round cutter over a patterned area, centering the design. Press straight down firmly to cut the circle, then lift. Cut 12 white pieces and 12 terracotta pieces, plus a few extras just in case. -
Smooth the Edges:
Gently pick up each clay disc. Run your finger lightly around the circumference to smooth down any sharp ridges left by the cutter, softening the edge into a gentle curve. -
Refine the Shape:
If the stamping process distorted the round shape slightly, gently reshape the token in your palms to ensure it is perfectly circular.
Step 3: Baking and Finishing
-
Prepare for Baking:
Place all your cut and stamped tokens onto a parchment-lined baking sheet. Ensure they are not touching each other. -
Cure the Clay:
Bake the pieces in your oven according to the manufacturer’s instructions on your specific package of clay. Typically, this is around 275°F (135°C) for 15-30 minutes. -
Cool Down:
Once the baking time is up, turn off the oven and open the door slightly. Let the pieces cool down completely before handling them to prevent warping while they are still soft. -
Sand the Bases:
Take a piece of fine-grit sandpaper and lay it flat on the table. Rub the bottom (flat side) of each checker against the paper in a circular motion to ensure it sits perfectly flush on the game board. -
Add a Protectant:
For longevity, especially if you play often, spray the tops with a light coat of matte varnish. This seals the clay and protects the textured surface from oils or dirt over time.
King Me!
Make your “King” pieces distinct by stamping a subtle crown or star design on the BOTTOM of every piece. When a player gets specifically kinged, they can flip the token over.
Arranging your new custom pieces on the board is the perfect way to begin a cozy afternoon of strategy and fun


Ludo-Style Race Board
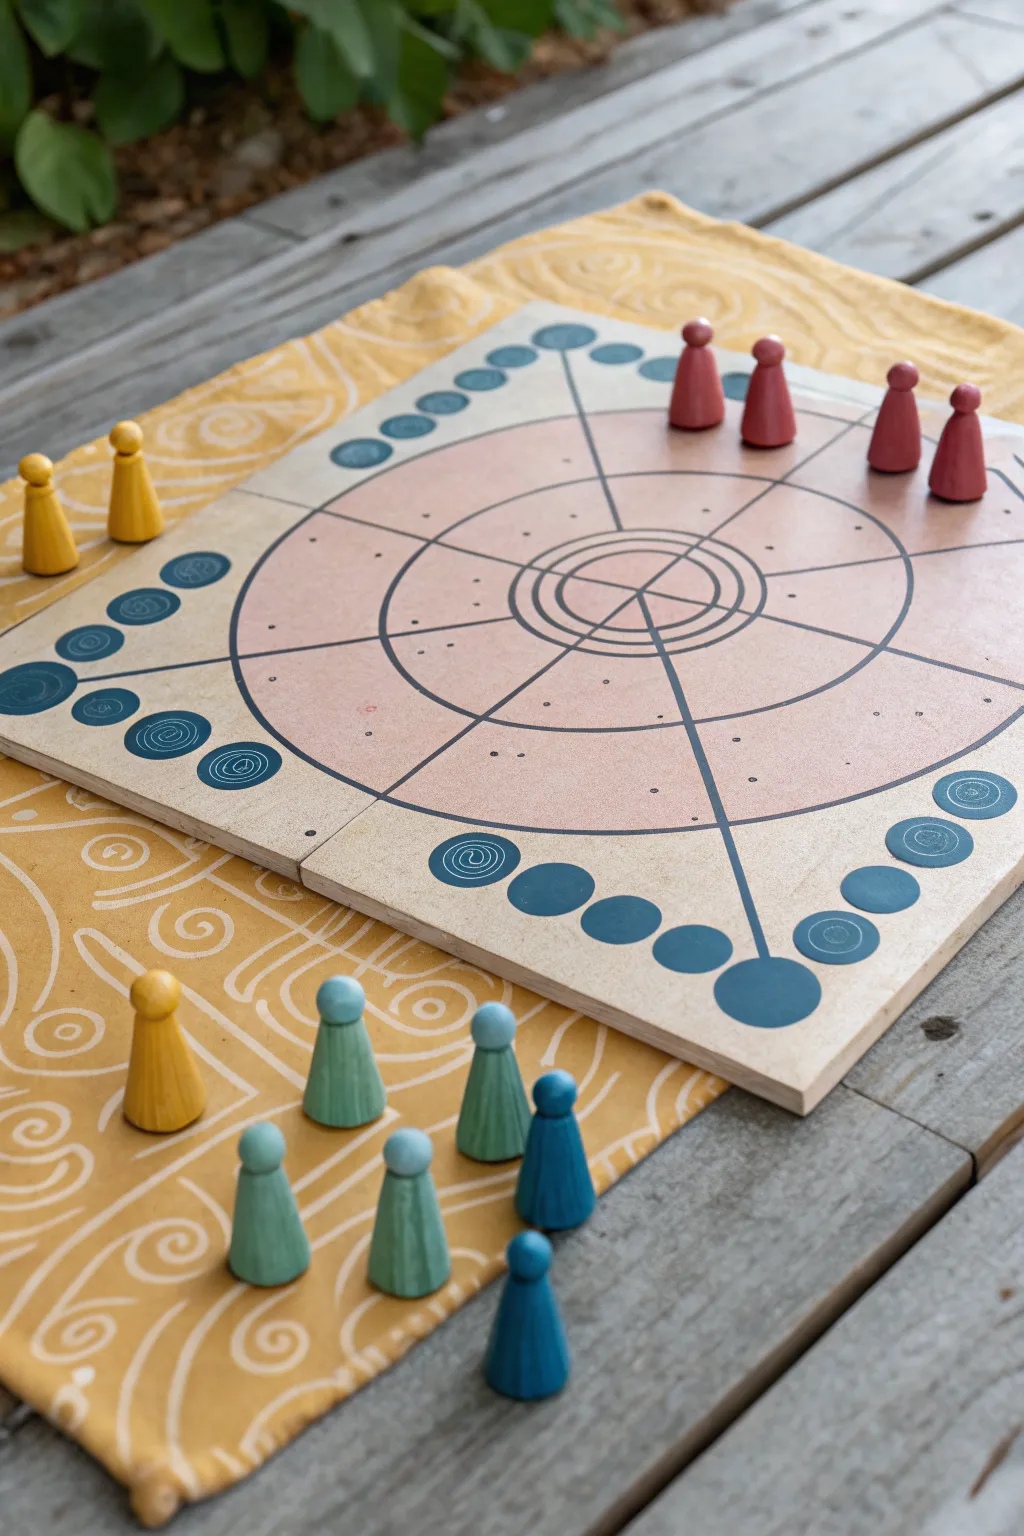
Create your own timeless strategy game with this beautiful, minimalist board inspired by ancient race games. Combining a hand-illustrated wooden or clay slab base with charmingly sculpted clay pawns, this project is as fun to display as it is to play.
Step-by-Step Tutorial
Materials
- Polymer clay (terracotta, yellow, teal, dark blue)
- Square wooden plaque (approx. 12×12 inches) or a large air-dry clay slab
- Fine-grit sandpaper
- Ruler and compass
- Pencil and eraser
- Black fine-tip paint pen or permanent marker
- Acrylic paints (pale pink, deep blue)
- Small round paintbrush
- Matte spray varnish
Step 1: Preparing the Game Board
-
Surface prep:
Begin by sanding your wooden plaque until it is perfectly smooth to the touch. If you are opting for an all-clay route, roll out a large, thick square slab of air-dry clay, trim the edges sharp, and let it cure completely before sanding flat. -
Finding the center:
Using a ruler, lightly draw corner-to-corner diagonal lines in pencil to locate the exact center of your board. -
Drafting the race track:
Place your compass point on the center mark. Draw a series of concentric circles: a small inner ‘home’ circle, followed by three larger rings that will form the main track spaces. -
Dividing the board:
Use your ruler to draw four straight lines intersecting through the center point, effectively dividing the circular tracks into eight equal pie-slice sections. -
Adding start zones:
In the corners of the board, sketch out the ‘start’ areas. I like to draw a diagonal line of four small circles leading from the corner toward the main circular track.
Clean Circles Tip
If you struggle painting perfect circles for the corner spots, use the end of a round dowel or a foam pouncer dipped in paint to stamp them instead.
Step 2: Painting and Inking
-
Applying the base color:
Mix a diluted wash of pale pink acrylic paint. Carefully paint only the center circle area, leaving the corners and the outer rim natural wood (or white clay). -
Painting the details:
Using deep blue acrylic, paint the four starting circles in each corner. To add visual interest, you can paint distinct spiral patterns on the larger circles closest to the track entry points. -
Inking the lines:
Once the paint is fully dry, take your black fine-tip paint pen. Trace over your pencil lines with a steady hand to define the wedge shapes and the concentric circles. -
Adding track markers:
Use the pen to add small dots or stippling inside the track spaces to give them texture and distinguish the movement squares. -
Drawing the center motif:
In the very center ‘home’ circle, draw a geometric or spiral pattern that connects the intersecting lines, creating a visual focal point. -
Sealing the board:
Spray the entire board with a matte varnish to protect the paint and ink from scratches during gameplay.
Smudge Prevention
Ink smearing on wood grain? Apply a thin layer of clear matte medium or sealer over the wood *before* using your paint pen to prevent ink bleeding.
Step 3: Sculpting the Pawns
-
Portioning the clay:
Divide your polymer clay colors. You will need four distinct sets (e.g., terracotta, yellow, teal, dark blue). Create four equal-sized balls of clay for each color group. -
Shaping the cones:
Roll each ball into a smooth cone shape. Flatten the bottom against your work surface so it stands upright without wobbling. -
Forming the heads:
Roll a smaller, pea-sized ball of the same color clay for each pawn. Gently press this onto the tip of the cone to create the classic ‘pawn’ silhouette. -
Adding texture:
For a rustic look, you can use a sculpting tool to carve vertical ridges or facets into the sides of the cones, mimicking carved wood. -
Baking the pieces:
Arrangement your pawns on a baking sheet lined with parchment paper. Bake according to the manufacturer’s instructions for your specific brand of polymer clay. -
Cooling and finishing:
Let the pawns cool completely before handling. If desired, you can add a coat of matte varnish to them as well to match the board finish.
Gather your friends and roll the dice on your beautiful new handmade game board

The Complete Guide to Pottery Troubleshooting
Uncover the most common ceramic mistakes—from cracking clay to failed glazes—and learn how to fix them fast.
Handmade Dice and Score Tokens
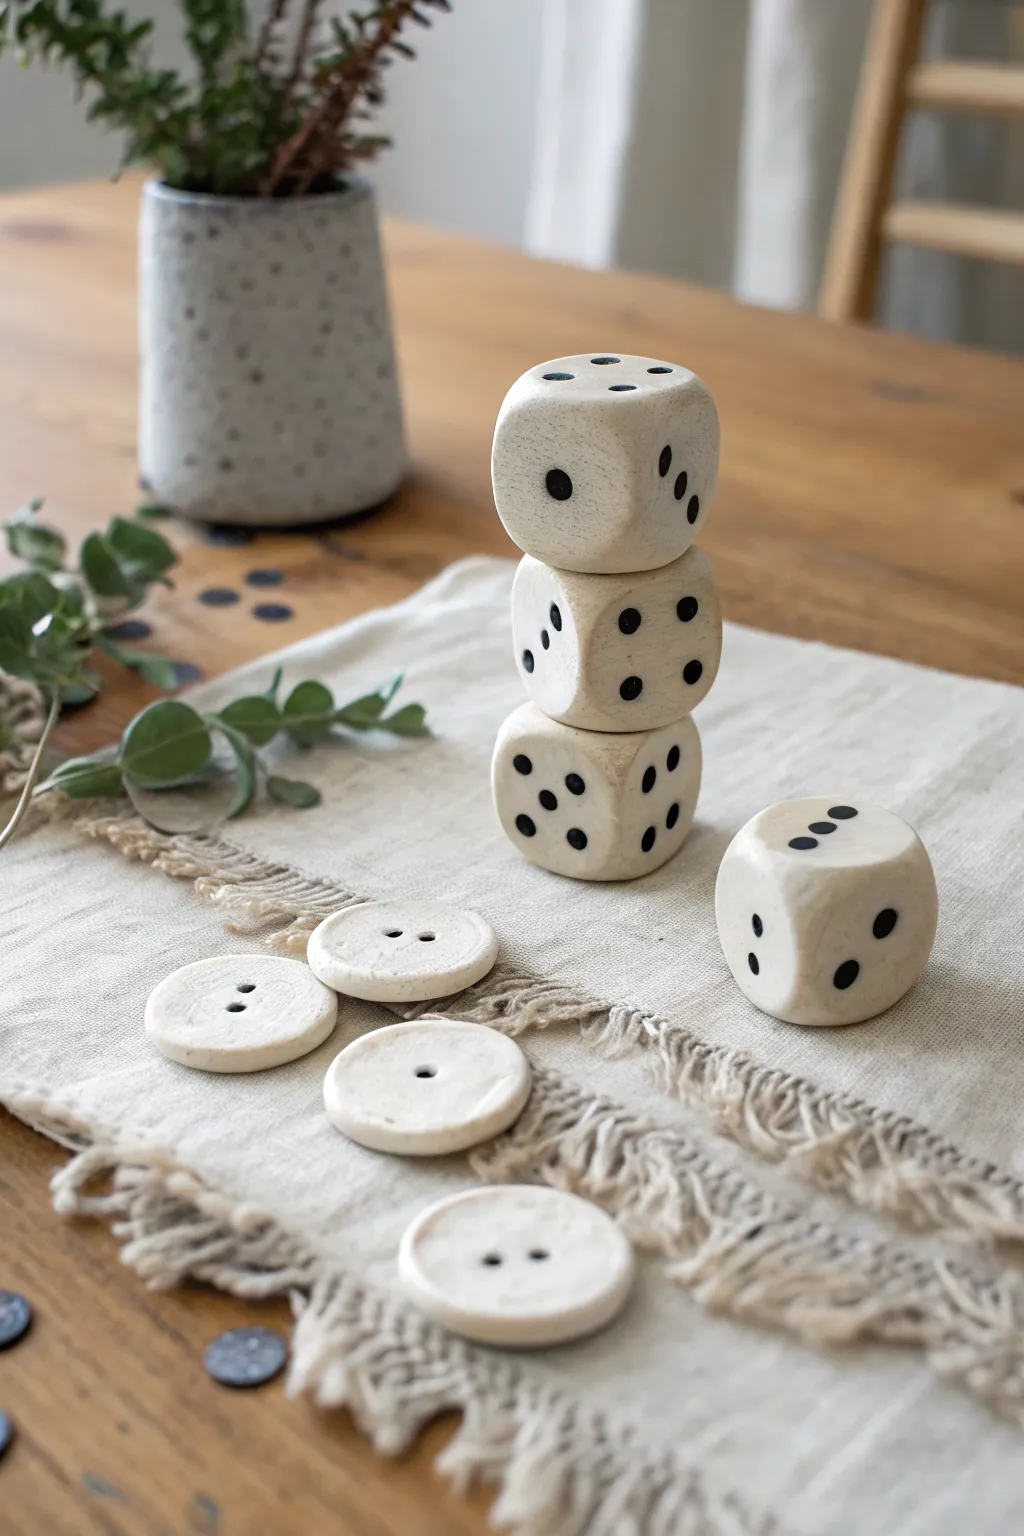
Bring a tactile, artisanal feel to family game night with these oversized dice and matching score tokens. Sculpted from air-dry clay with a stone-like finish and hand-painted pips, this set doubles as beautiful coffee table decor when playtime is over.
Step-by-Step Guide
Materials
- White or stone-colored air-dry clay (approx. 500g)
- Rolling pin
- Ruler
- Sharp crafting knife or clay blade
- Small circular cutter or bottle cap (approx. 1.5 inches)
- Fine-grit sandpaper (220-400 grit)
- Black acrylic paint
- Small round paintbrush (size 1 or 2)
- Dotting tool or the end of a paintbrush handle
- Clear matte acrylic sealer (spray or brush-on)
- Bowl of water and sponge
Step 1: Shaping the Dice
-
Prep the block:
Begin by taking a substantial chunk of clay for your first die. Knead it briefly to remove air bubbles, then shape it into a rough cube with your hands. -
Refine the cube:
Using a flat surface, gently tap each side of the clay against the table to flatten the faces. Aim for a cube that measures approximately 1.5 to 2 inches on each side. -
Soften edges:
Instead of razor-sharp geometric corners, use your moistened fingertips to gently round off the edges and corners. This gives the die that organic, tumbled-stone look shown in the photo. -
Smooth the surface:
Dip a sponge in a little water and wipe down all six sides to smooth out fingerprints or cracks. Repeat this process to create four dice in total.
Cracked Clay?
If minor cracks appear while drying, don’t panic. Mix a tiny bit of fresh clay with water to make a paste (slip) and fill the crack, then smooth it over.
Step 2: Creating the Score Tokens
-
Roll the slab:
Take the remaining clay and roll it out into an even slab, roughly 1/4 inch thick. -
Cut the rounds:
Use your small circular cutter or a bottle cap to punch out four discs. If the edges are ragged, smooth them down with a wet finger. -
Indent the center:
Press your thumb gently into the center of each disc to create a slight concave depression, making them look like oversized buttons. -
Add button holes:
Use the handle of a paintbrush or a skewer to poke two distinct holes in the center of each token. Make sure they go all the way through for authentic detailing. -
Drying phase:
Set all pieces on a wire rack or parchment paper. Let them dry for 24-48 hours, flipping them occasionally to ensure even drying.
Weight Tech
For a heavier, more satisfying roll, hide a small, centered ball of aluminum foil inside the clay cube while you are initially shaping it.
Step 3: Painting and Finishing
-
Sanding:
Once bone dry, lightly sanding the surfaces with fine-grit sandpaper removes any unwanted bumps. Be careful not to sand away the rounded corners you sculpted. -
Mapping the pips:
lightly mark the positions of the dots (pips) on the dice with a pencil. Remember that opposite sides on a standard die usually add up to seven (1 opposite 6, 2 opposite 5, etc.). -
Painting the dots:
Dip your small round brush or a dotting tool into black acrylic paint. I find that a dotting tool creates much more uniform circles than a brush. -
Adding texture:
Apply the black paint to your pencil marks. Don’t worry if the edges aren’t perfect circles; a little irregularity adds to the hand-hewn charm. -
Painting token details:
For the tokens, paint inside the two buttonholes with black paint to define them, or add small decorative dots near the rim if desired. -
Sealing:
Protect your work from hand oils and wear by applying a coat of clear matte acrylic sealer. Let this cure completely before playing your first game.
Now you have a charming, durable set ready for casual gaming or stylish display on your coffee table
Memory Match Discs
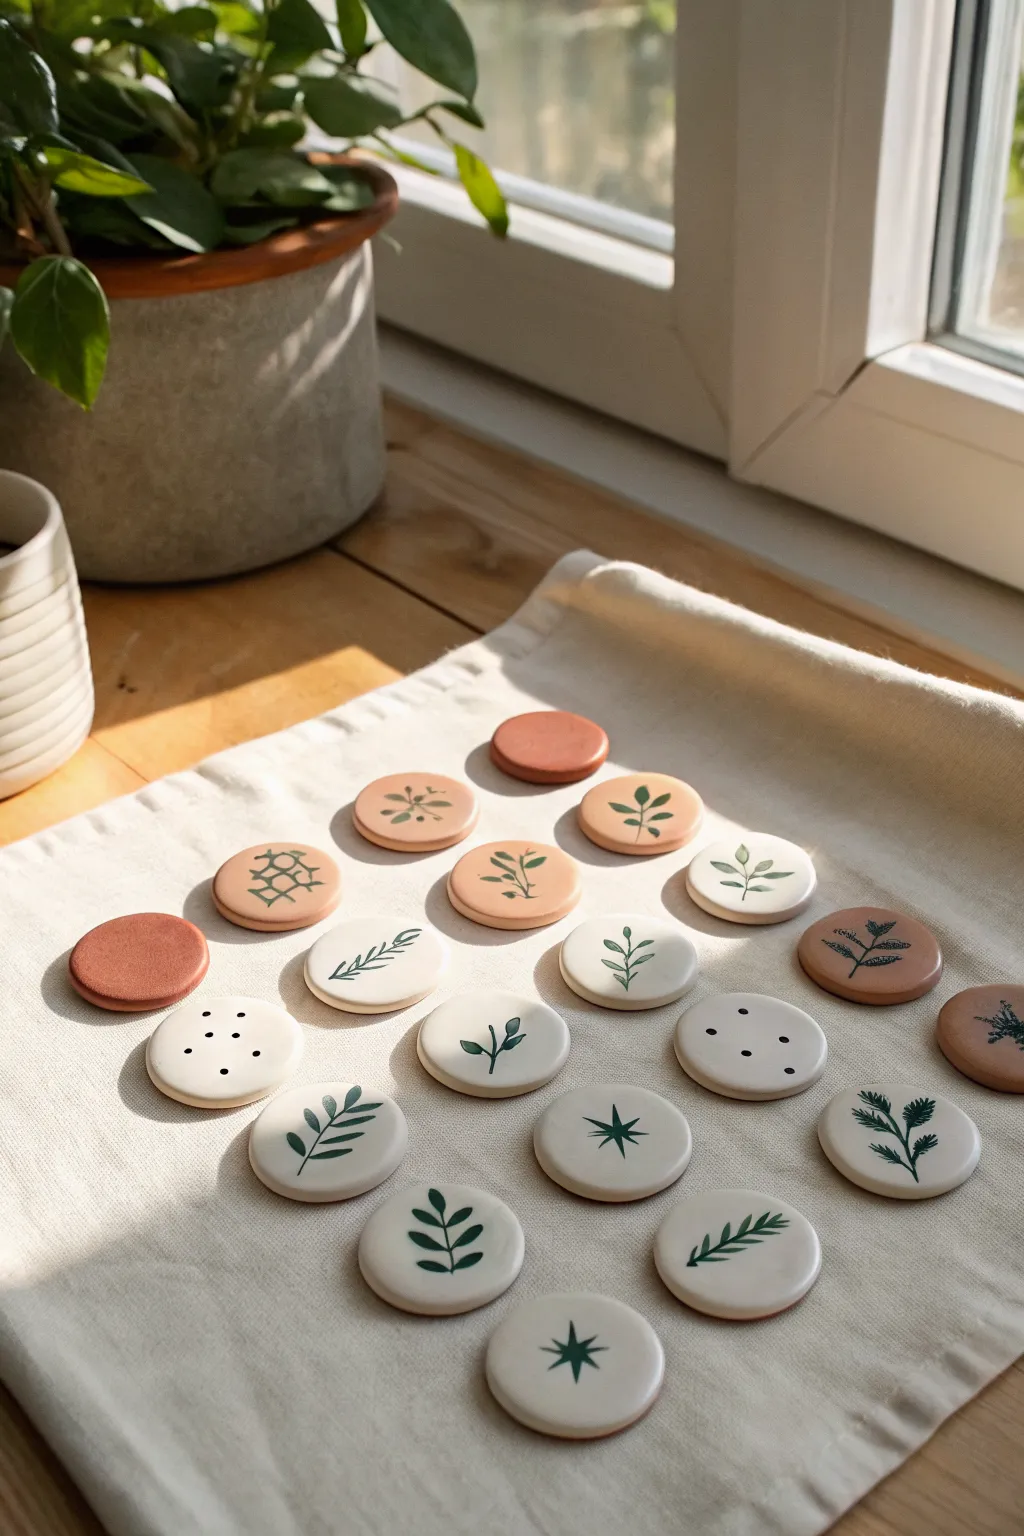
Create a timeless memory matching game with these beautiful handcrafted clay discs. Featuring earthy tones and delicate botanical motifs, this set is as much a piece of decor as it is a fun activity for quiet afternoons.
Step-by-Step
Materials
- White air-dry clay or polymer clay
- Terracotta air-dry clay or polymer clay
- Round cookie cutter (approx. 1.5 – 2 inches diameter)
- Rolling pin
- Parchment paper or canvas mat
- Fine grit sandpaper (400-600 grit)
- Green acrylic paint (olive or forest shades)
- Black acrylic paint
- Fine detail paintbrush (size 0 or 00)
- Matte acrylic varnish or sealant
- Small sponge (optional for smoothing)
Step 1: Shaping the Base
-
Prepare the workspace:
Lay down parchment paper or a canvas mat on a flat surface. This prevents the clay from sticking and picking up unwanted texture. -
Roll out the clay:
Take a portion of your white clay and roll it out evenly. You are aiming for a thickness of about 1/4 inch (6mm). If you have thickness guides, use them to ensure every disc is perfectly uniform. -
Cut the discs:
Using your round cookie cutter, press firmly into the clay to cut your shapes. Twist slightly before lifting to get a clean separation. -
Repeat with terracotta:
Clean your rolling pin and cutter, then repeat the process with the terracotta-colored clay. Aim for an equal number of white and terracotta discs to create a pleasing visual mix. -
Smooth the edges:
Dip your finger in a little water and gently run it around the rim of each disc to smooth out any sharp cutting lines or ragged bits. -
Initial Drying:
If using air-dry clay, loosely cover the discs with plastic wrap for the first few hours to prevent curling, then let them air dry completely for 24-48 hours. If using polymer clay, bake according to the package instructions.
Step 2: Refining and Painting
-
Sand for perfection:
Once fully cured or dry, inspect your discs. Use fine-grit sandpaper to gently buff the surface and edges. This step is crucial for getting that professional, silky feel. -
Plan your pairs:
Group your discs into pairs. Decide which design will go on which pair. Simple designs work best: single leaves, fern fronds, stars, or simple dot grids. -
Paint botanical designs:
Using a size 00 brush and forest green acrylic paint, carefully paint your leafy designs on the cream discs. Keep your hand steady and use light pressure for the stems. -
Add variety:
Mix it up by painting some designs on the terracotta discs using black or a darker brown paint for contrast. I find that simple geometric patterns like the grid shown in the image look particularly striking on the darker clay. -
Paint stars and dots:
For the starburst patterns, paint a small cross first, then add smaller diagonal lines in between. For the dot discs, use the non-brush end of your paintbrush dipped in paint to stamp perfect circles. -
Leave some blank:
Consider leaving a few discs solid colored without designs. These act as ‘wild cards’ or simple color-matching pairs in the game. -
Let the paint set:
Allow the acrylic paint to dry completely. This usually takes about 20-30 minutes depending on how thick the application is.
Warped Discs?
If air-dry clay lifts at the edges while drying, flip the discs over halfway through the drying process. Weighting them down with a heavy book lined with parchment paper can also flatten them out.
Step 3: Finishing Touches
-
Seal the front:
Apply a thin coat of matte varnish over the painted side of the discs. This protects the artwork from scratching during play. -
Seal the back:
Don’t forget the backs! Flip them over and seal the reverse side to ensure the clay is protected from moisture and handling oils. -
Final cure:
Let the varnish cure fully according to the bottle instructions before stacking the discs or putting them in a bag.
Even Thickness Hack
Place two magazines or stacks of playing cards of equal height on either side of your clay. Rest the ends of your rolling pin on these stacks while rolling to guarantee perfectly even thickness.
Once dry, toss your beautiful new set into a linen pouch and you are ready for a game night


What Really Happens Inside the Kiln
Learn how time and temperature work together inside the kiln to transform clay into durable ceramic.
Mini Bowling Desk Game
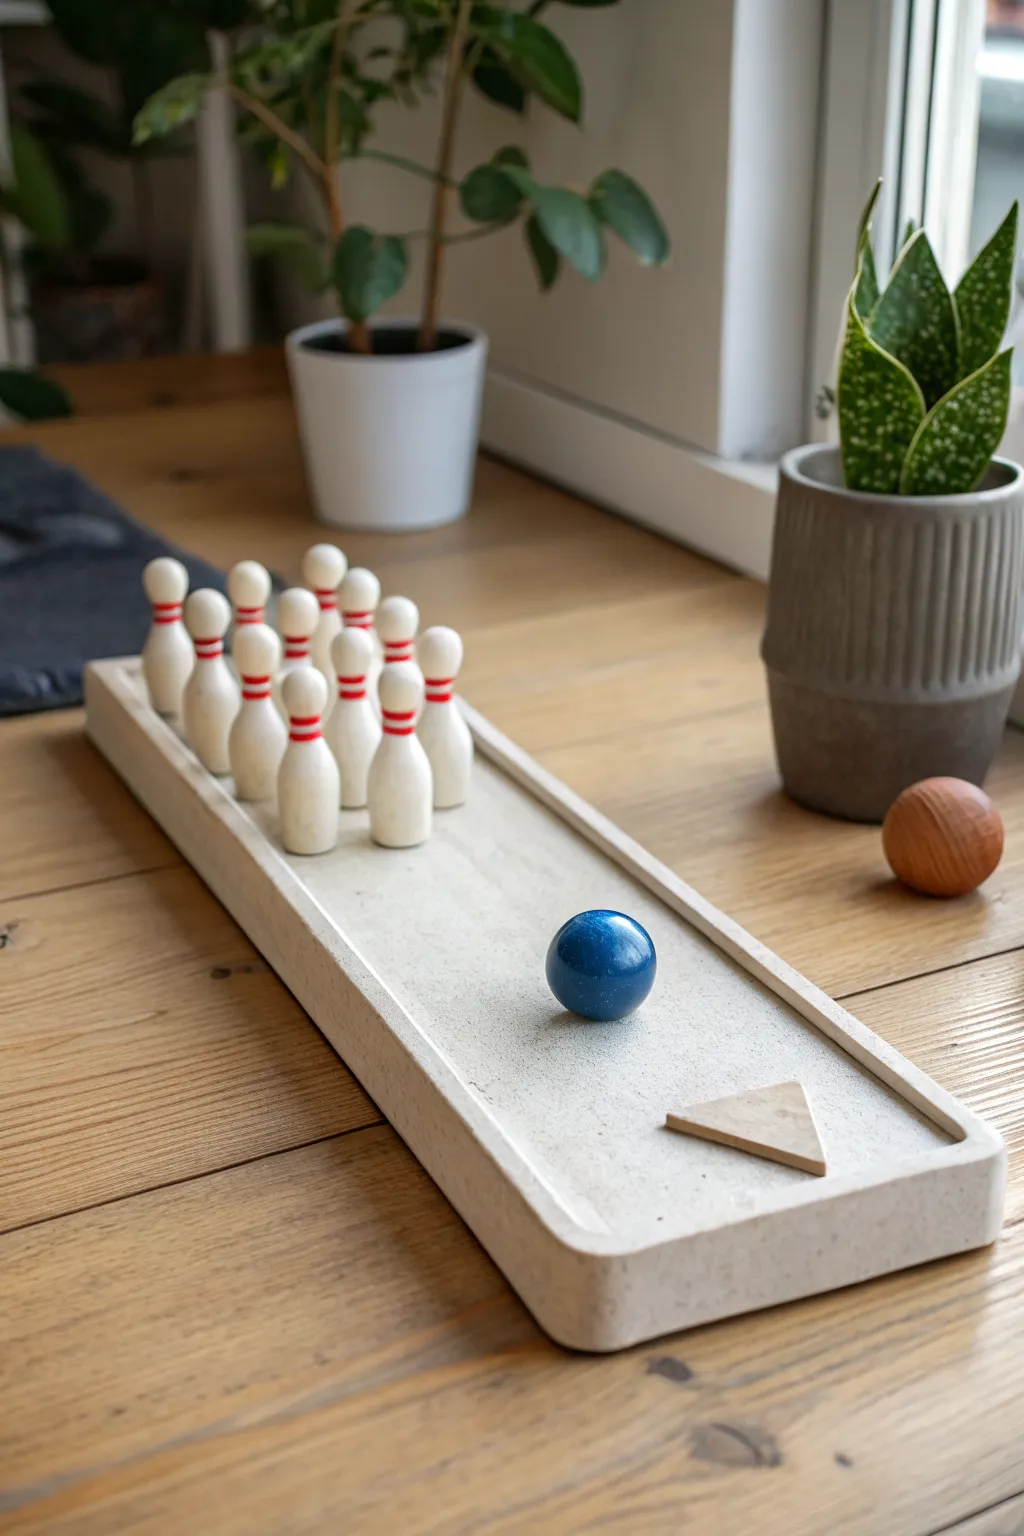
Bring the bowling alley to your workspace with this minimalist, handmade set. Featuring a sleek, speckled clay lane and tiny hand-painted pins, it’s a stylish distraction that looks as good as it plays.
Step-by-Step
Materials
- White air-dry clay or polymer clay (approx. 500g)
- Flecked stone-effect spray paint or acrylic paint (grey/black)
- Rolling pin
- Ruler
- Craft knife
- Fine sandpaper
- 10 Wooden peg doll bodies (small size)
- Red acrylic paint
- Fine detail paintbrush
- Medium wooden bead (for the ball)
- Blue metallic or glossy acrylic paint
- Mod Podge or clear varnish
- Small triangular wood scrap or cardboard (for the pin setter template)
Step 1: Crafting the Bowling Lane
-
Condition the Clay:
Begin by kneading your chosen clay until it is soft, warm, and pliable. This prevents cracks from forming later on. -
Roll the Base:
Roll the clay out into a long rectangle, aiming for a thickness of about 1/4 inch. The strip should be roughly 12-14 inches long and 3-4 inches wide. -
Trace and Cut:
Use a ruler and a craft knife to trim the irregular edges, creating a perfectly straight rectangle. Don’t discard the scraps yet; you’ll need them for the walls. -
Create the Walls:
Roll the excess clay into long, thin snakes. Flatten these slightly to create the raised borders for your lane. You’ll need two long pieces for the sides and two shorter ones for the ends. -
Attach the Borders:
Score the edges of your base and the bottom of your wall pieces with a needle tool or toothpick. Apply a tiny bit of water (or liquid clay if using polymer) to join them securely. -
Smooth the Seams:
Using a modeling tool or your finger, blend the clay walls into the base so the seams disappear completely. I like to use a slightly damp sponge here to get a uniform texture. -
Dry or Bake:
If using air-dry clay, let the piece dry for 24-48 hours. If using polymer clay, bake according to the manufacturer’s instructions. Ensure it sits on a perfectly flat surface while curing to prevent warping. -
Create the Stone Effect:
Once fully cured, sand any rough edges. To get that concrete look, spray the entire tray with a stone-texture spray paint, or dab on white paint mixed with tiny specks of grey and black.
Uneven Roll?
If the clay base warps while drying, causing the ball to roll sideways, glue a piece of felt to the bottom to level it out perfectly.
Step 2: Pins and Ball Setup
-
Prep the Pins:
Take your wooden peg doll bodies. If they have rough spots, give them a quick sanding so they stand perfectly flat. -
Paint the Base Coat:
Paint the wooden pins with a coat of cream or off-white acrylic paint. You want them to look like classic maple wood pins, so a natural tone works best. -
Add the Stripes:
Using your finest brush, carefully paint two thin red rings around the neck of each pin. Spinning the pin while holding the brush steady often yields the cleanest line. -
Paint the Ball:
Select a wooden bead that is heavy enough to knock over the pins. Paint it a striking metallic blue. You might need two or three coats for a deep, rich color. -
Seal Everything:
Apply a coat of clear varnish or Mod Podge to the pins and the ball. This protects the paint from chipping during intense bowling matches. -
Make the Ball Return:
For a finishing touch, cut a very small triangle from wood or scrap clay to act as a decorative arrow or ‘spot’ maker on the lane, just like the image.
Level Up: Magnetism
Embed tiny magnets in the floor of the lane and the bottom of the pins. They’ll snap into perfect formation every time you reset.
Now set up your pins and enjoy a little analog fun right at your desk
Ring Toss Peg Board
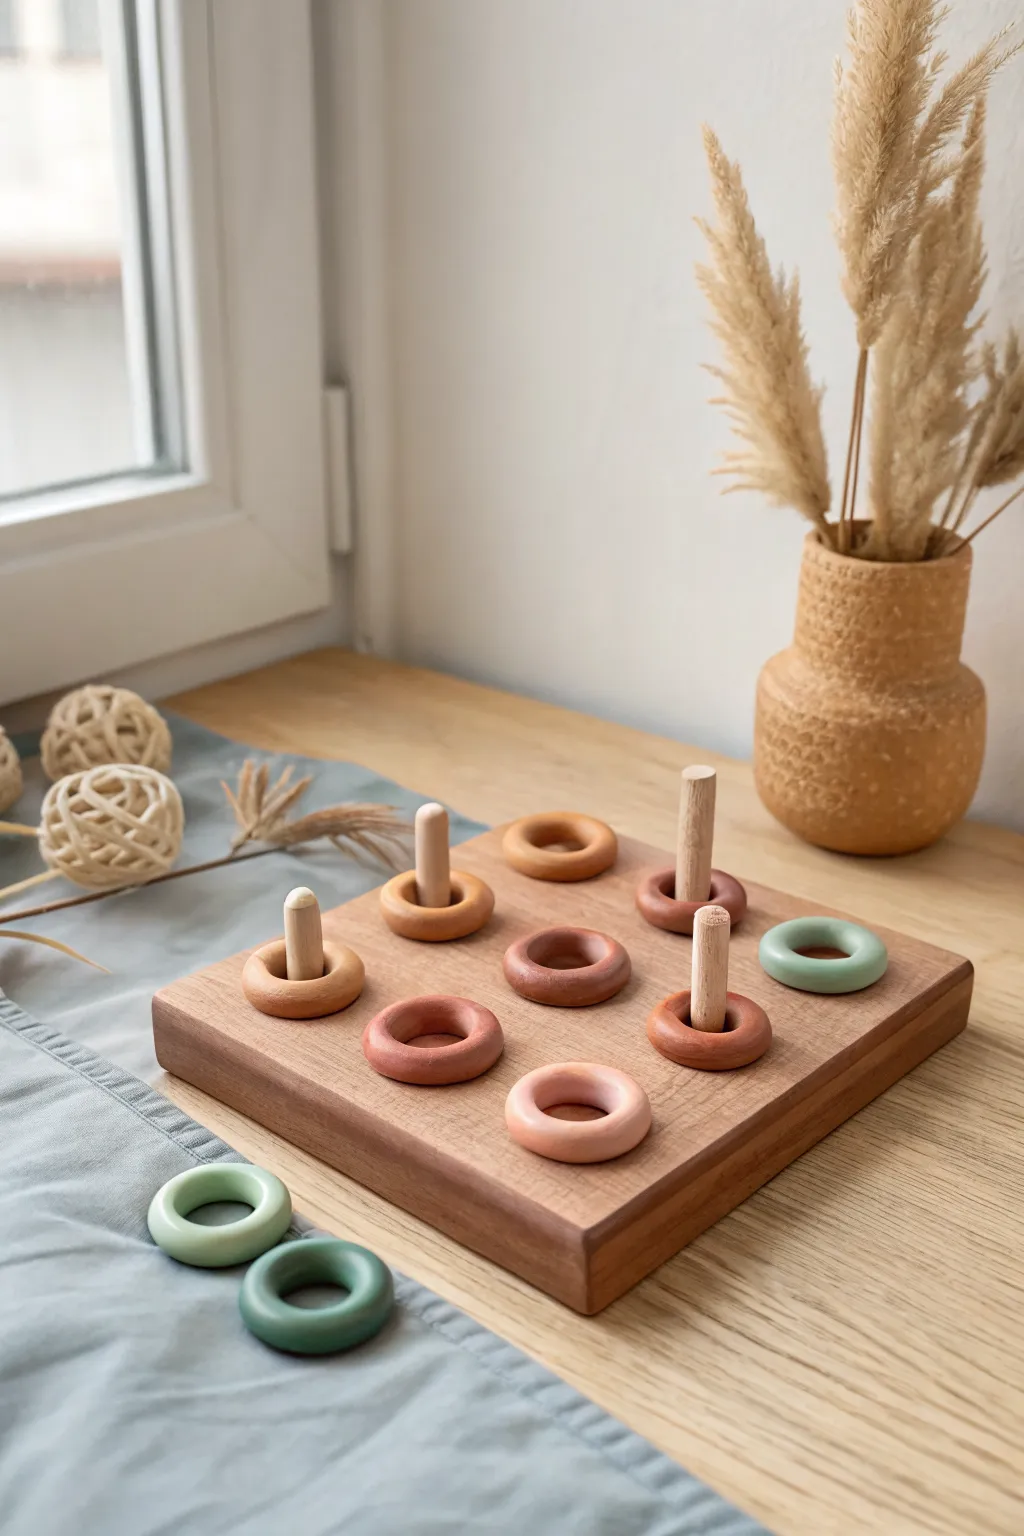
This minimalist, nature-inspired take on the classic Tic-Tac-Toe game blends smooth wooden textures with soft, earthy clay tones. The tactile combination of chunky clay rings and sleek dowels makes it as beautiful to display as it is fun to play.
Step-by-Step Guide
Materials
- Polymer clay (in terracotta, peach, sage green, and beige colors)
- Square wooden plaque (approx. 8×8 inches)
- Wooden dowel (1/2 inch diameter)
- Wood glue
- Drill with 1/2 inch spade bit or forstner bit
- Sandpaper (fine grit)
- Acrylic rolling pin
- Circle cutters (1.5 inch and 0.75 inch)
- Baking sheet and parchment paper
- Matte spray varnish (optional)
Step 1: Crafting the Clay Rings
-
Condition the Clay:
Begin by warming up your polymer clay in your hands. Knead each color separately until it becomes soft and pliable, ensuring there are no air bubbles trapped inside. -
Roll Snakes:
Take a portion of clay (about the size of a walnut) and roll it into a smooth, even snake about 1/2 inch thick on a clean surface. -
Form the Ring Shape:
Wrap the clay snake around a cylindrical object or simply join the ends together to form a circle. The finished ring needs to have an inner diameter slightly larger than your wooden dowels—about 3/4 inch is usually perfect. -
Smooth the Seams:
Using your thumb or a clay tool, gently blend the seam where the two ends meet until it’s invisible. I like to roll the joined section lightly on the table to ensure it’s perfectly round. -
Refine the Profile:
Gently press the ring flat just a little bit so it sits stably. You want a rounded aesthetic, but a slightly flattened top and bottom help them stack and store neatly. -
Create Multiple Colors:
Repeat this process to make at least 5 rings in one color palette (like the warm peaches and terracottas) and 5 in a contrasting palette (like the sage greens and beiges). -
Check the Fit:
Before baking, quickly test one of your raw rings against the wooden dowel you plan to use. It should slide on easily with a little wiggle room. -
Bake:
Place all formed rings on a parchment-lined baking sheet. Bake according to your polymer clay package instructions (usually around 275°F for 15-30 minutes). Let them cool completely to harden.
Sticky Situation?
If your clay rings are attracting dust or fingerprints before baking, lightly brush them with a tiny bit of baby oil or cornstarch to smooth the surface perfectly.
Step 2: Building the Wooden Base
-
Mark the Grid:
On your square wooden plaque, use a pencil and ruler to lightly mark a 3×3 grid layout. You need nine specific points where the dowels will stand. -
Cut the Dowels:
Saw your wooden dowel into nine equal pieces. For this design, a height of about 2 to 2.5 inches works well to hold the rings securely. -
Sand the Wood:
Sand the cut ends of the dowels until they are smooth and slightly rounded on top. Give the wooden base a light sanding as well to remove any rough edges. -
Drill Holes (Optional but Sturdy):
For the strongest hold, drill shallow holes (about 1/4 inch deep) into your nine marked spots on the base using a bit that matches your dowel diameter. -
Glue the Dowels:
Place a drop of wood glue into each hole (or directly onto the wood surface if you skipped drilling). Insert the dowels, wiping away any excess glue immediately with a damp cloth. -
Verify Alignment:
Before the glue sets, look at the board from eye level to ensure all dowels are standing straight up and aren’t leaning. -
Final Styling:
Once the wood glue is fully cured and the clay rings are cool, you can slide the rings onto the pegs. Arrange them randomly or by color to start your first game.
Make It Yours
Instead of plain wood, stain the base a dark walnut or whitewash it for a different vibe. You can also paint patterns like stripes or dots onto the baked clay rings.
Enjoy the satisfying clink of the clay rings as you strategize your next move

TRACK YOUR CERAMIC JOURNEY
Capture glaze tests, firing details, and creative progress—all in one simple printable. Make your projects easier to repeat and improve.
Marble Maze Challenge Board
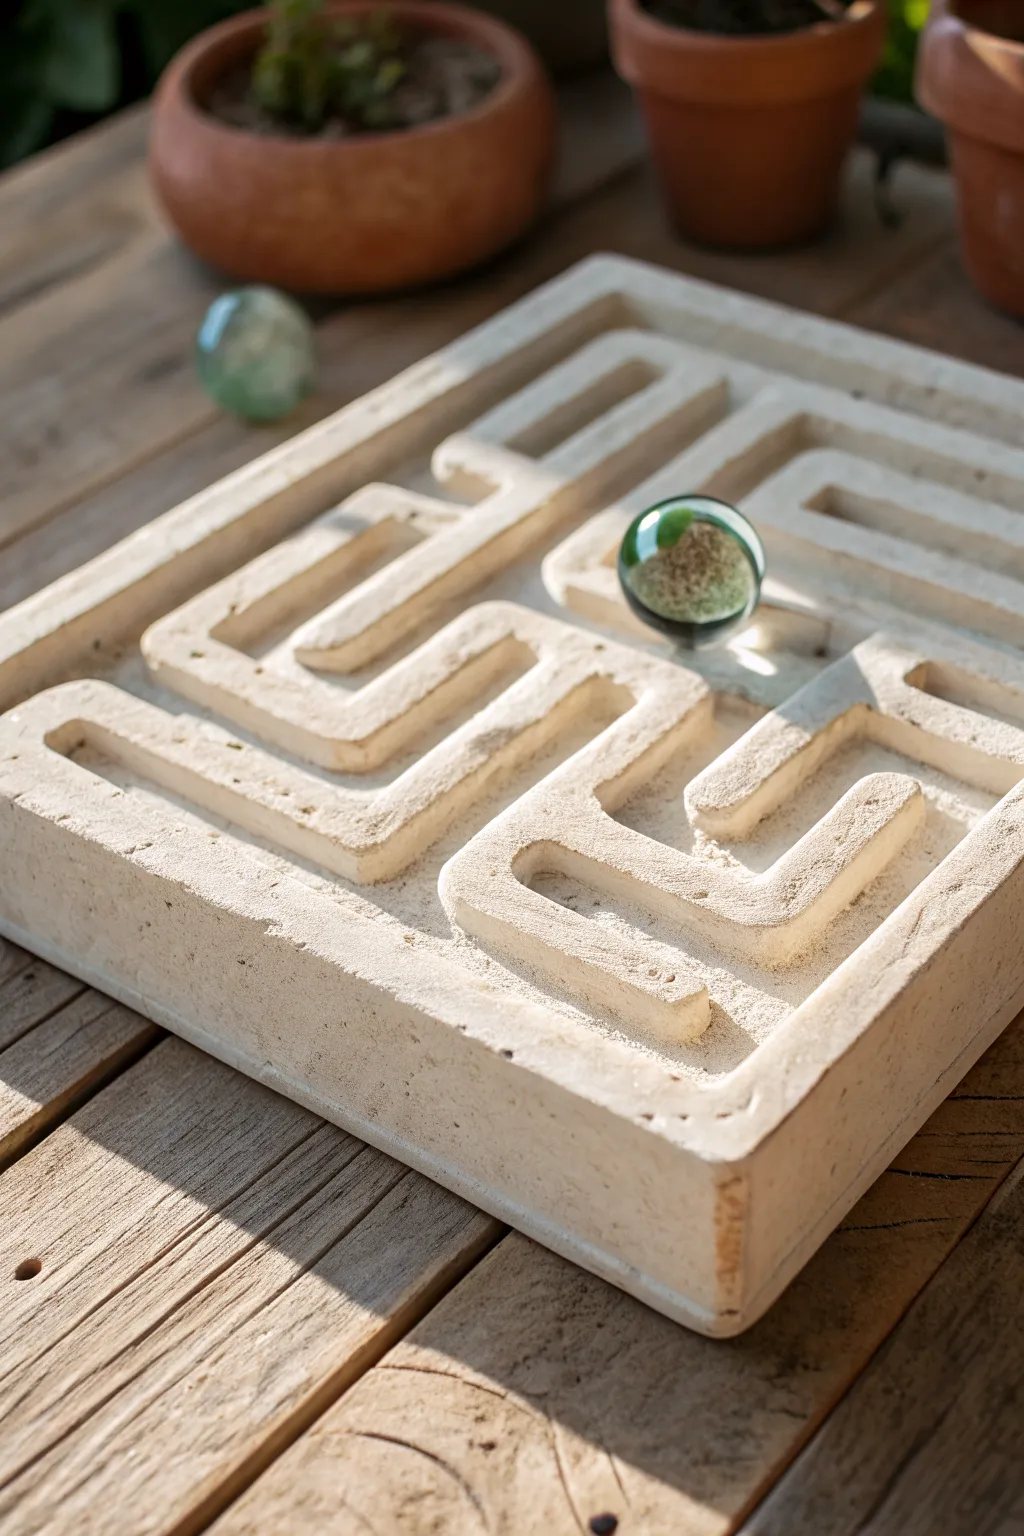
Transform a slab of clay into an interactive tabletop labyrinth that looks like an ancient artifact. This tactile marble run features carved channels and organic, raised walls, perfect for idle play or as a striking coffee table object.
Detailed Instructions
Materials
- Light-colored stoneware clay or air-dry clay (approx. 2-3 lbs)
- Square wooden board or template (approx. 8×8 inches)
- Rolling pin
- Two wooden guide strips (1 inch thick)
- Loop tool (medium size for carving channels)
- Needle tool
- Small sponge
- Smoothing rib (rubber or metal)
- Clay knife or wire cutter
- Standard glass marble (for testing size)
Step 1: Preparation and Base Forming
-
Wedge the clay:
Begin by thoroughly wedging your clay to remove air bubbles and ensure an even consistency, which is crucial for preventing cracks during the drying phase. -
Prepare the workspace:
Set up your guide strips on either side of your workspace. These will ensure your slab is a uniform thickness, specifically around one inch deep. -
Roll the slab:
Roll your clay out between the guides. You want a thick, solid block rather than a thin sheet, so don’t compress it too much. -
Cut the square:
Using your square template or a ruler, cut the irregular edges off the slab to create a perfect 8×8 inch square (or your desired size). Keep the walls thick and substantial. -
Smooth the surfaces:
Run a damp smoothing rib over the top surface and the sides to seal the pores and create a clean canvas for your maze design.
Smoother Rolling
Use the back of a measuring spoon that matches your marble’s size to compress and round out the channel floors for perfect movement.
Step 2: Drafting and Carving
-
Sketch the path:
Lightly draw your maze pattern onto the clay surface using a needle tool. I find it easiest to start with the entry and exit points and work inward. -
Plan wall thickness:
Ensure your drawn walls are at least half an inch thick so they remain sturdy. The paths need to be wide enough for your marble to roll freely. -
Begin the excavation:
Using the loop tool, start carving out the clay along your drawn paths. Dig down about half an inch, leaving the floor of the maze flat. -
Refining the channels:
Go back over your channels to ensure the depth is consistent. The floor of the maze shouldn’t be bumpy, or the marble will get stuck. -
Create corner radii:
Round off the interior corners of the walls slightly. Sharp 90-degree clay corners are prone to chipping and interrupt the flow of the marble.
Level Up: Trap Doors
Drill a hole slightly larger than the marble through the floor in one corner to create a ‘game over’ drop-out point.
Step 3: Finishing Touches
-
Chamfer the edges:
Use a damp sponge or your fingers to soften the top edges of the maze walls. This gives it that weathered, stone-like aesthetic seen in the photo. -
Smooth the channel floors:
This is a critical step: use a small, slightly damp sponge or finger to burnish the bottom of the carved paths until they are silky smooth. -
Test the fit:
Gently place your marble in the channels (don’t roll it too hard yet) to visually verify that the width is sufficient at every turn. -
Add texture:
If you want a rougher, limestone look, gently tap the exterior walls with a stiff brush or a crumpled ball of foil. -
Slow drying:
Cover the maze loosely with plastic to let it dry very slowly over several days. Fast drying will warp the slab and ruin the level playing surface. -
Final wipe down:
Once bone dry (or cured, if using air-dry clay), give it one last light sanding or sponge wipe to remove any sharp burrs before firing or sealing.
Once fully cured or fired, drop in a colorful glass marble and enjoy the satisfying sound of it rolling through your handmade creation
Flick Football Table Game
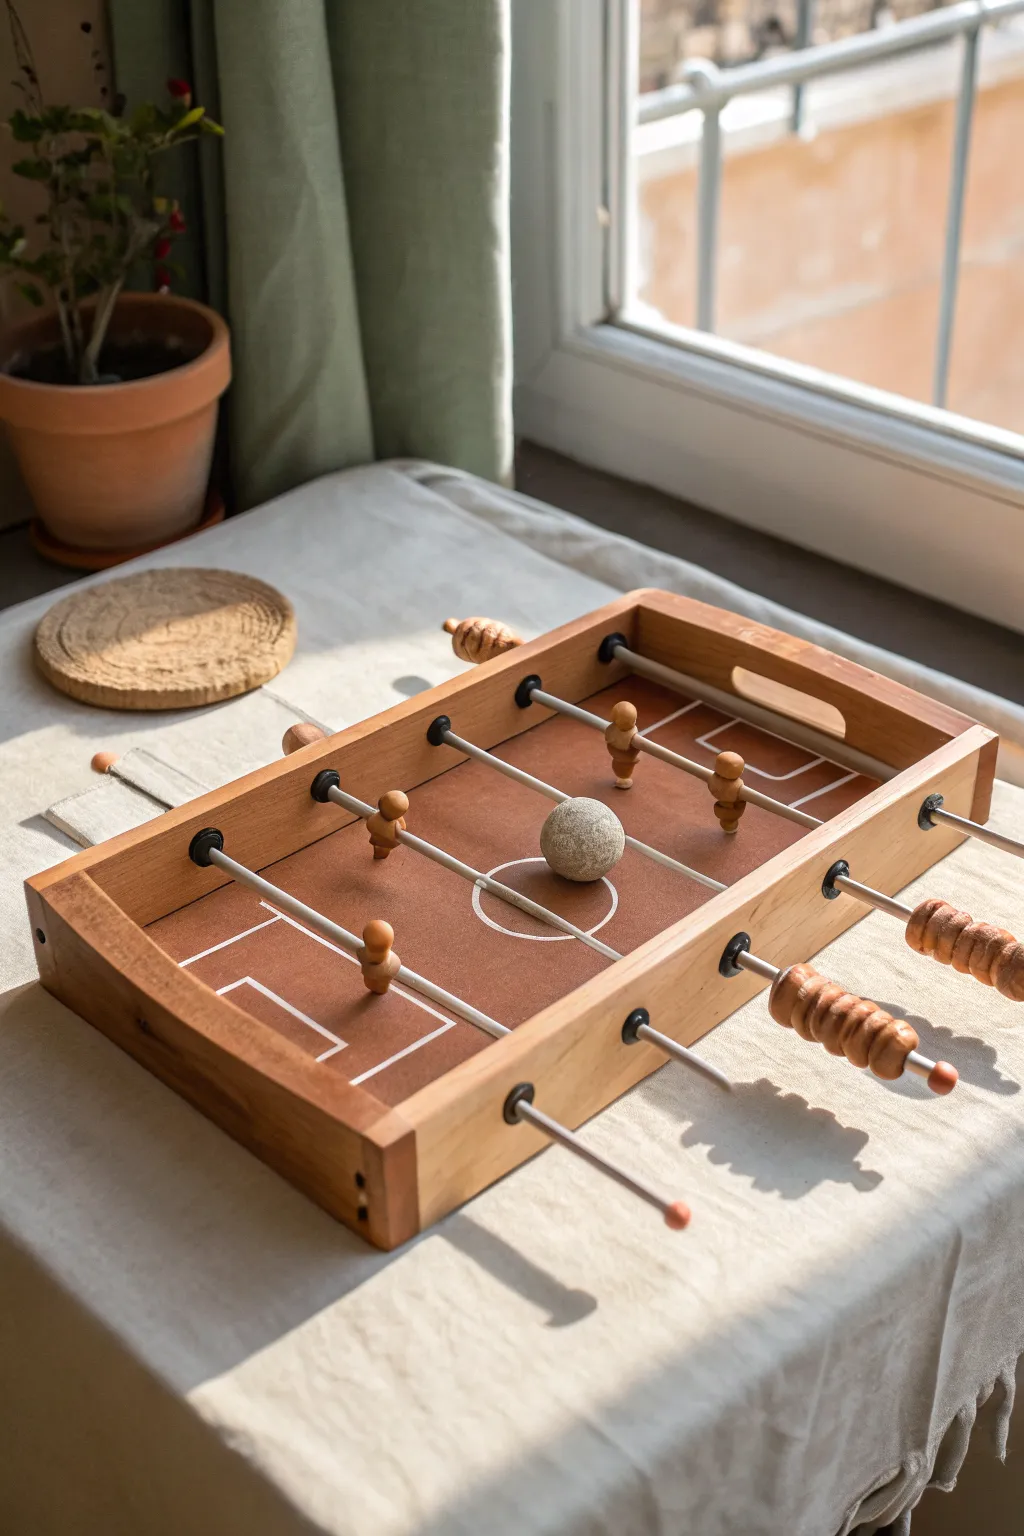
This charming, portable foosball table combines sleek woodwork with custom clay elements for a sophisticated take on the classic arcade game. Featuring a rich brown pitch, minimalist players, and unique textured handles, it’s perfect for a desktop distraction or a handmade gift.
How-To Guide
Materials
- Hardwood box frame (approx. 12×8 inches, 2 inches deep) or wood slats to build one
- Thin plywood or hardboard for the base
- Polymer clay (terracotta or wood tone)
- Air-dry clay or stone-textured clay (for the ball)
- Aluminum or steel rods (approx. 4mm – 6mm diameter)
- Wooden beads or clay for handles
- Brown acrylic paint (burnt sienna or similar)
- White paint marker or fine detail brush with white acrylic
- Drill with bit matching rod diameter
- Super glue or strong epoxy
- Rubber grommets or small washers
- Fine-grit sandpaper
- Matte sealant spray
Step 1: Constructing the Stadium
-
Assemble the box frame:
If you aren’t starting with a pre-made tray, cut four strips of hardwood to create a rectangular frame approximately 12 by 8 inches. Use wood glue and small finish nails to secure the corners. Ensure the wood is smooth and sanded. -
Create the rod holes:
Measure and mark the positions for the lateral holes on the long sides of the frame. You’ll need two holes on each side, spaced evenly. Drill these carefully, ensuring they are perfectly level so the rods slide smoothly. -
Prepare the playing field:
Cut your plywood base to fit snugly inside the frame. Paint the entire surface with a rich, reddish-brown acrylic paint to simulate a clay court or vintage leather pitch. Let this dry completely. -
Draw the pitch lines:
Using a ruler and a white paint marker, draw the boundaries, center line, and goal boxes. I find a white paint pen gives sharper, cleaner lines than a brush for this step. Don’t forget the center circle. -
Attach the base:
Once the paint is dry, glue the base securely to the bottom of your wooden frame. If you want extra durability, add small nails from the bottom up into the frame walls.
Sticky Rods?
If rods don’t spin freely, the holes might be too tight. Use a rolled-up piece of sandpaper to slightly widen the holes in the wood frame, then re-lubricate with wax.
Step 2: Sculpting the Players & Ball
-
Form the player bodies:
Using polymer clay in a warm wood tone or terracotta color, roll four small cylinders for the players. Shape them slightly narrower at the waist and round at the top. -
Create the rod channel:
Before baking, carefully press a spare piece of your metal rod horizontally through the torso of each player to create the channel. Wiggle it slightly so the hole is just big enough to slide onto the real rods later. -
Sculpt the ball:
Roll a sphere of stone-textured or granite-colored clay. Keep it slightly rough or textured to help with grip during gameplay, but round enough to roll true. -
Make the handles:
You can use pre-made wooden beads, or for a custom look, sculpt ringed handles from polymer clay as seen in the photo. Create a stack of clay rings or carve grooves into a cylinder to achieve the ribbed grip texture. -
Bake the clay components:
Follow the manufacturer ‘s instructions for your specific brand of clay to bake the players, ball, and handles. Let them cool completely before handling.
Dual Teams
Paint the top half of two players a different color, or use two distinct shades of clay, to clearly differentiate the opposing team for clearer gameplay.
Step 3: Assembly & Finishing
-
Insert the rods:
Slide your metal rods through the drilled holes in the frame. If the fit is loose, you can add small rubber grommets on the outside later to keep them centered. -
Mount the players:
Slide the clay players onto the rods. Position them centrally within their zones. Secure them in place using a drop of strong epoxy or super glue inside the hole you created earlier. -
Attach the handles:
Fix the textured handles to the ends of the rods. Use epoxy ensuring a strong bond, as these will take the most stress during intense matches. -
Add safety caps:
On the opposite ends of the rods (the side without handles), attach small wooden beads or rubber caps to prevent the metal from sliding out or scratching anyone. -
Seal the surface:
Give the painted pitch a light coat of matte spray sealant to protect the white lines from wear and tear. -
Final smooth out:
Rub a tiny bit of wax or soap on the rods where they pass through the wood frame to ensure silky smooth spinning action.
Give the ball a test flick and enjoy your custom desktop stadium
Mini Skee-Ball Ramp
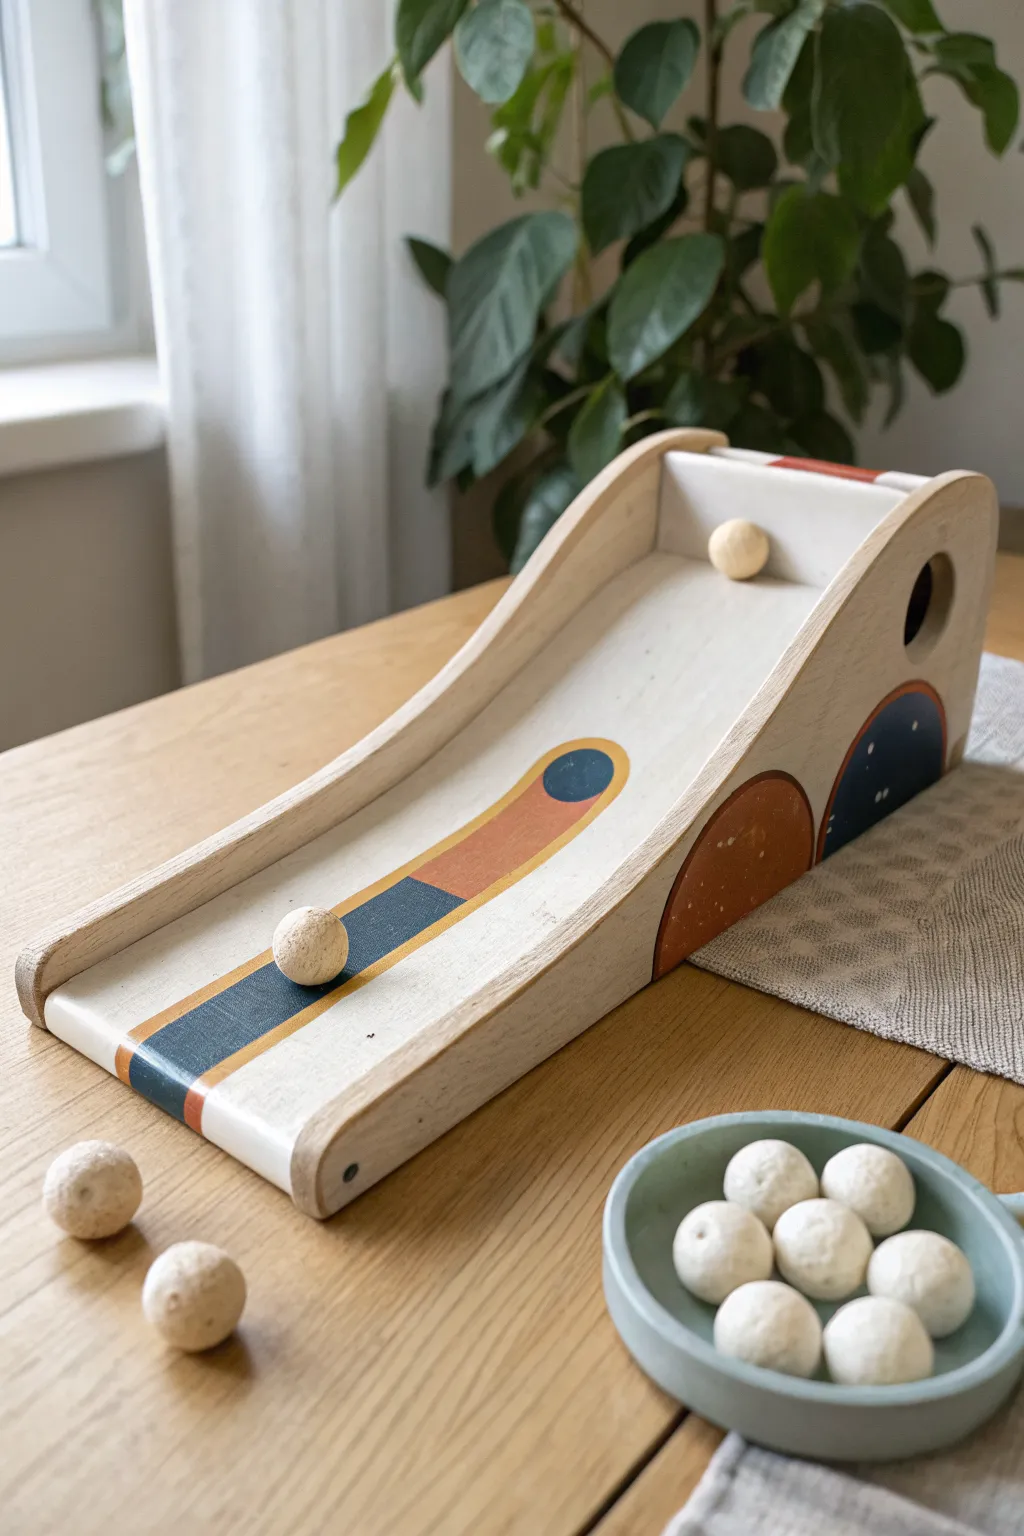
Bring the classic arcade excitement home with this beautifully crafted wooden ramp designed for rolling handmade clay spheres. The smooth, inclined surface features retro-inspired painted arches and distinct scoring zones, making it a stylish and fun addition to your game shelf.
Step-by-Step
Materials
- 1/4-inch balsa wood or basswood sheet
- Air-dry clay (white or natural stone color)
- Craft knife or scroll saw
- Fine-grit sandpaper (220 grit)
- Wood glue
- Acrylic paints (matte white, navy blue, terracotta orange)
- Masking tape or painter’s tape
- Paintbrushes (flat shader and fine detail)
- Ruler
- Pencil
- Small ceramic bowl (optional, for storage)
- Clear matte varnish (spray or brush-on)
Step 1: Crafting the Clay Spheres
-
Portion the clay:
Begin by pinching off small, equal-sized chunks of air-dry clay. You’ll want them to be roughly 1 inch in diameter when rolled. -
Roll the spheres:
Roll the clay between your palms to create smooth, round balls. Don’t worry about perfection; a slightly rustic texture adds charm, resembling stone. -
Dry thoroughly:
Set the balls aside on a clean cloth or drying rack. Allow them to dry completely for 24-48 hours, turning them occasionally to ensure even drying.
Sticky Rolling?
If clay balls don’t roll smoothly, sand them gently after drying. If the wood ramp feels gritty, sand lightly with 400-grit paper and apply a coat of wax.
Step 2: Building the Ramp Structure
-
Cut the base:
While the clay dries, cut a rectangular strip of wood for the main ramp surface, approximately 4 inches wide and 12 inches long. -
Draft the side panels:
Draw the side profile on your wood sheet. You want a shape that starts low (about 1 inch high) and curves gently upward to a height of about 4-5 inches at the back. -
Create the scoring hole:
On the taller end of one side panel (or the backboard depending on your design preference), sketch a circle slightly larger than your clay balls. Use a craft knife or drill to cut this hole out carefully. -
Cut out remaining pieces:
Cut out both side panels and a small rectangular backboard that fits between the sides at the top. -
Sand edges:
Use fine-grit sandpaper to smooth all cut edges, especially the curve of the side panels, to prevent splinters. -
Assemble the frame:
Apply wood glue to the edges of the ramp base. Attach the side panels so the ramp sits flush inside them. I find using masking tape to hold the pieces together while the glue sets is very helpful. -
Attach the backboard:
Glue the final back piece at the top of the ramp to stabilize the structure.
Level It Up
Add numbered point values inside the painted zones or install a small bell inside the hole so it chimes when you make a winning shot.
Step 3: Painting and Finishing
-
Base coat:
Paint the entire ramp surface (the part the ball rolls on) with a matte white acrylic paint. Let it dry completely. -
Tape the design:
Use masking tape to mark out a central lane. The design features a long stripe down the middle with a rounded end. -
Paint the center stripe:
Fill in the taped area with terracotta orange paint near the bottom and transition to a navy blue near the top, or choose a split-color design as shown. -
Add side details:
Freehand or use a stencil to paint semi-circles on the exterior side panels. Use the terracotta for smaller arches and navy blue for larger ones to match the ramp stripe. -
Detailing:
Add small white specks or ‘stars’ onto the navy blue sections for a whimsical touch. -
Seal the project:
Once all paint is dry, apply a coat of clear matte varnish to the wood and the clay balls to protect them from wear during play.
Now you have a stylish, handcrafted game ready for your next game night or rainy afternoon
Spinner Wheel Game
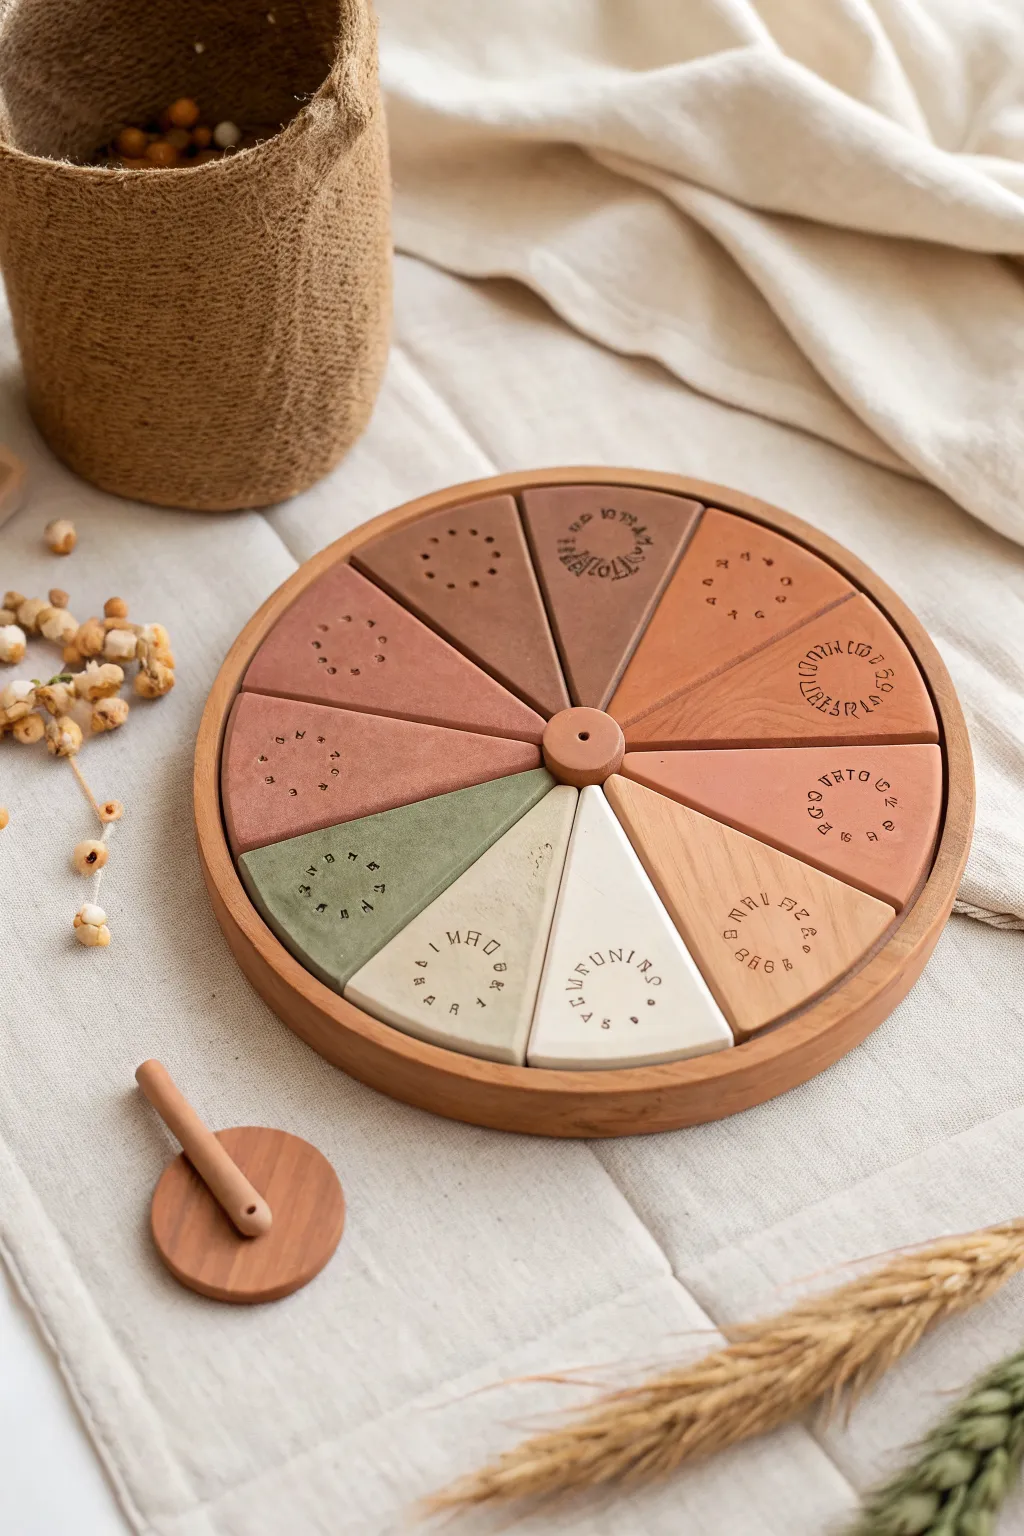
This beautifully tactile game wheel combines the smooth finish of polymer or air-dry clay with a satisfying spinning mechanism. The aesthetic features a calming palette of terracotta, sage, and cream wedges, each stamped with unique glyph-like patterns for a rustic, ancient feel.
How-To Guide
Materials
- Polymer clay (terracotta, beige, dark brown, sage green, cream)
- Round wooden tray or pizza pan (approx. 8-10 inches diameter)
- Lazy Susan bearing hardware (flat turntable mechanism)
- Central wooden dowel or small spool
- Rolling pin
- Clay knife or craft blade
- Circle template or compass
- Stamps (alphabet, geometric, or floral patterns)
- Sandpaper (fine grit)
- Strong adhesive (E6000 or wood glue)
- Matte sealant/varnish
- Small wooden spinning top (optional game piece)
Step 1: Planning and Base Preparation
-
Measure the base:
Begin by measuring the inner diameter of your wooden tray. You need to know the exact space available for your clay wedges to fit snugly without friction. -
Create a wedge template:
Draw a circle on paper matching your tray’s inner diameter. Use a protractor to divide this circle into 10 equal sections (36 degrees each). Cut out one single wedge shape to use as your master template. -
Prep the hardware:
If your wooden tray isn’t already a spinner, attach the Lazy Susan bearing to the underside of the tray now using strong adhesive or screws, ensuring it is perfectly centered for a wobble-free spin.
Step 2: Creating the Clay Wedges
-
Mix your colors:
Prepare your clay palette. You want a gradient of earth tones. I like to mix a little white into the terracotta to create softer hues, and mix brown into the green for that muted sage look. -
Roll out the slab:
Roll your clay out to a consistent thickness of about 1/4 inch. Using depth guides or rulers on either side of your rolling pin helps keep the surface perfectly level. -
Cut the shapes:
Place your paper wedge template onto the clay. Carefully cut around it using a sharp craft blade. You will need to cut 10 wedges in total, varying the colors as seen in the reference imag—some rust, some brown, some cream, and one green. -
Smooth the edges:
Gently run your finger along the cut edges of each wedge to soften the sharp corners. They should look like smooth, distinct tiles rather than sharp shards. -
Make the center hub:
Create a small circle of clay to cover the central meeting point of the wedges. This can be shaped around a small wooden spool or formed into a donut shape with a hole in the middle.
Clean Cuts Pro-Tip
Chill your rolled clay slab in the fridge for 10 minutes before cutting. Firm clay distorts less under the knife, giving you sharper, more precise wedge shapes.
Step 3: Stamping and Detailing
-
Plan the patterns:
Before stamping, decide on a pattern for each color group. The image uses circular arrangements of small glyphs, dots, and letters. -
Stamp the designs:
Press your stamps gently into the soft leather-hard clay. A circular motion works best here; try rotating the wedge as you stamp to create a ring of symbols. Use letter stamps for random characters or dotting tools for minimal texture. -
Initial drying or baking:
If using polymer clay, bake the wedges and the center hub on a baking sheet according to the package instructions (usually 275°F for 15-30 minutes). If using air-dry clay, let them cure for 24-48 hours on a flat surface to prevent warping.
Level Up: Magnetic Play
Embed small magnets into the bottom of the clay wedges and use a metal pizza pan base. This makes the game modular so you can rearrange the color order whenever you like.
Step 4: Assembly and Finish
-
Sand for smoothness:
Once fully cured and cool, lightly sand the edges of the wedges with fine-grit sandpaper. This ensures they fit together nicely in the circle formation without snagging. -
Test the fit:
Arrange all wedges inside the wooden tray. They should form a complete circle with a small gap in the center for the hub. -
Glue the wedges:
Apply a strong adhesive to the back of each clay wedge and press them firmly onto the wooden tray surface. Work opposite pairs (12 o’clock then 6 o’clock) to keep the spacing even. -
Attach the center:
Glue the central clay hub or wooden spool into the middle gap. This hides the points where the wedges meet and completes the wheel look. -
Enhance the stamp work:
To make the stamped patterns pop, you can dilute a little dark acrylic paint with water and wash it over the clay. Wipe it off immediately with a damp cloth, leaving the dark pigment only in the recessed stamped areas. -
Seal the surface:
Apply a coat of matte varnish over the clay parts. This protects them from wear and tear during gameplay and gives the piece a professional, finished look. -
Add the spinner accessory:
If you created the separate wooden spinning top shown in the image, sand it smooth and treat it with a wood wax or oil to match the tray’s finish.
Now you have a stunning, handcrafted game piece that looks as good as an art object on your coffee table
Storytelling Prompt Stones
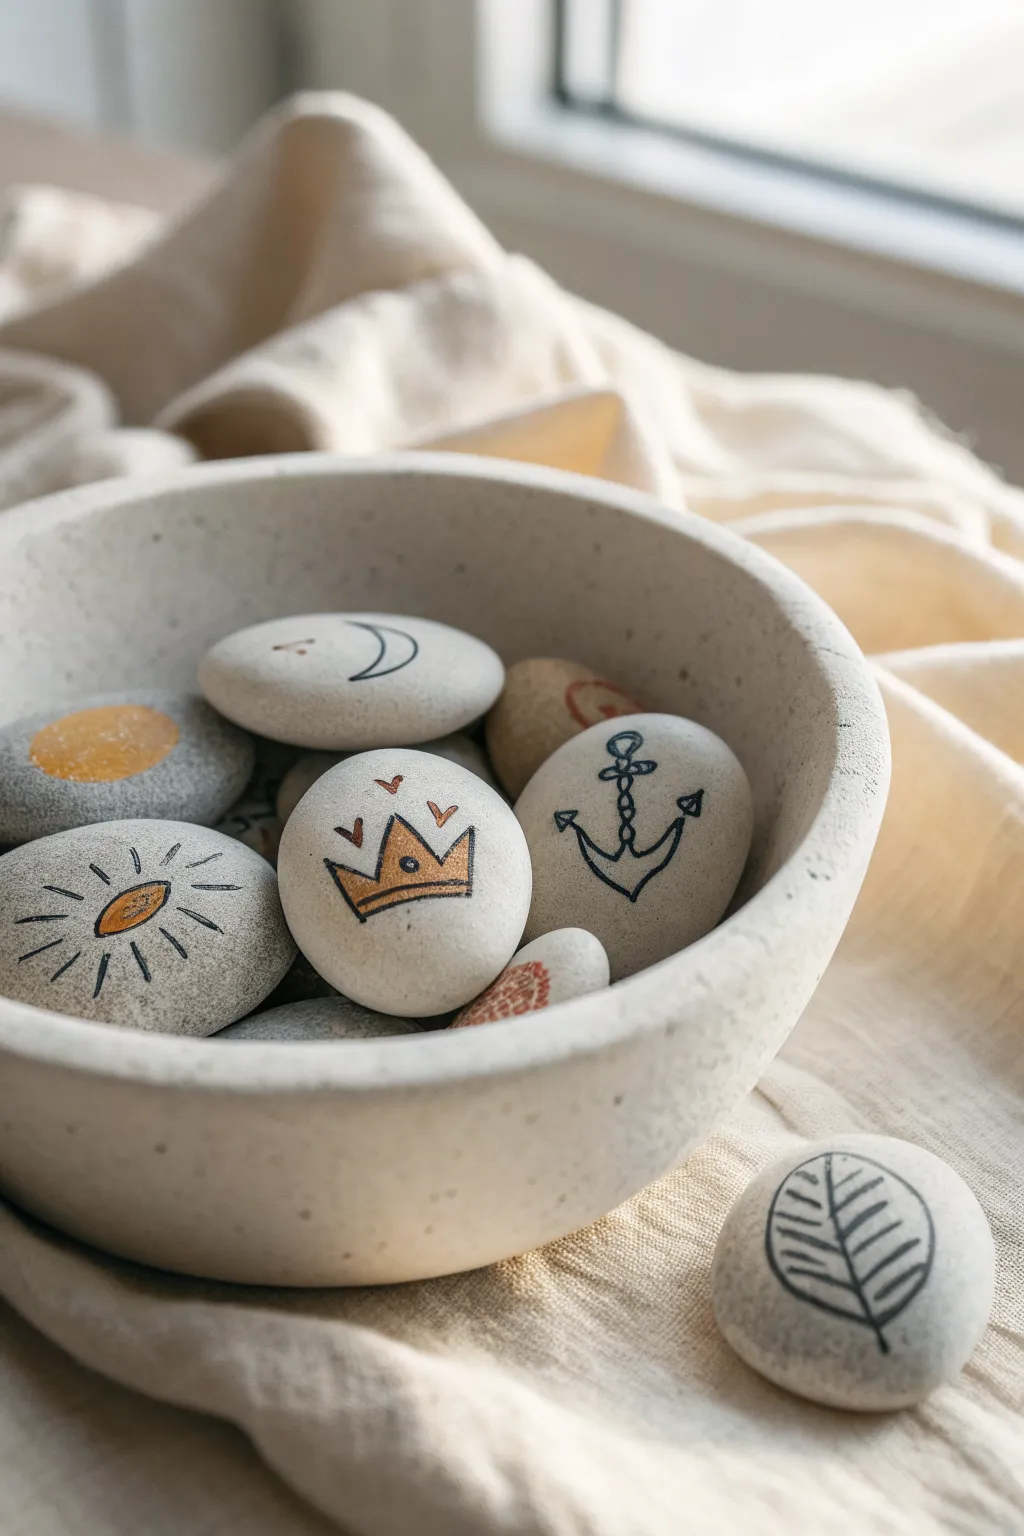
These charming, smooth pebbles feature simple, hand-drawn icons that spark endless imaginative tales. The soft, neutral palette combined with gold accents and crisp black linework gives them a modern, heirloom-quality feel perfect for creative play.
Step-by-Step Tutorial
Materials
- White or light gray polymer clay (or air-dry stone clay)
- Black ultra-fine tip permanent marker or acrylic paint pen
- Gold metallic acrylic paint or paint pen
- Yellow ochre acrylic paint
- Rust or terracotta acrylic paint
- Small fine-point detail brush
- Matte varnish or sealant
- Fine grit sandpaper (400-600 grit)
- Parchment paper based baking sheet (if using polymer clay)
Step 1: Shaping the Canvas
-
Condition the Clay:
Begin by thoroughly conditioning your polymer clay in your hands until it becomes soft and pliable, ensuring there are no air bubbles trapped inside. -
Portion Control:
Divide the clay into equal portions, aiming for pieces about the size of a large walnut, though looking slightly varied adds to the natural stone effect. -
Roll Smooth Spheres:
Roll each portion between your palms to create a smooth, tight ball. -
Flatten into Pebbles:
Gently press the ball onto your work surface with the palm of your hand, flattening it into a rounded disc shape. -
Smooth the Edges:
Pick up the clay disc and use your thumb to gently round over the sharp edges, mimicking the look of a water-worn river stone. -
Check Consistency:
Ensure all stones are roughly uniform in thickness, about 1/4 to 1/2 inch thick, so they feel substantial in the hand. -
Cure or Dry:
If using polymer clay, bake according to the manufacturer’s instructions on your parchment-lined sheet. If using air-dry clay, allow them to dry fully for 24-48 hours.
Step 2: Refining the Surface
-
Cool and Inspect:
Allow the stones to cool completely before handling them further. -
Sand for Texture:
Take a piece of fine-grit sandpaper and lightly buff the surface of each stone to remove any fingerprints and create a slightly matte, stone-like texture. -
Wipe Clean:
Use a barely damp cloth to wipe away any sanding dust to ensure a clean surface for your artwork.
Stone Effect Trick
Mix a tiny pinch of black pepper or used dried coffee grounds into white clay before shaping. This gives a fantastic realistic speckled granite look.
Step 3: Adding the Iconography
-
Plan the Icons:
Sketch out simple symbols on scrap paper first; think classic storytelling elements like a crown, anchor, leaf, sun, moon, or eye. -
Paint Color Blocks First:
Start with the colored elements. Use the yellow ochre for the sun and crown base, and the rust color for smaller details like hearts or textures. -
Apply Gold Accents:
Once the base colors are dry to the touch, add gold metallic paint on top of the crown or the center of the sun for a touch of royal shimmer. -
Let Paint Dry:
Allow these painted sections to dry completely so your marker nib doesn’t get clogged or smear the paint. -
Draw Outlines:
Using your ultra-fine black marker, carefully draw the outlines over and around your painted shapes. Keep the lines deliberate but slightly organic. -
Add Texture Details:
Use the pen to add small details, like the veins in the leaf stone, the chain on the anchor, or the eyelashes on the eye symbol. -
Create Plain Line Drawings:
For some stones, skip the paint entirely and just draw simple line art, like the anchor or the leaf shown in the example, to create visual variety in your set. -
Seal the Work:
Finish by applying a thin coat of matte varnish over the entire stone to protect the drawing from oils and wear during play.
Smudged Ink?
If your marker smears on the clay surface, wait for it to dry fully, then gently scratch the mistake away with a craft knife or sandpaper.
Gather your new collection in a simple bowl and get ready to weave wonderful stories together
Word-Building Letter Tiles
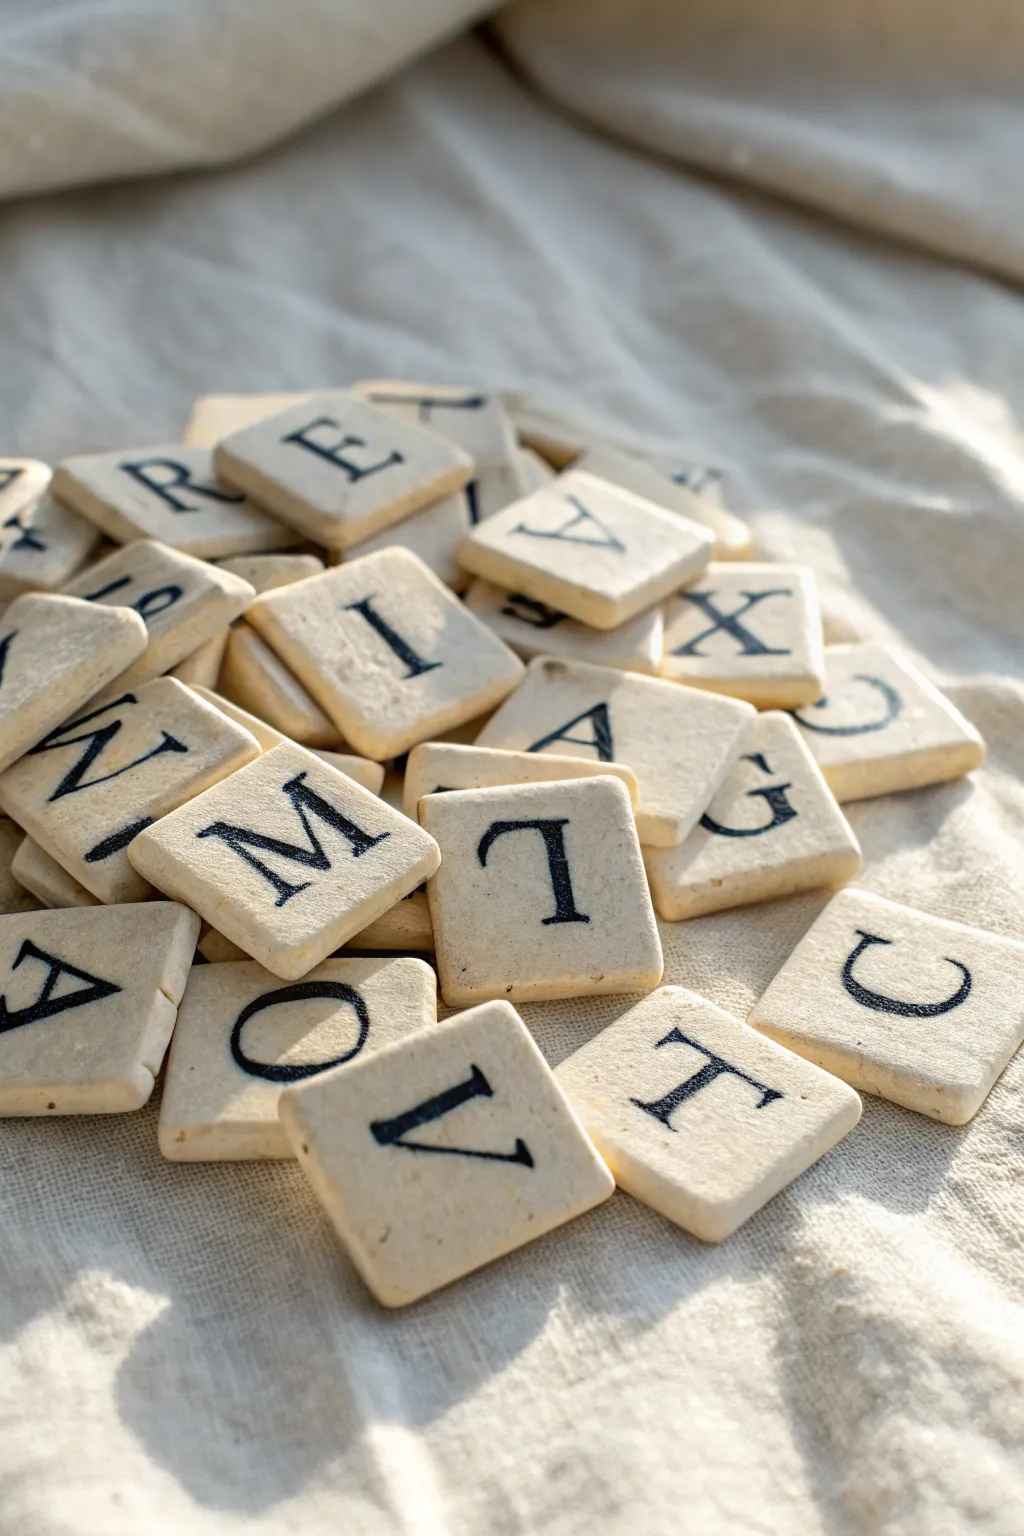
Reimagine classic word games with this customized set of letter tiles made from air-dry or polymer clay. These smooth, tactile squares feature classic serif typography and a lovely rustic finish that makes spelling out words feel special.
Step-by-Step Guide
Materials
- White or beige air-dry clay (or polymer clay)
- Rolling pin
- Square cookie cutter (approx. 1 inch) or sharp craft knife
- Rubber alphabet stamps (serif font)
- Black ink pad (permanent/archival quality) OR black acrylic paint
- Fine-grit sandpaper
- Matte spray varnish or acrylic sealer
- Parchment paper or silicone mat
Step 1: Preparing the Clay Base
-
Condition the clay:
Begin by working a handful of clay in your hands to warm and soften it. If you are using air-dry clay, adding a tiny drop of water can help unexpected cracking, while polymer clay just needs the heat of your hands. -
Roll out the slab:
Place the clay on a sheet of parchment paper or a silicone mat. Use your rolling pin to flatten the clay into a slab of consistent thickness, aiming for about 1/4 inch (6mm) to give the tiles a nice weight. -
Cut the squares:
Using a small square cookie cutter, punch out as many tiles as you need (a standard Scrabble set has 100 tiles). If you don’t have a cutter, use a ruler and a craft knife to grid out perfect squares. -
Smooth the edges:
Gently lift each square and use your finger to tap down any sharp overhangs or rough edges created by the cutting tool. You want the tiles to feel smooth in the hand. -
Dry the tiles:
If using air-dry clay, arrange the plain tiles on a flat surface and let them dry for 24-48 hours, flipping them halfway through to prevent curling. If using polymer clay, bake according to the package instructions and let cool completely.
Uneven Ink?
If your stamped letters look patchy, your clay might be too textured. Lightly sand the top face again to make it perfectly smooth before re-stamping.
Step 2: Adding the Lettering
-
Sand for perfection:
Once hardened, inspect your blank tiles. Use fine-grit sandpaper to buff away any remaining fingerprints or rough bumps on the surface or corners. -
Prepare the stamps:
Clean your rubber stamps to ensure there is no old debris in the crevices. Select a serif font to match the classic look seen in the project image. -
Ink the stamp:
Press the stamp firmly onto a black pigment ink pad. Make sure the letter is fully coated but not dripping with excess ink, which can cause smearing. -
Stamp the tile:
Align the stamp carefully over the center of a tile. Press straight down with even pressure—try not to rock the stamp—and lift straight up to leave a crisp black impression. -
Stamp method alternative:
I prefer using ink, but if you don’t have pads, you can lightly brush black acrylic paint onto the stamp raised face, or even freehand the letters with a fine-point permanent marker. -
Repeat the alphabet:
Continue stamping until you have completed your full set of letters. It is helpful to keep a checklist of how many of each vowel and common consonant you need based on the game you plan to play.
Step 3: Finishing Touches
-
Let the ink set:
Allow the ink or paint to dry completely. Pigment ink can remain wet for a while on non-porous surfaces, so give it at least an hour to prevent smudging. -
Seal the tiles:
Take the fully dried tiles outside or to a well-ventilated area. Place them face up on scrap paper and apply a light mist of matte spray varnish. -
Apply a second coat:
Once the first coat is dry to the touch, apply a second light coat to ensure the clay is sealed against moisture and dirt from handling. -
Final cure:
Let the final sealant layer cure overnight before gathering them into a bag for your first game.
Add Scoring Values
Make them playable for Scrabble by adding the small point value number in the bottom corner of each tile using a fine-point black pen.
Now gather your friends and enjoy playing with a game set made entirely by hand
Build-Your-Own Adventure Path Board
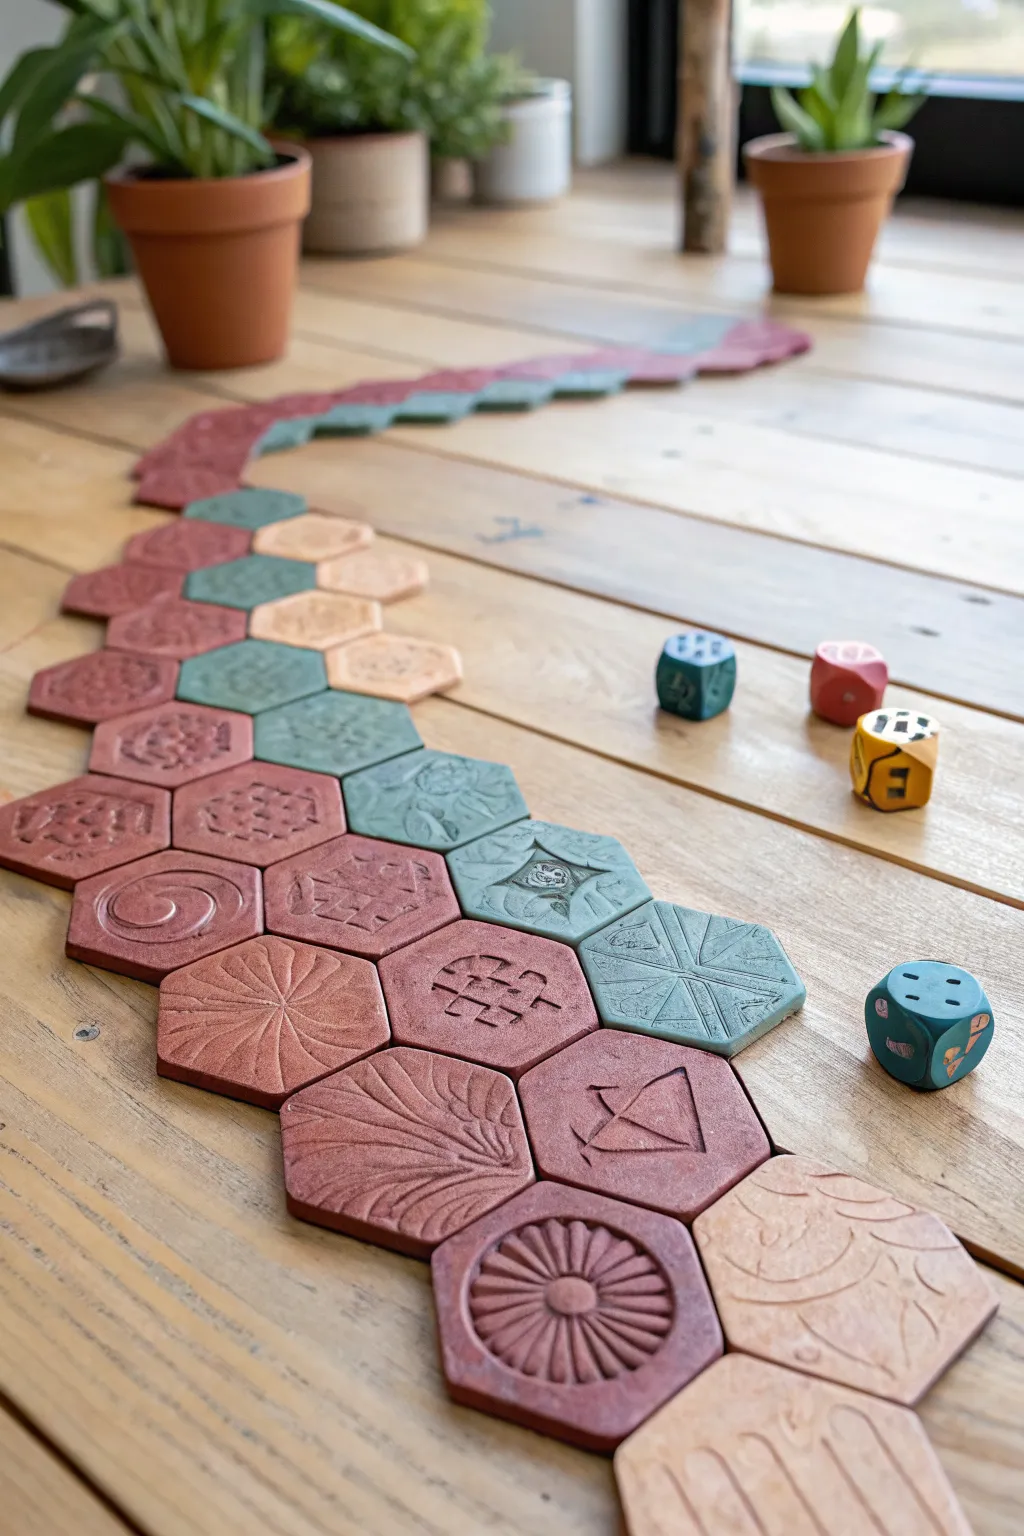
Transform your tabletop gaming with a completely modular, hand-carved adventure path made from earthy, textured clay tiles. This project combines geometric precision with organic patterns, letting you lay out a winding journey that changes every time you play.
Step-by-Step
Materials
- Polymer clay or air-dry clay (terracotta, stone green, and beige colors)
- Hexagon cookie cutter (approx. 1.5 – 2 inches)
- Texture stamps or carving tools (needle tool, stylus)
- Acrylic rolling pin
- Rolling guides or playing cards (for even thickness)
- Sandpaper (fine grit)
- Matte sealant or varnish
- Parchment paper
Step 1: Preparing the Clay Base
-
Condition the clay:
Begin by thoroughly kneading your clay blocks. Whether you are using polymer or air-dry variants, conditioning is crucial to prevent cracking and ensure the clay takes distinct impressions later. -
Roll out the sheets:
Using your acrylic rolling pin, roll out the clay on a sheet of parchment paper. Use rolling guides or two stacks of playing cards on either side of the clay to ensure a perfectly uniform thickness of about 1/4 inch. -
Cut the hexagons:
Press your hexagon cutter firmly into the rolled clay. Try to maximize space to get as many tiles as possible from a single sheet. You’ll need a mix of colors: primarily terra cotta red, sage green, and lighter beige tones. -
Clean the edges:
Gently gently lift the hexagons away from the scrap clay. Smooth the edges of each tile with your finger or a slightly damp sponge to remove any sharp ridges left by the cutter.
Clean Release Tip
If your clay sticks to the cookie cutter, dip the cutter into a small bowl of cornstarch or water before pressing it into the clay for a perfect, clean release every time.
Step 2: Designing the Symbols
-
Plan your iconography:
Sketch a few ideas on paper first. The image shows a mix of geometric shapes, nature motifs (like shells and swirls), and abstract path markers. You want a variety of ‘terrain’ types. -
Carve linear designs:
For tiles like the ‘arrow’ or ‘geometric grid,’ use a needle tool to carve lines directly into the damp clay. Drag the tool lightly to avoid displacing too much material. -
Stamp organic textures:
Press rubber stamps, textured fabrics, or even found objects like leaves into some of the tiles to create background variety without deep carving. -
Create the sunbursts:
For the striking radial designs, press a small circle tool (like a marker cap) into the center. Then, use a flat modeling tool to radiate lines outward to the hex edges. -
Sculpt the shell motifs:
I like to use a small loop tool here to scoop shallow grooves that fan out from a corner, mimicking the ridges of a scallop shell. -
Add raised elements:
For certain special tiles, roll purely thin snakes of clay and press them onto the tile surface to create raised spirals or borders, blending the seams carefully.
Step 3: Finishing the Tiles
-
Check consistency:
Lay out a small section of tiles to ensure they fit snugly against one another. If any have warped during handling, gently flatten them again with the rolling pin. -
Texture the backs:
Lightly cross-hatch the back of each tile. This gives them a bit of grip on a wooden table so your board doesn’t slide around during intense gaming sessions. -
Bake or dry:
If using polymer clay, bake according to the package instructions (usually 275°F for 15-30 minutes). If using air-dry clay, allow them to dry on a wire rack for 24-48 hours, flipping occasionally. -
Sand the surfaces:
Once fully cured or dry, use fine-grit sandpaper to buff the edges and surface lightly. This removes fingerprints and gives a professional, stone-like feel. -
Apply a wash (Optional):
To make the carvings pop, mix a tiny amount of dark acrylic paint with water. Brush it over the tile and immediately wipe the surface with a paper towel, leaving pigment only in the recesses. -
Seal the tiles:
Apply a thin coat of matte varnish to protect the clay from oils and dirt. A matte finish looks more natural and earthy than gloss. -
Make the dice:
Don’t forget the dice! Roll a cube of clay, smooth the sides, and press numbers or pips deep into the faces before curing. Paint the recessed numbers a contrasting color after baking.
Magnetic Snaps
Embed small neodymium magnets into the sides of each hexagon before baking. Ensure the polarity is consistent so your tiles physically ‘snap’ together on the table.
Now you have a durable, custom game board ready for whatever adventure you dream up next
Stack-and-Balance Totem Game
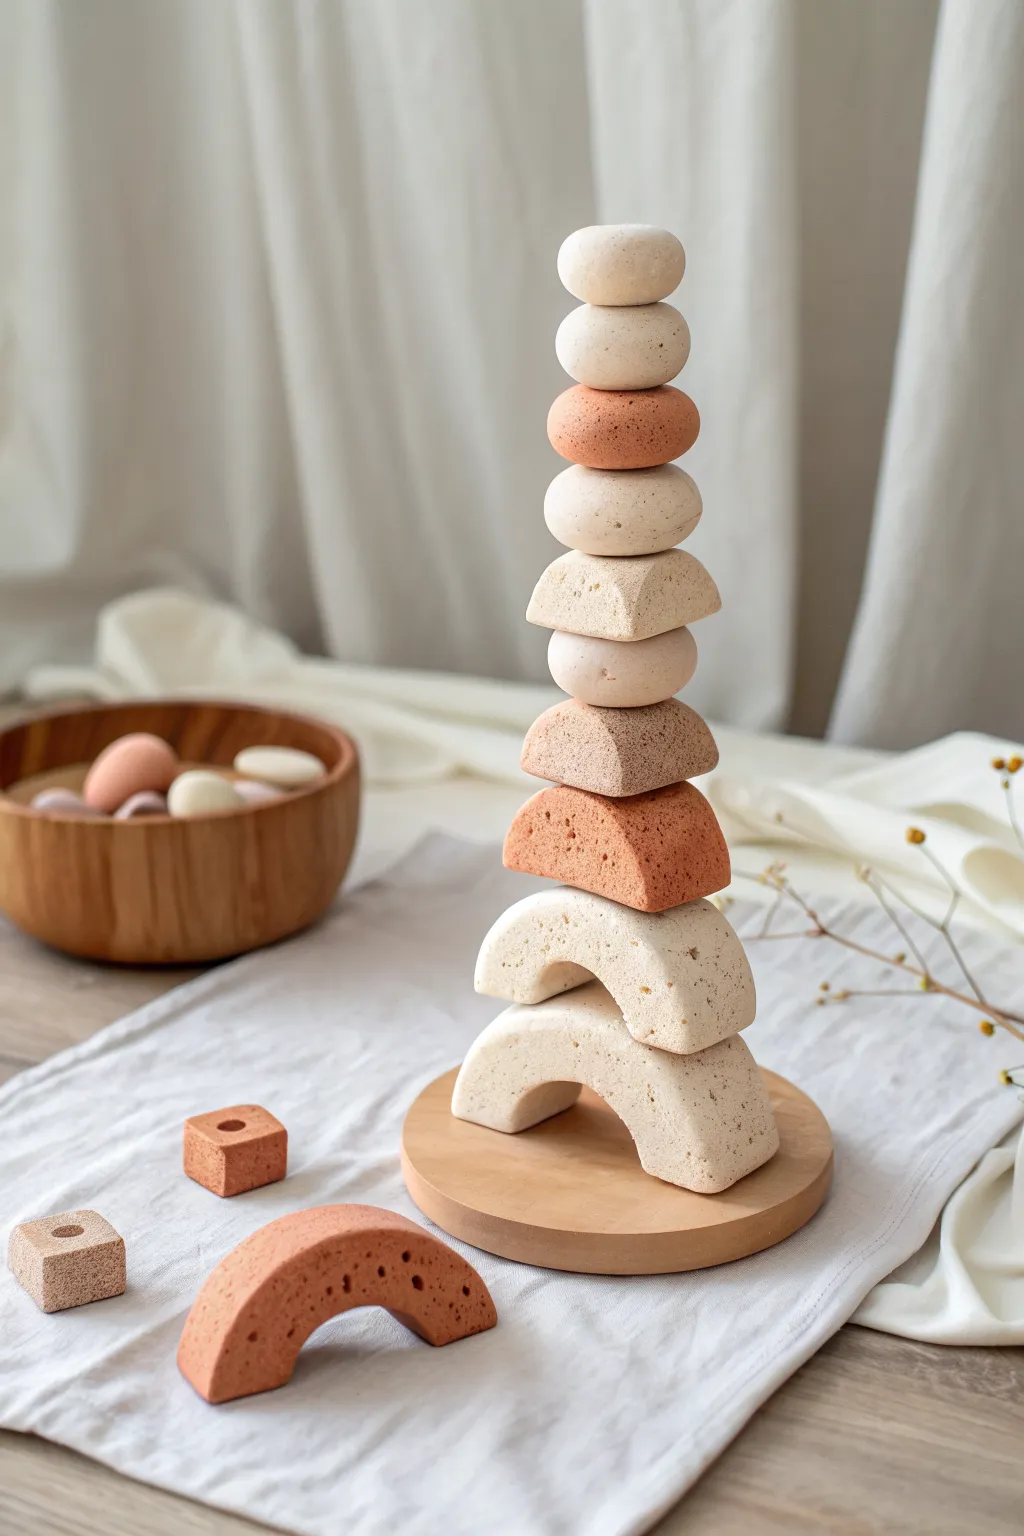
Sculpt a serene, nature-inspired balancing game using simple clay forms in varied earthy tones. This stack-and-balance set features organic pebbles, semi-circles, and arches that double as a meditative desk sculpture when not in play.
Step-by-Step Tutorial
Materials
- Air-dry clay or polymer clay (white, beige, and terracotta colors)
- Speckled sand or dried coffee grounds (for texture)
- Rolling pin
- Circle cutters (various sizes)
- Modeling tools or a dull knife
- Fine-grit sandpaper
- Round wooden coaster or wooden disk (for the base)
- Matte varnish (optional)
Step 1: Preparing the Clay
-
Mix colors:
Start by preparing your color palette. You will need three distinct shades: a creamy white, a soft beige, and a warm terracotta. If using polymer clay, mix colors to achieve these muted, natural tones. -
Add texture:
To mimic the stone-like finish seen in the photo, knead a small pinch of speckled sand or dried coffee grounds into each color batch. This adds that lovely, organic grit.
Uneven Stacking?
If pieces slide off each other too easily, lightly sand the contact points (top and bottom of each shape) to create a rougher surface
Step 2: Shaping the Base Arches
-
Create the large arch:
Take a portion of white or light beige clay and roll it into a thick log, about 1 inch in diameter. Bend this log gently into a ‘U’ shape to form an arch. -
Flatten the sides:
Gently press the front and back of your arch against a flat surface to square them off slightly, ensuring the top surface is flat enough for stacking. -
Sculpt the medium arch:
Repeat the process with a slightly smaller amount of clay to create a second, smaller arch that can sit atop the first one perfectly.
Level Up: Magnetize It
Embed small, strong neodymium magnets inside the clay during the shaping phase. This helps the precarious pieces snap together for an impossible-looking stack
Step 3: Forming the Middle Pieces
-
Cut semi-circles:
Roll out a slab of terracotta clay to about 3/4 inch thickness. Use a large round cutter to punch a circle, then cut that circle exactly in half using a blade. -
Soften edges:
Using your fingers and a bit of water (if using air-dry clay), smooth the sharp cut edges of the semi-circles to look more like tumbled stones. -
Create the flattish wedge:
Sculpt a piece of beige clay into a thick, rounded triangle or wedge shape with a flat bottom and a curved top, acting as a transition piece.
Step 4: Creating the Balancing Pebbles
-
Roll spheres:
Roll four to five balls of varying sizes using different colors from your palette ranging from 1 inch to 1.5 inches wide. -
Flatten into pebbles:
Gently press each ball between your palms to flatten them into lentil or pebble shapes. They shouldn’t be totally flat like coins, but rather plump discs. -
Check stability:
I like to verify that the pebbles can actually sit on top of one another now, while the clay is malleable, pressing them just slightly to create a tiny resting point if needed.
Step 5: Finishing Touches
-
Dry or bake:
If using air-dry clay, let the pieces dry on a wire rack for 24-48 hours. If using polymer clay, bake according to the manufacturer’s instructions. -
Refine the surface:
Once fully cured, use fine-grit sandpaper to buff away any fingerprints or sharp ridges, enhancing the smooth, stone-like feel. -
Seal (Optional):
Apply a coat of ultra-matte varnish if you want to protect the pieces without adding unnatural shine. -
Assemble display:
Place your round wooden base on the table and stack your totem to test the balance and complete the look. -
Create extra geometric bits:
Use leftover clay to form small cubes with holes (beads) or extra mini-arches to scatter around the base as shown in the photo.
Enjoy the calming ritual of stacking your new clay stones into endless formations
Mini Tabletop Sports Kit
Create your own pocket-sized stadium with this charming clay and wood tabletop sports kit. Featuring a handcrafted scoring ring, textured game balls, and a woven goal, this set brings the excitement of the field to your coffee table.
Step-by-Step
Materials
- White air-dry clay or polymer clay
- Wooden round plaque (approx. 8-10 inches)
- Small wooden tray (rectangular)
- Balsa wood sheet (thin)
- Waitang or rattan reed (for the goal)
- Fine grit sandpaper
- Carving tools or needle tool
- Acrylic paint (black/dark brown for markings)
- Matte sealant spray
- Wood stain (medium oak or walnut)
- Strong craft glue or wood glue
Step 1: Crafting the Game Balls
-
Shape the base spheres:
Begin by rolling slightly less than a dozen balls from your white clay. You want them to be uniform in size, roughly 1 inch in diameter, similar to a large marble or a ping pong ball. -
Smooth the surface:
Roll each ball gently between your palms to remove any cracks or seams. For a polished look, I like to dip my finger in a little water to slick down the surface before drying. -
Add texture (optional):
For the specific ‘game ball’ look seen on the round board, take four of your spheres and gently press a rough fabric or burlap square against them to imprint a subtle texture. Leave the other balls smooth. -
Add detail holes:
On the textured balls, use a needle tool to poke two or three tiny, shallow holes near the top to mimic bowling ball or bocce grips. -
Dry the clay:
Allow all clay balls to dry completely according to the package instructions. Air-dry clay usually needs 24-48 hours; rotate them occasionally so they don’t develop flat spots.
Flat Spot Fix
If your clay balls developed flat spots while drying, gently sand them round again with fine-grit sandpaper before sealing.
Step 2: Constructing the Playing Field
-
Prepare the wooden base:
Sand your round wooden plaque until it is perfectly smooth. This will be the main playing surface, so you don’t want roughness interfering with the roll. -
Create the central scoreboard:
Cut a smaller circle from your thin balsa wood sheet, roughly 5 inches in diameter. This will sit in the center of the wooden plaque. -
Etch the rings:
Using a compass or tracing circular objects, lightly draw concentric rings onto the balsa circle. Carefully carve over these lines with a carving tool to create grooved tracks. -
Add scoring segments:
Carve straight radial lines dividing the rings into segments. Use a fine-point marker or watered-down dark paint to add small numbers or symbols into the segments for scoring values. -
Stain the wood:
Apply a medium wood stain to the large round plaque and the rectangular tray. Leave the balsa center piece natural or stain it extremely lightly for contrast. -
Assemble the board:
Once dry, glue the detailed balsa circle directly into the center of the larger round wooden plaque.
Level Up: Magnetic Action
Embed small magnets inside the clay balls before drying, and under the wood board, to create a ‘sticky’ landing zone for harder shots.
Step 3: Weaving the Goal & Final Assembly
-
Form the goal frame:
Soak your rattan or reed in warm water until pliable. Bend a thicker piece into a ‘U’ shape to form the main arch of the goal frame. -
Add support ribs:
Bend two smaller ‘U’ shapes and attach them perpendicular to the main frame to create depth, securing joints with strong glue or binding wire. -
Weave the net:
Using thinner reed or twine, create a loose lattice pattern between the frame ribs. It doesn’t need to be perfect; a rustic, open weave captures the look best. -
Secure the goal base:
Glue a straight piece of reed across the bottom back of the goal to stabilize it so it stands upright on its own. -
Seal everything:
Spray the wooden components and the dry clay balls with a matte sealant to protect them from handling and moisture. -
Set the scene:
Arrange your smooth balls in the rectangular tray and place the textured game balls on the round board to complete the set.
Now you have a beautifully handcrafted game set ready for display or play
Puzzle Box With Hidden Clue Tiles

Craft a set of enchanting terracotta clue tiles nestled within a custom wooden box. These tactile, engraved symbols carry an ancient aesthetic perfect for scavenger hunts or tabletop escape room games.
Detailed Instructions
Materials
- Polymer clay (terracotta or reddish-brown color)
- Small wooden box with lid (square shape preferred)
- Clay roller or rolling pin
- Square cookie cutter (sized to fit 4 inside your box)
- Sculpting need tool or sharp toothpick
- Ball stylus tool
- Fine-grit sandpaper
- Brown acrylic paint (burnt umber/dark wash)
- Paper towels or soft cloth
- Matte spray varnish
Step 1: Preparing the Clay Tiles
-
Condition the Clay:
Begin by warming the terracotta polymer clay in your hands, kneading it until it becomes soft and pliable. This prevents cracks during the sculpting process. -
Roll Out the Slab:
Roll the clay onto a flat surface to an even thickness of about 1/4 inch (6mm). Using thickness guides or playing cards stacked on either side of your roller ensures a perfectly level surface. -
Measure and Cut:
Check the interior dimensions of your wooden box. Select a square cutter that allows four tiles to fit snugly inside, commonly a 2×2 grid. Press the cutter firmly into the clay to create four identical squares. -
Smooth the Edges:
Before sculpting, gently run your finger along the cut edges of each square to soften the sharp corners. This gives the finished pieces a worn, historical artifact feel rather than a freshly cut look.
Depth Perception
Make your carvings deeper than you think is necessary. The antiquing wash needs deep grooves to pool in, otherwise, the symbols won’t pop visually.
Step 2: Carving the Symbols
-
Drafting the Designs:
Lightly trace your designs onto the clay surface using a needle tool without digging deep yet. For this set, aim for celestial and geometric themes: a crescent moon, an angular rune, a radiant star, and a grid of dots. -
Sculpting the Moon:
For the moon tile, use a small loop tool or press the side of a rounded tool to depress the clay into a crescent shape. Smooth the interior of the crescent so it looks carved. -
Detailing the Moon:
Add small asterisk-like stars around the crescent using the tip of your needle tool, pressing down firmly to create distinct indentations. -
Carving the Rune:
For the second tile, use a straight edge or knife tool to incise the triangle and intersecting line symbol. Press deeply to ensure the lines remain visible after baking. -
Creating the Dot Grid:
On the third tile, use a ball stylus to press a uniform grid of small circles. I find that starting with the corner dots helps keep the alignment straight. -
Carving the Star:
For the final star tile, carve a central cross, then add diagonal lines. Deepen the center point and taper the cuts toward the tips to create a beveled, gemstone-like effect. -
Adding Texture:
Gently tap the flat surfaces of the tiles with a textured sponge or sandpaper to remove fingerprints and add a stone-like grain.
Distorted Shapes?
If lifting the clay squares deforms them, pop the rolled slab into the fridge for 10 minutes before cutting. Cold clay holds sharp edges much better.
Step 3: Finishing and Assembly
-
Bake the Pieces:
Place your tiles on a parchment-lined baking sheet. Bake according to your clay manufacturer’s specific temperature and time instructions (usually 275°F/135°C for 15-30 minutes). -
Allow to Cool:
Let the tiles cool completely inside the oven with the door slightly ajar. Sudden temperature changes can sometimes cause brittle clay to crack. -
Applying an Antiquing Wash:
Mix a small amount of burnt umber acrylic paint with water. Brush this wash over the entire surface of the cooled tiles, ensuring it gets into all the carved grooves. -
Wiping Back:
Immediately wipe the surface with a paper towel. The dark paint will remain in the recessed symbols and texturing, while the raised areas return to the terracotta color, highlighting the design. -
Sealing the Clay:
Once the paint is fully dry, apply a light coat of matte spray varnish to protect the finish without making the tiles look artificial or glossy. -
Prepare the Box:
While the varnish dries, you can stain or oil your wooden box to match the rustic aesthetic. A dark walnut stain pairs beautifully with the terracotta. -
Final Assembly:
Place the finished tiles into the box. They should nestle together satisfyingly, ready for players to discover and decipher.
Now you have a mysterious set of artifacts ready to spark imagination in your next game night