When I want a quick win in the studio, I reach for air-dry clay or polymer clay and make a little batch of Christmas ornaments that look sweet without needing fancy skills. Here are my go-to easy clay ornament ideas—the kind you can finish in a relaxed afternoon and actually feel proud to hang up.
Classic Cookie-Cutter Stars and Trees
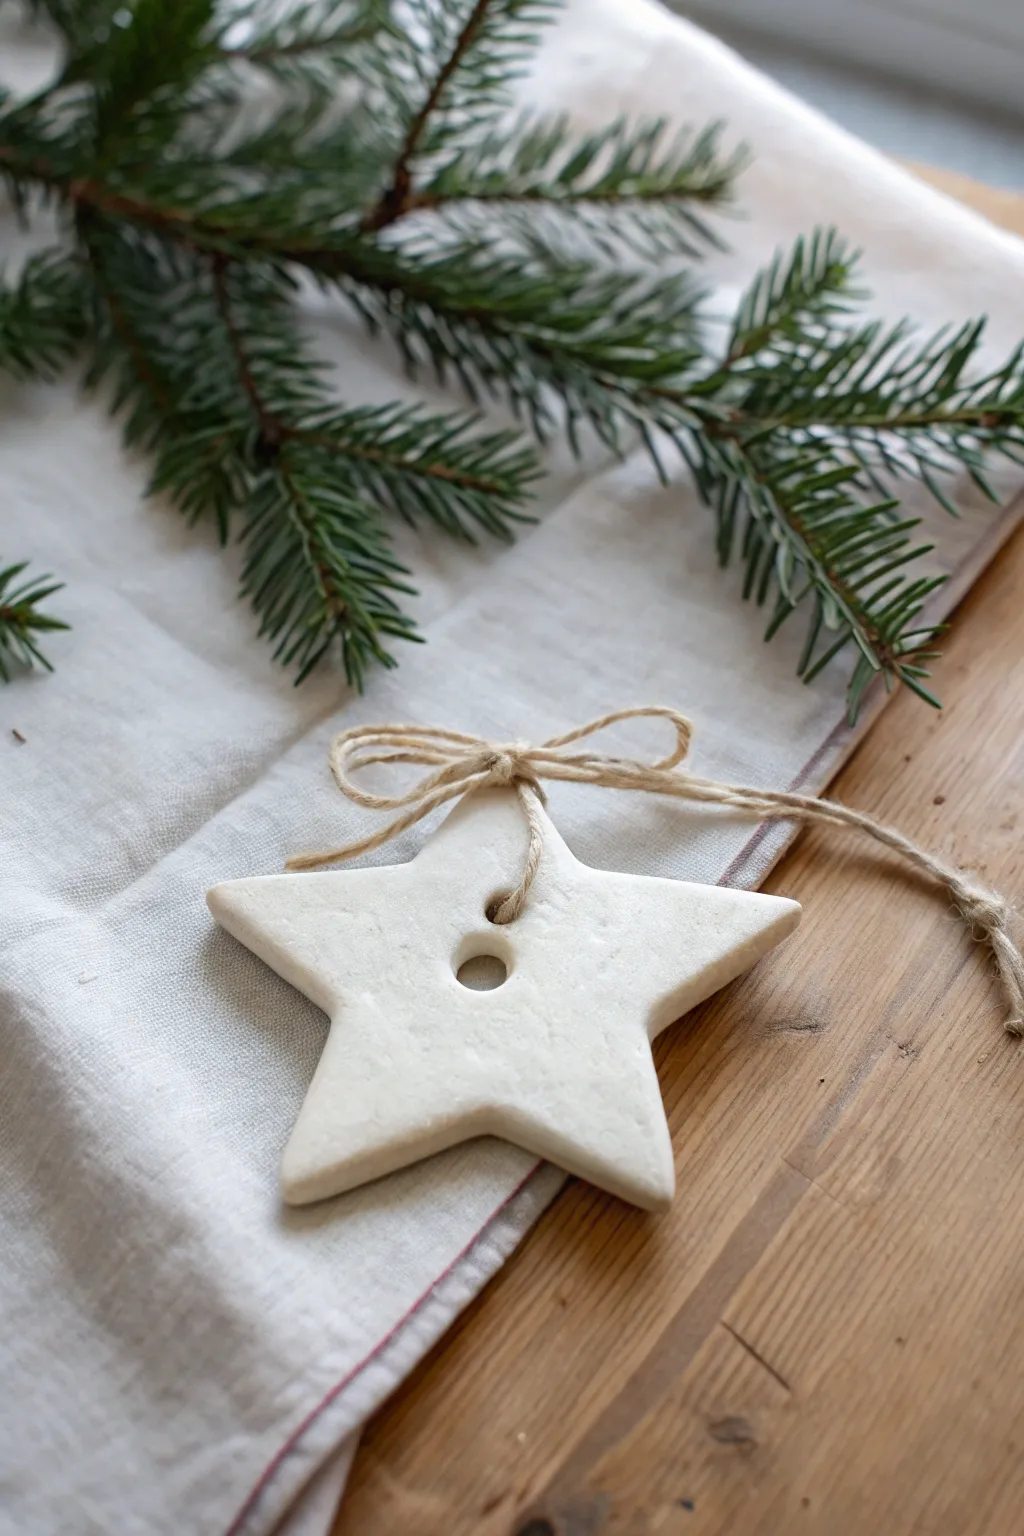
Embrace the beauty of simplicity with this understated star ornament that mimics the look of a classic sugar cookie. Its pure white finish and natural twine accent make it a perfect addition to any farmhouse or Scandi-style holiday decor.
Step-by-Step
Materials
- White polymer clay, air-dry clay, or salt dough
- Rolling pin
- Parchment paper or non-stick craft mat
- Star-shaped cookie cutter (approx. 3-4 inches)
- Small straw or round tool (for the hole)
- Fine-grit sandpaper (optional)
- Natural jute twine
- Scissors
Step 1: Shaping the Clay
-
Prepare your workspace:
Lay down a sheet of parchment paper or a silicone craft mat on a flat surface to prevent sticking. -
Condition the clay:
Take a handful of your white clay and knead it in your hands until it becomes soft, pliable, and warm to the touch. -
Roll it out:
Place the clay on your mat and use a rolling pin to flatten it. Aim for an even thickness of about 1/4 inch; too thin and it might crack, too thick and it will be heavy. -
Cut the shape:
Press your star-shaped cookie cutter firmly into the rolled clay. Give it a tiny wiggle to ensure it cuts all the way through, then lift the cutter. -
Remove excess:
Peel away the scrap clay from around the star shape. If the star sticks to the mat, you can gently flex the mat to pop it loose. -
Smooth the edges:
Dip your finger in a tiny bit of water and run it gently along the cut edges of the star to soften any harsh lines or burrs left by the cutter. -
Create the hanging hole:
Using a straw or a small round tool, punch a hole directly in the center of the star. Make sure the hole is wide enough to accommodate your twine later. -
Final inspection:
Check the surface for any lint or fingerprints. You can lightly smooth the top face one last time before drying.
Step 2: Drying and Finishing
-
Dry the ornament:
Follow the instructions for your specific clay. For air-dry clay, leave it on a flat cooling rack for 24-48 hours, flipping halfway through. If baking, follow package heat guidelines. -
Sand imperfections:
Once fully cured and hard, check the edges again. I like to use a fine-grit sandpaper to give the perimeter a buttery smooth finish if any rough spots remain. -
Cut the twine:
Cut a length of natural jute twine, approximately 10-12 inches long. -
Thread the loop:
Fold the twine in half to create a loop. Push the folded end through the center hole of the star from front to back. -
Secure the hanger:
Pull the loose ends of the twine through the loop you just pushed through the hole, tightening it against the clay to create a lark’s head knot structure, or simply thread it through and tie a decorative bow on the front. -
Tie the bow:
For the specific look in the photo, thread a single strand through the hole and tie a small, neat bow right at the top of the hole, leaving long tails. -
Create the loop:
With the remaining long tails of the twine, tie a simple overhand knot near the ends to create the hanging loop.
Crack Prevention
If your clay cracks while drying, you can repair it by mixing a tiny bit of fresh clay with water to make a paste and filling the gap.
Add Texture
Before cutting your star shape, press a piece of lace or a patterned sweater into the clay to emboss a subtle, cozy design onto the surface.
Now you have a charming, minimalist ornament ready to hang on the tree or use as a special gift tag


Botanical Leaf-Imprint Medallions
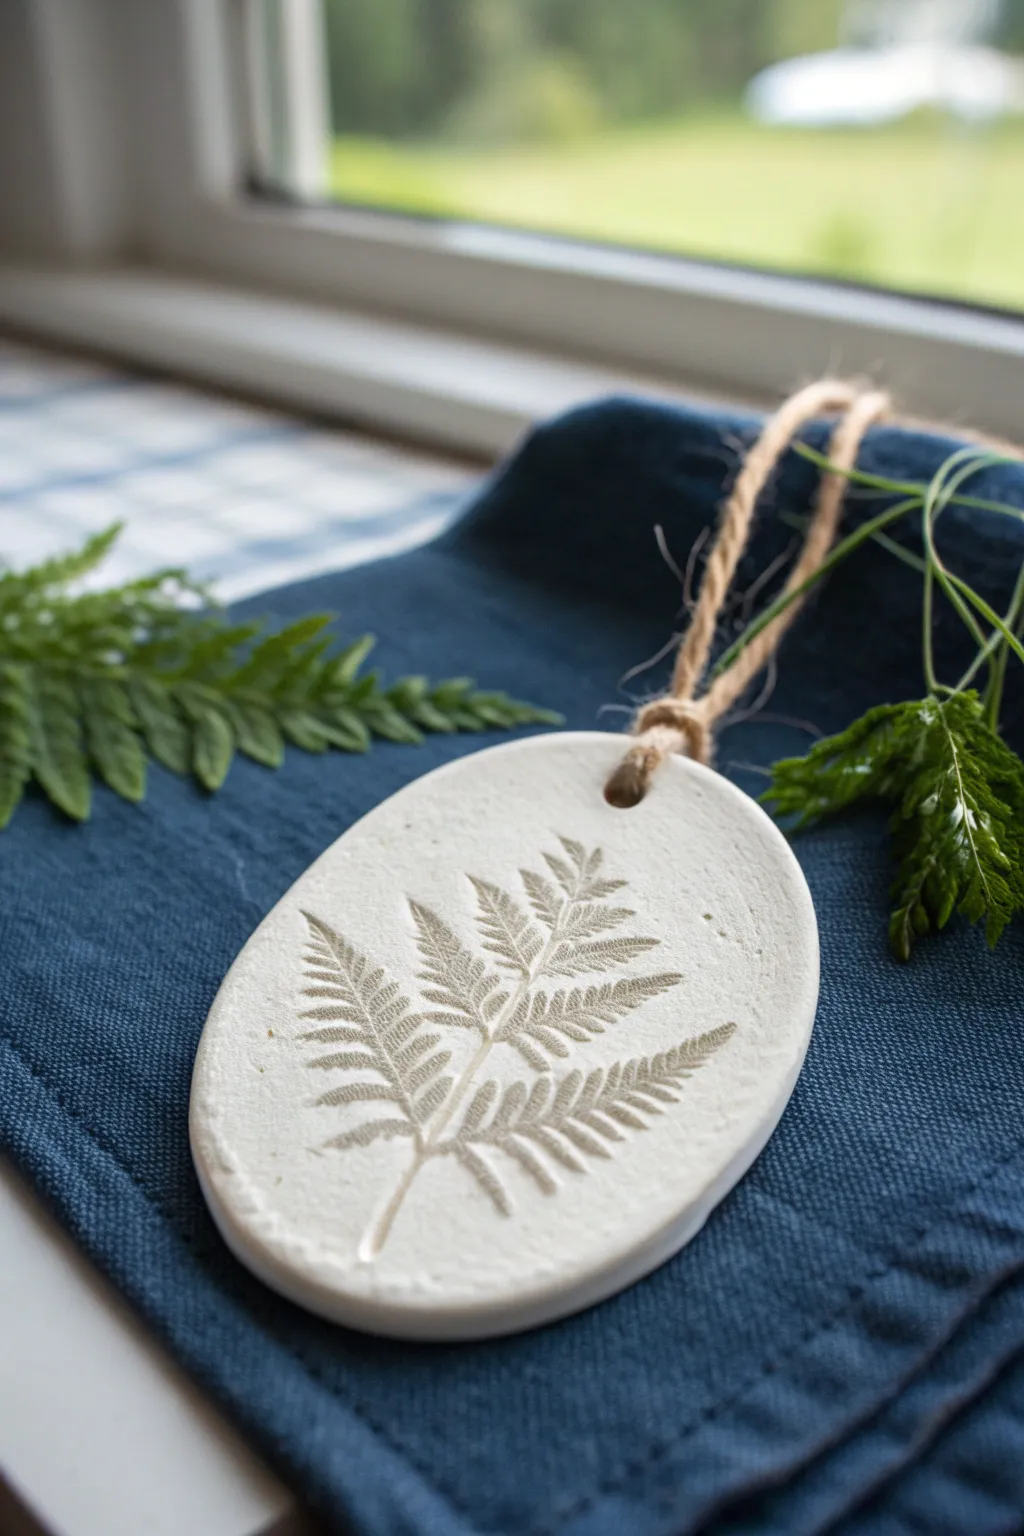
Capture nature’s delicate details with these minimal and rustic clay medallions. By pressing fresh greenery directly into soft clay, you create a timeless botanical relief that highlights the intricate veins and shapes of your favorite leaves.
How-To Guide
Materials
- White or off-white air-dry clay
- Rolling pin
- Small oval cookie cutter (approx 3-4 inches)
- Fresh fern leaves with sturdy stems
- Wax paper or parchment
- A drinking straw or small tool for making a hole
- Fine-grit sandpaper (optional)
- Jute twine or rustic string
- Small craft brush
- Water
Step 1: Preparing the Clay Base
-
Condition the clay:
Begin by taking a handful of your air-dry clay and kneading it in your hands until it becomes pliable and warm. This prevents cracking later on. -
Roll out a slab:
Place the clay between two sheets of wax paper to prevent sticking. Use your rolling pin to flatten it into an even slab, aiming for a thickness of about 1/4 inch. -
Inspect the surface:
Check the clay surface for any large air bubbles or imperfections. Smooth them gently with a slightly damp finger if needed to ensure a pristine canvas for your print.
Vein-Side Down
Always engage the back of the leaf (the underside) with the clay. This side usually has raised veins which create a much sharper, detailed print.
Step 2: Creating the Botanical Imprint
-
Select your specimen:
Choose a fresh fern frond that is slightly smaller than your intended ornament size. Fresh leaves work best as dry ones can crumble into the clay. -
Position the leaf:
Lay the fern gently onto the rolled clay slab. I find it helpful to place it vein-side down for the deepest and most detailed impression. -
Press the leaf:
Use your rolling pin to pass firmly over the leaf once. Apply steady, even pressure so the plant embeds into the clay without distorting the slab’s thickness too much. -
Remove the greenery:
carefully lift the stem of the fern and peel the leaf away from the clay. Do this slowly to avoid tearing the delicate edges of the impression.
Step 3: Cutting and Shaping
-
Cut the shape:
Position your oval cookie cutter over the imprint, centering the fern design nicely within the frame. Press down firmly to cut the shape. -
Release the shape:
Remove the excess clay from around the cutter first, then gently lift the cut oval shape. -
Smooth the edges:
Dip your finger in a tiny bit of water and run it along the cut edges of the oval to soften any sharp ridges left by the cutter. -
Add a hanging hole:
Using a drinking straw or a small cylindrical tool, punch a hole near the top of the oval. Make sure it is not too close to the edge to prevent breaking later.
Tinted Clay
Knead a tiny drop of acrylic paint or food coloring into your white clay before rolling. A soft sage green or terracotta color gives a beautiful base.
Step 4: Finishing Touches
-
Dry the ornament:
Place the clay medallion on a flat surface lined with clean parchment paper. Let it air dry for 24-48 hours, flipping it occasionally to ensure it dries flat. -
Sand for perfection:
Once fully cured and hard, check the edges again. If they feel rough, lightly sand them with fine-grit sandpaper for a professional finish. -
Enhance the details (Optional):
If you want the veins to pop, mix a tiny drop of brown or sage green watercolor with plenty of water. Wash it over the imprint and immediately wipe the surface with a damp cloth, leaving pigment only in the deep crevices. -
Seal the piece:
For longevity, apply a thin coat of matte varnish or sealant to protect the clay from moisture, especially if you used air-dry clay. -
Add the hanger:
Cut a length of jute twine, thread it through the hole at the top, and tie a secure loop knot to complete the rustic look.
Hang these natural beauties in a window or on seasonal branches to enjoy a piece of the outdoors inside


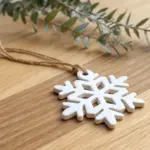
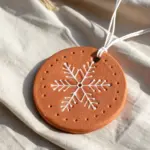
Snowflake Ornaments With Lace Texture
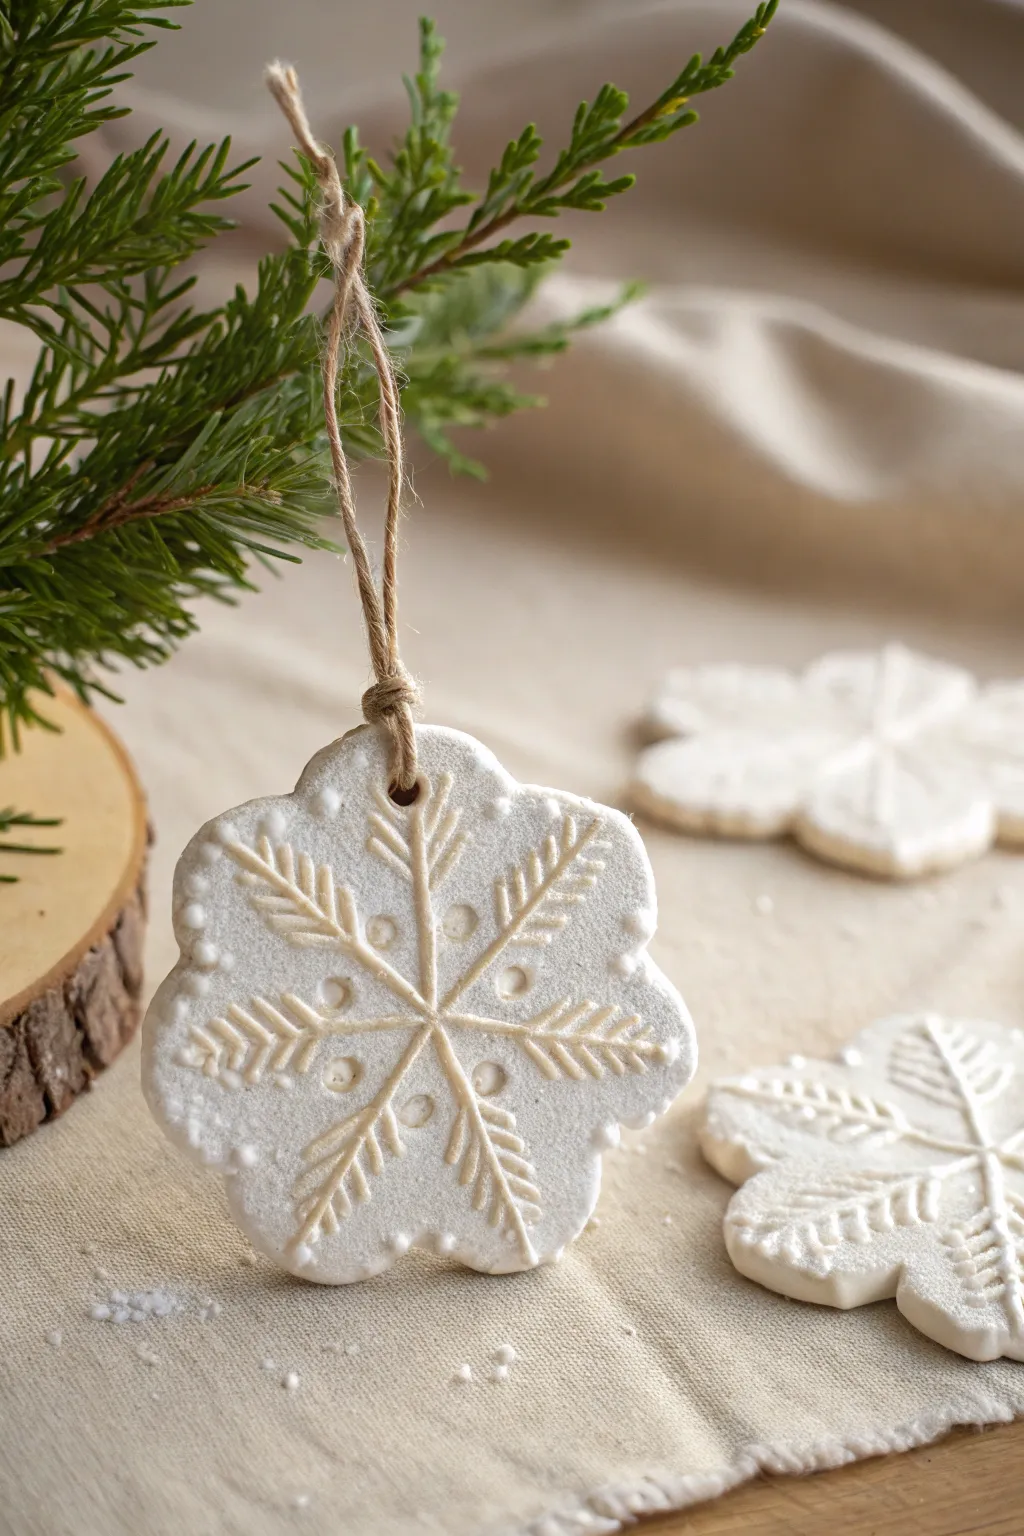
These elegant snowflake ornaments combine the simplicity of white clay with stunning embossed details that mimic the delicate structure of real snow crystals. Finished with a dusting of sparkle and a rustic twine loop, they make perfect additions to a farmhouse-style tree or festive gift tags.
Detailed Instructions
Materials
- Air-dry clay (white) or polymer clay
- Rolling pin
- Parchment paper or silicone mat
- Snowflake cookie cutter (scalloped edge)
- Snowflake texture stamp or embossing tool
- Straw or cocktail stick
- Jute twine
- Fine glitter (iridescent or white)
- Small craft paintbrush
- Clear matte varnish or Mod Podge (optional)
- Sandpaper (fine grit)
Step 1: Preparation and Cutting
-
Set the workspace:
Begin by laying down a sheet of parchment paper or a silicone mat on a flat surface to prevent sticking. -
Condition the clay:
Take a handful of your white clay and knead it gently until it becomes pliable and warm, ensuring there are no air bubbles trapped inside. -
Roll it out:
Flatten the clay ball with your palm, then use a rolling pin to roll it out to an even thickness of about 1/4 inch (6mm). -
Stamp the texture:
Firmly press your snowflake texture stamp or embossing tool into the rolled clay. Apply even pressure to ensure all the fine lines and dots transfer crisply. -
Cut the shape:
Center your scalloped snowflake cookie cutter over the embossed design. Press down firmly to cut out the ornament shape, then wiggle slightly to release. -
Create the hole:
Using a plastic straw or a cocktail stick, punch a clean hole at the top of one of the snowflake’s arms for hanging later. -
Clean the edges:
Dip your finger in a little water and gently smooth any rough edges left by the cutter to give the ornament a polished look.
Sharper Texture Trick
Dust your texture stamp with a tiny bit of cornstarch or flour before pressing it into the clay. This acts as a release agent and keeps the intricate details sharp without sticking.
Step 2: Finishing Touches
-
Let it dry:
Allow the clay ornaments to dry completely according to the package instructions. Turn them over halfway through the drying time to prevent curling. -
Sand imperfections:
Once fully hard, inspect the edges. I like to use a small piece of fine-grit sandpaper to buff away any remaining burrs gently. -
Apply sealant:
Brush a very thin layer of clear matte varnish or Mod Podge over the textured surface of the snowflake. -
Add the sparkle:
While the sealant is still wet, sprinkle a pinch of fine white or iridescent glitter over the embossed lines to highlight the design. -
Shake off excess:
Tap the ornament gently on its side to remove loose glitter, leaving just a subtle shimmer caught in the texture. -
Dry the finish:
Let the varnish and glitter layer dry completely before handling again. -
Prepare the twine:
Cut a piece of jute twine approximately 8 inches long. -
Thread the loop:
Fold the twine in half, push the loop end through the hole from front to back, and pull the tails through the loop to create a lark’s head knot. -
Secure the hanger:
Tie a simple overhand knot at the loose ends of the twine to complete the hanging loop.
Fixing Cracks
If you notice small hairline cracks as the clay dries, mix a tiny bit of fresh wet clay with water to make a paste. Smooth this ‘slurry’ into the cracks with your finger.
Now your handcrafted snowy creations are ready to add a touch of winter magic to your home decor

Gingerbread-Person Clay Ornaments

Capture the warmth of holiday baking without the crumbs using this adorable clay gingerbread person ornament. With its textured finish, simple icing details, and a rustic bow tie, this project looks good enough to eat but will last for years.
How-To Guide
Materials
- Air-dry clay (terra cotta color) or polymer clay
- Rolling pin
- Gingerbread man cookie cutter
- White puff paint or dimensional fabric paint
- Black round beads or small balls of black clay
- Beige polymer clay or air-dry clay (for the bow)
- Texturing tool (clean toothbrush or stiff bristle brush)
- Twine or jute cord
- Strong craft glue (e.g., E6000)
- Drinking straw or skewer
- Sandpaper (fine grit)
Step 1: Shaping the Base
-
Roll the clay:
Begin by conditioning your terracotta-colored clay until it is soft and pliable. Roll it out on a smooth surface to an even thickness of about 1/4 inch, ensuring it’s not too thin so it remains sturdy. -
Texture the surface:
Before cutting, gently tap the surface of the clay with a clean toothbrush or a stiff bristle brush. This stippling effect mimics the baked texture of a real cookie. -
Cut the shape:
Press your gingerbread man cookie cutter firmly into the textured clay. Wiggle it slightly to ensure a clean cut, then carefully remove the excess clay from around the shape. -
Smooth the edges:
Lift the shape and gently run your finger along the cut edges to smooth down any sharpness or burrs left by the cutter. -
Create the hanging hole:
Use a drinking straw or a skewer to poke a hole at the very top of the head. Make sure the hole is cleanly punched through and large enough for your twine to pass through later.
Making It Look Real
For an ultra-realistic ‘baked’ look, lightly brush the edges of the dry clay with soft brown pastel chalk dust before adding the white paint.
Step 2: Adding Baked Details
-
Form the eyes and buttons:
Take tiny pieces of black clay and roll them into three small spheres for the buttons and two even smaller spheres for the eyes. If you are using beads instead, wait until the assembly phase. -
Attach the features:
Press the black clay spheres gently onto the chest and face. If using air-dry clay, dab a tiny bit of water or slip on the back to help them adhere securely. -
Sculpt the bow tie:
Take a small pinch of beige clay. Shape two small triangles and join them at the points in the center to create a simple bow shape. Press a tiny flattened oval over the center join to finish the knot. -
Texture the bow:
Lightly tap the bow tie with your toothbrush to match the cookie texture, then press it firmly onto the neck area of your gingerbread person. -
Dry the ornament:
Allow the clay to dry completely according to the package instructions. For air-dry clay, flip the ornament over halfway through the drying process to prevent curling.
Creative Customization
Swap the bow tie for a tiny clay scarf, or use pink chalk to dust on rosy cheeks for a sweeter expression.
Step 3: Icing and Assembly
-
Pipe the arm cuffs:
Once the clay is fully hardened, use white puff paint to create the ‘icing.’ Draw a squiggly line across each wrist area. -
Pipe the leg cuffs:
Repeat the squiggly line design across both ankle areas, keeping the pressure on the bottle steady for an even line. -
Draw the smile:
Carefully pipe a simple U-shape smile below the eyes. I find resting my wrist on the table helps keep my hand steady for this delicate curve. -
Attach beads (alternative):
If you didn’t use black clay earlier, apply small dots of strong craft glue to the face and chest and set your black beads in place now. -
Set the paint:
Let the dimensional paint dry completely undisturbed, usually for several hours, until it is hard to the touch. -
Add the hanger:
Cut a length of jute twine or cord, roughly 8 inches long. Thread it through the hole at the top of the head. -
Tie the knot:
Bring the ends of the twine together and tie a secure overhand knot close to the ends to create a loop for hanging.
Hang your new creation on the tree and enjoy the cozy charm it brings to your holiday decor

The Complete Guide to Pottery Troubleshooting
Uncover the most common ceramic mistakes—from cracking clay to failed glazes—and learn how to fix them fast.
Mini Wreath Ornaments With Tiny Berries
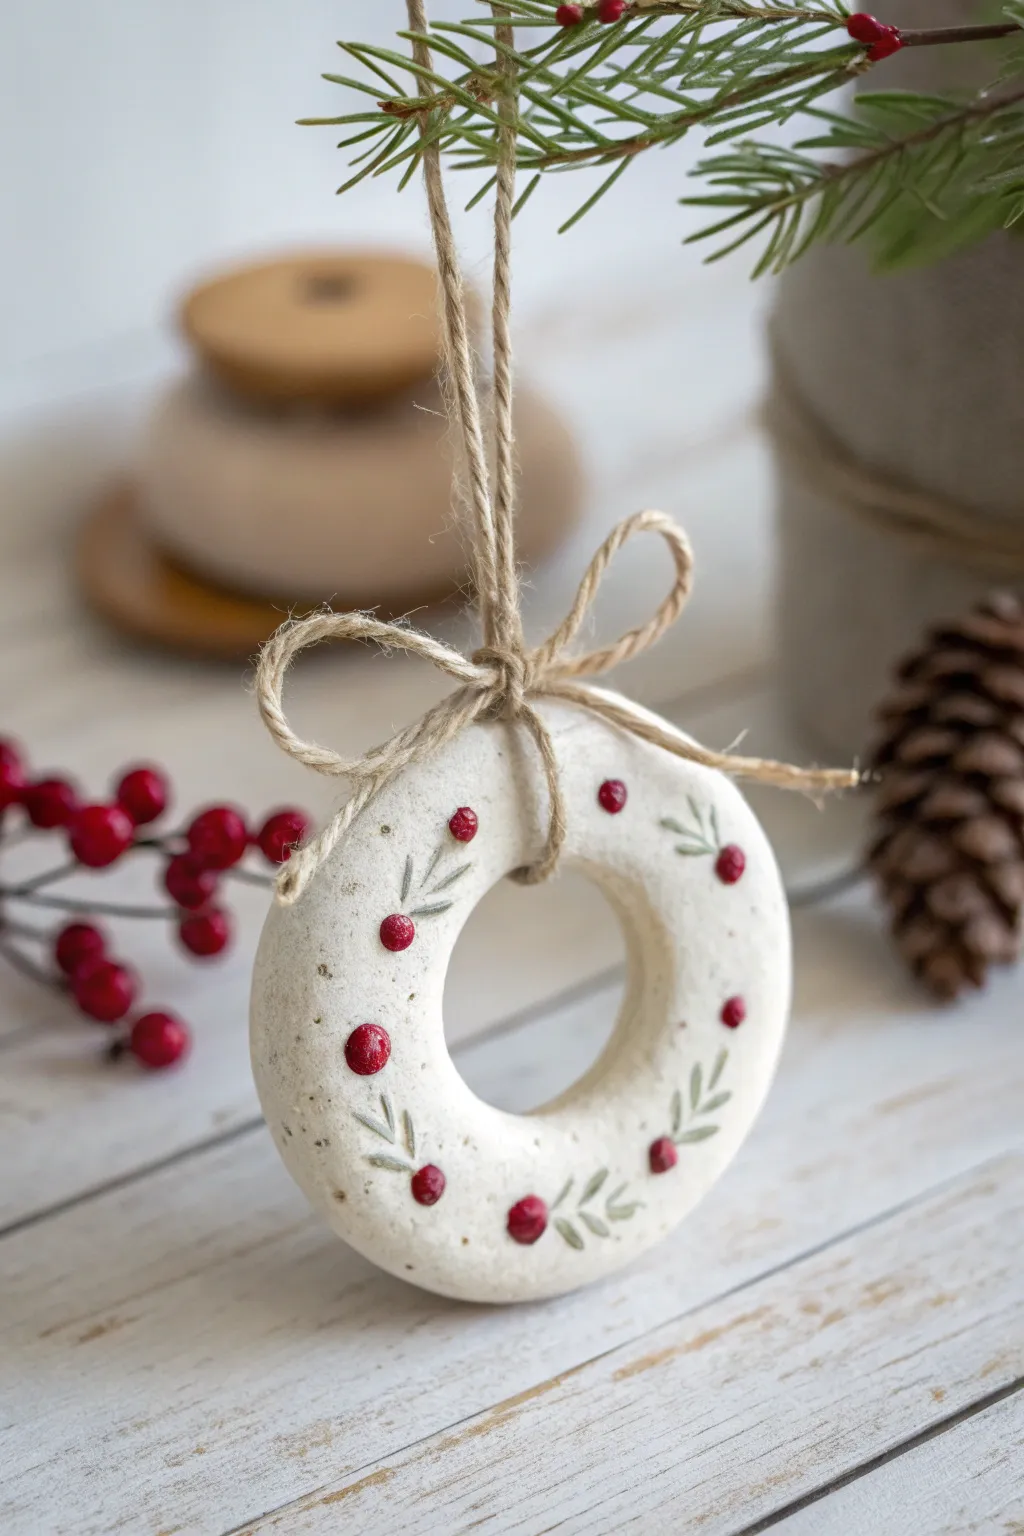
This charming, minimalistic ornament takes a classic donut shape and transforms it into a festive wreath speckled with delicate holiday details. With a sturdy twine bow and subtle speckling, it captures a perfect modern farmhouse aesthetic.
Detailed Instructions
Materials
- White polymer clay or air-dry clay (e.g., DAS)
- Dough roller or acrylic rolling pin
- Medium round cookie cutter (approx. 2-3 inches)
- Small round cutter (approx. 1 inch) or bottle cap
- Fine-grit sandpaper
- Acrylic paints (Dark red, sage green, and brown/black for speckling)
- Fine detail paintbrush (size 0 or 00)
- Old toothbrush (for speckling)
- Natural jute twine
- Matte sealant or varnish
- Water cup and paper towels
Step 1: Shaping the Clay Wreath
-
Condition the clay:
Begin by kneading your white clay thoroughly until it is soft, pliable, and free of cracks. This conditioning step is crucial for a smooth final surface. -
Roll out a slab:
Roll the clay out into an even slab, aiming for a thickness of about 1/4 inch or slightly thicker. You want the ornament to feel substantial, not fragile. -
Cut the outer circle:
Use your larger round cookie cutter to punch out the main circle shape. Press straight down and lift carefully to avoiding warping the circle. -
Create the wreath hole:
Center your smaller cutter or a clean bottle cap in the middle of the clay circle and cut out the center hole. This creates the classic donut wreath shape. -
Smooth the edges:
Dip your finger in a little water (for air-dry clay) or baby oil (for polymer clay) and gently run it along the cut edges. Smooth down any sharp ridges or burrs left by the cutters. -
Dry or bake:
Process the clay according to the package instructions. If using air-dry clay, let it sit for 24-48 hours until fully white and hard. If using polymer, bake at the recommended temperature. -
Sand for perfection:
Once fully cured or dried, use fine-grit sandpaper to lightly buff the surface and edges. This removes any lingering fingerprints or imperfections.
Uneven Edges?
If your inner circle isn’t perfectly centered or looks rough, use an emery board or nail file to gently reshape the inside curve after the clay has hardened.
Step 2: Painting the Details
-
Mix the speckle paint:
Dilute a tiny amount of brown or black acrylic paint with water until it reaches an ink-like consistency. -
Apply speckles:
Dip an old toothbrush into the diluted paint, then run your thumb across the bristles to flick tiny droplets onto the wreath. I find practicing on a paper scrap first helps gauge the splatter density. -
Let speckles dry:
Allow the splatter layer to dry completely before starting the hand-painted details to prevent smearing. -
Paint berry clusters:
Using your smallest detail brush and dark red paint, dab small, round dots randomly around the face of the wreath. Group some in pairs or trios, and leave others solo. -
Add highlights:
For a little dimension, you can add a microscopic dot of white or lighter red to the top of each berry once the base red is dry. -
Paint the foliage:
With sage green paint, create simple V-shaped sprigs or single leaves near the berries. Keep the strokes loose and delicate to mimic pine needles or olive leaves. -
Seal the artwork:
Once all paint is dry, apply a coat of matte varnish or sealant. This protects the paint and gives the ornament a finished, professional look.
Add Sparkle
Before the red paint dries on the berries, sprinkle a pinch of ultra-fine clear glitter over them. This creates a sugared cranberry effect similar to the photo.
Step 3: Assembly
-
Cut the twine:
Cut a long length of jute twine, roughly 12-15 inches. This length allows enough room for the loop and the bow. -
Create the hanging loop:
Loop the twine through the center hole of the wreath. Bring the ends up and tie a knot at the very top to create the hanger. -
Tie the bow:
Using the excess length of twine near the ornament itself (or a separate piece of twine if you prefer), tie a neat bow directly against the top of the wreath ring. -
Secure the knot:
If the bow feels loose or slides around too much, a tiny dab of clear craft glue behind the knot will hold it perfectly in place on top of the wreath.
Hang this lovely handmade piece on a sturdy branch where the light can catch the subtle details
Candy Cane Stripe Ornaments
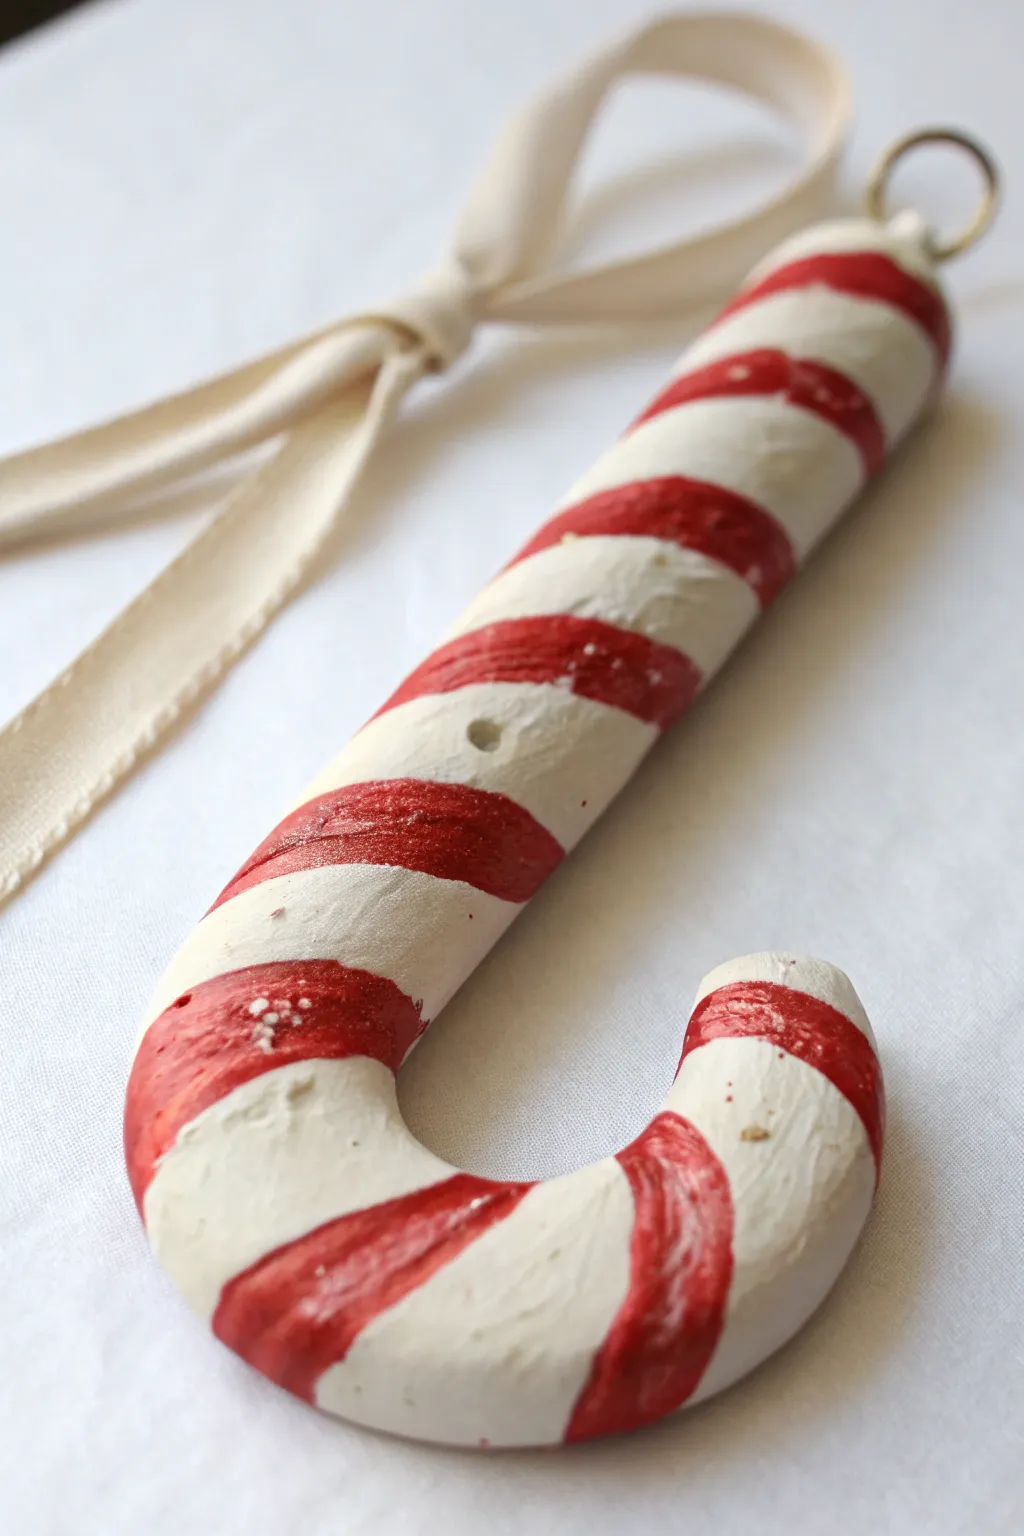
Capture the nostalgic charm of vintage holiday decor with these textured clay candy canes. Their hand-painted stripes and slightly imperfect finish give them a wonderful farmhouse feel that looks beautiful hanging on the tree.
Step-by-Step Tutorial
Materials
- White or cream-colored air-dry clay (or polymer clay)
- Red acrylic paint
- Small flat paintbrush
- Metal eye screw or jewelry bail
- Cream ribbon or twine
- Sandpaper (fine grit)
- Matte sealer or varnish
- Water cup
Step 1: Sculpting the Form
-
Condition the clay:
Begin by taking a handful of clay and kneading it thoroughly in your hands until it becomes warm and pliable, reducing the chance of cracks forming later. -
Roll a log:
On a clean, flat surface, roll the clay back and forth to create a snake or log shape. Aim for a thickness of about half an inch to three-quarters of an inch for a substantial ornament. -
Cut to length:
Trim the clay log to your desired length, typically around 5 to 6 inches, using a craft knife or clay tool. -
Shape the crook:
Gently bend the top third of the log to form the classic candy cane hook. Smooth out any stress marks that appear at the bend with a little water on your finger. -
Finish ends:
Tap the top and bottom ends on your work surface to blunt them slightly, or round them off with your fingers for a softer look. -
Insert hardware:
While the clay is still soft, carefully screw the metal eye hook into the very top center of the candy cane. If using air dry clay, you might remove it, add a dab of glue, and reinsert it for extra hold. -
Dry thoroughly:
Set the cane aside to dry completely according to your clay package’s instructions. Air dry clay usually needs 24-48 hours and should represent a bone-white color when fully cured.
Step 2: Painting and Finishing
-
Smooth imperfections:
Once fully dry, run a piece of fine-grit sandpaper over the surface to knock down any large bumps, though keep some texture for that rustic appeal. -
Base coat (optional):
If your clay dried off-white or gray, paint the entire cane with a coat of white acrylic paint. If the clay color is already perfect, you can skip this to keep it natural. -
Plan the stripes:
Visualize the diagonal striping pattern. You want the stripes to wrap around the form, angling downward from left to right. -
Paint first stripe:
Load a small flat brush with red acrylic paint. Start at the top and paint a bold, diagonal stripe. Don’t worry about perfectly straight edges; a little waviness adds character. -
Continue the pattern:
Space out your next stripe about a half-inch down and continue painting parallel red bands all the way to the bottom hook. -
Add texture details:
For a vintage look, I like to use a nearly dry brush to feather the edges of the red paint slightly, or lightly sand the red paint after it dries to embrace a worn-in aesthetic. -
Seal the piece:
Protect your paint job with a coat of matte spray sealer or brush-on varnish. This prevents the red paint from rubbing off over time. -
Attach the ribbon:
Cut a length of cream ribbon and thread it through the metal eye hook. -
Tie the bow:
Knot the ribbon securely at the base of the metal loop, then tie a loose, floppy bow or a simple loop for hanging.
Natural Texture
Don’t over-smooth the clay wet. Fingerprints and slight unevenness trap the paint later, enhancing the handmade aesthetic.
Sparkle Upgrade
While the red paint is still wet, sprinkle very fine clear or iridescent glitter over the stripes for a ‘sugared’ candy effect.
Hang these charming canes on your tree or use them as unique gift toppers for special presents


What Really Happens Inside the Kiln
Learn how time and temperature work together inside the kiln to transform clay into durable ceramic.
Reindeer Face Ornaments With Thumbprints
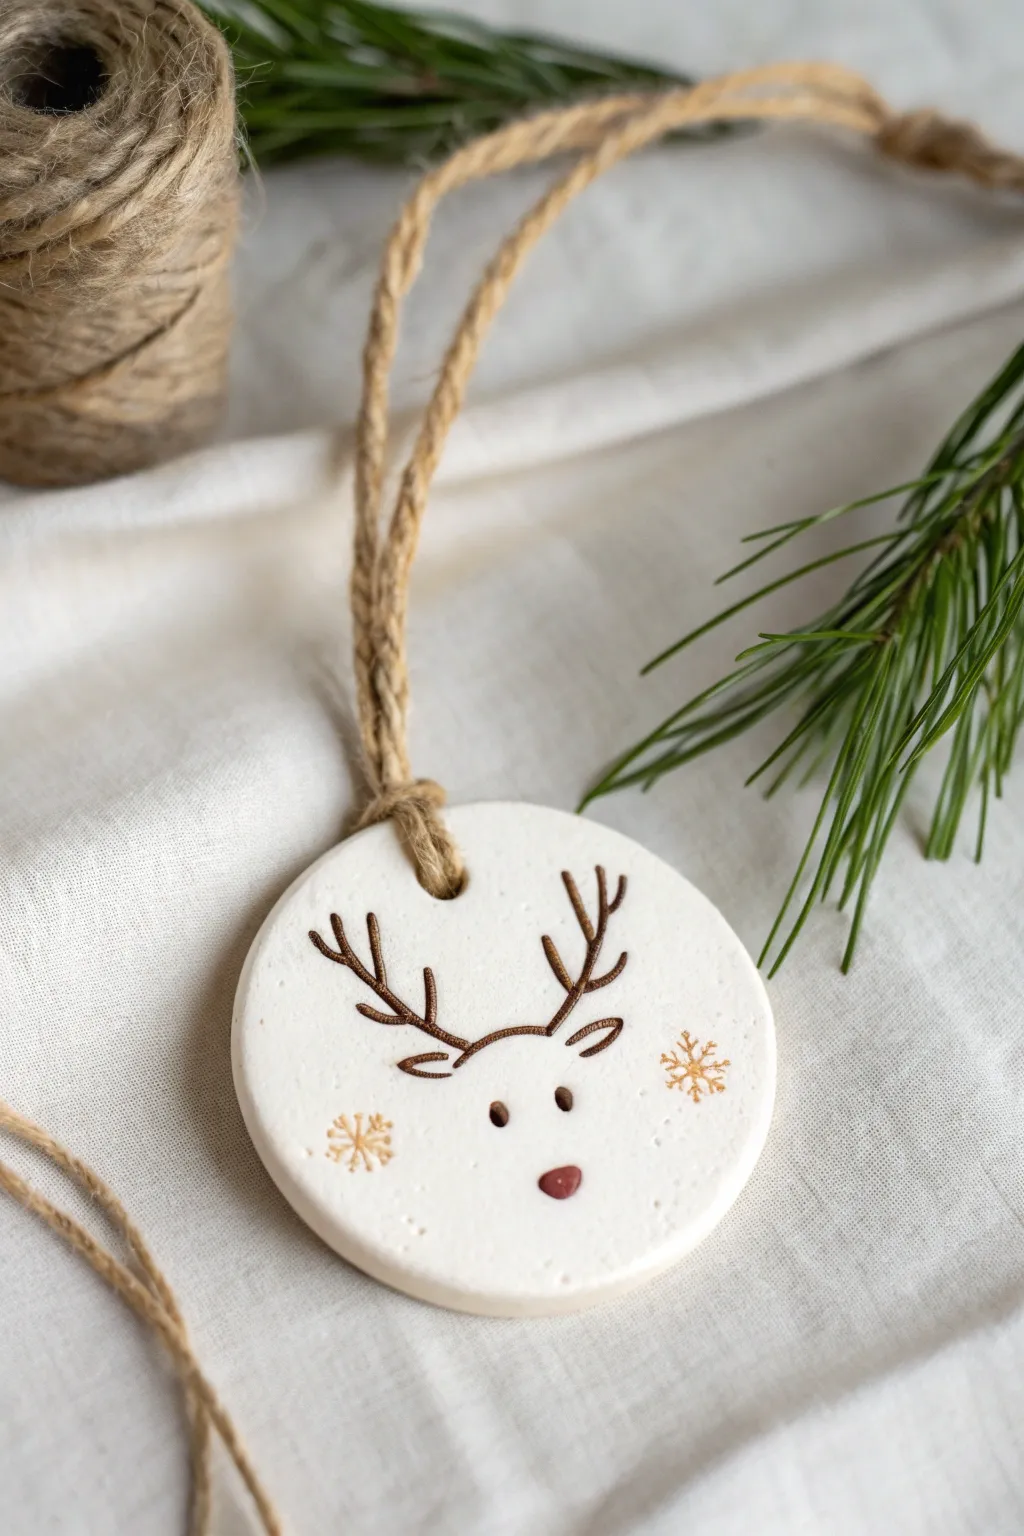
This adorable reindeer ornament captures the holiday spirit with a minimalist, rustic charm featuring simple antlers and a sweet red nose. It’s a clean, white clay project perfect for personalized gift tags or adding a handmade touch to your tree.
Step-by-Step Guide
Materials
- White polymer clay or air-dry clay
- Circle cookie cutter (approx. 3 inches)
- Rolling pin
- Parchment paper or silicone mat
- Jute twine or rustic string
- Brown acrylic paint or fine-tip permanent marker
- Red acrylic paint
- Gold ink pad or metallic gold paint
- Small snowflake stamp (optional)
- Straw or skewer (for hole punching)
- Very fine detail paintbrush
- Matte sealant or varnish (optional)
Step 1: Shaping the Base
-
Prepare your workspace:
Lay down parchment paper or a silicone mat to prevent sticking. Ensure your surface is clean so no dust gets into the white clay. -
Condition the clay:
Knead your white clay until it is soft, pliable, and free of cracks. Warm hands help this process go faster. -
Roll it out:
Use a rolling pin to flatten the clay to an even thickness, aiming for about 1/4 inch thick. Too thin, and it might crack; too thick, and it will be heavy. -
Cut the circle:
Press your circle cookie cutter firmly into the clay. Give it a tiny wiggle before lifting to ensure a clean cut. -
Smooth the edges:
Dip your finger in a little water (for air-dry clay) or baby oil (for polymer) and gently run it around the cut edge to smooth out any roughness. -
Create the hanging hole:
Use a straw or a skewer to punch a hole near the top edge. Make sure it’s large enough to fit your jute twine later.
Keep it Clean
White clay picks up everything! Keep a pack of wet wipes nearby and clean your hands and tools constantly to avoid stray lint or dust specs.
Step 2: Adding the Details
-
Create the nose indentation:
Before the clay dries or bakes, gently press your thumb or the end of a paintbrush handle into the center-bottom area to create a slight depression for the nose. -
Dry or bake:
Follow the manufacturer’s instructions for your specific clay. Bake polymer clay in the oven or let air-dry clay sit for 24-48 hours until fully hardened. -
Paint the antlers:
Once cool and hard, use a very fine detail brush and brown acrylic paint to draw the antlers. Start from the center of the forehead and branch out toward the ears. -
Add the eyes:
Dip the non-brush end of a paintbrush into the brown paint and dot two small eyes just below the antlers. This creates perfectly round circles. -
Fill the nose:
Use red acrylic paint to carefully fill in the indentation you made earlier. You might need two coats for a vibrant candy-apple red. -
Add snowflakes:
Dip a small snowflake stamp into gold ink (or paint a snowflake freehand with a gold pen) and place one on each cheek area for a festive sparkle. -
Let the paint set:
Allow all paint work to dry completely. I usually give this about an hour to be safe so nothing smudges.
Scented Clay
Knead a drop of cinnamon or peppermint essential oil into the clay before rolling. Your ornaments will smell like Christmas cookies on the tree.
Step 3: Finishing Touches
-
Seal the ornament:
Apply a thin coat of matte varnish or sealant over the front to protect the paint and give the clay a finished look. -
Cut the twine:
Snip a length of jute twine, approximately 8-10 inches long, depending on how low you want the ornament to hang. -
Loop the hanger:
Fold the twine in half, push the loop end through the hole from front to back, and pull the tails through the loop to secure it with a lark’s head knot.
Now you have a charming, rustic reindeer ready to hang on the tree or gift to a friend
Minimal Black-and-White Pattern Ornaments

Achieve a chic, Scandinavian-inspired look with these minimalist clay ornaments. The crisp black ink against the matte white surface creates a striking contrast that feels both timeless and modern for your holiday decor.
Step-by-Step Guide
Materials
- White air-dry clay or polymer clay
- Rolling pin
- Circle cutter or glass (approx. 3-inch diameter) to check size, though these are spheres so hand-rolling is key
- Fine-point black permanent marker or acrylic paint pen
- Jute twine or hemp cord
- Bamboo skewer or toothpick
- Fine-grit sandpaper (optional)
- Small eye pins (optional, if not making a clay loop)
- Clear matte sealant spray (optional)
Step 1: Shaping the Sphere
-
Prepare the clay:
Begin by taking a chunk of white clay, roughly the size of a golf ball or a large walnut. Knead it in your hands for a minute to warm it up and make it pliable. -
Roll the ball:
Place the clay between your palms and roll it in a circular motion. Apply gentle, even pressure to form a smooth sphere. If you notice cracks, dip your finger in a tiny bit of water and smooth them over before continuing to roll. -
Create the cap:
Pinch off a very small, pea-sized amount of clay separately. Flatten it slightly into a thick disk or cylinder shape to mimic a traditional ornament cap. -
Attach the cap:
Score the top of your sphere and the bottom of your small cap piece with a toothpick (scratching the surface helps adhesion). Add a drop of water or liquid clay as ‘glue’ and press the cap firmly onto the top of the sphere. -
Make the hanger hole:
Take your skewer or toothpick and carefully pierce a hole horizontally through the small cap you just attached. Wiggle the tool slightly to ensure the hole is wide enough for your twine to pass through later. -
Let it dry:
Set the ornament aside to dry completely. For air-dry clay, I generally suggest waiting at least 24 to 48 hours. Turning it occasionally prevents a flat spot from forming on the bottom. -
Sand for smoothness:
Once fully dry and hard, inspect the surface. If there are any rough bumps or fingerprints, gently buff them away with fine-grit sandpaper until the bauble feels smooth to the touch.
Step 2: Drawing the Pattern
-
Planning the sections:
visualize your sphere divided into vertical segments, like the slices of an orange. You can lightly mark these dividing lines with a pencil first if you want a guide. -
Draw the base lines:
Using your black marker or paint pen, draw two parallel horizontal lines circling the bottom third of the ornament. These act as a border for your vertical design. -
Create hatched stripes:
Start at the top near the cap and draw two vertical lines down to your horizontal border. Fill the space between these two lines with diagonal hatch marks. -
Add dotted details:
Move clockwise around the sphere. Leave a gap of white space, then create a vertical line of distinct black dots starting from the top and going down to the border. Vary the dot size slightly for an organic look. -
Repeat the pattern:
Continue alternating between the hatched stripes and the vertical dot lines around the entire circumference of the ornament. -
Detail the top area:
Add small curved lines or arches near the cap where your stripes begin to give the design a finished, intentional start point. -
Let the ink set:
Allow the ink or paint to dry completely. If you used a paint pen, be careful not to smudge your work as you rotate the ball—I usually let one side dry before finishing the back.
Smooth Surface Secret
Before drying, smoothing the clay with a damp finger works wonders. If using polymer clay, a little baby oil removes fingerprints instantly.
Step 3: Finishing Touches
-
Seal the surface:
To protect the white clay from dust and moisture, take the ornament outside and give it a light coat of clear matte sealant spray. -
Prepare the twine:
Cut a piece of jute twine or hemp cord, approximately 6 to 8 inches long. -
Thread the loop:
Thread the twine through the hole in the clay cap. Bring the ends together and tie a simple overhand knot to secure the loop. -
Final check:
Trim any excess fraying from the twine knot. Your ornament is now ready to hang.
Color Pop Variation
Instead of black, use a metallic gold or copper paint pen for the patterns to add a warm, festive shimmer to the minimalist white base.
Hang these on your tree or gather several in a bowl for a truly handcrafted holiday centerpiece

TRACK YOUR CERAMIC JOURNEY
Capture glaze tests, firing details, and creative progress—all in one simple printable. Make your projects easier to repeat and improve.
Plaid Holiday Ornaments With Easy Lines
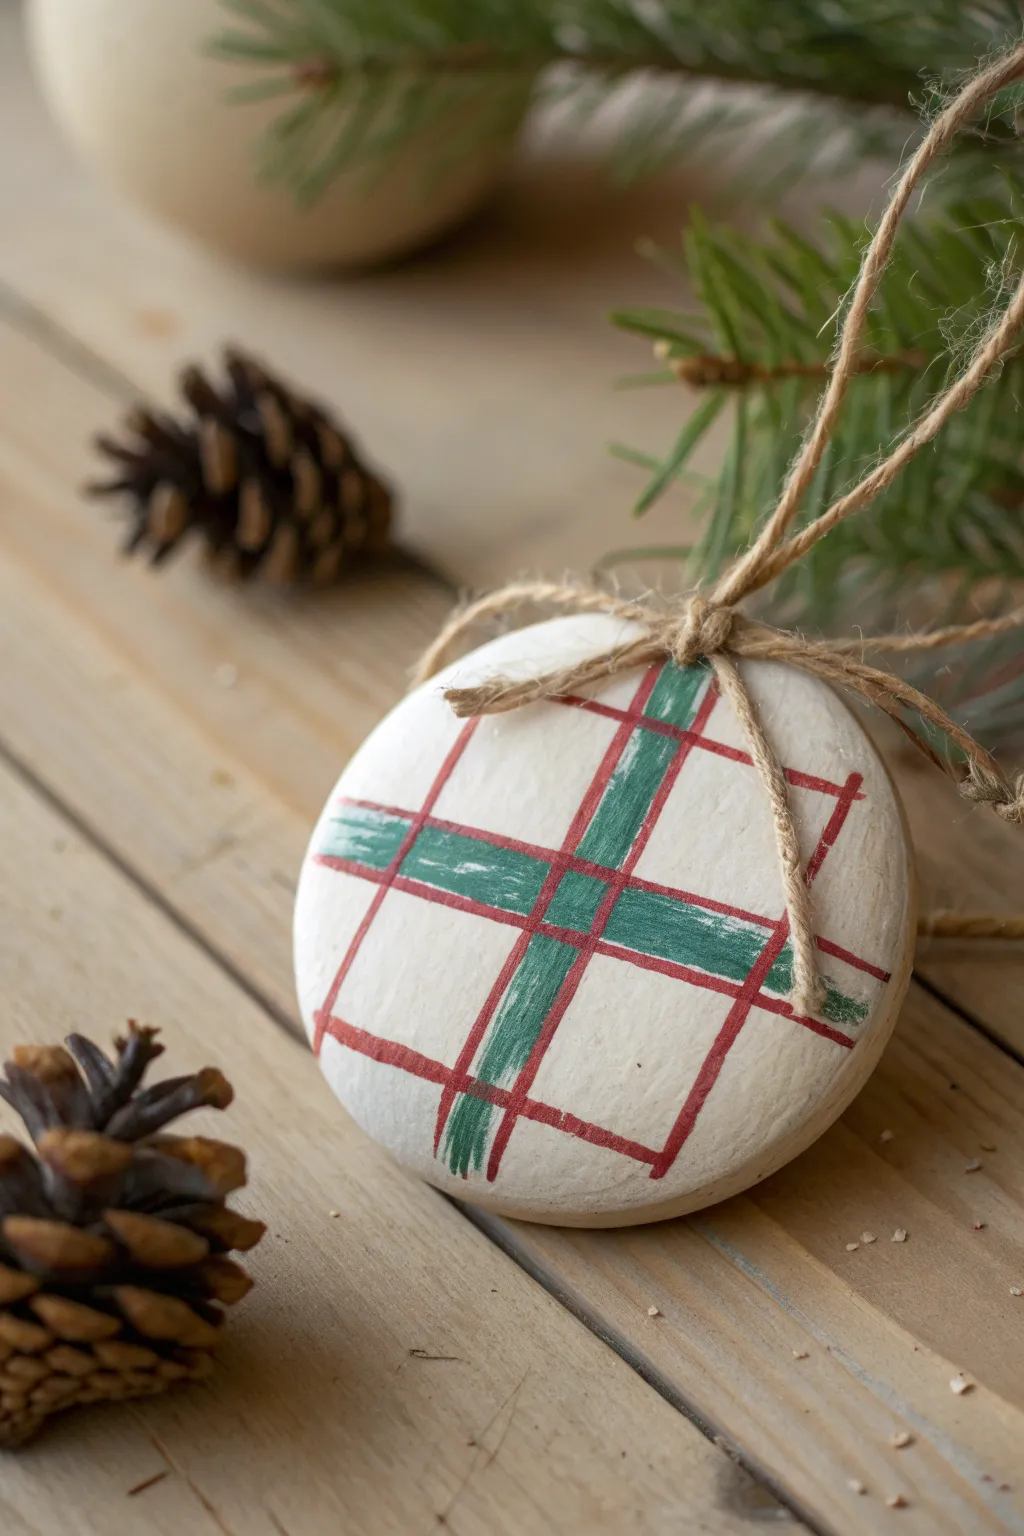
Bring a touch of cozy farmhouse style to your tree with these simple hand-painted ornaments. Using clean lines and classic holiday colors, this project transforms a basic clay circle into a charming plaid decoration that looks intricate but is surprisingly easy to master.
Detailed Instructions
Materials
- Air-dry clay or polymer clay (white)
- Circle layout tool (cookie cutter or glass rim, approx. 3 inches)
- Rolling pin
- Sandpaper (fine grit)
- Acrylic paint (Deep Green, Red, White)
- Small flat brush (size 2 or 4)
- Fine liner brush (size 0 or 00)
- Jute twine or hemp cord
- Straw or toothpick (for creating the hole)
- Ruler (optional)
- Matte finish sealant (optional)
Step 1: Shaping the Clay Base
-
Condition the clay:
Begin by working a handful of white clay in your hands until it becomes warm and pliable. This conditioning step prevents cracks from forming later. -
Roll it out:
Use a rolling pin to flatten the clay into an even slab. Aim for a thickness of about 1/4 inch so the ornament feels substantial but not too heavy. -
Cut the circle:
Press your circle cutter firmly into the clay to create a clean disc shape. If you don’t have a cutter, trace around a glass and cut carefully with a craft knife. -
Smooth the edges:
Dip your finger in a little water and run it along the cut edge of the circle to smooth out any roughness or sharp bits left by the cutter. -
Create the hanging hole:
Use a drinking straw to punch a hole near the top edge of the circle. Position it about half an inch down to ensure the top rim is strong enough to hold the twine. -
Let it dry completely:
Place the clay disc on a flat surface to dry. I prefer to flip it over halfway through the drying process to ensure both sides dry evenly and stay flat. Allow 24-48 hours depending on humidity.
Straight Line Hack
Struggling with freehand lines? Use masking tape or washi tape to mask off the areas you want to keep white. Peel it off while paint is wet for crisp edges.
Step 2: Painting the Plaid Design
-
Sand the surface:
Once fully cured, lightly sand the surface of the ornament if there are any bumps. Wipe away the dust with a barely damp cloth. -
Paint the background:
Apply a coat of white acrylic paint to the entire front surface. Even though the clay is white, this provides a sealed surface that makes the colored lines crisp and prevents the clay from soaking up the pigment too fast. -
Establish the center cross:
Using the small flat brush and deep green paint, paint a vertical stripe down the center. Then, paint a horizontal stripe across the middle to form a large cross. -
Create the heavy grid:
Add two more thick green stripes parallel to your first ones, spacing them out to create an uneven grid. For the rustic look shown here, perfect straightness isn’t required—hand-painted charm is key. -
Add the distressed texture:
While the green paint is tacky or just dry, you can lightly scuff it with dry sandpaper to give it a worn, vintage look if the lines appear too solid. -
Paint the thin red lines:
Switch to your fine liner brush and red paint. Draw thin lines that intersect the green stripes. Place some red lines right next to the green ones, and others crossing through the white spaces. -
Define the plaid pattern:
Continue adding thin red perpendicular lines. The goal is to create a ‘tartan’ feel by grouping these thin lines near the thicker green bands. -
Let the paint set:
Allow the design to dry completely for about 30 minutes. If you want a glossy finish, you can add a clear sealant now, but the matte finish looks wonderful for this style.
Step 3: Finishing Touches
-
Prepare the twine:
Cut a length of jute twine, roughly 8 to 10 inches long, depending on how low you want the ornament to hang. -
Thread the loop:
Fold the twine in half and push the looped end through the hole from front to back. Pull the tails through the loop to create a lark’s head knot. -
Tie the decorative bow:
Cut a second, shorter piece of twine. Tie it into a small, tight bow around the base of the hanging loop, right against the clay. This adds that finished, rustic texture.
Fixing Wobbly Lines
If a line goes astray, don’t panic. Wait for it to dry completely, then paint over the mistake with your white background color before re-painting the stripe.
Hang your new plaid creation on a sturdy bough and enjoy the handmade warmth it brings to your holiday decor
Marbled Swirl Clay Ornaments
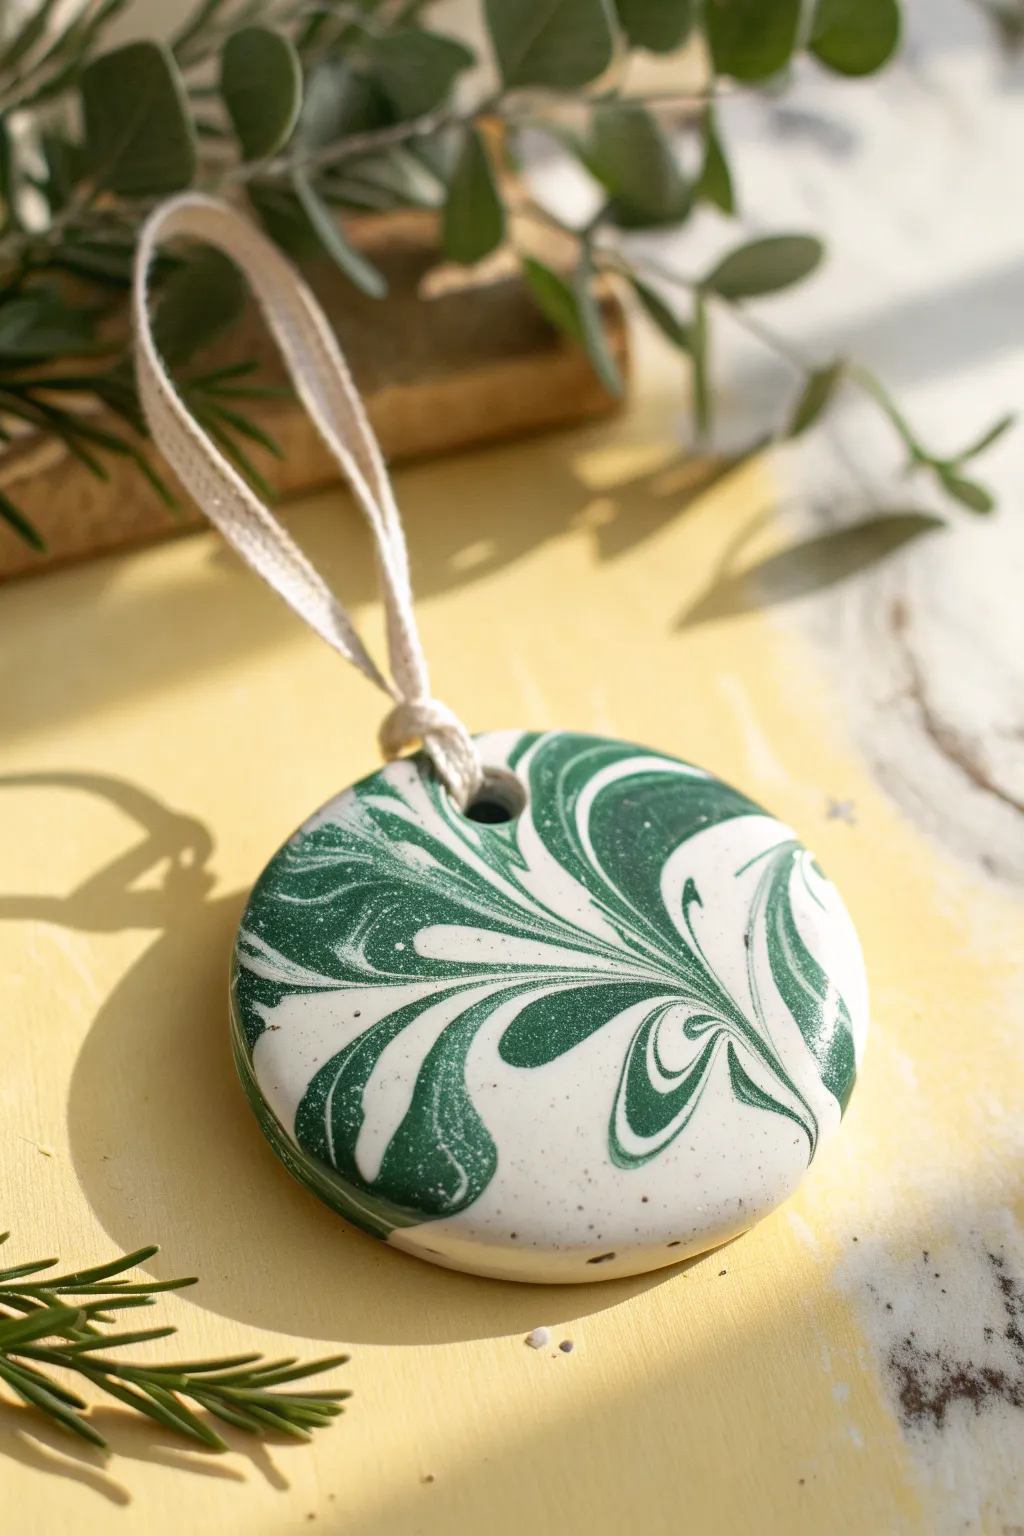
Capture the organic elegance of forest leaves with this stunning two-tone clay project. By twisting green and white clay together, you’ll create a mesmerizing, one-of-a-kind pattern that looks intricate but comes together in moments.
Step-by-Step Guide
Materials
- White polymer clay
- Deep forest green polymer clay
- Acrylic rolling pin
- Round cookie cutter (approx. 3 inches)
- Small straw or clay hole punch tool
- Glossy polymer clay glaze or varnish
- Soft paintbrush for glazing
- Natural cotton ribbon or thin rope
- Parchment paper or baking mat
Step 1: Creating the Marble Mix
-
Condition the Clay:
Start by warming up both your white and forest green clay in your hands separately. Knead them until they are soft, pliable, and free of cracks. -
Form the Ropes:
Roll a portion of the white clay into a snake about 5 inches long. Repeat this process with a smaller amount of green clay to make a slightly thinner snake. -
Twist Together:
Place the two snakes side-by-side and twist them around each other to form a single, candy-cane striped rope. -
Fold and Twist Again:
Fold the twisted rope in half and twist it again. The more you fold and twist, the finer your marbling lines will be; for the bold look in the photo, stop after just two or three folding cycles. -
Ball It Up:
Smoosh the twisted rope into a smooth ball. You should see distinct areas of green and white on the surface.
Step 2: Shaping and Cutting
-
Roll It Out:
Place your marbled ball on a piece of parchment paper. Using your acrylic roller, flatten the ball to a thickness of about 1/4 inch. -
Check the Pattern:
Look at your flattened slab. If you aren’t happy with the swirl placement, you can fold it once more and re-roll, but be careful not to over-mix or the colors will turn muddy. -
Cut the Shape:
Position your round cookie cutter over the most attractive section of the swirl pattern. Press down firmly to cut out your circle. -
Smooth the Edges:
Gently lift the circle and use your fingertip to lightly smooth the raw edge where the cutter sliced through, removing any tiny clay burrs.
Muddy Colors?
If your green and white are blending into a light mint color rather than distinct swirls, you have over-mixed. Stop twisting earlier next time to keep lines crisp.
Step 3: Baking and Finishing
-
Punch the Hole:
Use a small straw or a clay hole punch tool to create an opening near the top edge of the circle. Make sure it is not too close to the rim to prevent cracking. -
Bake the Ornament:
Transfer the parchment paper with your ornament to a baking sheet. Bake according to the specific temperature and time directions on your polymer clay package (usually around 275°F for 15-30 minutes). -
Cool Completely:
Remove the ornament from the oven and let it cool completely on a flat surface. Don’t handle it while hot, as the clay is still slightly soft. -
Apply Glaze:
Once cool, brush a thin, even layer of glossy glaze over the front and sides of the ornament. This makes the green color pop and protects the surface. -
Second Coat:
Let the first coat dry fully, then apply a second coat if you want a high-shine, ceramic-like finish like the example shown. -
Add Ribbon:
Cut a length of natural cotton ribbon or rope. Fold it in half to create a loop. -
Secure the Knot:
Thread the folded end through the hole in the ornament, then pass the loose ends through the loop and pull tight to create a lark’s head knot.
Add Sparkle
Before baking, lightly press gold leaf flakes onto the surface or mix a pinch of fine glitter into the white clay for a festive, shimmering effect.
Hang your finished ornament near a light source to show off the glossy, stone-like finish
Confetti Terrazzo Clay Ornaments
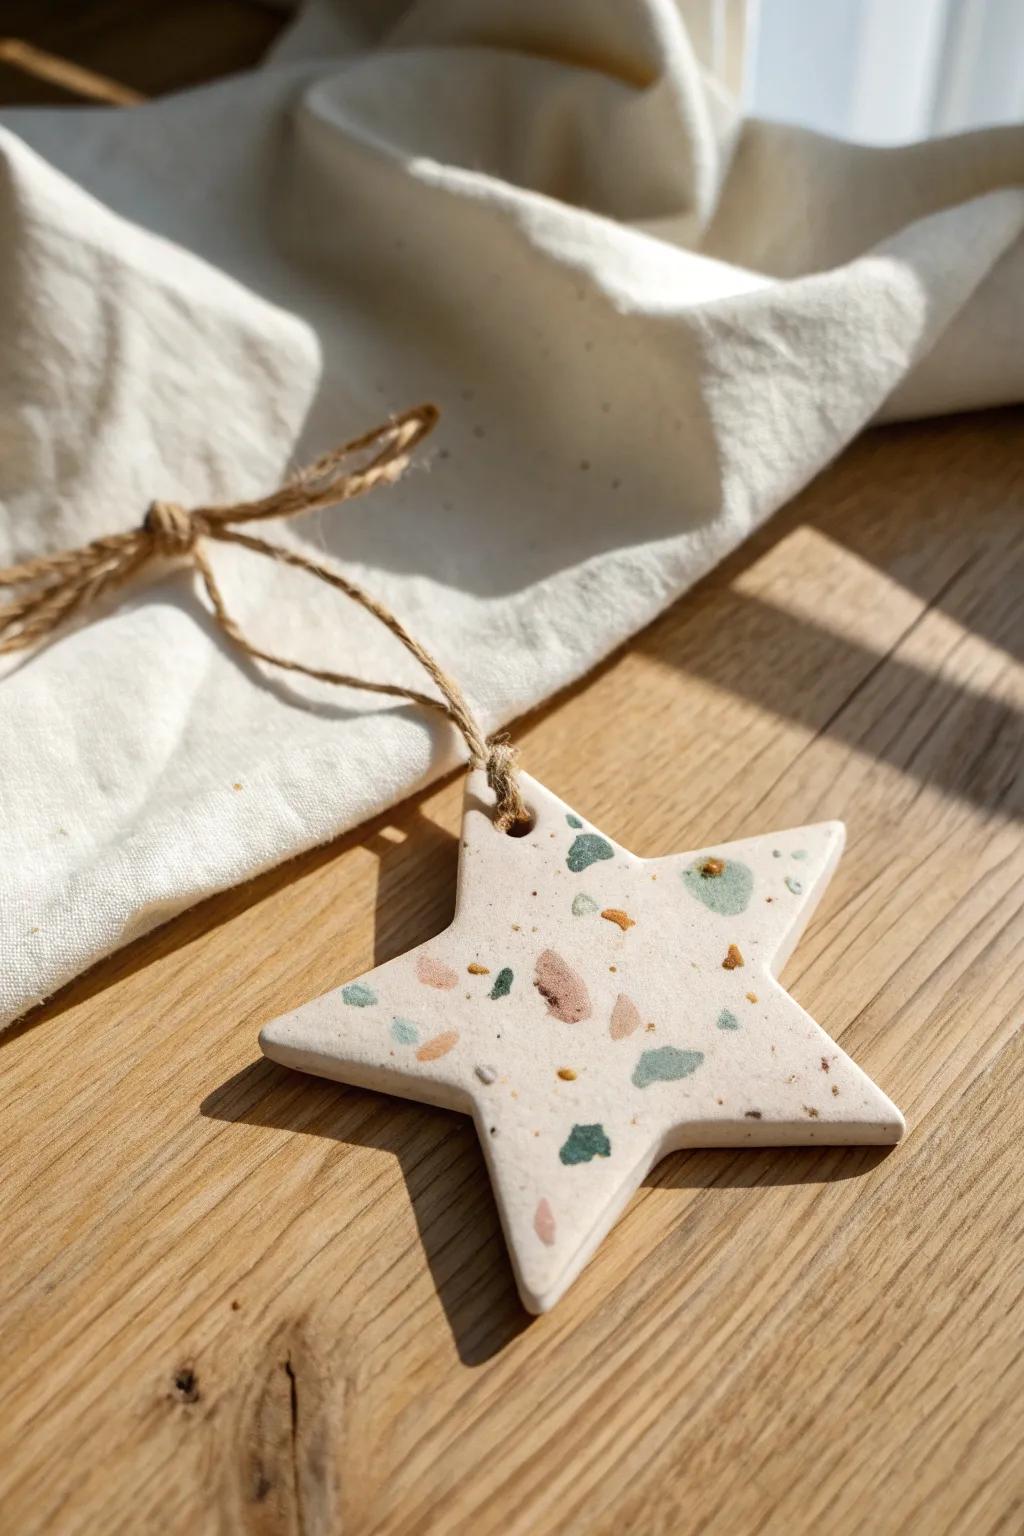
Capture the trendy, sophisticated look of terrazzo with this simple DIY ornament that brings a modern touch to your holiday decor. Using colored polymer clay chips embedded in a neutral base, you’ll create a unique, speckled star that looks like genuine stone.
Detailed Instructions
Materials
- White or beige polymer clay (base color)
- Various colored polymer clays (terracotta, sage green, navy, mustard)
- Acrylic rolling pin
- Star-shaped cookie cutter
- Parchment paper or baking mat
- Twine or jute cord
- Toothpick or small straw
- Fine-grit sandpaper (optional)
- Oven and baking sheet
Step 1: Creating the Confetti
-
Select your palette:
Choose 3-4 complementary colors for your ‘stones.’ For the look in the photo, go with muted earth tones like sage green, pale pink, terracotta, and a deep teal or navy. -
Roll thin sheets:
Take a very small amount of each colored clay and roll it out as thinly as possible on your work surface. The thinner the clay, the more delicate and realistic the terrazzo fragments will look. -
Bake the sheets:
Place these thin colored sheets on a baking tray lined with parchment paper. Bake them for just 10-15 minutes according to the package temperature directions. They need to be hard enough to crumble. -
Cool and crumble:
Once baked and fully cooled, break the thin sheets into tiny, irregular shards. You can use your fingers for larger chunks or chop them with a craft blade for finer specks. Aim for a variety of sizes.
Step 2: Forming the Terrazzo Base
-
Prepare the base:
Condition your white or beige base clay by kneading it until it is soft and pliable. Roll it into a thick log or ball. -
Embed the chips:
Press your baked colored chips into the raw base clay. I like to fold the clay over and knead gently to distribute the chips throughout the entire block, not just on the surface. -
Roll out the slab:
Roll the chip-filled clay out into a smooth slab, about 1/4 inch thick. You should see the colors peeking through, but they might look a bit buried—don’t worry, we will reveal them later. -
Add surface texture:
Sprinkle a few remaining chips on top of the rolled slab and gently roll over them with your acrylic roller once more to press them flush into the surface. This ensures a nice density of color on the front.
Uneven Surface?
If the added chips make the surface bumpy, lay parchment paper over the clay and roll firmly. The paper prevents sticking while flattening the decorative chips.
Step 3: Cutting and Finishing
-
Cut the shape:
Press your star-shaped cookie cutter firmly into the clay slab. Wiggle it slightly to ensure a clean cut before lifting it away. -
Smooth the edges:
Use your fingertip to gently smooth the raw edges of the star, removing any loose crumbs of clay or sharp corners left by the cutter. -
Create a hole:
Using a toothpick or a small straw, poke a hole near the top point of the star. Make sure the hole is large enough for your twine to pass through later. -
Final bake:
Place your star on a parchment-lined baking sheet. Bake according to the manufacturer’s instructions for the thickest part of the clay (usually 15-30 minutes). -
Sand to reveal:
Once the ornament is baked and completely cool, sand the surface with fine-grit sandpaper. This is the magic step that removes the top film of white clay and sharply defines the colorful terrazzo chips. -
Dust off:
Wipe the ornament with a slightly damp cloth to remove any sanding dust and reveal the clean, matte finish. -
String it up:
Cut a length of natural jute twine, thread it through the hole, and tie a simple knot to create a hanging loop.
Level Up: Gold Leaf
For a luxe touch, press small flakes of gold leaf onto the raw clay surface alongside your colored chips before the final roll and bake.
Hang your speckled star creation on the tree or use it as a stunning gift topper
Cutout Silhouette Ornaments With Negative Space
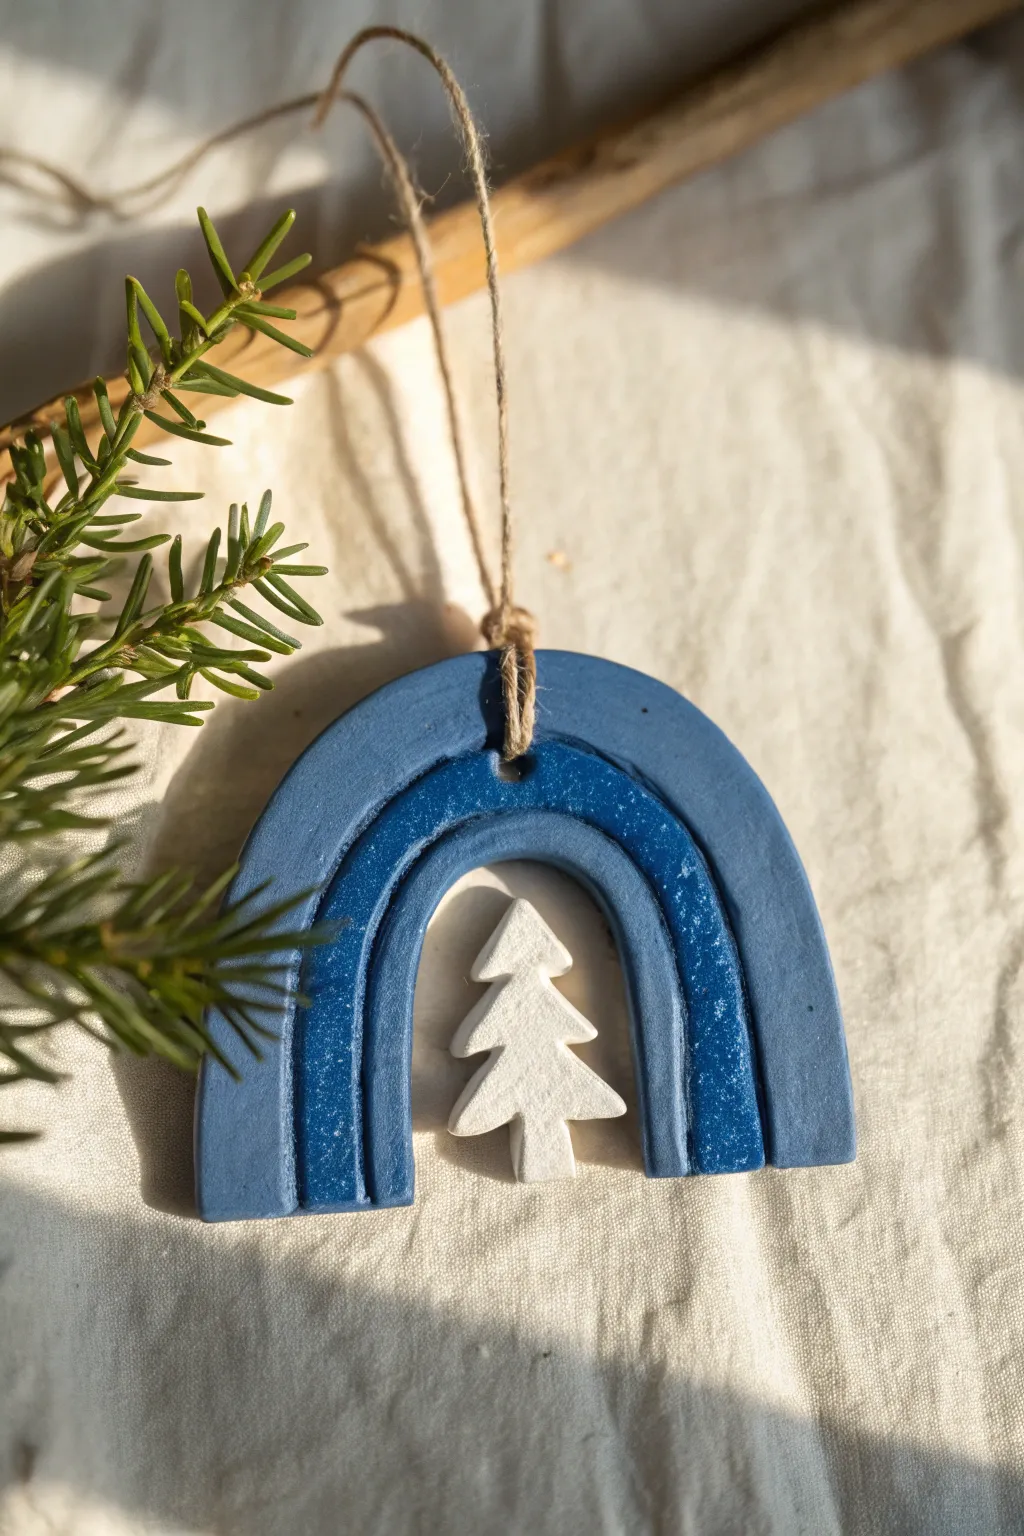
This charming ornament captures the silent beauty of a winter forest by framing a tiny white tree within a deep blue rainbow arch. Combining matte and sparkling finishes adds depth to the clay, creating a piece that feels both modern and festive.
How-To Guide
Materials
- Polymer clay (navy blue, royal blue/sparkle blue, white)
- Small Christmas tree cookie cutter (micro size)
- Round cutters or templates (approx. 3-inch and 2-inch diameter)
- Acrylic rolling pin
- Craft knife or scalpel
- Jute twine or rustic string
- Toothpick or needle tool
- Sandpaper or nail buffer (optional)
- Parchment paper
Step 1: Prepping the Clay
-
Condition the clay:
Start by warming up your navy blue and white polymer clay in your hands. Knead them separately until soft and pliable to prevent cracking later. -
Roll out the base:
Roll the navy blue clay into a sheet approximately 1/4 inch thick. You want it substantial enough to hold its shape but not too heavy for a branch. -
Roll out the inner arch:
Take your sparkly royal blue clay (or mix glitter into standard blue) and roll it into a thin sheet, slightly thinner than your base layer.
Uneven Arches?
If you don’t have circle cutters, trace around a water glass or bowl onto paper first. Cut this paper template out and place it on your clay, then trace around it with your craft knife for perfect curves.
Step 2: Constructing the Arch
-
Cut the outer shape:
Using your largest round cutter or a template, cut a half-circle shape from the thick navy blue sheet to form the main body of the rainbow. -
Create the inner cutout:
Use a smaller round cutter to remove a semi-circle from the bottom center of your navy arch. This creates the negative space where the tree will hang. -
Cut the accent strip:
From the thin sparkly blue sheet, cut a curved strip that matches the arch of your main piece. It should be slightly narrower than the navy base to leave a border. -
Attach the accent:
Gently press the sparkly blue strip onto the navy base. Roll over it lightly with the acrylic roller to bond the layers without distorting the shape. -
Add texture:
Use a needle tool to scribe shallow lines separating the two blue tones, enhancing the distinct ‘rainbow’ bands effect.
Make it Sparkle
Before baking, lightly brush the white tree with pearl mica powder or press loose cosmetic glitter into the clay surface to give it a fresh-snow shimmer that catches the holiday lights.
Step 3: The Tiny Tree
-
Form the tree:
Roll out a small amount of white clay until it’s about 3/16 inch thick. Use your micro tree cutter to punch out a sharp, clean tree shape. -
Create hanging holes:
Using a toothpick or needle tool, pierce a hole through the very top of the white tree. Then, pierce a corresponding hole in the center bottom of the blue arch’s inner curve. -
Add the main suspension hole:
Don’t forget the main hanging point! Pierce a hole at the very top center of the blue rainbow arch so you can hang the finished ornament. -
Smooth edges:
Dip your finger in a tiny bit of rubbing alcohol or cornstarch and gently smooth any rough edges on both clay pieces before baking.
Step 4: Baking and Assembly
-
Bake:
Place both pieces on parchment paper and bake according to your clay package instructions. I typically bake at a slightly lower temperature for longer to prevent white clay from scorching. -
Cool down:
Allow the pieces to cool completely on the baking sheet. They will harden fully as they return to room temperature. -
Thread the tree:
Cut a short piece of jute twine. Thread it through the top of the tree, tie a knot, and then thread the other end up through the hole in the bottom of the rainbow arch. -
Secure the tree:
Tie a secure knot behind the arch so the tree dangles freely in the center of the negative space without touching the sides. -
Add the hanger:
Loop a longer piece of jute twine through the top hole of the rainbow arch to create the hanger for the tree branch.
Hang your new creation near a light source to let the silhouette really shine
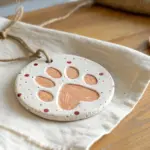
Mini Gift-Tag Ornaments With Short Messages

Elevate your gift wrapping with these charming, rustic clay tags that add a permanent keepsake to any present. The bright white clay contrasts beautifully with simple kraft paper, while delicate imprinted patterns create a subtle, sophisticated texture.
Step-by-Step Guide
Materials
- White air-dry clay or polymer clay
- Rolling pin
- Small round cookie cutter or bottle cap (approx. 1.5-2 inches diameter)
- Small alphabet stamps
- Small snowflake or floral stamp
- Drinking straw or skewer
- Fine-grit sandpaper
- Jute twine
- Fresh evergreen sprigs (for styling)
- Wax paper or craft mat
Step 1: Prepping the Clay Base
-
Condition the clay:
Begin by taking a small handful of white air-dry clay. Knead it in your hands until it becomes soft, pliable, and free of cracks. -
Roll it out:
Place the clay on a sheet of wax paper or a craft mat to prevent sticking. Use a rolling pin to flatten the clay to an even thickness of about 1/4 inch. -
Check consistency:
Make sure the surface is smooth; if you see any air bubbles, gently pierce them and smooth over with your finger. -
Cut the shape:
Press your round cookie cutter or a clean bottle cap firmly into the clay to create a perfect circle. Lift the cutter straight up to keep the edges clean. -
Smooth the edges:
Dip your finger in a tiny bit of water and run it gently around the circumference of the circle to soften any sharp cutting ridges. -
Create the hanging hole:
Using a drinking straw or a skewer, punch a hole near the top edge of the circle. Twist the tool slightly as you pull it out to ensure a clean opening for the twine.
Step 2: Adding the Design
-
Plan your spacing:
Before stamping, hover your tools over the clay to visualize where the letters and icons will sit. For this ‘JOY’ design, you want the elements spaced loosely in the center. -
Stamp the first letter:
Press a small ‘J’ stamp into the clay on the left side. Apply firm, even pressure but don’t push all the way through the tag. -
Stamp the center motif:
Instead of an ‘O’, stamp a small snowflake or floral icon in the center. I find rocking the stamp very slightly helps catch all the details. -
Stamp the final letter:
Add the letter ‘Y’ or ‘O’ on the right side to complete your short message. -
Add decorative texture:
Stamp a second snowflake below the text for asymmetrical balance. Then, use a needle tool or toothpick to prick tiny scattered dots around the background for an airy, snowy effect.
Cracked Clay?
If tiny cracks appear while drying, don’t toss it! Mix a tiny bit of fresh wet clay with water to make a paste and fill the crack, then sand smooth once dry.
Step 3: Finishing and Assembly
-
Let it dry:
Allow the clay to dry completely according to the package instructions. Air-dry clay usually takes 24-48 hours; flip it halfway through for even drying. -
Sand for perfection:
Once fully hard, lightly rub the edges and surface with fine-grit sandpaper to remove any lingering roughness or fingerprints. -
Prepare the wrapping:
Wrap your gift box neatly in brown kraft paper. -
Cut the twine:
Cut a generous length of jute twine, enough to wrap around the gift and tie a bow. -
Thread the tag:
Slip one end of the twine through the hole in your clay tag and slide it to the center of the string. -
Attach to gift:
Wrap the twine around the box. Tie a simple knot to secure the tag in place. -
Add greenery:
Tuck a small sprig of fresh fir or pine underneath the twine knot. -
Final bow:
Tie a loose, floppy bow with the remaining twine ends directly over the greenery stem to secure it.
Add Some sparkle
After the clay dries, brush a thin layer of liquid glue over the stamped snowflake indentations and sprinkle with clear ultra-fine glitter for a frosty look.
Now you have a touching handmade addition to your holiday giving that shows extra thoughtfulness
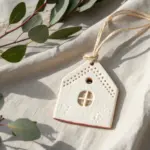
Little Village House Ornaments
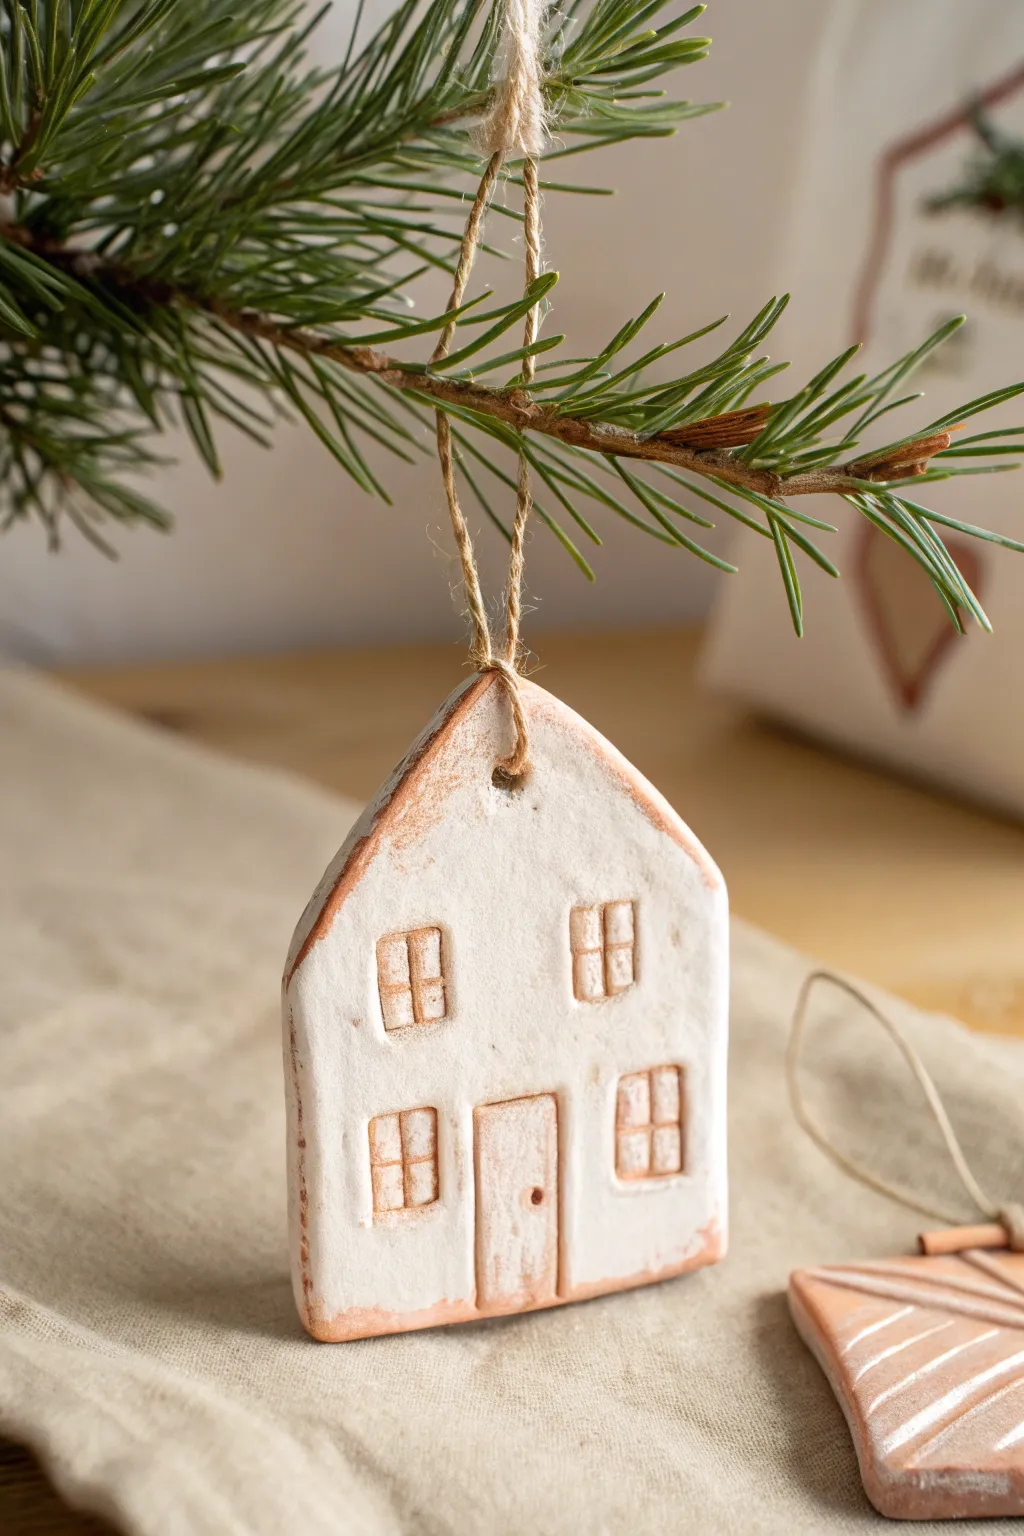
Create a charming miniature village for your tree with these primitive-style house ornaments. The technique combines simple shape-cutting with a rustic white-wash finish to let the warm clay tones peek through.
How-To Guide
Materials
- Air-dry clay (terracotta color)
- Rolling pin
- Parchment paper or canvas mat
- Craft knife or clay shaping tool
- Cookie cutter (house shape) or paper template
- Drinking straw or skewer
- Small flat sculpting tool or toothpick
- White acrylic paint
- Water
- Flat paintbrush
- Paper towel or rag
- Jute twine for hanging
Step 1: Shaping the House
-
Roll the clay:
Start by kneading a manageable chunk of terracotta-colored air-dry clay until it is pliable. Roll it out on parchment paper to an even thickness of about 1/4 inch / 6mm. You want it sturdy enough to hang but not heavy. -
Cut the silhouette:
If you have a house-shaped cookie cutter, press it firmly into the clay. Alternatively, sketch a simple house shape (a rectangle with a triangle on top) onto paper, cut it out, place it on the clay, and trace around it with a craft knife. -
Smooth the edges:
Dip your finger in a little water and gently run it along the cut edges of your house. This softens any sharp corners or ragged bits left by the cutting tool. -
Make the hanging hole:
Use a drinking straw or a skewer to modify the top of the roof. Press straight down through the clay to create a clean hole for the twine, centered near the peak.
Fixing Warped Clay
If your ornament curls while drying, lightly mist the back with water and place it under a heavy book between two sheets of parchment paper overnight.
Step 2: Adding Details
-
Outline the windows:
Using a small flat tool or a toothpick, lightly impress four squares into the clay face—two on the top level and two below them. Don’t cut all the way through; just press deep enough to make an indentation. -
Create window panes:
Inside each square indentation, press a cross shape to mimic window panes. This divides the square into four smaller quadrants. -
Form the door:
Between the two bottom windows, press a rectangular outline for the door. It should be slightly taller than the windows. Add a tiny dot indentation on the right side of the door for the doorknob. -
Dry the ornament:
Place your finished house on a flat surface to dry. I prefer to flip mine over halfway through the drying process to prevent curling. Check your clay’s package instructions, but this usually takes 24-48 hours.
Step 3: Finishing Touches
-
Prepare the wash:
Mix a small amount of white acrylic paint with water. You are looking for a milky consistency, roughly 1 part paint to 1 part water. -
Apply the paint:
Brush the watered-down paint over the entire front surface of the house. Make sure the liquid pools slightly into the indented windows and door lines. -
Wipe back:
Before the paint fully dries, take a paper towel or damp rag and gently wipe the surface. You want to remove most of the white from the raised areas while leaving it in the crevices and texture. -
Refine the edges:
If the edges got too white, gently sand them or wipe them firmly with a damp cloth to reveal the raw terracotta color. This framing effect highlights the house shape. -
Seal (optional):
For longevity, you can apply a matte varnish, though leaving the clay raw preserves the rustic, primitive texture shown in the photo. -
Add the hanger:
Cut a length of jute twine. Thread it through the hole at the roof peak and tie a simple loop knot.
Add a Snowy Roof
Use textured snow paste or thick white puff paint just on the roof edges to make your little village look like it was just hit by a winter blizzard.
Hang your little terracotta village on the tree and enjoy the handmade warmth it brings to your holiday decor