
A mini clay date is my favorite kind of cozy night: low-pressure, lots of laughs, and you end up with tiny keepsakes you’ll actually want to keep. Pick air dry clay or polymer clay, clear a little space, and choose one of these quick, couple-friendly ideas.
Matching Mini Heart Trinket Dishes
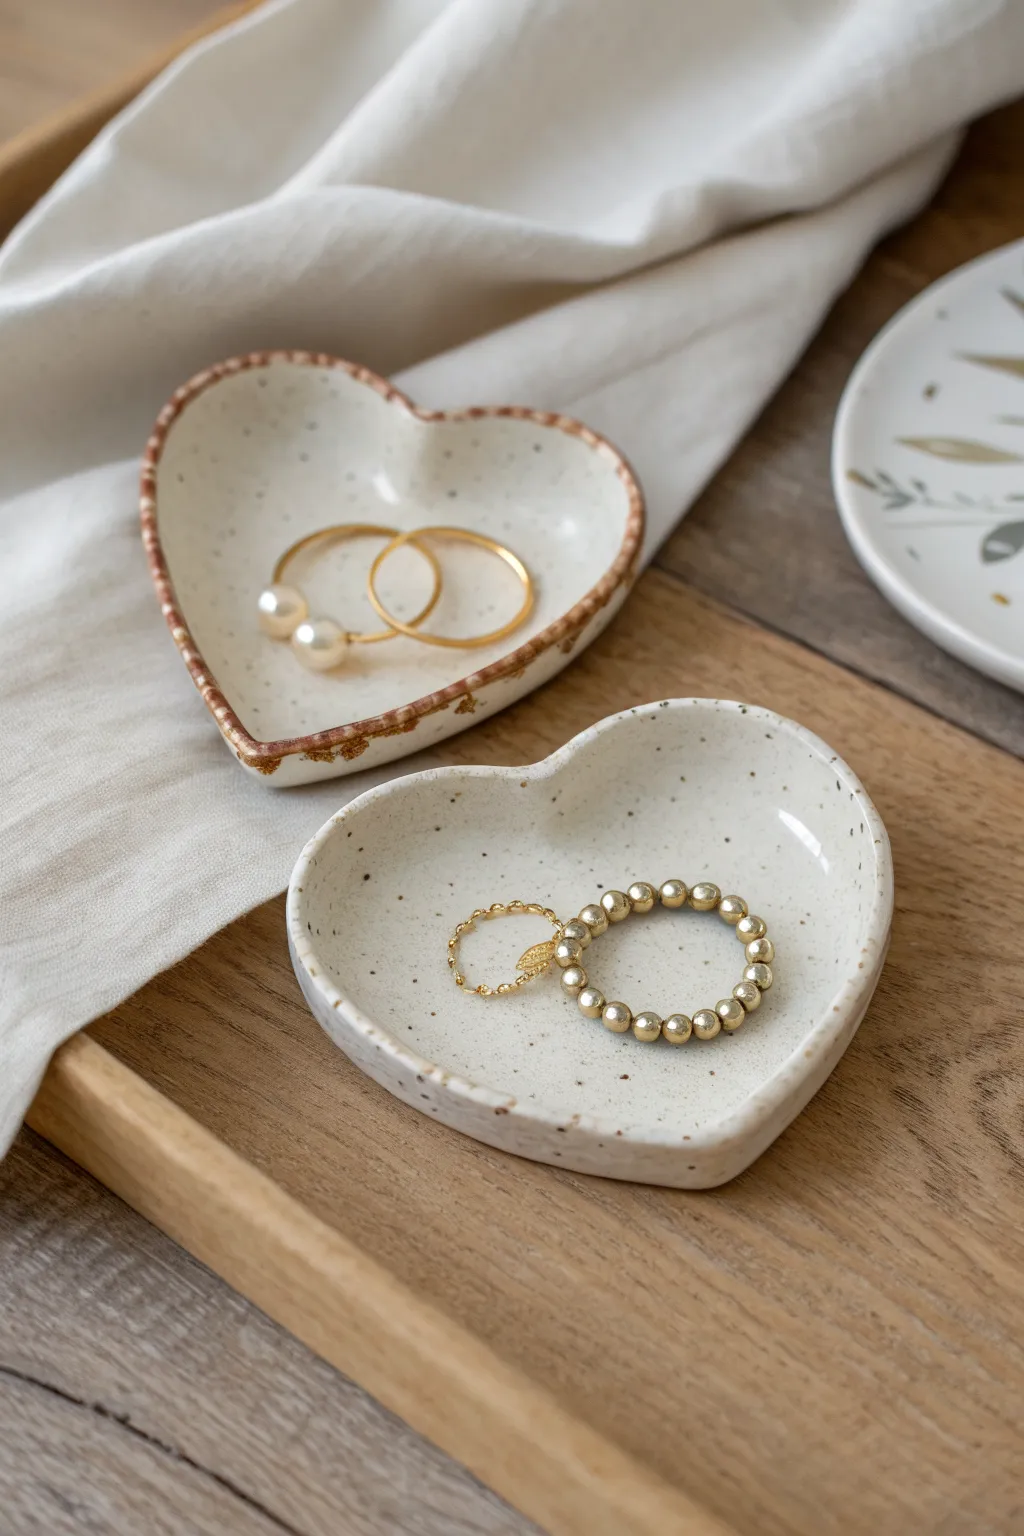
These darling matching heart dishes are perfect for holding dainty rings and adding a touch of romance to your nightstand. With their rustic speckled finish and optional rim detailing, they have an upscale, handmade pottery vibe you can easily achieve at home.
Step-by-Step Guide
Materials
- Air-dry clay (white or light cream)
- Acrylic rolling pin
- Heart-shaped cookie cutter (approx. 3-4 inches)
- Small sponge or foam brush
- Pottery glaze or clear varnish (gloss finish)
- Brown and burnt orange acrylic paint
- Old toothbrush (for speckling)
- Fine grit sandpaper
- Small detail brush
- Bowl of water
- Canvas mat or parchment paper
Step 1: Shaping the Clay
-
Condition the clay:
Begin by taking a handful of air-dry clay and kneading it in your warm hands until it feels soft and pliable. This prevents cracks later on. -
Roll it out:
Place the clay on your parchment paper or canvas mat. Use the acrylic rolling pin to roll it into a slab about 1/4 inch thick. Aim for an even surface without any major bumps. -
Cut the shapes:
Press your heart-shaped cookie cutter firmly into the clay slab. Wiggle it slightly to ensure a clean cut, then lift the excess clay away. -
Smooth the edges:
Dip your finger in a little water and run it gently along the cut edges of the heart to smooth out any roughness or sharp corners left by the cutter. -
Form the curve:
Pick up the clay heart and gently pinch the edges upward with your thumbs and forefingers to create a shallow rim. You want a subtle curve that will hold jewelry, not a deep bowl. -
Refine the shape:
Place the curved heart back down. If the bottom has rounded out too much, press the center gently so it sits flat on the table, then reshape the rim as needed.
Clean Edges Pro Tip
Is your rim cracking while you pinch it upwards? Your clay might be too dry. Dip your fingers in water constantly while shaping to keep the clay flexible and smooth.
Step 2: Drying and Refining
-
Let it dry completely:
Allow your dishes to air dry for 24 to 48 hours. I like to flip them over halfway through the drying process to ensure the bottom dries as evenly as the top. -
Sand for smoothness:
Once fully hard and white, take your fine-grit sandpaper and lightly buff the surface. Focus on the rim and any uneven spots on the interior until it feels silky smooth to the touch. -
Wipe clean:
Use a slightly damp paper towel or sponge to wipe away all the sanding dust before you start painting. This ensures your finish will be crystal clear.
Step 3: Adding the Finish
-
Create the speckles:
Dilute a tiny drop of dark brown acrylic paint with water. Dip an old toothbrush into this mixture, hold it over the dish, and run your thumb across the bristles to flick tiny speckles onto the clay. -
Paint the rim (optional):
For the dish with the darker edge, mix burnt orange with a touch of brown paint. Use a small sponge or detail brush to dab this color unevenly along the very top edge of the rim for a rustic look. -
Seal the deal:
Once the paint is totally dry, apply a generous coat of high-gloss varnish or pottery glaze. This gives it that ceramic shine and protects the paint. -
Apply a second coat:
For extra durability and shine, let the first coat of varnish cure according to the bottle’s instructions, then add a second layer. -
Final cure:
Let the varnish cure completely—usually another 24 hours—before placing any jewelry inside.
Level Up: Texture
Before cutting out your heart shape, press a piece of lace or a textured fabric into the rolled slab. This leaves a subtle imprinted pattern underneath the glaze.
Enjoy styling these little treasures on your dresser or gifting one to your clay date partner


Tiny Couple Ring Cones
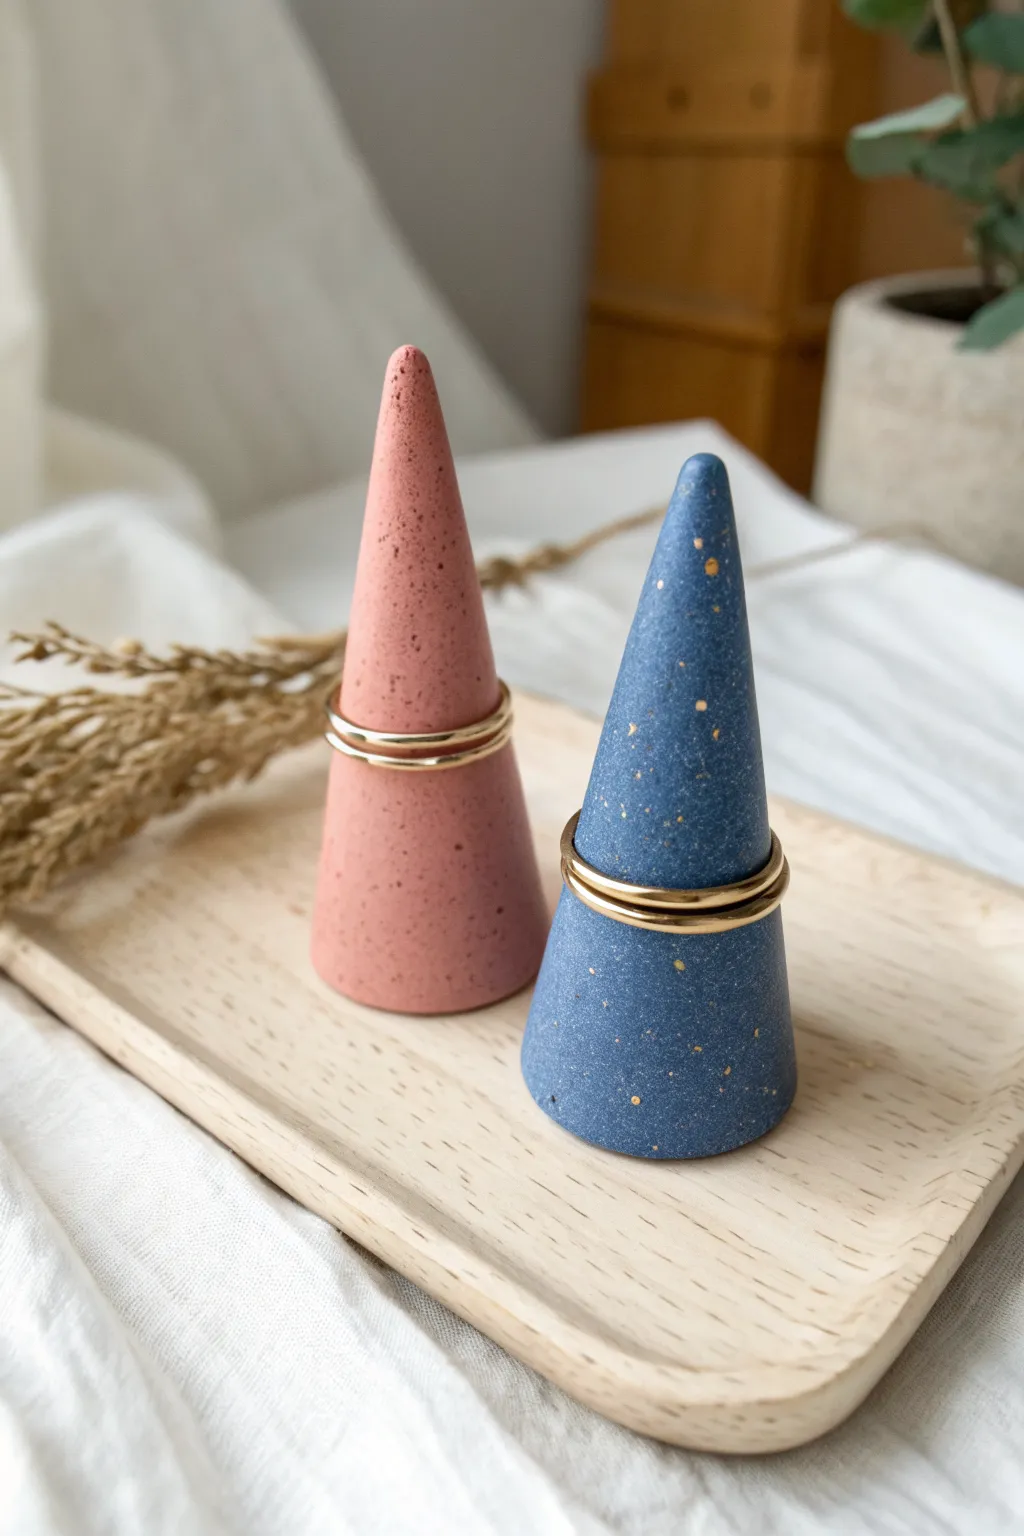
These miniature ring cones are the perfect functional keepsake for a crafty date night. Featuring a chic matte finish with subtle gold speckling, they keep your precious bands safe and add a touch of modern decor to your bedside table.
Detailed Instructions
Materials
- Polymer clay (terracotta pink and denim blue)
- Small rolling pin or acrylic roller
- Ceramic tile or smooth working surface
- Flexible clay blade or craft knife
- Gold leaf flakes or gold metallic paint
- Small stiff-bristled paintbrush (an old toothbrush works too)
- Baking sheet with parchment paper
- Fine-grit sandpaper (400-600 grit)
- Matte spray varnish (optional)
Step 1: Prepping and Shaping
-
Condition the Clay:
Start by taking a chunk of the pink clay about the size of a walnut. Warm it up in your hands by rolling and squishing it until it becomes soft and pliable. -
Form a Ball:
Roll the conditioned clay into a smooth, crack-free sphere between your palms. If you notice any lines or cracks, keep rolling until they disappear. -
Create the Cone Shape:
Place the ball on your work surface. Place the edge of your hand or a flat tool against one side of the ball and roll back and forth, applying slightly more pressure at the top creates a tapered point. -
Flatten the Base:
Once you have a rough cone shape, pick it up and tap the bottom gently against your table to create a flat, stable base. -
Refine the Slopes:
Roll the cone gently on the surface again to smooth out the sides. You want a straight, clean line from the base to the tip, not a wobbly one. -
Create the Second Cone:
Repeat the entire process with the blue clay. Try to make this one slightly different in height or width for a complementary ‘couple’ look rather than an identical match. -
Check for Stability:
Set both cones on your flat surface. Give them a tiny nudge to ensure they don’t tip over easily. If they wobble, press the base down firmly again.
Clean Cuts
Before baking, wipe your raw clay with a little rubbing alcohol on a cotton swab. This removes lint, dust, and fingerprints instantly for a pro finish.
Step 2: Surface Detailing
-
Add Texture (Method A – Before Baking):
For embedded gold flecks like in the blue cone, take tiny bits of gold leaf and press them randomly into the surface of the raw clay. Roll the cone gently to flatten the gold flush with the clay. -
Alternative Speckling (Method B):
The pink cone has a more organic grit. You can achieve this by mixing a pinch of dried coffee grounds or black pepper into the clay during the conditioning phase. -
Final Smoothing:
Do a final once-over with your fingertip to smooth out any fingerprints. I find that a tiny drop of baby oil on my finger helps glide over the clay without leaving marks.
Marbled Magic
Twist white and colored clay together before rolling your cone to create a soft marble effect, then add the gold leaf on top for extra luxury.
Step 3: Baking and Finishing
-
Bake the Cones:
Place both cones on a parchment-lined baking sheet. Bake according to your clay manufacturer’s instructions—usually around 275°F (135°C) for 15-30 minutes depending on thickness. -
Cool Down:
Let the cones cool completely in the oven with the door cracked open. This gradual cooling helps prevent cracking. -
Add Gold Splatters (Method C – After Baking):
If you didn’t use gold leaf earlier, dip a stiff brush or toothbrush into gold metallic paint. Run your thumb over the bristles to flick tiny specks of gold onto the cured cones. -
Sand the Bases:
Rub the bottom of each cone against fine-grit sandpaper placed flat on the table. This ensures they sit perfectly flush. -
Seal the Project:
Lightly mist the cones with a matte varnish to protect the surface and keep the gold accents from tarnishing over time.
Place these charming little peaks on your dresser and enjoy a stylish home for your favorite rings


Mini Food Magnets Set
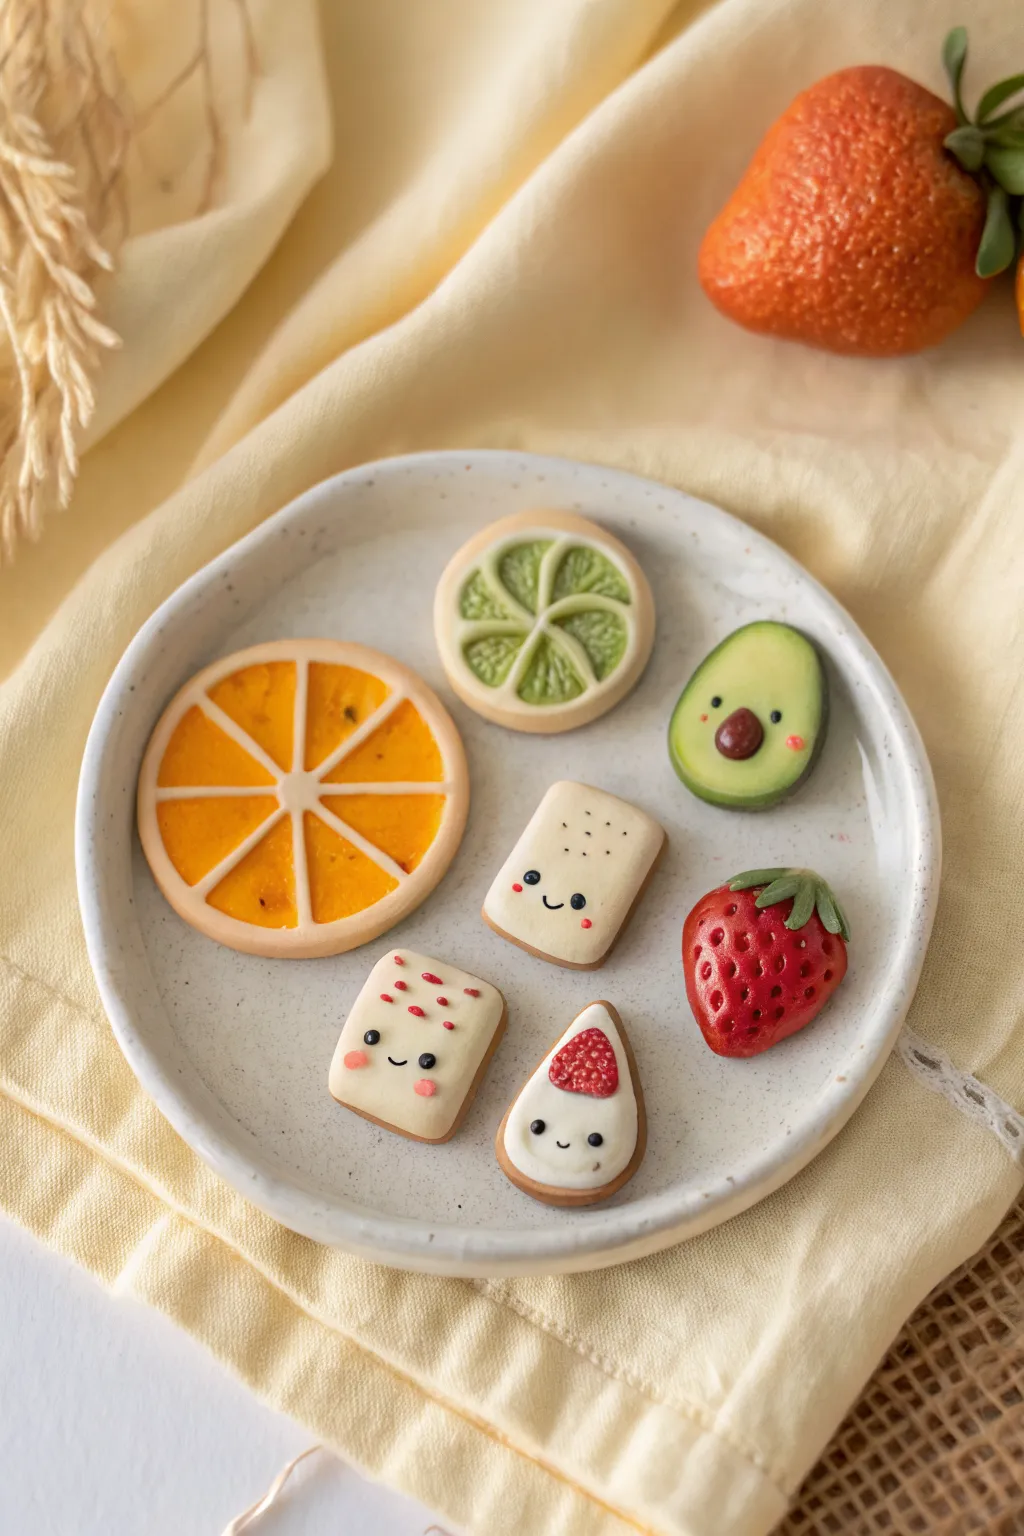
Transform polymer clay into an adorable platter of miniature treats, including citrus slices, a tiny avocado, and smiling crackers. These Kawaii-inspired magnets are perfect for brightening up your fridge or gifting to a friend who loves tiny things.
How-To Guide
Materials
- Polymer clay (white, translucent, orange, lime green, dark green, red, beige/tan, brown, black)
- Clean ceramic tile or glass work surface
- Rolling pin or pasta machine
- X-acto knife or clay blade
- Small round cutters (cookie cutter set)
- Needle tool or toothpick
- Dotting tool or ball stylus
- Liquid polymer clay (translucent and white)
- Chalk pastels (brown, orange, green) for shading
- Gloss glaze or UV resin
- Small magnets
- Super glue (E6000 or similar)
Step 1: Citrus Slices
-
Prepare the segments:
Mix translucent clay with a tiny bit of orange (for the orange slice) or lime green (for the lime slice). Roll this into a log, then wrap the log in a very thin sheet of white clay. -
Form the cane:
Cut the wrapped log into 8 equal sections. Pinch each section into a teardrop or triangular wedge shape to mimic fruit segments. -
Assemble the fruit:
Arrange the 8 wedges in a circle with the points meeting in the center. Fill the center gap with a tiny snake of white clay if needed. -
Wrap the rind:
Wrap the entire circle of wedges in a layer of white clay, followed by a layer of the matching rind color (orange or beige/green mix). -
Slice the cookies:
Gently reduce the cane to your desired diameter and use a sharp blade to slice off two clean cookies. Texture the fruit flesh gently with a needle tool.
Keep it Clean
Baby wipes are essential! Clean your hands and tools between colors, especially before handling white clay, to avoid transferring lint or dark pigments.
Step 2: Fresh Produce
-
Shape the avocado:
Blend lime green and yellow clay for the flesh, forming a teardrop shape. Wrap the outside with a thin snake of dark green clay and smooth it down to create the skin. -
Add avocado details:
Press a small ball of brown clay into the lower center for the pit. Use a dotting tool to add two black eyes and a tiny pink mouth for personality. -
Create the strawberry base:
Shape a ball of red clay into a rounded strawberry form slightly flattened on the back. -
Texture the strawberry:
Use a needle tool to poke small indentations all over surface for seeds. Add a small green clay ‘star’ on top for the leafy calyx, using a tool to texture the leaves.
Step 3: Kawaii Crackers
-
Cut the bases:
Roll out beige or tan clay to a medium thickness. Cut out two rectangles and one teardrop shape. Soften the harsh edges with your finger. -
Shade for baking:
Brush the edges of the crackers lightly with brown chalk pastel dust to simulate a baked look. -
Decorate the toast:
For the rectangle cracker, pipe a thin layer of white liquid clay (or white clay softened with baby oil) onto the surface. Add tiny red clay crumbs on top as sprinkles. -
Make the jam cracker:
For the teardrop cracker, add a blob of white clay ‘cream’ and top it with a tiny red triangle textured to look like a strawberry slice. -
Bring them to life:
Like the avocado, give each cracker a face using tiny balls of black clay for eyes and a thin snake for the mouth. Add pink chalk dust cheeks with a q-tip.
Scented Charms
Mix a tiny drop of essential oil or fragrance oil (like orange or vanilla) into the clay specifically for the crackers to make them smell as good as they look.
Step 4: Finishing Up
-
Bake:
Bake all pieces according to your polymer clay package instructions (usually 275°F for 15-30 minutes). Let them cool completely. -
Glaze:
Add gloss glaze or a thin layer of UV resin to the fruit segments, the strawberry jam, and the avocado pit to make them look juicy. -
Magnetize:
Once everything is dry, flip the pieces over and use a dab of super glue to attach a small magnet to the back of each item.
Arrange your completed magnets on the fridge for a sweet touch of daily happiness


Chubby Animal Pair: Ducks or Frogs
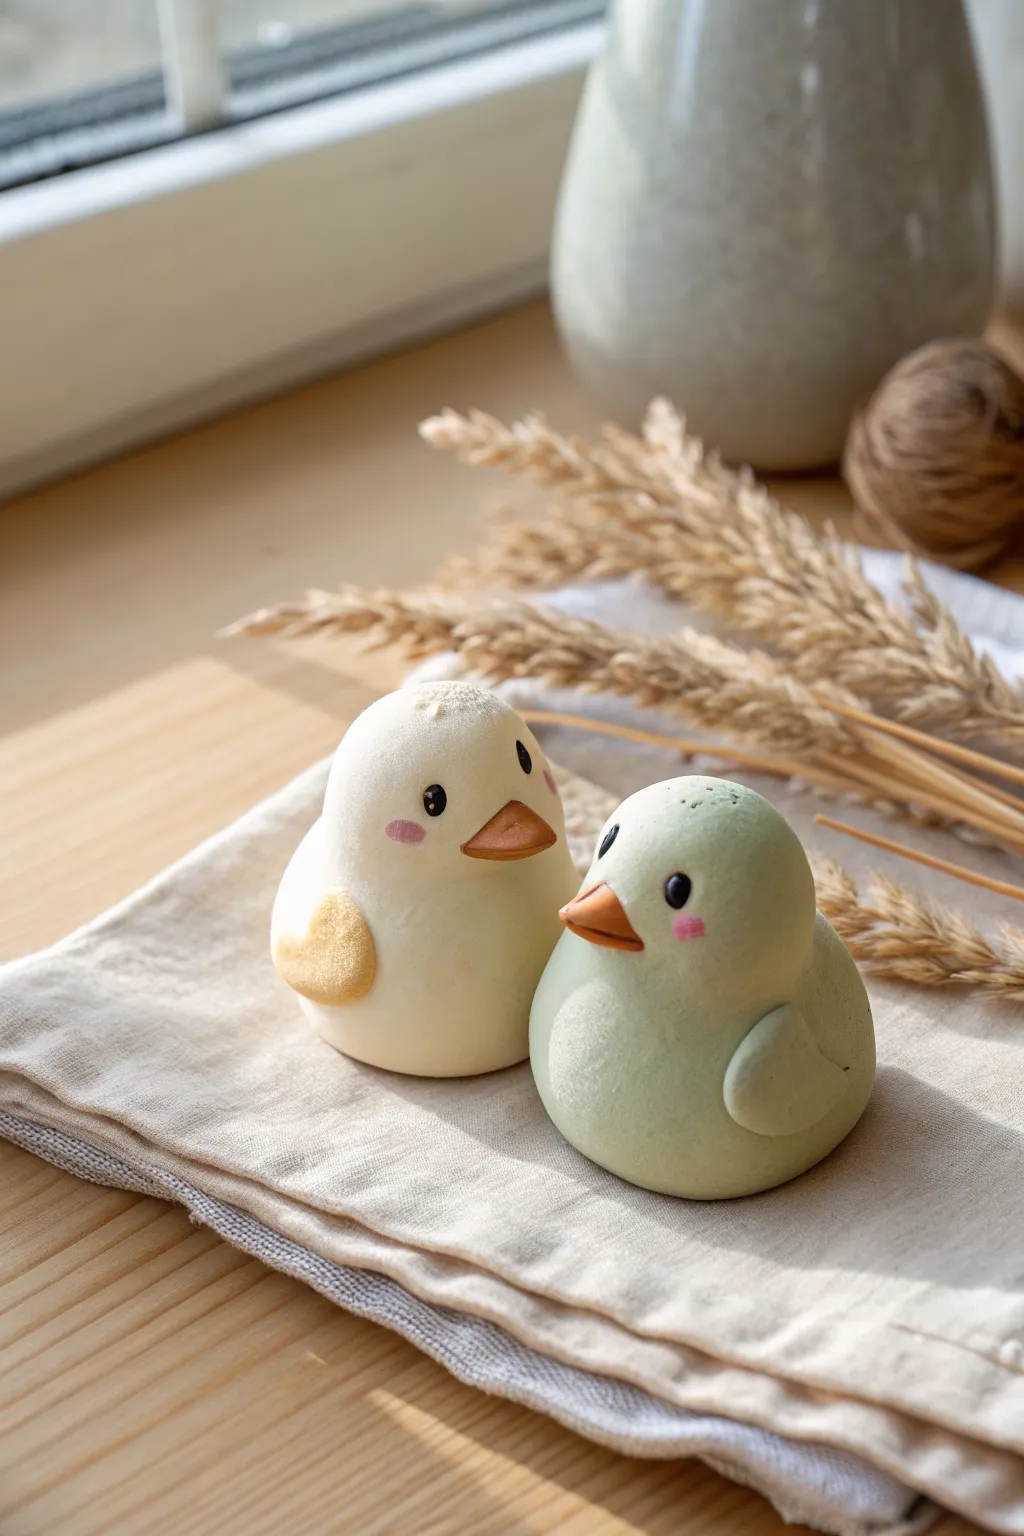
Create this adorable duo of minimalist, chubby birds to brighten up your desk or windowsill. With their smooth, matte finish and blushing cheeks, these matching figurines are a perfect beginner-friendly project for a cozy clay date.
Detailed Instructions
Materials
- Polymer clay (Cream/White and Pastel Green)
- Small amount of orange clay (for beaks)
- Small amount of yellow clay (for wing detail)
- Black acrylic paint or clay (for eyes)
- Soft pastel chalks (Pink and Brown)
- Paintbrush (fine tip)
- Modeling tools (spherical tool, needle tool)
- Oven for baking (if using polymer clay)
Step 1: Shaping the Bodies
-
Prepare the Base:
Start by conditioning your clay well until it is soft and pliable. Divide your cream clay and pastel green clay into two equal-sized portions to ensure your birds will be the same scale. -
Form the Pear Shape:
Roll each portion into a smooth ball first to remove any cracks. Then, gently roll one side of the ball between your palms to taper it slightly, creating a fat teardrop or pear shape. This will be the combined head and body. -
Flatten the Base:
Gently tap the wider bottom of your pear shape onto your work surface. You want the bird to sit flat and stable without wobbling, preserving that lovely chubby silhouette. -
Smooth the Surface:
Check for any fingerprints. I find that lightly stroking the clay with a tiny bit of cornstarch or baby oil on your finger helps create that flawless, porcelain-like finish visible in the photo.
Step 2: Adding Features
-
Create the Beaks:
Take a tiny amount of orange clay and roll it into a small cone. Press it gently to flatten the bottom, creating a triangular pyramid shape. -
Attach the Beaks:
Press the orange triangle onto the front of the face, roughly midway up the form. Use a needle tool or the side of a toothpick to gently press a horizontal line across the middle of the beak for the mouth opening. -
Form the Wings:
For the green bird, make two small, flat tear-drop shapes from the same green clay. For the cream bird, make one cream wing and one yellow wing for a cute accent patch. -
Attach the Wings:
Press the wings onto the sides of the bodies, curving them slightly to hug the round form. Blend the back edge of the wing into the body with a modeling tool for a seamless look, leaving the front edge slightly raised for dimension. -
Create Eye Sockets:
Using a small ball-tipped tool, make two shallow indentations where the eyes will go. Placing them slightly wide apart gives that innocent, ‘kawaii’ look.
Sticky Fingerprints?
To remove stubborn fingerprints from raw clay, lightly brush the surface with a little baby oil or use a soft brush dipped in removing alcohol before baking.
Step 3: Finishing Touches
-
Bake the Clay:
Follow the heating instructions on your specific brand of polymer clay. Usually, this means baking at around 275°F (130°C) for 15-30 minutes. Let them cool completely before painting. -
Paint the Eyes:
Once cool, use a fine-tip brush or a dotting tool to carefully paint the eyes black inside the indentations you made earlier. Allow the paint to dry. -
Add Highlights:
Dip the very tip of a toothpick into white paint and add a tiny white dot to the upper corner of each black eye. This ‘catchlight’ brings the character to life. -
Blush the Cheeks:
Scrape a little pink soft pastel chalk into a powder. Use a soft, dry brush to gently dust this powder onto the cheeks right below the eyes for a rosy glow. -
Add Texture (Optional):
If you want the textured look seen on the cream bird’s head, you can gently stipple the unbaked clay with a toothbrush before baking, or dust the top with a tiny bit of light brown pastel powder for a ‘toasted’ effect.
Make it a Gift
Before baking, insert a small eye-screw into the top of the head. turning these figurines into adorable matching keychains or hanging ornaments for a friend.
Set your finished pair on a sunny windowsill and enjoy their charming company

The Complete Guide to Pottery Troubleshooting
Uncover the most common ceramic mistakes—from cracking clay to failed glazes—and learn how to fix them fast.
Matching Initial Charm Keychains
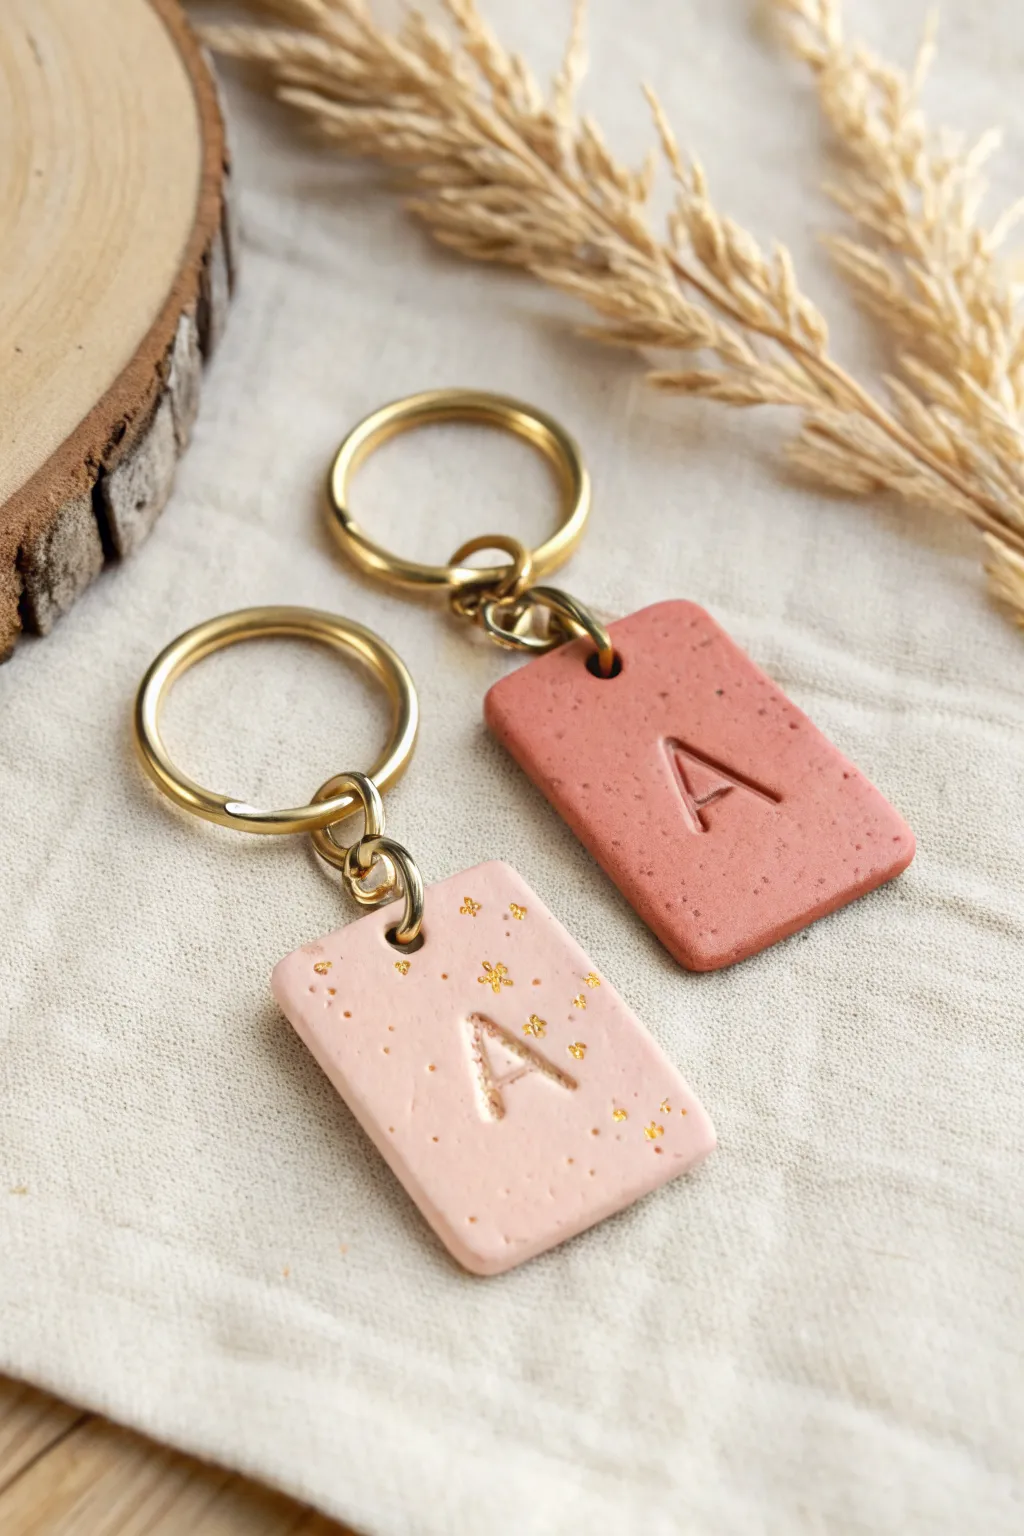
These charming, personalized keychains are the perfect crafty date night project, blending modern aesthetics with hands-on fun. With their soft, speckled finishes and elegant gold hardware, they make sophisticated keepsakes that you’ll actually want to carry around every day.
How-To Guide
Materials
- Polymer clay (terracotta and pale pink)
- Small rolling pin or acrylic roller
- Rectangle clay cutter (approx. 1.5 inches)
- Letter stamp set
- Gold leaf foil (optional)
- Toothpick or small straw
- Parchment paper or baking tile
- Gold key rings with jump rings
- Jewelry pliers
- Oven (for baking)
- Sandpaper (fine grit)
Step 1: Prepping the Clay
-
Condition the base:
Start by warming up your polymer clay in your hands. Knead the terracotta and pale pink colors separately until they are pliable and smooth. -
Add texture:
For the terracotta keychain, you can create a speckled look by mixing in a tiny pinch of black pepper or craft sand, though many clay brands come pre-speckled. Knead until evenly distributed. -
Apply gold accents:
For the pink keychain, take a small sheet of gold leaf foil. Tear off tiny flakes and gently press them onto the surface of your conditioned pink clay. -
Fold and flatten:
Fold the pink clay over itself to trap the gold leaf, then flatten it out again. Repeat this once or twice so the gold flakes are embedded within the clay layers rather than just sitting on top.
Stamp Stuck?
If your letter stamp sticks to the clay and ruins the surface, lightly dust the stamp face with cornstarch or dip it in water before pressing it into the clay.
Step 2: Shaping and Stamping
-
Roll it out:
Place your clay on a piece of parchment paper or a clean tile. Use your roller to flatten the clay to an even thickness, aiming for about 1/4 inch or 4-5mm. -
Cut the shape:
Take your rectangle cutter and press firmly into the clay. Give it a tiny wiggle to ensure it cuts all the way through, then lift the cutter. Peel away the excess clay. -
Smooth the edges:
Before baking, gently run your finger along the cut edges of the rectangle to soften any sharp corners or clay burrs left by the cutter. -
Stamp the initial:
Select the ‘A’ (or your chosen letter) from your stamp set. Position it carefully in the center of the rectangle and press down evenly—firm enough to make a clear impression, but not so hard that you warp the shape. -
Pierce the hole:
Using a toothpick or a small straw, poke a hole near the top center of the rectangle. Make sure the hole is wide enough to fit your jump ring later.
Make it Shine
Coat the baked clay with a thin layer of UV resin or glossy water-based glaze to protect the gold leaf and give the keychain a high-end, ceramic-like finish.
Step 3: Baking and Assembly
-
Bake:
Place your clay pieces on a parchment-lined baking sheet. Bake according to the specific temperature and time instructions on your package of polymer clay (usually around 275°F for 15-30 minutes per 1/4 inch thickness). -
Cool down:
Allow the clay pieces to cool completely on the baking sheet. They adhere to safety standards best when cooled slowly, and they will harden fully as they return to room temperature. -
Sand for perfection:
I like to take a piece of fine-grit sandpaper and wet-sand the edges under a little running water. This creates an incredibly professional, smooth finish. -
Open the jump ring:
Using two pairs of jewelry pliers (or your fingers and one pair of pliers), twist the jump ring open laterally—don’t pull it apart. -
Attach the hardware:
Slide the open jump ring through the hole you created in the clay. Add the gold keyring loop onto the jump ring as well. -
Close and secure:
Twist the jump ring back into a closed position using your pliers, ensuring the two ends meet perfectly flush so the charm doesn’t slip off.
Enjoy carrying a piece of your creativity with you wherever you go
Tiny Photo Holder Stands for Two Prints
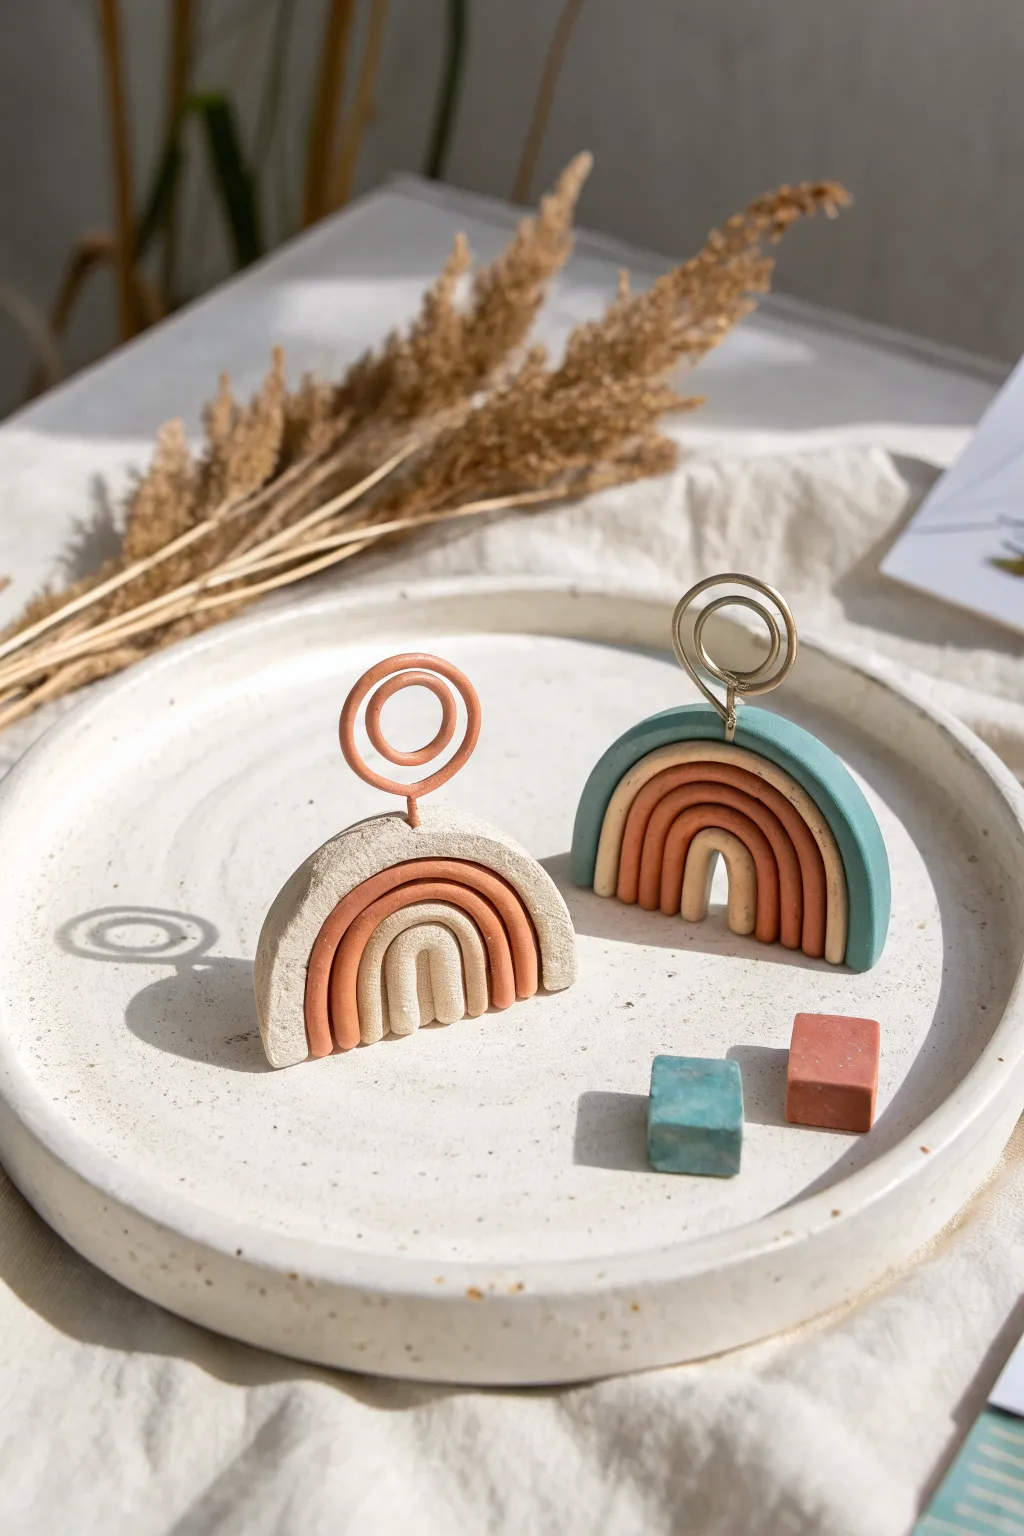
These miniature arched photo stands bring a touch of earthy, desert-inspired charm to any desk or shelf. Crafted from simple coils of clay, they feature tonal gradients and wire loops perfect for displaying your favorite tiny polaroids or love notes.
Step-by-Step Guide
Materials
- Polymer clay (colors: speckled beige, terracotta, rust, teal, and soft yellow/cream)
- Craft wire (gold or copper, approx. 18-20 gauge)
- Wire cutters
- Needle-nose pliers
- Acrylic rolling pin
- Clay knife or straight blade
- Toothpick or needle tool
- Parchment paper or ceramic tile (for baking surface)
- Oven (if using polymer clay)
Step 1: Shaping the Wire
-
Cut the wire:
Cut a piece of craft wire approximately 4 to 5 inches long for each holder you plan to make. -
Form the loop:
Using your needle-nose pliers, grip one end of the wire and gently twist it into a circular spiral shape. Create two full circles to ensure the photo will be held securely between the wires. -
Straighten the stem:
Once your spiral is formed, straighten the remaining tail of the wire so it points directly downwards. This stem will need to be about 1 to 1.5 inches long to anchor firmly into the clay.
Sticky Situation?
If your clay is getting too soft and sticky from the warmth of your hands, pop it in the fridge for 10 minutes to firm it up before slicing the bottom edge.
Step 2: Creating the Clay Arches
-
Condition the clay:
Start by warming the polymer clay in your hands, kneading each color until it is soft and pliable. This prevents cracking later on. -
Roll the coils:
Roll each color into a long, even snake roughly the thickness of a pencil. For the teal rainbow, you’ll need four ropes (teal, rust, terracotta, cream). For the beige one, roll four similarly sized ropes. -
Form the center arch:
Take your innermost color (cream or soft yellow) and bend a small section into a tight U-shape. This forms the tiny central tunnel of your rainbow. -
Layer the arches:
Take the next color rope and drape it snugly over the first U-shape. Gently press them together so they adhere, but be careful not to flatten the rounded profile of the coils. -
Complete the stack:
Continue stacking your remaining ropes over the arches until you have four distinct layers. I usually give the sides a tiny squeeze inward to make sure there are no gaps between colors. -
Trim the base:
Use your straight blade to cut straight across the bottom of the rainbow legs. This creates a flat, stable surface for the holder to stand on. -
Make the backing (optional but recommended):
Roll out a flat slab of your outer color clay. Place your rainbow on top and trace the shape, then cut it out. Press this slab onto the back of your rainbow to reinforce the coils and keep them from separating. -
Smooth the edges:
Run your finger or a clay tool along the cut bottom edges and the back seam to soften any sharp cuts or fingerprints.
Step 3: Assembly and Baking
-
Insert the wire:
Carefully push the straight stem of your wire spiral down through the exact center of the top arch. Push it deep enough so it crosses through at least two or three layers of coils for maximum stability. -
Secure the wire:
If the clay distorted slightly while inserting the wire, gently reshape the top arch around the entry point to ensure a clean look. -
Make companion cubes:
Use leftover clay scraps to form small cubes. Slice them with your blade for sharp corners; these cute little confetti blocks make great photo props. -
Bake carefully:
Place your rainbows and cubes upright on parchment paper. Bake according to your clay package instructions (usually around 275°F or 135°C for 15-30 minutes). -
Cool down:
Let the pieces cool completely inside the oven with the door slightly ajar. This gradual cooling helps prevent the clay from becoming brittle.
Texture Trick
To get the stone-like texture on the beige rainbow, use ‘granite’ effect clay or mix coarse black pepper into plain white clay before rolling.
Slide your favorite memory between the wire loops and enjoy your handmade display piece


What Really Happens Inside the Kiln
Learn how time and temperature work together inside the kiln to transform clay into durable ceramic.
Micro Bud Vases as a Set
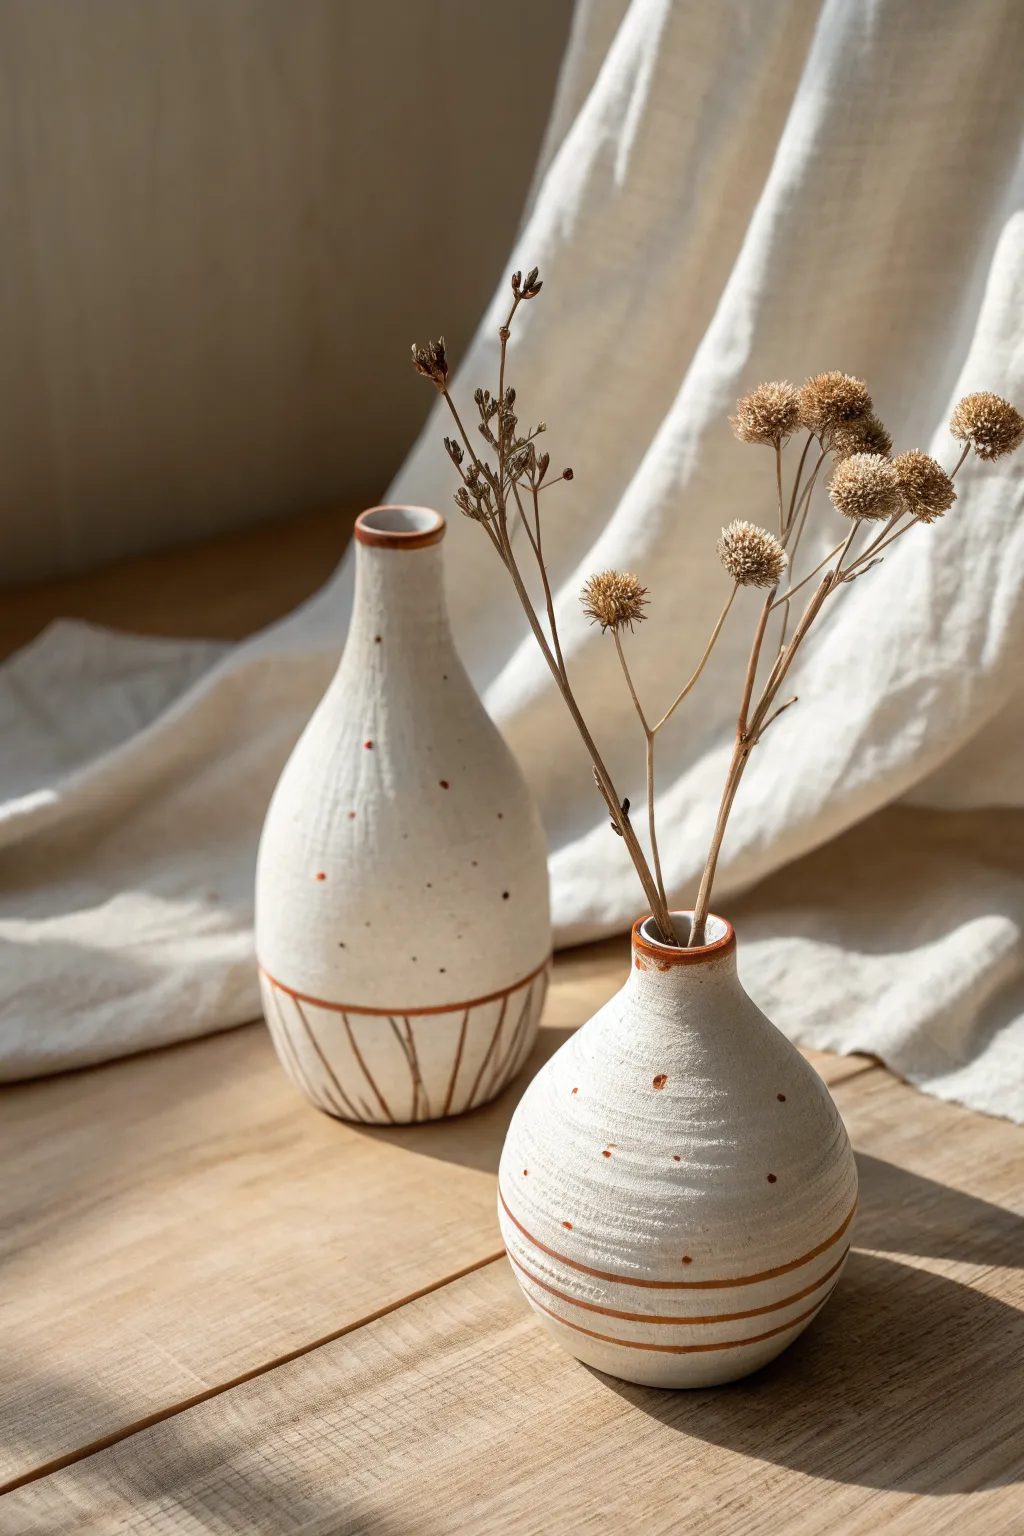
These charming, palm-sized vases feature a rustic speckled finish and simple ochre detailing, making them perfect for holding dried wildflowers. The duo combines a tall, tapered bottle shape with a squatter, rounder vessel for a balanced, minimalist set.
Detailed Instructions
Materials
- Air-dry clay or polymer clay (white or cream)
- Acrylic rolling pin
- Sculpting tools (needle tool, blending tool)
- Small paintbrush (for water/slip)
- Fine grit sandpaper
- Acrylic paints (burnt sienna/ochre, warm white)
- Old toothbrush or stiff bristle brush
- Matte spray varnish or sealant
- Water cup
Step 1: Forming the Tall Vase
-
Prepare the clay:
Start by conditioning a ball of clay roughly the size of a tangerine until it is pliable and smooth. Roll it into a smooth sphere to eliminate air bubbles. -
Extend the neck:
Gently roll one side of the sphere against your work surface to elongate it into a teardrop or pear shape. Continue focusing on the top third, rolling it between your fingers to pull the clay upward into a long, tapered neck. -
Flatten the base:
Tap the bottom of the teardrop shape firmly against the table to create a stable, flat base. Ensure the vase stands upright without wobbling. -
Create the opening:
Using a blunt tool or the handle of a paintbrush, gently press straight down into the center of the neck to create the opening for your flower stems. Go slowly to avoid distorting the thin neck walls. -
Refine the shape:
Smooth out the transitions between the body and the neck using a splash of water on your finger. The silhouette should flow gently rather than having a sharp angle.
Uneven Stripes?
Don’t stress straight lines! The charm comes from the ‘wobbly’ aesthetic. If a line is too thick, wait for it to dry and tidy it up with cream paint.
Step 2: Shaping the Round Vase
-
Form the base sphere:
Take a slightly smaller amount of clay than before and roll it into a neat ball. -
Pinch the neck:
Instead of rolling a long neck, gently pinch the very top of the sphere to create a short, stubby rim. This vase should feel much squatter and rounder than the first. -
Hollow the center:
Press your tool into the center to create the cavity. Because this vase is shorter, you can wiggle the tool slightly to widen the opening just a bit more than the tall vase. -
Smooth and dry:
Dip your finger in water (or slip) to smooth away any fingerprints on both pieces. Let them dry completely, which usually takes 24-48 hours for air-dry clay.
Step 3: Painting and Detailing
-
Sand for texture:
Once fully dry, lightly sand the surfaces. Don’t make them perfectly smooth; leaving subtle horizontal ridges adds to the hand-thrown wheel look shown in the photo. -
Apply base coat:
Paint both vases with a warm white or cream acrylic paint. Apply two thin coats for opaque coverage. -
Create the speckles:
Mix a small amount of burnt sienna paint with a little water to make it fluid. Dip an old toothbrush into this mix and run your thumb across the bristles to flick tiny speckles onto the vases. -
Paint the rims:
Using a fine detail brush and the burnt sienna paint (undiluted), carefully paint a thin ring around the very top rim of both vases. -
Detail the round vase:
On the short, round vase, paint three horizontal rings around the bottom third of the body. The lines don’t need to be perfectly straight; a shaky hand adds organic charm. -
Detail the tall vase:
For the tall vase, paint a single horizontal ring near the bottom. Then, paint vertical stripes extending from the bottom of the vase up to that ring. -
Add sporadic dots:
I like to take the end of a paintbrush, dip it in the brown paint, and add a few larger, intentional dots scattered randomly among the fine splatters for variety. -
Add textural scratching:
While the paint is barely tacky, you can gently scratch slight horizontal texturing into the surface with sandpaper to make them look more like stoneware. -
Seal the work:
Finish with a matte spray varnish to protect the paint and give the clay a finished, ceramic feel.
Make it Waterproof
To use fresh flowers instead of dried ones, nest a small glass vial or test tube inside the clay form before drying, or coat the inside with resin.
Now nestle small dried branches inside to enjoy your new handcrafted vignette
Mini Candle Holders With Shared Pattern
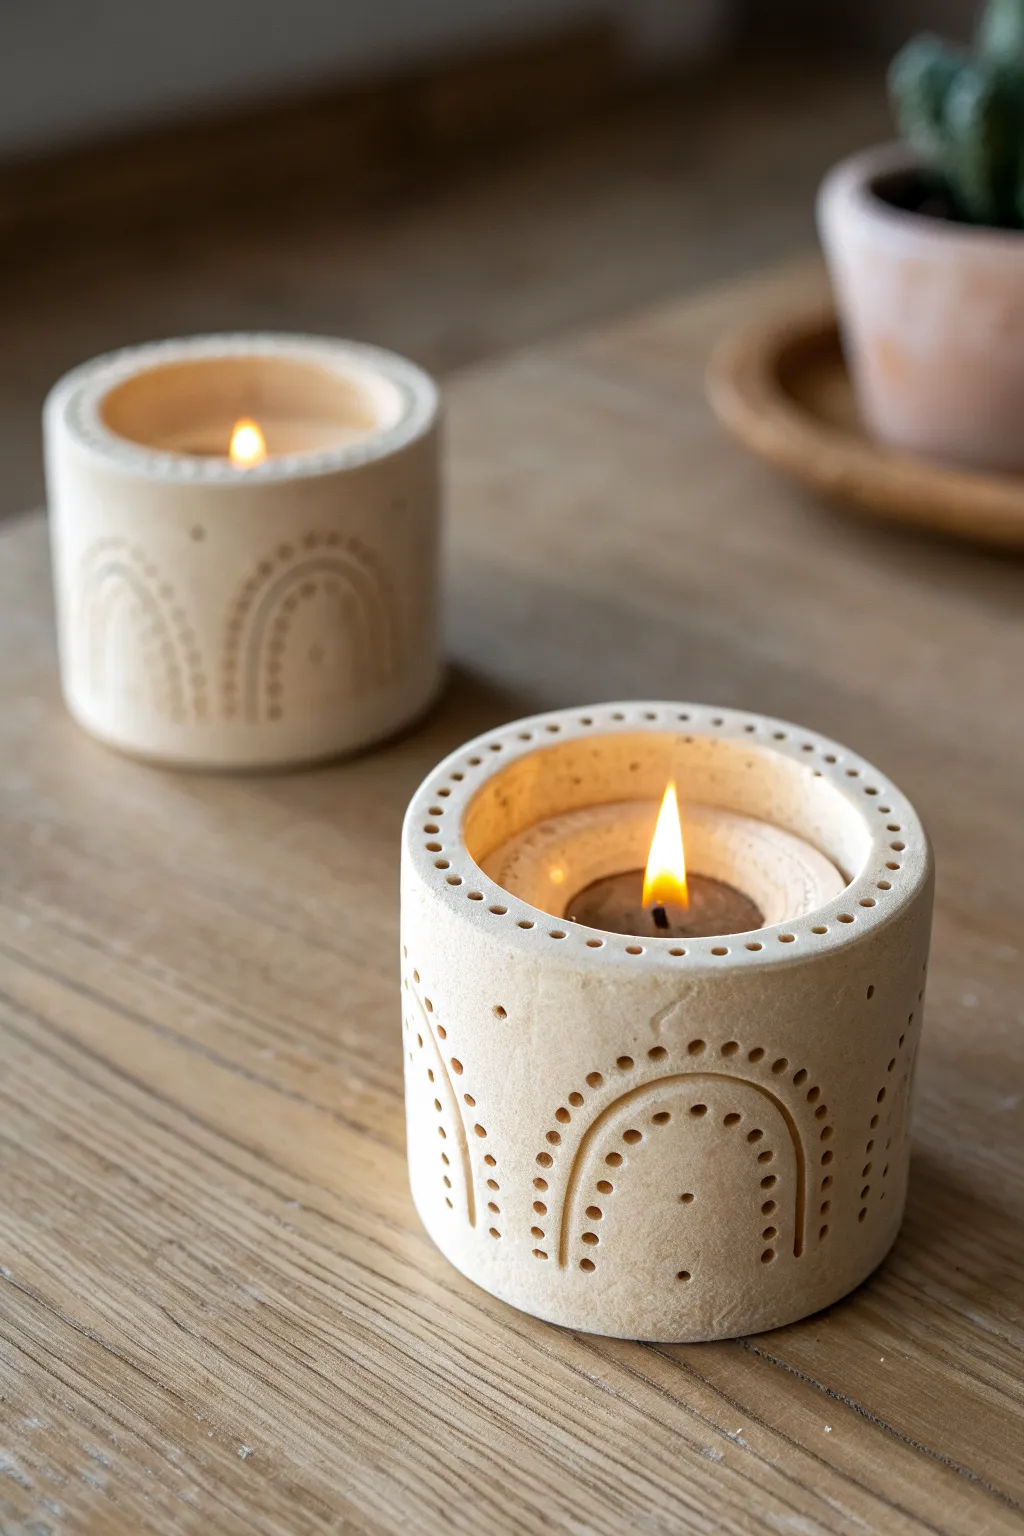
Create a cozy ambiance with these textured clay candle holders featuring a charming rainbow arch design. The minimalist dotted pattern and natural finish give them a sophisticated, handcrafted look perfect for a romantic crafting session.
Step-by-Step
Materials
- Air-dry clay (white or cream)
- Small rolling pin
- Circle cookie cutters (one slightly larger than a tealight, one for outer shape)
- Clay knife or craft blade
- Small wooden skewer or dotting tool
- Fine-grit sandpaper
- Small bowl of water
- Standard tealight candle (for sizing)
- Clear matte sealant or varnish
Step 1: Forming the Base
-
Prepare the clay:
Start by kneading a tennis-ball-sized chunk of clay until it is warm, pliable, and free of air bubbles. If the clay feels too dry, dip your fingers in water and work it in. -
Roll out the slab:
Roll the clay flat on a smooth surface or canvas mat until it’s about 1/4 inch thick. Try to keep the thickness even across the entire slab for structural stability. -
Cut the base:
Use your larger circle cutter to stamp out two circular bases. These will serve as the bottom of your candle holders. Smooth the edges gently with a wet fingertip. -
Measure the walls:
To determine the length of the wall, wrap a piece of string or paper around the circular base you just cut, adding a tiny bit for overlap. This measurement will be your wall length. -
Cut the clay strip:
From the remaining rolled clay, cut a long, rectangular strip using the length you measured and a height of roughly 2.5 to 3 inches. Use a ruler to ensure the top and bottom edges are perfectly straight.
Clean Dots Trick
To prevent clay from sticking inside your dotting tool, dip the tip into cornstarch or a tiny bit of oil before pressing it into the clay for each indentation.
Step 2: The Dotted Design
-
Plan the pattern:
Before assembling, it’s easier to impress your pattern while the strip is flat. Lightly trace arch shapes onto the clay strip using a very light touch, just as a guide. -
Create the arches:
Use the blunt end of a skewer or a dotting tool to press small holes along your guide lines to form the arches. Press firmly enough to make a clear indentation but not all the way through the clay. -
Add rim details:
For the finishing touch seen in the photo, add a single row of dots along the very top edge of the clay strip. I usually space these slightly closer together than the arch dots. -
Smooth the surface:
Once the texturing is done, lightly graze over the surface with a barely damp finger to remove any sharp burrs created by the dotting tool.
Cracking Seams?
If the vertical seam cracks while drying, mix a tiny amount of fresh clay with water to make a paste and fill the crack. Let it dry again, then sand smooth.
Step 3: Assembly & Finishing
-
Score the edges:
Use your knife to make small hatched scratches (scoring) along the outer edge of the circular base and the bottom edge of your rectangular strip. -
Apply slip:
Dab a little water or liquid clay (slip) onto the scored areas. This acts as the glue that bonds the two pieces together permanently. -
Attach the wall:
Carefully wrap the rectangular strip around the circular base. Press the wall firmly onto the base, ensuring the scored edges mate perfectly. -
Seal the seam:
Where the two ends of the wall meet, blend the clay together using a downward stroking motion with a modeling tool or your thumb until the seam disappears. This creates that seamless cylinder look. -
Refine the rim:
Take a moment to reshape the top rim if it became slightly oval during handling. Gently press a tealight candle inside (don’t leave it in!) just to check fit and roundness. -
Dry completely:
Let the holders dry for 24-48 hours away from direct heat. Turn them occasionally to ensure even airflow. -
Sand and smooth:
Once fully dry and chalky white, use fine-grit sandpaper to gently smooth the rim and any rough patches on the outside, being careful not to sand away your dot pattern. -
Apply sealant:
Finish by applying a clear matte varnish or sealant. This protects the clay from soot and handling while preserving that raw, stoneware aesthetic.
Light a candle inside and enjoy the warm glow filtering through your beautiful handiwork.

TRACK YOUR CERAMIC JOURNEY
Capture glaze tests, firing details, and creative progress—all in one simple printable. Make your projects easier to repeat and improve.
Two-Piece “Our Place” Mini House Ornament
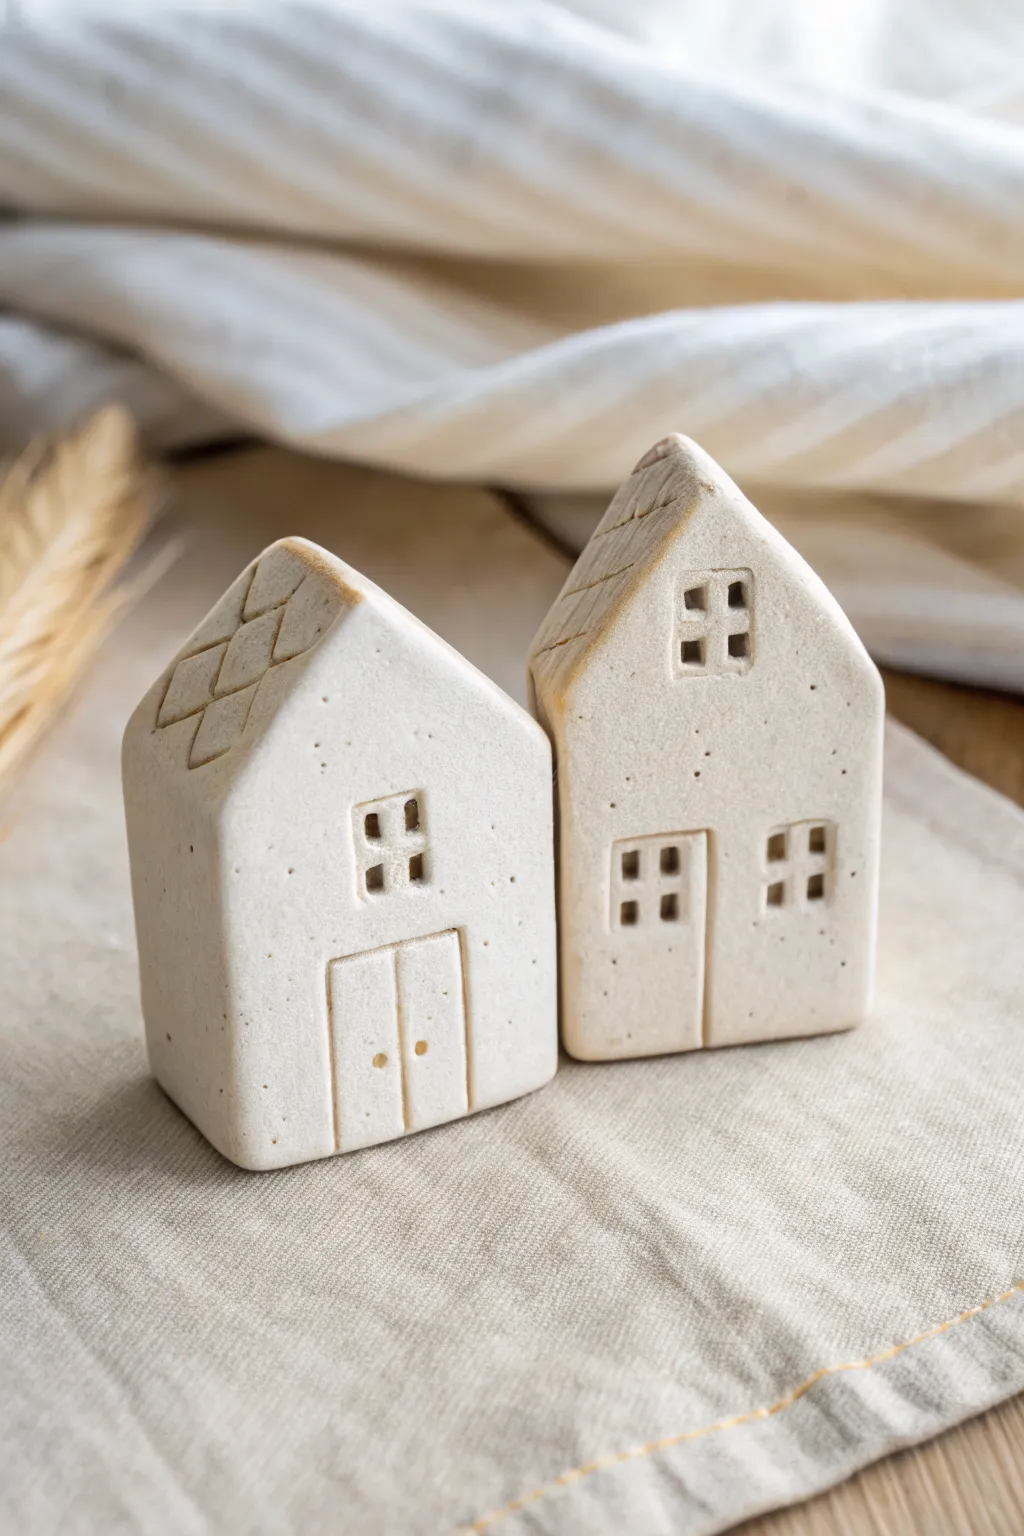
Create a charming set of miniature ceramic-style houses that fit perfectly together as a symbol of unity. These air-dry clay ornaments feature textured roofs, rustic windows, and a warm, speckled finish that mimics high-end stoneware.
Detailed Instructions
Materials
- White air-dry clay (e.g., DAS or Crayola Air Dry)
- Rolling pin
- Parchment paper or craft mat
- sharp craft knife (X-Acto)
- Ruler
- Wooden sculpting tools or a toothpick
- Fine-grit sandpaper
- Small square cutter (optional, for windows)
- Needle tool
- Water in a small cup
- Acrylic paint (cream/off-white)
- Acrylic paint (warm brown for speckles)
- Old toothbrush
- Matte sealant or varnish
Step 1: Shaping the Base Blocks
-
Condition the clay:
Begin by kneading a good-sized chunk of white air-dry clay until it is warm, pliable, and free of cracks. -
Form the initial blocks:
Divide your clay into two roughly equal portions. Shape each portion into a solid rectangular block with your hands, tapping the sides against your work surface to square them up. -
Create the roof pitch:
On the top of each block, shape a triangular peak. You want the block to look like a simple milk carton shape—rectangular bottom with a gable roof on top. -
Refine the height difference:
To match the image, make one house slightly taller and narrower than the other. I like to press the taller house gently to elongate it while keeping the shorter one a bit stouter. -
Smooth the surfaces:
Dip your finger in a little water and run almost imperceptibly over the sides to smooth out fingerprints, keeping the edges relatively sharp.
Keep it Pro
To prevent the bottoms from bowing outward while drying, dry the houses on a piece of foam or mesh screen to allow airflow underneath.
Step 2: Carving Details
-
Carve the roof texture:
Using a craft knife or a flat sculpting tool, carve a diagonal cross-hatch pattern onto the roof sections. Keep the pressure light; you just want surface lines, not deep cuts. -
Outline the doors:
On the shorter, wider house, use your needle tool to lightly sketch a large double door centered at the bottom. For the taller house, you might add a simpler door or focus on windows. -
Define the door panels:
Press slightly deeper into your sketched lines to define the door frame. Add a vertical line down the center for double doors and two tiny dots for door knobs using a needle point. -
Create the windows:
For the windows, use a small square cutter or carefully carve four tiny squares in a grid pattern to create a windowpane effect. Dig out the clay slightly so the windows appear recessed. -
Add variance:
Place a single window above the door on the shorter house, and place two windows side-by-side or stacked on the taller house to give them distinct personalities. -
Final smoothing:
Check all your carved lines. If any clay crumbs have appeared, brush them away with a soft, dry paintbrush.
Make it Special
Instead of solid blocks, make the houses hollow by building with slabs. You can then cut the windows out completely and place an LED tea light inside.
Step 3: Finishing Touches
-
Let them dry completely:
Set the houses aside on parchment paper to dry. Depending on thickness and humidity, this usually takes 24-48 hours. Rotate them occasionally for even drying. -
Identify imperfections:
Once bone dry, inspect the houses for any rough burrs or sharp edges. -
Sand for a stone look:
Gently sand the surfaces with fine-grit sandpaper. This not only creates a professional finish but helps mimic the texture of unglazed bisque ware. -
Apply base color:
Paint both houses with a coat of creamy off-white acrylic paint. You want a matte finish, not glossy, to keep the natural look. -
Create the speckled effect:
Dilute a tiny amount of warm brown paint with water. Dip an old toothbrush into this mixture, and flick the bristles with your thumb to spray fine speckles over the dried houses. -
Enhance texturing:
If desired, create a very watery wash of light brown paint and brush it into the roof grooves, then immediately wipe the surface clean. This leaves pigment only in the cracks for depth. -
Seal the project:
Finish with a clear matte varnish spray to protect your work without adding unwanted shine.
Set your finished houses side-by-side on a mantle or shelf to enjoy your handcrafted architectural mini-scene.
Pocket-Size Tic-Tac-Toe Kit
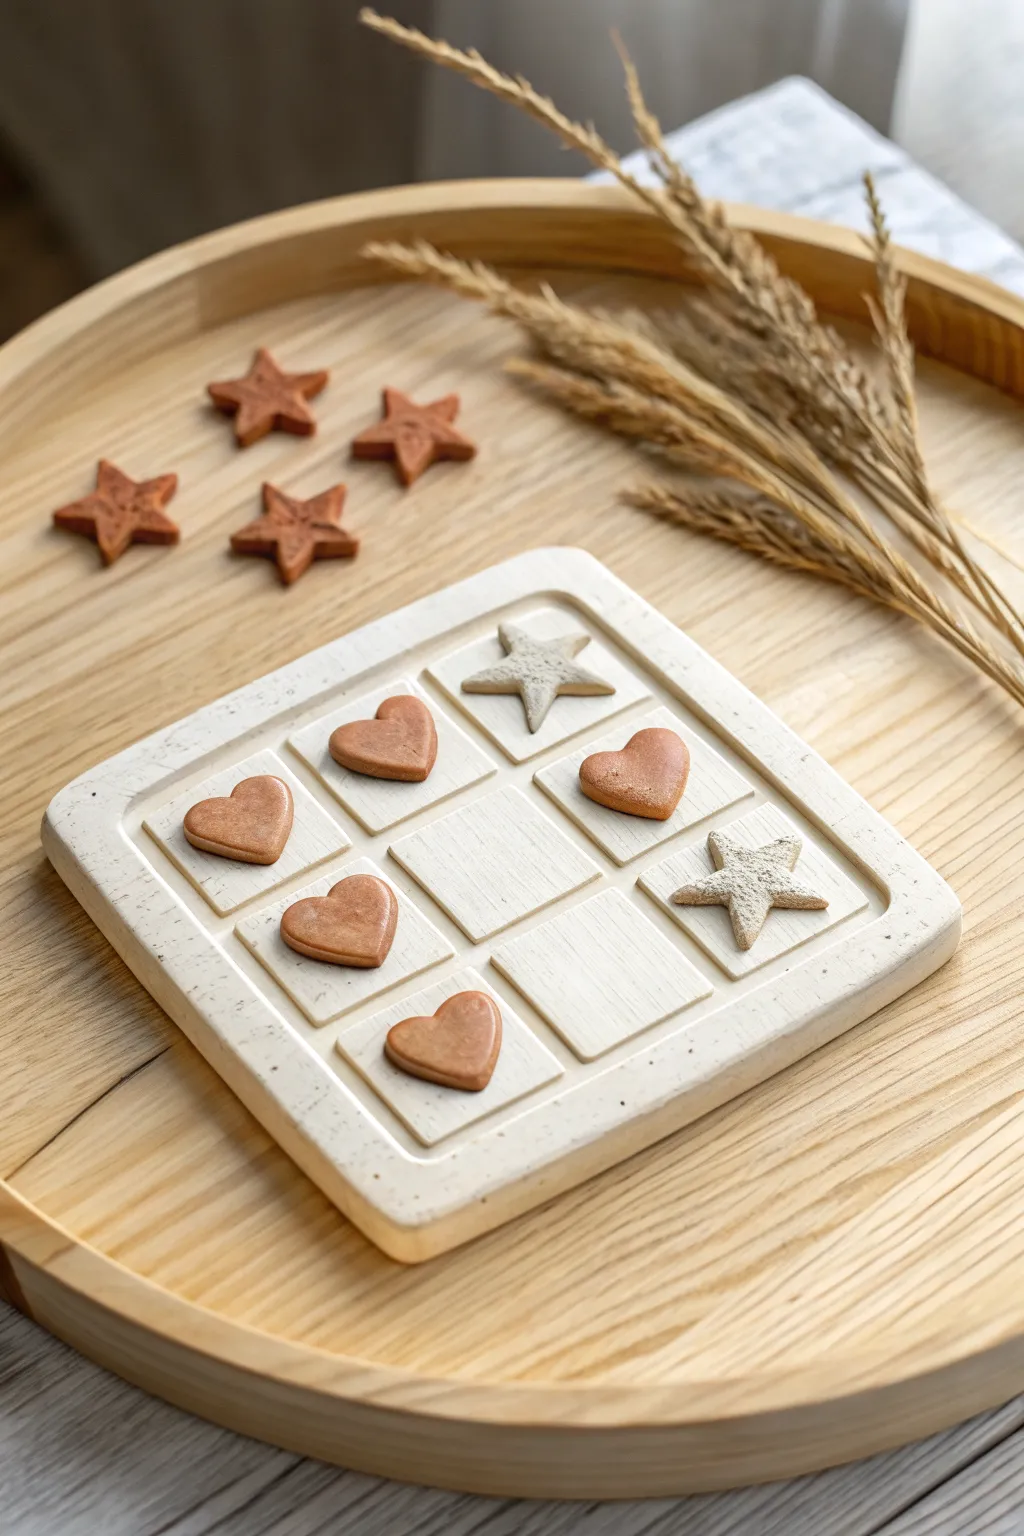
Transform game night into a romantic gesture with this handmade ceramic-style tic-tac-toe set. Featuring a sleek, indented grid board and adorable heart and star playing pieces, this minimalist project brings earthy warmth to your coffee table.
Step-by-Step
Materials
- White air-dry clay or polymer clay (approx. 500g)
- Terra cotta colored air-dry clay (or acrylic paint)
- Rolling pin
- Square cookie cutter (approx. 4-5 inches)
- Ruler
- Craft knife or scalpel
- Small heart cookie cutter
- Small star cookie cutter
- Fine-grit sandpaper (220-400 grit)
- Matte sealant or varnish
- Optional: Texture sponge or toothbrush for speckling
Step 1: Creating the Game Board
-
Prepare the base slab:
Begin by conditioning your white clay until it is pliable and smooth. Roll it out into an even slab that is approximately 1/4 to 1/2 inch thick, ensuring there are no air bubbles trapped inside. -
Cut the square shape:
Using a large square cutter or a ruler and craft knife, cut out a perfect square for your game board. I recommend rounding the corners slightly with your fingertips to soften the look and match the cozy aesthetic. -
Mark the grid:
Using a ruler, lightly measure and mark a 3×3 grid on the surface. Don’t cut all the way through; these marks are just guides for where the depressed squares will go. -
Create the indented squares:
This is the unique feature of this board. Instead of drawing lines, you will create depressed zones for the pieces. Press a smaller square object (like a small fondant cutter or a wood block) into each of the nine grid spaces to create shallow indentations. -
Refine the edges:
The pressure from pressing the grid might distort the outer shape. Use your ruler to gently push the outer edges back into a straight square form. -
Add texture (optional):
If you want the speckled stone look seen in the photo, dip a stiff toothbrush in watered-down brown paint and flick tiny droplets onto the wet clay surface.
Fixing Warped Boards
If the board curls while drying, dampen the concave side slightly and place it under a heavy book overnight to flatten it back out.
Step 2: Sculpting the Pieces
-
Roll clay for pieces:
Roll out a slab of terra cotta colored clay and a smaller amount of the white/grey clay mixed with a tiny bit of brown for the stars. Aim for a thickness similar to the board, perhaps slightly thinner. -
Cut out hearts:
Use your small heart cutter to punch out five heart shapes from the terra cotta clay. Smooth the sharp edges of each heart with a damp fingertip to give them a puffy, rounded finish. -
Cut out stars:
From the grey-beige clay, cut out five star shapes. To mimic the texture in the image, you can gently press a piece of coarse sandpaper or a stone onto the surface of the stars before they dry. -
Create extra pieces:
It is always wise to make one or two extra pieces of each shape just in case one breaks or warps during the drying process. -
Dry all components:
Place the board and all game pieces on a flat surface lined with parchment paper. Let them air dry for at least 24-48 hours, flipping them occasionally to ensure even drying and prevent curling.
Step 3: Finishing Touches
-
Sand the edges:
Once fully dry, take your fine-grit sandpaper and gently buff away any rough edges on the board and the playing pieces. Pay special attention to the corners of the board. -
Enhance the star texture:
If the stars look too flat, you can simulate the powdery texture shown in the image by dabbing them lightly with a dry brush dipped in white acrylic paint. -
Seal the project:
Apply a thin coat of matte varnish to the board and pieces. This will protect the clay from scratches and moisture while maintaining that natural, non-glossy earthenware appearance. -
Assemble the set:
Once the varnish is dry, arrange your hearts and stars into the recessed grid squares to complete your portable game set.
Pro Texture Tip
Mix dried tea leaves or coffee grounds into the white clay before rolling to get an authentic, speckled ceramic look without painting.
Now you have a charming, pocket-sized game that doubles as stylish decor when not in use
Mini “Snack Date” Charms
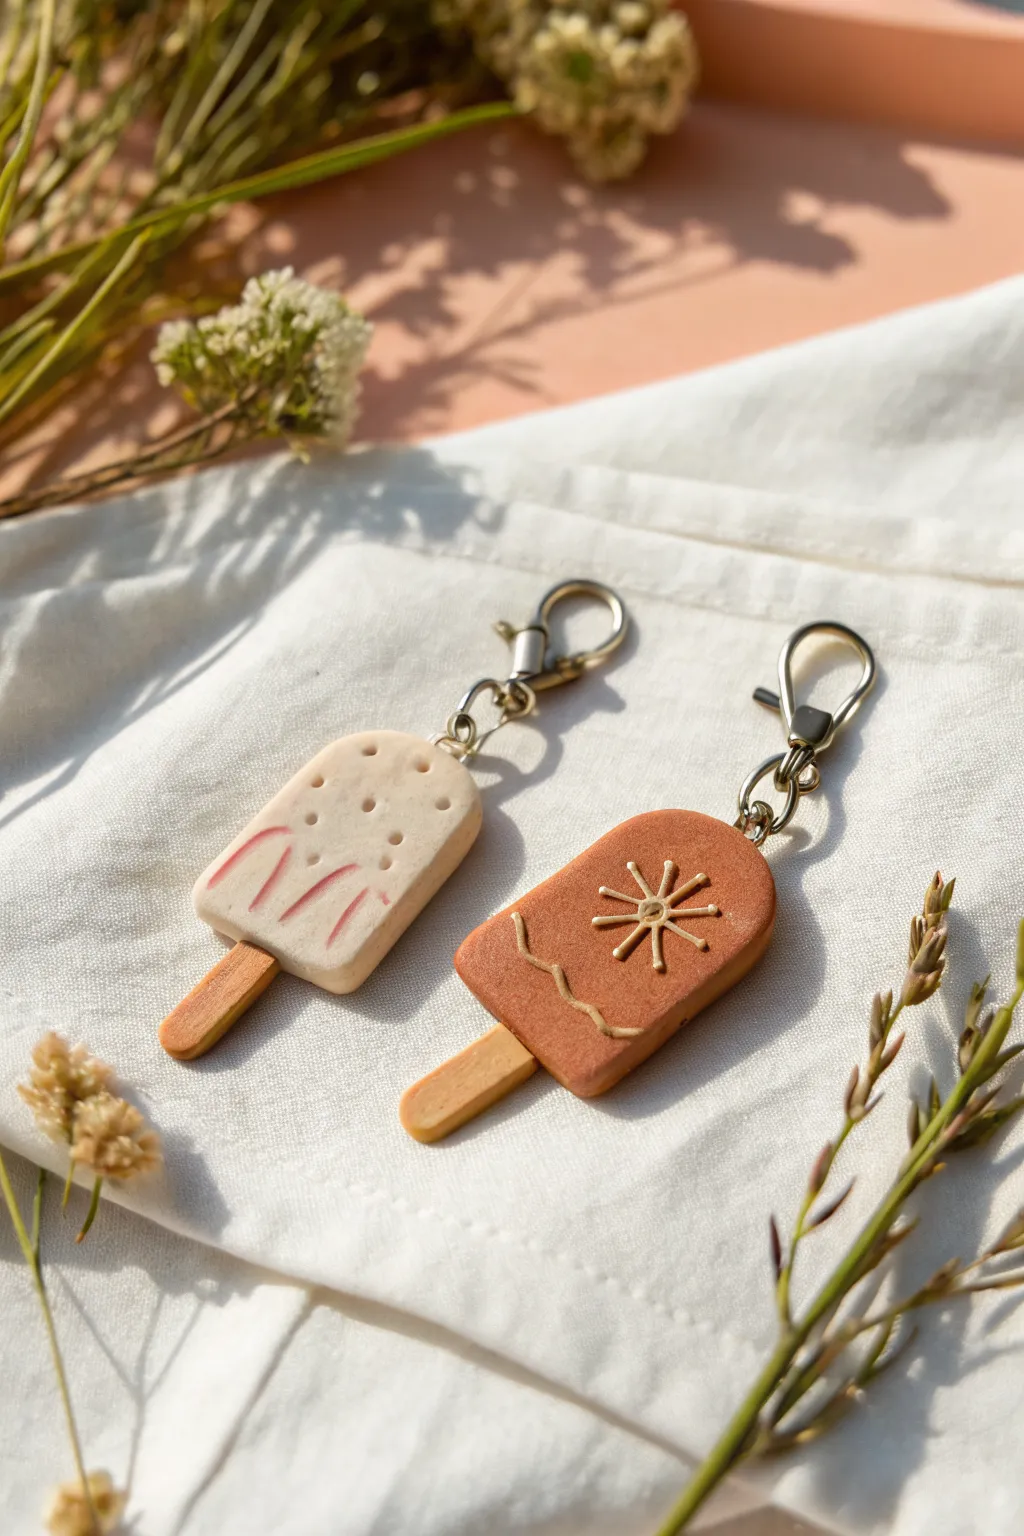
Capture the essence of summer with these delightful clay popsicle charms, featuring textured detailing and warm, earthy tones. They make perfect keychains or bag accessories to remind you of sunny snack dates all year round.
Detailed Instructions
Materials
- Polymer clay (cream/white and terracotta/rust colors)
- Mini wooden craft sticks (or trimmed standard popsicle sticks)
- Clay roller or pasta machine
- U-shaped clay cutter (or a craft knife with a steady hand)
- Needle tool or toothpick
- Small jump rings and lobster clasp keychains
- Liquid clay (TLS) or strong craft glue
- Acrylic paint (muted pink or red)
- Fine detail paintbrush
- Oven for baking
- Gloss or matte glaze (optional)
Step 1: Shaping the Base
-
Condition the clay:
Start by warming a chunk of cream clay and a separate chunk of terracotta clay in your hands until soft and pliable. This conditioning step is crucial to prevent cracks later. -
Roll out the slabs:
Using your roller, flatten each color into a slab about 1/4 inch thick. You want them thick enough to hold the stick securely without bulging too much. -
Cut the shapes:
Use a U-shaped cutter to punch out the main popsicle body. If you don’t have a specific cutter, lightly sketch an arch shape with a needle tool and carefully cut it out with a craft knife. -
Prepare the sticks:
Trim your mini wooden craft sticks so only about 1/2 inch will be inserted into the clay. If the sticks are too wide for your mini charms, carefully split them lengthwise with scissors or a knife. -
Insert the sticks:
Gently push the wooden stick into the flat bottom edge of the clay shape. Be careful to push straight up so the stick doesn’t poke through the front or back faces. -
Add hardware:
Insert a small screw eye pin into the top center of each popsicle arch. To ensure it stays put, I sometimes dip the threads in a tiny dot of liquid clay before inserting.
Clean Stick Tip
Before baking, wipe the exposed part of the wooden stick with a baby wipe or damp cloth to remove any clay residue or fingerprints for a tidy finish.
Step 2: Detailing the Cream Pop
-
Create texture:
Using a needle tool or a small ball stylus, gently press indentations into the upper half of the cream-colored popsicle to mimic seeds or a porous texture. -
Paint the ripples:
Take a very small amount of muted pink acrylic paint. Using your finest brush, paint three vertical, wavy lines starting from the bottom edge, resembling a fruit swirl. -
Clean up edges:
If the paint is too heavy, you can gently scrape away excess with a toothpick once dry to get that slightly distressed look shown in the photo.
Step 3: Detailing the Terracotta Pop
-
Roll fine coils:
Take a tiny bit of the cream clay leftover from the first pop. Roll it into an extremely thin snake or coil on your work surface. -
Form the wavy line:
Cut a small segment of the thin coil and gently press it onto the lower portion of the terracotta pop in a wavy horizontal pattern. -
Create the sunburst:
Roll even tinier bits of cream clay for the sun. Place a small dot in the center, then radiate eight tiny lines outward from that center point. -
Secure the design:
Gently roll over the entire surface with a light hand or press flat with an acrylic block to ensure the cream details bond seamlessly into the terracotta base.
Scented Charm Level-Up
Add a drop of vanilla or citrus essential oil to the wooden stick after baking so your charm smells as sweet as a real frozen treat.
Step 4: Finishing Up
-
Bake:
Arrange your charms on a parchment-lined baking sheet. Bake according to your brand of polymer clay instructions (usually 275°F/135°C for 15-30 minutes). -
Cool down:
Let the charms cool completely inside the oven with the door cracked open to prevent thermal shock. -
Attach findings:
Once cool, use pliers to open a jump ring, thread it through the eye pin on top of the popsicle, and attach your lobster clasp keychain.
Clip your new charms onto a backpack or zipper and enjoy the summer vibes
Sculpt Each Other as Chibi Minis
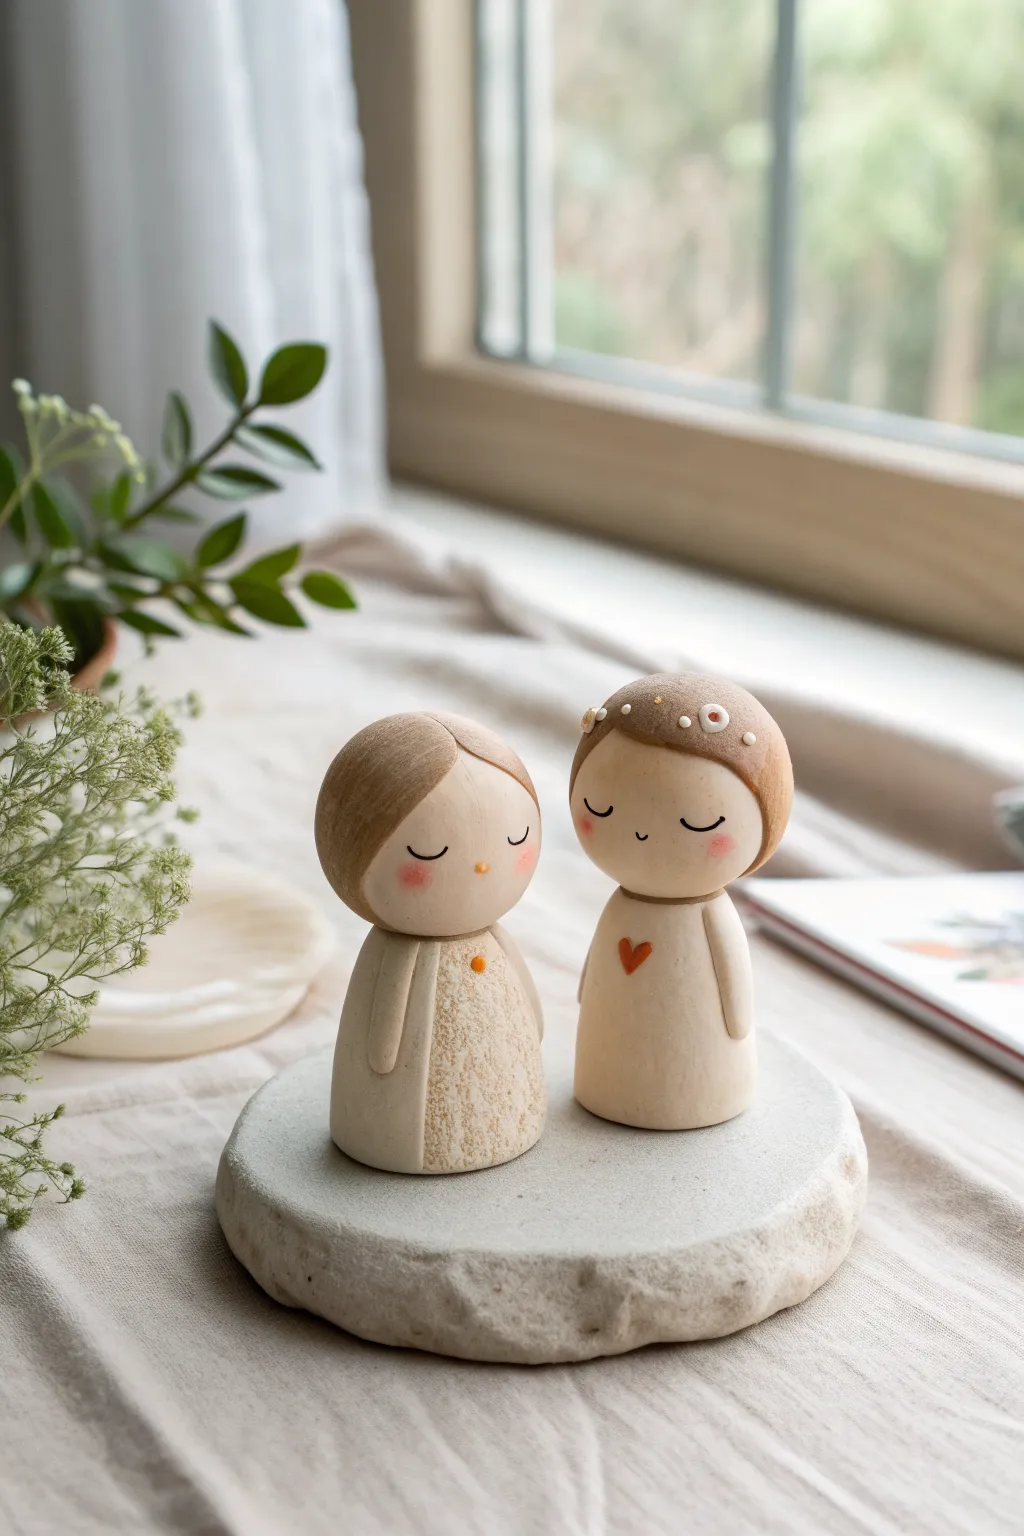
Create a sentimental keepsake with these minimalist clay figurines, featuring soft, earthy tones and delicate sculpted textures. This project focuses on clean lines and gentle expressions to capture a warm, loving vibe.
Step-by-Step Guide
Materials
- Polymer clay (beige/ecru, white, light brown)
- Wooden peg doll bases (optional, as core)
- Small rolling pin
- Pointed sculpting tool or toothpick
- Soft-bristle paintbrush
- Acrylic paints (black, pink, terra cotta)
- Matte varnish or sealant
- Fine grit sandpaper
Step 1: Forming the Base Figures
-
Prepare the core:
Start with two lumps of beige clay conditioned until soft. Roll them into smooth, tapered cylinders that are slightly wider at the bottom for stability. Aim for about 2.5 inches tall. -
Shape the heads:
Roll two smooth spheres of beige clay for the heads, proportionate to your bodies. Gently press them onto the top of the tapered cylinders. You can use a bit of liquid clay or wire as an internal anchor for extra security. -
Smooth the seams:
Using your thumb or a smoothing tool, gently blend the clay where the neck meets the body so it looks like one cohesive piece, but define the chin area slightly.
Clean Clay Tip
Keep baby wipes nearby to clean your hands when switching clay colors. White clay picks up lint instantly, so roll it in your palms only after washing them thoroughly.
Step 2: Sculpting the Hair
-
Create the left figure’s hair:
Roll out a sheet of light brown clay. Cut a circle and drape it over the first head, smoothing it down the back. -
Detail the bangs:
Trim the front of the hair sheet into a gentle curve across the forehead. Use your sculpting tool to press a subtle center part. -
Texture the hair:
For the figure on the left, lightly drag a needle tool from the roots to the ends to create very faint strands, giving it a soft, combed look. -
Create the right figure’s hair:
Use a slightly darker brown clay (or mix in a tiny bit of red) for the second figure. Create a similar cap, but shape the bangs to curve more noticeably around the face. -
Add floral details:
Roll teacup-sized balls of white clay and press them flat onto the hair of the right figure to form tiny flowers. Use a needle point to poke holes in the center.
Make it Magnetic
Before the clay hardens, embed small magnets into the side of each figure where their arms touch. They will satisfyingly ‘click’ together when displayed side-by-side.
Step 3: Adding Clothing Details
-
Define the arms:
Roll two thin snakes of beige clay for each figure. attach them vertically along the sides of the body to represent arms resting at their sides. Blend the shoulders seamlessly. -
Texture the dress:
For the left figure, create a textured panel on the front of the dress. Use a piece of sandpaper or a stiff brush to stipple the clay, creating a rough, fabric-like surface. -
Smooth the second outfit:
Keep the right figure’s outfit smooth. I like to dampen my finger slightly with water (if using air dry) or baby oil (if polymer) to get this perfectly sleek. -
Embellish chests:
Press a tiny orange clay dot onto the textured dress. For the smooth figure, indent a small heart shape into the center of the chest. -
Bake or dry:
If using polymer clay, bake according to package directions (usually 275°F/135°C for 15-30 minutes). If using air-dry clay, allow to cure for 24 hours.
Step 4: Painting & Finishing
-
Paint the heart:
Using a fine detail brush, paint the indented heart on the right figure with terra cotta or deep orange paint. -
Paint the eyes:
With the finest brush you own or a toothpick tip, paint two gentle ‘U’ shapes for closed eyes. Keep them low on the face for a cute, peaceful look. -
Add blush:
Dip a dry brush into pink paint, wipe almost all of it off on a paper towel, and gently stipple rosy cheeks onto both figures. -
Seal the work:
Finish with a coat of matte varnish to protect the paint while maintaining that natural, unglazed pottery aesthetic.
Place your tiny couple on a flat stone or shelf to enjoy your handiwork
Build a Shared Micro-World on One Base
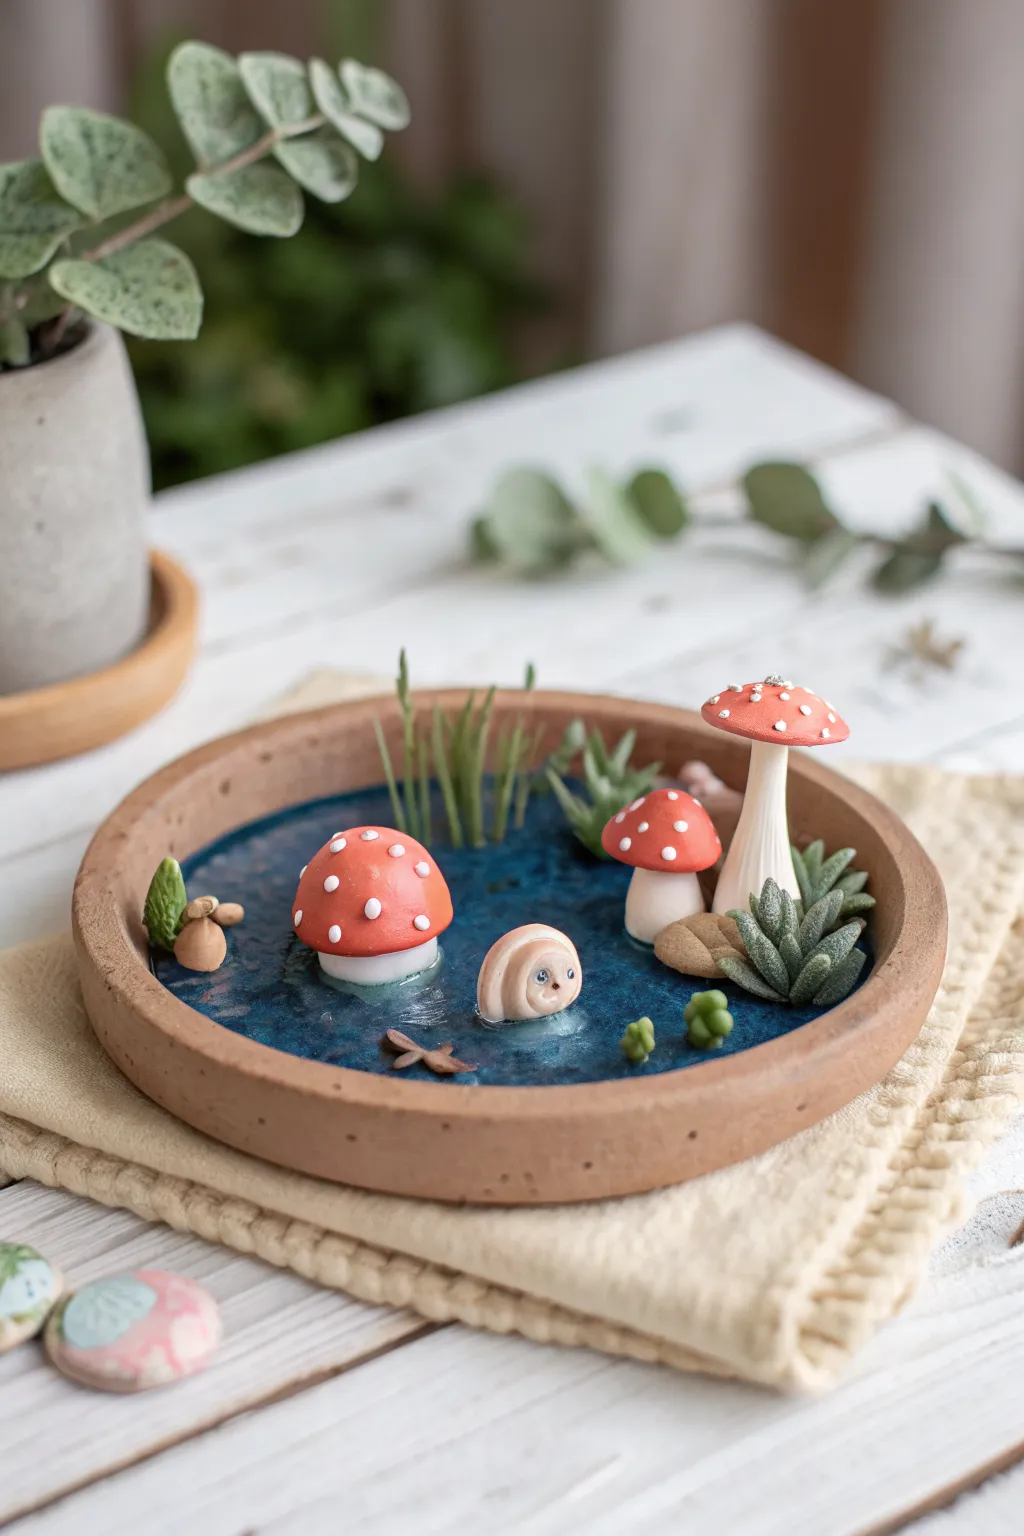
Create a serene miniature world featuring playful mushrooms and a curious swimming critter suspended in a shimmering blue pond. This project combines polymer clay sculpting with a beautiful resin pour to mimic the glassy surface of a magical forest pool.
Step-by-Step Tutorial
Materials
- Polymer clay (terracotta, white, red, beige, green, brown)
- Shallow round dish or lid (approx. 4-5 inches wide) or clay to make one
- Two-part epoxy resin
- Blue alcohol ink (specifically teal or ocean blue)
- UV resin (optional, for securing)
- Sculpting tools (needle tool, ball stylus)
- White acrylic paint
- Fine detail paintbrush
- Rolling pin
- Small disposable cup and stir stick
- Lighter or heat gun
Step 1: Base and Landscape Preparation
-
Form the Dish:
If not using a pre-made dish, roll out terracotta-colored clay into a smooth sheet about 1/4 inch thick. Cut a perfect circle and add a raised rim, smoothing the seam meticulously so it will hold liquid resin later. -
Bake the Base:
Bake the dish fully according to your clay manufacturer’s instructions to ensure it’s rigid and sealed before adding delicate details. -
Sculpt the Tall Mushroom:
Using white clay, roll a tapered stalk. Form a flat red cap, press it onto the stalk, and texture under the cap with a needle tool for gills. Plant this firmly into a small lump of scrap clay that will be hidden by the resin. -
Create the Floating Mushroom:
Make a rounded red dome for the swimming mushroom cap. Add a small white ‘skirt’ underneath to suggest the stalk is submerged. -
Sculpt the Small Side Mushroom:
Create a shorter, stout mushroom with a white stem and red cap to sit near the edge of your pond.
Step 2: Flora and Fauna Details
-
Make the Swimmer:
Using beige clay, roll a small ball for the creature’s head. Indent eye sockets and add a tiny nose. Wrap a thin sheet of beige clay around the back of the head to look like a hood or seal neck emerging from water. -
Sculpt Grass Tufts:
Roll thin green snakes of clay, tapering the ends to points. Cluster three or four together to create tufts of marsh grass. -
Form Tiny Succulents:
With a slightly darker green clay, shape tiny teardrops and press them together in a rosette pattern to resemble small succulents. -
Add Wooden Accents:
Use brown clay to shape tiny driftwood logs or a small dragonfly silhouette. Texture them with a needle tool to look like bark. -
Second Bake:
Isolate your sculpted pieces (mushrooms, critter, plants) and bake them separately. I prefer baking them on a tile to keep the bottoms flat.
Sticky Situation?
If your resin stays sticky after 48 hours, the ratio was likely off. You can try coating it with a thin layer of UV resin or clear nail polish to seal the tackiness.
Step 3: Assembly and Resin Pour
-
Position the Pieces:
Glue your baked pieces into the terracotta dish. The tall mushroom and succulents go on one side; the swimmer and floating mushrooms go directly on the bottom. -
Paint the Dots:
Once cool, use the fine brush and white acrylic paint to add the signature white spots to the red mushroom caps. Add tiny black dots for the creature’s eyes. -
Mix the Resin:
In a disposable cup, mix your two-part epoxy resin slowly to minimize bubbles. Add one drop of blue alcohol ink—you want it transparent, not opaque. -
The Pour:
Carefully pour the resin into the dish. Fill it just enough to submerge the base of the tall mushroom and surround the floating head. -
Pop Bubbles:
Pass a lighter or heat gun quickly over the surface of the resin to pop any rising air bubbles. -
Floating Details:
Before the resin sets, carefully place the tiny brown driftwood or dragonfly on the surface tension so they appear to flow. -
Curing:
Cover the project with a box to prevent dust from settling and let the resin cure undisturbed for 24-48 hours.
Make it Sparkle
Mix a tiny pinch of white mica powder or iridescent glitter into the resin before pouring. This adds a magical shimmer that mimics sunlight hitting the water.
Displays nicely on a sunny windowsill where the light catches the blue resin
Blind-Bag Surprise Minis to Trade
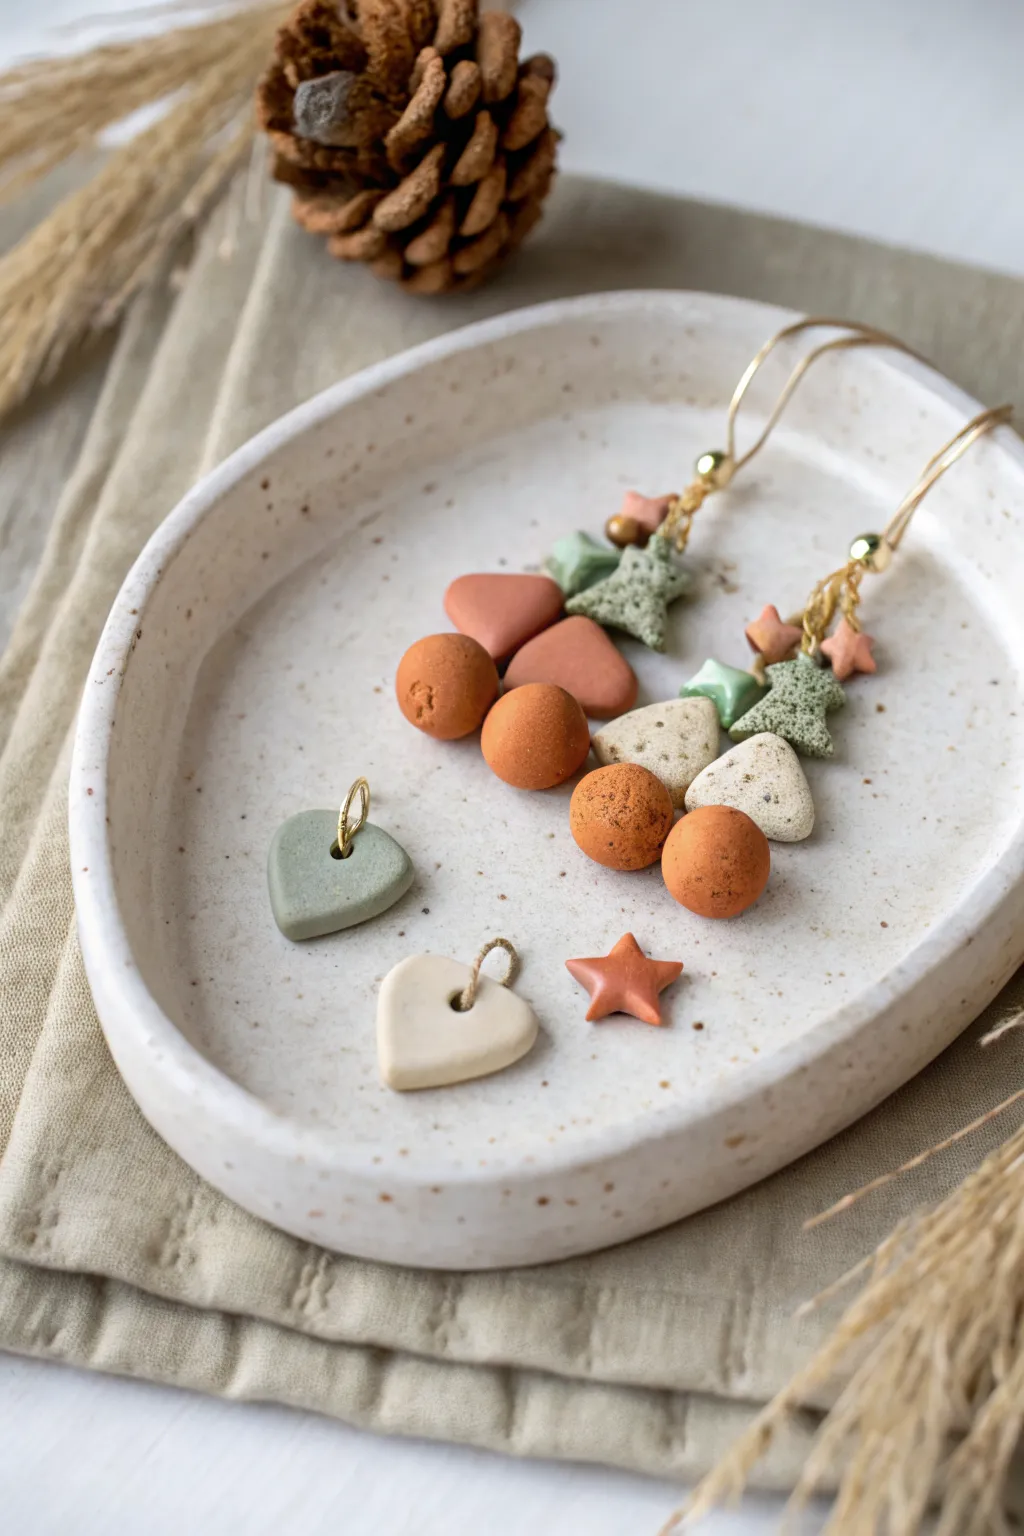
Create a stunning set of earthy, textured charms perfect for earrings, pendants, or trading with friends. These miniature sculptures feature a beautiful matte finish and organic speckling that mimics the look of natural stone and pottery.
How-To Guide
Materials
- Polymer clay in earthy tones (terracotta, beige, sage green, cream)
- Black pepper or dried coffee grounds (for speckling effect)
- Darning needle or toothpick
- Headpins and jump rings (gold finish)
- Earring hooks
- Small clay cutters (hearts, stars) or craft knife
- Ceramic tile or baking sheet
- Sandpaper or nail buffer (fine grit)
- Jewelry pliers
Step 1: Preparing the Clay
-
Condition the clay:
Start by warming the polymer clay in your hands, kneading each color separately until it is soft and pliable. This prevents cracking later. -
Create the stone effect:
To achieve that lovely speckled organic look, mix a tiny pinch of cracked black pepper or dried coffee grounds into your lighter clay colors (cream and sage). Knead until the specks are evenly distributed. -
Color mixing:
If your terracotta color is too bright, try mixing in a small amount of brown or beige to mute it down to the earthy tone shown in the photo.
Fingerprints Begone
If you see fingerprints on your raw clay, lightly brush the surface with a tiny bit of baby oil or cornstarch before baking to smooth it out perfectly.
Step 2: Shaping the Beads & Charms
-
Roll spheres:
Take small portions of the terracotta clay and roll them between your palms to create perfectly round spheres. You’ll want varying sizes, some about 1cm and others slightly smaller. -
Pierce the beads:
Gently pierce the center of each sphere with your darning needle to create a bead hole. I find that twisting the needle as you push prevents the distinct round shape from distorting. -
Cut geometric shapes:
Flatten a portion of your speckled cream clay to about 4mm thickness. Use a small knife to cut soft triangle shapes with rounded corners. -
Create texture:
For the green stars, press a piece of sandpaper or a textured sponge on top of the clay before cutting out your star shape to give it a rough, stone-like surface. -
Form the hearts:
Use a small heart cutter or hand-shape small hearts from the sage and cream clay. Gently soften the edges with your fingertip so they look puffed and organic rather than sharp. -
Add suspension loops:
For flat charms like the hearts, carefully poke a hole near the top edge large enough for a jump ring to pass through.
Step 3: Baking and Assembly
-
Bake the batch:
Arrange all your pieces on a ceramic tile or parchment-lined baking sheet. Bake according to your clay package instructions (usually 275°F/130°C for 15-30 minutes). -
Cool down:
Let the pieces cool completely in the oven before moving them. This annealing process makes the clay stronger. -
String the stack:
Take a gold headpin and thread it through a sequence of shapes—try a terracotta sphere followed by a speckled triangle, or stack multiple stars. -
Create a loop:
Using your pliers, bend the top of the headpin 90 degrees, trim the excess wire, and roll it into a neat loop. -
Attach jump rings:
Open a jump ring by twisting it sideways (not pulling apart). Thread it through the hole of your heart charms. -
Final connection:
Attach your beaded stacks and heart charms to earring hooks or a necklace chain, ensuring all loops are closed tightly for security.
Make it Matte
After baking, if the clay looks too shiny or plasticky, buff the surface gently with ultra-fine steel wool to get that high-end matte ceramic finish.
Enjoy styling these versatile little sculptures as a complete set or mix and match them for a unique daily look