Whenever I need a satisfying clay project that doesn’t feel overwhelming, I make a simple clay mask—it’s basically a slab plus a few playful features. These ideas are all beginner-friendly and meant to help you get great results with basic handbuilding and a little imagination.
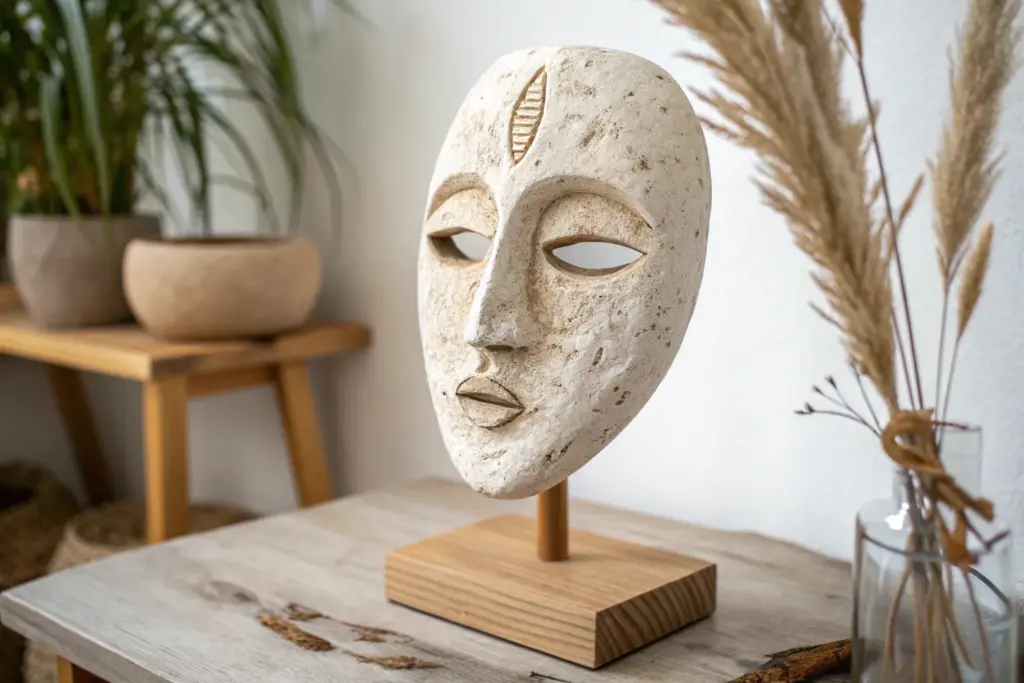
Classic Calm Wall-Hanging Mask
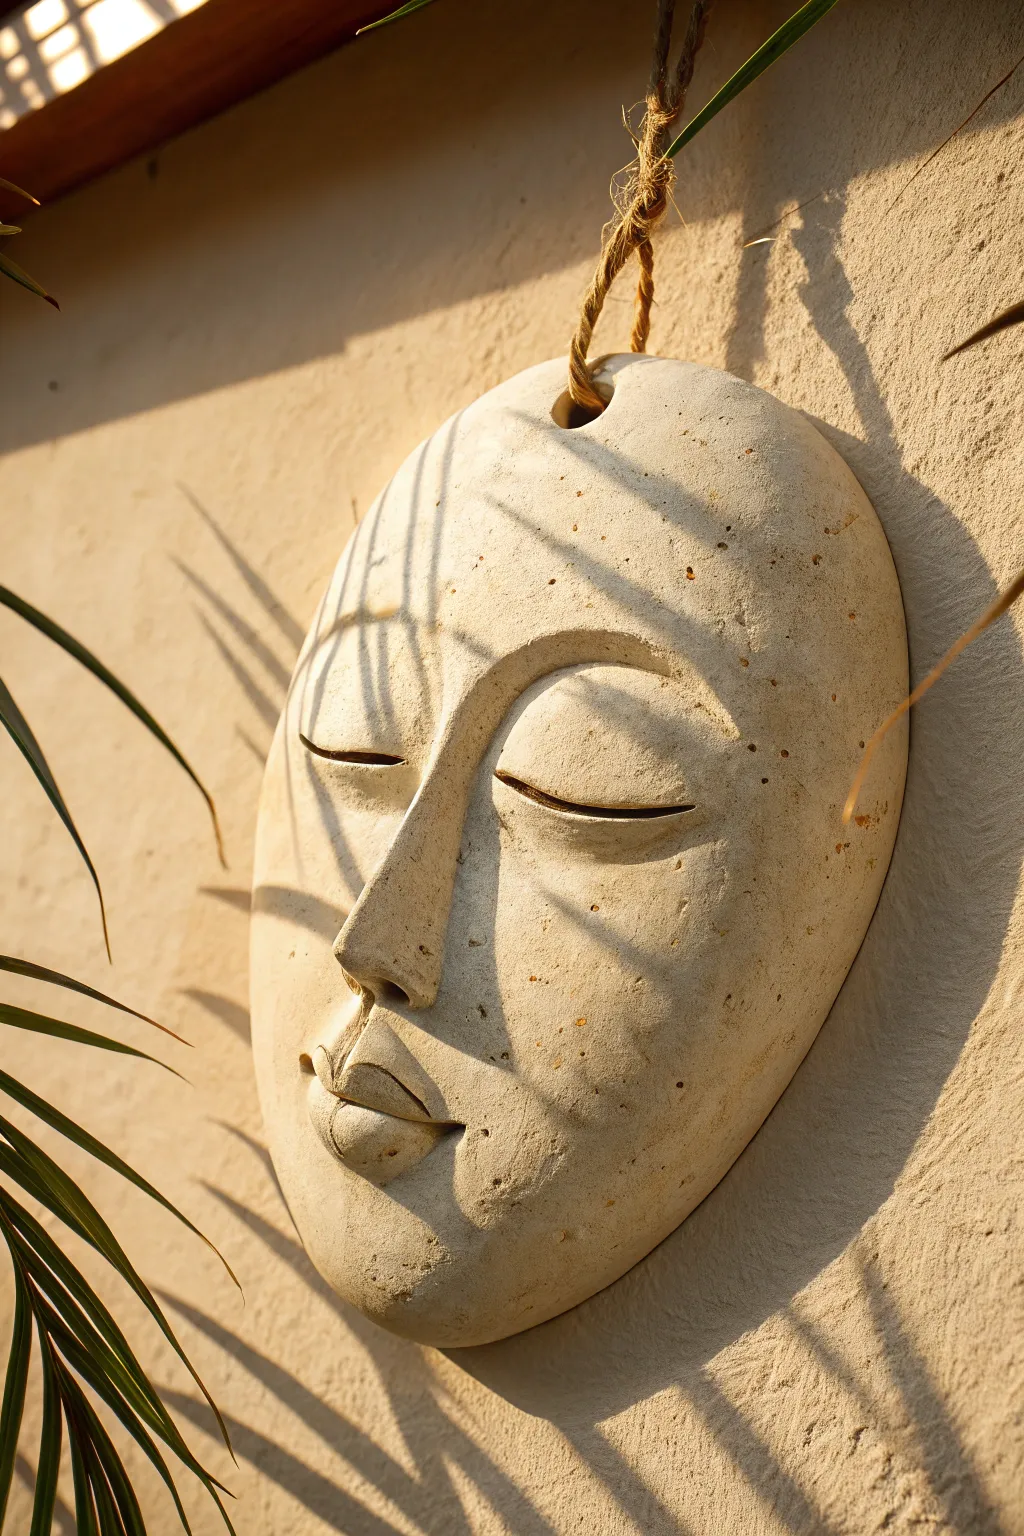
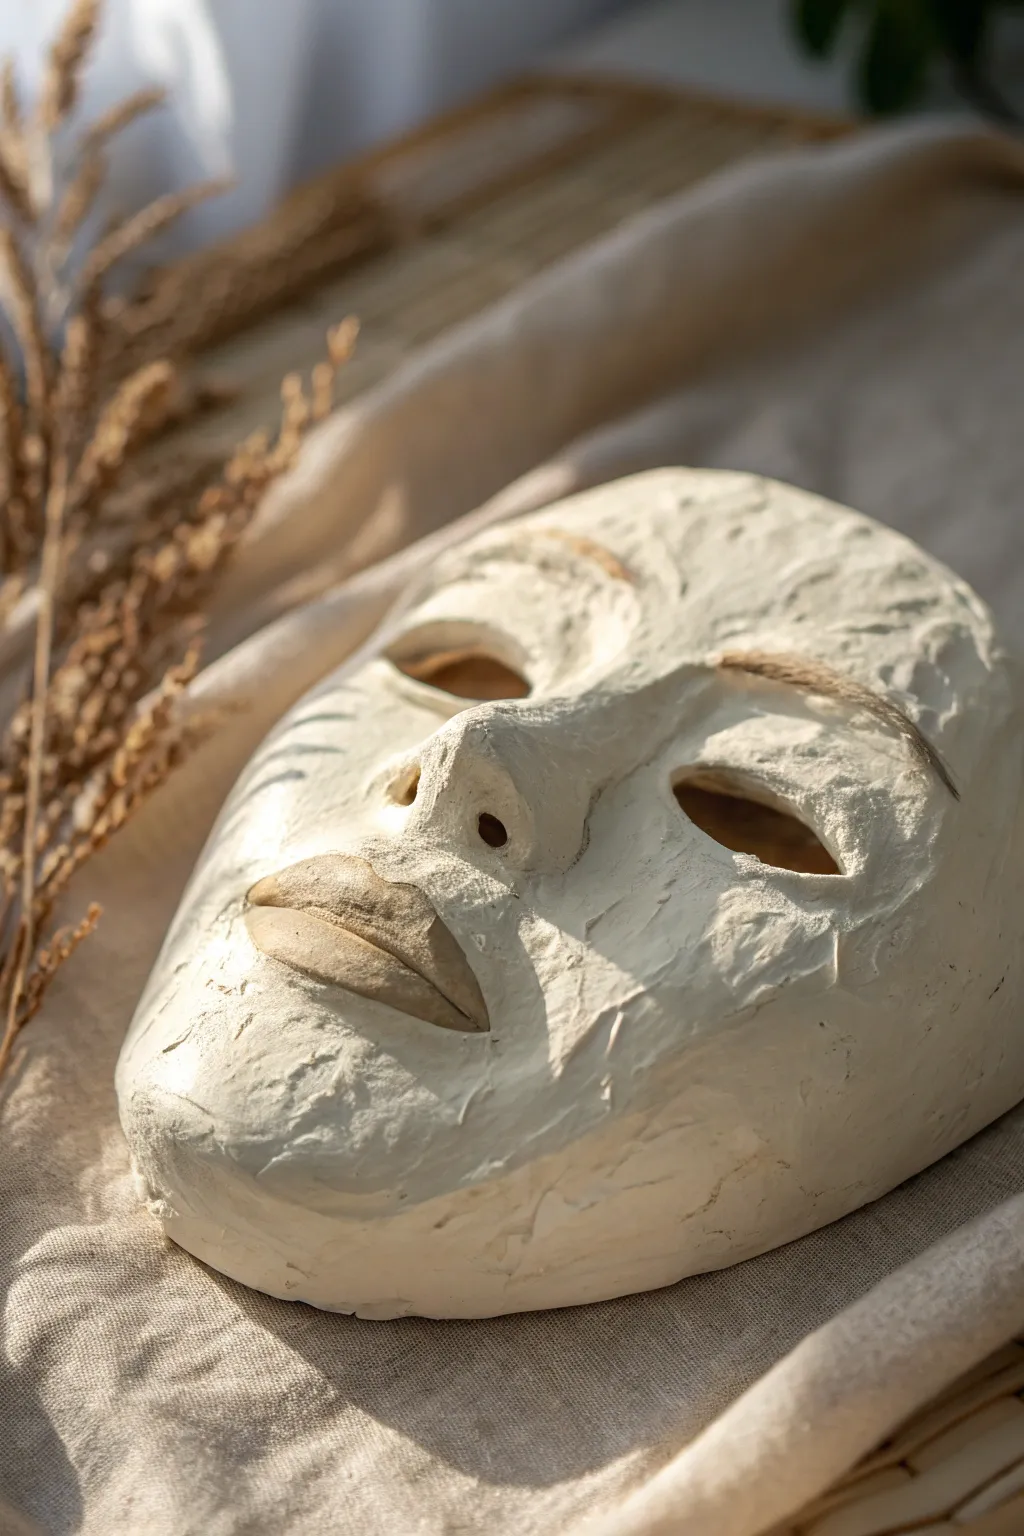
Capture the peaceful essence of a meditative face with this hanging wall sculpture. Using air-dry clay and subtle texturing techniques, you’ll create a piece that mimics the look of aged, sun-warmed stone.
How-To Guide
Materials
- Stone-colored air-dry clay (approximately 2 lbs)
- Rolling pin
- Canvas or heavy cloth (to roll clay on)
- Clay carving tools (loop tool, needle tool)
- Small sponge
- Bowl of water
- Old toothbrush
- Coarse sandpaper or rough stone
- Jute or hemp twine
- Matte sealant spray
Step 1: Forming the Base
-
Prepare the Slab:
Begin by rolling out your clay on a piece of canvas to prevent sticking. You are aiming for a slab about 1/2 to 3/4 inch thick. A thicker slab ensures durability for a wall hanging. -
Shape the Outline:
Cut a smooth, elongated oval shape from your slab. The bottom should taper slightly to suggest a chin, while the top remains rounded. -
Create the Convex Curve:
To give the mask its three-dimensional volume, gently drape the clay slab over a curved form, like a large overturned bowl or a bundled towel covered in plastic wrap. Press lightly so it takes a shallow, domed shape.
Natural Speckles
Mix recycled paper pulp or dried tea leaves directly into your clay body before sculpting to achieve a deeper, integral granite-like texture.
Step 2: Sculpting the Features
-
Establish the Nose Bridge:
Roll a coil of clay and attach it to the center of the face for the nose. Blend the edges seamlessly into the base slab, building up the bridge so it flows directly up into the forehead area. -
Define the Brows:
Instead of separate eyebrows, let the top of the nose bridge branch out into two smooth arches above the eye area. This continuous T-shape line is key to the mask’s serene, classic look. -
Add the Eyelids:
Form two half-moon shapes from small clay patties. Attach these below the brow arches to create closed, resting eyelids. Smooth the edges carefully so they look like part of the face, not just stuck on. -
Detail the Eyes:
Use a needle tool or thin knife to gently slice a horizontal slit across the center of each eyelid patty, defining the meeting point of the upper and lower lids without opening the eyes. -
Form the Mouth:
Add a small mound of clay near the bottom for the mouth. Shape the upper lip with a subtle cupid’s bow and a fuller lower lip. Use your tool to carve the separation line, curving it slightly downward at the corners.
Step 3: Texturing and Hanging
-
Create the Hanging Hole:
At the very top center of the forehead, use a straw or a hole cutter to punch a clean hole through the clay. Ensure it is at least an inch from the edge to prevent cracking under the weight. -
Initial Smoothing:
Dip a small sponge in water and wring it out almost completely. Wipe the entire surface of the mask to remove fingerprints and harsh tool marks. -
Add Stone Texture:
Take an old toothbrush and gently stipple (tap vertically) the surface of the clay. This creates a porous, stone-like texture. Focus on the cheeks and forehead, leaving the nose and lips slightly smoother. -
Speckling Effect:
For that realistic sandy look, you can gently press coarse sand or dried coffee grounds into the wet clay surface sparingly. I find this creates wonderful little imperfections once dry. -
Drying Process:
Allow the mask to dry slowly on its form in a cool area away from direct sunlight. This helps prevent warping. It may take 3-5 days to dry completely depending on thickness. -
Sanding:
Once fully dry and hard, use sandpaper to rough up any unnaturally smooth areas, enhancing the weathered stone aesthetic. -
Seal and Finish:
Spray the mask with a matte sealant to protect the clay from humidity. Finally, loop a length of rustic jute twine through the top hole and knot it securely.
Ancient Aging
Once dry, apply a watered-down brown acrylic wash. Wipe it off immediately with a rag, leaving darker pigment only in the crevices and textures.
Hang your serene creation in a spot where the light casts shadows across the features for a truly calming effect

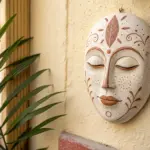
Add-On Features “Mix-And-Match” Mask

This striking mask project combines traditional sculpture with bold, abstract painting techniques to create a piece that feels both ancient and modern. The finished look features sharp geometric zones of primary colors against a textured, stone-like background.
Step-by-Step Tutorial
Materials
- Air-dry clay (white or terracotta)
- Face mold (plastic mask form) or aluminum foil
- Rolling pin
- Sculpting tools (or a butter knife and toothpick)
- Acrylic paints (primary blue, red, yellow, plus white and black)
- Small and medium flat paintbrushes
- Fine grit sandpaper
- Cup of water
- Palette or paper plate
- Matte varnish (optional)
Step 1: Sculpting the Base Form
-
Prepare the Clay:
Begin by kneading a large handful of air-dry clay to warm it up and remove air bubbles. Roll it out into a slab that is roughly 1/4 inch thick; you want it sturdy but not too heavy. -
Form Over Mold:
Drape your clay slab over a plastic mask form. If you don’t have a form, you can create a rounded armature by scrunching aluminum foil into a large oval shape. -
Shape the Features:
Gently press the clay to define the nose bridge and eye sockets. Smooth out the perimeter so the mask has a clean, oval silhouette. -
Cut Eye Openings:
Using a craft knife or a pointed sculpting tool, carefully cut out two almond-shaped eye holes. Smooth the raw edges with a wet finger to unwanted jagged bits. -
Build the Nose and Mouth:
Roll a small snake of clay for the nose and add a small wedge for the lips. Score the back of these pieces and the mask surface, wet them slightly, and press them firmly into place. -
Refine the Details:
Blend the seams of the nose and lips into the main mask using a sculpting tool or your thumb. I like to keep the features somewhat stylized rather than hyper-realistic for this abstract look. -
Add Nostrils:
Use the rounded end of a paintbrush or a specialized tool to poke two small holes for the nostrils. -
Dry Completely:
Set the mask aside to dry. Depending on humidity and thickness, this can take 24 to 48 hours. Don’t rush this step, as painting wet clay can cause cracks.
Use Tape for Crisp Lines
For ultra-sharp geometric edges, use thin masking tape or washi tape to block off sections before painting. Peel it away while paint is still slightly tacky.
Step 2: Painting the Design
-
Sand and Prime:
Once dry, gently sand any rough spots with fine-grit sandpaper. Wipe away the dust, then apply a base coat of off-white or light beige acrylic paint to the entire surface. -
Sketch the Geometry:
Using a pencil, lightly draw the geometric zones onto the mask. Create curving triangles and sweeping shapes that intersect over the eye and cheek areas. -
Paint the Blue Zones:
Load a medium flat brush with a deep blue acrylic. Fill in the designated blue sections, such as the upper forehead and lower cheek triangles, keeping your edges crisp. -
Add the Red Accents:
Switch to a warm red ochre or terra cotta shade. Paint the lips and the large geometric shape surrounding the left eye. You may need two coats for full opacity. -
Fill with Yellow:
Use a mustard or golden yellow for the remaining shapes, like the cheek triangle and the curve above the right eye. Let the colors touch but try not to blend them. -
Refine the Lines:
Use a very small brush with your base off-white color to clean up any edges where the colors might have bled over the lines. This separation makes the geometry pop. -
Distress for Texture (Optional):
To mimic the stone-like texture in the photo, you can lightly dry-brush a tiny bit of white paint over the colored areas once they are dry. This softens the look. -
Seal the Work:
Finish by applying a coat of matte varnish. This protects the paint and unifies the sheen without making the mask look like glossy plastic.
Fixing Clay Cracks
If small cracks appear as the clay dries, don’t panic. Mix a small amount of fresh clay with water to make a paste (slip) and fill the cracks, then smooth over.
Display your finished mask on a stand or hang it on the wall to add an artistic touch to your space
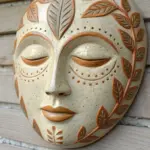


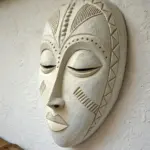
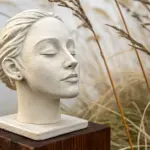
Closed-Eyes Serenity Mask

Capture a moment of perfect calm with this nature-inspired clay mask, featuring gentle closed eyes and delicate leaf carvings on the forehead. Its smooth, stone-like finish and symmetrical design make it a peaceful addition to any wall or meditation space.
Step-by-Step
Materials
- Air-dry clay (white or light grey) or low-fire ceramic clay
- Rolling pin
- Newsprint or paper towels
- Plastic mask mold or a makeshift curved form (like a balloon or bowl)
- Clay carving tools (needle tool, loop tool)
- Small sponge
- Bowl of water
- Detail knife (like an X-Acto)
- Fine grit sandpaper
Step 1: Forming the Base
-
Prepare the workspace:
Lay down a canvas cloth or non-stick mat to work on. If using a plastic mask mold, cover it lightly with plastic wrap or petroleum jelly to prevent sticking later. -
Roll out the slab:
Take a large chunk of clay and condition it in your hands until it’s pliable. Roll it out into an even slab, roughly 1/4 to 1/2 inch thick, ensuring it is large enough to drape over your mold. -
Drape and shape:
Gently lift the clay slab and drape it over your mold. Press the clay softly against the form to establish the basic curve of the face, smoothing out any major air pockets. -
Trim the excess:
Use your needle tool or knife to cut away the excess clay around the perimeter, creating an oval face shape. -
Define the perimeter:
Smooth the cut edges with a damp sponge or your finger so the rim of the mask is rounded and finished, rather than sharp.
Cracks Appearing?
If small cracks form while drying, mix a tiny amount of clay with water to make a paste (slip) and fill them in. Smooth over with a damp finger and let dry again.
Step 2: Sculpting Features
-
Build the nose:
Roll a small coil of clay for the nose bridge. Score and slip the center of the mask, then attach the coil. Blend the clay outwards onto the cheeks to create a seamless slope. -
Refine the nostrils:
Shape the tip of the nose and use a small loop tool to hollow out the nostrils gently, ensuring they look symmetrical. -
Add the lips:
Form two small, flat sausage shapes for the lips. Attach them below the nose. I like to use a small modeling tool to press the corners deep and blend the outer edges into the chin and cheeks. -
Create the eyelids:
Instead of cutting eye holes, we are sculpting closed lids. Roll two equal balls of clay, flatten them into semi-circles, and attach them where the eyes should be. Smooth the edges down so they bulge slightly like resting eyelids. -
Carve the lash line:
Use a needle tool or knife to slice a clean, curved line across the middle of the eye mounds to indicate where the upper and lower lids meet. -
Smooth everything:
Take your damp sponge and gently wipe the entire surface. This knits the added features together and gives that soft, stone-like texture seen in the photo.
Step 3: Carving Details & Finishing
-
Mark the leaf placements:
Lightly trace the design guides with a needle tool: one vertical leaf in the center of the forehead, and two curved leaves that act as eyebrows over the eyes. -
Desgin the center leaf:
Carve the outline of the central leaf deeply. Inside the leaf shape, carve a central spine and angled veins on both sides to mimic natural foliage. -
Carve the eyebrow leaves:
Repeat the carving process for the eyebrow leaves, ensuring the veins curve naturally with the arch of the brow area. -
Enhance the eyelids:
Use a small tool to press a recessed line just above the upper lash line, creating a deep crease that defines the eyelid shape. -
Slow drying:
Loosely cover the mask with plastic to let it dry very slowly over 2-3 days. This prevents cracking, especially around the added nose and lips. -
Final sanding:
Once bone dry, use fine-grit sandpaper to gently buff away any fingerprints or rough tool marks, focusing on the chin and forehead for a matte, porcelain finish.
Symmetry Hack
Use a paper template folded in half to cut your initial face shape. You can also use a paper cutout for the leaf designs to ensure both eyebrows are identical.
Now you have a serene piece of art ready to bring a sense of peace to your home


Big Grin Character Mask
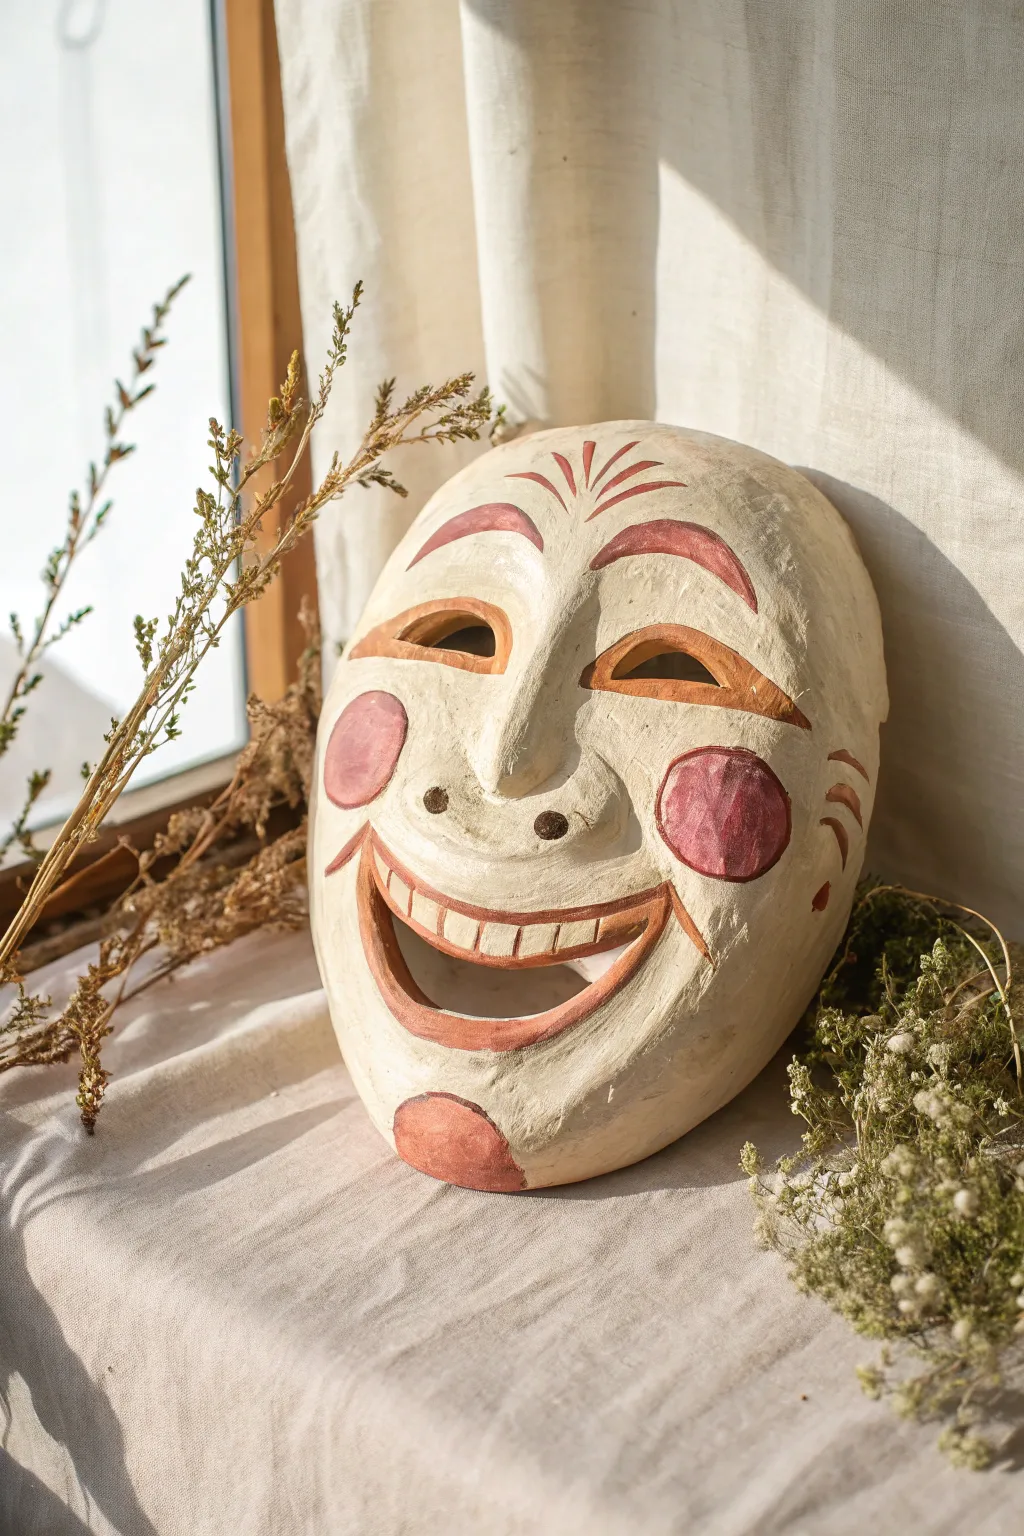
Capture infectious happiness with this expressive clay mask featuring exaggerated features and warm, earthy tones. Based on traditional folk art styles, its textured finish and wide, beaming smile make it a charming addition to any wall display.
Step-by-Step Tutorial
Materials
- Air-dry clay (white or natural)
- Plastic face mold or balloon (for base shape)
- Sculpting tools (needle tool, loop tool)
- Water and sponge
- Acrylic paints (cream/off-white, terracotta red, dark brown)
- Paintbrushes (medium flat, fine detail)
- Sandpaper (fine grit)
- Matte sealant spray
Step 1: Forming the Base Structure
-
Prepare the foundation:
Begin by covering your plastic face mold or inflated balloon with a smooth, even layer of air-dry clay, about 1/4 inch thick. Ensuring consistent thickness helps prevent cracking as it dries. -
Rough out the shape:
Smooth the clay down with a wet sponge to remove major fingerprints, but don’t worry about perfection yet; a little texture adds to the folk-art character. -
Create the nose:
Add a generous triangular wedge of clay to the center for the nose. Blend the edges seamlessly into the cheeks, keeping the bridge relatively wide and flat. -
Open the eyes:
Using a needle tool or fettling knife, carve out two crescent-shaped openings for the eyes. Angle them downwards slightly at the outer corners to enhance the smiling expression.
Step 2: Sculpting the Features
-
Build the cheeks:
Roll two flattened balls of clay and attach them to the cheek area. Blend the edges thoroughly to create high, rounded cheekbones that push up towards the eyes. -
Carve the mouth:
Cut a large, wide crescent shape for the open mouth. This should be significantly larger than a natural mouth to achieve that theatrical ‘big grin’ look. -
Detail the nose:
Use a small loop tool to hollow out two distinct nostrils at the base of the nose, ensuring they are deep enough to catch shadows. -
Sculpt the lips:
Roll thin coils of clay to outline the mouth opening. Use a modeling tool to press these coils into lips, tapering them at the corners where the smile crinkles. -
Add the teeth:
Form a small strip of clay inside the upper lip. Use a knife tool to gently score vertical lines, creating the suggestion of a full row of teeth without sculpting each one individually. -
Refine the brow:
Push the clay slightly above the eye openings to create a subtle brow ridge that arches upwards, mirroring the curve of the eyes.
Smoother Blending
Keep a small cup of slip (clay dissolved in water to a paste consistency) nearby. It works like glue for attaching the nose and cheeks seamlessly.
Step 3: Refining and Drying
-
Final smoothing:
Dip your finger in water and run it over all joints and rough patches. I like to leave just a bit of surface irregularity to mimic the look of aged wood or papier-mâché. -
Drying time:
Allow the mask to dry completely. This usually takes 24-48 hours depending on humidity. Rotate it occasionally so air reaches all sides. -
Sanding:
Once bone dry, lightly sand any sharp burrs or overly rough spots, particularly around the eye and mouth openings.
Antique Wash
Before sealing, apply a watered-down brown paint wash over the whole mask and wipe it off immediately with a rag. The dark pigment will settle in the crevices.
Step 4: Painting and Finishing
-
Base coat:
Paint the entire mask with a cream or off-white acrylic paint. You may need two coats to get solid coverage over the raw clay. -
Rosy cheeks:
Mix a terracotta red paint with a drop of water for transparency. Paint large, circular blushes on the highest part of the cheeks. -
Defining the features:
Use the terracotta shade effectively to outline the lips, paint the eyebrows (using arching strokes), and add decorative sweeping lines on the forehead. -
Side whiskers:
Paint three curved, whisker-like decorative dashes on the outer edges of the cheeks using your red tone. -
Accenting the chin:
Add a semi-circular patch of red to the very bottom of the chin to balance the color composition. -
Sealing:
Finish by spraying the mask with a matte sealant to protect the paint and give it a unified, professional finish.
Hang your smiling creation near a window or entryway to greet guests with a burst of cheer

The Complete Guide to Pottery Troubleshooting
Uncover the most common ceramic mistakes—from cracking clay to failed glazes—and learn how to fix them fast.
Comedy And Tragedy Mask Pair
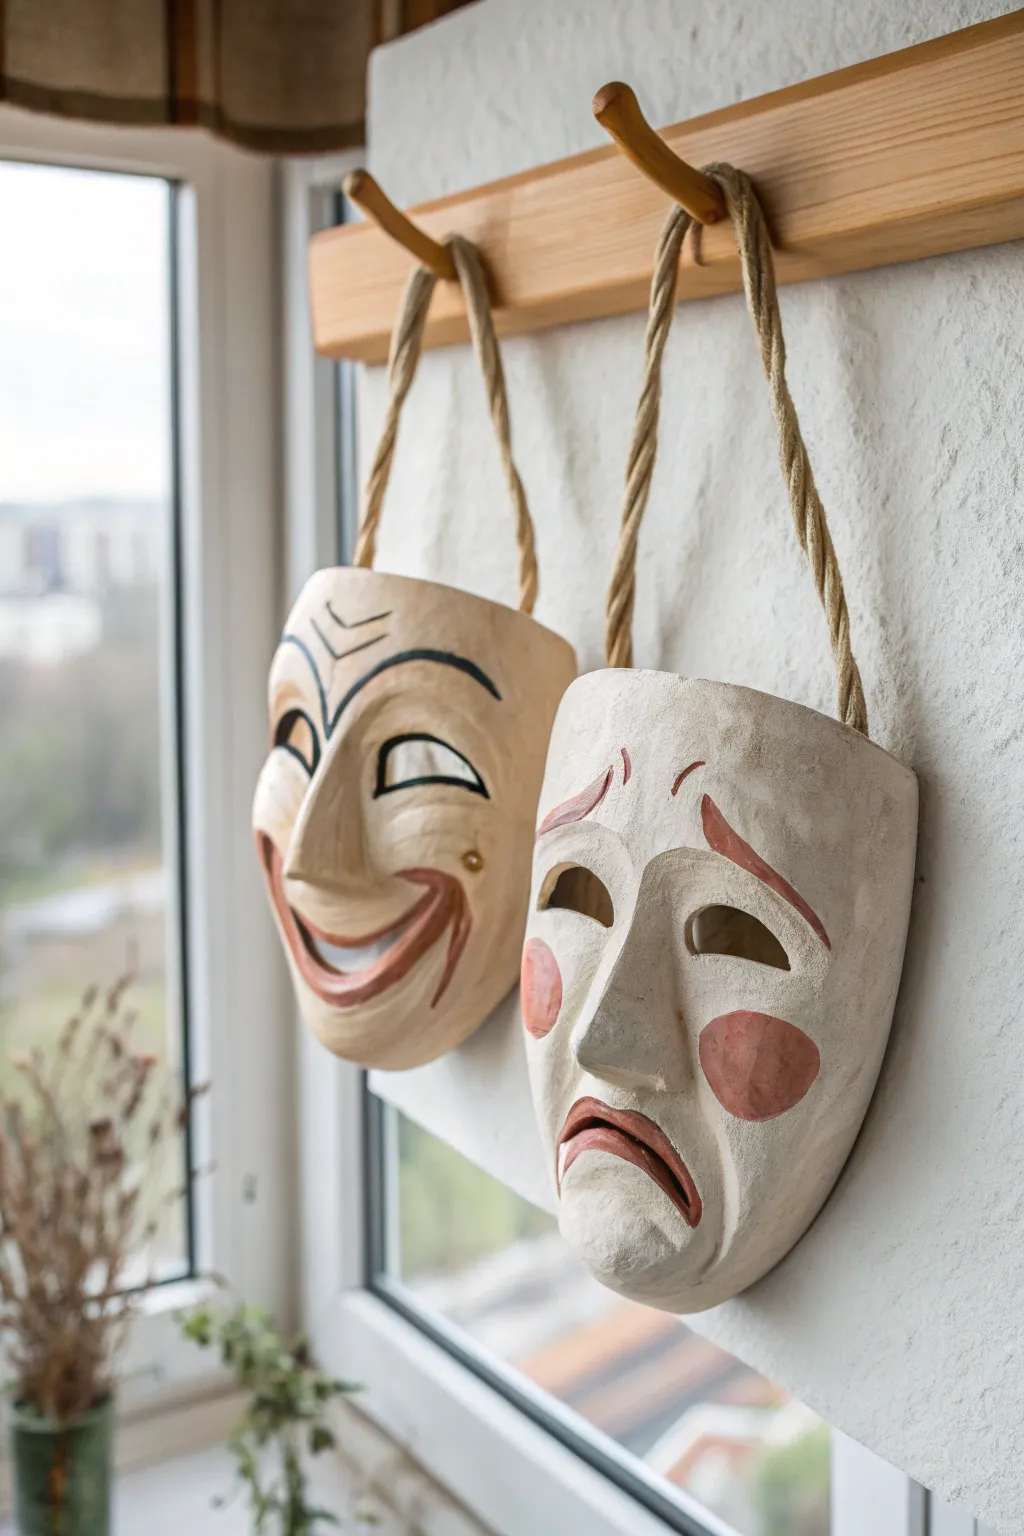
Reflect the duality of drama with this classic theatrical pair, sculpted with a charmingly rough-hewn texture. These matching clay masks capture exaggerated expressions of joy and sorrow, finished with earthy tones and hung by sturdy ropes for an authentic, old-world feel.
How-To Guide
Materials
- Air-dry clay or pottery clay (white or light grey)
- Clay rolling pin
- Sculpting tools (loop tool, needle tool, sponge)
- Bowl of water
- Acrylic paints (cream/off-white, terracotta/red-brown, black)
- Paintbrushes (medium flat brush, fine detail brush)
- Thick natural fiber rope (jute or hemp)
- Sandpaper (fine grit)
- Clear matte sealant spray
Step 1: Shaping the Base Forms
-
Roll the Slabs:
Begin by rolling out two slabs of clay to approximately a quarter-inch thickness. Try to keep them roughly the same size, aiming for a rounded rectangle or oval shape that mimics a face. -
Create the curvature:
To give the masks their convex, face-like curve, drape your slabs over a curved form like a mixing bowl or a bundle of newspapers covered in plastic wrap. Let them firm up slightly so they hold this shape. -
Cut the Outlines:
Trim the edges of both slabs into a u-shape or elongated oval. Ensure both masks have a similar perimeter size so they look like a matched set. -
Drill Suspension Holes:
While the clay is still wet, use a large needle tool or a straw to poke two holes at the very top of each mask. These need to be wide enough to accommodate your thick rope later.
Cracks while drying?
If small hairline cracks appear as the clay shrinks, mix a small amount of wet clay with water to make a paste (slip) and fill the gaps. Smooth over and let re-dry.
Step 2: Sculpting the Features
-
Build the Comedy Nose:
For the smiling mask, add a wedge of clay to the center for a prominent, sharp nose. Score and slip the contact points to ensure a strong bond, blending the edges seamlessly into the cheeks. -
Carve the Smile:
Using a loop tool, carve deeply into the lower half to create a wide, upturned mouth. Raise the cheeks slightly by adding small pads of clay underneath the eyes to emphasize the grin. -
Build the Tragedy Nose:
On the second mask, add a similar nose structure but perhaps slightly longer or more drooping to match the mood. -
Sculpt the Frown:
Carve a downturned mouth, pushing the clay at the corners downward. I find it helps to add a small ridge of clay above the mouth to deepen the expression of sorrow. -
Cut the Eyes:
Carefully cut out the eye holes. For Comedy, use arched, happy half-moons; for Tragedy, slope the holes downward at the outer corners to look sad. -
Add Eyebrows:
Roll small coils of clay for eyebrows. Attach them high and arched for the happy mask, and sloped upwards in the center (like a caret ^) for the sad mask to simulate distress. -
Smooth and Dry:
Use a damp sponge to smooth out any harsh fingerprints, but leave some surface texture for that rustic look. Allow the masks to dry completely, which may take 24 to 48 hours depending on humidity.
Step 3: Painting and Assembly
-
Base Coat:
Paint both masks entirely with an off-white or cream acrylic paint. You might need two coats to get solid coverage. -
Apply the Wash:
To age the masks, mix a tiny bit of brown paint with water and brush it over the dried base. Immediately wipe most of it off with a paper towel, leaving pigment in the crevices. -
Detail the Comedy Mask:
Using the terracotta or red-brown paint, carefully outline the lips and draw simple lines for the eyebrows. Add a swooping line on the forehead for wrinkles. -
Detail the Tragedy Mask:
Paint the downturned lips and sad eyebrows with the same reddish-brown. Add large, circular rosy patches to the cheeks for a distinct theatrical look. -
Seal the Work:
Once the paint is fully dry, spray both masks with a clear matte sealant to protect the finish without making them look glossy. -
Attach the Rope:
Cut two lengths of thick rope. Feed the ends through the holes in the top of the masks from front to back and knot them securely on the inside.
Make it antiqued
For a truly ancient look, gently sand the painted surface in high-touch areas (nose and chin) to reveal the clay underneath before sealing.
Hang your dramatic duo together to instantly add a touch of classical theater history to your space
Stamped Texture Pattern Mask
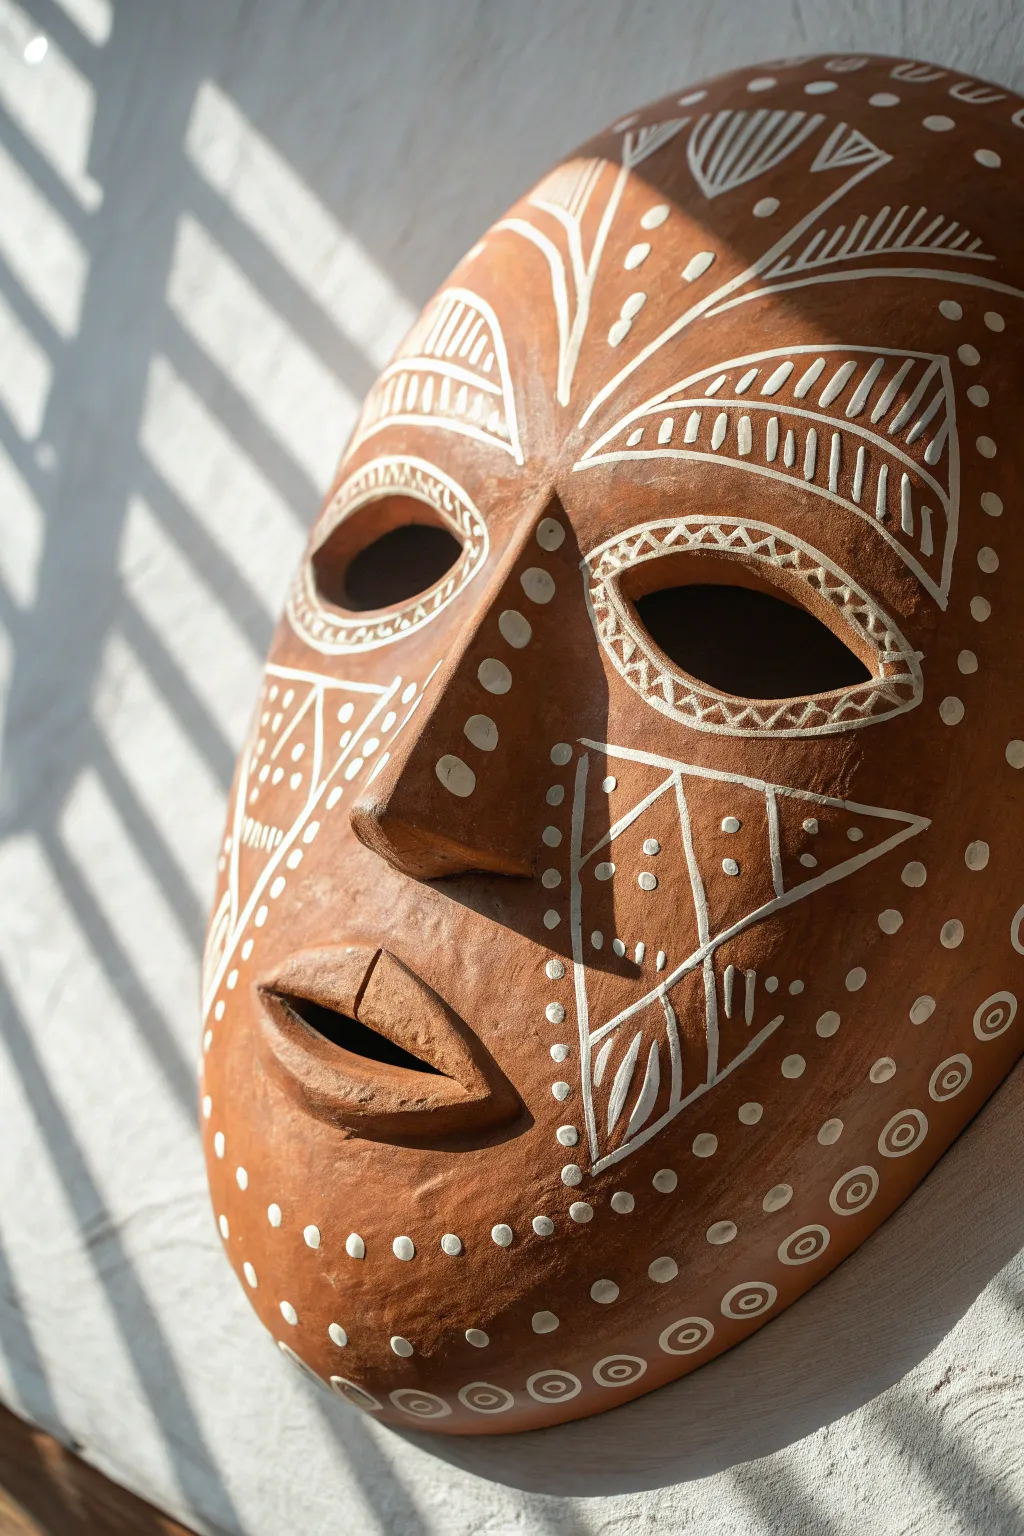
Bring an earthy, artistic touch to your wall with this striking clay mask inspired by tribal aesthetics. The warm terracotta base contrasts beautifully with intricate white geometric patterns, creating a piece that looks like authentic kiln-fired pottery without the need for a kiln.
Step-by-Step
Materials
- Air-dry clay (terracotta color) or white clay
- Rolling pin
- Clay sculpting tools (specifically a needle tool and a loop tool)
- Bowl (or mask mold) for shaping
- Sponge and water
- Acrylic paint (Terracotta/Burnt Sienna if using white clay)
- White acrylic paint or specialized white clay slip
- Fine-point detail brush (size 0 or 00)
- Small dotting tool or toothpick
- Fine grit sandpaper
- Matte varnish (spray or brush-on)
Step 1: Shaping the Base
-
Prepare your clay slab:
Start by rolling out your air-dry clay into an even oval slab, roughly 1/4 inch thick. Aim for a smooth surface, using a slightly damp sponge to wipe away any cracks or rolling pin textures. -
Form the convex shape:
To get that curved mask profile, drape your clay slab over the back of a large bowl or a dedicated mask mold. Gently press it to conform to the shape without stretching it too thin. -
Refine the outline:
Use a knife or needle tool to trim the edges into a clean, elongated oval shape. Smooth the cut edges with a bit of water on your finger so they are rounded, not sharp. -
Build the nose bridge:
Roll a separate wedge of clay to form the nose. Score the back of the nose piece and the center of the mask where it will attach. Apply a little water or slip, then press the nose firmly onto the mask. -
Blend the seams:
Use a sculpting tool or your thumb to drag the clay from the nose piece onto the main mask body, smoothing the seam until the nose looks like it was pushed out from the main slab rather than just stuck on. -
Cut the features:
Using a sharp knife or scalpel, carefully cut out two almond shapes for the eyes. For the mouth, create a horizontal cut, then use a tool to gently open and shape the lips, giving them a slight pout. -
Dry completely:
Let the mask dry for at least 24-48 hours. I prefer to let it dry slowly away from direct heat to prevent cracking. Once fully dry, sand any rough spots with fine-grit sandpaper. -
Apply base color:
If you used white clay, paint the entire mask with a terracotta or burnt orange acrylic paint to mimic the look of red earth pottery. Apply two coats for solid coverage.
Fixing Wobbly Lines
If your white lines look messy, wait for them to dry. Then, use a small brush with your base terracotta color to ‘erase’ the mistake by painting over the edges to sharpen the line.
Step 2: Creating the Geometric Design
-
Map out the forehead:
Using your fine detail brush and white paint, create a central leaf-like shape extending up the forehead from the bridge of the nose. Add curved triangles above the eyebrows filled with vertical hatch marks. -
Detail the eyes:
Paint an outline around the eye cutouts. Inside this outline, add a zigzag or triangular pattern to emphasize the shape. It helps to steady your hand against the table while doing this fine work. -
Paint the cheeks:
On the cheeks, paint large triangular sections. Fill them with a mix of geometric elements: cross-hatching, parallel lines, and small dots. Keep the lines relatively thin to maintain elegance. -
Add the nose dots:
Running down the bridge of the nose, paint a vertical line of graduating dots. Start with smaller dots near the eyes and slightly larger ones toward the tip. -
Decorate the chin area:
Create circular patterns or rings near the chin and lower jawline. You can use the back of your paintbrush handle or a dotting tool to stamp perfect white circles. -
Embellish the perimeter:
Finish the design by adding a series of dots or small circles along the very edge of the mask, framing the entire face. -
Seal the artwork:
Once the white paint is completely dry, apply a coat of matte varnish. This protects the paint and deepens the terracotta color without adding an unnatural glossy shine.
Rustic Texture Trick
Before the clay dries, gently dab the surface with a stiff bristle brush or a crumpled ball of foil. This creates a pitted, stone-like texture that makes the paint look ancient.
Hang your finished mask in a spot where the light casts dramatic shadows across its surface to highlight the depth of the features


What Really Happens Inside the Kiln
Learn how time and temperature work together inside the kiln to transform clay into durable ceramic.
Coil Brows And Mustache Mask
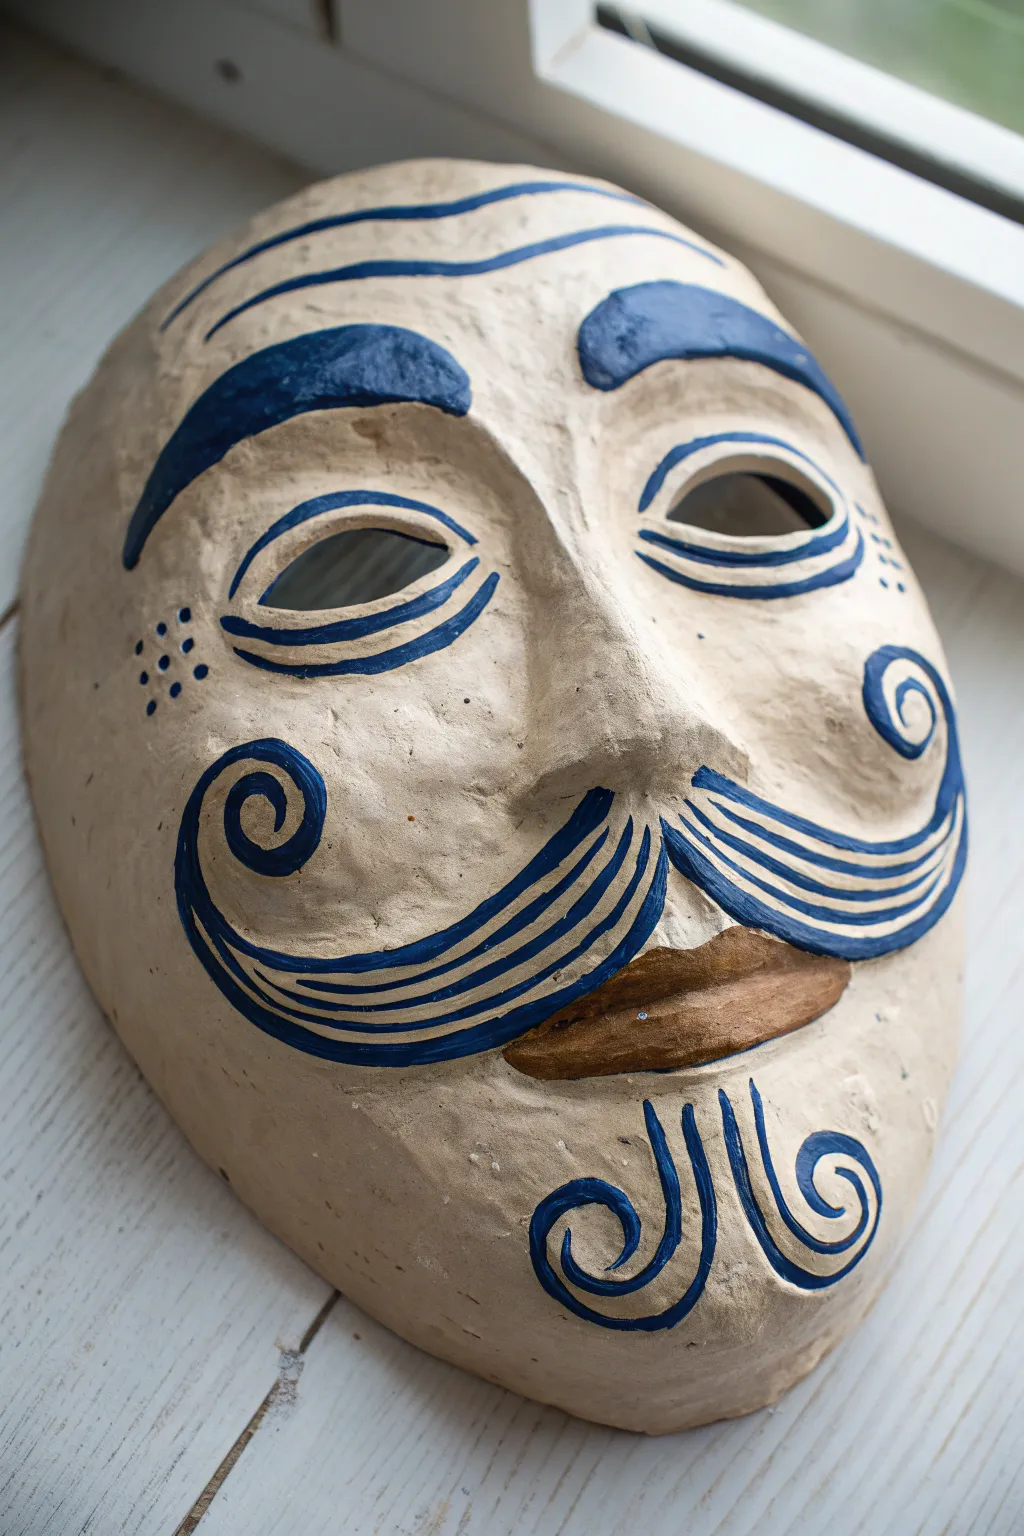
Bring a touch of theatrical charm to your space with this expressive, sculpted mask featuring bold blue details. With its prominent nose and stylized mustache coils, this project combines simple clay building techniques with striking graphic painting.
Step-by-Step Guide
Materials
- Air-dry clay or paper clay (white/grey)
- Plastic face mold or balloon (for base shape)
- Sculpting tools (hook tool, needle tool)
- Water and slip (clay slurry)
- Fine-grit sandpaper
- Acrylic paints: Navy blue, Warm brown, Cream/Beige
- Fine liner brush and medium flat brush
- Clear matte varnish
- Sponge
Step 1: Sculpting the Base Form
-
Prepare the foundation:
Begin by rolling out a consistent slab of clay, roughly 1/4 inch thick. Drape this carefully over your plastic face mold or a blown-up balloon to establish the primary curved shape of the mask. -
Shape the face outline:
Trim the excess clay from the edges to create a smooth oval face shape. Dip your fingers in a little water to smooth out the rim so there are no sharp edges. -
Build the nose:
Roll a sturdy coil or wedge of clay for the nose. Score and slip the center of the mask, then attach the nose firmly. Blend the edges of the nose seamlessly into the cheeks so it looks like one piece, not an add-on. -
Cut the eyes:
Use a needle tool or small knife to carefully cut out the almond-shaped eye holes. Position them symmetrically on either side of the nose bridge, smoothing the interior edges of the cuts.
Smooth Surface Secret
Before painting, wipe the dried clay with a slightly damp sponge. This removes sanding dust and creates a ‘burnished’ surface that takes paint much more evenly.
Step 2: Adding Raised Details
-
Create the eyebrow ridges:
Roll two small, tapered coils of clay. Score the area above the eyes and attach these coils to form the raised brow bone. Use a sculpting tool to blend the bottom edge of the coil into the forehead while keeping the top edge slightly defined. -
Form the mustache volume:
This is the signature feature. Roll two larger, thicker coils that taper at the ends. Attach them under the nose, curving them upwards into a handlebar shape. -
Refine the mustache texture:
Flatten the mustache coils slightly against the face so they integrate well. You don’t need to carve individual hairs yet; just ensure the raised volume follows the shape of the blue swirl painting you will add later. -
Sculpt the lip area:
Add a small, flattened lozenge of clay beneath the mustache for the mouth. Press it gently to give it a slight fullness, distinct from the chin area. -
Allow to dry:
Let the mask dry completely. This usually takes 24-48 hours depending on humidity. I like to rotate it occasionally so air reaches all sides.
Step 3: Finishing and Painting
-
Sand for smoothness:
Once bone dry, use fine-grit sandpaper to go over the entire surface. Pay special attention to the nose blend and the edges of the mask to get a texture similar to smooth stone. -
Apply the base coat:
Mix a cream or beige acrylic paint to mimic a natural parchment or unbleached paper tone. Sponge or brush this over the entire mask for an even, matte finish. Let it dry. -
Paint the eyebrows:
Using a medium brush and navy blue paint, fill in the raised eyebrow shapes. Keep the edges crisp and bold. -
Add forehead details:
With a thinner brush, paint two wavy blue lines across the forehead. These should look like stylized wrinkles, adding expression to the character. -
Outline the eyes:
Paint a blue rim around the eye holes. Above the eye, paint a double curved line to simulate an eyelid crease, mirroring the curve of the eyebrow. -
Detail the mustache:
On the raised mustache area, paint a large, sweeping swirl in blue. Start from the center and spiral outward at the cheeks. Add inner lines inside the main swirl to suggest hair texture. -
Paint the lips:
Fill in the sculpted mouth area with a warm brown paint. This provides a nice earthy contrast to the stark blue graphics. -
Add the beard design:
Beneath the mouth, use your fine liner brush to paint three distinct curlicues in blue—one central loop and two flanking outward swirls—to represent a stylized beard. -
Add cheek freckles:
Dot a few tiny blue spots on the cheeks, just below the outer corners of the eyes, for a final decorative touch. -
Seal the work:
Finish with a coat of clear matte varnish to protect the paint and give the mask a unified sheen.
Antique Wash Effect
Dilute brown paint with water (1:10 ratio) and brush it over the dried base coat. Generally wipe it off immediately to leave pigment in the crevices for an aged look.
Hang your finished creation on a wall or prop it on a shelf to enjoy its unique personality
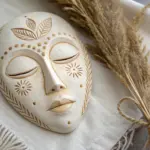
Leaf-Imprint Nature Mask
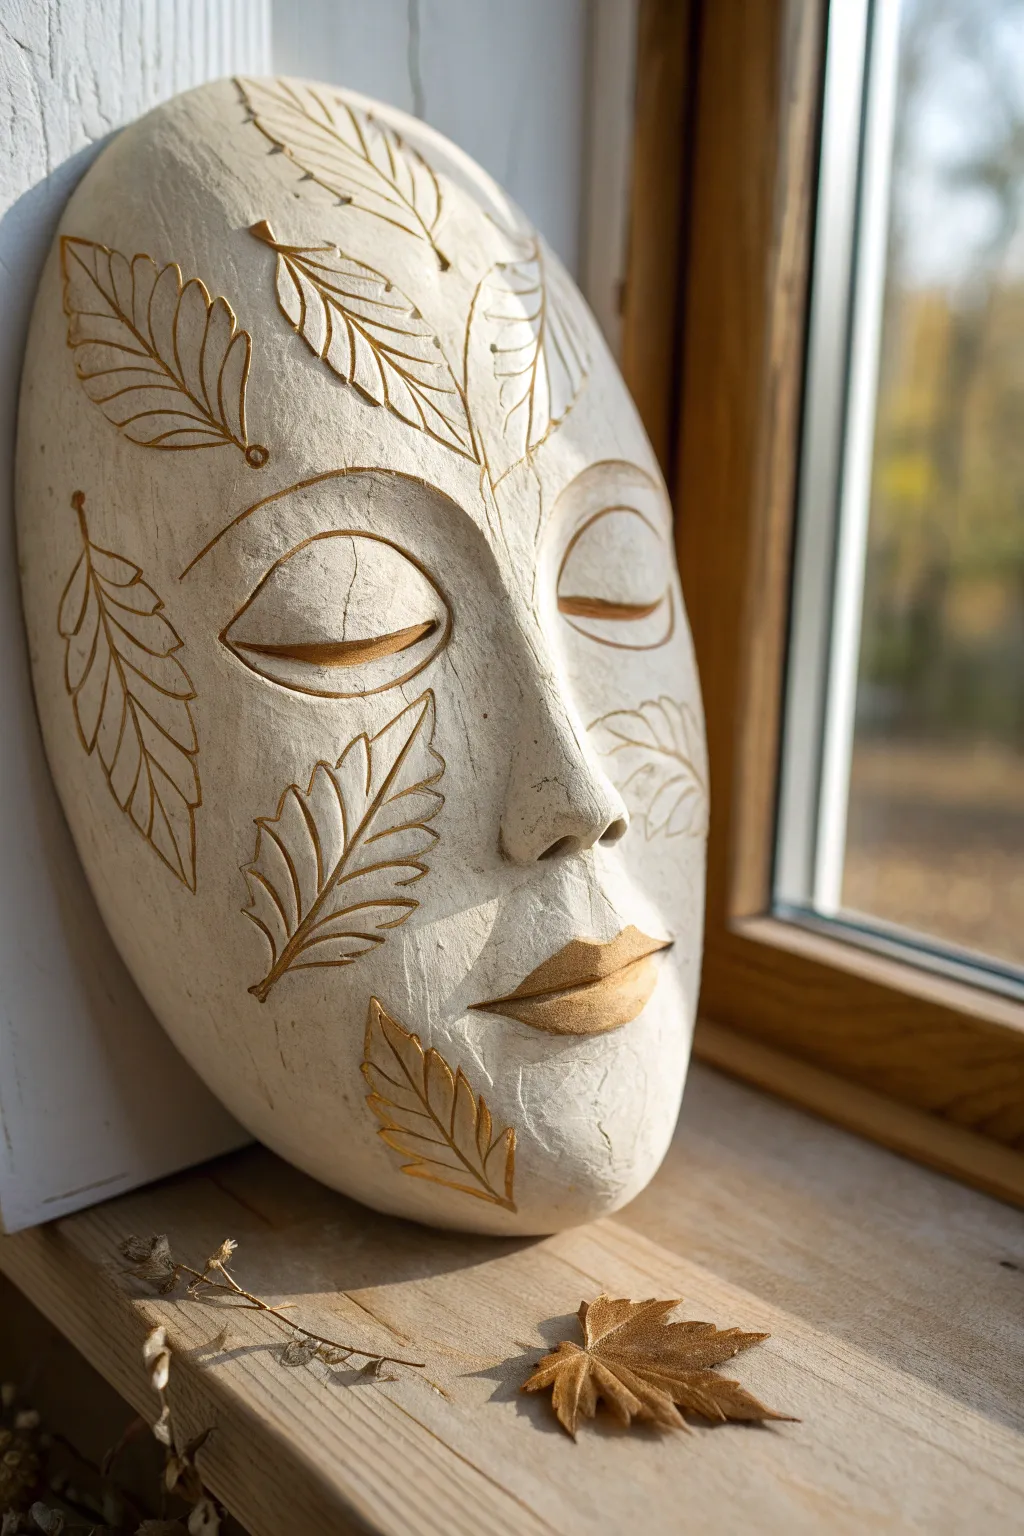
This elegant clay mask project captures the quiet beauty of autumn with its delicate leaf motifs and tranquil expression. The textured white clay is elevated by stunning gold accents that highlight the intricate carvings, creating a sophisticated piece of decor perfect for displaying on a windowsill or shelf.
Step-by-Step Tutorial
Materials
- White smooth air-dry clay (approx. 500g)
- Plastic face mask form or armature (reusable)
- Clay carving tools (needle tool, small loop tool)
- Leaf stamps or actual sturdy leaves (optional)
- Rolling pin
- Parchment paper
- Bowl of water
- Sponge
- Fine grit sandpaper
- Metallic gold acrylic paint
- Fine detail paintbrush (size 0 or 1)
- Matte sealant or varnish
Step 1: Shaping the Foundation
-
Prepare the Clay:
Begin by kneading your white air-dry clay until it is warm and pliable. This removes air bubbles and prevents future cracking. -
Roll the Slab:
Roll the clay out on parchment paper to a uniform thickness of about 1/4 inch. Aim for an oval shape slightly larger than your mask form. -
Drape the Form:
Carefully lift the clay slab and drape it over your plastic mask form. Gently press the clay onto the armature, smoothing it down to capture the basic contours of the forehead, nose, and chin. -
Refine the Features:
Using your fingers and a damp sponge, smooth the surface. Pay special attention to the nose bridge and the eye sockets, ensuring they are symmetrical but soft. -
Sculpt the Lips:
Add a small, flattened coil of extra clay to the mouth area. Blend the edges seamlessly into the mask, then shape the upper and lower lips with a modeling tool to create a closed, peaceful pout. -
Define the Eyes:
Instead of cutting eye holes, use a modeling tool to gently outline large, closed eyelids. I like to press slightly deeper at the lash line to create a shadow that enhances the sleeping expression.
Step 2: Carving the Nature Motifs
-
Draft the Design:
Before carving, lightly trace your leaf placement with a needle tool. Imagine the leaves drifting across the face—one near the temple, a few on the cheek, and one at the chin. -
Carve the Outlines:
Using a needle tool or small V-gouge, firmly carve the outline of each leaf. The heavy, confident lines are key to the style shown in the photo. -
Detail the Veins:
Inside each leaf outline, carve a central vein and branching side veins. These lines should connect clearly to the outer edges. -
Add Texture:
If you want a naturally weathered look, lightly dab the un-carved areas with a stiff brush or crumbled foil to create a stone-like texture. -
Thorough Drying:
Allow the mask to dry completely on the form. This usually takes 24-48 hours depending on humidity. Don’t rush this, or the paint won’t adhere properly. -
Refining the Surface:
Once fully dry and hard, use fine-grit sandpaper to smooth any rough burrs created during carving, but be careful not to sand away your texture.
Cracks happen!
Small surface cracks add to the antique look. If a structural crack appears, fill it with a mix of white hue and clay slip (watery clay) before painting.
Step 3: The Golden Touch
-
Base Sealing (Optional):
Apply a very thin coat of matte varnish to seal the clay. This prevents the porous clay from soaking up too much gold paint. -
Painting the Carvings:
Dip a fine detail brush into metallic gold acrylic paint. Carefully trace all the carved troughs of the leaves. It’s okay if the lines aren’t perfect; a little variation adds character. -
Highlighting the Features:
Paint the closed eyelid line with a steady hand. Then, paint the entire lip area gold to create a focal point. -
Softening Edges:
While the gold is still slightly wet, you can wipe the surface gently with a damp cloth if you accidentally got paint outside the carved lines. -
Final Protection:
Once the gold paint is fully cured, apply a final coat of matte sealant spray to protect the finish without making it too glossy.
Sharper lines
For crisper carvings, wait until the clay is ‘leather hard’ (firm but cool to touch) before carving the leaves. The clay will be less sticky.
Set your finished mask near natural light to watch the gold accents shimmer as the day goes by

TRACK YOUR CERAMIC JOURNEY
Capture glaze tests, firing details, and creative progress—all in one simple printable. Make your projects easier to repeat and improve.
Sun And Moon Split-Face Mask
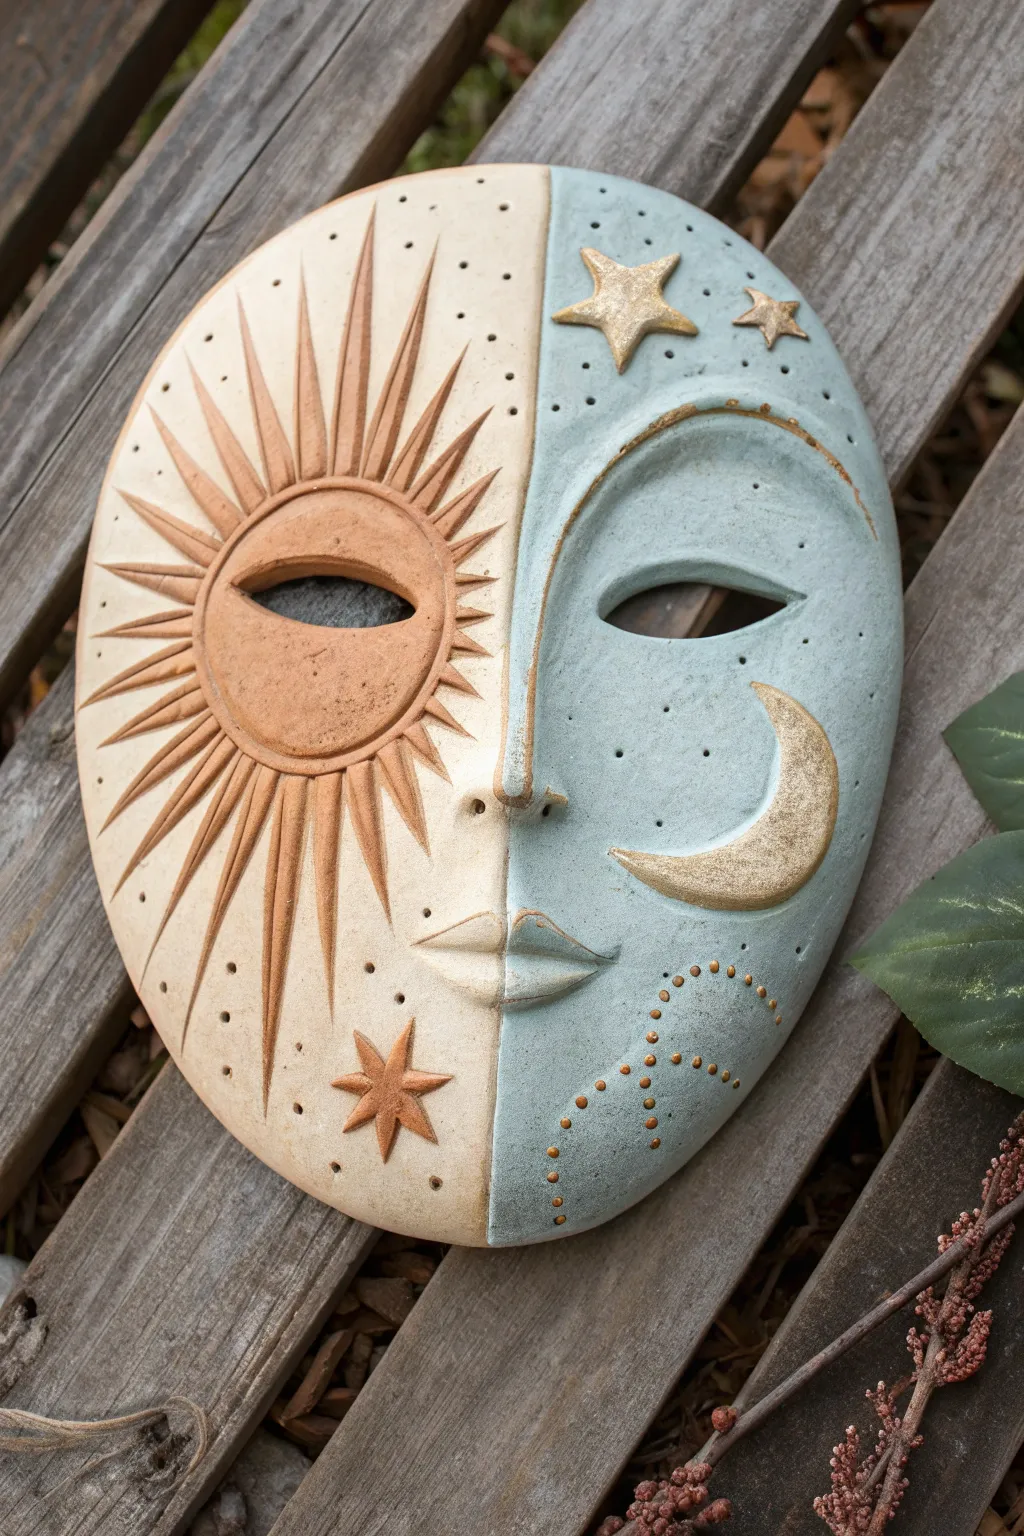
This striking wall piece captures the balance between day and night in a single, cohesive oval form. By combining the warm, unglazed texture of terracotta with cool, starry blues and gold accents, you’ll create a mystical split-face work of art perfect for a garden or indoor sanctuary.
Step-by-Step Guide
Materials
- Air-dry clay or polymer clay (approx. 2-3 lbs)
- Rolling pin
- Oval paper template or large bowl for shaping
- Sculpting tools (needle tool, modeling tool, knife)
- Small circle cutters or a straw (for texture dots)
- Acrylic paints: Terracotta/warm brown, soft blue-grey, metallic gold
- Matte sealant or varnish
- Fine grit sandpaper
- Water and sponge for smoothing
- Small detail paintbrushes
Step 1: Shaping the Base
-
Prepare the slab:
Begin by conditioning your clay and rolling it out into a smooth, even slab about 1/4 to 1/2 inch thick. You want it substantial enough to hold the details but not so heavy it cracks easily. -
Cut the oval form:
Place your paper template onto the clay and carefully cut around it with a knife to create a clean oval shape. If you want a slightly curved, mask-like profile, you can gently drape this oval over a large overturned bowl or a curved mold. -
Define the center line:
Lightly score a vertical line down the exact center of the face. This will serve as your guide for separating the sun side from the moon side. -
Mark the features:
Sketch the placement of the eyes, nose, and mouth lightly onto the clay surface using a needle tool. The nose acts as the central bridge connecting the two halves.
Step 2: Sculpting the Sun Side
-
Build the eye:
On the left (sun) side, roll a small coil and form an almond-shaped eye outline. Blend the outer edges into the base clay, leaving the inner ridge distinct. -
Carve the rays:
Using a knife tool, carve deep, sharp triangular rays radiating outward from the eye area towards the mask’s edge. Vary the lengths, alternating between long and short spikes for a dynamic look. -
Add dimensional rays:
For added depth, I prefer to roll thin tapered snakes of clay and lay them on top of the carved rays, smoothing them down to create raised relief details. -
Texture the background:
Use a needle tool or small stamp to press tiny random dots into the spaces between the rays, adding interest to the sun’s surface.
Cutting Clean Eye Holes
Wait until the clay has dried slightly (leather hard) before cutting the final eye openings. This prevents the shape from warping or squishing while you cut.
Step 3: Sculpting the Moon Side
-
Define the moon profile:
On the right (moon) side, build up the brow bone with a swipe of extra clay to give the face dimension. Cut out the eye hole cleanly. -
Add celestial symbols:
Roll a small crescent shape and a few stars from spare clay. Score and slip (or use liquid clay) to attach a large crescent moon on the cheek and stars on the forehead. -
Create the nose and mouth:
Build up the central nose bridge and sculpt the lips. The lips should be split right down the middle—keep the sun side slightly flatter and the moon side fuller if desired, or keep them symmetrical. -
Dotted constellations:
Using a small ball tool or the end of a paintbrush, press a swirling pattern of dots along the chin and cheek area to mimic constellations or stardust.
Add a Hanging Loop
Before the clay dries, create two small holes near the top edge or embed a wire loop into the back so you can easily hang your mask on the wall later.
Step 4: Finishing and Painting
-
Dry and sand:
Allow the mask to dry completely according to your clay’s instructions (usually 24-48 hours for air dry). Once hard, gently sand any rough edges, especially around the outer rim. -
Paint the sun base:
Paint the entire left side with a warm terracotta or sandy brown color. You might want to water down the paint slightly so it settles into the textured dots, acting like a wash. -
Paint the moon base:
Apply a soft, matte blue-grey paint to the right side. Be careful to paint neatly along the central nose line for a crisp division. -
Highlight with gold:
Using a small detail brush and metallic gold paint, carefully fill in the raised crescent moon, the stars, and the dotted swirls on the moon side. You can also dry-brush a tiny bit of gold onto the sun rays for a subtle shimmer. -
Seal the work:
Finish by applying a matte varnish over the entire piece to protect the paint and give the clay a finished, professional look.
Hang your celestial masterpiece in a spot where the light catches the gold details, bringing a harmonious balance to your space.
Cubist Two-Eye Abstract Mask

Embrace bold shapes and earthy tones with this striking mask sculpture that blends Cubist influences with a primitive aesthetic. The finished piece features a textured, matte finish in terracotta, sage, and white, making for a sophisticated decor accent.
Detailed Instructions
Materials
- Air-dry clay (white or terracotta base)
- Plastic face mold or balloon (for armature)
- Aluminum foil
- Sculpting tools (needle tool, loop tool)
- Acrylic paints (terracotta/rust, sage green, titanium white)
- Small and medium flat brushes
- Fine-grit sandpaper
- Wooden dowel (approx. 1/2 inch thick)
- Wooden block for base
- Strong craft glue or epoxy
- Water bonding cup
- Matte spray varnish
Step 1: Sculpting the Base Form
-
Prepare the armature:
Begin by covering your plastic face mold with a layer of aluminum foil to prevent sticking. If using a balloon, inflate it to head size and stabilize it in a bowl. -
Roll the slab:
Roll out your air-dry clay to an even thickness of about 1/4 inch. Carefully drape this slab over your armature, gently pressing it down to conform to the basic curve of a face. -
Refine the perimeter:
Trim the edges of the clay into an elongated oval shape using a needle tool or knife. Smooth the cut edges with a damp finger to remove any sharpness. -
Add the nose ridge:
Form a long, triangular prism of clay for the nose. Score and slip the center of the mask face, then press the nose firmly into place, blending the seams completely so it looks like one solid piece. -
Create the eyes and mouth:
Using a knife, cut out two almond shapes for the eyes. Below the nose, sculpt simple, raised lips by adding small coils of clay and blending them onto the surface, creating a slight pout.
Step 2: Geometric Detailing & Mounting
-
Map the design:
Once the initial form is leather-hard (firm but cool to the touch), lightly sketch the geometric pattern directly onto the clay with a needle tool. Draw the triangles on the forehead, the sweeping curves over the eyes, and the cheek segments. -
Refine the texture:
Instead of smoothing everything perfectly, dab the surface with a stiff-bristled brush or crumpled foil to create a slightly pitted, stone-like texture. -
Insert the mount hole:
Carefully poke a hole at the very bottom center of the chin that matches the diameter of your wooden dowel. Make it deep enough to be secure, but don’t poke through to the front. -
Let it dry completely:
Allow the mask to dry for 24-48 hours until it is bone dry and chalky white. I usually rotate it halfway through to ensure the inside dries evenly. -
Sand imperfections:
Gently sand any overly sharp ridges or rough edges, particularly around the eye cutouts and the rim of the mask.
Clean Lines Hack
Use thin masking tape or washi tape to mask off the geometric sections before painting. Press the edges down firmly to prevent paint bleed for super crisp lines.
Step 3: Painting & Final Assembly
-
Base coat:
Paint the entire mask with a thin wash of titanium white acrylic. This acts as a primer and ensures your colors pop against the clay. -
Apply the white sections:
Using a medium flat brush, paint the central vertical stripe, the eye surrounds, and the specific triangle segments in a thick, opaque white. -
Add the terracotta tones:
Isolate the geometric sections meant for the rust color—specifically the outer cheeks, lips, and forehead triangles. Apply two coats of terracotta paint for solid coverage. -
Paint the sage accents:
Fill in the remaining geometric shapes (the nose, eyelids, and cheek triangles) with a muted sage green paint. Use a small detail brush to keep the lines crisp where colors meet. -
Outline details:
If you want extra definition, mix a tiny bit of grey into your white paint and gently drag a very fine liner brush through the carved grooves between colored sections. -
Assemble the stand:
Drill a hole into the center of your wooden base block. Glue the dowel into the base, then apply strong glue to the top of the dowel and insert it into the hole you made in the mask’s chin. -
Seal the work:
Finish with a light coat of matte spray varnish to protect the paint without adding an unnatural shine.
Metallic Accent
For a luxe twist, apply gold leaf or metallic gold paint to just the thin lines separating the color blocks, giving the mask a cloisonné effect.
Display your sculpture in a well-lit spot to let the shadows play across the geometric relief
Scratch-Line Sgraffito Style Mask
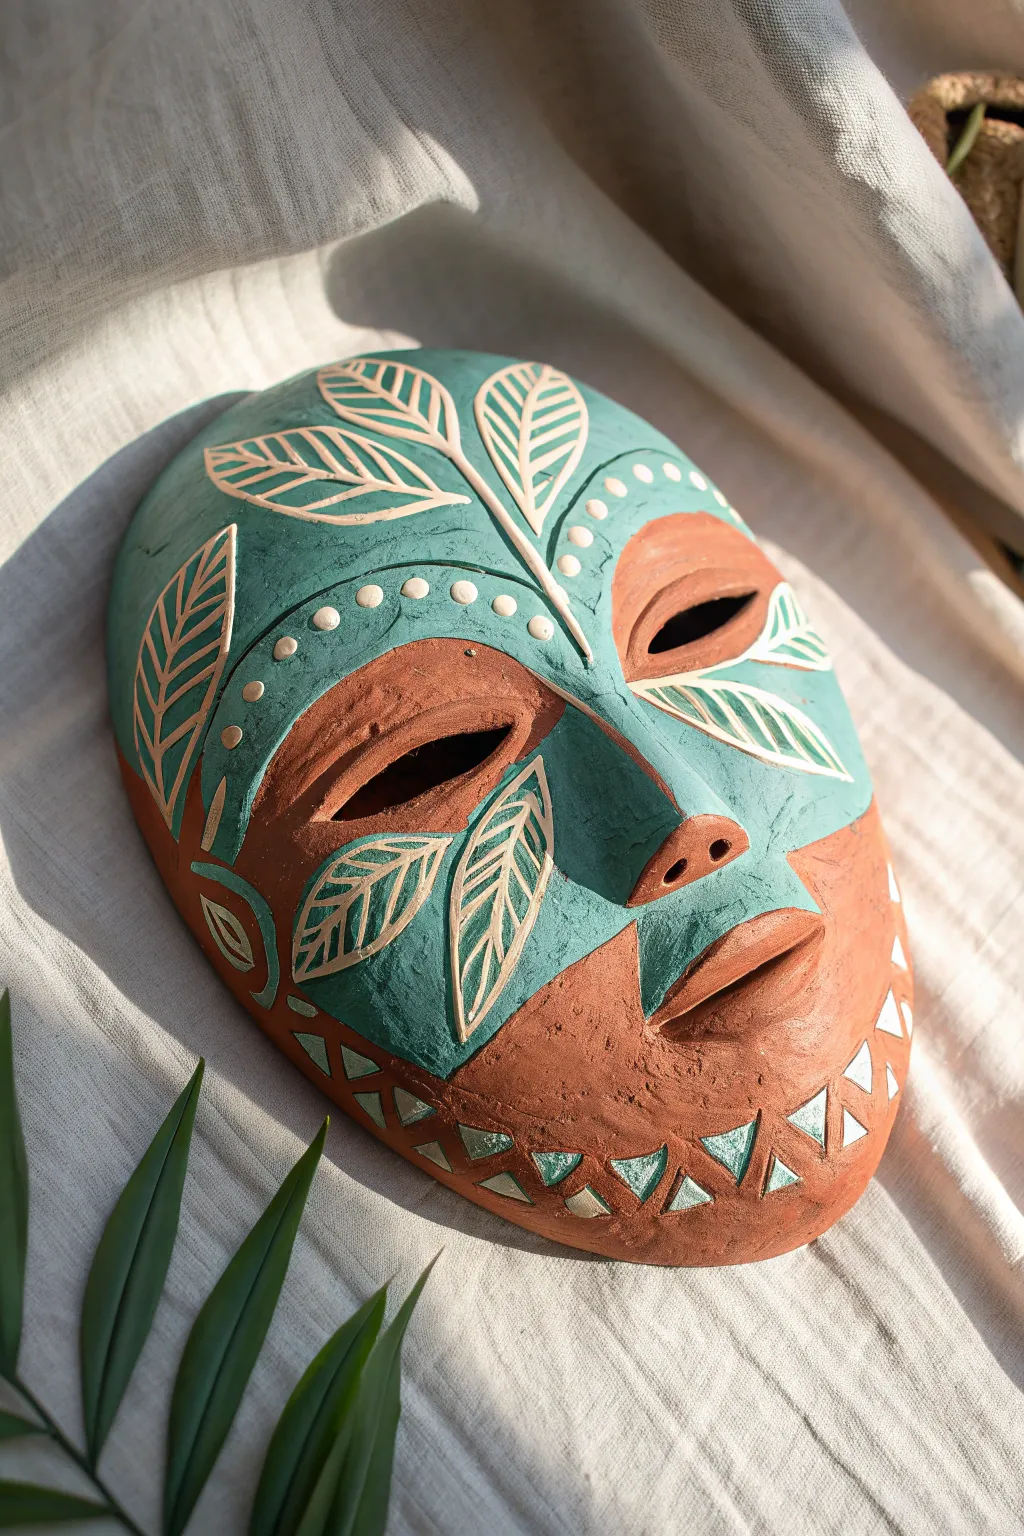
Embrace the natural texture of clay with this striking sgraffito-style mask, featuring bold leaf motifs and geometric accents. By carving through a layer of teal underglaze to reveal the warm terracotta body underneath, you achieve a vivid, contrasting design that feels both ancient and modern.
Step-by-Step Guide
Materials
- Red earthenware or terracotta clay
- Rolling pin and guide strips (approx. 1/4 inch)
- Small bowl or face mold for shaping
- Teal or turquoise underglaze
- Wide, soft paintbrush
- Sgraffito tool or a fine loop tool
- Needle tool
- Sponge
- Clear matte glaze (optional)
- Kiln (for firing)
Step 1: Sculpting the Form
-
Roll the slab:
Start by rolling out a smooth, even slab of terracotta clay, aiming for about a quarter-inch thickness. Using guide strips helps keep the thickness consistent. -
Cut the oval:
Using a needle tool, cut a large oval shape from your slab. You want this to be roughly the size of a human face, perhaps slightly larger to account for shrinkage. -
Mold the curve:
Drape your clay oval over a hump mold or a bowl covered in newspaper to give it a convex, face-like curve. Gently press it down so it takes the shape without thinning the clay. -
Add facial features:
Build up the nose using a small coil of additional clay, blending it seamlessly into the main slab. Carve out almond-shaped eyes and a mouth opening with your needle tool. -
Refine the surface:
Smooth out the clay with a damp sponge or your fingers. Pay special attention to the edges of the eye and mouth holes to ensure they aren’t sharp or jagged.
Clean Lines Only
If your carving tool drags or creates jagged edges, the clay is too soft. Let it dry for another 30 minutes. If it chips, the clay is too dry—mist it lightly.
Step 2: Applying Color
-
Leather hard stage:
Allow the mask to dry slowly until it reaches the leather-hard stage. It should be firm enough to handle without warping, but still cool to the touch. -
Apply underglaze:
Using a wide, soft brush, apply 2-3 even coats of teal underglaze to the upper forehead, the nose bridge, and the left cheek area. -
Create negative space:
Leave the mouth area, chin, and right cheek as bare clay to create the color-blocking effect seen in the photo. I usually sketch these zones lightly with a tool before painting. -
Drying time:
Let the underglaze dry completely until it is chalky and matte. If it’s still shiny, your carving tool will gum up.
Step 3: The Sgraffito Technique
-
Outline the leaves:
With your sgraffito or needle tool, gently scratch the outline of large leaves into the tea-colored sections. Vary the sizes and angles for a dynamic look. -
Carve the veins:
Carve a central vein down each leaf, then add diagonal veins branching off. Press firmly enough to reveal the red clay beneath the teal paint. -
Add dotted borders:
Along the curved edge where the teal paint meets the bare clay on the forehead, carve a series of small, evenly spaced dots or circles. -
Carve the chin detail:
Move to the bottom chin area. Although this area is unpainted, you can carve triangles directly into the clay body. To make them pop, apply a dab of teal into the carved triangle and wipe away the excess on the surface. -
Leaf details on bare clay:
For the leaves that overlap onto the bare clay sections (like on the cheek), you will need to slip-trail or paint the leaf shape in white or teal first, then carve back into it, or simply carve the outline deeply for texture. -
Clean up debris:
As you carve, little crumbs of clay will accumulate. Use a large, soft, dry makeup brush to gently sweep these away without smudging your design.
Go 3D
Instead of just carving, try adding small balls of clay for the dots on the forehead before painting them, turning the texture from negative to positive space.
Step 4: Finishing
-
Final drying:
Let the mask dry completely to the bone-dry stage. This is crucial to prevent explosions in the kiln. -
Bisque fire:
Fire the mask to cone 04 (or your clay’s specific bisque temperature). -
Clear glaze (optional):
If you want a glossy finish, apply a clear glaze now. However, leaving it matte preserves the rustic, earthy texture shown in the reference. -
Final fire:
Fire the piece again to the final maturity temperature of your clay body.
Hang your finished mask near a window where the natural light can highlight the carved textures
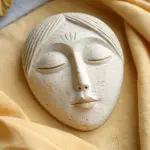
Soft “Melted” Surreal Face Mask
This project leans into the natural texture of air-dry clay to create a face that feels dreamlike and softly dissolving. With its muted white tones and organic, unfinished surface, this mask captures a surreal aesthetic perfect for wall art or a sculptural centerpiece.
How-To Guide
Materials
- Plastic face form or mannequin head (for base)
- White air-dry clay (stone or paper-based)
- Plastic wrap or cling film
- Rolling pin
- Bowl of water
- Sculpting tools (needle tool, wooden modeling tool)
- Small piece of textured fabric (optional for imprinting)
- Fine-grit sandpaper (optional)
- Matte sealant spray
Step 1: Preparing the Base
-
Prepare your form:
Start by protecting your plastic face form. Cover the entire surface with a layer of plastic wrap, smoothing out as many wrinkles as possible. This barrier is crucial so your clay doesn’t stick to the mold permanently. -
Roll the clay slab:
Take a large chunk of white air-dry clay and knead it until it’s pliable. Roll it out into a uniform slab, roughly 1/4 inch thick. You want it substantial enough to hold its shape but not so heavy that it slides off the mold. -
Drape the clay:
Carefully lift your clay slab and drape it over the mask form. Gently press the clay down, starting from the center of the nose and working outward towards the cheeks and forehead to avoid trapping air bubbles.
Cracking Issues?
If you see hairline cracks while drying, mix a small amount of clay with water to make a paste (slip). Rub this into the cracks with your finger to fill and bond them.
Step 2: Sculpting Features
-
Define the nose:
Using your stronger thumbs, press the clay firmly around the nose area of the underlying form. You want the nose to be prominent. If the clay stretches too thin here, add a small extra patch of clay and smooth the seams with water. -
Open the eyes:
Locate the eye sockets on your form. Instead of cutting crisp, almond shapes, use a wooden tool or your fingers to push the clay inward, following the socket’s curve. Once indented, carefully cut out the eye holes, keeping the edges slightly ragged and soft. -
Build the eyebrows:
Roll two small snakes of clay for the eyebrows. Blend them onto the forehead above the eye sockets. Don’t smooth them perfectly flat; pinch them slightly to create a raised, textured ridge that catches the light. -
Form the lips:
This is a focal point. Roll a thicker oval of clay and attach it where the mouth sits. Use a modeling tool to slice horizontally through the middle, then gently pry the lips apart slightly. I like to press a textured cloth or coarse sponge against the lips specifically to give them that distinct, pitted look seen in the reference.
Level Up: Antique Look
After drying, rub a diluted wash of burnt umber acrylic paint over the texture. Quickly wipe it away with a damp cloth, leaving pigment only in the crevices for an aged effect.
Step 3: Texturing and Refining
-
Add surface texture:
The charm of this mask is its imperfection. Ditch the smoothing sponge for now. Instead, use a palette knife or the side of a tool to “butter” the clay surface, creating small drag marks and uneven peaks across the cheeks and forehead. -
Soften the edges:
Along the jawline and top of the head, don’t trim the clay into a perfect oval. Allow the edges to remain slightly irregular and chunky, reinforcing the idea that the face is emerging from raw material. -
Refine the nostrils:
Use a rounded tool handle to press deep, dark holes for the nostrils. This creates crucial shadow depth that makes the face look dimensional. -
Subtle discoloration (Optional):
To mimic the image’s specific lip color, you can mix a tiny drop of brown watercolor or muddy water into the lip area while still wet, or simply let the natural clay discolor slightly if you are using a natural earth clay blend.
Step 4: Drying and Finishing
-
Initial drying:
Let the mask sit on the form for at least 24 hours. Drying it on the form ensures it retains the facial curvature and doesn’t flatten out. -
Remove from mold:
Once the outer surface feels leathery and firm, carefully peel the clay and plastic wrap off the mold. Peel the plastic wrap away from the inside of the clay mask. -
Backside drying:
Place the mask face-up on a soft surface (like a folded towel) to allow the inside to dry completely. This may take another 24-48 hours depending on humidity. -
Final touches:
Inspect the mask. If there are any sharp spikes of clay that distract from the ‘soft’ look, gently sand them down. Otherwise, leave the rough texture alone. -
Seal the work:
Finish with a light coat of matte spray sealant. This protects the raw clay from humidity without adding an artificial glossy sheen.
Display your surreal creation among dried florals or on a linen backdrop to complete the organic aesthetic
Patchwork Tile Mosaic Mask
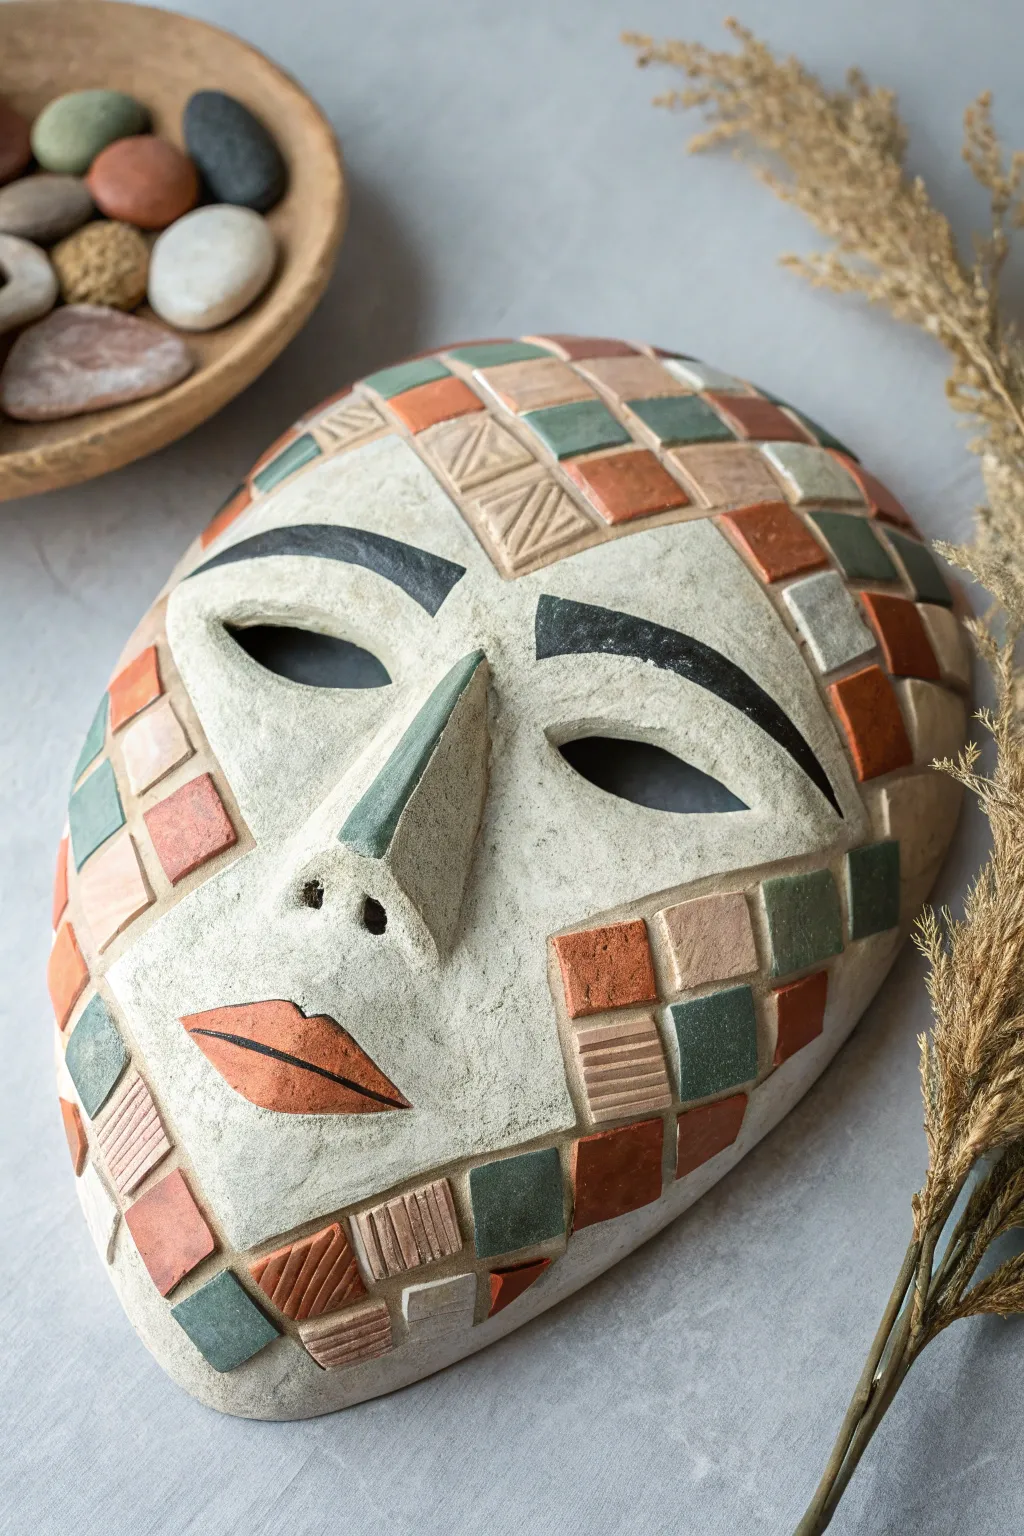
This striking decorative mask combines the ancient feel of stone with a playful, modern mosaic border. By incising grid lines and painting faux tiles, you achieve the look of complex ceramic work without needing to cut or glue individual tesserae.
Step-by-Step
Materials
- Air-dry stone clay or white ceramic clay
- Rolling pin
- Plastic face mold or DIY foil armature
- Clay sculpting tools (needle tool, modeling tool)
- Acrylic paints (terracotta, sage green, beige, black, dark brown)
- Fine grit sandpaper
- Clear matte varnish
- Small flat brush and detail brush
- Sponge or textured fabric for imprinting
Step 1: Sculpting the Base
-
Roll out the slab:
Begin by rolling out your clay on a flat surface to a uniform thickness of about 1/4 inch. If you are using stoneware clay, ensure no air bubbles are trapped. -
Form the shape:
Drape the clay slab over your face mold or armature. Gently press it down to conform to the curves of the forehead, cheeks, and chin. Trim the excess clay around the edges to create a smooth oval shape. -
Sculpt the features:
Build up the nose by adding a wedge of clay and blending the seams completely until smooth. Carve out almond-shaped openings for the eyes, smoothing the inner edges with a damp finger. -
Refine the surface:
Use a sponge or a piece of rough fabric to gently pat the ‘skin’ area of the mask. This adds a stone-like texture that contrasts beautifully with the smooth areas later. -
Create the nose ridge:
Sharpen the nose bridge. I like to keep the angles geometric and distinct rather than perfectly rounded to match the mosaic style.
Step 2: Creating the Mosaic Effect
-
Mark the face boundary:
Use a needle tool to lightly scribe a line separating the central face area from the outer border. Keep this line organic but generally following the oval contour. -
Grid the border:
On the outer border area, incise a grid of small squares. Press firmly enough to create deep grooves that will simulate grout lines. -
Add detail to select tiles:
Choose a few random squares in your grid and press a textured tool or stamp into them to create striped or diagonal lined patterns. This variation adds depth to the faux mosaic. -
Define the mouth:
Sculpt or carve the lips in the lower center of the face. Keep them simple and stylized. -
Dry the piece:
Allow the clay to dry completely according to package instructions. Air-dry clay may take 24-48 hours. Sand any rough edges lightly once dry.
Make Fake Grout
After painting the tiles, run a diluted grey or cream paint wash into the incised grooves. This mimics real grout and makes the ’tiles’ pop visually.
Step 3: Painting and Finishing
-
Base coat the skin:
Paint the central face area with a wash of off-white or light beige paint. You want it to look like limestone, so don’t make it too opaque. -
Paint the tiles:
Using a small flat brush, paint the individual squares in the border. Alternate between terracotta, sage green, and beige. Leave the grooves unpainted or paint them a neutral grout color later. -
Highlight the eyebrows:
Paint stylized, arching eyebrows in black. Make the arches sharp and geometric to echo the tile shapes. -
Detail the nose:
Paint a vertical stripe of sage green down the side of the nose bridge to emphasize its geometric form. -
Color the lips:
Fill in the lip area with a terracotta shade, outlining it thinly in black for definition. -
Antique the tiles:
If the tile colors look too bright, wipe a very diluted brown wash over them and immediately wipe it off with a rag. This settles into textures and ages the look. -
Seal the work:
Protect your mask with a coat of clear matte varnish to seal the paint and clay.
Real Texture Variation
Before drying, press real fabric like burlap or lace into just the beige clay squares. The paint will catch on the texture later for an intricate finish.
Hang your finished mask as a unique wall feature or display it in a bowl for a rustic, artisan touch.
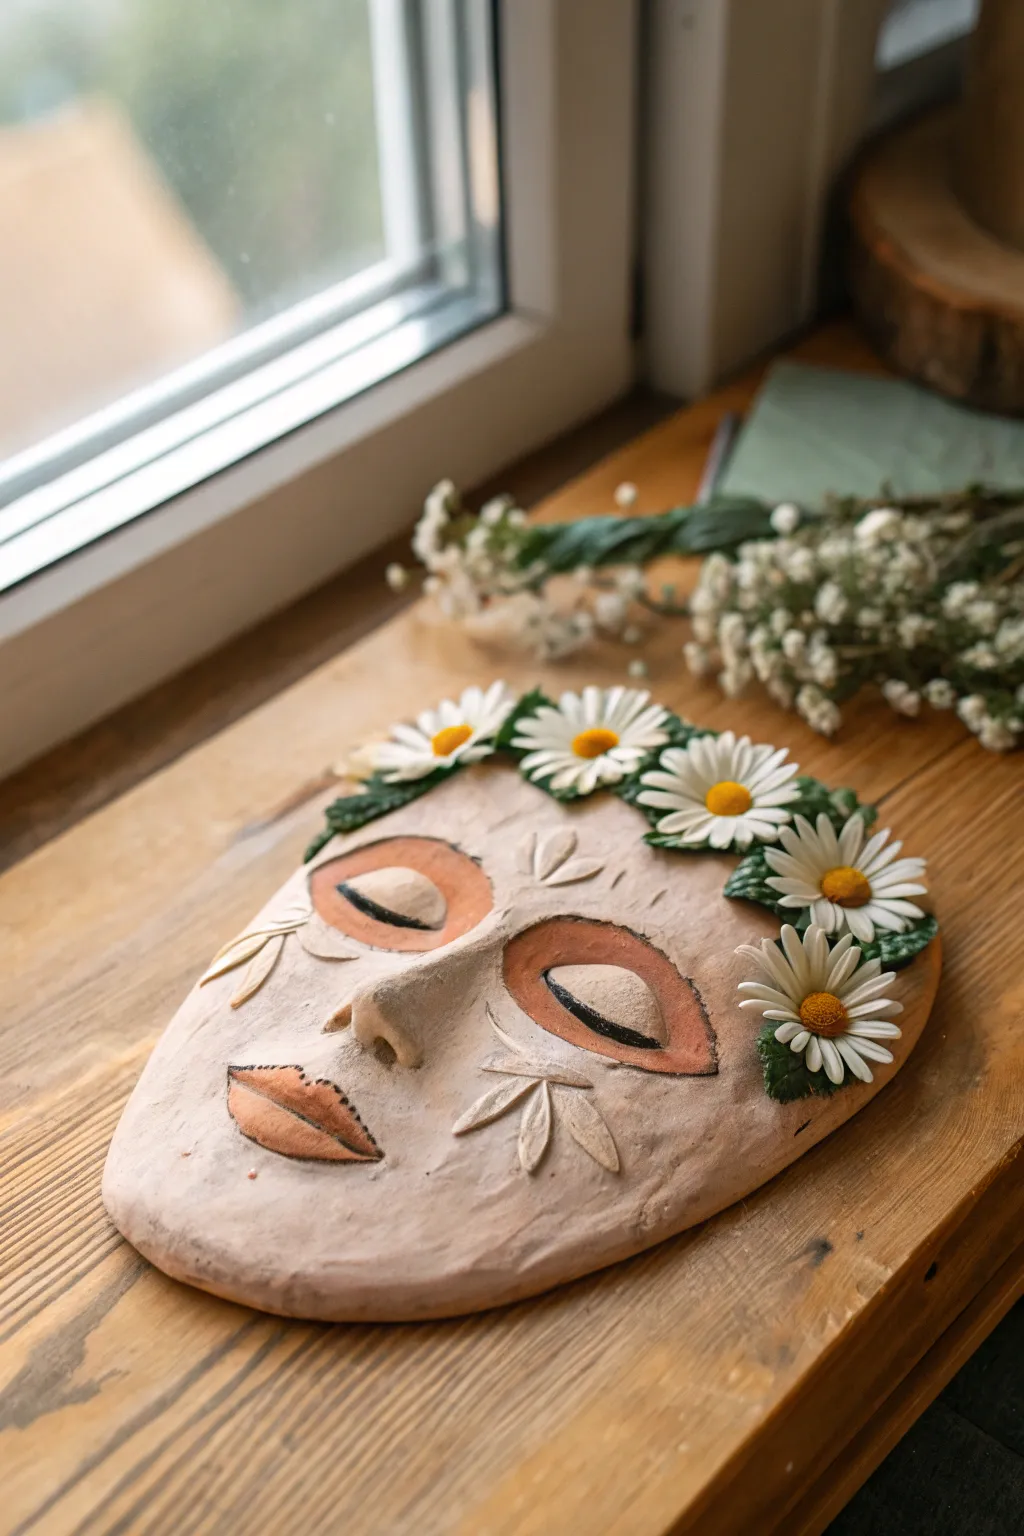
Flower Crown Garden Mask
Capture the serenity of nature with this charming clay mask project featuring a crown of daisies and gentle, sleeping features. The combination of sculpted relief details and soft painted accents gives it a lovely, handmade folk-art aesthetic ideal for a garden-themed display.
Step-by-Step Guide
Materials
- Air-dry clay (white or terra cotta based)
- Rolling pin or smooth bottle
- Clay sculpting tools (needle tool, loop tool, smoothing tool)
- Bowl or curved form (for shaping)
- Acrylic paints (terracotta orange, white, yellow, dark green)
- Fine detail paintbrushes
- Small cup of water
- Plastic wrap
- Sandpaper (fine grit)
Step 1: Sculpting the Base
-
Roll the slab:
Begin by easy-kneading your air-dry clay to soften it, then roll it out into an even oval slab about 1/4 to 1/2 inch thick. This will form the main face shape. -
Create the curvature:
Place a piece of plastic wrap over an inverted bowl or a curved mold. Describe the clay slab over this form to give the mask a convex, face-like curve while you work. Smooth out any finger marks gently. -
Add the nose:
Form a small pyramid or cone shape of clay. Score the back of it and the center of the mask face, add a dab of water (slip), and press the nose firmly into place. Blend the edges seamlessly into the cheeks using a smoothing tool or your finger. -
Sculpt the nostrils:
Using a rounded tool or the back of a paintbrush, press two indentations into the bottom of the nose to create nostrils.
Smooth Seams
Use a tiny bit of vinegar on your finger instead of water when smoothing clay joints. It breaks down the clay surface slightly, creating a stronger bond and seamless blend.
Step 2: Adding Facial Details
-
Carve the eyelids:
Use a needle tool or a small knife to lightly sketch large, almond-shaped eyes. Instead of carving them out, you will be defining the eyelids. Carefully incise the arched line for the closed eyelid crease. -
Define the lashes:
Using a darker tool or a bit of diluted dark clay slip, paint or carve a thick, dark line along the bottom visual edge of the closed eyelid to simulate the lash line. -
Create the lips:
Roll a very small coil of clay for the mouth. Score and attach it below the nose. Press a horizontal line through the center to separate the upper and lower lip, shaping them into a soft pout. -
Add cheek embellishments:
On the cheeks, add relief details rather than paint. Roll tiny, thin coils to create leaf or stylized scratch marks similar to the reference photo. Attach these firmly with slip so they look like raised scarification or tattoos. -
Smooth everything:
Before moving to the flowers, take a slightly damp sponge or finger and smooth all the skin texture of the mask to remove fingerprints.
Step 3: Creating the Flower Crown
-
Make the leaves:
Flatten small balls of clay into teardrop shapes. Use a knife tool to press a central vein and small notches on the edges to resemble jagged leaves. Attach a row of these along the top forehead edge of the mask. -
Form the petals:
For the daisies, create several small, white teardrops of clay. Arrange them in circles on top of the leaves, pressing the pointed ends toward a center point. -
Add flower centers:
Roll small balls of clay for the flower centers. Press them into the middle of your petal arrangements. Use a needle tool or stiff brush to stipple the texture of pollen into these centers. -
Dry the mask:
Let the mask dry completely on the form. This usually takes 24-48 hours depending on humidity. I like to rotate it occasionally to ensure even airflow.
Vintage Patina
After painting, apply a diluted brown wash over the whole mask and wipe it away quickly with a rag. The dark color will settle into the carved grooves for an antique look.
Step 4: Painting and Finishing
-
Sand edges:
Once bone dry, gently sand the outer rim of the mask to ensure it is smooth and pleasant to handle. -
Paint the skin features:
Use a terracotta or warm orange acrylic paint to fill in the eyelid ovals and the lips. Keep the edges crisp. You can add a very contrasting dark line for the closed eye slit if your carving wasn’t deep enough. -
Paint the flowers:
Paint the petals a bright, clean white. Paint the centers a sunny yellow, and carefully paint the visible leaves a deep forest green to frame the crown. -
Seal:
Protect your work with a matte or satin varnish spray to keep the natural clay look while preventing moisture damage.
Hang your flowery creation near a window to let the natural light highlight the gentle contours
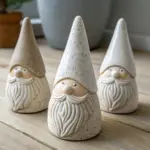
Mini Mask Charms And Ornaments
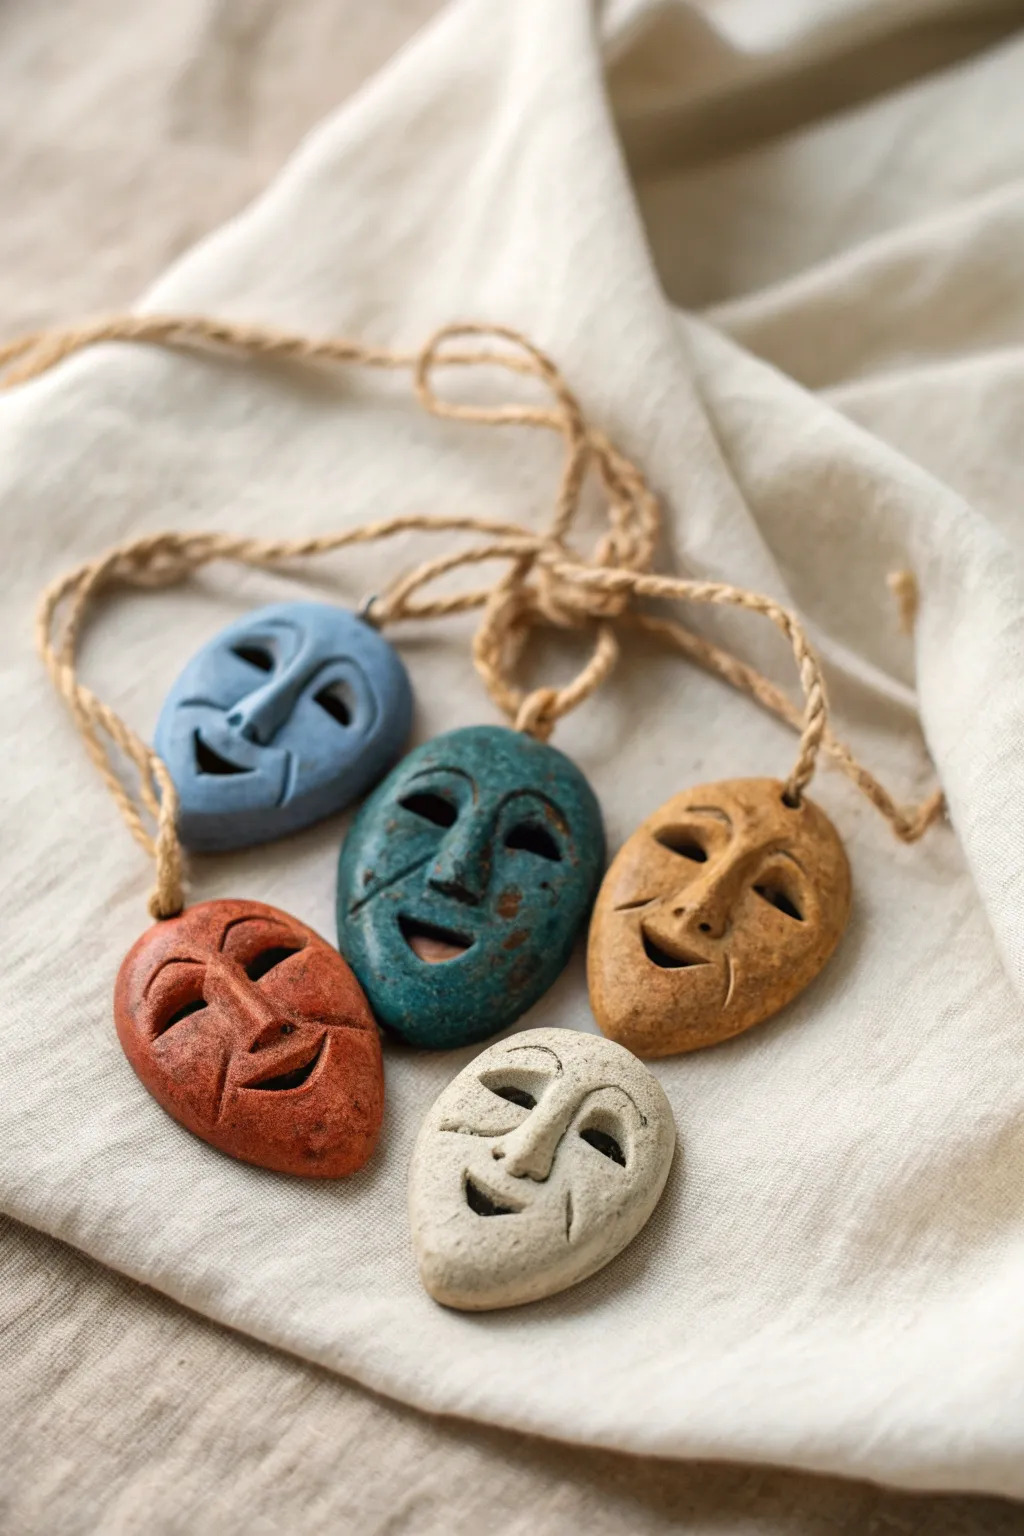
These charming, stony-faced pendants have a wonderful primitive theater aesthetic that adds character to any ornament collection. Crafted from simple clay and strung on jute, their carved expressions feel timeless and uniquely expressive.
Step-by-Step
Materials
- Air-dry clay (stone, granite, or terracotta effect preferred)
- Hemp or jute twine
- Small sculpting tools (needle tool, small loop tool)
- Acrylic paints (muted tones: rust red, slate blue, teal, ochre, off-white)
- Matte varnish or sealant
- Sponge or paper towel
- Small round paintbrush
- Water cup
- Toothpick or small dowel
Step 1: Sculpting the Faces
-
Portion the clay:
Start by pinching off five golf-ball-sized amounts of clay. Roll each piece into a smooth ball between your palms to remove cracks. -
Form the base shape:
Gently flatten each ball into an oval or egg shape, about 1/4 to 1/2 inch thick. Keep the edges slightly rounded rather than sharp. -
Create the nose bridge:
Pinch the center of the oval vertically to raise a ridge for the nose. I like to smooth the clay downward from the forehead to make this transition seamless. -
Define the nose:
Use a modeling tool or your fingers to shape the nose more distinctly, creating a triangular base and refining the bridge. -
Carve the eye sockets:
Press your thumbs or a ball-stylus tool deep into the clay on either side of the nose bridge to create shadowed sockets. -
Cut the eye openings:
Using a small knife or loop tool, carve out almond or half-moon shapes within the sockets. You don’t need to cut all the way through; deep impressions work well for this style. -
Shape the mouths:
Carve the mouths. For variety, make some smiling, some straight, and some slightly open. A simple crescent cut creates a classic theatrical look. -
Add character lines:
Use a needle tool to gently etch faint expression lines around the mouth and eyes, giving the faces an aged, weathered appearance. -
Pierce the hanging hole:
Insert a toothpick or small dowel horizontally through the top or vertical ridge of the mask forehead to create a channel for the string. Ensure the hole is wide enough for your twine. -
Dry completely:
Set the masks aside to dry fully according to your clay manufacturer’s instructions, usually 24-48 hours.
Quick Fix: Cracks
If tiny cracks appear while drying, don’t panic. Mix a tiny bit of fresh clay with water to make a paste (slip) and smooth it into the cracks with your finger.
Step 2: Painting and Finishing
-
Apply base colors:
Paint each mask a solid color using the muted acrylics. Use one color per mask: rust red, slate blue, teal, ochre, and off-white. -
Create the weathered effect:
Once the base coat is dry, mix a small amount of dark brown or black paint with water to create a thin wash. -
Apply the wash:
Brush the dark wash over the entire face, ensuring it settles into the deep carvings of the eyes, mouth, and nose. -
Wipe back:
Immediately wipe the high points of the face with a damp sponge or paper towel. This leaves the dark pigment in the crevices, highlighting the features. -
Dry brush highlights:
Dip a dry brush into a lighter shade of your base color (or white) and very lightly dust the nose, brow, and cheekbones to emphasize the texture. -
Seal:
Apply a coat of matte varnish to protect the paint without making the faces look glossy or plastic. -
String the masks:
Cut lengths of jute twine. Thread a piece through the hole in each mask. -
Knot and loop:
Bring the ends of the twine together and tie a sturdy knot about an inch above the mask. Tie another knot at the very end of the strings to create a large loop for hanging. -
Connect (optional):
If creating a garland, tie the individual mask loops onto a long main strand of thick jute rope.
Level Up: Texture
Before drying, gently press a piece of coarse sandpaper or a rough stone against the clay surface to give it a realistic, pitted stone texture.
This simple project results in a set of evocative faces that bring a touch of ancient drama to your decor