
There’s just something about a tiny baby handprint that hits you right in the heart, especially once you turn it into a gift someone can keep forever. Here are my go-to baby handprint gift ideas—from classic clay keepsakes to a few fun, unexpected twists that still feel totally doable at the kitchen table.
Simple Framed Handprint Plaque
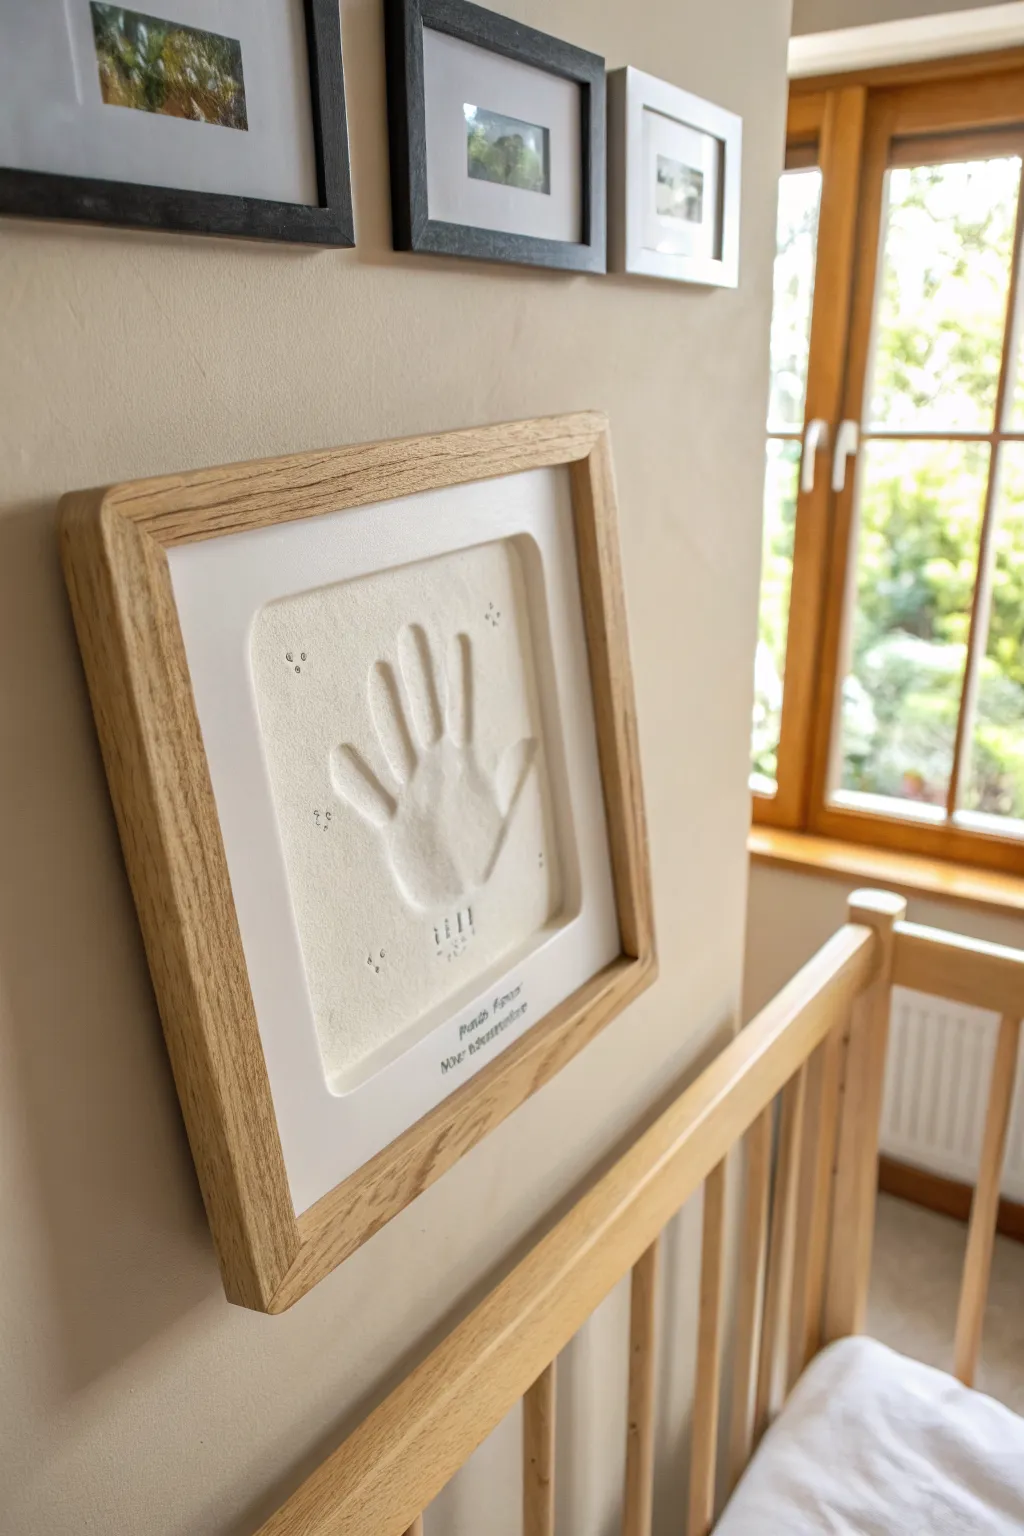
This elegant keepsake captures every tiny crease and curve of a little hand in a sophisticated, raised-relief style plaque. The soft white finish and deep shadow box frame create a gallery-worthy display that preserves a fleeting moment in time beautifully.
Step-by-Step Guide
Materials
- Air-dry clay (white) or polymer clay
- Rolling pin
- Parchment paper
- Square cookie cutter (or knife and ruler)
- Deep shadow box frame (oak or light wood finish)
- Fine-grit sandpaper
- Small letter stamp set
- Matte white acrylic paint (optional)
- Small star or icon stamps
- Strong craft adhesive or mounting tape
- Ruler
Step 1: Preparing the Clay Base
-
Clean surface:
Begin by setting up a clean, flat workspace covered with a sheet of parchment paper to prevent sticking. Ensure your hands (and baby’s!) are clean and dry. -
Condition the clay:
Take a generous handful of air-dry clay and knead it thoroughly until it is soft, pliable, and free of cracks. This conditioning step is crucial for a smooth impression. -
Roll it out:
Use a rolling pin to flatten the clay into an even slab. Aim for a thickness of about 1/2 to 3/4 of an inch—you need enough depth to press the hand in without piercing through the back. -
Smooth the surface:
Dampen your finger slightly with water and gently glide it over the clay surface to erase any rolling pin marks or tiny imperfections. -
Shape the square:
Place your square cutter or use a ruler and knife to cut the clay into a clean square shape. Round the corners slightly with your fingertip to mimic the soft edges seen in the example.
Smooth Moves
Apply a tiny bit of baby lotion to the child’s hand before pressing. This acts as a release agent and prevents the clay from sticking to their skin.
Step 2: Creating the Impression
-
Positioning:
With the clay ready, verify that your child is calm. It helps to have a helper hold the baby while you guide their hand. -
Pressing the hand:
Center the child’s hand over the clay square. Gently but firmly press the palm down first, then press each individual finger and the thumb to ensure a deep, clear impression. -
Lift carefully:
lift the hand straight up and away from the clay to avoid dragging or distorting the print you just made. -
Check the details:
Inspect the print immediately. If the impression is too shallow or the hand wiggled, you can knead the clay and start over while it’s still fresh. -
Add decorative stamping:
Using tiny icon stamps (like stars or dots), press a few decorative elements into the negative space around the fingers for a whimsical touch. -
Personalize it:
Use your small letter stamps to impress the child’s name and the date along the bottom edge or just below the palm.
Make it Shine
For a glossy, high-end look, seal the dried clay with a spray-on gloss varnish or apply a layer of pearlescent white paint to catch the light.
Step 3: Finishing and Framing
-
Drying time:
Allow the clay plaque to dry completely. For air-dry clay, this usually takes 24-48 hours. I like to flip it gently halfway through to ensure the back dries evenly. -
Sanding edges:
Once bone dry, use fine-grit sandpaper to gently smooth the outer edges of the square or any rough spots on the surface. -
Painting (Optional):
If the natural clay color isn’t quite white enough, apply two thin coats of matte white acrylic paint for a pristine, ceramic-like finish. -
Preparing the frame:
Disassemble your shadow box frame. Clean the glass thoroughly on both sides to remove dust and fingerprints. -
Mounting the plaque:
Apply strong craft adhesive or heavy-duty mounting tape to the back of your dried clay square. -
Centering:
Press the clay square firmly into the center of the frame’s backing board. Use a ruler to ensure the margins are equal on all sides. -
Final assembly:
Reassemble the frame, placing the backing board with the mounted print behind the glass and spacer, securing the clips at the back.
Now you have a stunning, minimalistic piece of art that freezes time in the most beautiful way

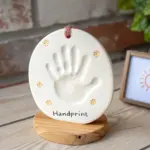

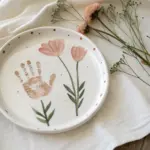
Classic Hanging Handprint Ornament
Capture the fleeting memory of those tiny fingers with this minimalist, elegant hanging ornament. Its pure white finish and simple stamped date give it a boutique look that serves as a beautiful keepsake for years to come.
Step-by-Step
Materials
- High-quality air-dry clay (white) or salt dough ingredients (flour, salt, water)
- Small rolling pin
- Circular cookie cutter (approx. 4-5 inches)
- Parchment paper
- Drinking straw or chopstick (for hole punching)
- Small metal letter/number stamp set
- Fine-grit sandpaper (optional)
- Natural jute twine
- Matte spray sealer or white acrylic paint (optional)
Step 1: Preparing the Base
-
Prepare your surface:
Lay down a sheet of parchment paper on a flat, stable surface. This prevents the clay from sticking and makes it easier to move the ornament later without distorting the shape. -
Condition the clay:
Take a handful of air-dry clay or your prepared salt dough and knead it in your hands until it feels pliable and warm. If using store-bought clay, ensure there are no cracks. -
Roll it out:
Place the ball of clay on the parchment and use your small rolling pin to flatten it. Aim for a thickness of about 1/4 to 1/2 inch—thick enough to take a deep impression but not so heavy it won’t dry well. -
Smooth the surface:
Gently run your fingers or the back of a spoon over the surface to remove any texture left by the rolling pin. You want a pristine canvas for the print.
Sticky Situation?
If the clay is sticking to the baby’s skin, lightly dust their hand with a tiny bit of cornstarch or flour before pressing it. This acts as a release agent for a cleaner print.
Step 2: Creating the Impression
-
Cut the circle:
Press your large circular cookie cutter firmly into the clay. Give it a tiny wiggle to ensure a clean cut, then carefully peel away the excess clay from the outside. -
Position the hand:
Gently guide your baby’s hand over the center of the circle. I find it helps to practice this motion on a scrap piece first just to get them comfortable. -
Press firmly:
Press the palm down first, then gently press each finger individually into the clay to ensure a deep, clear impression. Lift the hand straight up quickly to avoid dragging the edges. -
Refine the edges:
If the pressure of the hand distorted the outer circle slightly, gently reshape the rim with your fingers to make it perfectly round again. -
Create the hanging hole:
Use a drinking straw or a chopstick to punch a hole near the top edge. Twist the straw as you pull it out for a clean opening.
Step 3: Finishing Touches
-
Add the date:
Using your small metal stamps, gently press the date (the year and month works beautifully) into the bottom curve of the ornament. Don’t press as hard as the handprint; a subtle indentation is elegant. -
Initial dry time:
Let the ornament sit undisturbed in a dry, room-temperature area for 24 hours. Flip it over carefully to let the back breathe. -
Complete drying:
Allow it to dry for another 24-48 hours until the clay is completely hard and turns a solid, chalky white. -
Sand imperfections:
Once fully dry, take a piece of fine-grit sandpaper and very gently buff the edges of the circle to remove any sharpness or burrs. -
Optional sealing:
For a smoother finish like the one in the photo, you can apply a light coat of matte sealer or very thin white acrylic paint, though raw white clay has a lovely natural look on its own. -
Add the twine:
Cut a length of natural jute twine, about 8 inches long. Thread it through the hole you created earlier. -
Secure the loop:
Tie a secure knot at the base of the loop, right against the distinct top of the ornament, or tie the ends together at the top for a different hanging style.
Pro Tip: Depth Control
To ensure even thickness when rolling, place two wooden rulers on either side of your dough as guiderails for your rolling pin. This creates a perfectly flat, uniform surface.
Now you have a simple, monochromatic keepsake that preserves a precious moment in time


Tiny Handprint Trinket Dish

Immortalize those tiny fingers with this charmingly rustic trinket dish, perfect for holding jewelry or keys. The soft terra cotta tone and subtle speckled texture give it a modern, artisanal feel that looks beautiful on any bedside table.
Detailed Instructions
Materials
- Air-dry clay (terra cotta color) or polymer clay
- Rolling pin
- Baking paper or canvas work mat
- Small bowl (approx. 5-6 inches diameter) or circular cookie cutter
- Plastic wrap
- Fine-grit sandpaper
- White acrylic paint
- Old toothbrush or stiff bristle brush
- Matte sealant or varnish
- Bowl of water
- Sponge
Step 1: Shaping the Base
-
Prepare the workspace:
Lay down your baking paper or canvas mat to prevent the clay from sticking to your table. If using air-dry clay, wipe down your rolling pin with a slightly damp cloth. -
Condition the clay:
Take a handful of terra cotta-colored clay and knead it thoroughly in your hands until it is warm, pliable, and free of air bubbles. -
Roll it out:
Place the clay ball in the center of your mat and roll it out evenly. Aim for a thickness of about 1/4 inch—not too thin, or it might crack, but not too chunky. -
Cut the circle:
Place your small bowl or circular cutter onto the clay. Press down firmly to cut a perfect circle, then peel away the excess clay from the edges. Smooth the cut edge gently with a wet fingertip.
Clean Lines
To get super smooth edges without sanding later, run a wet finger or a damp sponge around the rim immediately after cutting the circle, before you press the handprint.
Step 2: Creating the Impression & Form
-
Position the hand:
Gently guide your little one’s hand onto the center of the clay circle. Make sure their fingers are spread slightly apart for a clear silhouette. -
Press evenly:
Press down firmly on the palm and each individual finger. I find it helpful to press my own fingers over theirs to ensure a deep, even impression without wiggling their hand. -
Lift carefully:
Slowly lift the hand straight up to avoid smudging the edges of the print. If the print isn’t clear, simply ball up the clay and roll it out again. -
Create the curve:
Lift your clay circle and gently place it inside a slightly larger soup bowl lined with plastic wrap. The plastic wrap prevents sticking, while the bowl acts as a mold to curve the edges of your clay upward as it dries. -
Smooth the interior:
While it’s in the bowl, use a slightly damp sponge to smooth out any unintentional fingerprints or rough spots on the surface, being careful not to erase the handprint.
Cracking Issues?
If you notice tiny cracks appearing as the clay dries, smooth a small amount of clay slip (clay mixed with water into a paste) into the cracks with your finger, then let it dry again.
Step 3: Finishing Touches
-
Dry completely:
Allow the clay to dry according to the package instructions. For air-dry clay, this usually takes 24-48 hours. Rotate the piece occasionally to ensure even drying. -
Sand the edges:
Once fully cured and hard, remove the dish from the mold. Use fine-grit sandpaper to gently smooth the rim and any sharp edges. -
Prepare the splatter:
Dilute a small amount of white acrylic paint with water until it has a milky consistency. -
Apply the texture:
Dip an old toothbrush into the watered-down paint. Hold it near the outer rim of the dish and run your thumb across the bristles to flick tiny white speckles onto the exterior sides. Keep the inside relatively clean for contrast. -
Clean any overspray:
If any large drops land inside the handprint where you don’t want them, quickly wipe them away with a damp cotton swab. -
Seal the piece:
Apply a coat of matte sealant or varnish over the entire dish to protect the clay from moisture and give it a finished look.
Now you have a timeless keepsake that captures a fleeting moment in your child’s life


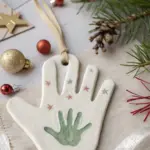
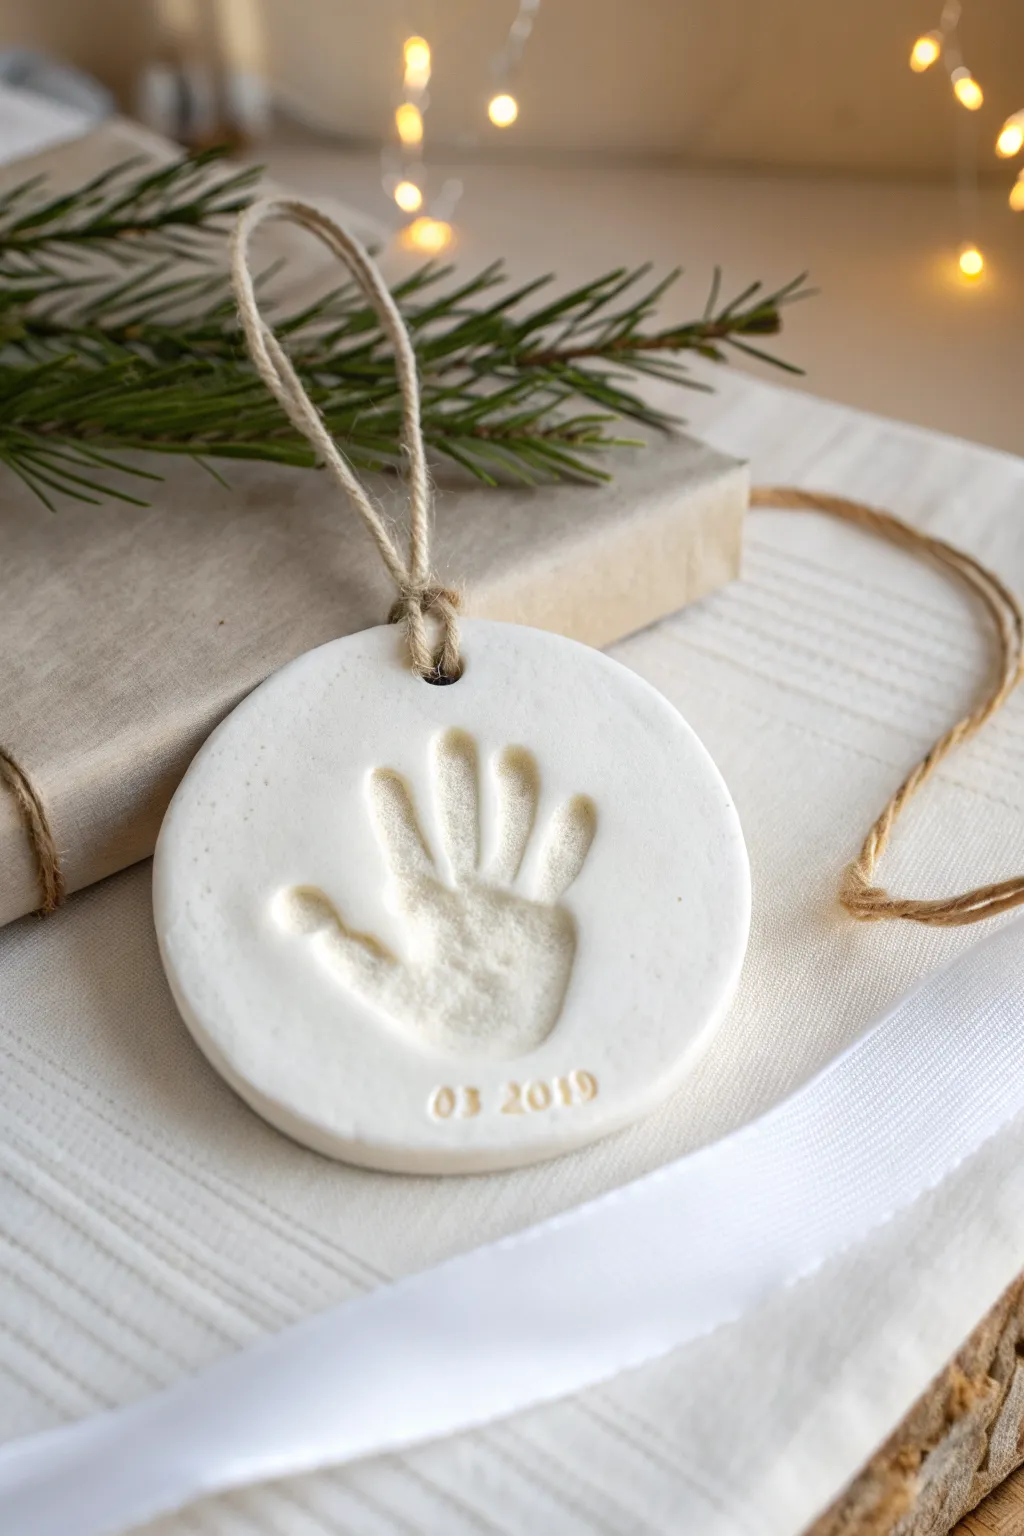
Holiday Handprint Ornament Keepsake
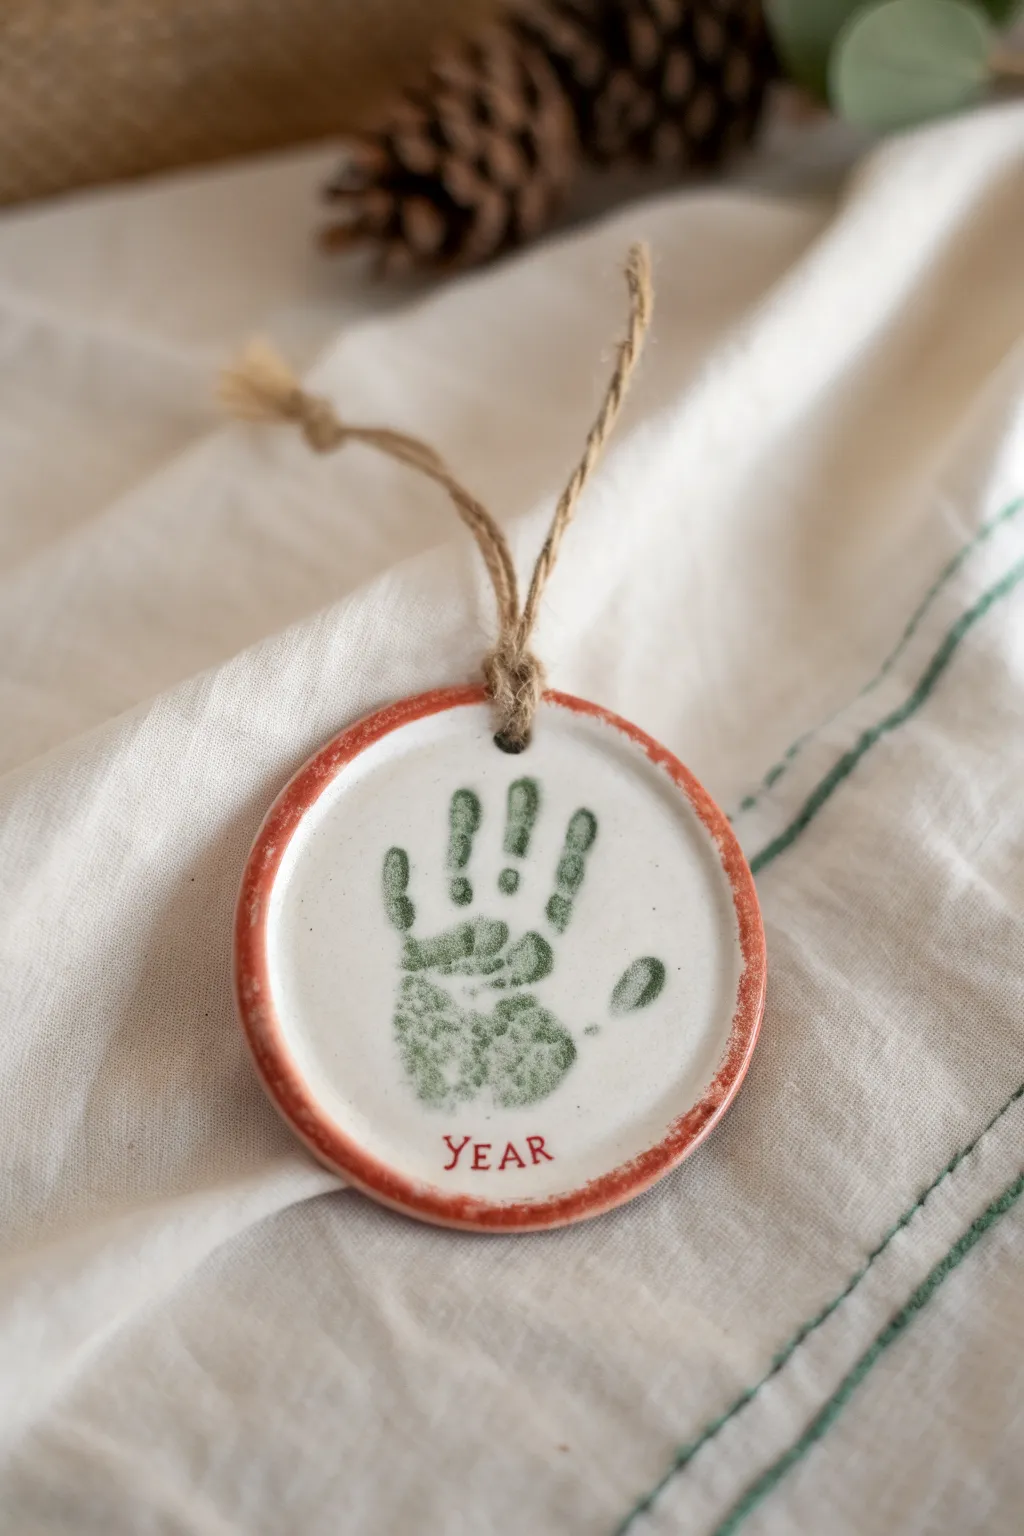
Preserve those tiny fingers forever with this timeless ceramic-style keepsake featuring a rustic red rim and a soft green print. The earthy color palette and raw twine hanger give it a classic, handmade feel that looks beautiful on any holiday tree.
How-To Guide
Materials
- White polymer clay or air-dry clay
- Rolling pin
- Round cookie cutter (approx. 4 inches)
- Green acrylic paint
- Red acrylic paint
- Small foam brush or sponge
- Fine detail paintbrush
- Small alphabet stamps
- Straw or skewer (for hole)
- Jute twine
- Sandpaper (fine grit)
- Clear matte sealant spray (optional)
Step 1: Shaping the Clay Base
-
Prepare the clay:
Begin by working your white clay in your hands until it is soft, pliable, and free of cracks. If you are using polymer clay, the warmth of your hands is essential for conditioning. -
Roll it out:
Use a rolling pin to flatten the clay on a clean, smooth surface. Aim for a consistent thickness of about 1/4 inch so the ornament feels substantial but isn’t too heavy. -
Cut the circle:
Press your round cookie cutter firmly into the clay to create a perfect circle. Peel away the excess clay from the edges before lifting the cutter. -
Smooth the edges:
Dip your finger in a tiny bit of water and run it gently around the rim of the clay circle to soften any sharp edges left by the cutter. -
Create the hanging hole:
Use a straw or a skewer to poke a hole near the top edge of the circle. Make sure the hole is wide enough for your jute twine to pass through later.
Smudged Print Rescue
If the hand slides, don’t panic! If the paint is wet, wipe it off gently with a baby wipe. If the clay got dented, ball it up, re-roll it, and start fresh. Clay is forgiving.
Step 2: Capturing the Print
-
Apply the paint:
Squeeze a small amount of green acrylic paint onto a palette. Using a foam brush or sponge, lightly dab the paint onto the baby’s palm and fingers. You want a thin, even coat rather than a thick globs to capture the skin texture. -
Press the hand:
Gently guide the baby’s hand onto the center of the clay circle. Press down firmly on the palm and each individual finger to ensure a good impression. -
Lift carefully:
Lift the hand straight up and off the clay to avoid smudging the print. Wipe the baby’s hand clean immediately. -
Dry the paint:
Allow the green paint to dry completely on the wet clay before moving to the stamping step to prevent smearing.
Pro Tip: Deep Impressions
For a deeper texture in the print, press the clean hand into the clay first to make an indentation, then carefully paint inside that impression afterward.
Step 3: Stamping and Baking
-
Prepare stamps:
Arrange your alphabet stamps to spell out the current year. I find it helpful to test the spacing on a scrap piece of paper first. -
Stamp the date:
Lightly brush or dip the letter stamps into red acrylic paint. Carefully press them into the clay below the handprint. You want to impress the clay slightly while transferring the color. -
Bake or cure:
If using polymer clay, bake the ornament according to the package instructions (usually around 275°F for 15-30 minutes). If using air-dry clay, let it sit in a dry spot for 24-48 hours until fully hardened. -
Sand imperfections:
Once the ornament is fully cured and cooled, use fine-grit sandpaper to gently smooth any rough spots on the edges or back.
Step 4: Finishing Touches
-
Paint the rim:
Dip a fine detail brush or the edge of a small sponge into the red paint. carefully run it along the outer rim of the ornament to create a rustic border. -
Feather the edge:
For that vintage look seen in the photo, allow the brush to be slightly ‘dry’ so the red paint looks inconsistent and textured rather than like a solid, perfect line. -
Seal the piece:
Protect the handprint and clay by spraying the entire ornament with a light coat of clear matte sealant. Let this dry completely. -
Add the hanger:
Cut a 6-inch length of jute twine. Thread it through the hole at the top of the ornament. -
Secure the loop:
Bring the two ends of the twine together and tie a simple overhand knot roughly two inches above the ornament rim to complete the hanger.
Now you have a captured moment in time ready to be hung on the tree year after year

The Complete Guide to Pottery Troubleshooting
Uncover the most common ceramic mistakes—from cracking clay to failed glazes—and learn how to fix them fast.
Floral Bouquet Handprint Canvas Look
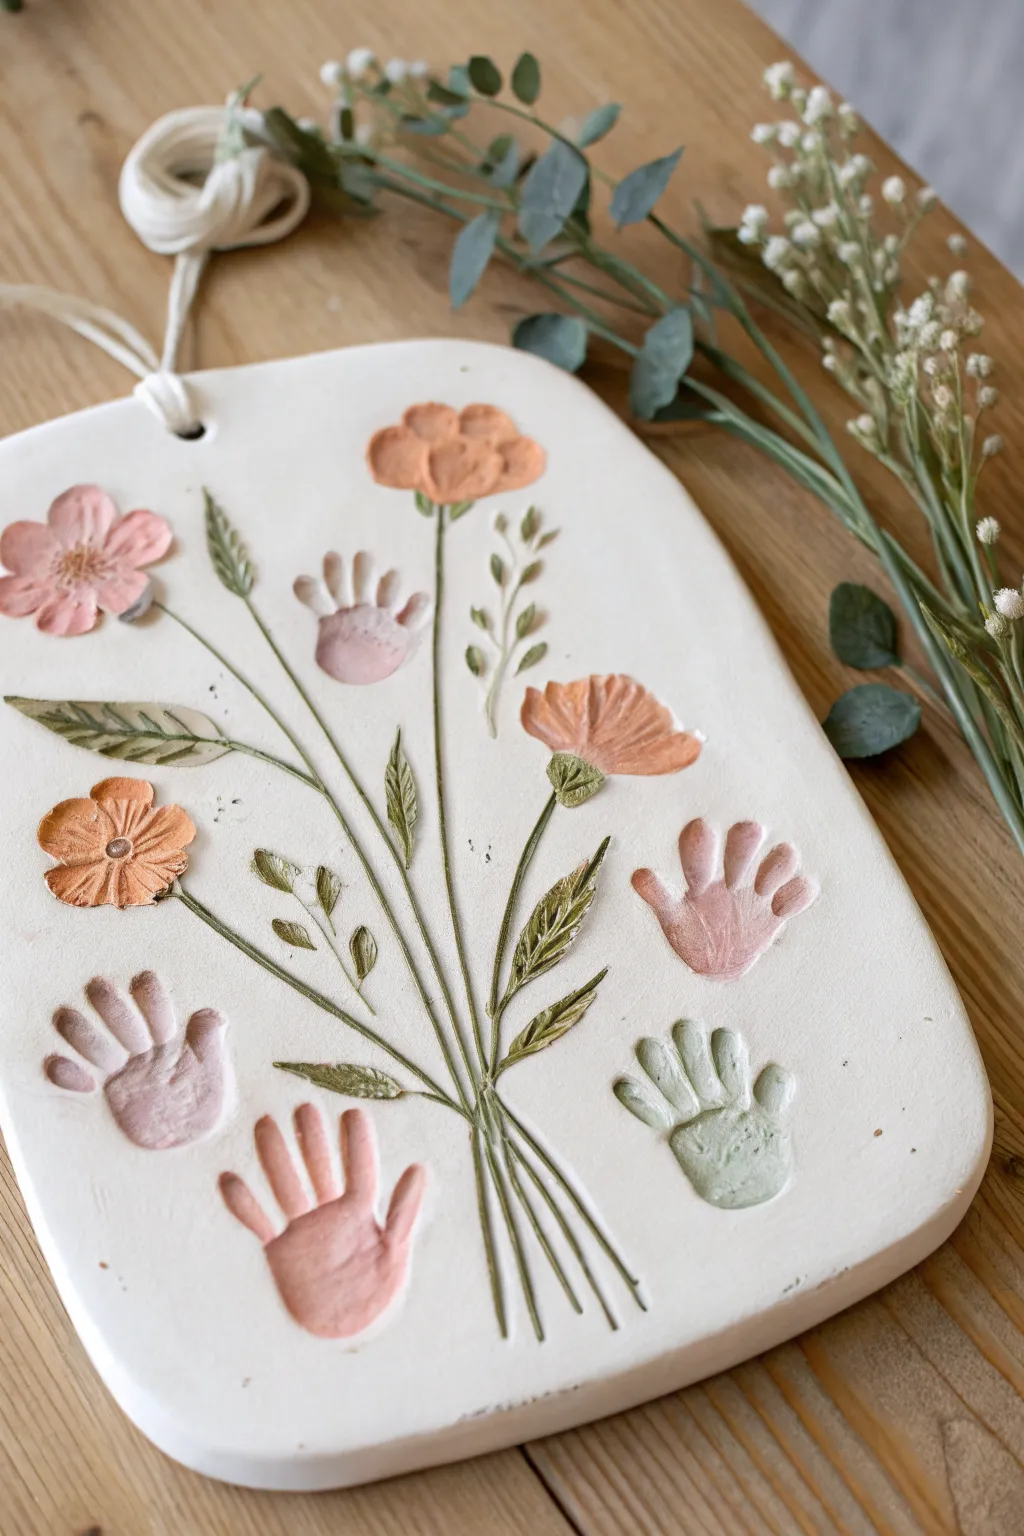
Capture the sweetness of tiny hands forever with this elegant clay plaque that transforms prints into a timeless botanical arrangement. The natural, earthy tones and delicate raised details give this piece a sophisticated, artisanal look perfect for gifting.
Step-by-Step
Materials
- Air-dry clay (white)
- Rolling pin
- Parchment paper or clay mat
- Real wildflowers, leaves, or faux silk flowers (for impressions)
- Clay sculpting tools or a dull knife
- Acrylic paints (muted tones: terracotta, sage green, blush pink, pale olive)
- Fine detail paintbrushes
- Drinking straw or skewer (for the hole)
- Fine-grit sandpaper
- Matte spray varnish or Mod Podge (optional)
- Cotton or velvet ribbon
- Water cup and paper towels
Step 1: Prepping and Impressions
-
Roll the clay:
Begin by kneading your white air-dry clay until it is smooth and pliable. Place it on parchment paper and roll it out into a rectangular slab. Aim for a thickness of about 1/4 inch to ensure durability without being too heavy. -
Shape the plaque:
With a clay knife or a ruler, trim the edges to form a soft rectangle with rounded corners. Smoothing the edges now with a slightly damp finger will save you sanding time later. -
Create the hanging hole:
Before the clay starts to dry, use a drinking straw to punch a clean hole at the top center of the plaque. Give it a little wiggle to make sure the hole is wide enough for your chosen ribbon. -
Plan the layout:
Visualize where the handprints will go. You want them scattered around the bottom half and sides, acting as ‘blossoms’ or distinct elements within the bouquet. -
Imprint the hands:
Gently press the baby’s hand into the clay. Ensure you press firmly on the center of the palm and each individual finger to get a deep, clear impression. Repeat for as many handprints as you desire. -
Add floral textures:
To create the rest of the bouquet, take real stems, leaves, or textured faux flowers and press them into the clay surface. Arrange them so their stems would naturally converge at the bottom center. Remove them carefully to leave a detailed relief pattern. -
Sculpt stem details:
If your pressed flowers didn’t leave strong stem lines, use a sculpting tool or needle point to lightly carve thin lines connecting the floral heads and handprints down to the base of the bouquet.
Clean Prints Secret
If the clay is sticky, lightly dust the baby’s hand with cornstarch before pressing. This prevents the clay from pulling up when you remove their hand.
Step 2: Finishing and Painting
-
Allow to dry completely:
Let the plaque dry flat on a wire rack or parchment paper. This usually takes 24-48 hours depending on humidity. Flip it over halfway through I usually find helps it dry evenly and prevents warping. -
Sand imperfections:
Once fully cured, inspect the edges. Use fine-grit sandpaper to gently smooth away any rough spots or sharp burrs on the rim or inside the hanging hole. -
Mix your palette:
Prepare your acrylic paints. You are aiming for a “dried flower” aesthetic, so mix your bright colors with a tiny dot of brown or white to create muted shades of sage, dusty rose, and terracotta. -
Paint the handprints:
Using a small brush, carefully paint the inside of the hand indentations. You can make each hand a different soft pastel shade (like blush and sage) or keep them uniform. -
Highlight the florals:
Paint the floral impressions you made earlier. Use the sage green for leaves and stems, and warm terracotta or peach tones for any flower heads. A fairly dry brush works best here to keep paint only on the textured areas. -
Add the stems:
With your finest liner brush and olive green paint, retrace the carved stem lines. Use long, confident strokes to mimic the look of gathered wildflowers. -
Seal the artwork:
To protect the clay from moisture and dust, apply a light coat of matte spray varnish or brush on a thin layer of matte Mod Podge. -
String it up:
Cut a length of cotton cord or velvet ribbon. Loop it through the hole at the top, tie a secure knot, and your botanical keepsake is ready to hang.
Add Dimension
After painting the initial base colors, lightly dry-brush a tiny amount of white or gold paint over the raised ridges of the flowers and prints to make the texture pop.
Now you have a stunning piece of wall art that freezes a moment in time with artistic flair
Handprint Coaster Set
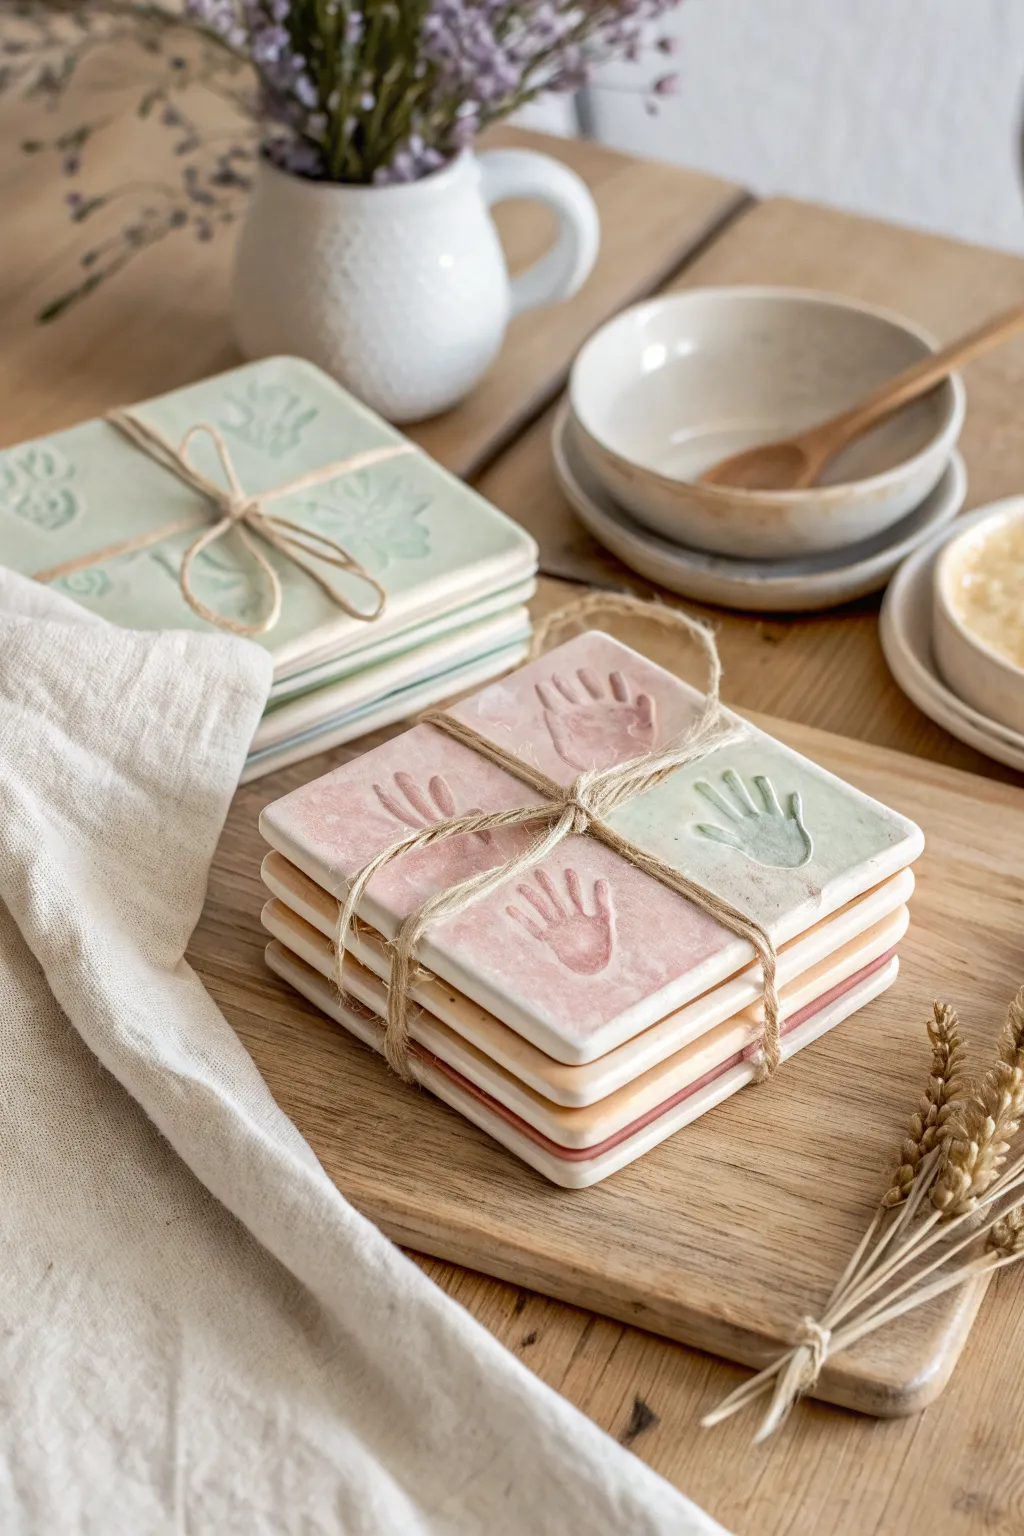
Capture the fleeting size of those tiny fingers with this charming and practical coaster set. These square clay tiles feature delicate handprint impressions in soft pastel tones, tied together with rustic twine for the perfect heartwarming gift.
Step-by-Step
Materials
- White air-dry clay or polymer clay (oven-bake)
- Square cookie cutter (approx. 4×4 inches) or a knife and ruler
- Rolling pin
- Parchment paper or silicone baking mat
- Fine-grit sandpaper
- Acrylic paints (dusty pink, sage green, cream)
- Sponge dabbers or soft paintbrushes
- Matte or satin clear varnish/sealant
- Jute twine for packaging
- Small bowl of water (for smoothing)
Step 1: Shaping the Coasters
-
Prepare your workspace:
Lay down your silicone mat or parchment paper onto a flat, stable surface. This prevents the clay from sticking and ensures the back of your coasters remains smooth. -
Roll out the clay:
Take a large ball of clay and roll it out evenly. Aim for a thickness of about 1/4 inch to ensure the coasters are sturdy but not too heavy. Rotate your rolling pin frequently to keep the thickness uniform. -
Cut the squares:
Using your square cookie cutter, press firmly into the rolled clay to cut out your coaster shapes. If you don’t have a cutter, use a ruler and a craft knife to measure and cut precise squares. -
Smooth the edges:
Dip your finger into a little water and run it gently along the cut edges of each square. This softens any sharp corners or clay burrs left by the cutting tool.
Step 2: Making the Impressions
-
Position the hand:
Gently guide your baby’s hand over the center of the clay square. You might want to do a practice run on a scrap piece of clay first to gauge how much pressure is needed. -
Press firmly:
Press the palm and each finger down into the clay firmly but gently. Make sure to get the fingertips and the heel of the palm for a clear impression. -
Repeat the process:
Create impressions on as many coasters as you’d like in your set. You can vary the position slightly or alternate hands for a dynamic look. -
Initial drying or baking:
If using air-dry clay, leave the squares flat in a cool, dry place for 24-48 hours, flipping them occasionally to prevent warping. If using polymer clay, bake according to the package instructions on a baking sheet.
Fixing Cracks
If small hairline cracks appear in air-dry clay while drying, mix a tiny bit of fresh wet clay with water to make a paste and smooth it into the cracks before painting.
Step 3: Decoration and Finishing
-
Sand the surface:
Once the coasters are completely dry or cooled, lightly sand the edges and surface with fine-grit sandpaper to remove any rough spots or fingerprints that aren’t part of the design. -
Prepare the paint wash:
Mix a small amount of acrylic paint with water to create a semi-transparent wash. You want the color to tint the clay rather than cover it in a thick opaque layer. -
Apply the base color:
Brush the paint wash over the entire surface of the coaster. I like to use a small sponge to dab it on for a more textured, ceramic-like look. -
Wipe back excess:
Immediately wipe the surface gently with a damp paper towel or sponge. This leaves more pigment inside the handprint depression, highlighting the details, while leaving the flat surface softer in color. -
Add color accents:
If you want the multi-colored look from the photo, use different pastel washes (pink, green) for different quadrants or separate coasters. Let the paint dry completely. -
Seal the coaster:
Apply two thin coats of matte or satin varnish to protect the clay from moisture. This is crucial since coasters will come into contact with condensation from drinks. -
Tie the set:
Stack your finished coasters. Take a length of jute twine and wrap it around the stack twice, finishing with a simple bow to replicate the rustic gift presentation.
Add Cork Backing
For a professional touch and to protect your furniture, glue a square of thin cork sheet or stick-on felt pads to the bottom of each fired or dried coaster.
Now you have a timeless set of keepsakes ready to be gifted or cherished on your own coffee table


What Really Happens Inside the Kiln
Learn how time and temperature work together inside the kiln to transform clay into durable ceramic.
Fridge Magnet Mini Handprint
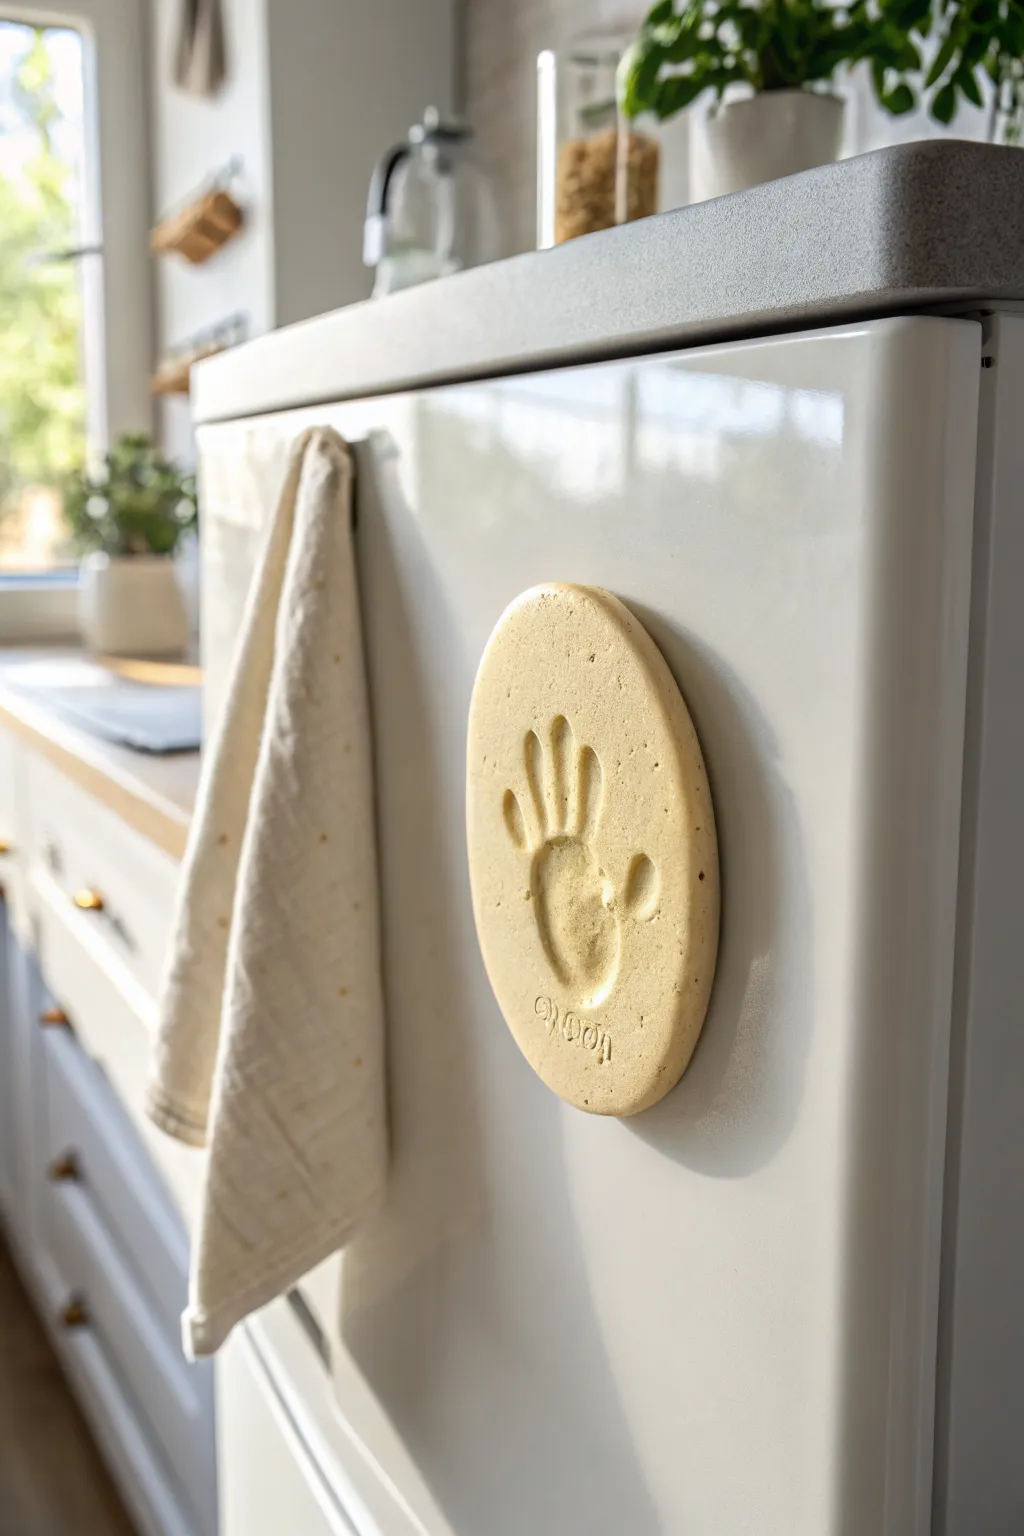
This charming little keepsake turns a fleeting moment into a permanent fixture on your kitchen fridge. It features a soft, biscuit-colored dough impression of a tiny hand, stamped with a sweet personalized note at the bottom.
Detailed Instructions
Materials
- 1 cup all-purpose flour
- 1 cup salt
- 1/2 cup warm water (approximate)
- Circle cookie cutter (approx. 4-5 inches)
- Rolling pin
- Parchment paper
- Letter stamps or toothpicks for engraving
- Strong craft magnets
- Super glue or heavy-duty adhesive
- Fine-grit sandpaper
- Clear matte acrylic sealer spray
Step 1: Mixing & Rolling
-
Combine dry ingredients:
In a large mixing bowl, stir together the cup of flour and the cup of salt until they are evenly distributed. -
Add water gradually:
Slowly pour in the warm water while mixing. I like to add it in small splashes rather than all at once to avoid a sticky mess. -
Knead the dough:
Use your hands to knead the mixture for about 5-7 minutes. You want a consistency that feels like smooth playdough—pliable but not sticky. Add a pinch more flour if it’s too wet. -
Roll it out:
Place a ball of dough onto a sheet of parchment paper. Roll it out to a thickness of about 1/2 inch. It needs to be thick enough to take a deep impression without breaking. -
Cut the shape:
Use your large circle cookie cutter to punch out a perfect round disc. Remove the excess dough from around the edges.
Dough Cracking?
If cracks appear while baking, mix a tiny bit of water and flour to make a paste, fill the crack, smooth it with a finger, and return to the oven.
Step 2: Impressing & Baking
-
Prepare the hand:
Make sure the baby’s hand is clean and dry. Position the palm over the center of the dough disc. -
Make the print:
Press the hand firmly into the dough. Apply distinct pressure to each finger and the palm to ensure a clear, deep indentation. -
Lift carefully:
Gently peel the hand away from the dough to avoid distorting the shape or smudging the edges. -
Add text:
Using small letter stamps, press a name or date underneath the palm print. While the example shows ‘MOM’, you can choose the child’s name or the year. -
Smooth the edges:
Dip your finger in a tiny bit of water and run it around the circumference of the circle to smooth out any rough cutting marks. -
Bake slowly:
Transfer the parchment paper to a baking sheet. Bake at a very low temperature, around 200°F (95°C), for 2-3 hours. You are essentially drying it out, not cooking it. -
Cool down:
Once hard, remove the disc from the oven and let it cool completely on a wire rack.
Step 3: Finishing Touches
-
Sand for smoothness:
Check the edges and surface for any rough spots. Lightly sand them with fine-grit sandpaper for a professional finish. -
Seal the keepsake:
Spray the front and back with a clear matte acrylic sealer. This protects the salt dough from moisture, which is crucial for longevity. -
Attach the magnet:
Flip the hardened disc over. Apply a strong adhesive to the back of a heavy-duty craft magnet. -
Secure placement:
Press the magnet firmly onto the center of the back of the disc. I usually hold it there for 30 seconds to ensure initial contact. -
Final cure:
Allow the glue to cure fully according to the manufacturer’s instructions before placing it on your fridge.
Add Subtle Color
Before sealing, lightly brush a pale watercolor wash into the handprint depression to make the details pop without losing the natural look.
This simple, rustic magnet will be a daily reminder of just how small those hands once were
Handprint Keychain Keepsake Tag
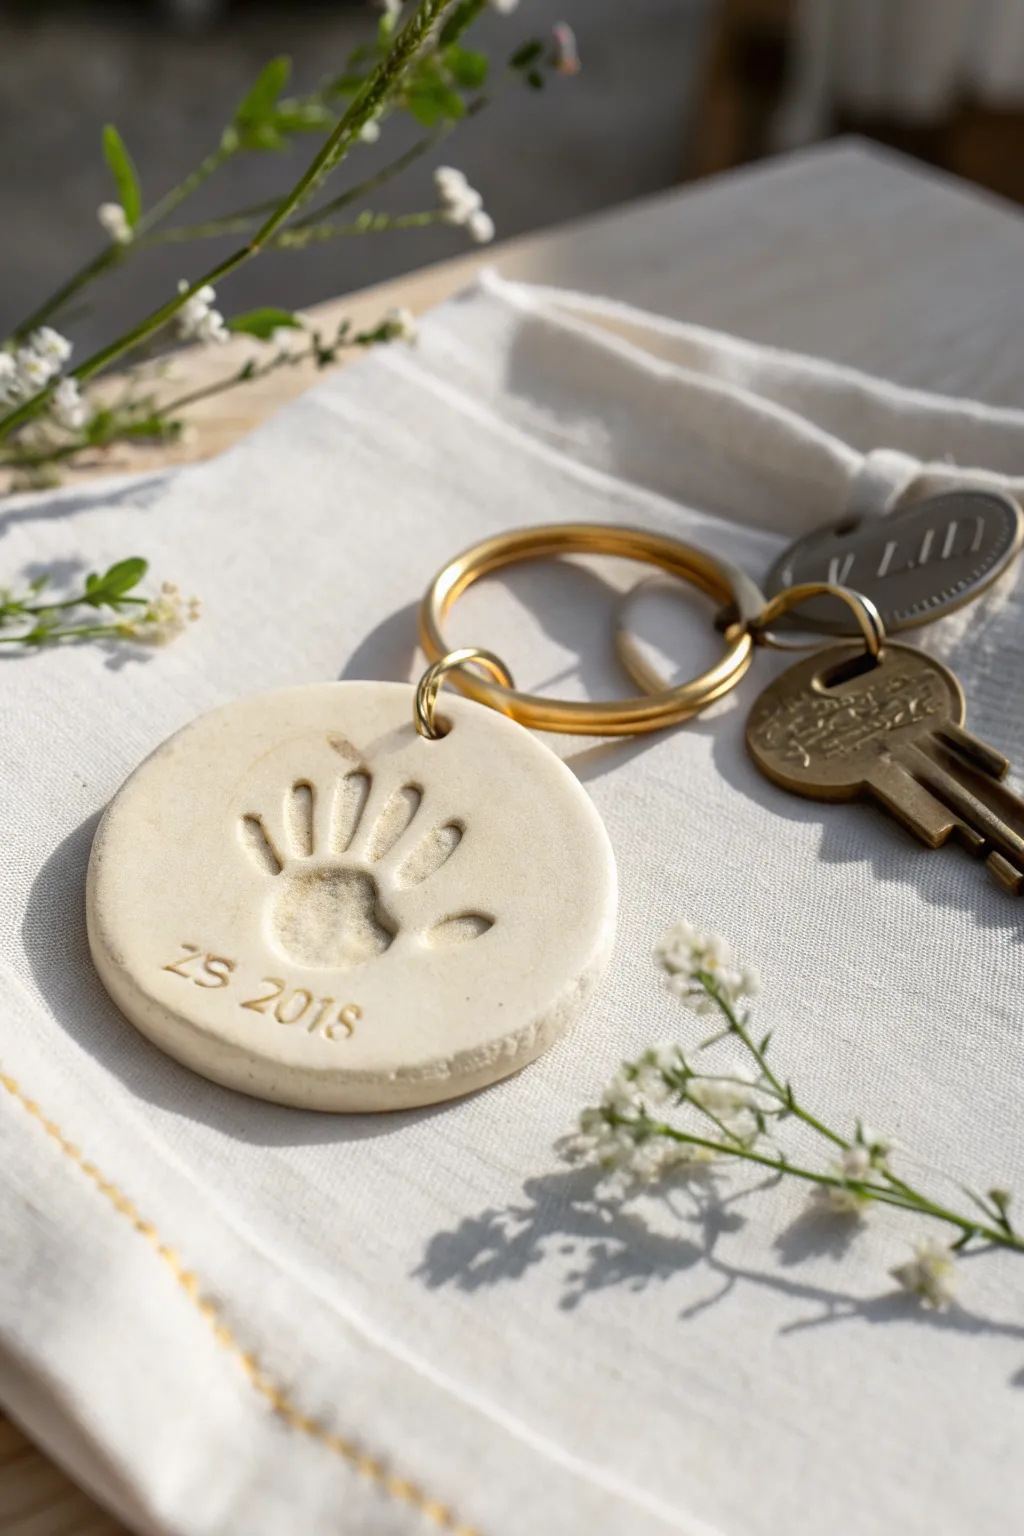
Capture the tiniest moments with this classic clay keepsake tag, perfect for turning a fleeting memory into a durable, everyday treasure. The smooth, stone-like finish and delicate gold lettering give it a timeless, minimalist feel that looks beautiful alongside your keys.
Step-by-Step Guide
Materials
- Polymer clay (white or beige stone effect)
- Circular clay cutter (approx. 2-3 inches)
- Small rolling pin
- Parchment paper or baking mat
- Small alphabet and number stamp set
- Small straw or piercing tool (for the hole)
- Fine grit sandpaper
- Gold keyring hardware (split ring and jump ring)
- Jewelry pliers
- Oven for baking
Step 1: Shaping the Clay Base
-
Condition the clay:
Start by warming a chunk of polymer clay in your hands. Knead it thoroughly until it is soft, pliable, and free of cracks. This conditioning step is crucial to prevent the clay from crumbling later. -
Roll it out:
Place the clay on a sheet of parchment paper. Use your rolling pin to flatten it into a smooth slab. Aim for a thickness of about 1/4 inch (6mm) to ensure the keychain is sturdy enough to withstand daily use. -
Check the surface:
Inspect the clay for any air bubbles or lint. Gently smooth them out with your fingertip or re-roll if necessary to get a flawless surface. -
Cut the circle:
Press your circular cutter firmly into the clay. Give it a tiny wiggle before lifting to ensure a clean cut, then carefully peel away the excess clay from around the circle.
Stamp Clarity Tip
Dust your baby’s hand or the text stamps lightly with cornstarch before pressing into the clay. This acts as a release agent, preventing the clay from sticking to the stamps.
Step 2: Making the Impressions
-
Create the handprint:
This step requires your little helper. Gently but firmly press their hand (or use a stamp if recreating the look without a baby nearby) into the center of the circle. Ensure the palm and each finger make a clear indentation. -
Refine the print:
If the edges of the print look a bit rough, you might gently tap them down with a soft, round tool or your finger to smooth the transition. -
Stamp the details:
Take your alphabet stamps. Assemble the initials (like ‘ZS’) and the year (‘2018’). Position them below the handprint, following the curve of the circle’s edge, and press them evenly into the clay. -
Pierce the hole:
Using a small straw or a proper piercing tool, punch a hole near the top edge of the circle. Make sure it isn’t too close to the edge to avoid breakage—leave at least 3-4mm of clay border.
Color Wash Idea
Mix a tiny drop of brown paint with water and brush it over the whole tag, then wipe immediately. The ‘dirt’ stays in the crevices of the handprint for an antique fossil look.
Step 3: Baking and Finishing
-
Bake the clay:
Transfer the parchment paper with your clay tag onto a baking sheet. Bake according to the specific manufacturer instructions on your package of clay (usually around 275°F/135°C for 15-30 minutes). -
Cool completely:
Once baked, remove the tray from the oven and let the tag cool down completely. It will harden fully as it cools. -
Sand the edges:
Take a piece of fine-grit sandpaper and gently buff the outer rim of the circle. I find this gives it that professional, stone-tumbled look and removes any sharp ridges from the cutter. -
Highlight the text (optional):
If you want the date to pop, you can lightly brush a tiny amount of diluted brown or gold acrylic paint into the stamped letters, wiping away the excess on the surface. -
Prepare the jump ring:
Using two pairs of jewelry pliers, twist your small jump ring open. Always twist side-to-side rather than pulling apart to maintain the circle’s shape. -
Attach the hardware:
Thread the open jump ring through the hole in your clay tag. Before closing it, loop your larger gold keyring onto the jump ring as well. -
Secure the closure:
Use the pliers to twist the jump ring back into a closed position, ensuring the ends meet perfectly flush so the tag doesn’t slip off.
Now you have a charming, pocket-sized memento that keeps those little fingers close at hand wherever you go

TRACK YOUR CERAMIC JOURNEY
Capture glaze tests, firing details, and creative progress—all in one simple printable. Make your projects easier to repeat and improve.
Handprint Necklace Pendant
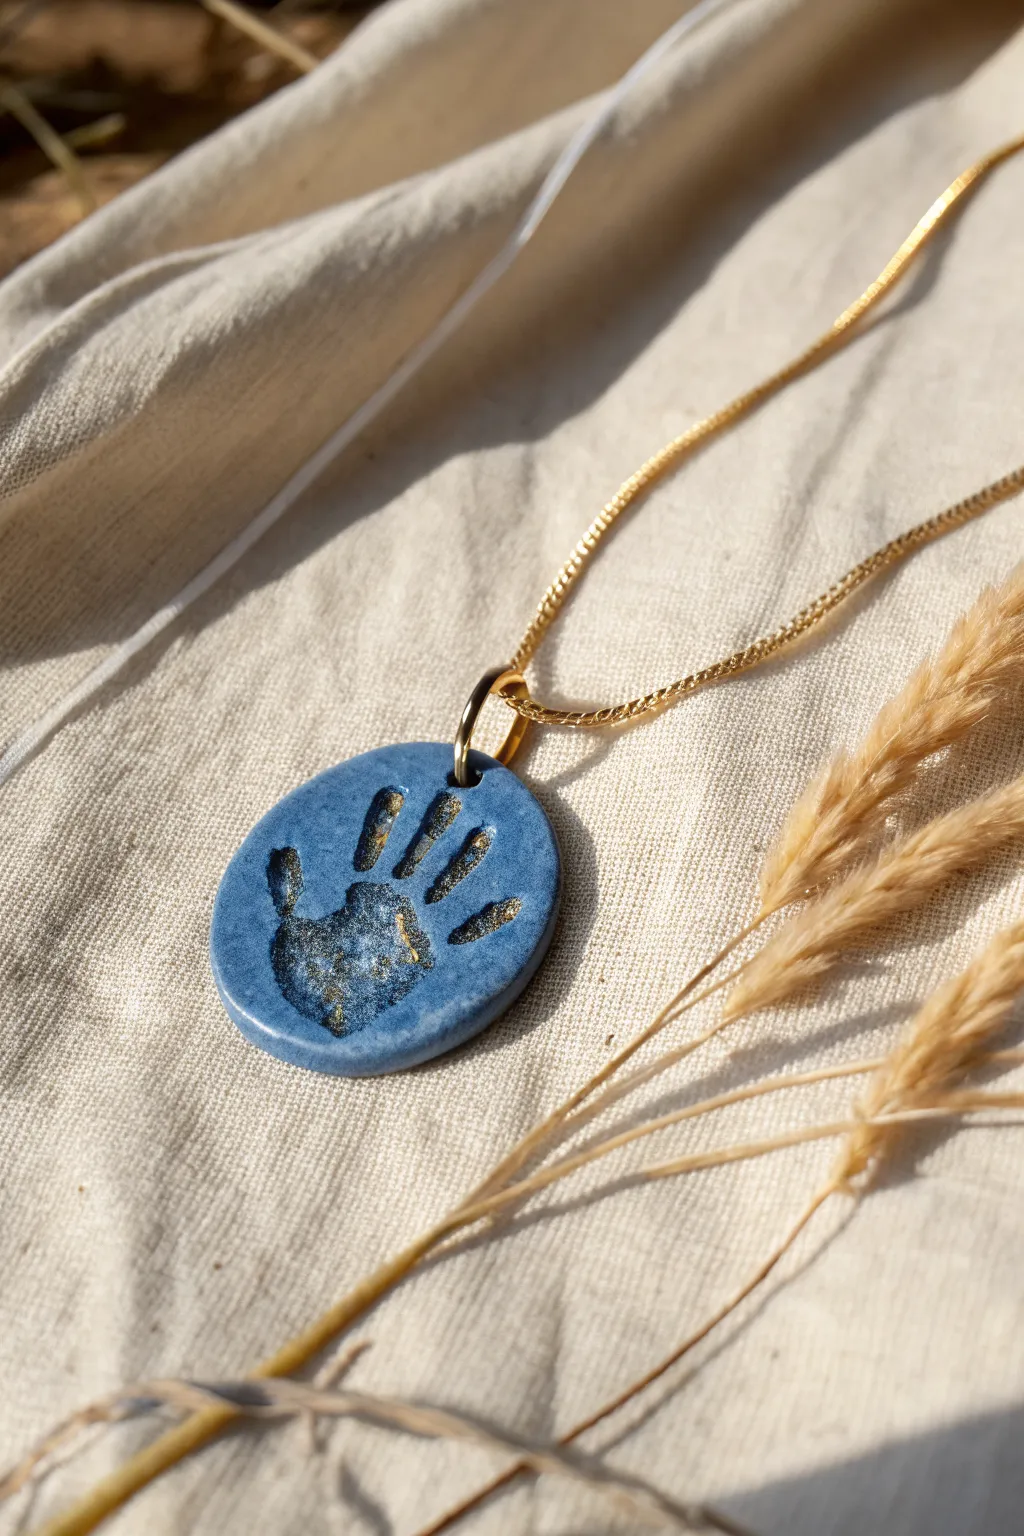
Immortalize the tiniest details of your baby’s hand in this elegant, ceramic-style pendant. The deep blue polymer clay contrasts beautifully with the gold dusted print, creating a jewelry piece that looks professionally kiln-fired but is easily made at home.
How-To Guide
Materials
- Blue polymer clay (granite or stone effect preferred)
- Gold mica powder or fine gold acrylic paint
- Small rolling pin or glass jar
- Round cookie cutter (approx. 1.5 – 2 inches)
- Small paintbrush (fine tip)
- Toothpick or large needle tool
- Jump ring (gold)
- Gold necklace chain
- Smooth work surface (ceramic tile or glass)
- Oven for baking
- Gloss glaze (optional)
Step 1: Preparation & Impression
-
Condition the clay:
Begin by warming the blue polymer clay in your hands. Knead it thoroughly until it is soft, pliable, and free of cracks. -
Roll the slab:
Place the clay on your smooth work surface. Use your rolling pin to create a flat slab, aiming for a consistent thickness of about 4-5mm. It needs to be thick enough to take a deep impression without breaking. -
Clean the surface:
Inspect the clay surface for any lint or fingerprints. Use a smoother or your finger to gently buff them out before making the print. -
Capture the print:
This is the tricky part. Gently press your baby’s hand into the center of the clay. Apply even pressure on the palm and each finger to ensure a clear indentation. -
Cut the shape:
Once you have a print you are happy with, center your round cookie cutter over the handprint. Press down firmly to cut out the pendant shape. -
Create the hole:
Use a toothpick or a needle tool to create a hole at the very top of the circle. Make sure the hole is large enough to fit your jump ring, and wiggle the tool slightly to ensure clean edges.
Clean Print Secret
Dust the baby’s hand lightly with cornstarch before pressing into the clay. This acts as a release agent, preventing the clay from sticking to sticky skin and distorting the print.
Step 2: Detaling & Baking
-
Smooth the edges:
Dip your finger in a little water (or cornstarch) and gently run it along the cut edge of the circle to smooth out any roughness from the cutter. -
Add the gold accent:
Dip a fine-tipped brush into your gold mica powder. Carefully tap the powder strictly into the grooves of the handprint. -
Clean up excess:
If gold powder strays onto the flat surface, use a piece of scotch tape to lift it off, or wipe gently with a slightly damp cotton swab. -
Bake the piece:
Transfer the clay (still on its tile if possible to avoid warping) to the oven. Bake according to your specific clay manufacturer’s instructions—usually around 275°F (135°C) for 15-30 minutes. -
Cool down:
Allow the pendant to cool completely in the oven with the door cracked, or remove it and let it sit undisturbed until it reaches room temperature.
Level It Up
For a true faux-stone look, mix a tiny amount of black pepper or craft sand into your blue clay before rolling. The speckles add incredible realistic texture.
Step 3: Assembly
-
Seal (Optional):
For a glossy ‘ceramic’ finish like the photo, apply a thin layer of polymer clay glaze. Just avoid pooling it in the textured handprint. -
Open the jump ring:
Using two pairs of pliers, twist the gold jump ring open sideways (never pull it apart). -
Attach hardware:
Loop the open jump ring through the hole you made in the pendant. Before closing it, ensure the necklace chain is threaded through. -
Secure the closure:
Twist the jump ring back into a closed position, ensuring the two ends meet perfectly flush so the chain doesn’t slip out.
Now you have a sophisticated, wearable memory that keeps your little one close to your heart.
Handprint Heart Keepsake Plaque
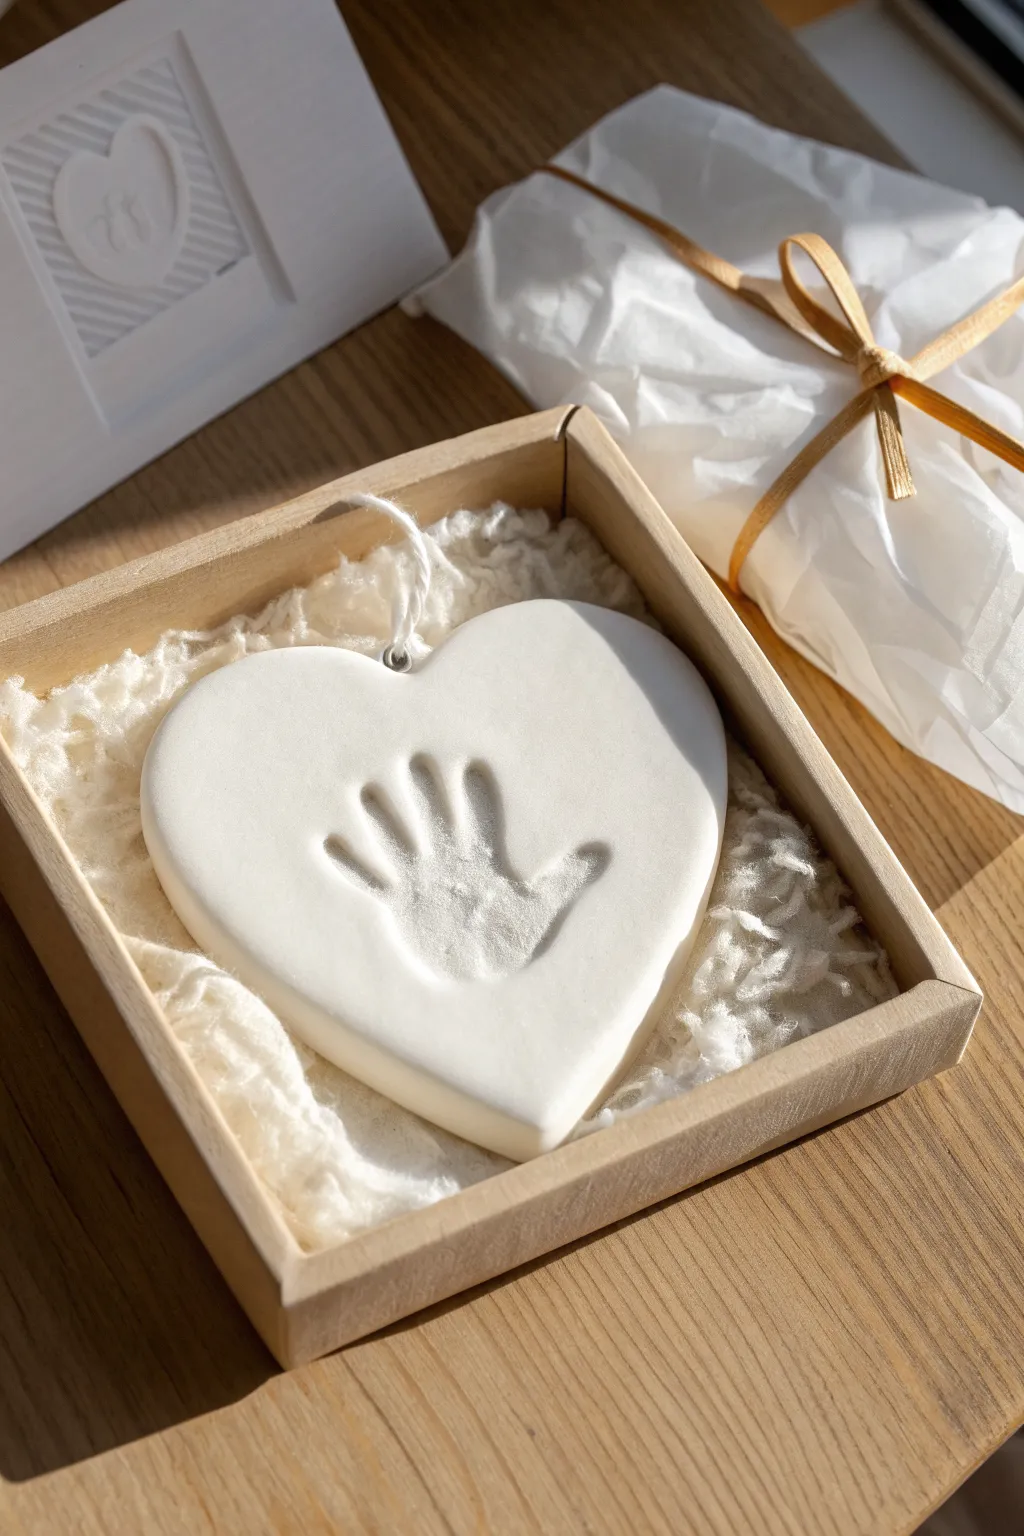
Capture the fleeting memory of tiny fingers with this pristine white heart keepsake. Resting gently in fluffy wool, this minimalist ornament creates an elegant and timeless memento of your little one’s earliest days.
Detailed Instructions
Materials
- White air-dry clay or polymer clay (softened)
- Heart-shaped cookie cutter (large)
- Rolling pin
- Parchment paper
- Drinking straw or skewer
- Fine-grit sandpaper
- White satin or cotton cord
- Small square kraft gift box
- White wool roving or soft batting
- Clear matte sealant spray (optional)
Step 1: Shaping the Clay
-
Prepare your surface:
Begin by laying down a sheet of parchment paper on a flat, stable table. This prevents the clay from sticking and ensures a smooth back for your ornament. -
Condition the clay:
Take a generous handful of white air-dry clay. Knead it in your hands for several minutes until it becomes warm, pliable, and free of any lumps or air bubbles. -
Roll it out:
Place the clay on the parchment and use your rolling pin to flatten it. Aim for an even thickness of about 1/4 to 1/2 inch—too thin and it might crack; too thick and it takes ages to dry. -
Cut the heart:
Press your large heart-shaped cookie cutter firmly into the rolled clay. Wiggle it slightly to ensure a clean cut, then gently remove the excess clay from around the shape before lifting the cutter. -
Smooth the edges:
Dip your finger in a tiny bit of water and run it along the cut edges of the heart to smooth out any roughness or sharp ridges left by the cutter.
Step 2: Creating the Impression
-
Position the hand:
Bring your baby over to the workspace. Gently guide their open hand towards the center of the clay heart. I find it helps to do this when they are calm or sleepy to prevent sudden grabbing motions. -
Press firmly:
Press the palm down first, then gently press each individual finger and the thumb into the clay. You need firm, even pressure to get clear details of the creases. -
Lift away:
Peel the little hand away quickly but vertically to avoid dragging the clay. If the print isn’t clear, simply ball up the clay, re-roll, and try again immediately. -
Add the hanging hole:
Use a drinking straw to punch a clean hole near the top center of the heart (or specifically in the dip of the heart lobes). Twist the straw as you push through for a clean cut.
Cracks Appearing?
If small hairline cracks appear while drying, mix a tiny bit of fresh clay with water to make a paste. Smooth this paste into the cracks with your finger and let dry again.
Step 3: Drying and Finishing
-
Let it dry:
Place the heart on a clean drying rack or leave it on the parchment in a safe spot. Allow it to air dry completely for 24-48 hours. Turn it over halfway through to ensure the back dries evenly. -
Sand for perfection:
Once fully hard, inspect the edges. Use a piece of fine-grit sandpaper to gently buff away any remaining rough spots or sharp edges for a professional, porcelain-like finish. -
Seal (optional):
For longevity, you can spray a light coat of clear matte sealant over the piece. This protects the white surface from dust and yellowing over time. -
Attach the string:
Thread a piece of white cotton or satin cord through the hole. Tie a neat knot or loop, creating a hanger for the ornament.
Gilded Touch
Once the clay is totally dry, use a small brush to paint the inside of the handprint indentation with liquid gold leaf for a stunning metallic contrast.
Step 4: Packaging Presentation
-
Line the box:
Open your kraft gift box. Take a handful of white wool roving or soft cotton batting and tease it apart to create a fluffy, cloud-like bed in the bottom of the box. -
Nestle the heart:
Gently place the finished handprint heart into the wool, pressing it down slightly so the soft fibers cradle the edges. -
Arrange the cord:
Coil the hanging string neatly above the heart so it looks tidy and intentional.
Now you have a beautifully preserved memory ready to be gifted or treasured for years to come
Handprint Mosaic Border Frame
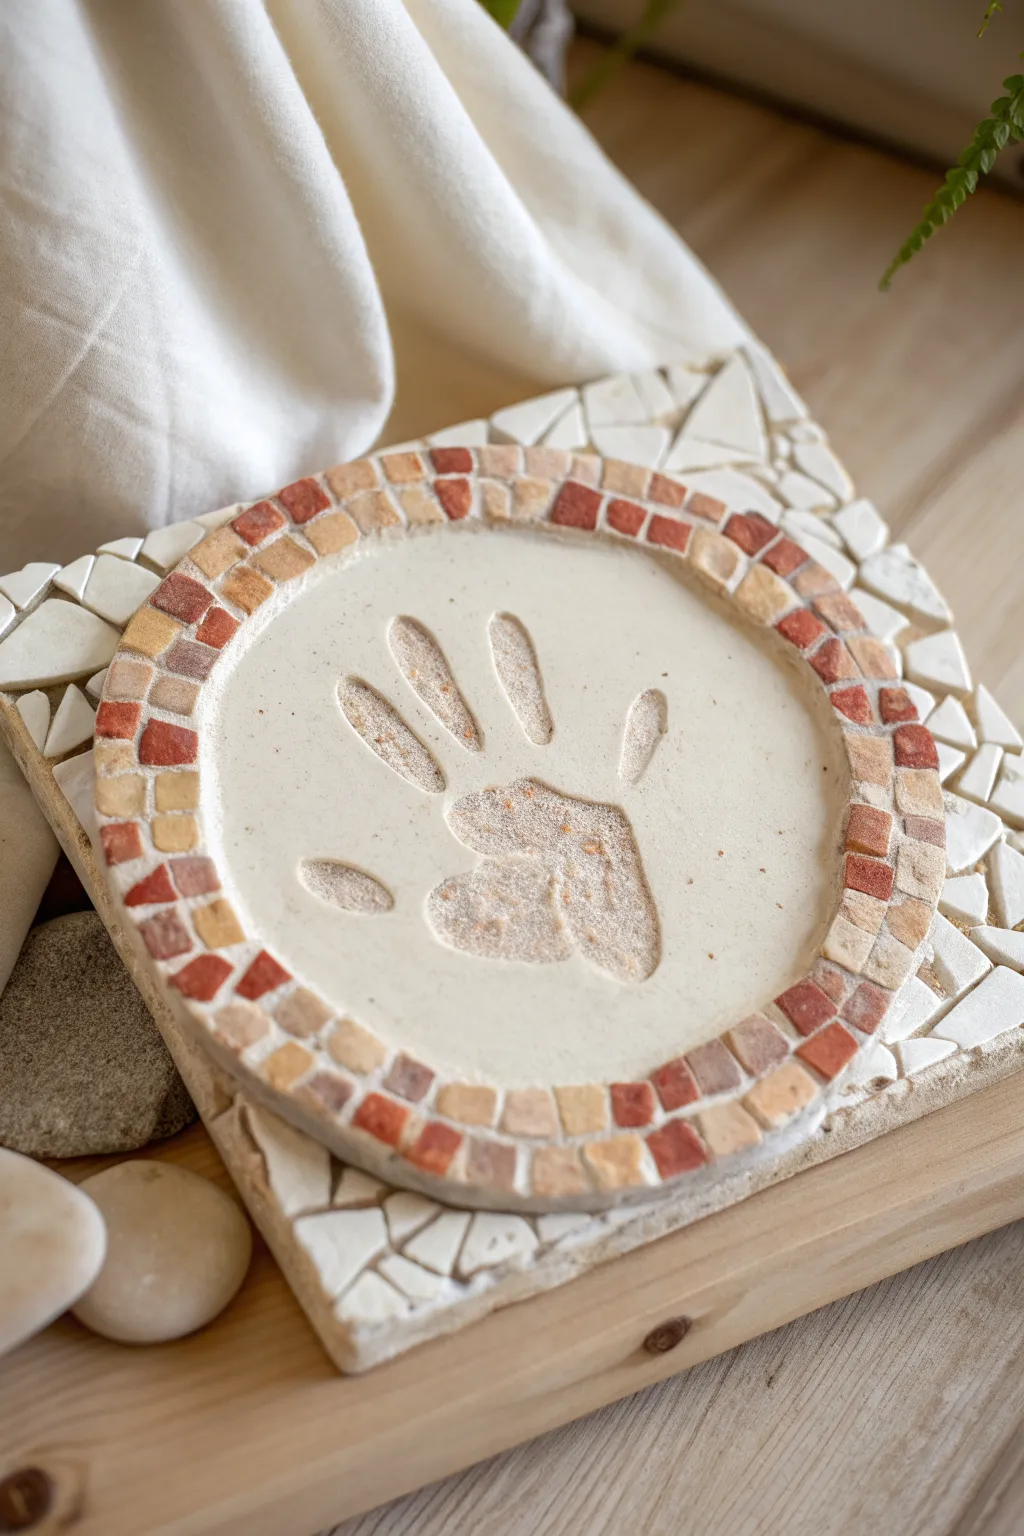
Transform a fleeting moment into a timeless keepsake with this Roman-style mosaic medallion. Featuring a charming sandy handprint center surrounded by earthy tesserae, this piece feels like an ancient artifact discovered on a sunny beach.
Step-by-Step Guide
Materials
- Square plywood or MDF board (approx. 8×8 inches)
- Air-dry clay or white cement mix (fine grain)
- Small mosaic tiles/tesserae (terracotta, beige, cream)
- White irregular mosaic tile pieces (for the background)
- Tile adhesive or heavy-duty craft glue
- Pre-mixed grout (sandy beige or off-white)
- Sand (fine beach sand or craft sand)
- Old rolling pin
- Circle cutter or large bowl (approx. 6 inches diameter)
- Sponge and water
- Soft brush
Step 1: Creating the Handprint Center
-
Prepare the base:
Start with a clean, flat surface. Roll out your air-dry clay or pour your cement mix into a circular mold to create a disk about 1/2 inch thick and roughly 6 inches in diameter. -
Texture the surface:
Before making the impression, lightly dust the center of the wet clay or cement with fine sand. This gives the handprint that distinct, gritty texture seen in the photo. -
Make the impression:
Gently but firmly press the baby’s hand into the center of the disk. Ensure you get the palm and all five fingers clearly defined. I like to press each finger individually afterward to ensure depth. -
Refine the edges:
While the material is still pliable, smooth the outer rim of the circle with a wet finger or sponge to create a clean boundary for your mosaic border. -
Initial drying:
Allow this central medallion to dry completely according to the manufacturer’s instructions—usually 24 to 48 hours for thick clay or cement.
Step 2: Building the Mosaic Border
-
Dry fit the border:
Once dry, place your medallion in the center of your square board. Arrange your small, earthy-colored square tiles around the perimeter of the circle to check the spacing. Aim for a mix of terracotta red, beige, and tan. -
Glue the medallion:
Secure the central clay disk to the wooden board using tile adhesive. Press down firmly to potential air pockets. -
Adhere the ring:
Apply a thin layer of adhesive around the immediate edge of the circle. Create the ring border by pressing the square tiles into the glue, following the curve tightly. -
Prepare the background tiles:
For the corners of the square base, use irregular white tile shards. If your pieces are too large, wrap them in a towel and gently tap with a hammer to break them into smaller, organic shapes. -
Fill the corners:
Spread adhesive on the exposed corners of the board. Puzzle-piece the white shards together to fill the space, leaving small gaps between them for grout.
Cracking Clay?
If using air-dry clay, cracks can happen as it shrinks. To fix, mix a tiny amount of fresh clay with water to make a paste and fill cracks before painting or sealing.
Step 3: Grouting and Finishing
-
Mix the grout:
Prepare a small amount of sandy beige grout. It should be the consistency of thick peanut butter. -
Apply grout:
Spread the grout over the mosaic sections, working it into the crevices between the tiles and around the central medallion’s edge. Be careful not to fill the handprint depression itself. -
Clean the excess:
Wait about 10-15 minutes for the grout to set slightly, then use a damp sponge to wipe away the excess from the surface of the tiles. -
Detail clean:
Use a soft dry cloth to buff the tiles once a haze forms. Use a dry brush to gently sweep any stray grout granules out of the sandy handprint area. -
Final cure:
Let the entire piece dry for another 24 hours before moving or displaying it.
Beach Treasure Look
Mix tiny crushed seashells or glitter into the sand before dusting the handprint impression for a sparkling, authentic seaside finish.
Display this stony keepsake on a shelf or use a plate stand to show off those tiny fingers forever