
Every December I get the itch to make a fresh batch of Christmas clay cuties for the tree, gifts, and little cozy corners around the house. If you’ve got air-dry clay or polymer clay on your table, these ideas will help you turn it into festive keepsakes fast.
Classic Cookie-Cutter Tree Ornaments
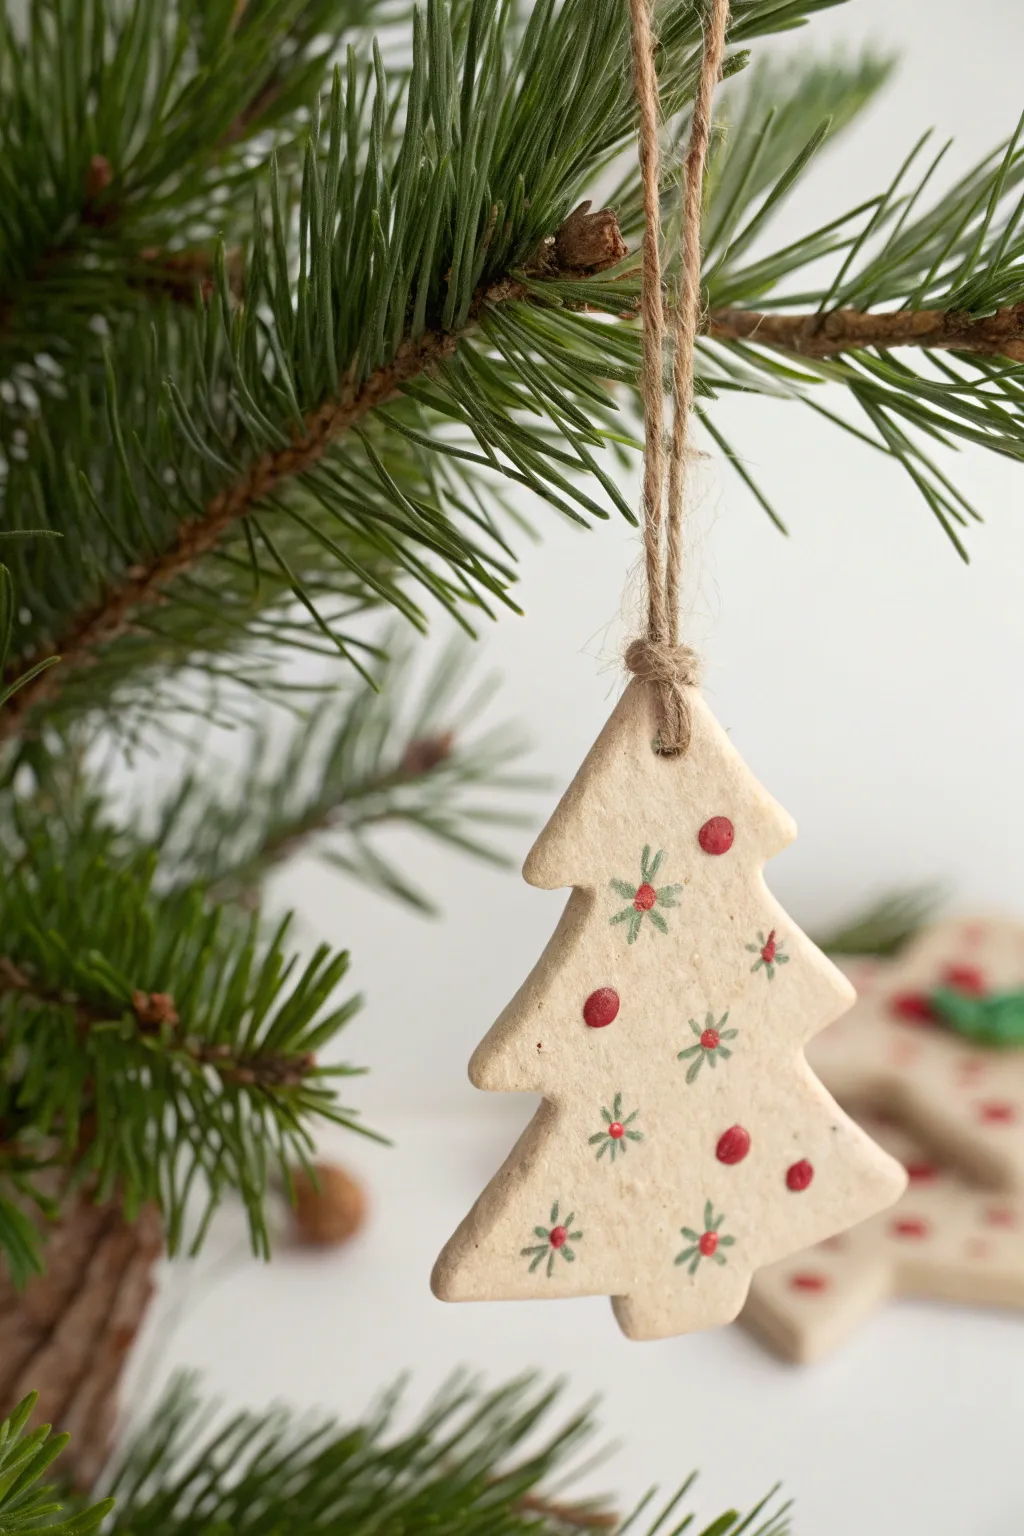
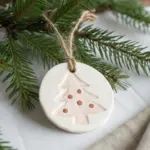
Capture the charm of homemade holiday decor with these simple yet beautiful clay tree ornaments. Their natural, stone-like texture provides the perfect canvas for delicate painted details, bringing a touch of cozy nostalgia to your Christmas tree.
Detailed Instructions
Materials
- Air-dry clay (white or natural stone color)
- Christmas tree cookie cutter
- Rolling pin
- Parchment paper or canvas mat
- Drinking straw or small circular tool
- Sandpaper (fine grit)
- Acrylic paints (Red, Forest Green)
- Fine detail paintbrush (size 0 or 00)
- Jute twine or hemp cord
- Clear matte varnish (optional)
Step 1: Shaping the Clay Base
-
Prepare your workspace:
Lay down parchment paper or a canvas mat to prevent sticking. This makes it much easier to move your delicate shapes later without distorting them. -
Roll out the clay:
Take a portion of air-dry clay and knead it briefly until pliable. Roll it out to an even thickness of about 1/4 inch (6mm). If it’s too thin, it may crack; too thick, and it will be heavy. -
Cut the shapes:
Press your Christmas tree cookie cutter firmly into the clay. Give it a tiny wiggle to ensure clean edges before lifting it away. Continue cutting as many trees as your slab of clay allows. -
Smooth the edges:
Dip your finger in a little water and gently run it along the cut edges of each tree to smooth out any roughness left by the cutter. -
Create the hanging hole:
Use a drinking straw or a small circular tool to punch a hole near the top point of the tree. Make sure not to get too close to the edge, or the clay might break later. -
Dry the ornaments:
Place the clay trees on a flat surface to dry. I find that flipping them over halfway through the drying process helps keep them perfectly flat. Allow 24-48 hours depending on your clay brand. -
Sand for perfection:
Once fully cured and hard, use fine-grit sandpaper to gently buff away any remaining sharp edges or bumps on the surface.
Step 2: Painting the Details
-
Plan your pattern:
Visualize a random, confetti-like pattern. You want a mix of small green starbursts and red dots evenly distributed across the surface. -
Paint the red berries:
Dip the very tip of your fine brush into red acrylic paint. Place small dots randomly on the tree face. Keep them spaced out to leave room for the green details. -
Start the green stars:
Using the forest green paint and your finest brush, paint small ‘X’ shapes in the empty spaces between the red dots. -
Add the vertical stroke:
Paint a vertical line directly through the center of each green ‘X’ to create a six-pointed star or snowflake shape. -
Finish the starbursts:
Add a tiny red dot to the center of a few of the green stars for extra detail, though you can leave some plain green for variety. -
Let the paint dry:
Allow the painted details to dry completely. Since the dots are slightly raised, this might take 20-30 minutes.
Clean Lines Tip
If you struggle painting tiny dots with a brush, use the non-brush end of a paintbrush or a toothpick as a stamp. Dip it in paint and press down for a perfect circle.
Step 3: Assembly
-
Seal the surface (Optional):
If you want these to last for years, apply a thin coat of clear matte varnish. This protects the clay from moisture and prevents the paint from chipping. -
Cut the twine:
Cut a piece of jute twine approximately 8 inches long for each ornament. -
Thread the loop:
Fold the twine in half and push the looped end through the hole in the ornament from back to front. -
Secure the hanger:
Pass the loose ends of the twine through the loop you just pushed through, and pull tight to create a lark’s head knot directly on the ornament. -
Tie the top:
Knot the two loose ends of the twine together at the top to complete the hanging loop.
Scented Variation
Knead a few drops of cinnamon or pine essential oil into the clay before rolling it out. Your ornaments will smell like Christmas whenever you hang them.
Hang these rustic beauties on your tree branches to enjoy a simple, handcrafted holiday aesthetic


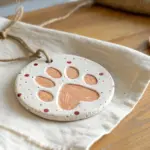
Personalized Clay Gift Tags
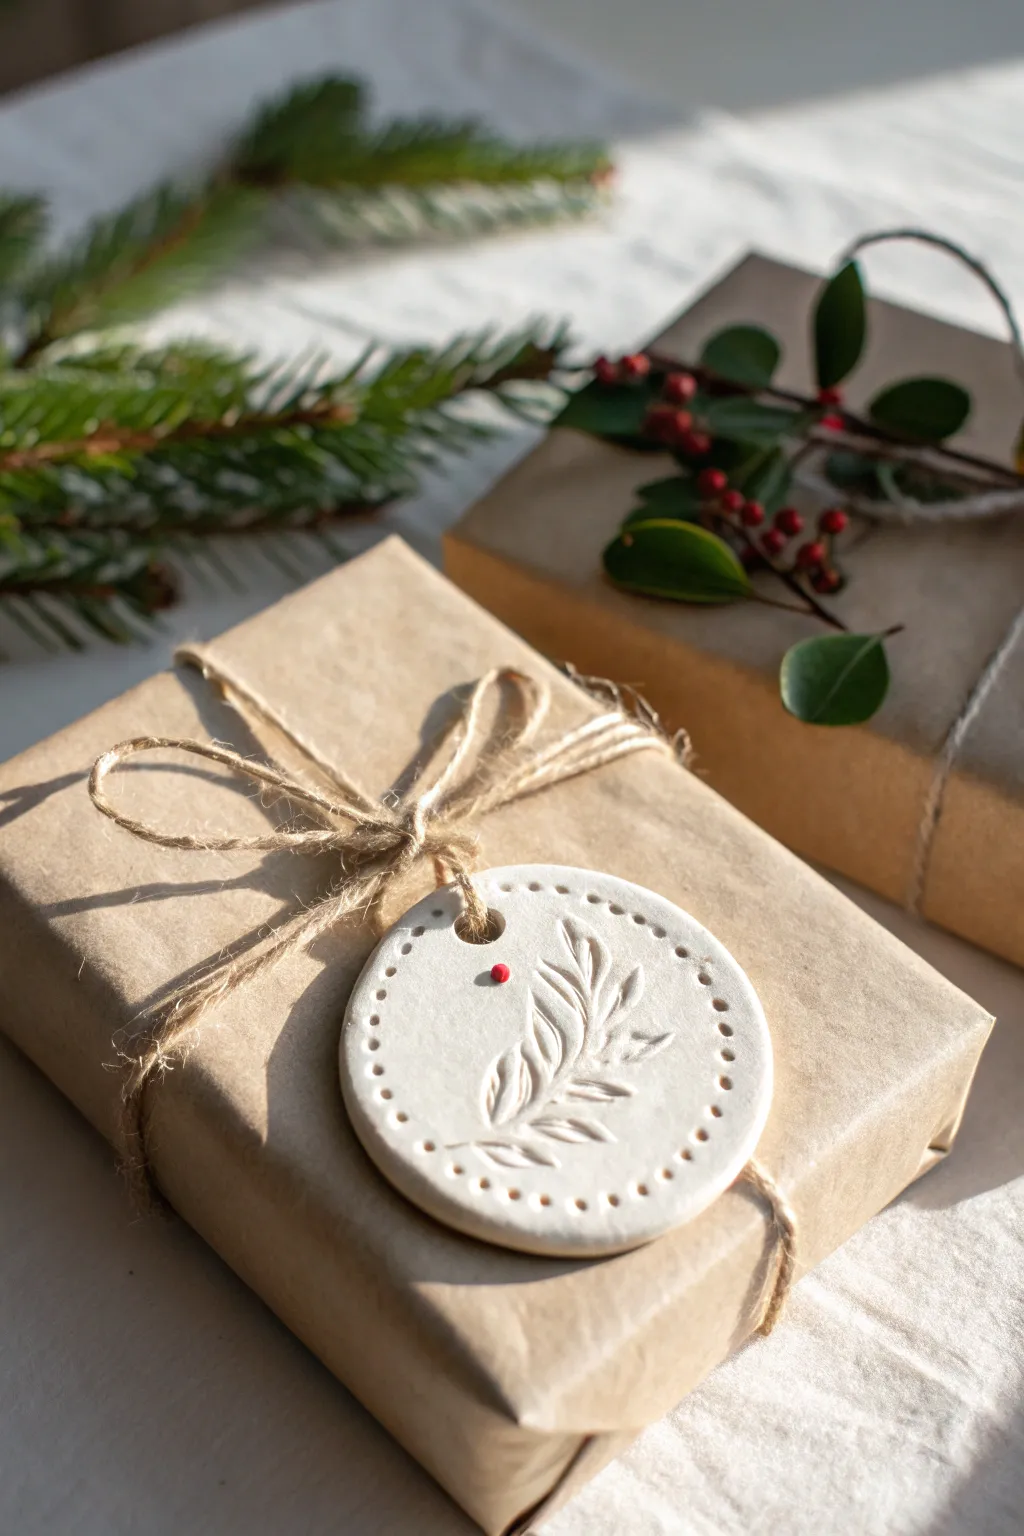
Add an artisan touch to your holiday wrapping with these simple yet elegant clay tags. Featuring a delicate stamped fern design and a dotted border, they bring a beautiful, handcrafted warmth that elevates plain kraft paper instantly.
Step-by-Step Tutorial
Materials
- White air-dry clay (or white polymer clay)
- Rolling pin
- Circle cookie cutter (approx. 2.5 inches)
- Botanical stamp or real fern leaf
- Toothpick or skewer
- Straw or large skewer (for hole punching)
- Red acrylic paint
- Fine-grit sandpaper
- Jute twine for tying
- Clear matte sealant (optional)
Step 1: Preparation & Cutting
-
Condition the clay:
Begin by taking a handful of white air-dry clay and kneading it in your hands until it becomes soft, pliable, and free of cracks. -
Roll it out:
Place the clay on a smooth surface or craft mat. Use a rolling pin to flatten it to an even thickness of about 1/4 inch. If the clay sticks, you can lightly dust your surface with cornstarch. -
Cut the shape:
Press your circle cookie cutter firmly into the rolled clay to create a clean, round disc. Lift away the excess clay from the edges. -
Smooth the edges:
Dip your finger in a tiny bit of water and gently run it around the circumference of the clay circle to smooth out any rough bits from the cutter.
Sticky Stamp Issues?
If your stamp is pulling the clay up, lightly dust the stamp surface with cornstarch or baby powder before pressing it down for a clean release.
Step 2: Adding the Design
-
Create the botanical impression:
Take your botanical stamp or a sturdy real leaf. Press it firmly into the center of the clay circle, applying pressure evenly to ensure the stem and leaves leave a deep, clear impression. -
Remove the stamp:
Carefully lift the stamp or peel back the leaf to reveal your design. If you used a real leaf, check that no debris is left behind in the clay grooves. -
Mark the border:
Using a toothpick or a skewer, gently press small indentations around the perimeter of the circle. Space them evenly about 1/8 inch from the edge to create the dotted frame effect seen in the photo. -
Punch the hanging hole:
Use a straw or a larger skewer to punch a clear hole near the top of the tag. Make sure it is large enough to accommodate your jute twine.
Prevent Curling
To stop air-dry clay from curling edges as it dries, place a light book over the drying tags (sandwiched between parchment paper) once they are semi-hard.
Step 3: Finishing Touches
-
Let it dry:
Place the tag on a drying rack or a sheet of parchment paper. Allow it to air dry completely for 24-48 hours, flipping it halfway through to prevent curling. -
Sand for smoothness:
Once fully dry and hard, take a piece of fine-grit sandpaper and very lightly buff the edges and surface to remove any remaining imperfections or fingerprints. -
Add the pop of color:
Dip the tip of a toothpick or a very fine brush into red acrylic paint. Carefully dab a single, small dot near the stem of your botanical impression to mimic a holly berry. -
Dry the paint:
Allow the red paint dot to dry completely, which usually takes just a few minutes. -
Seal the tag:
For longevity, brush a thin coat of clear matte sealant over the front and back of the tag. I prefer matte over gloss here to keep that natural, earthy look. -
Attach the twine:
Cut a length of jute twine. Fold it in half, thread the loop through the hole, and pull the tails through the loop to secure it to the tag. -
Tie to the gift:
Wrap your gift in simple kraft paper and tie the tag onto the package, finishing with a simple bow.
Your beautifully personalized tag is now ready to make someone’s gift extra special this season


Evergreen Imprint Ornaments
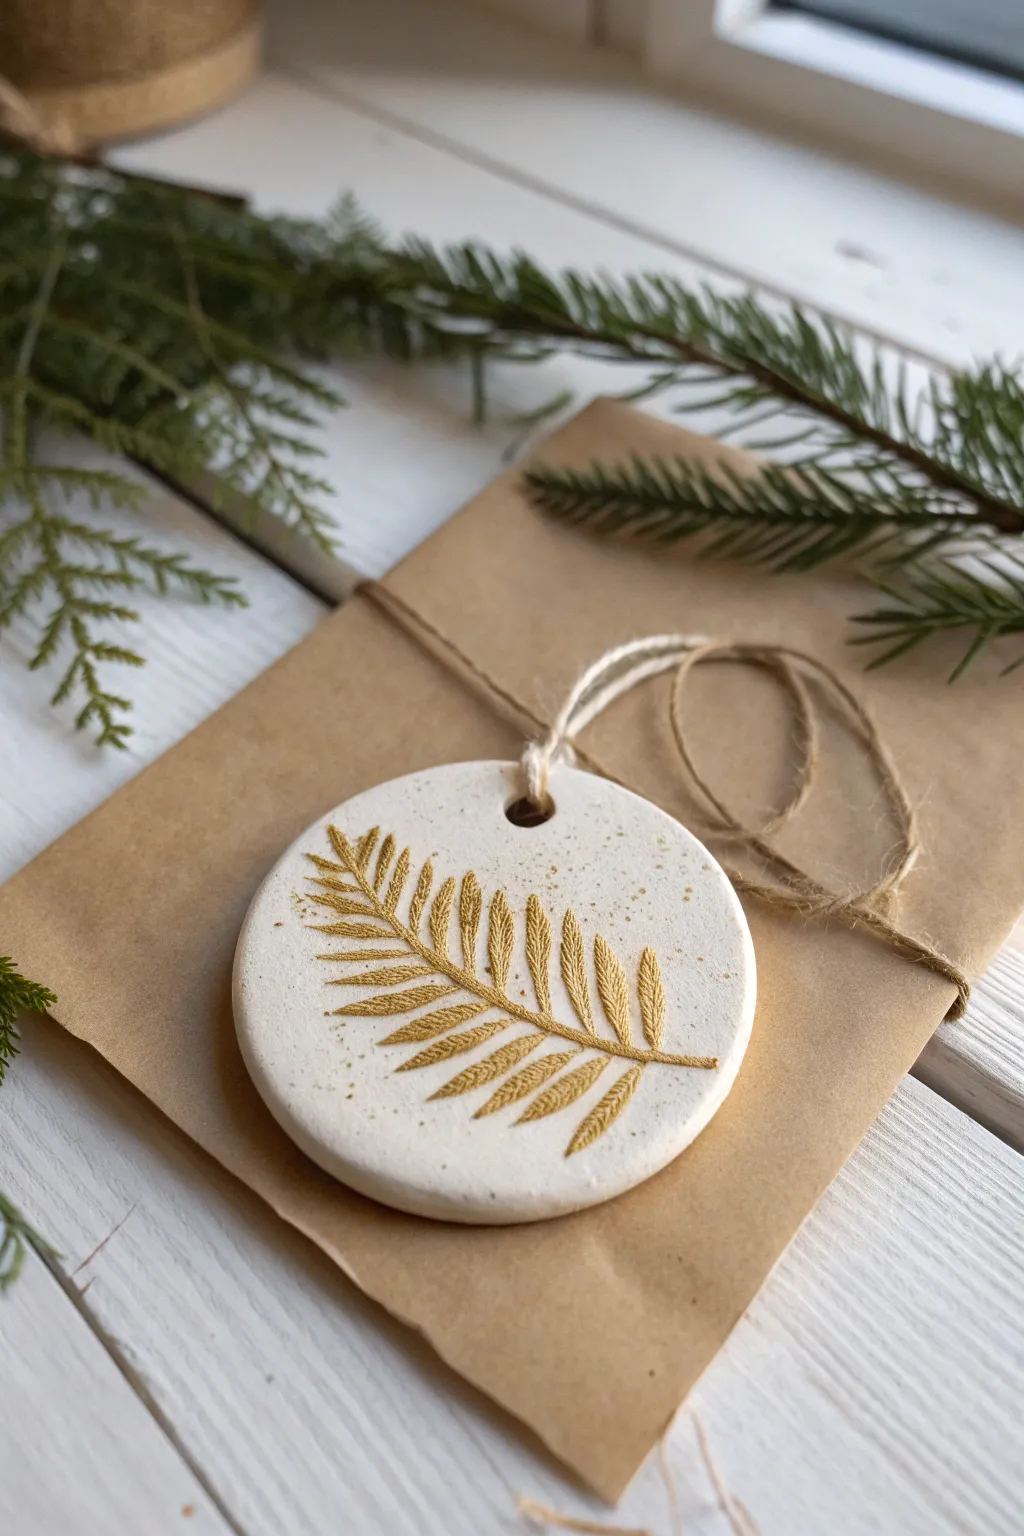
Capture the delicate beauty of winter flora with these elegant white clay ornaments. Featuring a crisp evergreen impression highlighted in shimmering gold paint, they make sophisticated gift toppers or nature-inspired tree decorations.
How-To Guide
Materials
- Air-dry white clay or polymer clay
- Rolling pin
- Fresh fern frond or evergreen sprig
- Round cookie cutter (approx. 3 inches)
- Drinking straw or small circular tool
- Fine grit sandpaper
- Metallic gold acrylic paint
- Fine detail paintbrush
- Clear matte sealant spray (optional)
- Jute twine or string
- Parchment paper or craft mat
Step 1: Preparing the Clay Base
-
Condition the Clay:
Begin by kneading a ball of white clay in your hands until it becomes soft, pliable, and free of cracks. Warm hands help speed up this process. -
Roll it Out:
Place the clay on a sheet of parchment paper to prevent sticking. Use your rolling pin to flatten the clay into an even slab, aiming for a consistent thickness of about 1/4 inch. -
Smooth the Surface:
Before imprinting, run your finger or a slightly damp sponge over the surface to ensure it is perfectly smooth and free of fingerprints. -
Position the Botanical:
Select a fresh fern frond that fits within the diameter of your eventual ornament. Lay it gently onto the center of the clay slab, ensuring the detailed side is facing down.
Clean Cuts
To avoid distortion when lifting the cutout shape, lift the parchment paper underneath or slide a blade under the clay rather than pulling the clay circle itself.
Step 2: Creating the Impression
-
Embed the Fern:
Take your rolling pin and gently roll over the fern frond once with firm, even pressure. You want to press the greenery into the clay without making the slab too thin. -
Reveal the Texture:
Carefully lift the stem of the fern and peel it away from the clay to reveal the detailed impression left behind. If bits of leaf get stuck, use tweezers to remove them. -
Cut the Shape:
Center your round cookie cutter over the botanical impression. Press down firmly to cut the circle, then wiggle slightly to release it from the excess clay. -
Add a Hanging Hole:
Using a drinking straw or a small circular tool, punch a clean hole near the top edge of the ornament for the hanging string. -
Refine Edges:
Dip your finger in a little water and gently smooth the cut edges of the circle to soften any sharp ridges left by the cutter.
Antique Finish
For a vintage look, rub a little brown antiquing wax over the dried clay before painting the gold, wiping it back to leave darker tones in the textures.
Step 3: Finishing Touches
-
Allow to Dry:
Place the ornament on a flat surface away from direct heat. Let it dry completely for 24-48 hours, flipping it occasionally to ensure it dries evenly and stays flat. -
Sand Imperfections:
Once fully cured, use fine-grit sandpaper to lightly buff the edges and surface if there are any rough spots. -
Load the Brush:
Squeeze a small amount of metallic gold acrylic paint onto a palette. I usually dip a fine detail brush in, then dab off the excess so the paint isn’t gloopy. -
Paint the Imprint:
Carefully paint inside the depressed areas of the fern imprint. Use a light hand to keep the gold strictly within the textured grooves. -
Create a Speckled Effect:
Dilute a tiny drop of gold paint with water. Load an old toothbrush or stiff brush, and gently flick the bristles to create a subtle splatter effect around the blank white space. -
Seal (Optional):
To protect the finish, especially if using air-dry clay, give the ornament a light coat of clear matte sealant spray. -
String It Up:
Cut a length of natural jute twine. Thread it through the hole and secure it with a simple knot or loop to finish your rustic keepsake.
These simple yet striking ornaments bring a permanent touch of nature to your holiday decor

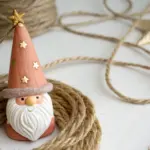
Mini Santa Face Ornaments

Capture the jolly spirit of the season with these adorable, miniature Santa face ornaments perfectly sized for any tree. With their rosy cheeks and textured beards, these little characters add a handcrafted, whimsical touch to your holiday decor.
How-To Guide
Materials
- Polymer clay (Red, White, Beige/Flesh tone, tiny bit of Black)
- Small metal eye pin
- Red satin ribbon (1/4 inch width)
- Texture tool or needle tool
- Ball stylus tool
- Soft pastel chalk (pink/red) and a small brush
- Oven for baking
- Gloss glaze (optional)
Step 1: Forming the Base
-
Prepare the face shape:
Start with a ball of beige or flesh-toned polymer clay about the size of a large marble. Roll it until it is perfectly smooth and free of fingerprints, then gently flatten it just slightly into a thick oval or egg shape. -
Add the hat:
Take a piece of red clay and roll it into a ball, then flatten the bottom to create a dome shape. Press this firmly onto the top third of your beige oval to create Santa’s hat. -
Create the hat brim:
Roll a thin snake of white clay. Wrap this strip around the seam where the red hat meets the beige face, pressing gently to adhere it. -
Texture the brim:
Using a needle tool or a stiff brush, tap repeatedly all over the white brim to create a fluffy, fur-like texture.
Clean Clay Pro-Tip
Red clay pigment loves to stain hands and transfer to white clay. Always use baby wipes to clean your hands thoroughly between handling the red hat and shaping the white beard.
Step 2: Creating the Face
-
Apply the beard:
Flatten a piece of white clay into a crescent moon shape that fits the bottom half of the beige face. -
Detail the beard:
Press the white crescent onto the bottom of the face. Use your needle tool to draw short, vertical lines down the beard to simulate hair strands. -
Add rosy cheeks:
Before adding the nose or mustache, shave a little pink soft pastel onto a paper scrap. Use a soft, dry brush to gently dust the pink powder onto the cheek area, blending the edges for a soft glow. -
Form the mustache:
Roll two very tiny teardrops of white clay. Join the rounded ends in the center and curl the tips slightly upward. -
Attach facial features:
Place the mustache in the center of the face, slightly overlapping the beard. Add a tiny ball of beige clay right above the mustache center for his button nose. -
Make the eyes:
Use a small ball stylus to make two small indentations for eye sockets. Roll two minuscule balls of black clay and press them into these sockets. -
Add a smile:
Use a needle tool or a small blade to gently impress a tiny curve under the mustache to give him a little smiling mouth.
Step 3: Finishing Touches
-
Insert the hardware:
Take a metal eye pin and trim the stem if it’s too long. Push it straight down into the center of the red hat until the loop sits flush with the clay. -
Bake:
Bake the ornament according to your specific brand of polymer clay’s instructions (usually around 275°F or 130°C for 15-30 minutes). I recommend tenting foil over them to prevent the white clay from yellowing. -
Cool and glaze:
Let the piece cool completely. If desired, brush a little gloss glaze over the eyes to make them twinkle. -
String it up:
Thread a length of red satin ribbon through the eye pin loop and tie a knot to create the hanger.
Level Up: Texture
Instead of just scratching lines for the beard, press a piece of coarse sandpaper or a clean toothbrush against the unbaked white clay to give it a realistic, fuzzy stubble texture.
Now you have a charming miniature Santa ready to brighten up your tree branches

The Complete Guide to Pottery Troubleshooting
Uncover the most common ceramic mistakes—from cracking clay to failed glazes—and learn how to fix them fast.
Chubby Reindeer Ornaments
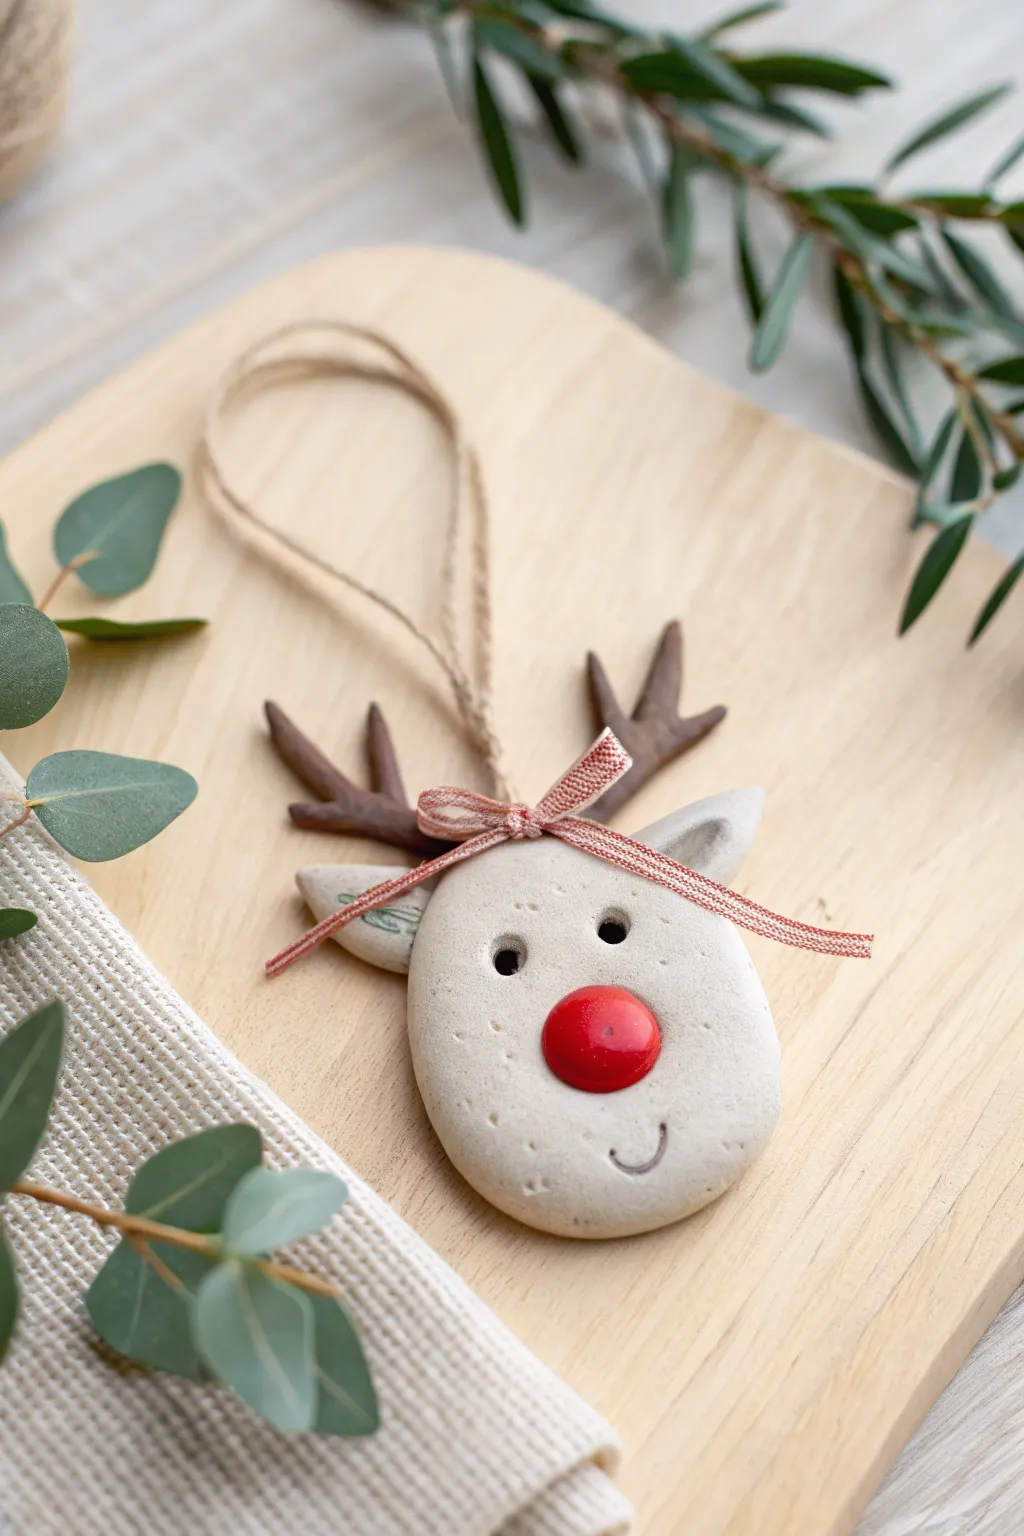
This adorable reindeer ornament features smooth, rounded clay shapes and a charming touch of rustic simplicity. Its prominent red nose and twine hanger make it a perfect addition to a natural or minimalist holiday tree.
Detailed Instructions
Materials
- White polymer clay or air-dry clay
- Brown polymer clay (or brown acrylic paint)
- Red polymer clay (or red acrylic paint)
- Small rolling pin
- Oval or round cookie cutter (approx. 2-3 inches)
- Clay carving tool or knife
- Toothpick or needle tool
- Jute twine
- Narrow ribbon (red or patterned)
- Super glue or strong craft glue
- Small dotting tool
- Black acrylic paint (optional, for eyes)
- Sandpaper (fine grit)
Step 1: Shaping the Head
-
Prepare the Clay:
Begin by conditioning your white clay until it is soft and pliable. Roll it into a smooth ball to remove any air bubbles. -
Flatten the Shape:
Using your rolling pin or the palm of your hand, flatten the ball into a thick, chubby oval. Aim for a thickness of about 1/4 inch so it feels substantial. -
Smooth the Edges:
Dip your finger in a little water (if using air-dry clay) or baby oil (for polymer) and gently run it around the perimeter to smooth out any cracks or rough edges.
Step 2: Creating Facial Features
-
Make the Ears:
Take two small pinch-sized pieces of white clay and roll them into teardrop shapes. Flatten them slightly. -
Attach the Ears:
Press the wider end of each teardrop onto the top corners of the head. Use a modeling tool to blend the seam at the back so they stay secure. -
Form the Nose:
Roll a small ball of red clay. Press it firmly into the center of the face, flattening it just enough so it looks like a button. -
Create Eye Sockets:
Use a dotting tool or the rounded end of a paintbrush to press two deep indents above the nose for the eyes. You can leave these as indentations or fill them with black clay. -
Carve the Smile:
Use a curved carving tool or the side of a straw to impress a small, U-shaped mouth slightly off-center below the nose. -
Pierce the Hole:
Use a toothpick or straw to create a hole at the very top center of the head, between where the antlers will go. Make sure it’s wide enough for your twine.
Cracking Clay?
If using air-dry clay, cracks can appear while drying. Mix a tiny bit of fresh clay with water to make a paste and fill the cracks, then sand smooth once dry.
Step 3: Adding Antlers & Finishing
-
Shape the Antlers:
Roll brown clay into two small snakes. Split the top of each snake slightly to create a ‘Y’ shape, forming the antler branches. -
Texture the Antlers (Optional):
I like to lightly scratch lines along the brown clay with a needle tool to simulate a wood or bark texture. -
Attach Antlers:
Press the antlers onto the back of the head, just behind the ears. Blend the clay at the attachment point on the back to secure them. -
Bake or Dry:
Follow the instructions for your specific clay. If baking polymer clay, place it on a ceramic tile or baking sheet. For air-dry, let it sit for 24-48 hours. -
Sand and Refine:
Once fully cured or dry, use fine-grit sandpaper to gently smooth out any fingerprints on the white face. -
Paint Details:
If you didn’t use colored clay, paint the nose red and the antlers brown now. Add a tiny dot of black paint inside the eye sockets if desired. -
Add Greenery Detail:
For the subtle leaf detail seen on the ear, mix a tiny speck of green paint with water for a wash, or use a fine-tip green marker to draw a simple sprig. -
Tie the Bow:
Cut a small length of ribbon and tie a tiny bow. Glue this securely at the base of the antlers, right over the hanging hole. -
String It Up:
Thread a loop of jute twine through the hole (behind the bow) and knot it securely to finish your ornament.
Pro Tip: Liquid Clay
For polymer clay, apply a drop of liquid clay (like Bake & Bond) between the nose, ears, and antlers before pressing them on for a virtually unbreakable bond.
Hang your cheerful new friend on the tree and enjoy the handmade charm it brings to your holiday decor
Snowman Button-Belly Ornaments
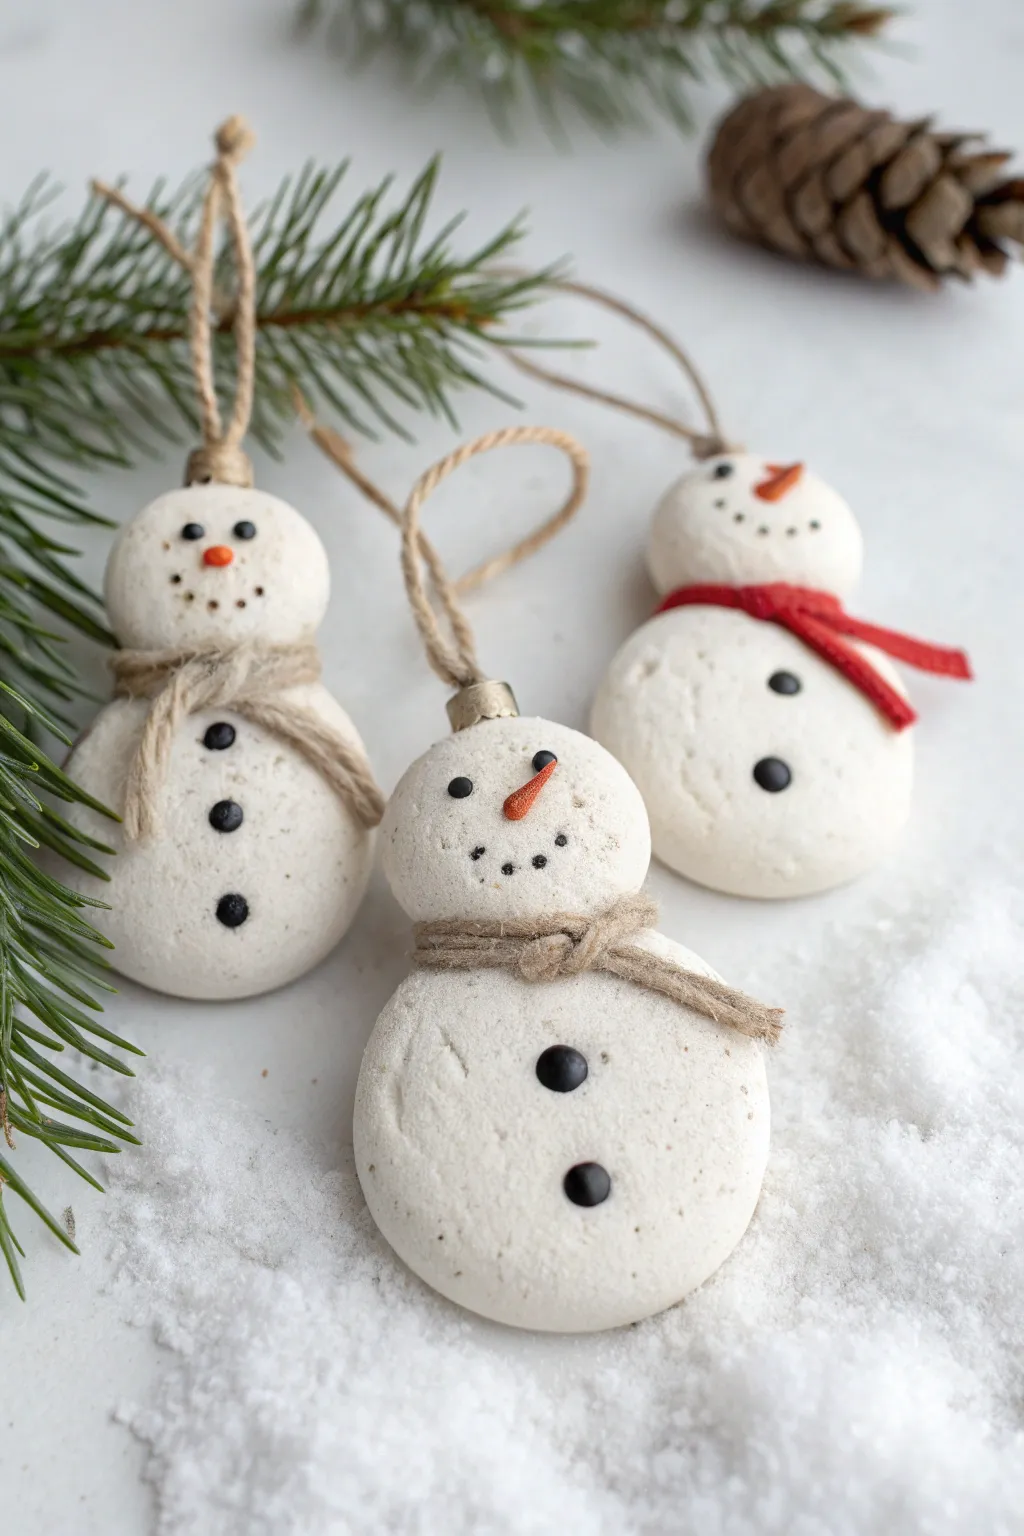
These charming snowman ornaments combine the simplicity of white clay with rustic twine accents for a cozy, handmade feel. Each figure features tiny button details and a classic carrot nose, making them perfect for creating a nostalgic winter atmosphere on your tree.
Step-by-Step
Materials
- White polymer clay or white air-dry clay
- Jute twine or hemp cord
- Small black beads or black seed beads (for eyes and buttons)
- Small amount of orange clay (or orange paint)
- Black acrylic paint and fine detail brush (for mouth)
- Red felt or fabric scrap (optional for scarf)
- Eyepins or wire loops for hanging
- Craft glue or strong adhesive
- Rolling pin
- Toothpick or needle tool
- aluminum foil (for armature core, optional)
Step 1: Shaping the Snowmen
-
Prepare the Body:
Start by conditioning your white clay until it is soft and pliable. Roll a medium-sized ball of clay for the body, about 1.5 inches in diameter, and flatten it slightly into a thick disc shape rather than a perfect sphere to give it that ‘stone’ look. -
Form the Head:
Roll a smaller ball of white clay, roughly half the size of the body. Flatten this one slightly as well to match the body’s profile. -
Assemble the Base:
Press the head firmly onto the top of the body piece. To ensure a strong bond, you can score the connecting surfaces with a toothpick and add a dab of liquid clay or water (depending on your clay type) before joining them together. -
Add Texture:
For that organic, stone-like finish seen in the photo, gently tap the surface of the clay with a clean toothbrush or the texture of a crumpled ball of aluminum foil. This removes visible fingerprints and adds character. -
Insert the Hanger:
Push an eyepin carefully into the top center of the head. If you don’t have eyepins, you can form a small loop with craft wire and insert the ends deeply into the clay.
Keep It Clean
White clay picks up dust instantly! Keep baby wipes or a scrap piece of ‘cleaning clay’ nearby to clean your hands and tools often while working.
Step 2: Adding Details
-
Create the Nose:
Take a tiny pinch of orange clay and roll it into a very small cone shape. Press this gently into the center of the face. If you plan to paint the nose later, simply shape it with white clay for now. -
Place the Eyes:
Press two small black beads firmly into the clay for the eyes. Ensure they are embedded deep enough that they won’t pop out after baking or drying. -
Add the Buttons:
Press two or three slightly larger black beads down the center of the body section to create the classic coal buttons. -
Bake or Dry:
Follow the manufacturer’s instructions for your specific clay. If baking polymer clay, ensure your oven is at the correct temperature to prevent burning white clay. If using air-dry clay, allow 24-48 hours for complete drying.
Step 3: Finishing Touches
-
Paint the Smile:
Once the snowman is completely cool or dry, use a very fine detail brush or a black fine-tip marker to dot on a cheerful, coal-mouth smile. -
Paint the Nose (Optional):
If you used white clay for the nose, carefully paint it with orange acrylic paint now. -
Create a Twine Scarf:
Cut a length of jute twine roughly 6 inches long. Wrap it snugly around the ‘neck’ area where the two clay circles meet. -
Secure the Scarf:
Tie a simple knot or a small bow at the front or slightly to the side. I often add a tiny dot of super glue under the knot to keep it permanently in place. -
Alternative: Red Scarf:
For a pop of color like the third snowman, cut a thin strip of red felt instead of twine. Wrap it around the neck and cross the ends, gluing them down flat against the body. -
Attach the Hanging Loop:
Thread a piece of jute twine through the metal eyepin loop at the top. Tie the ends securely to create a hanger for your tree. -
Final Inspection:
Check that all beads and scarves are secure. If any beads feel loose, secure them with a tiny drop of clear craft glue.
Glittery Frost Effect
Before the clay dries or bakes, brush a tiny amount of mica powder or white bioglitter over the surface to give the snowman a freshly fallen snow sparkle.
Now hang your trio of frosty friends on the tree and enjoy their timeless charm.


What Really Happens Inside the Kiln
Learn how time and temperature work together inside the kiln to transform clay into durable ceramic.
Gingerbread People With Faux Icing
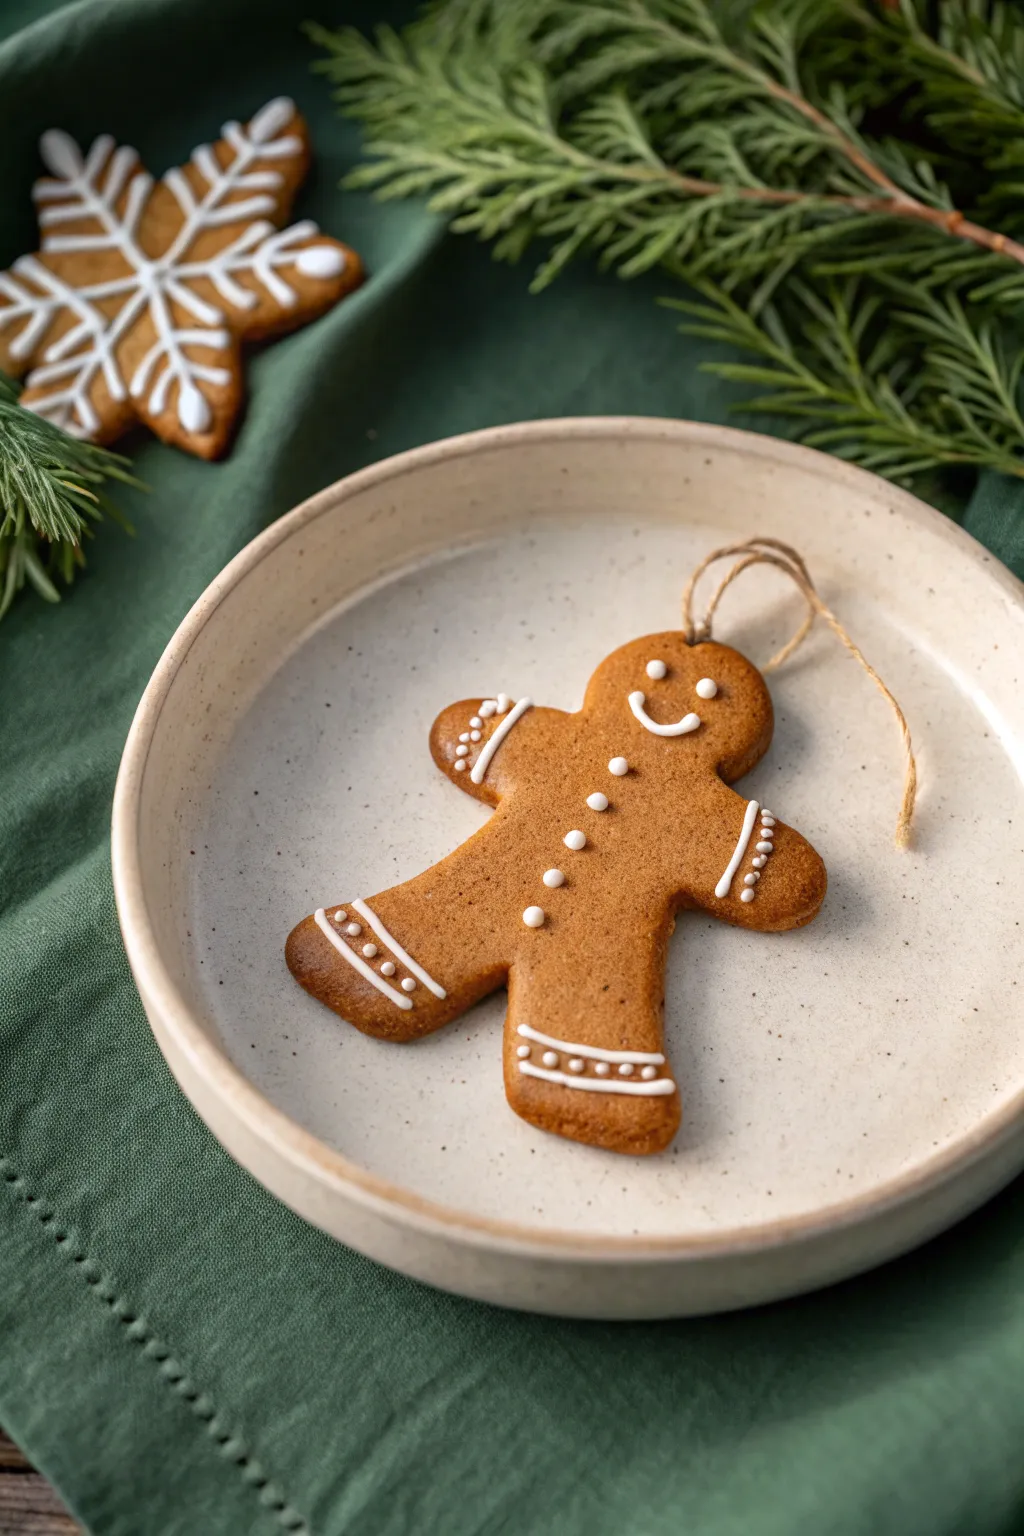
Create a classic holiday keepsake without the baking using polymer clay that looks good enough to eat. This realistic gingerbread person features clean white piping details and a rustic texture that perfectly mimics the beloved cookie.
Detailed Instructions
Materials
- Polymer clay in a warm gingerbread color (mix brown, translucent, and a touch of red/orange)
- White liquid polymer clay (or white clay softened with baby oil)
- Gingerbread man cookie cutter
- Rolling pin or pasta machine
- Toothbrush or balls of tin foil (for texturing)
- Soft pastels (dark brown and russet tones)
- Needle tool or toothpick
- Twine or jute cord
- Parchment paper
- Needle tip applicator bottle (optional but recommended)
Step 1: Prepping and Shaping the Dough
-
Mix your custom color:
Start by conditioning your brown clay. To get that baked-good depth, I usually mix a standard brown with a significant chunk of translucent clay and just a tiny pinch of red or orange to warm it up. -
Roll it out:
Roll your clay into a sheet approximately 1/4 inch thick. You want it substantial enough to look like a thick, soft cookie, not a thin cracker. -
Add texture:
Before cutting, gently press a texture onto the surface of the clay sheet. A clean toothbrush or a crumpled ball of aluminum foil rolled lightly over the surface creates perfect cookie crumbs and pores. -
Cut the shape:
Press your gingerbread man cookie cutter firmly into the textured clay. Give it a little wiggle to ensure a clean separation before lifting the cutter away. -
Soften the edges:
Real cookies bake and puff up, creating rounded edges. Use your finger to gently tap and round off the sharp cut edges of the clay so it doesn’t look like a harsh mechanical cut. -
Create the hanging hole:
Use a needle tool or the end of a paintbrush to poke a hole through the top of the head. Make it slightly larger than you think you need, as it can shrink slightly during baking.
Scent of the Season
Mix a tiny pinch of real cinnamon or pumpkin pie spice directly into the clay during the conditioning phase. It adds realistic speckles and a faint, festive scent.
Step 2: Shading and Baking
-
Prepare the pastels:
Scrape some dark brown and reddish-brown soft pastels into a fine powder using a craft knife or sandpaper. -
Apply the ‘bake’:
Using a soft fluffy brush, dust the edges of the gingerbread man with the pastel powder. Concentrate on the hands, feet, and head to mimic where a cookie would naturally brown in the oven. -
First bake:
Place your creation on parchment paper and bake according to your specific clay manufacturer’s instructions (usually around 275°F/135°C for 15-30 minutes). Let it cool completely.
Make it Sparkle
While the liquid clay icing is wet, sprinkle very fine clear or iridescent glitter over the white lines. It mimics the look of sugar crystals on fresh cookies.
Step 3: Icing and Assembly
-
Prepare the icing:
While the piece cools, prepare your white liquid clay. If it’s too thick, add a drop of clay softener. Pour it into a needle-tip applicator bottle for precision. -
Pipe the face:
Squeeze the bottle gently to create two small dots for eyes and a curved line for the smile. Let the liquid clay settle slightly so it looks like royal icing. -
Add the buttons:
Place three evenly spaced dots down the center of the torso for the buttons. -
Decorate the limbs:
Draw squiggly lines across the wrists and ankles. I like to add tiny dots above or below these lines for extra detail, just like traditional decorating. -
Final cure:
Return the decorated piece to the oven for a second, shorter bake (about 10-15 minutes) to set the liquid clay ‘icing’. Monitor closely so the white doesn’t yellow. -
String it up:
Once fully cooled, cut a length of rustic jute twine. Thread it through the hole in the head and tie a loop for hanging.
Now you have a charming, permanent cookie ornament ready to hang on the tree or gift to a friend.
Mini Gingerbread House Ornaments

These miniature houses capture the cozy warmth of real gingerbread without the crumbs, featuring a realistic cookie texture and stark white “icing” details. Hanging from a rustic twine loop, they make perfect additions to your tree or festive gift tags.
Step-by-Step Tutorial
Materials
- Light brown polymer clay or air-dry clay
- Terracotta or dark brown acrylic paint (if tinting clay)
- White puff paint (3D fabric paint) or thick white acrylic paint in a fine-tip applicator bottle
- Rolling pin
- Craft knife or clay blade
- Sandpaper or a stiff bristle brush (e.g., old toothbrush)
- Eye pin or thick wire loop
- Jute twine
- Ruler
- Matte varnish (optional)
Step 1: Prepping the Dough
-
Tint the clay:
If using white air-dry clay, mix in a small amount of terracotta or light brown acrylic paint. Knead thoroughly until the color is uniform and resembles baked gingerbread dough. -
Roll it out:
Roll your clay out on a smooth surface to a thickness of about 1/4 inch (6-7mm). You want it chunky enough to hold its shape but light enough to hang. -
Texture the surface:
Before cutting, gently press a piece of fine-grit sandpaper or tap a stiff bristle brush over the entire surface of the clay. This creates that authentic baked cookie texture.
Step 2: Constructing the House
-
Cut the walls:
Using a craft knife and ruler, cut out four rectangles for the walls. For this square design, aim for roughly 1.5 inches wide by 1.5 inches tall. -
Create the roof pitch:
Take two of your wall pieces and trim the top into a triangular point to create the gables. Ensure they match perfectly by stacking them while cutting. -
Cut the roof panels:
Cut two rectangular slabs for the roof. These should be slightly wider and longer than the house base to create an overhang. -
Scoring edges:
Score the edges where the walls will join with your needle tool or knife. If using air-dry clay, apply a tiny dab of water or clay slip to these scored areas to act as glue. -
Assemble the base:
Press the walls together to form the box shape. Use your fingers to smooth the seams inside and out, blending the clay so the joints disappear. -
Attach the roof:
Place the two roof panels on top, pressing them gently onto the gable peaks and joining them at the center ridge. The overhang adds instant charm. -
Add hanging hardware:
Insert an eye pin into the center of the roof ridge. Twist it slightly as you push it in to ensure the clay grips the metal securely. -
Dry or bake:
Follow the manufacturer instructions for your specific clay. If baking, tent with foil to prevent scorching. If air-drying, rotate the house occasionally for even drying.
Sagging Roof?
If the roof sags during assembly, scrunch up a small ball of aluminum foil or paper and place it inside the house structure for support until the clay hardens.
Step 3: Decorating
-
Snowy roof base:
Once fully cured and cool, paint the entire roof white using acrylic paint or white texture paste. Dab it on rather than brushing to make it look like thick, fluffy snow. -
Icing loops:
Using your fine-tip white puff paint or applicator bottle, pipe a row of small loops along the bottom edge of the roof to mimic dripping icing. -
Windows:
Pipe simple square outlines for windows on the side walls. Add a cross in the center of each square to create four panes. -
Front door:
Pipe an arched doorway on the front gable end. Add a tiny dot for the doorknob. -
Attic window:
Above the door, pipe a slightly smaller, arched window with a cross-pane detail to fill the triangular gable space. -
Roof details:
Once the base white roof layer is dry, add tiny brown dashes using a fine brush and watered-down brown paint to simulate sprinkles or texture on the snow. -
String it up:
Thread a piece of rustic jute twine through the eye pin loop and tie a knot to finish your ornament.
Scented Clay
Knead a generous pinch of real cinnamon, ginger, and cloves directly into the clay dough. The ornament will smell like fresh baking for years.
Hang your new creation on a sturdy branch where the white details can catch the light

TRACK YOUR CERAMIC JOURNEY
Capture glaze tests, firing details, and creative progress—all in one simple printable. Make your projects easier to repeat and improve.
Candy Cane Twist Ornaments
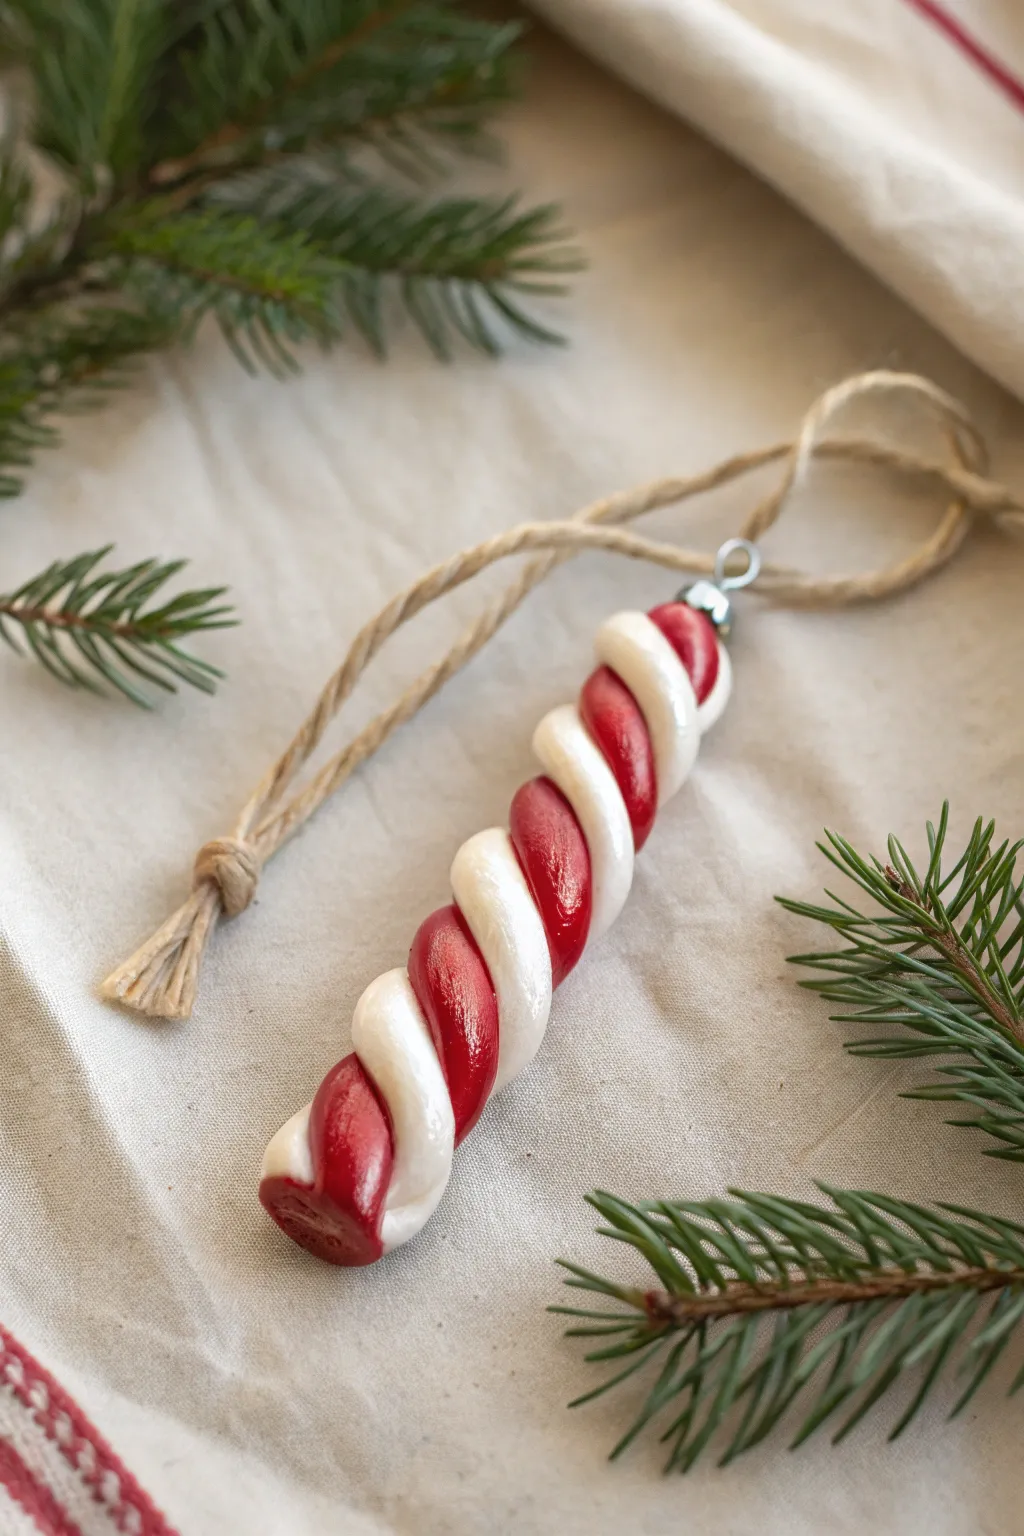
Capture the classic look of holiday candy with this surprisingly simple polymer clay project. These twisted red and white ornaments have a smooth, glossy finish that makes them look just like the real sweet treat hanging on your tree.
Step-by-Step Guide
Materials
- Red polymer clay (e.g., Fimo or Sculpey)
- White polymer clay
- Acrylic rolling pin or clay machine
- Sharp clay blade or craft knife
- Metal eye pins
- Glossy polymer clay glaze or polyurethane varnish
- Soft synthetic paintbrush
- Jute twine or ribbon
- Oven for baking
Step 1: Prepping and Rolling
-
Condition the clay:
Begin by thoroughly conditioning your red and white clay separately. Knead each color in your hands until it is warm, soft, and pliable to prevent cracking later. -
Roll out ropes:
Take a chunk of white clay and roll it into a smooth, even snake on your work surface. Aim for a thickness of about 1/4 inch (6-7mm). -
Repeat with red:
Repeat the previous step with the red clay, ensuring it matches the thickness and length of your white rope as closely as possible. -
Clean your hands:
I always make sure to wipe my hands or wash them between colors, especially after handling red, to keep the white clay pristine and free of pink smudges. -
Align the strands:
Place the red rope and the white rope side-by-side, pressing them gently together along their entire length so they stick slightly but don’t merge.
Clean Clay Pro-Tip
Keep baby wipes nearby. Red pigment is notorious for staining hands; wipe thoroughly before touching white clay to keep your peppermint stripes bright.
Step 2: Creating the Twist
-
Begin twisting:
Hold one end of the paired ropes stationary. With your other hand, slowly twist the other end. Watch the spiral form evenly as you go. -
Roll gently:
Once twisted, place the rope on your work surface and roll it very gently back and forth. This seals the two colors together and smooths out the ridges for a more uniform candy look. -
Cut to size:
Using your sharp clay blade, cut the long twisted rope into shorter segments. A length of about 3 to 4 inches creates a nice standard ornament size. -
Check the ends:
Inspect the cut ends. If the twisting distorted the shape, gently pat the ends flat or slightly round them with your fingertip for a polished appearance.
Step 3: Hardware and Finishing
-
Insert eye pin:
Take a metal eye pin and carefully push the straight end down into the center of the top of your twisted stick. Ensure it goes in straight so it doesn’t poke out the side. -
Secure the pin:
If the clay feels loose around the pin, pinch the top of the ornament ever so slightly to secure the metal in place. -
Bake the batch:
Place your ornaments on a baking sheet lined with parchment paper. Bake according to your brand of clay’s specific instructions (usually 230°F – 275°F for 15-30 minutes). -
Cool down:
Allow the ornaments to cool completely before handling. Polymer clay is still slightly soft when hot and hardens as it cools. -
Apply varnish:
Once cool, brush a coat of glossy polymer clay glaze or water-based polyurethane over the entire surface. This gives it that hard-candy shine. -
Dry completely:
Let the glaze dry fully according to the bottle directions, usually at least an hour. -
Add the hanger:
Thread a length of jute twine through the metal eye loop. I prefer the rustic look of jute, but ribbon works too. -
Tie the knot:
Secure the twine ends with a simple overhand knot to create a loop for hanging.
Level Up: Sparkle Finish
Before baking, lightly brush the white sections with pearl mica powder, or mix a tiny bit of ultra-fine iridescent glitter into your glaze for a sugar-coated effect.
Now hang your sweet creations on the tree or use them as charming gift toppers for friends and family
Clay Bell Ornaments With Big Bows
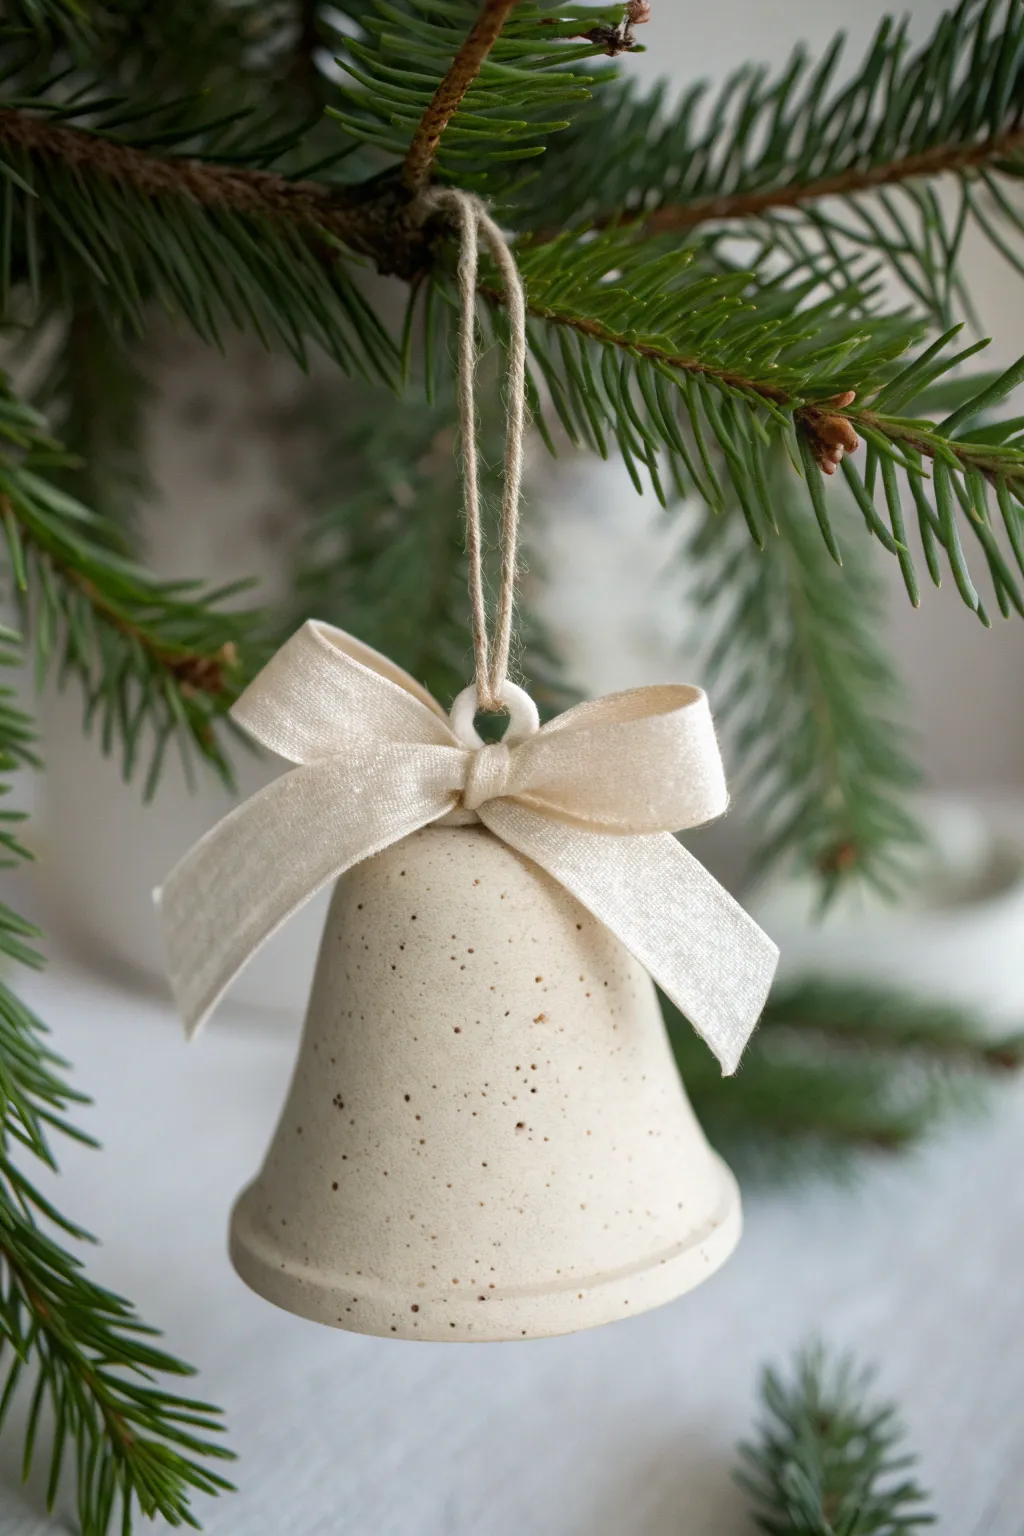
These charming bell ornaments bring a minimalist, Scandinavian-inspired touch to your holiday decor. With a lovely speckled finish and a soft ribbon bow, they look like high-end ceramic pieces but are surprisingly simple to craft at home using polymer or air-dry clay.
How-To Guide
Materials
- White or cream polymer clay (or air-dry clay)
- Black pepper or dried coffee grounds (for speckling)
- Rolling pin
- Cone-shaped mold (cardboard cone or foam cone covered in foil)
- Small round cutter or straw
- Natural jute twine
- Cream silk or velvet ribbon
- Craft knife or clay blade
- Fine-grit sandpaper
- Matte spray varnish (optional)
Step 1: Preparing the Clay
-
Condition the base:
Begin by conditioning your white or cream clay in your hands until it is soft, pliable, and free of cracks. -
Add the texture:
Sprinkle a small pinch of ground black pepper or dried coffee grounds onto the clay. I find that pepper gives a more subtle, stonewear look. -
Incorporate the flecks:
Fold and knead the clay repeatedly to distribute the specks evenly throughout the mixture so it resembles natural speckled pottery. -
Roll it out:
Using a rolling pin, flatten the speckled clay into an even slab, aiming for about 1/4 inch thickness for durability.
Step 2: Shaping the Bell
-
Proper sizing:
Determine the height of your bell and cut a rectangle or slightly curved fan shape from your clay slab that will wrap fully around your cone mold. -
Wrap the mold:
Gently drape the clay sheet around your prepared cone mold. Ensure your mold is covered in foil or plastic wrap first so the clay doesn’t stick. -
Seam smoothing:
Join the edges of the clay together. Use your finger or a smoothing tool to blend the seam until it vanishes completely. -
Create the rim:
At the bottom of the bell, you can either trim cleanly or roll a very thin snake of clay and attach it to the edge to create the slight lip seen in the photo. -
Smooth the surface:
With the clay still on the mold, gently smooth out any fingerprints or bumps using a tiny bit of water (for air-dry clay) or baby oil (for polymer).
Cracked Clay?
If using air-dry clay, cracks can happen as moisture evaporates. Fill small fissures with a wet clay slip and smooth over before the piece is fully rigid.
Step 3: Finishing Touches
-
Add the hanger loop:
Form a small, thick loop of clay. Attach this securely to the very top point of your bell using liquid clay or slip to bond it. -
Reinforce the hole:
Before baking or drying, insure the opening in your top loop is large enough for your twine to pass through. -
Bake or dry:
Follow the manufacturer’s instructions for your specific clay. If baking polymer, tent fit with foil to prevent scorching the white color. -
Sanding:
Once fully cured and cooled, use fine-grit sandpaper to smooth any rough edges on the bottom rim for a professional finish. -
Seal (Optional):
If you want a sealed finish, apply a coat of matte varnish, though the raw matte look often works best for this rustic style.
Make It Ring
Before assembly, attach a small bead or jingle bell inside on a separate string hidden under the main bell shape so it makes a sound when moved.
Step 4: Assembly
-
Thread the hanger:
Cut a length of natural jute twine. Fold it in half and pass the loop end through the clay handle on top of the bell. -
Secure the twine:
Pass the loose ends of the twine through the loop and pull tight to create a lark’s head knot arrangement. -
Tie the bow:
Take your cream ribbon and tie a neat, symmetrical bow around the base of the clay loop, right where the twine connects. -
Trim edges:
Cut the ribbon tails into
Now you have a timeless, handcrafted ornament ready to grace your tree for years to come
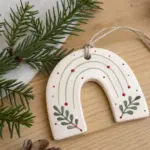
Wreath Ring Ornaments
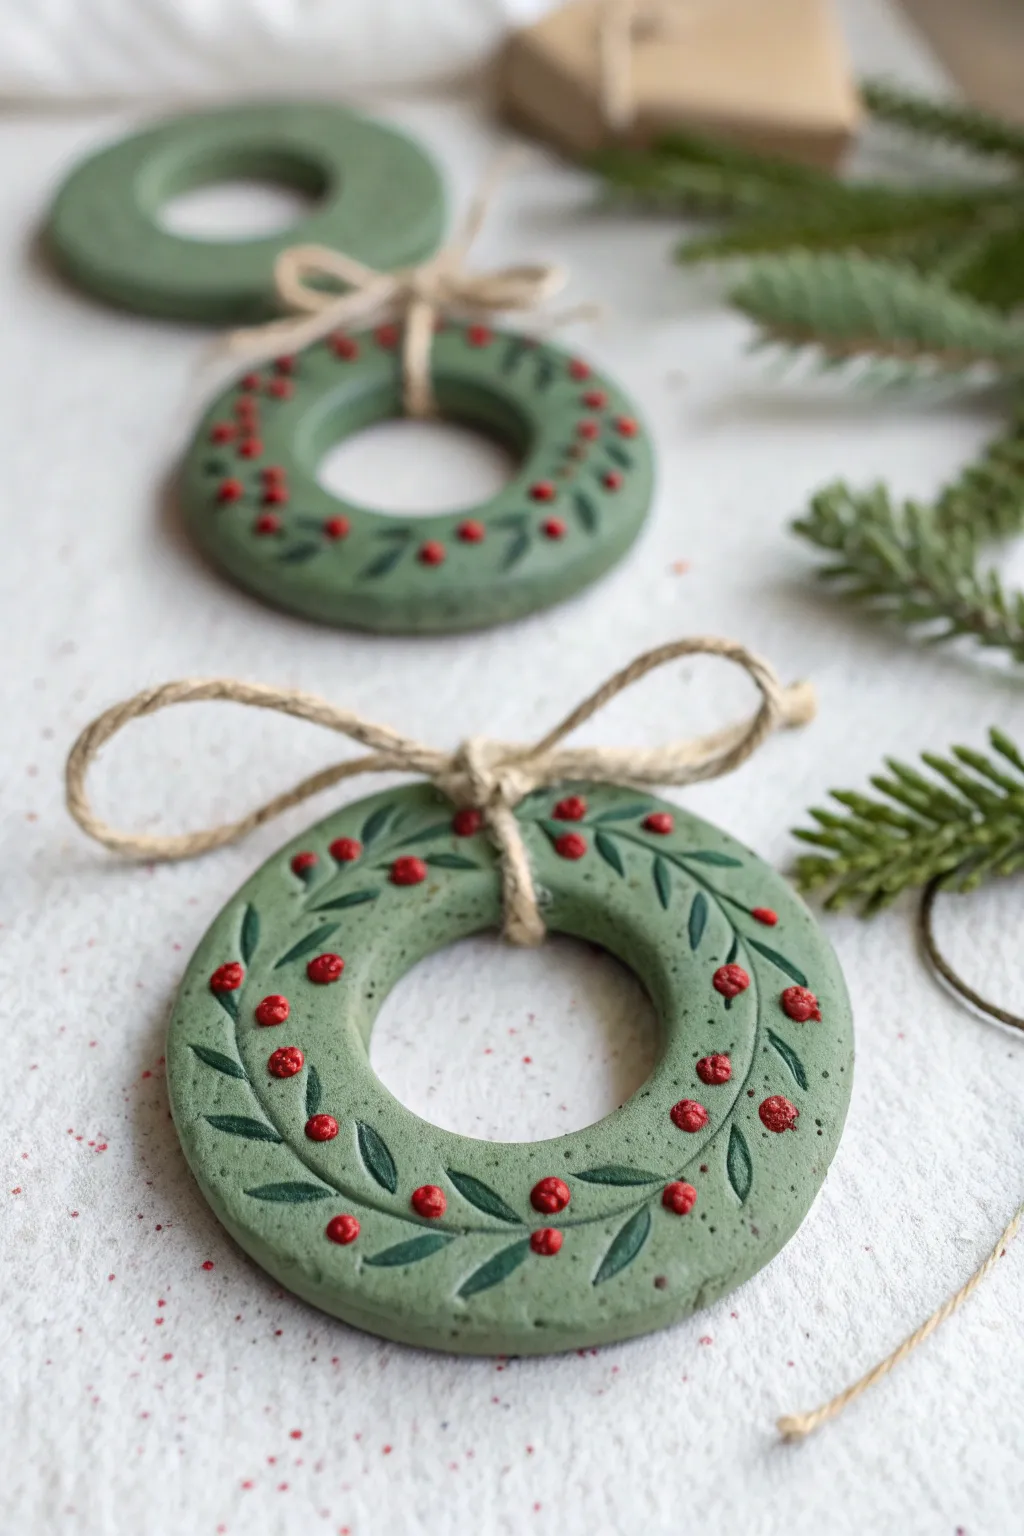
These sage green wreath ornaments bring a touch of woodland charm to your tree with their painted delicate fern leaves and bright red berries. The matte clay finish combined with hand-painted details gives them a lovely, high-end ceramic look without the need for a kiln.
Step-by-Step Tutorial
Materials
- Air-dry clay (or polymer clay)
- Acrylic rolling pin
- Circle cookie cutters (one large, one small)
- Sage Green acrylic paint (matte)
- Forest Green acrylic paint
- Bright Red acrylic paint
- Fine detail paintbrush (size 0 or 00)
- Jute twine
- Fine grit sandpaper
- Matte spray varnish
Step 1: Shaping the Base
-
Condition the clay:
Start by taking a handful of your air-dry clay and kneading it in your hands until it becomes soft, pliable, and free of cracks. -
Roll it out:
Using an acrylic rolling pin, flatten the clay to a uniform thickness of about 1/4 inch (6mm). If you want perfectly even ornaments, place wooden dowels on either side of the clay as guides while rolling. -
Cut the outer circle:
Press your larger circle cutter firmly into the clay to create the outer edge of the wreath. -
Cut the inner circle:
Take the smaller cutter and center it carefully within the larger circle. Press down to punch out the middle, creating a donut shape. Remove the excess clay from the center and edges. -
Smooth the edges:
Dip your finger in a tiny bit of water and gently run it along the cut edges to smooth out any roughness or burrs left by the cutters. -
Dry completely:
Place your clay rings on a flat surface lined with parchment paper. Let them dry for 24-48 hours, flipping them occasionally to ensure they dry evenly and stay flat.
Clean Lines Tip
If your hand feels shaky while painting the fine vines, rest your pinky finger on the table surface to stabilize your hand and create smoother strokes.
Step 2: Painting and Decorating
-
Sand imperfections:
Once fully dry, check for any rough spots. Lightly sand the edges with fine-grit sandpaper for a professional finish. -
Base coat application:
Apply a coat of sage green acrylic paint to the entire surface, including the inner ring and sides. Let it dry, and apply a second coat for solid, opaque coverage. -
Paint the stems:
Using your fine detail brush and forest green paint, draw a thin, curving line that meanders around the face of the wreath ring. This acts as the main vine. -
Add fern leaves:
Along the vine, paint small, teardrop-shaped leaves branching off. Angle them slightly to mimic the natural growth of fern fronds. -
Create the berries:
Dip the non-brush end (the handle tip) of your paintbrush into thick bright red paint. Gently dot this onto the wreath surface among the leaves to create raised, round berries. -
Let the details set:
Allow the painted details to dry completely before handling, ensuring you don’t smudge the raised berry dots. -
Seal the ornament:
Spray the ornament with a matte varnish. This protects the paint and gives the piece a cohesive, finished texture similar to stoneware.
Make it Sparkle
For a frosty winter morning effect, lightly sprinkle ultra-fine white glitter over the red berry dots while the paint is still wet.
Step 3: Finishing Touches
-
Prepare the hanger:
Cut a length of jute twine, roughly 8 inches long. -
Loop attachment:
Fold the twine in half and pass the loop end through the center of the wreath ring. -
Secure the knot:
Pull the loose ends of the twine through the loop you just created and tighten it gently against the clay ring (a lark’s head knot). -
Tie the bow:
With the secure knot at the base, take the two loose ends and tie a simple shoelace bow right above the clay ring. Trim the ends to your desired length.
Hang these lovely handmade pieces on your tree or use them as unique gift toppers for special presents
Poinsettia Petal Ornaments
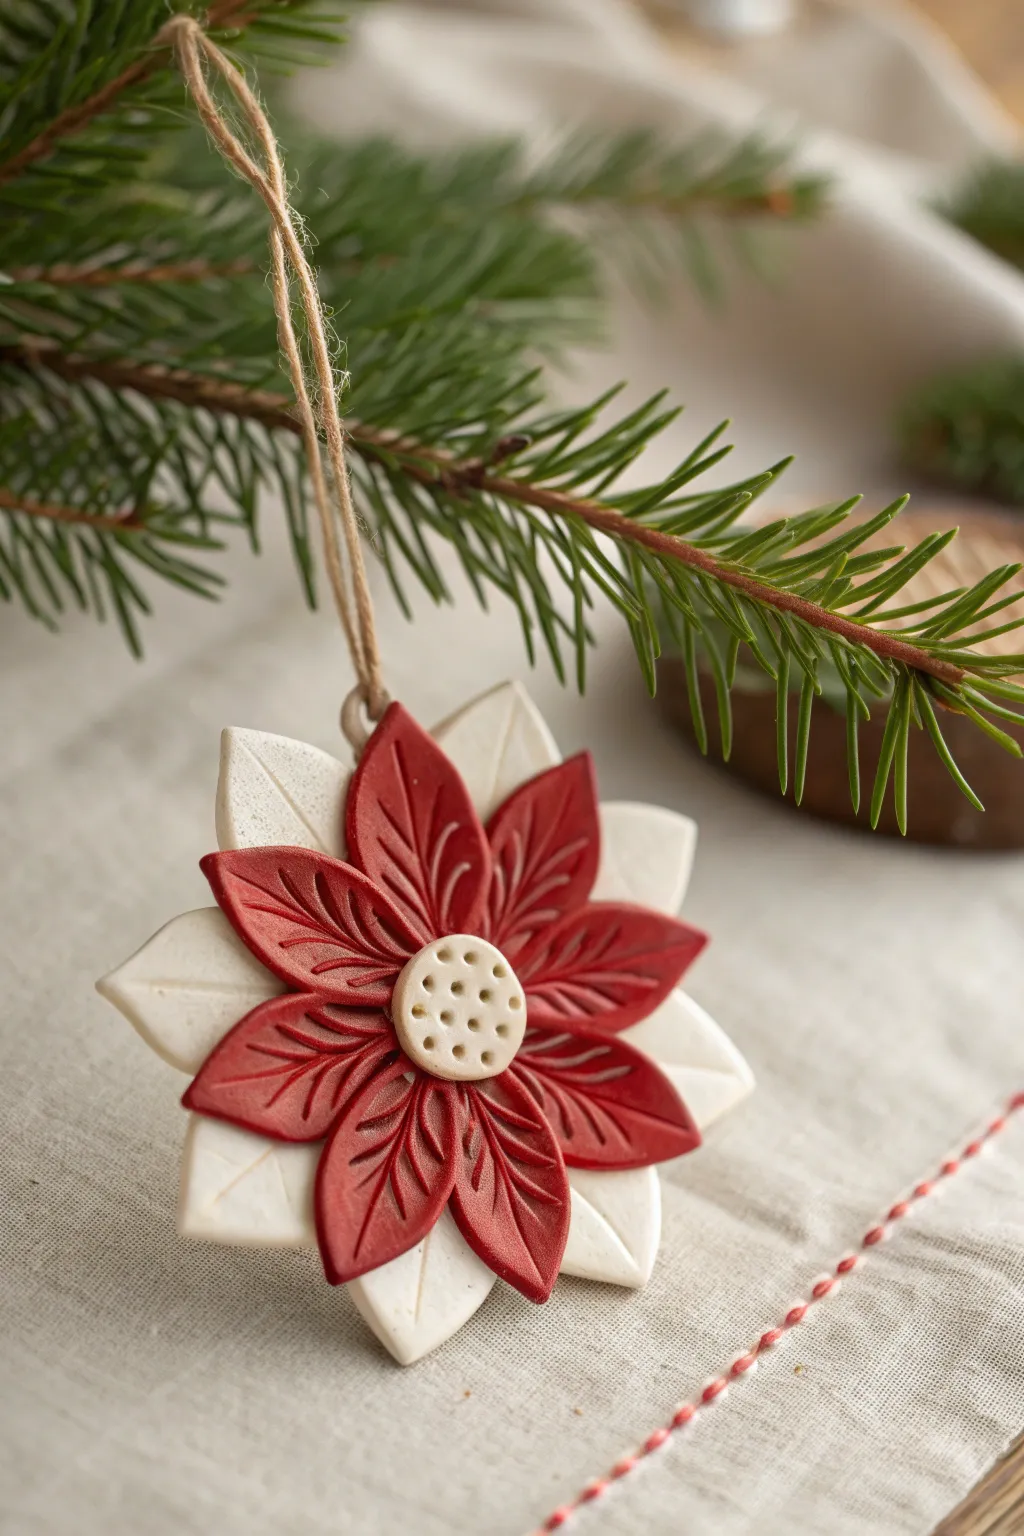
This two-toned poinsettia ornament captures the classic beauty of Christmas flora with a modern, textured twist. Using contrasting layers of rich red and creamy white clay, you’ll build a durable and festive decoration perfect for hanging on the tree.
Detailed Instructions
Materials
- White or cream polymer clay
- Deep red polymer clay
- Leaf-shaped cutter (small and medium sizes)
- Leaf vein texture mat or veining tool
- Small circle cutter or straw
- Dotting tool or toothpick
- Liquid polymer clay or bake and bond
- Jute twine or ribbon
- Rolling pin or pasta machine
- Needle tool
- Oven and basking sheet
Step 1: Creating the Base Layer
-
Condition the Clay:
Start by thoroughly conditioning your white or cream polymer clay. Knead it in your hands until it becomes soft, pliable, and free of cracks. A well-conditioned clay is the secret to a smooth finish. -
Roll the Sheet:
Roll the white clay out to a uniform thickness, approximately 3-4mm thick. You want it sturdy enough to support the top layer but not too heavy for a branch. -
Cut the Base Petals:
Using your leaf-shaped cutter, punch out eight individual petal shapes. If you don’t have a cutter, you can trace a template and cut them out carefully with a craft knife. -
Add Texture:
Press a leaf vein texture mat onto each white petal to create subtle indentations. If you lack a mat, gently score a central vein and branching side veins using a needle tool. -
Assemble the Star:
arrange the eight white petals in a radial starburst pattern on your work surface. The tips should point outward, and the bases should overlap slightly in the very center to create a solid foundation. -
Bond the Center:
Press the overlapping center points together firmly to ensure they fuse. You can smooth the back of this joint with your finger or a tool to strengthen the connection.
Clean Cuts Pro Tip
To prevent fingerprints, place a sheet of cling film over the clay before cutting your leaf shapes. This creates a beautifully rounded, ‘pillowed’ edge.
Step 2: Adding the Red Layer
-
Prepare Red Clay:
Condition the red clay and roll it out slightly thinner than your base layer, perhaps around 2-3mm. -
Cut Red Petals:
Cut out eight more leaf shapes from the red clay. These should ideally be the same size or just a hair smaller than your white petals. -
Imprint Veins:
Use your texture mat or needle tool to add deep, defined vein patterns to each red petal. I find that pressing a bit harder on this top layer makes the detail pop nicely. -
Apply Bonding Agent:
Dab a very small amount of liquid polymer clay or bake-and-bond onto the center of the white flower base. -
Layer the Petals:
Place the red petals on top of the white ones, but rotate them slightly so the red points lay in the gaps between the white petals. This offset layering creates depth. -
Secure the Center:
Press the bases of the red petals down gently into the center to secure them.
Hole Troubleshooting
If you forgot to make a hole before baking, don’t panic. You can carefully drill a hole in cured polymer clay using a small hand drill or pin vise.
Step 3: Final Details and Baking
-
Create the Button Center:
Roll a small ball of white clay and flatten it into a thick disk. It needs to be large enough to cover the messy junction of all the petal bases. -
Texture the Center:
Refine the circle’s shape, then use a dotting tool or a toothpick to poke a pattern of small holes across the surface, resembling seeds or a button. -
Attach the Center:
Add a drop of liquid clay to the center of the red flower and press the textured white disk firmly into place. -
Make the Hanger:
Using a needle tool, carefully pierce a hole through the top of one of the white petals. Ensure the hole is wide enough for your twine. -
Check for Lint:
Before baking, inspect the white clay for any stray red specks or dust. Remove them gently with a cotton swab dipped in rubbing alcohol. -
Bake:
Bake the ornament according to the manufacturer’s instructions for your specific brand of clay. Usually, this is around 275°F (135°C) for 15-30 minutes. -
Cool and Hang:
Allow the piece to cool completely before handling. Once hard, thread a length of jute twine through the hole and tie a knot to finish.
Now you have a timeless floral ornament ready to bring a touch of handcrafted charm to your holiday display
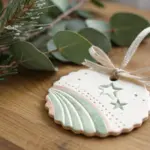
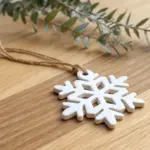
Snowflake Cutouts With Lacy Texture
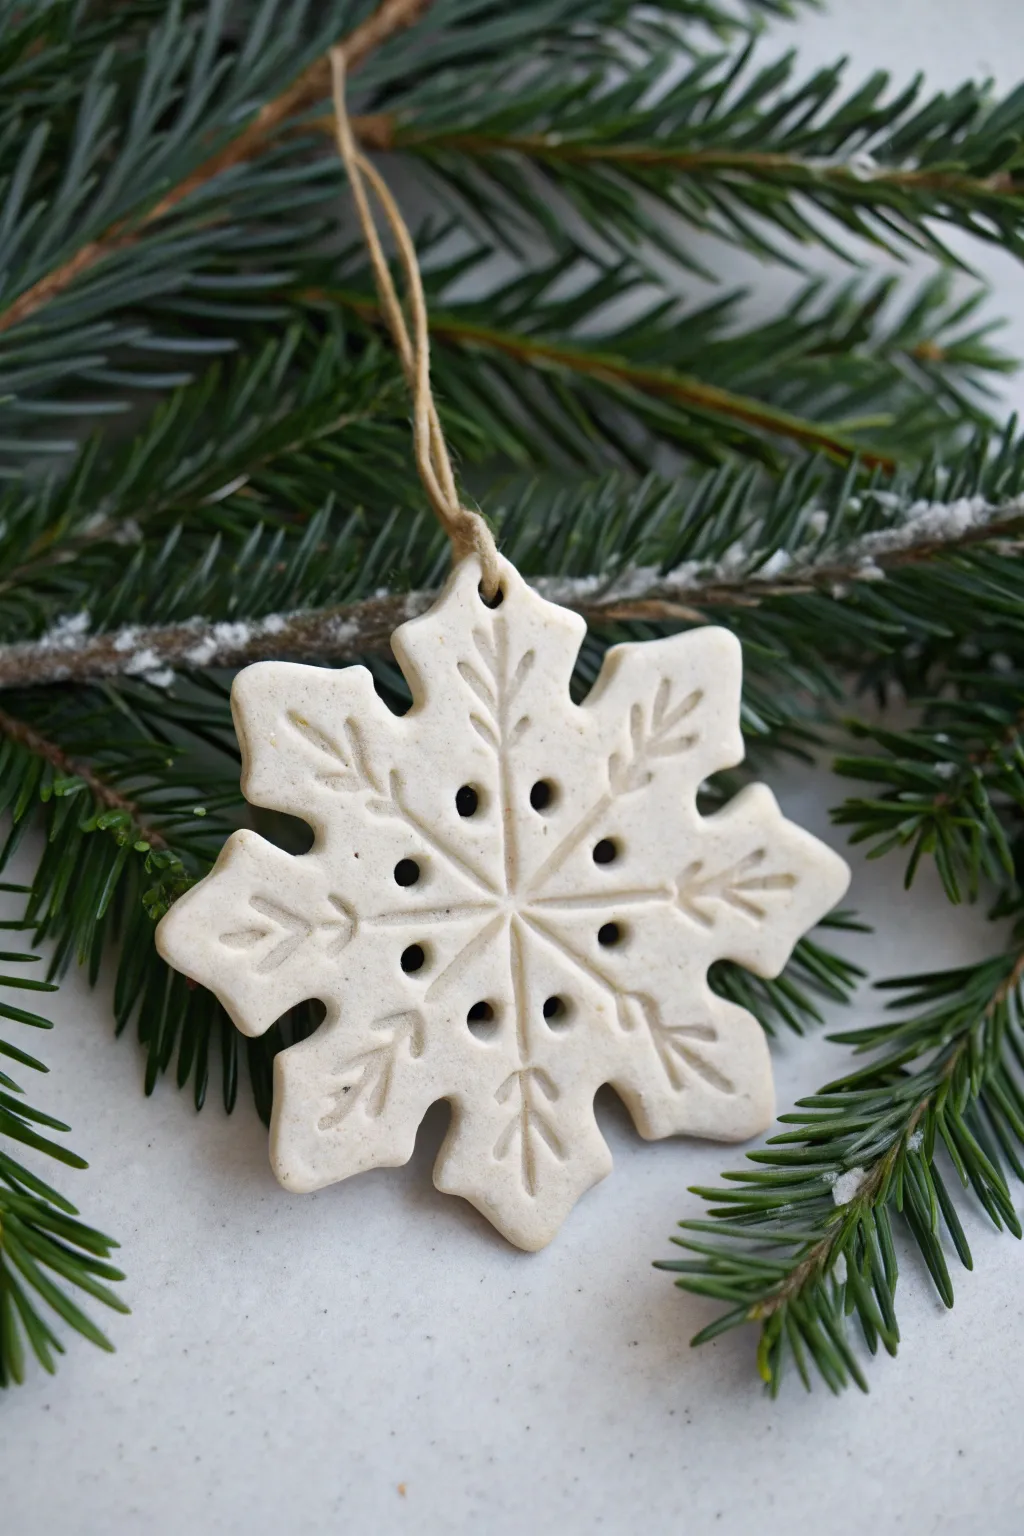
Capture the magic of winter with these charmingly rustic snowflake ornaments, featuring delicate incised details and a soft, matte finish. This simple project transforms basic clay into heirloom-quality decor perfect for hanging on the tree or gifting to loved ones.
Step-by-Step Guide
Materials
- White polymer clay or air-dry clay
- Rolling pin
- Snowflake cookie cutter (approx. 3-4 inches)
- Parchment paper or silicone mat
- Needle tool or toothpick
- Small round tool (like a stirrer or paintbrush end)
- Natural jute twine
- Fine grit sandpaper (optional)
- Clear matte varnish (optional)
Step 1: Shaping the Base
-
Prepare your workspace:
Lay down a sheet of parchment paper or a silicone mat to prevent the clay from sticking to your table. Clean hands are essential here, as white clay shows every speck of dust. -
Condition the clay:
Knead a palm-sized amount of clay in your hands until it becomes soft, pliable, and warm. This helps prevent cracks from forming later. -
Roll out the slab:
Using your rolling pin, flatten the clay to an even thickness of about 1/4 inch. Try to keep the surface smooth and level. -
Cut the shape:
Press your snowflake cookie cutter firmly into the clay. Give it a tiny wiggle to ensure it cuts all the way through, then lift the cutter. Gently remove the excess clay from around the shape. -
smooth the edges:
Dip your finger in a tiny bit of water and run it along the raw edges of the snowflake to soften any sharpness left by the cutter.
Clean Lines Pro Tip
Work on a piece of wax paper so you can rotate the paper, not the clay, while you are drawing the details. This prevents you from accidentally smudging the design.
Step 2: Adding the Details
-
Create the center hole:
Using your needle tool or a small skewer, pierce a hole at the very tip of one snowflake arm. Make it slightly larger than your twine, as clay can shrink slightly when drying. -
Mark the center:
Find the approximate center of the snowflake and gently press a small dot with your round tool to serve as an anchor point for your design. -
Scribe the main lines:
Take your needle tool and draw straight lines radiating from the center out to the tip of each arm. Use light pressure; you want to emboss the clay, not cut through it. -
Add the arrow details:
On each arm, scratch two small ‘V’ shapes along the central line, pointing outward like the fletching on an arrow. Keep these faint and delicate. -
Punch the decorative holes:
Using a small round tool or the end of a stirrer, press circular indentations into the clay between the arms of the snowflake. I find that rocking the tool slightly in a circular motion creates a cleaner impression. -
Add inner dots:
Press a smaller set of dots closer to the center point, creating a secondary ring of texture. -
Clean up burrs:
Check your incised lines and holes for any little crumbs of clay that pushed up. Gently brush them away or smooth them down.
Step 3: Finishing Up
-
Dry or bake:
If using polymer clay, bake according to the package instructions on a parchment-lined sheet. For air-dry clay, let it sit in a dry spot for 24-48 hours, flipping it once halfway through. -
Sand for perfection:
Once fully cured and hard, gently rub the edges with fine-grit sandpaper if there are any rough spots remaining. -
Seal the piece:
Brush on a thin layer of clear matte varnish to protect the surface from dust and moisture, keeping that crisp white look intact. -
Attach the hanger:
Cut a length of natural jute twine, thread it through the top hole, and tie a secure knot to create a loop.
Level Up: Vintage Wash
Dilute brown acrylic paint with water and brush it over the textured areas, then immediately wipe it off with a damp cloth. The dark paint will stay in the grooves for an antique look.
Now you have a timeless decoration ready to bring a touch of snowy elegance to your holiday display
Winter Animal in a Santa Hat

This adorable penguin ornament brings a touch of frosty charm to your holiday decor with its festive Santa hat and wide-eyed expression. Its smooth, rounded forms make it a perfect project for beginners looking to create a polished, boutique-style decoration.
Step-by-Step Tutorial
Materials
- Black polymer clay
- White polymer clay
- Red polymer clay
- Orange polymer clay
- Eye pin (silver)
- Silver hanging thread or cord
- Dotting tool or toothpick
- Clay blending tool (optional)
- Gloss glaze (optional)
- Oven and baking sheet
Step 1: Shaping the Penguin Body
-
Condition the clay:
Start by kneading the black clay until it is soft and pliable. This conditioning step is crucial to prevent cracks during baking. -
Form the base:
Roll the black clay into a smooth ball, approximately the size of a large walnut. Gently tap the bottom on your work surface to create a flat base so the penguin can stand upright if needed. -
Create the tummy:
Take a smaller piece of white clay and roll it into a ball, then flatten it into a thin oval disc. Press this gently onto the lower front center of the black body. -
Add the wings:
Shape two small tear-drop pieces of black clay. Flatten them slightly and attach one to each side of the body, curving them downward to hug the penguin’s shape. -
Make the feet:
Roll two tiny balls of orange clay. Flatten them slightly into ovals and attach them to the bottom front of the body, just peeking out from under the tummy.
Step 2: Adding the Face Details
-
Form the eyes:
Roll two small balls of white clay for the eyes. These should be fairly large to give that cute, surprised look. -
Attach the eyes:
Press the white balls side-by-side onto the upper part of the black body, just above the tummy. -
Add the pupils:
Using the smallest tip of a dotting tool or the very tip of a toothpick, pick up a microscopic amount of black clay and place it in the center of each white eye. -
Sculpt the beak:
Create a tiny cone shape from orange clay. Press it gently between the eyes, slightly lower than center, pointing outward.
Clean Clay Tip
Keep wet wipes handy! Always clean your hands thoroughly when switching colors, especially before handling the white clay, as dark pigments transfer easily.
Step 3: Crafting the Santa Hat
-
Making the hat cone:
Roll a piece of red clay into a cone shape. The base of the cone should be wide enough to sit comfortably on the penguin’s head. -
Curving the hat:
Gently bend the tip of the red cone over to one side to give it a floppy, relaxed look. -
Adding the brim:
Roll a snake of white clay and flatten it slightly into a strip. Wrap this strip around the base of the red cone to create the fur trim. -
Creating the pom-pom:
Roll a small ball of white clay and attach it firmly to the very tip of the bent red hat. -
Assemble the hat:
Place the finished hat onto the top of the penguin’s head. Press down gently to secure it without squishing the shapes.
Customize It
Make a scarf! Roll a thin snake of metallic green or blue clay, flatten it, and wrap it around the penguin’s neck before adding the head for extra winter coziness.
Step 4: Finishing and Baking
-
Texturing the white trim:
I like to use a toothbrush or a needle tool to gently stipple the white brim and pom-pom, giving them a fluffy, fur-like texture. -
Insert the hardware:
Trim an eye pin to about half an inch long. Push it down through the top of the hat (through the red part, avoiding the pom-pom) until only the loop is visible. -
Smoothing fingerprints:
Before baking, dampen your finger or a soft brush with a tiny bit of baby oil and lightly smooth over the black clay to remove any fingerprints or dust. -
Bake the ornament:
Bake according to your polymer clay manufacturer’s instructions, usually around 275°F (135°C) for 15-30 minutes. -
Cooling down:
Allow the penguin to cool completely on the baking sheet before handling it to ensure durability. -
String it up:
Once cool, threat a shiny silver cord through the eye pin loop and tie a knot to create the hunger.
Now you have a charming little friend ready to hang on the tree or give as a handmade gift
Cozy Sweater Pattern Ornaments
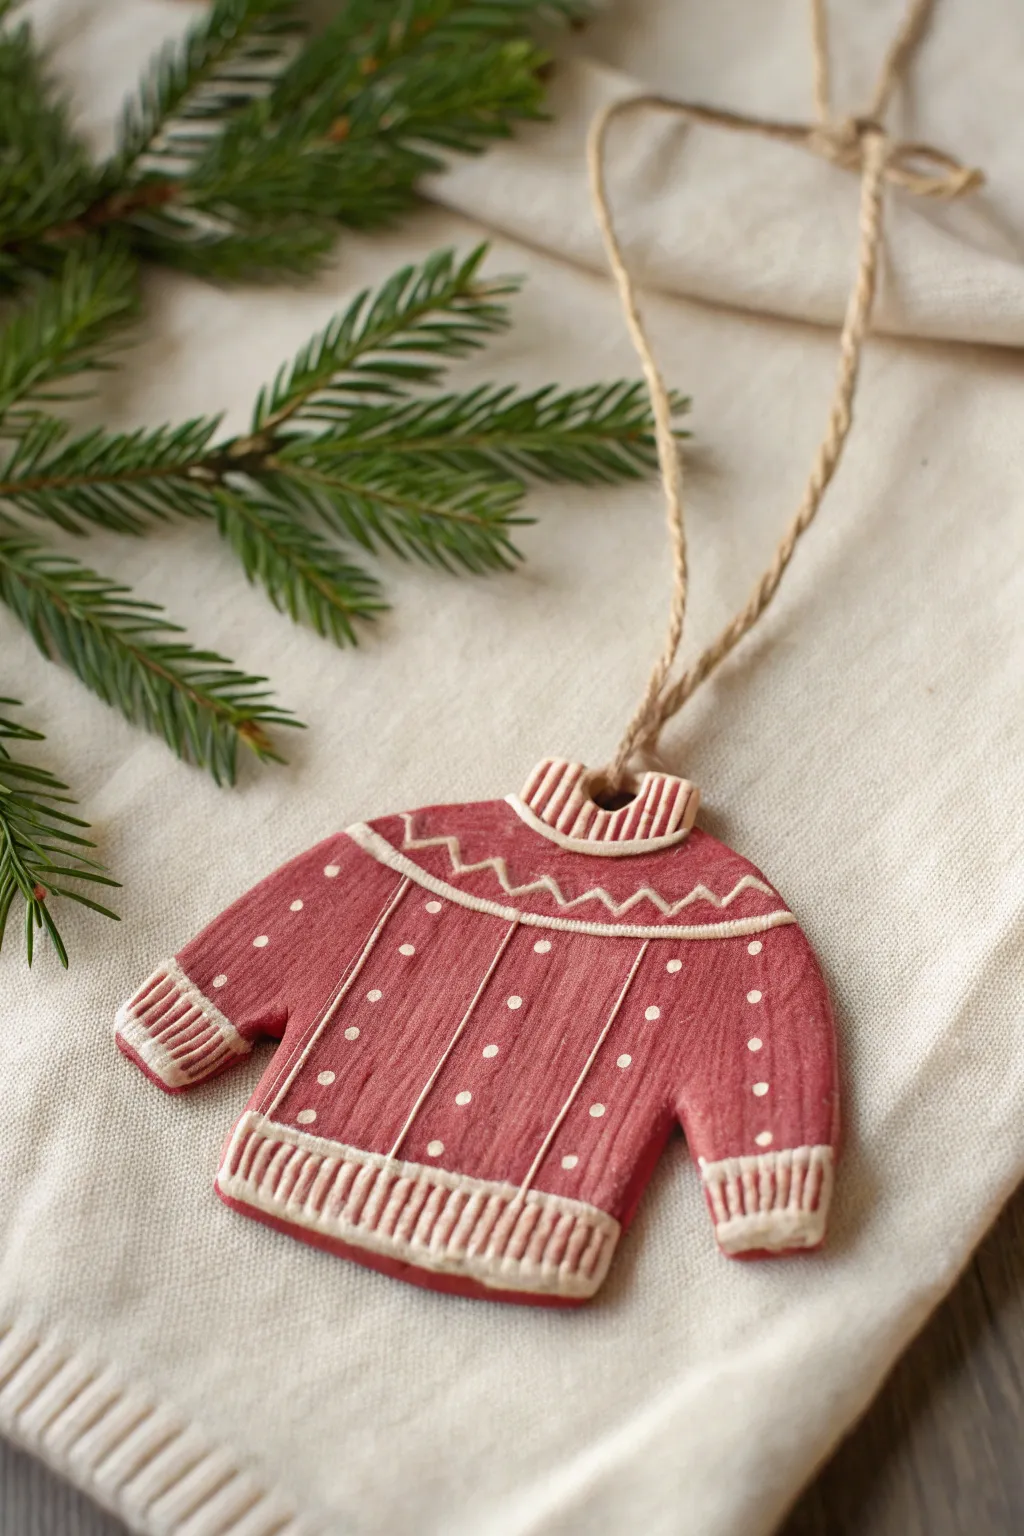
Capture the warmth of a favorite winter knit in a miniature form with this charming clay sweater ornament. The distinct red and white palette evokes classic Nordic designs, while textured details make it feel extra cozy.
Step-by-Step
Materials
- Polymer clay (Red or Maroon)
- Polymer clay (White or Cream)
- Rolling pin
- Sweater-shaped cookie cutter (or a craft knife and paper template)
- Needle tool or toothpick
- Small craft knife (X-Acto)
- Texturing tool or fine comb (optional)
- Jute twine or ribbon for hanging
- Baking sheet and parchment paper
- Oven (for baking polymer clay)
Step 1: Base Construction
-
Condition the Clay:
Begin by warming the red polymer clay in your hands, kneading it until it is soft and pliable. This prevents cracks and makes rolling much easier. -
Roll the Slab:
Roll your conditioned red clay out to a uniform thickness, ideally about 1/4 inch (6mm). You want it sturdy enough to hang but not too heavy. -
Cut the Shape:
Use a sweater-shaped cookie cutter to press out your main form. If you don’t have a specific cutter, lightly sketch a sweater outline onto the clay with a needle tool and carefully cut it out using your craft knife. -
Smooth the Edges:
Gently run your finger along the cut edges of the sweater to soften any sharp corners or clay burrs left by the cutting process. -
Make the Hanging Hole:
Use a straw or a larger needle tool to pierce a hole through the center of the collar area. Ensure the hole is wide enough to accommodate your jute twine later.
Pro Tip: Fabric Texure
Before baking, gently press a piece of real denim or canvas fabric onto the red clay surface. This imitates a woven wool texture.
Step 2: Adding the Ribbed Details
-
Prepare White Clay:
Condition a small amount of white or cream clay. Roll it into a very thin snake or a thin flat strip depending on your preference for the trim. -
Create the Collar:
Fashion a small crescent shape from the white clay and press it gently onto the neckline. Use your knife or needle tool to press vertical lines into it, creating a ribbed knit texture. -
Add Hem and Cuffs:
Cut thin strips of white clay for the bottom hem and the sleeve cuffs. Attach them to the red base, pressing lightly so they adhere. -
Texture the Trim:
Just like the collar, use the edge of your knife to impress vertical stripes along the cuffs and bottom hem to mimic elastic ribbing.
Step 3: Decorative Surface Design
-
Create the Yoke Pattern:
Roll a very thin thread of white clay. Lay it in a gentle curve across the chest of the sweater, joining the shoulders. Add a second parallel thread slightly below it. -
Add Zig-Zags:
Between the two white threads on the chest, use a needle tool to scratch a zig-zag pattern into the red clay, or carefully lay down tiny segments of white clay in a zig-zag formation for a raised effect. -
Define Vertical Lines:
Using a ruler or a steady hand, gently score two vertical lines down the front of the sweater, starting from the yoke pattern down to the hem. This creates the illusion of knit panels. -
Apply Polka Dots:
Roll tiny, uniform balls of white clay. Place them in vertical columns on the sweater body and sleeves. I find using the tip of a needle tool helps pick up and place these tiny dots accurately. -
Flatten the Details:
Once all decorative elements are placed, cover the ornament with a piece of parchment paper and roll over it very gently with your roller to embed the white clay flush with the red surface.
Troubleshooting: Dirty Clay
Red clay can stain. Wash hands thoroughly or use baby wipes before handling the white clay to keep your trim crisp and clean.
Step 4: Baking and Finishing
-
Bake the Ornament:
Place your finished sweater on a parchment-lined baking sheet. Bake according to your polymer clay manufacturer’s instructions (usually around 275°F or 135°C for 15-30 minutes). -
Cool Completely:
Let the ornament cool completely on the baking sheet before handling. Polymer clay is slightly soft when hot and hardens as it cools. -
Optional Texture:
If you want a more matte, dusty finish like real fabric, you can lightly sand the surface with very fine-grit sandpaper after baking. -
String It Up:
Thread a length of natural jute twine through the hole in the collar. Tie a secure knot at the top to create a loop for hanging on your tree.
Hang this little woolen-style masterpiece on a branch and enjoy the cozy handmade vibe it brings to your decor
Embroidered Snowflake Clay Ornaments
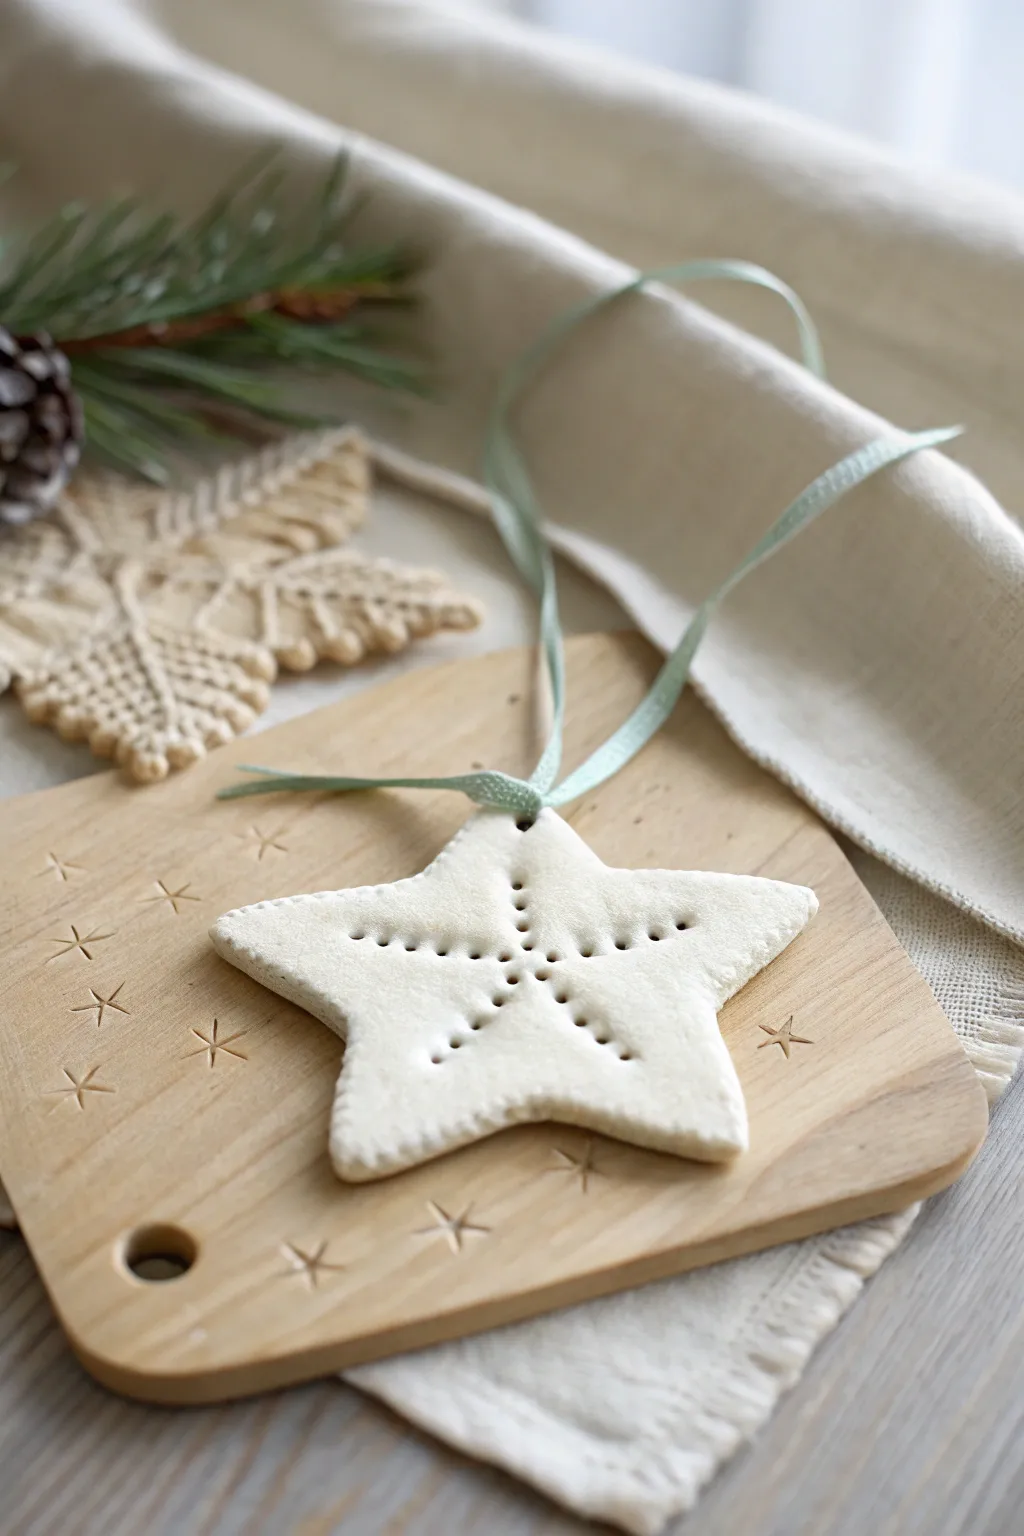
Capture the delicate beauty of embroidery without a single stitch using this clever clay technique. These charming star ornaments feature a punctured design that mimics classic needlework, creating a simple yet sophisticated holiday keepsake.
How-To Guide
Materials
- White specialized modeling clay (polymer or air-dry)
- Star-shaped cookie cutter (medium size)
- Rolling pin
- Parchment paper or silicone mat
- Large embroidery needle or toothpick
- Fine-grit sandpaper (optional)
- Pale sage green ribbon (1/4 inch width)
- Drinking straw
Step 1: Shaping the Stars
-
Condition the clay:
Begin by warming a handful of clay in your hands, kneading it until it is soft, pliable, and free of any cracks. -
Roll it out:
Place the clay between two sheets of parchment paper or directly on a silicone mat. Roll it out to an even thickness of about 1/4 inch. You want it sturdy enough to handle the puncturing process later. -
Cut the shapes:
Press your star-shaped cookie cutter firmly into the clay. Give it a tiny wiggle to ensure a clean cut before lifting it away. -
Smooth the edges:
After removing the excess clay, dip your finger in a little water (for air-dry clay) or baby oil (for polymer) and gently run it along the cut edges to soften any harsh lines. -
Create the hanging hole:
Use a drinking straw to punch a neat, circular hole near the top point of the star. Twist the straw as you pull it out to remove the clay plug cleanly.
Needle Knowledge
Use a blunt tapestry needle rather than a sharp sewing needle. The blunter tip compresses the clay into a clean hole rather than just piercing it, making the ‘stitches’ more visible.
Step 2: Creating the Faux-Embroidery Pattern
-
Mark the center:
Locate the exact center of your star. Use your needle or toothpick to make a single, deep indentation right in the middle. Do not poke all the way through; just press deep enough to create a distinct shadow. -
Start the radiating lines:
Imagine a line traveling from the center point out toward one of the star’s arm tips. Punch a series of holes along this imaginary line, spacing them evenly apart. -
Complete the primary rays:
Repeat this process for all five points of the star, creating five lines of dots radiating outward from the center. -
Add secondary rays:
Now, add a shorter row of dots radiating from the center toward the inner corners (the ‘valleys’) of the star shape. These lines should stop halfway to the edge. -
Check the depth:
Review your pattern. The holes should be deep and distinct to mimic the look of eyelet embroidery. If any holes look shallow, gently re-press them with your tool. -
Clean up:
If the puncturing process raised any tiny bumps around the holes, gently pat them down with a flat finger so the surface remains level.
Step 3: Finishing Touches
-
Dry or bake:
If using air-dry clay, set the stars aside on a flat surface away from direct heat for 24-48 hours, flipping them once halfway through. If using polymer clay, bake according to the manufacturer’s package instructions. -
Sand gently:
Once fully cured and cool, check the edges again. If there are any rough spots, use fine-grit sandpaper to give the ornament a polished, porcelain-like feel. -
Thread the ribbon:
Cut a 10-inch length of pale sage green ribbon. Fold it in half to find the midpoint. -
Create a lark’s head knot:
Push the folded loop of ribbon through the hanging hole from front to back. Then, pass the loose ends of the ribbon through that loop and pull tight to secure it to the ornament. -
Tie it off:
Knot the two open ends of the ribbon together at your desired hanging length, trimming any frayed ends for a neat finish.
Add Real Stitching
For a mixed-media twist, poke the holes all the way through the clay. Once baked, use actual embroidery floss to stitch a snowflake pattern through the pre-made holes.
Hang these delicate stars on a branch or tuck them into a gift box for a handmade touch that feels timeless
Faceted Tea Light Holders for Christmas Glow
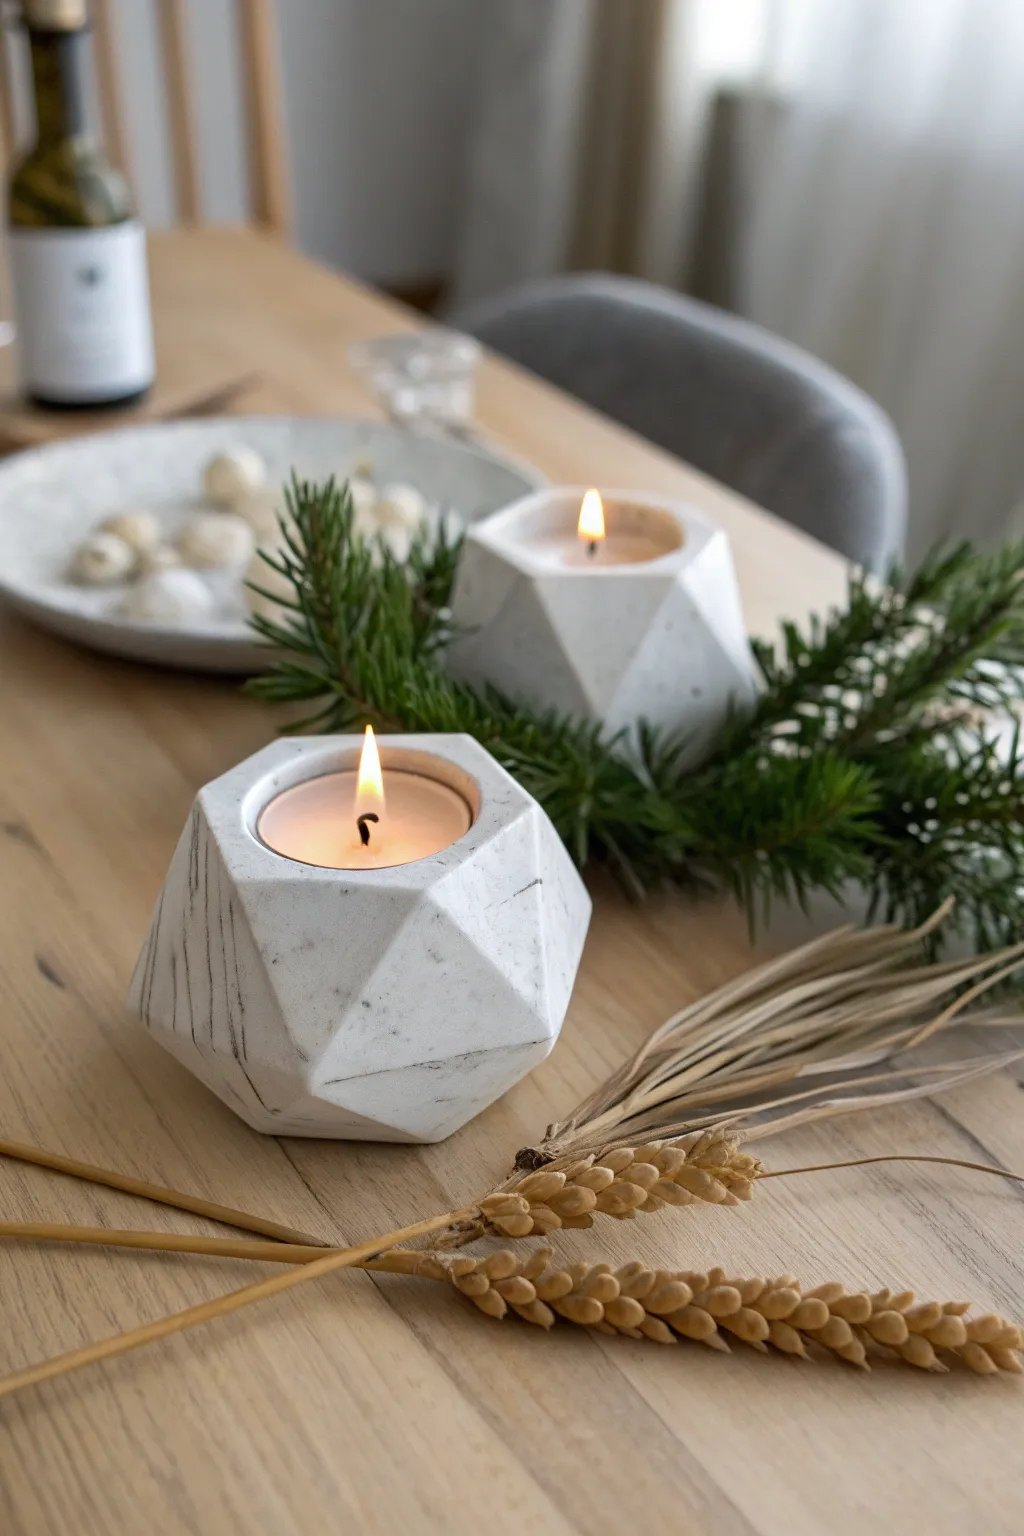
Elevate your holiday table setting with these sophisticated, geometric tea light holders that mimic the look of expensive marble. Crafted from polymer or air-dry clay, their varying angles catch the candlelight beautifully, adding a modern yet cozy glow to your Christmas decor.
Detailed Instructions
Materials
- White baking clay (polymer) or air-dry clay
- Small amount of black or gray clay (for marbling)
- Tea light candle (for sizing)
- Sharp craft knife or rigid clay blade
- Rolling pin
- Parchment paper or clay mat
- Fine-grit sandpaper (400-600 grit)
- Gloss or satin varnish (optional, for a polished stone look)
- Soft brush for varnish
Step 1: Preparing the Faux Marble
-
Condition the clay:
Start by thoroughly conditioning a large block of white clay until it is soft and malleable. You’ll want enough to form a ball slightly larger than a tennis ball for each holder. -
Add color accents:
Take a very tiny pinch of black or gray clay and roll it into thin, spaghetti-like snakes. Randomness is key here to achieve a natural stone look. -
Combine clays:
Lay the thin gray snakes across your block of white clay. Twist the white clay like a candy cane, fold it in half, and twist again. Repeat this twisting and folding process 3-4 times, but be careful not to over-blend, or you’ll get gray clay instead of distinct veins. -
Form the base shape:
Roll your marbled clay into a smooth, solid ball. Ensure there are no air pockets trapped inside, as these can cause cracking later. -
Flatten the bottom:
Press the ball firmly onto your work surface to create a flat, stable base. The shape should now resemble a smooth dome or slight mound.
Sharper Edges
Chill your clay in the fridge for 15 minutes before cutting the facets. Cooler clay is firmer and slices cleanly without dragging or deforming.
Step 2: Shaping the Facets
-
Create the candle recess:
Take a tea light candle (remove the wick/wax if possible and use just the metal tin) and press it firmly into the center of the dome top. Push down until the rim is flush with the clay surface. -
Widen the opening:
Gently wiggle the tin to create a little wiggle room—clay shrinks slightly when drying or baking, so you want the hole to be slightly larger than the candle. -
First cuts:
Using your sharp blade, slice a flat plane off the side of the dome. Make the cut crisp and straight. I usually start near the bottom to establish the shape’s foundation. -
Build the geometry:
Continue slicing flat sections off the round dome. Vary the angles of your blade to create triangular and irregular quadrilateral facets. Aim for an asymmetrical, gem-like appearance. -
Refine the top rim:
Carefully slice small facets around the top opening where the candle sits. This makes the transition from the geometric side to the flat top look intentional and refined. -
Smooth the surface:
Once you are happy with the shape, gently run your finger dipped in a little water (or baby oil for polymer clay) over the flat planes to remove any fingerprints, being careful not to round over the sharp edges you just cut.
Step 3: Finishing Touches
-
Bake or dry:
If using polymer clay, bake according to the package instructions (usually 275°F/135°C for 15-30 minutes per 1/4 inch thickness). If using air-dry clay, allow it to dry for 24-48 hours until completely hard and white. -
Cool down:
Let the holders cool completely in the oven (if baking) to prevent thermal shock cracks. -
Sand edges:
Use fine-grit sandpaper to lightly buff any sharp burrs or roughness on the corners. You want the tactile feel to be smooth like polished stone. -
Clean dust:
Wipe the faceted holder with a damp cloth to remove all sanding dust. -
Apply varnish:
For that realistic marble sheen, apply a thin coat of gloss or satin varnish. Brush in one direction to avoid streaks and let it dry fully.
Removing Fingerprints
If you smudge a facet while holding the piece, don’t press more clay on top. Instead, slice a very thin layer off that specific face to refresh the surface.
Place a tea light inside and watch how the geometric shadows dance across your centerpiece
Mini Light-Up Clay Christmas Trees
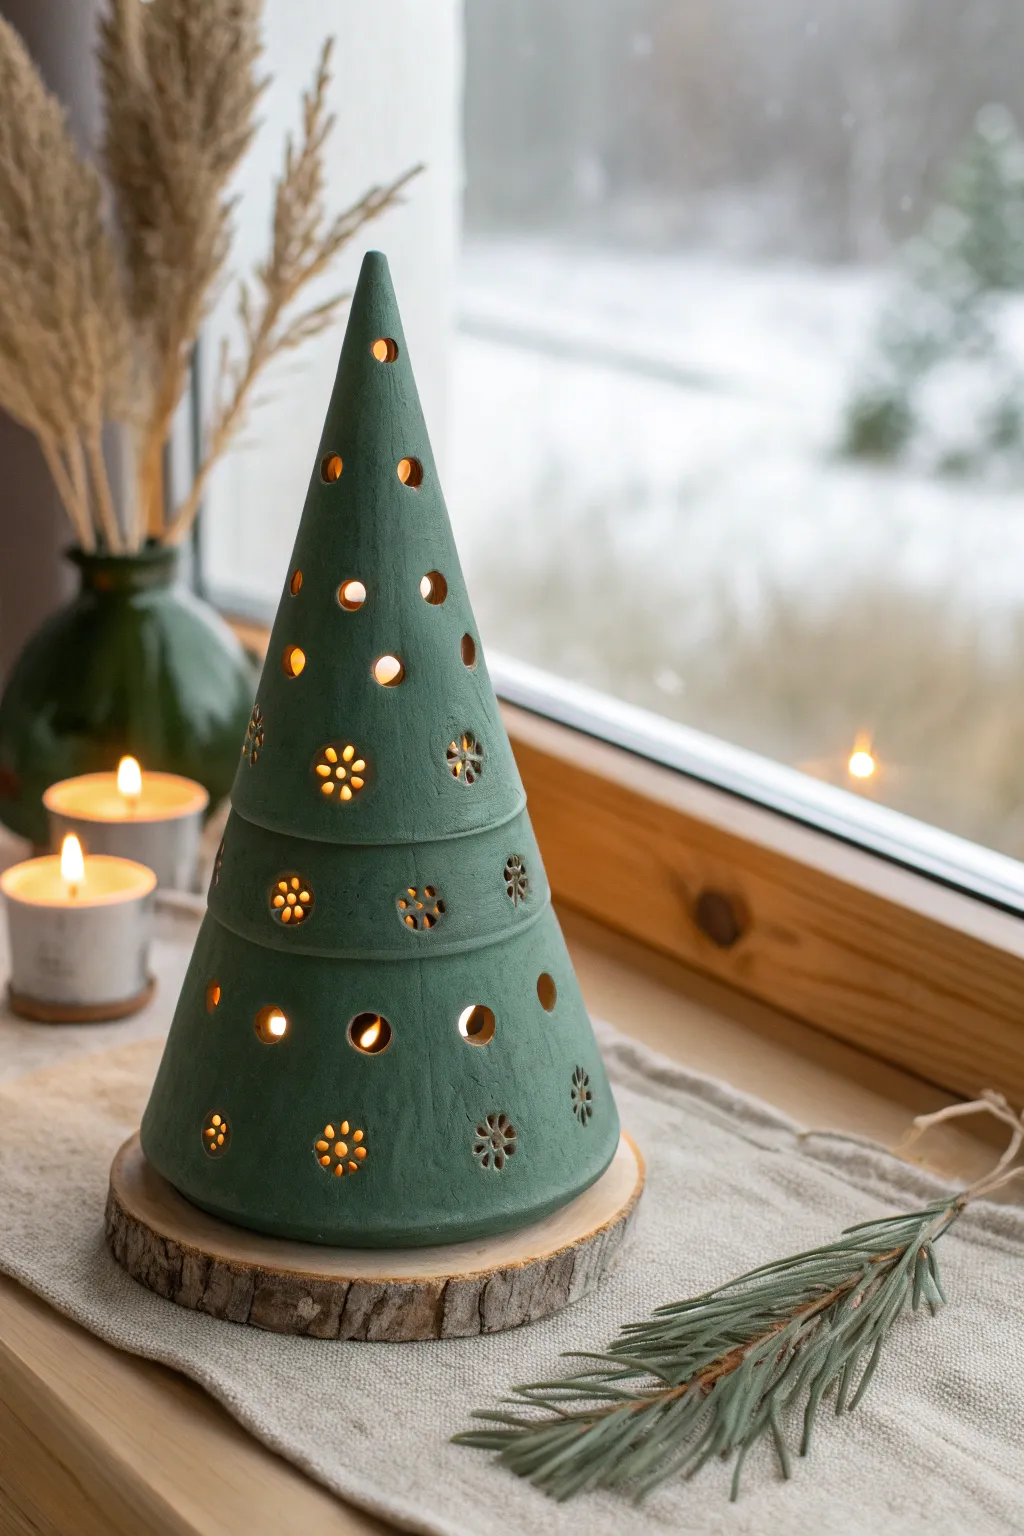
Bring the serene beauty of a winter forest indoors with this minimalist, cone-shaped ceramic tree luminary. Featuring delicate circular and snowflake cutouts, the rich forest-green finish glows warmly when placed over a tealight, creating a cozy atmosphere on any windowsill.
Step-by-Step Guide
Materials
- Air-dry clay or polymer clay (white or terracotta)
- Rolling pin
- Cone form (cardboard cone or styrofoam wrapped in parchment paper)
- Pottery knife or craft knife
- Small circular clay cutters (various sizes like straws or piping tips)
- Small snowflake cutter or needle tool
- Water and sponge for smoothing
- Fine-grit sandpaper
- Dark forest green acrylic paint (matte finish)
- Paintbrush (soft bristle)
- Matte spray sealant (optional)
- Battery-operated tealight
- Wood slice coaster (for display)
Step 1: Shaping the Cone
-
Prepare the Clay:
Begin by kneading your clay until it is pliable and free of air bubbles. Roll it out into a large, even slab approximately 1/4 inch thick. Aim for a consistent thickness to ensure the light shines through evenly later. -
Create the Cone Template:
Wrap a piece of paper around your cone form (like a styrofoam cone covered in parchment) to create a template. Unroll it to get a fan shape, then trace this shape onto your clay slab using a needle tool. -
Cut and Form:
Cut out the fan shape from the clay. Carefully wrap the clay around your parchment-covered form, bringing the two straight edges together to form a seam. -
Seal the Seam:
Score (scratch) and slip (wet) the edges where they meet. Press them firmly together and smooth the seam with your finger or a damp sponge until it disappears completely. The tree should look like one continuous piece. -
Trim the Base:
Use your knife to trim the bottom edge of the cone while it’s still on the form, ensuring it sits perfectly flat and stable on a table surface.
Slumping Shapes?
If your clay cone starts to sag or warp while working, the clay is too wet. Let the clay slab sit on a wooden board for 15-20 minutes to ‘leather up’ before cutting and shaping it.
Step 2: Carving the Details
-
Marking Tier Lines:
While the clay is still slightly soft but firm enough to hold its shape, use a needle tool to gently scribe two horizontal lines around the cone. This creates the illusion of three distinct tree tiers. -
Deepening the Grooves:
Carefully trace over your scribed lines with a modeling tool to create deeper, rounded indentations. I like to smooth the edges of these grooves with a damp brush to keep them looking soft. -
Planning the Pattern:
Lightly mark where you want your light holes to go. Space them out nicely, alternating between simple round holes and decorative snowflake clusters. -
Punching Holes:
Use various sizes of small round cutters (like the end of a straw or a small piping tip) to punch clean holes through the clay. Remove the little clay plugs carefully. -
Carving Snowflakes:
For the snowflake details, you can use a tiny fondant cutter if you have one. If not, use a needle tool to pierce a central hole, then carefully carve 5-6 small petals radiating outward to form the flower-like snowflake shape. -
Cleaning Edges:
Once all holes are cut, gently run a damp fine-point brush or your finger over the raw edges of the cutouts to smooth away any jagged bits or crumbs.
Textured Finish
Mix a tiny amount of baking soda into your green acrylic paint. This creates a grainy, ceramic-like texture that mimics the look of unglazed stoneware pottery perfectly.
Step 3: Finishing and Painting
-
Drying:
Let the tree dry completely on the form for the first few hours so it doesn’t slump. Then, carefully remove the form and let it air dry for 24-48 hours until rock hard and light in color. -
Sanding:
Once fully dry, use fine-grit sandpaper to smooth out any fingerprints, bumps, or rough edges around the base. Wipe away all dust with a slightly damp cloth. -
Base Coat:
Apply a coat of dark forest green acrylic paint. Use a soft brush to get good coverage, but be careful not to clog the small drilled holes with paint. -
Stippling Effect:
To achieve the matte, stone-like texture seen in the photo, dab a second layer of paint on using a dry sponge or stiff brush in an up-and-down motion rather than brushing strokes. -
Final Cleanup:
Check the light holes again. If any paint has pooled inside the rims, use a toothpick to clear it out while wet so the light shines through cleanly. -
Lighting Up:
Allow the paint to cure fully. Place a battery-operated tealight on a wood coaster, set your clay tree over it, and watch the geometric patterns glow.
Enjoy the peaceful ambiance your handcrafted forest creates on chilly evenings.